How to make a porch out of wood. How to make a porch with your own hands: choice of materials and design Platform made of piece building materials
A house always begins with a porch, this is its main entrance, this is its calling card, one might say. And, at the same time, the final chord of construction. The point is in the work done. In addition, it has a purely functional purpose - protecting the entrance from wind, rain, snow, so it must be beautiful, comfortable, and durable. Of course, the design should not contradict the design of the entire house. A powerful red brick structure will look strange wooden house with carved shutters, for example. But a wooden object attached to a brick house can completely serve as its decoration. If the house is small, then the porch should not be made into a monument that outweighs the proportions of a private house. And most importantly: a house without this element has an unfinished appearance.
How to build a porch for a private house with your own hands
There are a lot of construction options and materials offered. Choose the one that suits you best, prepare everything you need and get to work.
Wooden
It is not difficult to assemble the structure of such a porch
The easiest wooden structure You can do it yourself, even if you don’t have any special skills in construction. First, let's choose a design.
There are three main types: simplified, built-in and attached porch. A simplified design is a platform and a canopy over the entrance. Let's consider the most common option: a platform, steps and a protective canopy, which is located above the door.
Porch option with a small terrace
Even for such a light and simple structure we will need . It will not be difficult at all, because for such wooden porch we can make a foundation from piles. We will impregnate the support beams with an antiseptic. Having calculated where the supports should be, we dig holes under them to a depth of 80–90 cm. We immerse the supports in these holes strictly vertically, checking the level. At 30 cm, we first fill the hole with crushed stone, compact it tightly, then a layer of soil, and then concrete it.
You need to make a foundation for the porch
After the cement has completely dried, you need to level all the supports in height, make cuts for spikes, nests and other preparatory work.
Making steps
Now it's time to choose the string on which the steps will be located. It comes in two types: with embedded steps and with cut out ledges. Since the second option is simpler, we will do it. Let's select several thick edged boards for the bowstring and obliques. The length must be chosen in accordance with the number of steps. The rules here are simple: quantity:

Obliques are needed so that the steps have additional internal supports. On first edged board Using a construction square, we mark the profile of the stairs. We cut off the excess and use the first board as a template for preparing the remaining parts.
The strings are attached to the lags using a tongue-and-groove connection, for which a transverse board with selected grooves must be nailed to the lags, and tenons must be cut at the ends of the ribs and bowstrings. After the bowstrings and obliques are secured to the logs, their lower ends must be installed on a reinforced and leveled platform. Now the frame of the future staircase for the porch is ready. It's time to lay the floor and steps. You should try to lay the boards for the floor of the site as tightly as possible so that cracks do not appear when they dry out. After the site is ready, it is necessary to install risers and treads, which are also connected according to the “tenon and groove” principle, like a riser with a bowstring: this will give the connections the very rigidity that is needed. Here, in fact, everything is ready.
If the porch stairs have more than three steps, it is worth making a railing.
Step-by-step installation steps
Concrete
Concrete porch
We calculate materials. The volume of concrete required for pouring depends on the width and height of the structure, as well as the number of steps. If we make concrete ourselves, we must remember that per 1 cubic meter. m of concrete is 340 kg of concrete, 1.05 cubic meters. m of sand and 0.86 cubic meters. m of crushed stone. It is also necessary to calculate the necessary waterproofing and reinforcement. If the frame is reinforced, then each step requires 2 bars of reinforcement.
The porch has a concrete base
We are making a foundation for the future porch. In the place where we will set up the object, we need to dig a small pit with a depth of 30–40 centimeters. We pour a 10 cm layer of gravel on the bottom and compact it thoroughly, a layer of sand on top, and then moisten it so that the sand completely fills all the spaces between the crushed stone.
We make a formwork frame. We will install board formwork on the sides. You can use plywood or chipboard for formwork. The main thing is that the formwork should follow the shape of the steps. We strengthen the formwork with pegs and spacers. The formwork must be aligned in height and level. We cut pieces of boards equal to the length and width of the risers and nail them to the formwork itself. All formwork must be treated from the inside with a lubricant so that the concrete does not stick to the wood. Roofing material must be laid down to waterproof the concrete.
Step-by-step actions during construction concrete stairs
Please note: the steps of the stairs must be made with a slight slope so that water flows freely from them.
We reinforce the formwork. This is necessary to ensure that the concreted areas have a rigid structure. It is better not to skimp on reinforcement when building a concrete structure. For a medium-sized porch, approximately 150 meters of reinforcing bars will be needed. In order to be able to make a canopy and railings in the future, it is necessary to leave outlets from the corner or pipes on each side.
Preparing the harness
We are concreting. The prepared concrete solution is placed in the formwork. You need to start from the bottom step, evenly distributing the solution and constantly compacting it. Under no circumstances should empty spaces be left. After all the formwork is filled, we level the surface and now we need to let the structure dry for about a week. After this, you can remove the formwork and start finishing this object.
Staircase with forged elements
Metal with forged elements
A metal staircase can decorate both brick and wooden house. When starting to build a metal porch, you should also first make a sketch. It makes it easier to calculate the quantity required material and avoid making mistakes when installing parts.
Simple staircase with forging elements
Let's decide on the size of the stairs. Everything needs to be calculated so that two people can easily walk on it, and the steps are convenient for going up and down.
- the width of the stairs must be at least 1 meter;
- the number of steps is odd;
- stairs - from 26˚ to 45˚;
- the height of the steps should be from 12 to 20 cm;
- the width of each step is not less than 25 cm;
- the overhang of one step over the other should be about 30 mm.
Just like under any other porch, you need to lay it under a metal porch.
The metal structure consists of three elements: the staircase itself, the railing to it and the canopy; the staircase is usually made from channels.
Arrangement of the entrance to the house
Let's consider one of the design options for a metal staircase, which we will make ourselves. Let's prepare two channels equal in length to the future staircase. We place them the width of the future staircase, say, 1 meter from each other. Now you need to mark and cut the corner to the size of the step, not forgetting to make an increase for the weld. We weld one end along the office to the channel. Then we take the next cut piece of the corner and weld it along the edge to the previous corner, then to the channel. So gradually weld all the corners.
Installation of the base of a metal staircase
Now you can connect the L-shaped elements to each other with an equal angle. Please note that the bottom of each step is connected by a corner with a shelf facing outwards. You can fill the steps with any suitable material: wood, porcelain stoneware, chipboard, plywood. It is better to fasten with self-tapping screws and silicone glue.
Entrance staircase with canopy or closed
For such a porch, the foundation is especially important. Of course, it is best if it is planned together with the entire house. But there are often cases when it is attached to an existing house, in which case we call it an “extension”.
Seating area near the entrance to the house
Closed entrance to the house
One way or another, the extension is a fundamental structure. Therefore, having calculated the parameters of the glazed porch area, we pour the foundation for it. Of course, a glazed extension is not for permanent residence with heavy furniture. Therefore, the foundation can be made of piles. After the foundation is prepared, all the piping is done, the concrete is completely dry, you can lay out the walls. We choose the material so that it does not contradict the design of the house. Of course, this is a frame building. The frame can be made from wooden beams, from metal profile. Some owners, wanting to make the porch more substantial, lay out such a porch from brick or timber. If speak about frame construction, then it is certainly cheaper and much easier to install.
Frame extensions come in two types: frame-panel and frame-frame. In the first case, the panels are already ready, you just need to take the time to assemble them; in the second, the fitting is done on site.
The main work is done. Now we need to work on the glazing and the door. For glazing we use wooden or plastic. We order the door with glass and according to the verified dimensions. We choose the stairs from all possible options.
The glazed porch-veranda is very convenient because in the summer you can sit here and drink tea in bad weather, and in the winter you don’t have to drag snow with you when you enter the house.
Porch construction diagram
The steps should be 30 cm long and 16 cm high, but do not forget that when making the first step, it is necessary to take into account the addition of sand and tiles. Because of this, the first stage is always slightly higher than the rest.
Brickwork during the construction of a porch
Very often, cinder blocks remain after construction. They can be laid in the foundation: it will be stronger, and we can recycle the remains of cinder concrete.
We lay out the porch area from brick. At the same time, we also lay the side wall, which can be immediately covered with facing material - brick, for example. We gradually form the steps using backfill and face bricks. We will lay out two rows of backing bricks in the middle, and lay out the outer part with facing bricks.
So, we are gradually forming the remaining steps. Don't forget to process the brick special means from the appearance of salt stains. After the masonry is completed, we complete the construction with finishing bricks. We use special glue for fastening. We complete the construction by installing a canopy.
Video: building a brick porch
Set up a small flower garden nearby, place pots or flowerpots with flowers. Add some quirky little touches to complete the look.
Porch brick house, or an external extension through which entry and exit is made, has both utilitarian functions, including protecting the premises from dirt brought in from the street, and decorative ones, and, in addition, is the calling card of the home. Already alone appearance The porch will tell a lot about the tastes of the owner who installed it, especially since there are many options.
Classification
By the size of the upper platform, as well as by its functional purpose
distinguish:
- an ordinary porch-extension, which has a largely utilitarian function;
- patio - an area that has a canopy and is essentially a small courtyard hidden from prying eyes decorative fencing or trellises with climbing plants;
- terrace - a large open area with railings, standing on a small foundation that protects from the accumulation of rainwater, and is the same recreation area as the patio, but a more modified version of it;
- veranda - a closed and glazed terrace, which is essentially a separate room.
The most common, of course, is the first option.
 Open area
 By degree of openness
the porch can be:
- open and represent steps or a platform with steps. In this case, the front door is in the open air, and only sometimes its opening is protected by a small canopy;
- covered, that is, covered on top with a roof or canopy, or the second floor of a building;
- closed - protected by walls or glass panels, that is, actually a cold vestibule, from bad weather.
 Porch construction
 By material
the porch can be:
- Wooden. This option is the most common and most traditional, dating back to the times of log huts. Brick house This porch adds additional charm and comfort. The material is cheap, but at the same time durable: as a rule, the most stable wood is used - larch, cedar, pine. The construction of such a porch takes a couple of days at most, without requiring special skills. At the same time, wood under the influence of unfavorable external environment deformed, especially if the design of the porch is initially incorrectly calculated and proper care is not provided to it, and this negatively affects its durability;
- Brick. Brick is more expensive and stronger than wood, although it is inferior in terms of decorative solutions. Building a porch from it is simple, but the process itself takes one to two weeks. Alternatively, you can use natural stone– then the massiveness and solidity of the structure will be evident;
- Concrete. Inexpensive and most practical option, the installation of which, however, requires serious site preparation plus additional tiling: concrete itself is visually unattractive. Besides, high-quality construction Not everyone can afford such a porch;
- Metallic. This option is the most aesthetic, strong and durable. It does not need a massive foundation: it weighs quite little. And forged railings and openwork steps give it additional lightness and elegance. This pleasure is expensive. And it is made by a master, and over a fairly long period of time. But installing it will take two or three days at most.
 The porch should be an extension of the house, in harmony with it.
 Brick house porch project
When developing a project, it is necessary to take into account not only the compatibility of the future porch with the architecture of the house, but also its ergonomics, convenience and practicality. Therefore, the porch project begins with its correct marking. SNiP standards will be of great help, according to which:
- the optimal step depth is 27-30 cm, and the height is 12-18 cm, but the total sum of their dimensions should be 45 cm;
- to ensure comfortable movement for one person, the width of the stairs should be at least 60-90 cm, for two – 120-145 cm;
- a porch consisting of three or more steps is fenced with railings, the height of which is 90-120 cm. However, according to experts, if the height of the porch does not exceed 1.5 m, it is quite possible to do without railings, but for a person of average height, railings are quite enough 80-100 cm high;
- the upper platform should be located 5 cm below the level of the entrance door in accordance with fire regulations. Ideally, the size of the platform is one and a half times the width of the door;
- but the width of the upper podium can be determined based on the available space in front of the house and your own preferences. You can make it a tiny spot, or you can stretch it around the perimeter of the building.
The design of the future porch also plays an important role in the development of the project.
 A small porch creates depth general appearance building.
 Porch design
The design of the porch directly depends on the specific architectural forms brick house, from the availability of free space, from the surrounding landscape and, of course, from the harmonious combination of porch elements:
- roof or canopy, usually having an arched or pitched shape, which better protects from precipitation. In this case, any roof should be located at a distance of 2 to 2.6 m from the top platform of the porch. If it is higher, snowflakes and raindrops will fly onto the porch;
- steps. As a rule, three, five or seven steps are enough for a porch. Their number must be odd. There are not many options for their placement: either in front or on the sides. The strict geometric lines of a brick house are perfectly “diluted” with semicircular or curved steps. If the extension is narrow, but you want to provide free and convenient entrance for several people at once, you can place the stairs on the side, on both sides of the platform. If you need to provide an entrance from three sides to a small narrow porch, arrange the steps in a circle from the main platform;
- railing. The railings themselves can become an excellent decorative element, but they have practical meaning only for high porches.
The materials for cladding the steps and the porch platform itself can be anything: wood, stone, brick, composite panels and slabs. Railings can also be made of wood, metal, stone, etc. IN Lately appeared different types vinyl fencing, and on luxury houses Glass fences and chrome railings can even be installed. At all universal option when choosing a design, no. Only the principle of adding a porch is universal.
How to attach a porch to a brick house
The addition of a porch is carried out in several stages:
- Project development and selection of building materials. This issue was touched upon above;
- Foundation construction. This point is key. Ideally, both the house and the porch should be located on a common foundation, buried to the same amount: this will promote uniform distribution of loads, which will practically eliminate the skewing of the porch in the off-season. The weight of the porch is less than the weight of the house, so when the ground moves, their shrinkage will be uneven. So if the porch is located on clay or heaving soil, it makes sense to install it on a lightweight foundation without “tying” it to the wall of the house. If the site has dry sandy soil, the porch can also be installed on a light foundation, but “tied” to the building. The foundation directly depends on the material used in the construction of the porch. Thus, a voluminous, heavy building requires a solid foundation, buried to the freezing depth characteristic of the area;
- Direct installation of the porch.
Naturally, you should not skimp on materials intended for the porch. A wooden porch must be treated with an antiseptic and painted, a concrete porch must be laid out with special tiles, and an anti-corrosion coating must be applied to the metal one.
The construction of a porch can be entrusted to a specialist, especially for a metal porch. But you can build a wooden, concrete or brick one yourself.
Construction of a porch of a brick house
- The construction of a concrete porch begins with the construction of a pit for the foundation approximately 1-1.2 m deep. A sand cushion of 20 cm in height is formed at the bottom of the pit. Then a wooden formwork is constructed to form the steps. To give the porch greater durability and reliability, it is reinforced - with reinforcement with a diameter of 1 cm. The steps are formed one after another: when the first one dries, the next one is formed. To fasten the corners of the steps, use corners recessed into uncured mortar. Particular attention is paid to hydro and vapor barrier of the building. Upon completion of the concrete work, the porch is finished with porcelain stoneware or tiles for exterior use;
 Porch-veranda - cozy atmosphere for family.
 - The construction of a brick porch begins with the installation of side walls. The area in front of the door is cleared, the location of the wall is marked with pegs and the diagonal is carefully measured. Dig a hole for the foundation. If the soil is loose, a meter depth is sufficient, but if the soil is soft, then the depth is at least 15 m. The width should be 10 cm greater than the width of the planned wall. Reinforcement with a diameter of 1 cm is installed along the edges, and the height should be 10 cm higher than the height of the top platform of the steps. The pit is filled with fine crushed stone, which is compacted tightly. Crushed stone is poured liquid concrete, after hardening, waterproofing is carried out with roofing felt laid in one layer. The laying of the first row begins with a whole brick, the next - with 3/4: this achieves maximum strength and improves the bond. The solution is prepared from grade 400 cement and sand in a ratio of 1:3. The size of the seam between the rows of masonry should be at least 1 cm. A straight platform is made in the upper part of the masonry, and below is laid out a place on which the steps themselves will stand. After the mortar has dried, the brickwork is jointed. After it dries, the finished wall is wiped with a dry cloth. Then the steps are poured using formwork. Soil is added to the base and compacted. The steps are reinforced with rods of at least 6 mm in diameter and in increments of 15 cm. It is also important to equip a special tray for draining water near the side railings;
- Construction of a wooden porch will require a pile foundation. Pits are dug to a depth of 80 cm, timber treated with an antiseptic is inserted into it, and the holes are filled with concrete. The pile beams are leveled in height to such an extent that the platform can lie on them, and the distance to the door is at least 5 cm. Notches are made on the piles. And exactly the same cuts are made on the joists attached to the support beam horizontally to the wall. The stringer is installed - Basic structure flight of stairs, with a comb designed for mounting steps. The side part of the steps is made of boards less than 5 cm thick. Under bottom part the bowstring sets the foundation site on fire. It is better to cover the foundation from above with a vapor barrier so that steam from the ground does not rise to the lower stage. The bowstring is made from a five-centimeter thick board, on which steps are drawn and cut with a hacksaw or electric saw. Ready-made stringers are attached to the logs by sawing or with tongue-and-groove joints. Then a board is stuffed onto the joists or screwed onto self-tapping screws, risers are attached to the string with self-tapping screws, and treads are attached to them.
The last stage involves the installation of handrails, railings and canopies and final finishing.
 A porch under the same roof as the house.
 Finishing the porch of a brick house.
1. Color contrasts. It is best to choose white for this, especially if the house is made of red brick. Vibrant contrast adds extra appeal to the home, while clever placement of white accents can highlight proportions or architectural elements. If the house is small, it is enough to add white railings or fences to the porch. If we are talking about a large mansion, white columns will do. However, the color can be any. Most often, the front door and supporting pillars of the porch are painted in bright colors, emphasizing the hospitality of the owner;
2. Stone cladding. This option is suitable for a shallow built-in porch and gives it solidity and solidity. The stone can be chosen to match the masonry or contrast with it, depending on the desired effect;
3.Brickwork. It harmonizes with a brick facade and porch, if the latter was made primarily of other materials - stone, wood, concrete. In this case, brick columns, fences and even paths leading to the porch are selected to match brick facade in order to save general style. The dimensions of the brick supports regulate the openness of the porch. If you need to make it as visible as possible, it is enough to make two powerful brick columns. If you put a row of thinner columns instead, inner space will become more closed;
4. Wooden decor. Most often, a porch canopy, canopy sheathing, flooring or steps are made from wood or its imitation. The texture can be either similar in color to the facade masonry in order to create a monochrome effect, or contrasting - to emphasize specific details and give the facade greater expressiveness.
Video: “Do-it-yourself concrete porch of a house”
If you want to build a porch for your house with your own hands, then we have great news for you - it can be done with your own hands! Moreover, you can even choose from several available options– concrete, wooden or metal porch! Moreover, in the latter version, the structure will be equipped with a beautiful polycarbonate canopy.
Let's take a closer look at each of the available options. First, let's take a look at the instructions for making a concrete porch for your house.
Option one. Concrete porch
The strongest and most durable design, which also looks quite solid. First, decide on the size of the porch.

Stage No. 1. How to calculate the dimensions of the porch

In most cases, the porch of a house is just a few steps. You are obliged to choose the optimal dimensions of this design. Ideally, the width of the stairs should be from 0.8 to 1 meter. If possible, you can make it even wider - this will make the entire porch look more attractive and comfortable. Making the width smaller is highly not recommended.
As for the angle of inclination of the stairs, it should be within 28-45 degrees. The table below shows the optimal dimensions of this design.

The width of all porch steps should be the same and be approximately 25 centimeters, while the optimal height is from 12 to 20 centimeters (it all depends on who exactly the porch is intended for).
Note! When arranging the upper platform, try to keep it about 5 centimeters below the front door.

Stage No. 2. How to make a foundation for a porch
First, dig a pit according to the dimensions of the future structure (at least half a meter deep). Build formwork around the perimeter.

Then take crushed stone and fill the bottom of the resulting pit with it (the thickness of the layer should be approximately 20 centimeters). Compact the crushed stone thoroughly, then pour a 10-centimeter layer of sand on top of it. It is advisable to water the sand cold water to make it easier to compact it.
Cover the resulting area with roofing felt. Lay a reinforcing mesh on top with cells of 100x100 millimeters, then fill everything concrete mixture. You can easily prepare the latter yourself; to do this, adhere to the following proportions:
- one part cement;
- five pieces of crushed stone;
- three parts sand.
After pouring is completed, level the concrete surface and pierce it in some places with a reinforcing rod to remove air. Now all that remains is to wait a few days for the initial strength gain of concrete to occur.

Stage No. 3. How to build formwork for steps

To build the formwork for the steps, you will need thick plywood. It is important that the height of such formwork be 20 centimeters greater than the height of the porch itself. The construction process itself is not complicated: cut out all the formwork parts from plywood (in accordance with the height of each step), and then install them in the right places. To tighten the shields together, use metal plates, wooden blocks or any other suitable fastenings.

Note! Shields located on the sides must be strengthened with additional stiffening ribs.
In addition, reinforce all steps, and lay the reinforcement in such a way that it is located in all 3 planes at once. As an option, you can weld an iron frame, the shape of which corresponds to the planned staircase, and build the formwork around it. It will be even more convenient. In a word, do what is most convenient for you.


Stage No. 4. How to fill porch steps with your own hands
First, lubricate, using oil, all the internal surfaces of the formwork. This is necessary so that you can later remove the structure without much effort. As for the filling solution, prepare it in the same way as before.

Start pouring in stages, starting with the first step. After pouring each new step, take a short break to let it dry a little, then proceed to fill the next one. This way your DIY home porch will be as strong and durable as possible. As the pour progresses, attach additional formwork pieces to the front of each step. The height should be the same as that of the first step.
Note! The surface of the formwork that will come into contact with the mortar should be as smooth as possible.
After pouring, carefully level the concrete, then pierce it with reinforcing bars.

The formwork can be dismantled no earlier than in a week, and better days after 10. At the end, carry out finishing designs. For cladding you can use tiles or a natural stone, boards or, alternatively, any other finishing material (decide for yourself).

Installing railings is not at all necessary, do it at your own discretion. If you decide to install it, please note that the height of the handrails must be at least 0.9 meters. As an example, we give an option that is equally suitable for metal/wood structures. Install at the top and bottom of the porch support posts made from metal pipes. In this case, the length should be such that the angle of inclination of the railing is similar to the inclination of the stairs. Connect the ends of the racks to each other using iron pipes, but already smaller diameter. Use a welding machine to make the connection.
The top tube will serve as a handrail for you. To fill the space between the pipes, you can use absolutely any rolled product. When installing an element, the gap can also be any - here everything will depend solely on your personal preferences.

Once installation is complete, clean everything thoroughly. metal parts, cover them with two layers of primer mixture. Thanks to this treatment, the service life of the railings will significantly increase.
Video - Constructing a concrete porch for a house with your own hands
Option two. DIY metal porch (with polycarbonate roof)
Let’s immediately make a reservation that the option described below is successfully combined with almost all types of private houses. The process consists of several stages; let’s get acquainted with the features of each of them.


IN in this case any fundamental differences there is no difference from the foundation that we previously created for the concrete porch, the only exception being the fact that the support posts for the future canopy must be installed at this stage. We recommend installing supports in each corner of the structure - this will make the structure more stable. If the dimensions of the porch are large enough, make several supports along its length in increments of 2 meters.
First, dig holes about 1.5 meters deep for supports (by the way, the latter can be used steel pipes). Place each pipe in the appropriate hole, then fill it with concrete mortar.
Note! Supports can also be wooden blocks. The sequence of actions here is the same, only the lower parts of the beams should first be tarred or wrapped in roofing material, and also treated with an antiseptic drug.
Also install supports under the stairs. Also dig holes and place them in metal racks, then fill with concrete mortar. The length of the staircase is unlikely to be too long, therefore, supports at the top and bottom of the structure will be sufficient. Although, for greater reliability, you can additionally place supports in the middle of the flight of stairs.
When pouring concrete mortar, make sure that the stairs are somewhat recessed in it. Do not pour concrete to the very top of the site - leave a small gap (within 10-30 centimeters, the specific figure depends on the current dimensions of the structure). Later, when the assembly metal structure will be completed, you can fill the pit to the top.


Stage No. 2. How to weld a ladder

To get started, take a couple of metal channels. Weld them to the supports that were installed and poured with concrete at the previous stage of work. Later, steps will be welded to these channels. Take an iron corner (necessarily equal flange), cut it in accordance with the length of the steps, adding the width of the weld. After this, weld this corner along the contour.

Take the second piece of the corner and weld it in the same way, only this time to the attached corner. At the next stage, it is necessary to weld the second corner to the channel. As a result, you should end up with something like this.


The result is a kind of L-shaped product, you have to connect them together. For the top connection, use an equal-flange angle - weld it along the contour to both elements so that the shelves are placed inward. Make the bottom connection using the same angle, but the shelves should “look” outward.


To fill the steps of the staircase that will decorate the future porch of the house with your own hands, you can use any materials - for example, plywood or wood. To fix, use self-tapping screws, screwing them in from the bottom. And to further secure wooden elements, use glue or, alternatively, silicone-based sealant.


In principle, you can perform further finishing at your own discretion. If you want, you don’t have to cover the horizontal openings with anything at all - in this case, the casing will be mounted directly on the steps.
Stage No. 3. How to make a canopy over a porch with your own hands

So, we installed the racks at the stage of pouring the base, so the further algorithm of actions should look something like this.

Take the cross supports and install them in accordance with the dimensions of the frame. If you want, your future canopy can have a curved shape. To achieve this, cut the profile every 4 centimeters and bend it as needed. The advantage of canopies with a curved shape is that precipitation and all kinds of debris will slide off them without hindrance.


Take the polycarbonate, install it on the frame and secure it with self-tapping screws (we recommend using special thermal washers). The fastening step in this case should be 30 centimeters. Seal the edges with glue. That's it, the canopy can be considered ready!

Video - Do-it-yourself porch to a house made of a profile pipe under polycarbonate
Option three. Wooden porch
You can see the diagram of a porch made of wood below.


The work consists of several stages; let’s get acquainted with the features of each of them.

Stage No. 1. How to build a foundation
The best option in this case is pile foundation. The fact is that such a base is extremely simple and quick to install, but its reliability is at a fairly high level.
First, dig holes where the piles will be located - not only in the corners of the future structure, but also along the length of its sides (the step should be from 0.8 to 1 meter). It will be great if you do this below the soil freezing level. After this, take the support beams and treat them with an antiseptic, and wrap the lower parts with roofing felt for waterproofing. After this, insert the beams into the holes. Align them vertically, and then fill them with concrete mortar.
After the concrete has hardened thoroughly, you can proceed to the next stage.
Stage No. 2. How to install joists
If necessary, trim the tops of the beams so that all supports are at the same level. It is worth noting that when calculating the height of the piles, it is necessary to act so that upon completion of installation of the platform between front door and it remained a 5-centimeter height difference.
Stage No. 3. How to make a bowstring (kosour)


Now start making the load-bearing part of the staircase structure. It is to this part that the steps will subsequently be attached. In other words, the stringer is like the side edge of the steps.
To make a bowstring, you will need boards whose thickness is 50 millimeters. Take one of them, draw steps on it and cut them out using a saw or jigsaw. Finally, connect the stringer to the joists using a tongue-and-groove connection.
Stage No. 4. How to design steps and landing

This final stage, after which the porch to the house with your own hands can be considered completely finished. First, attach the sheathing boards to the joists (you can either nail them or screw them). If you want, you can also put some kind of material on the boards. finishing coat(everything here, again, depends only on your personal preferences).
Attach treads and risers to the stringer, and you need to start working only from the bottom step. The sequence of actions is as follows: fix the riser, install a tread on top of it, and so on. Fasten it using a tongue-and-groove connection or self-tapping screws.


As for the arrangement of the canopy and railings, there are no special restrictions. Step by step instructions We provided information on the installation of these elements above. The algorithm itself is the same, only instead of the sheathing elements and supports you need to use similar wooden parts (you can use any other material you like).

Video - Original do-it-yourself wooden porch
Common mistakes in the process of building a porch to a house
There are several mistakes that are made most often at work. Let's get to know them.
- Mistake #1. The construction of the porch is carried out after the construction of the house itself is completed. In such cases, the depth of the foundation is not significant; moreover, it is not associated with the foundation of the house. Consequently, the foundation is affected by groundwater, soil heaving, as well as a number of other factors that lead to cracks appearing between the porch and the house.
- Mistake #2. Wooden support pillars, which are used in the case of arranging a wooden porch, are not treated with antiseptic preparations. The result of such an error is obvious - after some time the structure has to be rebuilt.
- Mistake #3. The height of the platform is the same as the height of the entrance to the house. IN winter time, when the soil rises, the height of the porch increases, which can cause the front door to jam.
- Mistake #4. There is no vapor barrier or it is Low quality. As a result, moisture will seep through the structure and reach the cladding, which does not allow steam to pass through. Next, this steam will turn into water and simply remain under this material. With the onset of cold weather, moisture will begin to expand, which will lead to failure of the finish.
Do-it-yourself porch made of stone or brick
We left this option to the very end, since it is perhaps the most complex and time-consuming, so not everyone is able to do everything with their own hands. And it’s not surprising, because building a foundation out of brick, where there is absolutely no special need, is one thing, but laying it out perfectly evenly is quite another.

It's no secret that professional masons lay bricks only if they have several assistants whose job is to prepare cement mortar and its timely submission. As for the stone, things are somewhat more difficult with it, because the uneven edges are extremely reluctant to fit together. In a word, if you do not have experience and a couple of assistants, then it is better to immediately forget about a porch made of stone or brick, otherwise you will simply waste your time and money.

It is much easier to build a concrete staircase, and then select facing stone or tiles for steps, the size of which is as close as possible to natural. After this, you can easily cover the entire structure. Besides everything else, this method It’s attractive because even if you make some mistake, you can then easily chop off the required piece of cladding and repeat the finishing without any problems.
What about the canopy over the porch?
If we talk about the canopy, it will serve not only to protect the porch and the staircase itself from rain or snow, but also as a decorative element of the design of the structure. On the Internet you can find a lot various options visor, in addition, there are photographs in printed publications specializing in suburban construction.

Note! In most cases, canopies are made of a frame - metal or coniferous wood - and polycarbonate / plexiglass as a cladding material.
Typically, canopies made of wood must be tinted every few years or, alternatively, coated with special compounds, otherwise the wood will dry out and begin to crack along the grain. The thickness of the polycarbonate used here should be 7 millimeters, and it is recommended to lay the material in spans of a maximum of 0.7 square meters. You should not use glass for this, since in winter it may not withstand the weight of the snow cover and simply crack (another reason for this may be deformation of the wood).

Note! The canopy should have a larger area than the entire porch to the house with your own hands, approximately 50 centimeters. Otherwise about execution main function– protective – you can forget.

In the instructions for pouring the base, we already mentioned that it is preferable to install support pillars under the canopy during the formation of the foundation. It is better to install your visor on such supports. In addition, this option will allow in the future (if such a need arises) to equip a closed glazed veranda in literally two to three hours.
As for the coating, they can serve sheet metal, on top of which is laid beautiful tiles, however, it is still better to use polycarbonate or plexiglass, which we just mentioned.

Note! To protect the metal that covers the visor from corrosion, paint it with two or three layers of suitable paint.
It is also important that the canopy is pitched, and there is a metal gutter on it, installed at a slight slope. We also recommend attaching a chain almost to the ground to the end of this gutter so that water does not splash around during rain. And in this case, it will flow smoothly along the chain. To avoid the appearance of puddles near the porch, you can install drainage at the drainage point.

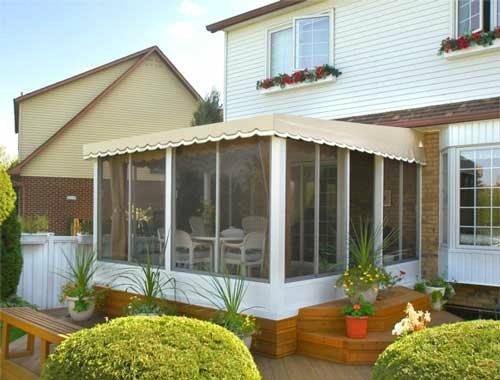
Glazed porch - is it possible?
A solution like closed porch, finds in last years increasingly popular. Transparent glass structures look extremely attractive, which is why many people are eager to build something similar next to their home.

What is it? glass porch? In essence, it is a simple foundation made of stone or concrete with a staircase and a canopy (the latter must be on stilts). Using corners, the length of which corresponds to the height of the piles, a frame is created.

Note! The sheets can be of any height, while the width should be a maximum of 1.2 meters. If the sheet is wider, then its windage will be so strong that a wind with a speed of 30 meters per second can easily break 5 mm glass.
If the distance between the piles is more than 1 meter, then it is better to break them with pseudo-piles. In a similar way, you can divide the height using a pair of double corners. Thanks to this, you will reduce the load on the sheets of glass, and the porch itself to the house with your own hands will still be light and transparent.
As we see, there are no specific skills or knowledge for self-construction a porch is not required, because even with the most complex options you can do it yourself. Each of the described operations is basic for the construction industry, and a person with with skillful hands will complete them without any problems.
That's all, good luck with your work and warm winters! And for a more detailed understanding of the issue, we recommend watching the thematic video below.
Video - Making a porch with your own hands
Usually, when building a residential building, they try to lay a common foundation that will also include the future porch. That is, the design of the porch of a wooden house is planned in advance. If you suddenly need a wooden porch for your dacha, you will have to work hard and build a separate foundation.
It can be made into piles with supports made of timber, which must be treated with a high-quality antiseptic. Of course, concrete pillars would be a more reliable option for supporting the porch, but this is not essential for light wooden structures.
Firstly, for wooden frame(formworks) you will need thick and not rotten boards that can withstand the load of what is being poured. Secondly, for the concrete itself you need good cement grade not lower than M400, sand and crushed stone or other dense filler.
The main mistake during construction is the private porch made of used bricks. Such material cannot be used categorically, because the structure is usually not protected from above and does not warm up in winter, like the walls of a house. Eventually old brick freezes and quickly collapses.
Sheds are divided into several types: single-pitched and double-pitched, semicircular, conical and others. Each material and shape has its own pros and cons during operation. So, for example, a wooden canopy is environmentally friendly and quite cheap, but the susceptibility of wood to erosion puts an unsatisfactory rating on the report card of a wooden canopy.
Metal tiles are durable material, but imagine yourself under metal canopy on a hot summer day! It is unlikely that you will like the hot air under heated metal. That's why polycarbonate canopies and the visors became the best option arrangement of the porch and entrance to the room.
Any canopy or canopy over the porch is an integral part of the architectural design of the building, which creates additional effect, decorativeness and functionality of the use of a porch of any type of building. All modern coatings for awnings and canopies they have durability, long service life and other positive characteristics.
A high-quality canopy or canopy over the porch allows you to keep this place clean and makes it visually attractive. A canopy and a canopy made of wood will best harmonize with a wooden porch, but with a brick or concrete one, it will be made of polycarbonate or metal.
An exclusive and extraordinary wrought-iron canopy base can become a stylish and fashionable addition to any type of porch. It will give an unusual exclusive appearance to the design of the porch.
All these subtleties, which will be taken into account when building the porch, will help achieve individuality, beauty and quality of the structure. Don't be afraid to experiment with designs and materials! All this will pay off handsomely. After all, the porch is the calling card of any home. This is the first thing that guests see when they come to your place.
A porch is an external extension in front of the entrance to a house.
Have you ever seen a building (logically complete) without it? Hardly. After all, the porch is a functionally significant detail of any residential (and non-residential) structure; it facilitates a comfortable transition of a person from ground level to floor plane level.
Since the floor in the house cannot be level with the ground, steps are a mandatory “component” of the porch. Directly in front of the door there should be a platform large enough to comfortably accommodate several people. A canopy can be installed over the extension to protect it from precipitation.
Building a porch with your own hands - where to start?
Before you build a porch, you should definitely plan all your activities correctly, in particular, think about the appearance and design of the “structure,” its dimensions, optimal proportions, number of steps, height of handrails, etc.
And also learn some technical tricks of building a house porch. Thus, the number of steps and their height should be calculated with the guideline that a person should take a step onto the platform from the same foot with which he began the “climbing”.

The optimal number of steps is three, five or seven (odd number). The recommended height of the step is 15-20 centimeters, the depth is about 30. If you make the depth larger, walking will not be particularly comfortable.
An appropriate solution when building a wooden porch would be to create a slope of steps of several degrees. This way, water will not stagnate on surfaces.
Fencing a porch with railings is a rather controversial issue. Experts believe that for a tall structure (from one and a half meters) the railings are at least to some extent justified, but for a low extension it is rather overkill. It is clear that when you are not limited in funds, you can get creative and assign them the role of a decorative, aesthetically attractive detail of the exterior. If you have a modest budget for a small-sized structure, it’s better not to waste too much on the railings.
Important! From an ergonomic point of view, the most acceptable railing height for the average owner is 80-100 centimeters.
The porch, if desired, can be equipped with a bench ( mandatory element she is not).
As for the area of the site, there are no SNIPs or recommendations for all occasions from professional builders. The area can be made in any size - large, small... or even encircling the entire house, like a terrace. Part original projects involves the porch performing the function of a veranda. In a word, before you start building a porch, it would be a good idea to look at photos of houses with interesting exterior solutions. There are many options for arranging an extension.

The porch is often made in the form self-constructed, docked to ready home. But it can be (even better) integral part buildings, initially have a common foundation with it.
For the first case there is one very important recommendation- connecting the extension to the monolith of the building, as they say, “tightly”, is categorically not recommended. This is due to the fact that the structures have different weights, and, as a result, different shrinkage. Don't want to admire the deformations and cracks at the joint? So, don't tempt fate.

Materials for building a porch
It is highly desirable that the porch be designed in the same style as the house. Agree, a wooden house with a stone porch will look ridiculous, as well as vice versa.
When decorating a porch, you can combine stone and wood, but this must be done very carefully and carefully. It is important that the extension (especially if it is “prominent”) forms harmonious combination with external attributes - a fence, gates, etc. So, if the fence or the site itself contains a sufficient number of decorative forged elements, then the logical solution would be to use the same ones when decorating the pilasters supporting the canopy or the railings of the porch itself. The extension can be illuminated with lamps identical in style to those that illuminate your property at night.
As for the size of material investments, the price for building a porch will directly depend on what materials you choose and what “beauties” you want to decorate it with.
How to properly build a concrete porch?
Before you build a porch with your own hands at a house made of concrete blocks or a brick house, you need to carry out a series of preparatory work. First of all, dig a hole for the foundation and form a platform for the extension. The depth of the foundation pit should be approximately 100-120 centimeters. At its bottom they form sand cushion 20 centimeters high. Next, you should build a wooden formwork and fill the base with mortar.

The next stage of building a porch with your own hands is creating a concrete staircase. It is built using formwork designed taking into account each of the steps. To make the porch more reliable and durable, you need to reinforce it with special frames (from reinforcement with a diameter of 10 millimeters). The steps are formed one after another: the first one has dried, the second one has been filled, etc. The corners of the steps are reinforced with metal corners, “recessed” into the still uncured solution.
During the work, do not forget to take care of the hydro- and vapor barrier of the extension.
The porch area should be made 5 centimeters below the level of the door.

When all concrete works will be completed, you can start finishing the extension. For these purposes it is impossible would be better suited porcelain stoneware or tiles.
Note! The main mistake of many inexperienced owners is to use interior tiles to decorate the porch. And sincere surprise why it is terribly slippery in the cold season.
Use only those materials whose use is recommended for exterior finishing.
Now, as for the railings. If your house is brick, the best option There will be metal or brick railings, the handrails of which are made of wood. Wooden, high-quality processed railings are optimal for use at any time of the year. Even in winter.

If you are planning to make a canopy (roof), then keep in mind that it should cover the entire porch with a margin (protecting the entrance from rain and snow).
Making a brick extension
The initial stage of construction of a brick porch is absolutely the same as that of a concrete one - from preparing a hole for the foundation to pouring mortar into the area under the porch. Then it is created brickwork, “layer by layer” - as if building a house. By strength brick extension no worse than concrete, but it will cost more.

How to build a wooden porch?
Wooden porch - great decoration any wooden structure. It can be built in two ways.
The first (simple) method is to install a stepped wooden box on a concrete foundation, and support the porch platform for strength with two beams extending from the wall of the house. It is recommended to treat the lowest boards in contact with concrete with bitumen or machine oil- this is a critically important procedure for extending their service life.

The second is implemented with the help of stringers. As in the first case, the porch platform rests on beams. And the stairs are on these same stringers (reinforced concrete sleepers or beams). The stringers are connected to the foundation by cutting them out, and they are fastened together with a support board (fixed with through tenons). A waterproof concrete support should also be provided.

Construction of a porch: video from an expert about the main technological mistakes
We construct a canopy
To create a canopy, you can use modern high-tech material polycarbonate. The frame for it is usually made from aluminum profile. Two consoles are used to support the structure.


Polycarbonate is attached to the frame using metal clips. It is better to use rubber washers at the fastening points - they will prevent leakage in bad weather. The dimensions of the holes for the screws should be two to three times larger than the dimensions of the parts themselves: this recommendation is intended to ensure free expansion of the polycarbonate under the summer sun.
Aesthetics and more aesthetics: how to build a beautiful porch in various styles
And finally, let's talk about the aesthetic side of the issue. There are a great many options for constructing a porch from a constructive and stylistic point of view. Let's try to highlight the main styles of porches that can be found in our cottage villages.

Classic porch
Lined ceramic tiles or natural stone. The canopy is most often gable, there are railings and decorative posts. Availability large quantity designer stuff unacceptable. It is undesirable to paint such an extension in bright colors. The classic porch is clean practical solution in "neat colors".

Gingerbread house porch
This combination decorative elements made of brick and metal gratings. Cover such an extension gable roof. For decoration, wild grapes and ivy (other climbing plants) are used. Wooden parts painted in a similar color are not excluded. flora colors.
European type of porch
It is characterized by regular, strict forms. Such an extension can be decorated with a wide variety of accessories.
In the question of how to build a porch, photos of various finishing and decoration options can be very useful. This way you can more clearly imagine what appearance the extension would like to see in the end.
At the entrance there can be street-type lanterns, decorative garden figurines(animals, gnomes).
Porch-patio
It is a kind of open terrace adjacent to the house. There can be tables, benches, and chairs. It is not always covered with a canopy or roof.
Fortress style porch
This extension is made massive and finished with natural stone. Appropriate details for its design are torch lamps and forged gratings. Pots with flowers will look great on forged gratings - they will further emphasize the massiveness and contrast of the structure.
Romantic style extension
This is a kind of symbiosis of a gazebo with a porch. This structure is ideal for communication, smoke breaks, and short dates. On the porch in a romantic style there must be benches; if desired, you can also place coffee tables. It is highly desirable to have flowers and several lamps at different levels.

Whatever type and design of the porch you like, remember, the main thing is the use quality materials and compliance with work technology at all stages of the process.