Options for making fences with your own hands. DIY decorative fencing
Work on the new site begins with the main thing - fencing the territory. It sometimes becomes equivalent to marking a border, but is done very conditionally: with stretched wire, somehow driven in stakes and other not very aesthetic substitutes for a fence. A little later, the moment comes when you need to seriously think about protecting your personal plot from outsiders. And then we build a fence.
The construction of a beautiful and durable fence is quite labor-intensive and requires financial investment. First you need to decide what purposes it will mainly serve:
- If the functions are limited to the designation of territorial boundaries, then inexpensive fence You can build it from a picket fence, metal mesh, or plant bushes around the perimeter of the site, which over time will grow and turn into an impenetrable hedge.
- If you want to close yourself off from the views of passers-by, you will need to erect a high and impenetrable fence. The cheapest and most durable options in this case are corrugated board and wood.
- Fence made of special concrete slabs, brick or forged spans will be very beautiful and will last more than 50 years, but building it with your own hands is quite difficult. The cost of such a fence is not affordable for everyone.
Therefore, you should consider how to build a fence with your own hands quickly and inexpensively.
Where to begin?
The first stage of any construction is marking.
Before you build a fence with your own hands, you need to call a specialist from the BTI to approve the boundaries of the site: the neighbors are unlikely to like it if the erected fence takes up part of their territory or casts a shadow on the plantings.
When marking, you must also follow the instructions of SNiP 30-02-97, which regulate:
- the distance from the residential building to the fence is at least 3 m;
- from outbuildings or large trees - 4 m;
- the height of the fence between adjacent areas is no more than 1.5 m;
- To ensure sufficient insolation of the area, the fence is made of translucent materials - lattice, mesh, picket fence.
After all the necessary approvals have been made, you can begin marking and preparing materials and tools for construction:

- For marking you will need pegs 60 cm long and a cord. Having determined the boundaries of the site in accordance with its plan, drive in the outermost stakes in the 4 corners and pull the cord from one peg to another, marking the line of the future fence.
- In accordance with the length of the fence span, which is determined individually in each case, drive a row of pegs along the line marked with the cord. They will indicate the installation locations for the fence support posts. The span length should not exceed 2.5 m. Based on the number of pegs, it is necessary to calculate the required amount of material for the posts and fencing fabric.
Purchase materials:
- asbestos-cement pipe, steel or wooden beam from 5x5 cm to 10x10 cm - for pillars;
- crushed stone - to secure the pillars in the ground;
- a profile metal pipe or block 10x2.5 cm - for installing transverse joists to which the fence sheet will be attached;
- profiled sheet, edged board, chain-link mesh or other material for making a fence;
- nails, screws for fastening.
Tools you will need:
- shovel or drill, manual or electric - for excavating soil for installing poles;
- plumb line and building level;
- welding machine for fastening metal logs by welding;
- drill, hacksaw, grinder.
Return to contents
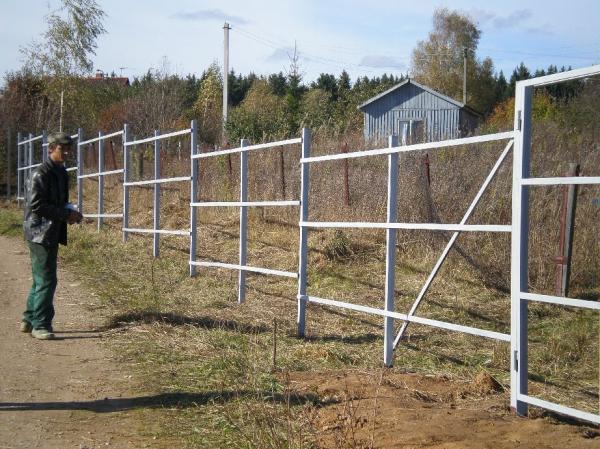
The basis of the fence is pillars for support

No matter what kind of fence you need to build, the installation of support posts will be a critical factor in its longevity and strength. From correct device the support will also depend on the aesthetics of the building, because even a rich fence looks sloppy if its pillars are skewed or collapsed.
In order for the fence to be level, you will first have to install corner posts and stretch a cord along their upper border to determine the plane of the fence and the height of the remaining supports. Dig intermediate posts in places marked with pegs, aligning them in height and vertically.
The method of installing the pillars is determined by the nature of the soil on the site: on heaving and deeply frozen soils, even concrete pillars can warp in the first winter. How to properly build a fence with your own hands and avoid such trouble?

Image 1: diagram of a fence made of brick and corrugated board.
- In order not to create unnecessary work for yourself in deepening and concreting the pillars, you need to drill or dig a hole so that its diameter is slightly larger than the diameter of the support.
- The depth of the hole is determined as 1/3 of the height of the post. On clay soils and at high level groundwater, increase this depth by another 10-15 cm to install a crushed stone cushion under the pillar. Place crushed stone in a layer of 10-15 cm into the dug hole and compact it. Install the post, use a plumb line to check its verticality in 2 planes perpendicular to each other and secure it with temporary spacers in the hole.
- Fill the space between the support and the walls of the hole with crushed stone and compact it. Remove the temporary spacers and check the verticality of the post again
- Add crushed stone to the edges of the hole and compact it thoroughly. This method of installing fence supports creates a layer of soil around the post that is not subject to heaving, and acts as drainage when moisture penetrates from precipitation and soil water.
The service life of support posts also depends on their preparation for use. The part immersed in the ground must be protected from moisture if it is wooden or steel elements:
- the wood should be stained strong solution copper sulfate in water (Bordeaux mixture) and cover with bitumen or mastic in 1-2 layers;
- coat the iron pipe with bitumen.
An asbestos-cement pipe is not subject to corrosion or rotting, but water that gets inside it (during rain) can, if it freezes in winter, tear a column made of such material from the inside. To prevent this, immediately after installation, the top hole of the pipe must be securely closed.
Return to contents
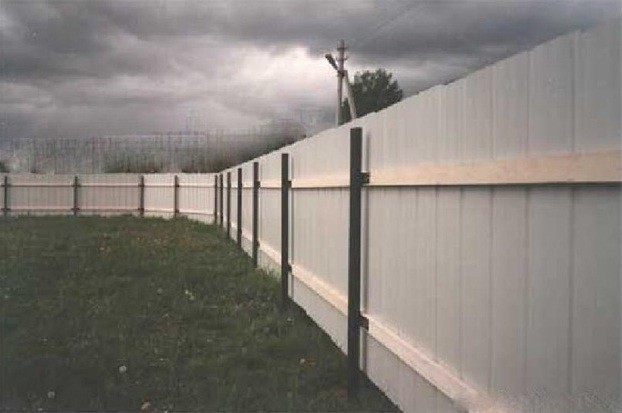
Installation of logs and fence fabric

Image 2: installation diagram of corrugated sheets.
- Install the lower logs at a height of no lower than 20 cm from the ground level. This is necessary so that they do not rot or corrode from contact with wet soil. The lower edge of the fence in this case will be located 10 cm below the log, covering it and not contacting the ground. The installation mark for the lower joist is determined by measuring the distance to it from the top of each of the corner posts. The cord is pulled along these marks, checking the horizontal position using a building level.
- To install the top joist from the top of each corner post set aside a distance of about 10 cm, put a mark and drive in a nail. Stretch the cord from one corner post to the other, marking the level of installation of the veins. The distance can be greater if the shaped supports perform decorative functions.

If necessary (high fence height), additional logs with the same spacing between them can be installed in the space between the upper and lower veins.
The lags are fastened to metal support posts by welding or threaded connection on bolts whose length is greater than the diameter of the pipe. To do this, through holes are drilled in the support and joist, the diameter of which is equal to diameter bolt. Screw a nut onto the bolt that goes through the holes and tighten it.
The logs are attached to wooden posts using nails or self-tapping screws. Their length is selected in such a way that they pass right through the vein and the column, protruding 2-3 cm. This part is carefully bent.
After this, they attach to the veins inexpensive material, which the fence will consist of - corrugated sheet, board 10x2 cm:
- Grade C corrugated sheeting (more than 0.5 mm thick) is attached to the joists with special self-tapping screws 3.5 cm long in increments of 45-50 cm. Such self-tapping screws are supplied with rubber washers and a polymer coating for the heads. Aluminum rivets are not recommended for fastening corrugated sheets. No corrosion treatment is required - the sheets are galvanized and coated with a colored polymer layer.
- A 10x2 cm edged board is nailed down or fastened with self-tapping screws in such a way that they pierce through the wooden parts. The head must be recessed into the wood by 1-2 mm. The protruding ends of the nails are bent. A wooden fence must be sanded and coated with exterior paint to protect it from rotting.
Every owner land plot, even a very small one, strive to define the boundaries of their possession. In most cases, owners erect fences that will hide the territory from prying eyes and intrusions from strangers from the street. And most often such a fence is a fence.
To build a quality and aesthetic fence, there is no need to immediately contact specialists. With your own hands you can create a unique design that will become your pride. To do this, you should find a good consultant, which is our site, and strictly follow it step by step instructions. According to our recommendations, you will independently build a wooden fence, from which you are now a few steps away.
The big step is choosing the material.
A large selection of materials for building a fence sometimes puts owners in a difficult position - what is better to choose? The choice depends on how you want the fence to look. Therefore, it is necessary to have at least a little information about each of the modern materials.
Brick fences are high-quality, durable buildings. This traditional building material is used to build a permanent, strong structure that will last for decades.
Particularly popular in Lately, steel fences are made of light, durable and beautiful corrugated sheets, which is universal for the construction of this structure. The result is an easy-to-install, lightweight and aesthetic barrier.

Fencing structures made of tree. Until recently, this was the most common type of building material, which is gradually, although undeservedly, being replaced by modern ones.
Quite often in the construction of facade and internal fences they use chain-link mesh. But this type of construction, unfortunately, will expose your entire site to the public.
Modern construction of fences involves the combined inclusion of different materials in the design, using stone and brickwork. Companies specializing in the construction of fence structures offer the most various options combined fences.
How to start construction correctly
Whatever material you choose for your fence, the beginning of construction always requires compliance with a certain order. The first is laying the foundation for the future fence - the foundation. This step is preceded by determining the corners and precise markings along the entire perimeter, taking into account the boundaries of the site.
If you decide to install a temporary fence and later build a permanent one, then it is not necessary to install a strip foundation, which will then need to be destroyed. It will be enough to install and concrete separately standing pillars, which will become the base of the fence.
To determine the boundaries of your fence frame, you need to dig holes in the corners into which the supporting posts will be installed and concreted.
What you need to know about racks
When choosing or self-production racks should also take into account some points.
The most durable and stable are metal racks. They are able to support the structure long time without any repairs.

Wooden supports, as practice has shown, are less durable. The part of the post that is in the ground requires separate processing. Therefore, it is most practical to install wooden racks during the construction of temporary fencing.
Pipe bases are extremely practical and durable. various diameters or square metal profile.
For self-construction For a fence structure, you will need a welding machine, with which you can assemble the load-bearing part of the structure and install fastenings for the spans. The video provides instructions for correct installation and concreting of support pillars.
Now let’s mount the frame on which the fence will be installed
When the first stage of work on installing the load-bearing part of the structure is completed, it is necessary to install the fasteners to which the spans will be attached. Here, too, there are several options for welding fasteners.
When installing wooden beams as guides, they are secured to “ears” welded to the support.
When a metal corner is used, it is also welded to the post, securing wooden blocks to it.
The profile pipe guide provides maximum strength and rigidity of the entire structure. The spans are quite easily mounted on the base using self-tapping screws.
Helpful information! When assembling a metal fence, you must first calculate its cost, as the structure may be more expensive than desired.
The pinnacle of your creation
When the frame of your structure is already ready, the most important but enjoyable step remains - installing the spans. Our recommendations are focused on corrugated sheets, although solutions can be very different - slate, wood, mesh.

To make the fence even, you must first stretch a strong thread along the top edge, along which the sheet will be installed. To set the horizontal direction, you can use a laser level or level.
At proper preparation and assembly, even a non-specialist should not have any difficulties with installation, connection and appearance of the structure.
Be proud - you are a jack of all trades!
We really hope that you have consistently followed all our recommendations and built a unique fence with your own hands and are enjoying the fruits of your labor.
Owners of private property always try to improve the area around their buildings. Create a special designer style fence, internal picket fences, in harmony not only with the facade, but also with the surrounding landscape. A beautifully made external fence, forming a single composition with the house, stands out for its exclusivity among monotonous buildings. In a single architectural ensemble with pronounced exteriors, the neighbors bring their own flavor to the overall architectural style.
Fence structures made of various materials plenty. The main thing is to choose the best option that elegantly fits into the surrounding landscape environment.
By erecting a decorative fence with your own hands from available materials, the owner of the site will not only save his personal budget, but will also receive pleasure from quality work done. Admiration for craftsmanship and design abilities from relatives, friends, acquaintances, and just passers-by. Build your own picturesque fence, decorative fence For internal zoning the task is not difficult. The main thing is to start and in the process you will acquire skills, knowledge, and the ability to work with the chosen material.
Functions, features and application of a decorative fence
An elegantly composed, individually styled, moderately colorful fence can perform several functions:
Construction on our own artificial fencing has some features.
Without knowledge or experience with the material, you will first have to study the topic and acquire practical skills.
Before creating them, the functions that the fence will perform are first determined. Structures installed as access barriers must be a reliable protection system from external attacks. With this purpose, it is necessary to take care of strong supports and the foundation of the future structure. The construction of wooden barriers will require special processing of the fence elements. Impregnation and painting will increase the service life of the fence. Working with any workpiece requires the ability to handle it safely. We must not forget that glass elements are fragile and require increased caution when working and protection from cuts.
Fences as decorations are not intended for long-term use. Over time, the owners may want to change the design to a more attractive one. Or new ideas and fantasies for decorating the interior garden space will appear. Therefore, it is convenient to use even short-lived materials for the construction of palisades and fences. The most common leftovers:
- plastic;
- wood;
- bricks;
- glass;
- stone;
- rubber;
- concrete;
- metal
Some craftsmen create combined structures that have their own flavor and attractiveness. And besides physical labor do not require financial costs. Following practicality, it is better to choose workpieces that will be familiar and convenient to work with. The most common type for creating picturesque fences is wood. By properly preparing the structural elements, the structure can be used for up to 10 years. Wood is easy to process and accepts necessary forms. Glass, plastic bottles the most affordable, convenient for creating quick fencing.
Types of decorative fences from scrap materials
Creating artificial barriers with your own hands from improvised means, which are abundant on the farm, does not require much effort. Main types of decorative fences:
- flowerbeds;
- front garden;
- water bodies;
- garden;
- sectional;
- front doors;
- zoning;
- security.
The front gardens are fenced with wooden mini-picket fences. On flower beds, stone borders, miniature fences, plastic tape. Looks great pre-painted plastic bottles installed around the perimeter of the bed. Zoning fences can be made in the same style for all zones. Individually selected for each site separately. Decorate with small metal fences garden paths, reservoirs located on the personal plot. The front entrance of the house is decorated with elegant fences that look impressive against the general background of the facade.
Decorative wooden fences
Making a board fence is simple. Thin boards will be required, the dimensions of which are determined by the purpose of the fence. Low hedges are used to separate flowers from lawns and paths. When restricting access to children and pets, the height is selected from 0.4 m. The configuration of the boards is created from simple triangles crowning the top decorative fence from wood, to carved complex shapes. The blanks are stuffed onto two crossbars closely or at a certain distance from each other. The finished sections are dug into the prepared trench. You can install posts on which to secure the board fence flush with the ground.
A wooden lattice fence is assembled from slats. First, prepare the outline, and then position the slats and connect them to the base. The structural elements are fastened together with nails and screws. The sections are installed and secured to previously dug supports. It’s even easier to make a wattle fence from tree branches. The best option willow vine. Prepared branches are laid between hammered wooden poles.
Stone
The construction of impressive structures made of stone will require the construction of a reliable foundation. Low stone barriers do not need support. The structural elements are laid end to end and provide shape to flower beds, flower beds, and garden beds. Placed in several rows, they block access for pets and children. For reliability, they are laid on concrete mortar. The most convenient plank stone, conveniently stacked on top of each other. The arrangement of the rubble in one layer close to each other is used for fencing beds and decorating garden paths.
You can make zoning with granite of various sizes, dividing ridges. If there is a small reservoir or spring on the site, then the stone is most suitable decorative element. High granite barriers are reliable external protection of the territory. The construction of a serious system will require skills in preparing concrete mortar, laying stone, and equipping a foundation for the structure. If you set yourself the goal of creating such a fence at home with your own hands, then after studying the construction business it will not be difficult to erect a structure that will last for decades.
Glass
Glass bottles are the most common raw material that almost every home owner has. An artificial fence near a flower bed, fencing garden paths, looks very original on the site. Glass bottles the raw material is unpretentious and can withstand all weather disasters. Collecting the required quantity will not be difficult. To increase strength, sand is poured inside. Transparent bottles pre-filled with colored fine gravel look beautiful. A glass fence for garden beds made from bottles will last for many years. The placement technology is simple: dig in with the neck down, halfway up.
Some home designers like a different arrangement. They place the bottles neck up with identical caps. Laying is done in a trench at an angle. This option gives the flowerbed or garden bed a special look.
Brick
The simplest improvised means zoning of flower beds - brick. The presence of residues can be used as an artificial fence. To create a flower garden you will have to master simple masonry skills. Landscaping of the territory is carried out using installations such as:
- "Zigzag";
- "Chess";
- "Vertical".
When laying in a zigzag pattern, the material is placed on top of each other with a slope of 45°. To ensure that the elements stand securely, first dig a groove. The bricks are laid in it in a checkerboard pattern, on top of each other with small gaps that fill cement mortar. When laying vertically, one row is placed vertically at a certain distance from each other so that the second row can be laid flat on top. Fantasy will help you create from brick original figures. Very often they cover flower beds, forming rhombuses, ovals, square, rectangular shapes.
Plastic
Most often, plastic bottles are used to create flower bed fences. You can paint the workpieces multi-colored paints. Such a fence will frame the beds in an original way. The shapes are as varied as your imagination allows. First, a groove is dug around the perimeter, half the height of the bottles. Then they are placed close to each other, covered with earth, and compacted. Neck up or down, depends on the preferences of the owner of the site. If you have old ones lying around vinyl records, you can also attach them by placing them around the perimeter of the beds.
The formation of flower beds is also done from sheet plastic. This is useful when you need to stop vegetation spreading by roots. The height of the plastic sheet is selected taking into account the depth at which it needs to be placed.
Rubber
Old car tires good for arranging small flower beds and flower gardens. Soil is poured into the middle and seedlings are planted. Some gardeners grow strawberries in such improvised beds. Previously, at certain distances, tires cut out holes for planting seedlings. The cameras are then stacked vertically on top of each other. Each tier is filled with earth. The system is stable, so you can place up to 6-8 rubber tubes. After this, the improvised bed is planted with strawberries. The method is convenient when the garden plot is small. The chambers can first be whitewashed with lime and painted.
For high-quality watering, install in the center of the column plastic pipe With drilled holes. If necessary, water is poured into it, which evenly flows to the roots of the plants.
Metal
Metal systems are convenient for creating decorative fences. Usually these are small barriers installed for the purpose of zoning and decorating the territory. Working with metal will require certain skills and tools. Electric welding is most often used. First, individual structural elements are prepared, then they are welded together. Such fences are durable and can be installed by driving supporting elements into the ground. It is convenient to use the remains of metal profiles in zoning flower beds.
Many gardeners who grow raspberries and blackberries use them as a limiter on the spread of plant roots. A trench is dug 20-30 cm deep along the perimeter of the berry garden and a metal profile is installed. Then they are covered with earth and compacted. In the future, the roots of raspberries and other vegetation will not be able to spread throughout the garden.
Concrete
It is not difficult to make artificial concrete fences with your own hands. First of all, it will be necessary to master the technique of preparing the solution and the proportions of its constituent substances. For massive external fences, the foundation is first laid out. A trench is dug and wooden formwork is installed around the perimeter. The created box is filled with the prepared solution. Small concrete fences for flower beds do not require a foundation.
The prepared forms are filled with solution and kept until the required strength is achieved. After this, the formwork is dismantled. The resulting volume is filled with earth, plants and flowers are planted. Small flower beds are made from concrete, which are installed at the main entrances to a house or cottage. Common shapes: rhombuses, squares, circles, rectangles, ovals.
Hedge
Decorative fences made from living plants are very popular among many owners of houses and summer cottages. The main thing is to find the appropriate seedlings of the required type and quantity. These can be trees with a falling crown, densely growing shrubs. Villagers often make living fences out of blackberries. The plant is unpretentious and grows quickly. It spreads by the root system, so you will have to build an underground barrier.
Natural blackberry hedge cheap option arrangement of a natural hedge. The main thing is not to start uncontrolled growth. You can create a natural hedge from the following plants:
- Maiden grapes;
- Honeysuckle;
- Climbing rose;
- Schisandra;
- Ivy.
When choosing a living garden, you need to pay attention to how the plants tolerate pruning. Some, like the juniper, are intolerant of such procedures. Therefore, if you plant these plants, you must give them the opportunity to grow freely.
Gabions
In the arrangement local area Gabions are also used. To create it yourself, you will need a metal mesh with a certain mesh size. First, a rigid cage is assembled, which is covered with the available mesh. Gabions are made with an anti-corrosion coating. The cage in the mesh is made depending on the size of the filler.
The system is created by welding individual wires together. Small cylindrical gabions are used as a separate decoration on the site. You can plant plants or assemble a composition from individual elements. The main thing is to have metal welding skills. Gabion filler: rubble, gravel, pebbles, granite. The flower beds arranged in them look good. You can diversify the landscape of the site using small forms, purchasing a ready-made mesh, giving it the desired geometry yourself, and strengthening it with rigid ribs.
DIY decorative fence made of branches
An interesting fence, as a decoration or protection for a personal plot, is a tyn or wicker fence. This type of arrangement has ancient roots. It was a common type of garden in past centuries. It is made from available branches, sticks, and vines. Today's landscape design made decor from branches quite popular. The building is environmentally friendly and natural. This element of Slavic culture has become fashionable today. It can be installed in the garden or protected from access by animals, children and other areas of the yard. The technology is simple: branches cut from bushes are woven into installed supports and stakes.
Preparatory work
Two groups of wicker fence elements are prepared as raw materials: supports and rods. For the former, thick branches with a diameter of 6-8 centimeters are suitable. You can use metal pipes and wooden poles. The basic principle is that the higher the supports, the thicker the rods can be used in the weave. The material is prepared from fruit trees, willow, birch. Maple and poplar rods are also suitable. Harvesting is done in the spring, before sap flows from the trees. In dry, hot weather, cutting off the rods in summer is allowed. Branches are separated at angles in the range of 40-60º. The tyn is woven from freshly cut blanks. Harvesting for future use is allowed, but before use, the rods are soaked in hot water. Wooden supports are treated with impregnation, fired, and tarred. The most optimal pillars are made of larch, which does not rot.
Main works
After preparing the materials, the main work begins. First of all, the pillars are buried. For a fence one meter high, the supports are driven to a depth of at least 0.3 meters. A one and a half meter fence will require deepening of the supports by 0.5 m. When constructing a low tyn, the pillars are dug at a depth of 0.2 m. The distance between supports is 0.4-0.5 m. The greater thickness of the rods makes it possible to install poles more rarely.
At the edges of both sides of the fence, three pillars are driven in, a distance of 0.20-0.25 m from each other. This is done with the aim of rigidly securing the vine at the initial and final sections. Then the rods are woven in, placing the pieces one by one between the supports. The lower rows of the vine must be secured with wire, buried 10-15 cm into the ground. Subsequent layers of branches are attached with wire around the frame. Weaving begins from the thicker side of the twigs, overlapping the thin ends of the branches.
After going through three or four rows, the vines need to be compacted. This is done by tapping them with a hammer. The panicles at the ends of the vines are pre-cut. If cattails or reeds are used, armfuls of material are placed between the posts. After finishing the work, the fence is decorated with national ornaments and ancient utensils. To increase the service life, the structure is coated with varnish.
Conclusion
Options for creating elegant, practical barriers for various purposes a bunch of. You need to purchase a tool, start learning carpentry and construction, and practice your skills. Selecting available tools to quickly decorate a flower garden will take a couple of minutes. Flower beds can be arranged in concrete containers filled with soil. These flower beds are used to decorate the front entrances, placing them along the perimeter of the porch. Climbing plant species look beautiful and create coolness in hot weather. It is easy to create green walls from them, which during the flowering period are fragrant and amaze with their beauty. On a private plot you can always create exclusive decors, easily dismantled parts of fences. Fences protecting plants from attacks by poultry, animals, and children's pranks.
As a rule, such fences consist of sections and exist in two types: fences with supports made of metal pipes or brick columns. The profiled sheets on them can be located in one case at a short distance from the ground, and in another - rest on a foundation or a brick side connecting the fence posts.
The first option is more economical, as it involves the use of fewer materials and simplified installation. Another type of fence allows you to make it more respectable, but requires more materials and labor effort.
The use of profiled sheets in metal fencing of a site is quite justified, as it has a number of advantages:
- The fence installation process does not cause technological problems;
- The profiled sheet is quite durable;
- If such a fence is installed correctly and then maintained, it will stand for a very long time;
- The appearance of the corrugated board fencing is quite modern.
Corrugated fence installation technology
The entire production process of installing a corrugated fence can be divided into several stages. Let's look at them in order.
Preparatory work before installing the fence

Before purchasing basic materials, you need to prepare tools and equipment for work. You will need a building level, a concrete mixer, a welding machine, pegs and a cord for marking the territory, an electric drill with drills, and 2.5 mm electrodes. You should also organize a water supply to the concrete work site.
It is not recommended to build any fence without a diagram or drawing. To compile any of these documents, markup data is required. It should begin with determining and measuring the perimeter of the site. To do this, you need to hammer pegs in its corners and connect them by pulling a cord between them. Using a tape measure, you need to determine the length of the future fence and the required number of its supports, which are located in increments of 2-3 m, depending on the length of the sheets. The location of each pillar must be marked with a peg.
In addition, you need to determine the dimensions of the foundation, the width of the entrance gate and entrance gate. The width of the base, in order to save costs on earthen and concrete works, can be made different. Then under the supports it is made to their size, and under the sheets it is narrower. The dimensions of the gate depend on its purpose. All marking data must be transferred to the diagram to calculate the required amount of materials.
If it is not planned to cover the supports with bricks, then a powerful foundation for a lightweight fence structure will not be required. In this case, a hole 15 cm wide and 1.5 m deep is dug under each rack. You can use a hand drill. The depth of immersion of the supports into the ground depends on the height of the fence. The higher you plan to make the fence, the deeper you need to dig its supports.
A heavy fence with brick posts will require a more massive foundation. To prepare it, you need shovels, a supply of polypropylene bags for removing excess soil, and time.
A trench, for example, with a volume of 4 m 3 is dug by a pair of workers within 4-5 hours with smoke breaks. Its depth for the foundation depends on the level of soil freezing in a certain region, on average - 1-1.5 m.
The most important thing in this type of work is soil sampling desired depth. The level of the foundation, its immobility and normal functioning entrance gate.
Selection of materials for corrugated fence

The main material of the fence is corrugated sheet. It is made from durable zinc coated steel. All sheets have a ribbed shape, as well as markings A or C followed by numbers from 8 to 35, which indicate the wave height of the product in millimeters. For example, C10 corrugated sheeting, used for fences, has a wave height of 10 mm. The larger it is, the stiffer the profiled sheet. In regions with strong winds For fencing, it is recommended to use C20 corrugated sheeting.
The thickness of the profiled sheets should be selected depending on the height of the fence. If it is, for example, up to 3 meters, optimal value will be 0.5 mm. For a higher fence, sheets of 0.6 mm are suitable.
When purchasing, you should pay attention to the flooring coating. Powder coating is more durable. Sheets must be double-sided. Their outer side has a brighter color. The inside has gray corrugated sheeting.
To make a fence from corrugated sheets, in addition to steel sheets, you will additionally need:
- Pipes and bricks for supports. Steel pipes are taken rectangular or round section 60x60 mm with a wall thickness of 3 mm and a length of 3 m. The brick used is silicate, clay or facing. To lay columns from it you will need building mixture.
- Lags. These are transverse fencing elements designed to securely connect the supports into a single frame. In addition, they serve as a basis for fastening profiled sheets. The material for the crossbars will be steel pipes of rectangular section 40x25 mm with a wall thickness of 2 mm and a length of 6 m.
- Fasteners. It is needed for installation of fencing sheets. These are roofing screws or metal rivets measuring 3.2x10 mm.
- Concrete M200 for installation of fence posts. If you plan to prepare it yourself, you will need cement, crushed stone and sand.
Pouring the foundation for the fence

Assembling formwork is an extremely responsible undertaking. The fact is that after pouring concrete, the defects in the formwork cannot be corrected. Therefore, in addition to a half-edged board, a drill and screws, you will definitely need wooden lintels and brick supports for additional fastening of the entire structure.
The assembly of formwork panels is carried out in a trench and begins with the top board, which marks the level of the foundation. Its upper part should be 10 cm above the ground surface to avoid the accumulation of dirt on it during rains.
The foundation is reinforced using a three-dimensional frame made of metal rods with a diameter of 10 mm. In the frame, horizontal reinforcement is represented by two lower and two upper reinforcement bars. Vertical reinforcement - four short jumpers connecting horizontal rods at equal intervals of 1.5 m. The reinforcement is connected with knitting wire.
After installing the frame, pipes or powerful corners are lowered into the formwork to strengthen future brick columns. Installation of these elements is carried out using a plumb line and a building level. Then they are fixed in it with short boards. After securing the formwork with lintels and supports, concrete can be poured into it.
When installing a corrugated fence, the concrete is prepared manually or using a concrete mixer. The composition of the mixture used is as follows: cement - 1 part, crushed stone - 6 parts, sand - 3 parts, water - 0.7 parts, concrete additives (liquid household soap) - 0.1% of the amount of cement.
Mixing 100 liters of concrete by hand takes 30-40 minutes. After concreting, it is advisable to cover the formwork with film to prevent the top layer of coating from drying out, and it can be removed after a week if the weather is warm.
A massive strip foundation under brick columns is poured in the usual way. If the racks are not planned to be lined with stone, the bottom of the recesses under them is filled with a 200 mm layer of crushed stone, then the racks are installed and concreted with a cement mixture.
In order to prevent the soil between them from being washed out over time, the pipes of the supports can be connected instead of a foundation with a buried concrete strip with a total height of 20 cm. To make it, a wooden box is made along the bottom of the metal racks. Its boards are fastened with wire or scraps of timber, and then lined with waterproofing from the inside. After pouring concrete into the box and setting it, the formwork is carefully disassembled. The resulting side will not only serve as protection against soil washout, but also as an obstacle to the penetration of domestic animals under the fence into the territory.
Instructions for installing a fence made of corrugated sheets

The fence frame made of profiled sheets is assembled from metal pipe with a cross section of 20x40x2 mm using manual welding. Pieces of profile pipe cut to the required length in a horizontal position are lightly welded to vertical posts in 2-3 rows, the accuracy of installation is checked by the building level. After this, the final welding is carried out. A fence 15 m long takes about 2 hours of welding work.
After completion, anti-corrosion treatment of the frame elements and its welding points is carried out. For this purpose, GF-020 primer is suitable, which can be applied to metal with a brush or spray paint.
For installation of brick columns it is used facing brick. Usually, experienced masons are involved in such work, because the quality requires it. When laying bricks, a mortar is used in a cement/sand ratio of 1 to 3 with the addition of a small part for the plasticity of the mixture liquid soap. Masonry columns are performed alternately in 1 day to a height of 0.5 m.
The gaps between the masonry and the metal post are filled with mortar while working on the post. Each row of masonry is reinforced with a 50x50x4 mm mesh. To protect the upper end of the column from rain and snow, decorative caps are installed on it. This gives the fence a special expressiveness.
As an option, the racks can be faced not with brick, but with artificial or natural stone. The appearance of the fence will only benefit from this. However, such a procedure will require considerable investment.
Installation of corrugated sheets is final stage making a fence. To avoid damaging the end of the profiled sheet during installation, it is recommended to lay cardboard on the foundation. Products are fixed on profile pipe through the wave at the base of the corrugation. The connection is made with overlapping screws using an electric drill with an attachment. You can also take rivets, but they must be steel.
Aluminum fasteners can create between different materials galvanic couple, the appearance of which causes electrochemical corrosion of steel.
Sheets of profiled flooring in the same fence are easily combined, for example, with forging. In order for such a fence to have an attractive appearance, you can use different arrangements of its enclosing elements: the top, Bottom part structures or the space between them.
To maintain a serviceable and attractive condition of a fence made of corrugated sheets, a lot of effort is not required. It is quite enough to periodically clean it from dirt. Any solution containing soap is suitable for this. It is important that the emulsion does not contain solvents: they can damage the coating.
How to make a fence from corrugated sheets - watch the video: