Do-it-yourself pond in clay soil. We create a pond with fish in the country with our own hands How to make a flowing pond
In the process of creating a pond on own dacha many questions arise general recommendations not enough. Let's consider these questions.
How to make a natural pond?
First, let's define what is meant by this phrase:

How to choose a place and what to provide:
- distance from trees, tall bushes. Leaves and branches should not clog the water;
- good lighting, direct rays of sun throughout daylight hours unacceptable;
- correctly located in a low area so that rainwater does not spill over the area, but flows into the pond;
- choose a flat area with a slight slope.
What to consider so that the reservoir is “alive” and does not rot:

Making a pond
A properly made pond occupies at least 10th of the site. Deep - it warms up poorly and is simply dangerous, shallow - it blooms. On the forums of summer residents, the optimal size of a reservoir is recommended to be 2.5 - 3 m in diameter, 1.5 m in depth. The hole is dug manually or using machinery. Next, waterproofing is done.
Ecopond - involves natural waterproofing, called clay castle. Only this natural material contributes to the vital activity of living things. ecological system. This is a good way to make a pond without film:

How to make a small pond?
There are a few simple ways arrangement of miniature reservoirs on the site. 

Since the shape is a wave-like configuration, transitions during burial are taken into account. Special steps are made, one wider than the other. After installation, the voids are filled with earth.
The form is set slightly above ground level, a layer of sand of approximately 20-30 cm is poured under it, but first markings are made on the ground. Then you can start digging a pit. How to do this can be clearly seen in the pictures below.

How to make a big pond?
- At first mark the contours. For irregular shapes, a regular rope will do; for a rectangle, square - hammer in pegs and stretch a string between them.
- An excavator is used to dig a pit. You can calculate its dimensions using the formula for calculating the volume of a truncated cone. This can be easily done on a site like fxyz.ru. You just need to insert the numbers into the required line.
- Further - level the walls of the dug bowl and make them flat. Provide terraces around the perimeter of the reservoir. They prevent the soil from crumbling and serve as convenient steps when laying waterproofing. They will be useful in the future when decorating a pond.
Important! Three zones are provided in the pit bowl: deep, 1.8-2.0 meters (below the freezing level of the ground). She is being prepared so that she can successfully winter. Medium – for plants. Small - in summer such places warm up well, fry and living creatures accumulate here, microflora multiplies.
If you are digging a pond for swimming, you do not need to deepen the bottom, it is made smooth.
Next you need:
- remove stones and driftwood from the bottom;
- prepare waterproofing material.
The Landscape Constructions company recommends first filling the bottom with sand and laying it on top. geotextiles. 
Among the existing options for waterproof coatings, they usually choose butyl rubber film. The main argument is durability. It lasts up to 20 years.
Lay out the film

How else can you waterproof a pond?

For your information! In specialized stores you can buy ready-made plastic mold for a reservoir of 1000 liters or more.
How to build a dam?
A pit is not necessary for a pond; it is enough to make a dam using a stream or a drainage area where water flows. Running water constantly fills the reservoir. They block it in the narrowest place. First, a ditch is dug, the bottom is lined with rich clay, and compacted. Then a clay wall is erected and buried into the bottom and edges of the ravine. The dam crest is raised one meter above the future water level, and the rapids are made steep. 
Dams are built from natural materials: stone, gravel, logs, sometimes concrete. The base is supposed to be wide so that the structure can withstand water pressure.
When constructing such structures, remember about floods and consider water drainage in extreme situations.
The embankment is filled with a width of half a meter to 4 meters, a height of at least 0.5 m. The dam is filled only after the dam has settled.
Concrete dam. It is reinforced with rods, angle iron, and steel mesh. For concreting, waterproof cement is used, liquid glass and PVA glue are added. 
If there is a ravine
A ravine next to an area along the bottom of which a stream flows and overflows during floods can be turned from a potential enemy into a friend and helper. The ravine is blocked from bank to bank by an embankment. Rain, spring, or river water gradually accumulates in front of it, forming a water surface.
We present such a positive experience step by step:
- Dig a bypass channel, temporarily direct a stream into it so that it does not interfere with work.
- Make shields from boards, cover them with film, and top with roofing felt..
- Make gaps in the ravine, insert shields into them, lay out a dam from stones.
- Bottom of the proposed pond fill with clay, compact, lay a layer of sand on top, level. At the end there is a pond line with film, walls with stone.
- In order to keep the water at a certain level, install overflow pipe. Excess water goes further through the diversion channel into the ravine. To avoid siltation, a septic tank is dug just upstream of the natural stream.
Such a water oasis requires virtually no costs, will avert the threat of flooding, and will decorate a vacation spot. 
How to prevent a pond from freezing in winter?
In autumn, especially tender and valuable plants are removed from the pond, and ornamental fish are moved to the aquarium. Pond at low temperatures Oh, it will freeze, it is impossible to resist nature, but it is possible to make it easier for fish to winter in a reservoir and ensure an influx of oxygen. 
- Reed, cattail placed vertically. Oxygen penetrates into the water through the hollow stems.
- Polystyrene foam, straw bundles on water will slow down freezing.
- Do vent, pouring boiling water over the ice.
- In severe frosts they cover insulation (straw, burlap, roofing felt). You cannot keep such a flooring for a long time, you need natural light. A wooden or foam plastic box is placed above the hole, an incandescent lamp is hung, the hole does not freeze.
Used here floating aerator, however, its effect is effective only at low subzero temperatures. 
Quarry pond
Such bodies of water are called quarry ponds or gravel pits. Usually these are old neglected quarries in which peat or stone was mined. The water in them stagnates, and the fish are mostly small fish. Used for fish breeding when it is possible to provide a constant flow of water. Specialized farms on quarry ponds produce up to 2 quintals of fish per hectare. Such reservoirs are of interest to entrepreneurs. 
If there is a well
The easiest way to feed a reservoir is from a well. The owner of such a pond shared this scheme, with the help of which a good idea was realized, on a dacha forum. Water circulates and its consumption is small.
- Water from the pond flows to the filter. In this case, it acts as a skimmer.
- Water cleared of debris flows into the waterfall, saturating the reservoir with oxygen. The pump in the well turns on only when there is a need to raise the water level.
- The relay is activated, turns on the pump in the well, water enters the pond, fills it to required level. Next comes the turn of the filter. All mechanisms come into play one by one. This scheme automatically maintains the water level necessary for the operation of the filter and waterfall.
How to make a flowing pond

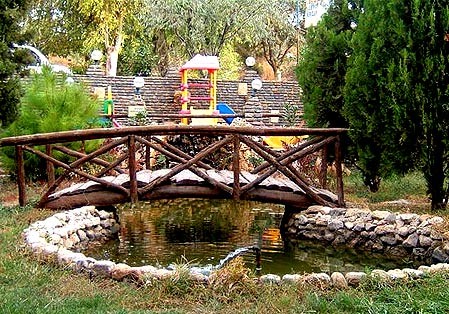
Bridge as a decoration for a pond
Straight, curved, hanging over the surface of the water - the bridge can be anything. Wood, concrete, stone, metal and their combinations are suitable for structures. Even the smallest bridge will enliven the area, become a continuation of the path, and add an unusual line to the landscape. 
A simple bridge is easy to make:

Pond filter
Alexander Pisanets talks about how to make a filter for a pond in the video below.
For waterproofing artificial reservoirs, butyl rubber membrane (EPDM) is most often used. This is no coincidence: thanks to its ability to stretch, it takes the shape of a bed without tension or voids. However, a pond with rubber banks looks unsightly. What is the best way to design its edge?
Water will hide everything
This can only be said about the deep-water zone of the reservoir. A few weeks after filling the pond with water, the membrane becomes covered with a coating, and at depth it is no longer so noticeable. artificial appearance. But the shallow water area and especially the visible part of the shore need to be decorated, otherwise the pond will have an unfinished appearance. To do this, it is important to correctly perform the upper edge of the bowl.
Usually it ends in a low roller, the ridge of which is aligned strictly in the horizontal plane. This compensates for the unevenness of the earth's surface and makes the edge of the bowl parallel to the water level. A membrane is placed over the roller and secured behind it. A roller made of sand or soil usually crumbles over time, releasing some of the water from the pond, so it needs to be removed from a more stable material. Most often, a “belt” is made of concrete, sometimes plastic and even metal.
Strengthening the shore of the pond , you can start decorating the butyl rubber film. Material for beautiful design The shores are pebbles, sand, stones, and boardwalk. Can be a wonderful decorative element lawn grass, shrubs, perennials with large leaves or creeping plants, for example, loosestrife (photo 1). If the pond is located in a lowland and there is a lawn or other plantings at its edge, drainage is needed along the entire perimeter of the pond. For beautiful lawn the soil must be fertile.
At abundant watering or heavy rains nutrients will fall into the pond and become available not only to terrestrial plants, but also unicellular algae, causing the water in the pond to take on a greenish tint. Drainage will prevent this. A drainage channel in the form of a pipe covered with crushed stone must be laid along the side of the reservoir and brought into drainage runoff. You can decorate it with a small layer of loose soil, pebbles or crushed stone (photo 2).
Large pond in natural style
When decorating shallow water and the shore, it is best to use stones and pebbles. Moreover, the more different factions there are, the more natural and interesting both the pond itself and the coastal zone look (photo 3).
On gently sloping banks, you can lay non-woven material over the film, lay stones on top and then fill the voids with pebbles. In addition to ease of installation, the advantage of such decoration is environmental friendliness.
Pebbles are a habitat for bacteria that clean the pond. The inconvenience of this method usually manifests itself after a few years when flushing the reservoir. It will take a lot of effort to rinse it clean. You can lay stones and pebbles on concrete base- then they lie more stable. The decorative effect is not lost, and it is much easier to wash such a pond. There is only one drawback - cement comes into contact with water and makes it more alkaline. It has been noticed that many filamentous algae, popularly called mud, prefer lime water.
Vegetable soil can also be used to decorate EPDM membranes in very large and deep reservoirs. It contains a lot of organic matter, due to which a small pond will quickly become overgrown aquatic plants or string algae and will look like a puddle. And in large bodies of water, the filled bank will eventually be overgrown with grass and will look like a natural one.
Pond with steep walls
In this case, decorating with stones and pebbles will require more skilled work. The stones are laid with the end part against the wall of the reservoir using a solution (cement, sand and external tile adhesive 2:4:1). This method is good for constructing deep reservoirs at relatively small area mirrors (photo 4).
Rounded stones or large pebbles can be used to decorate the walls of swimming ponds.
In small reservoirs with vertical walls, laying natural stone “steals” volume. Here you can use, for example, PVC film with small pebbles glued to it. True, it is not much more beautiful than the membrane: the glue is very clearly visible, and in those places where the pebbles have come off, they cannot be attached back. In specialized stores you can buy coconut sheets for constructing ponds. Although it looks like a rare fabric, it copes well with decorative functions (photo 5).
It is better to fasten it immediately during construction or leave more mortgages in the side, since when wet the canvas may sag and the edge of the film will be visible. Its color may seem too bright, but over time it will become neutral.
Pond near the recreation area
You can solve the problem of the edge quite simply if the pond is surrounded by a recreation area (photo 6).
Even if the site is adjacent to the pond on only one side, you can frame it with the same material. If the site is paved natural stone, then its thickness should be 3 cm or more. The paving should be laid with an overlap of 5-7 cm above the water - then when the reservoir is filled, the edge of the film will practically not be visible. During the construction of such a pond, it is necessary to provide for the overflow of excess rain or flood water into drainage ditch. Otherwise, the area around the pond, laid on a concrete base, may be flooded if the reservoir overflows.
Another classic and very nice option decorating the shore of a reservoir - wood flooring from larch or pine with oil impregnation(photo 7).
If wooden crafts do not come into contact with water, this is a fairly durable design. You can use boards made of composite material, which is almost indistinguishable from wood in appearance, but even more durable.
Leonid Karpov
Returning from Fokin, I wandered around the small Vladimir station, waiting for the train, and thought about how to usefully spend my time. Approaching the book stall, I immediately noticed the book “Reservoirs and Pools”. " But Anastasia suggested digging a lake at each site", - I remembered and began to leaf through the book with interest. However, everywhere in it there was supposed to be an artificial waterproof layer - film, roofing felt, etc., which was in no way woven into the bright image of the estate - the banks must “breathe”! Later I learned that When covering the bottom with film, the water must be drained regularly, otherwise it will deteriorate.
Arriving in Chelyabinsk, I thought about how water holds in natural reservoirs - there is natural waterproofing! And in the book by Anastasia Semyonova " Living water Your garden" met the lake project" on a clay castle".
Lake project on a clay castle
First of all, dig a depression with sloping (no steeper than 20-25 degrees) banks, one third of the depth of the reservoir you have planned. The excavated soil will continue the banks and triple the depth... With a slope from the pit, make a groove into which, from the very wall of the reservoir, lay a drainage pipe excess water into a ditch or ravine. Reinforce the bottom and walls of the reservoir with clay.
The clay is kneaded with water until it becomes a soft dough that does not stick to the shovel. The mass is placed in a layer of 15 centimeters on the bottom and walls of the reservoir and compacted. The clay is allowed to dry, a second layer is laid and compacted again. Then the third layer is laid. Each layer shrinks by approximately 3 centimeters, so the final thickness is about 35-39 cm.
Along the edges of the reservoir, reinforcing layers of clay are made 15 cm above the expected water level. IN upper layer After final drying, the clay is compacted with a 2-3 cm layer of coarse gravel. For final finishing 5-7 cm of fine crushed stone or sand is poured on top of the gravel.
If the soil is less moisture-absorbing, the bottom of the pool is strengthened with clay mixed with straw: Pools are most often filled with rainwater.
Much attention is paid to the plant design of the lake:
The yellow flowers of the marigold and the lower marigold harmonize with the blue forget-me-nots reflected in the water. Graceful inflorescences of astilbe bloom in July, when other plants have already faded.
The dense foliage of the peony serves as a good background for the openwork leaves of astilbe and swimsuit, and the large purple flowers add life to the blue and yellow tones. spring bloom. The floral design is complemented by willow - a constant companion of natural reservoirs: Flowers are illuminated by the sun; Ferns grow in the deep shade of the willow. The pleasant aroma of mock orange (jasmine) planted near the bench will add even more charm to this corner of the garden.
It seems that events in my life are lining up with an increasingly strict logic. At the “Cup of Love” festival, taking a break from the heat and immobility, I swam in the local pool and was amazed at how successful its size was - small, but allowing me to relax, joining in a different, joyful state .
The trainer, who is also looking after the pool, reported its dimensions - 10x25 meters, depth - 1.1-1.2 m. Anastasia’s words came to mind: “ In the garden we will dig a shallow pond, about two hundred square meters in size.". 10x20 meters - just two hundred square meters! Taking into account the gradual decline of the banks (maximum 25o), the volume of the pond is about 160 m3.
To replace the water in it in 2 weeks, as is done in a swimming pool, you need a source with a capacity of 8 liters per minute - a water tap with good pressure gives 15. The spring that Anastasia proposed to create at each site (Vladimir Megre talked about it at the presentation of the fifth books in St. Petersburg) can flow into the pond, replenishing it with fresh water.
Based on materials from the site www.anastasiaclub.ru
P.S. If you think that this information It's worth telling others, share on social networks.
And a pond. Even a small body of water attracts those around you like a magnet. Water is fascinating even in small quantities... Moreover, you can build a pond with your own hands in a few hours. But this is a small artificial reservoir. Building a large one will require both money and time.
Where to dig
Small artificial reservoirs are best viewed from above. Therefore, if there is a corresponding depression on the site, it is best to do it here. There is, however, in this negative side: You will have to raise the edges of the bowl higher to prevent rainwater from getting inside. The second option is to come up with a water drainage system (make a drainage system above the reservoir).
If there is a key somewhere on the site, it is logical to make a natural pond by digging or deepening the existing bowl, lining its borders with cobblestones or stones, and planting plants. The stream, which is sure to exist in this case, can also be improved by lining its edges with cobblestones, drowning them in the soggy soil, you will give greater strength to the bank, and you can plant moisture-loving plants between them.
Even a small waterfall is a magical sight. How to dam a pond if there is a natural stream on your site - dig a pit, cover it with stones and direct the stream into it
Not everyone has such a luxury on their property as a stream or a spring. We have to make artificial reservoirs. When properly designed, they look no worse than natural ones.
How to make an artificial pond with a bowl (without film)
The simplest and quick way to make an artificial pond at the dacha - bury the finished bowl in the ground, shaping and decorating its edges. There are plastic bowls - ready-made different forms, sizes and colors (mostly blue, green and black).

Construction of a plastic garden or country pond- it’s not a difficult matter. Here are the step-by-step instructions:
- It is necessary to dig a pit in the shape of a bowl. If the shape is very non-standard, you can turn it upside down at the installation site and outline the outline with something (at least dig it with a shovel). The bowl is taken to the side and a pit is dug. It should be a little larger in size - a little wider, but not deeper. The edges should either be flush with the ground or protrude slightly. If you can raise the edges a little, it will be even better: when it rains, dirty water will not flow in.
- After required depth reached, the bottom is leveled to the horizon: it is first leveled with a shovel, then compacted and the excess is removed with an even bar. The surface must be smooth and hard: the plastic must have good support. If the ground is poorly leveled (clay), you can pour 5-10 cm of sand, wet it and compact it.
- The next stage is installing the bowl in the pit. If the bottom has been made level, the edges of the bowl will be level with the horizon. Now the space that remains between the wall of the bowl and the pit must be filled with soil or sand and compacted well.
- Now it’s time for the design: the installation is complete, you can fill in the water.
How to use this technology to build a pond in the courtyard with lighting, see in this photo report (you can scroll through the photo gallery yourself by clicking on the thumbnails below).
We are digging a pit. We decided that the sides would be 1-2 cm higher than the level of the path - there would be less debris inside, and we would decorate the edges with stones. On this side, just below the maximum level, we cut a pipe into the bowl so that excess water would drain. She was taken to the sewer
But it is not always and not everywhere possible to constantly add and remove water to the pond. Then you will have to either plant plants that will clean it, or change it periodically.
Pond from an old bathroom
You don't have to buy a bowl at all. Any container can be used. Even old bath. It turns out very well. All the actions are the same, the foundation pit is dug first, a bathtub is placed in it, what happens next, see the series the following photos. There's a pond on them old bath transforms into a truly lovely place.
The platform was also entangled with wire - so that the clay did not float and the platform did not sag. This is such a beauty after a month - a garden pond built with my own hands makes me happy
Pond from a car tire (with film)
A mini pond can be made from an old one car tire, or rather from a tire. The larger it is, the larger the reservoir. The most difficult thing in this matter is to cut off one side part. If the resulting edges are sharp, they need to be processed sandpaper. The second most difficult task is to dig a hole of the appropriate size. The difficulties ended there. The rest is quite easy.
The cut tire is installed in the hole, covered with earth on the sides, and compacted well. Also, earth or sand is poured inside and the bottom is leveled. Take a piece of thick polyethylene film, you can fold it in half and cover the resulting tank. Don’t try too hard: just pour water, it will straighten the film itself.
Instead of polyethylene, you can take banner film (available from advertising companies that produce outdoor advertising) or a piece special for swimming pools and ponds. They are much stronger (but more expensive).
The protruding ends of the film are tucked around the walls of your pond and decorated with stones. The construction of the pond is completed, next comes decoration and planting. See how to make a pond from a tire in the photo report.
The next stage of making a mini-pond for a summer residence is decorating the edges with stones
There is certainly nothing complicated about such a device. Anyone can build such a pond at their dacha with their own hands, and the investment is minimal.
In general, mini-ponds are made from tanks, barrels, pans, even flower pots. The main thing is that there is a body, and designing it is not very difficult: experience gradually comes. They are placed in the garden, at the dacha, near the house. It is possible to supply water, make a stream, it can be placed under trees, for example, or shrubs. Both beauty and benefit at the same time.
Making a pond with film
By creating this artificial pond made of film, you almost exactly repeat the work described above, only without installing the bowl:
- mark the shape of the future pond;
- dig a pit, forming ledges if necessary;
- clean the bottom of any sharp objects: roots, stones, etc.;
- level the banks of your pond;
- spread the waterproofing film;
- fill the pond with water;
- fix the edges of the film;
- decorate.
A country pond created using this technology can be of a more substantial size. Important point: on loose soil, simply making a pit and laying down a film will not work. We will have to come up with some measures to strengthen the banks. In this case, you will have to either install a bowl, or make a more serious structure - from brick or concrete. Next, let's look at examples of how to inexpensively make a pond from film.
First project: sides flush with the ground
Eight simple steps and your pond at the dacha is built. How to dig and arrange a pond at your dacha and make it look natural, see the photo report.
Second project: raised sides
The second version of a homemade pond in the first stages is built in almost the same way as the first. Only after the pit reached the design depth were the sides raised, lined with bricks along the edges and concreted. The result was a pond with raised sides. A water circulation system has also been made. It is shown in the figure below.

As you can see, this pond is more multi-layered and its displacement is more serious. If you want to have a pond of at least medium size and not build a serious bowl, you can do as shown in the figure: fill the created pit with sand, cover it, and only lay the film on top. Geotextiles evenly distribute the load and do not allow plants to grow. This is especially true if you are building a pond in the garden and there are shrubs or trees nearby.
Serious projects: brick and concrete
If you want to have a large pond in your country house, and you want to build it yourself, you will have to study the topic of building swimming pools. Firstly, the construction of the bowls repeats all the stages one by one. Even the forms are sometimes made stepped. True, the banks are not decorated with plants, and they are not planted in the pool itself... But the construction process itself, with reinforcement, plaster, and waterproofing is the same. Moreover, the water supply and water treatment system is also similar. Except that they are not used in ponds. chemical methods cleaning, but filters, screamers and ultraviolet light can be used.
In general, a large pond is not a cheap pleasure. Moreover, it requires expenses not only for construction, but also for maintaining a large reservoir in in good condition: Filters need to be cleaned regularly and cartridges or media replaced. But of course the pleasure is great...
Not the largest pond, but it required 10 bags of cement, 30 bags of sand (20 coarse and 10 fine), a hydrophobic additive - 5 bags to make the concrete water-repellent. Plastered on a mesh fixed in the ground
Pond Plants
When shaping or choosing a bowl, consider not only its shape and depth. If you want plants to grow in your pond, a marshy riparian area is necessary. If you form a pond using film, you can make a profile approximately like the one in the picture.

It is more convenient to do this if you fill the pit with a layer of sand at least 15 cm thick. With its help you can make the relief the way you like. To make the work easier and the film not torn, lay geotextiles on the sand. This thin membrane is very tear-resistant. You can do whatever you want without breaking it. Having formed the desired bottom topography with its help, you can line the film and lay stones on it, fill it with water and plant plants for the pond at different levels.
To ensure there is enough oxygen in the water, you can plant Canadian elodea, hornwort and swampweed. They are in the photo below. They are planted in water - these are aquatic plants.

(DOM magazine No. 9, 2010) we looked at the issues that need to be resolved when designing a pond: choosing a location, shape and size of the reservoir, methods of filling it, etc. Now we will focus on the main stages construction decorative pond with a bed made of polyvinyl chloride film.
Pit
After the pond design is ready, they begin digging a pit. In this case, they first dig out the deepest part of the pond, and then gradually select the sides, bringing the bed to the desired size and shape.
If the soil is loamy or clayey, then at the very bottom of the bottom it is advisable to make a vertical drainage hole using a drill and fill it with crushed stone or sand. The importance of this event will become clear when, in the midst of work, it suddenly rains heavily and water pours into the pit - through the drainage it goes into the ground. And subsequently, when pond will be built, groundwater will also flow into this drainage without putting pressure on the walls.
As in the manufacture of a pond from reinforced concrete, when using polyvinyl chloride (PVC) films for this purpose, you must first make a sand cushion at least 10 cm thick along the shore and 15 cm at the bottom. After backfilling, the sand is spilled and compacted. After this, geotextiles with a density of 300 g/m2 are laid on it. This material resembles felt in appearance, it stretches well and can withstand large point loads (in pond manufacturing instructions it is sometimes called “soft bedding material”).
Strips of geotextile are laid on the bed across the long axis with an overlap of 10-15 cm. Instead of “300” geotextile, several layers of “80” or “100” can be laid. However, it should be taken into account that the material of these brands has weak stretch and cannot withstand large point loads, therefore, when preparing a pit, all stones and roots should be removed from its walls and bottom, and the bedding sand should be sifted.
Transparent film for greenhouses and greenhouses is not used in the construction of ponds, since it loses its qualities after 3 years (but usually breaks earlier). The same can be said about reinforced film.
PVC film for a pond (like a rubber membrane) is used with a thickness of at least 0.8 mm. These materials are acid- and alkali-resistant, do not decompose under the influence of sunlight, high and low temperatures, and can withstand significant mechanical loads. They are produced in strips up to 15 m wide, which makes it possible to cover the pond bed in one piece. In addition, pieces of film are easy to glue together.
The dimensions of the film are determined after the sand cushion is made. The film should reach the shore approximately 0.5 m above the water level. Moreover, the very edge of the film should be bent upward, cut at a level of 2...3 cm above the soil surface and secured in this position with stones. Otherwise, water from the pond will be sucked into the soil surrounding the pond due to the force of surface tension.
Laying film and stones
The prepared piece of film, folded in half along the long axis, is placed on one side of the bed, after which the film is unfolded to the other side. The material is straightened so that it is pressed as much as possible to the ground. The upper parts of the film are pressed against the banks with stones.
If you plan to build swimming pond, then after laying the film, it can be filled with water. If they want to give a reservoir a natural look, its walls are lined with flagstone or boulders. It is believed that stones can be laid directly on the film, but it is better to protect it with geotextiles with a density of 80 or 100 g/m2 and then lay the stones on it.
The bottom can be made of stone or crushed stone. In the latter case, the laying of stones begins from the walls of the bed. But in general it is advisable to use crushed stone as decorative material, and not as a bottom filler, since due to the flowability of the film, it may not withstand the pressure groundwater and swell at the bottom of the pond.
When the slope of the underwater part of the coast is less than 30°, the stones are laid without fastening them to each other, but with ligation of the seams, filling the space between them with either clay or a mixture of clay with wet peat in a ratio of 3:1. If the shore is steeper, the stones should be secured with cement mortar. This is done this way: a row of stones is laid, after which the space between the film (geotextile) and the stones is filled with cement mortar, and the voids facing the inside of the pond are filled with clay. In one day, you should not lay more than 50 cm of stones in height, since if the cement mortar has not hardened, the masonry may slide down the slope of the bank.
Pumping equipment and decorative lighting
Any body of water looks more attractive when using various types of lighting and organizing the movement of water. Currently available for sale big choice surface and underwater lighting, pumps, fountains and pumps, often combined with filters. You just need to remember that all products that consume electricity must have appropriate markings allowing their use in the open air and in water. Electrical wiring must satisfy the same conditions.
When using electrical equipment, the question often arises: “Should I leave it for the winter?” The answer depends on the size of the pond. Lamps and pumps should be removed from freezing low-volume shallow water bodies. In non-freezing reservoirs (at a depth of more than 1.5 m), electrical equipment is left for the winter. However, if pumps and lamps are installed in the freezing zone (up to 0.6...1 m), they should be removed or buried. In addition, in the fall it is necessary to drain the water from above-water filters and pipes (hoses).
If the electrical equipment is planned to be removed when storing the pond for the winter, then when installing it, the wires are either left openly lying on the ground (black wires are not noticeable), or covered with stones, rubble, laid between plants, etc. If the electrical equipment is not removed, then it is more convenient to pass the wires and hoses and bring them ashore through special pipe, which is placed in advance on the pond bed and covered with stones. On the shore, the wires are hidden in a corrugated sleeve and buried to a depth of at least 10 cm.
Finally, in accordance with safety standards, any power-consuming equipment must be de-energized as quickly as possible in the event of breakdowns or malfunctions. That is, the switch, sockets, and, for some models, ballasts must be installed near the pond in a special electrical box.
Filling and decorating the pond
Usually 7-10 days after laying the last decorative stone on the cement mortar (in some recommendations when using high brands cement, a period of 3 days is indicated) produce the first pond filling. The water is kept for about 10 days, preferably with stirring. (To do this, it is enough to lower the pump into the pond, the hose from which is placed at the surface of the pond.) The task of the “first water” is to displace air from possible cavities between the lining stones and the film and press the film as much as possible to the pond bed, wash out alkaline substances from the frozen cement mortar(of course, not all of them, but if possible) and wash the backfill crushed stone. After removing the “first water,” they clean the bottom of the pond from dirt and debris, install pumps (pumps, fountains), install underwater lights, decorate or hide wires and hoses.
Aquatic and semi-aquatic plants are planted in previously prepared and soaked soil in niches on the slopes of the banks. The top soil is covered with crushed stone or pebbles. Plants can also be planted in mesh baskets with soil, which are installed either in niches or on the bottom of a reservoir and decorated with stones.
If the reservoir can be filled in a short time, then all the plants are planted at once. Otherwise, plants are planted as the pond fills.
It should be remembered that the pond will fulfill its decorative function, if it becomes an element of a whole complex consisting of the reservoir itself, plants, stone lining and embankments, as well as paths and garden structures - bridges, etc. Among the trees and shrubs near the pond, weeping forms of willow, birch, larch, small bushes of purple willow or oleaster, single plantings of juniper or mountain pine, dogwood, mackerel, hydrangea, mock orange, thickets of spirea, astilbe, kupena and so on look good - assortment suitable plants almost limitless.
Water cascade
Cascade, waterfall, cliff, rock, coastal rock garden, spring - the project of these decorative elements must be created at the pond design stage. All these “structures,” with the exception of perhaps a small coastal rock garden or spring, must be erected on their own foundations. Otherwise, a multi-ton mass of stone (and 1 m 3 of stone can weigh 2 tons) will simply slide into the pond and destroy its wall.
Therefore, first of all, you should determine the size of the cascade (or other structures), calculate its tonnage and determine the pressure on the ground. It is believed that at a pressure of 1 t per 1 m 2 the depth of monolithic foundation may be within 50 cm.
But it should be taken into account that when the soil freezes, such a foundation can be squeezed out or shifted to the side by heaving forces. Therefore, it is laid to the freezing depth, subject to the relevant requirements (laying sand cushion, filling the sinuses with non-heaving soil, waterproofing).
The height of the waterfall, the number of waterfalls in the cascade, the degree of overhang of the rock, the steepness of the cliff - all this is chosen according to your taste or based on the designer’s recommendations.
But there are a few purely construction tricks:
- all stone or masonry materials must not retain water, otherwise winter time it can tear apart the masonry;
- to ensure a uniform flow of water at the top of the waterfall, a “water intake tank” should be laid out of stone, into which water will be pumped. The drain stone is made of flagstone, the outer edge of which is set horizontally at a level, and the back part is slightly recessed;
- so that the water in the “water intake tank” does not remain for the winter, you need to make a drainage hole in its lower part that can be closed in the summer;
- when a waterfall falls, it usually forms a large number of splashes, which over time can wash away the waterfall wall and foundation. To avoid this, the wall is protected with a film or membrane, which is decorated with stones;
- when constructing a cascade, it is advisable to create a lower “reception tank” and move the drain stone forward so that the water does not fall directly onto the wall of the pond.
Of course, a waterfall or a rock, a cascade or a spring will look lonely and uninhabited if they are not decorated with plants. Near these structures you can plant all plants suitable for rock gardens and rockeries. In addition, such “non-mountainous” plants as ferns, whiteflies, irises, callas, kupena, etc. will feel great under splashes of water.
It should be borne in mind that all stone elements greatly cool the soil in the fall and do not allow plants to properly prepare for winter. Therefore, plants should not be planted directly into the rock mass. It is necessary to ensure reliable thermal insulation of the soil and, consequently, plant roots from the stone mass.
S. Batov, magazine "Home" No. 10/2010
Read on topic "Pond in the garden":
- Construction of a pond and garden reservoir. Useful tips. >>>
- Construction of a pond with waterproofing from concrete and rigid forms. >>>
- Construction of a pond with flexible waterproofing. >>>
-