DIY tire ottoman. Ottoman table made from car tires
Not only a country house and country cottage area, but also a garage or garden gazebo. Decorate garden gazebo possible with various interior items. It's fun to decorate your garage with items you make yourself.
Necessary tools for creating a tire ottoman: Drill, plywood, glue and varnish, scissors, brush, rope.
These items will become truly original and exclusive solutions for arranging a garage or gazebo. You can use all your imagination and imagination to create them. creative ideas. One of these items can be an ottoman made from a tire. You can make it yourself, then the design will turn out original and stylish. Below are 2 methods self-made of this product.
Materials and tools:
- used car tire;
- twine;
- plywood;
- self-tapping screws;
- glue gun;
Step-by-step execution of work

Sequence of making an ottoman.
How to make a pouf with your own hands? A used car tire can be used to make this item. You need to take twine, any other type of rope or small rope. It is necessary to cut 2 circles from plywood according to the size of the tire.
Then place plywood on top and bottom of the tire surface. Then secure the plywood sheets to the tire using self-tapping screws. Further using glue gun string is glued to a sheet of plywood.
In this case, the work must be done sequentially, pressing each turn against the turn and rotating in a circle, starting from the center, using the snail principle.
In the same way, they continue to lay the twine further, gradually moving to the end of the tire and gluing it until the entire tire is covered.
To make an ottoman, it is best to use hemp rope. It looks attractive, is not afraid of the sun, and is environmentally friendly. After gluing to the tire, you can coat the rope with varnish.
This will protect the ottoman from moisture and adverse weather influences. This way you can get great design solution. The design of the ottoman is beautiful and economical. The ottoman can be placed in the garage, gazebo or veranda.
Second manufacturing method

It is not necessary to cover the outside of the ottoman - just place an old pillow inside.
Materials and tools:
- used car tires;
- foam;
- dense fabric or mesh;
- finishing fabric;
- fringe, lace;
- strong threads, needles;
- sewing machine;
- self-tapping screws
We make an ottoman with our own hands. First you need to prepare the tires. If the tires were previously used for a car, you must first wash them with water, using a brush and washing powder remove remaining dust and clay.
Nadi make an ottoman that has the height of a regular stool. To do this, you need to put 2 tires (one on top of the other) and connect them using electrical tape.
You can screw the tires to one another using self-tapping screws along their inner surface. The wheels must be firmly connected to each other, thus creating a fairly strong frame for the product.
We perform a seat. It is necessary to measure the diameter of the tire hole and cut a circle of the same diameter from foam rubber. The sides of the frame of the future product must be lined with foam rubber, then the ottoman will become soft and have a streamlined shape.
To do this, you need to cut a rectangle out of foam rubber. One side of the rectangle is equal to the height of the product frame, the second side is equal to the circumference of the frame. You need to wrap the frame with foam rubber and sew its ends with strong thread.
Then cover the hole with foam rubber. To do this you first need durable fabric or sew up the upper and lower holes with a special mesh, then attach the foam rubber on top of it.
The final stage is creating the upholstery. For this, it is better to use thick furniture fabric. Cut a rectangle from this fabric. Its short side is equal to the height of the ottoman walls plus a turning width of 10 cm on each side.
The long side of the ottoman is outer diameter wheels plus one cm per line. Sew the 2 short sides of the fabric upholstery and stretch it over the wheels. It is better to do the line on sewing machine. It is better to make a double seam.
The frame of the product is covered with fabric. Now you need to finish and fasten the upper and lower parts of the model together. Using strong thread and a needle, we fasten the structure along the inside of the wheels. To do this, thread the thread from the top edge, then pull it inside and pull it out from the bottom edge.
The fabric is stretched. After complete stitching, you can put a soft pad on top. The decoration can be complemented with fringe, applique, embroidery, and lace. When creating a model design, use all your imagination and creativity.
Necessary materials for making an ottoman:
3 tires per 1 stool;
- epoxy resin;
- foam rubber;
- 9 mm plywood or the lid of a 5 liter paint bucket;
- leather/synthetic leather;
- heavy-duty stapler gun.

Making an ottoman
GluingFirst of all, you need to wash your tires well to remove all dirt. Now apply glue to the highest point where the tires will touch. Place the tires on top of each other. Adjust the height yourself. In this instruction, 1 stool was made from 3 tires. Wait a day for the glue to dry.

Making a cover
Measure the height and diameter of the tire. Add 2-3 cm to the results obtained for the seams. Cut out a rectangle.
Cut a circle smaller than the diameter of the tire for the bottom cover.
Wrap the tires in a rectangle of fabric, wrong side up. Secure the pipe shape with pins. The shape should be a little tight. Now slowly remove the pipe and stitch it. Fold the resulting piece in half its width and make marks as shown in the photo. Thus, the pipe was divided into 4 equal parts.
Now fold the circle in half and make marks. The circle is also divided into 4 equal parts.
Connect the pipe and the circle at the marks. Distribute the fabric evenly and pin the pieces together. Sew the circle to the pipe.
Unscrew the resulting cylinder and place it on the tires. Then you need to stretch the fabric tightly and staple it to the rubber, as shown in the photo.


Lid
Measure the tire diameter and reduce the measurement by 40mm. Take 9 mm plywood and cut a circle out of it with the resulting diameter.
Now place the foam on top of the plywood circle, and circle the circle 25mm larger.
Then you need to cut a circle of fabric even larger than the foam rubber by 25 mm.
All that remains is to connect all the parts of the lid with a stapler, and then glue the lid to the base of the stool.


 \
\


Storage box
The stool can also be modified to hold items.
1. Place a wooden disc on the tire. Mark the locations where the bolt holes should be. Remove the lid and make holes. They should be slightly larger than the diameter of the bolt, because... rubber has the ability to compress.
2. Apply glue to the cover, screw the bolts into the holes in the plywood and tighten the nut. Now apply glue to the foam and cover everything with a cloth. Remember that the foam should be slightly larger than the plywood, and the fabric even larger than the foam.
Fasten the fabric to the plywood using a stapler.
3. The tire cover is made using the same pattern as shown above.
Now you need to make holes in the fabric in places where there were already holes in the tire. To do this, you need to pull the fabric towards you and punch holes through the fabric into the tire. Insert the bolt and nut into the resulting holes, and secure the staple fabric with inside tires Remove the bolt.
The tire stool with storage space is ready!
In the interior - something useful, beautiful and functional. It makes it much more convenient to put on shoes when leaving the apartment, it can be used as an additional seat, children can jump and play on it.
Ottomans are also often used as decorative elements . They are distinguished by bright colors, interesting shapes and a variety of designs. Making a pouf out of tires with your own hands is quite possible even for a beginner - the main thing is not to be afraid and to show creative ingenuity!
Handmade furniture always looks original and aesthetically pleasing. She is able to fill the house with a special atmosphere of warmth and comfort. The main advantages of making your own ottoman from old tires include:
This ottoman will be comfortable and comfortable to sit on.. Since the tires themselves are different:
- firmness and elasticity;
- resistance to mechanical damage;
- ability to withstand heavy loads.
Important: the only drawback of car tires is that when heated, they emit harmful substances. But for home furniture, this does not matter, since the ottomans will not heat up in the sun.
Master class on making
There are several different options making ottomans from tires.
Without side trim
Using this pattern, a low pouf is made from one tire. If you want to make the product taller, you need to connect two tires together. To make such a piece of furniture you will need the following tools:

The materials you will need to prepare are:
- two tires;
- foam;
- upholstery fabric;
- belt;
- plywood. It is better to take lumber with a thickness of at least 3-5 mm.
The process of manufacturing and assembling the product will look like this::

Concerning decorative finishing, then the tires can be painted in any color.
How to make it with twine?
To make it you will need the following tools:

The process of making a pouf from tires will be carried out in the following sequence:

The final touch is to coat the twine with colorless varnish.
Advice: varnish is applied to the product only after the glue has completely hardened. It is better to apply the varnish in two or three layers. This will make the process of using and maintaining the furniture easier.
This option for making an ottoman from tires will look great in eco-style rooms..
Soft
This option for making a pouf is simple and convenient. To make it you will need:

The pouf is made as follows::
- We take two wheels and connect them together with self-tapping screws.
- Two rectangles are cut out of foam rubber. Their size should be such that it is convenient for you to wrap the wheels with them. The edges of the foam are sewn together. This will make the frame of the product soft and comfortable to use.
- On top part Thick fabric is stretched over the product, and a pre-cut circle of foam rubber is placed on top. The top is lined with upholstery material.
- After that, we move on to decorating the sides. They are covered with fabric using strong thread.
You can decorate the product with lace or any other decorative elements..
Idea: To make a piece of furniture easily move around the room, you can make handles for it from an old belt. To do this, two loops are made from the belt and screwed on the sides with screws. You can also screw wheels to the bottom of a piece of furniture.
Photo
If you are not afraid to work with tires, you will get furniture that is stunning in beauty and functionality:


Useful video
The detailed process of making an ottoman with finishing can be seen in the following video:
Conclusion
In conclusion, it is worth noting that almost anyone can make an ottoman from old tires. This process is not difficult. As a result, you will get a stylish and practical piece of furniture that will harmoniously fit into any design and become its main decoration.
In contact with
The news portal “site” decided to devote this article to interior decoration. We bring to your attention a stylish and fashionable piece of furniture – a tire ottoman. You can easily make such a beautiful and comfortable piece of home furniture with your own hands! Yes, yes, just imagine, you don’t have to buy such beauty in stores designer furniture and pay incredibly large sums of money.
A ready-made ottoman made from a tire, made by yourself, will look great in country house, on the veranda, in the garden, in the gazebo, in a city apartment and even in a cafe or restaurant.
Well, now, let's figure out what materials you will need:
— old tire;
- thin rope or thick rope;
- hot glue gun;
- a piece of plywood;
- bright furniture fabric;
— synthetic winterizer or foam rubber;
- furniture glue;
- furniture stapler;
- scissors;
- four large buttons.
Manufacturing:
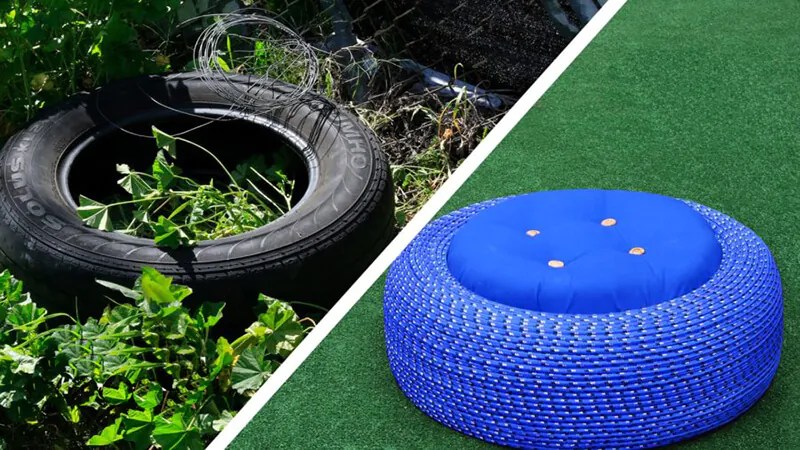
The tire must be thoroughly washed and dried. Then wrap it with a thin rope or thick rope, fixing it with glue.
Then cut a circle from a piece of plywood, the diameter of which will be slightly larger than the diameter of the hole in the tire. Place the cut plywood in the center of the tire, securing it with glue. This will be the bottom of the ottoman.
Now we cut out another circle from another sheet of plywood. We glue foam rubber to it, and then wrap it in beautiful furniture fabric, which we fasten using furniture stapler. This will be the seat of the ottoman.
We decorate the ottoman with four large buttons.
A detailed master class on making an ottoman from a tire can be seen in this video.
A do-it-yourself tire ottoman for the hallway is an interesting and useful craft. Choosing the right one color scheme and decor, you can quickly and without special costs decorate the apartment.
Tools and materials
A stylish, simple and comfortable pouf is made from tires wrapped in thick textured rope. The manufacturing process is simple, and by varying the shades, you can achieve a wide variety of styles.
To work you will need:
- old car tires;
- plywood;
- rope or hemp rope;
- self-tapping screws;
- pencil;
- roulette;
- hacksaw;
- screwdriver;
- glue gun;
- furniture varnish.
To make the ottoman taller, use two or three tires.
Manufacturing instructions
The process of making an ottoman is simple, even a beginner can handle it:
- Lay the tire on the floor and measure its diameter. Make markings on a sheet of plywood and cut out 2 identical circles.
- Place a circle on the tire and attach it with self-tapping screws, screwing them along the edge. Turn the product over and secure the second circle in the same way.
- Glue the end of a rope or thin rope to the bottom plywood circle with a gun.
- Start wrapping the blank for the ottoman. The coils are laid tightly, but without overlap, in a spiral, from bottom to top. Each row is secured with a few drops of glue.
- After finishing the work, cover the pouf with a layer of furniture varnish - this will protect the product from moisture and dirt.
- If desired, the pouf can be placed on legs. Finished parts fastened at the bottom with self-tapping screws or liquid nails.
The ottoman can be made with a removable top, then you can put some things inside.
Decor ideas
The appearance of the pouf depends on the design of the hallway and the entire apartment. For example, for a room decorated in eco-style, ottomans wrapped with hemp rope or twine in beige or grayish colors are suitable. Those who prefer a brighter color scheme should paint the pouf with a quick-drying acrylic paint or use tinted ropes. A dark hallway will be refreshed by shades of turquoise, strawberry, and lemon. Burgundy, purple, emerald green and deep blue poufs look stylish.
From car tires you can make a soft pouf by putting a fabric cover on a rubber base and placing it in the hole round pillow. Such a product should be decorated with a frill or fringe; it will fit perfectly into a romantic or classic interior. It is better to use plain, dense fabrics with an interesting texture: tapestry, plush, velor, faux velvet or synthetic fur.
Homemade poufs made from tires are not only attractive, but also quite comfortable. Using this technique you can also make funny tables that will be useful on the veranda, balcony and even in the living room.