How to make butterflies for wall decoration. Making a butterfly panel with your own hands
There is no doubt that many would like to transform or slightly refresh their home. Often, the transformation consists of carrying out repairs, at least cosmetic ones. A creative approach and a little creativity will help you modify a room (apartment) without much difficulty and substantial financial investments. It is enough to take advantage of such a magnificent decor option as ceiling and/or wall panels. Not the last in this series of decorative solutions will be a relatively simple and financially attractive way of decorating - DIY butterflies on the wall.
What is it - “do-it-yourself butterfly decoration on the wall”?
This type of decor is one of the varieties of appliqués, or, more accurately, a panel of figured butterflies, for the creation of which it is used a wide range of sheet materials. Elegant and light applications can be placed on all walls of the room or just one wall can be used for the composition. There are many ways to make and attach butterflies to the wall with your own hands. It is the manufacturing technique you choose that will determine the final result and impression made by this hand-made decoration.
Imagine - a whirlwind of moths from the center of the wall different sizes and unprecedented colors are just going wild! Whirling in a round dance and fluttering their graceful wings, they are pleasing to the eye and undoubtedly attract the attention of one and all. Naturally, we are not talking about living butterflies or their mummies.
Video: DIY interior decoration with butterflies
To decorate the walls, butterflies of various designs, sizes and colors are used, cut from the selected material. A lot depends on the approach to the implementation of this truly enchanting spectacle. Butterflies made from rigid cardboard can be given all sorts of positions and shapes. They are more durable and do not lose appearance. Moth figures made of light fibrous paper or film, fixed only in the middle, tremblingly flap their lace wings from any, even the slightest movement of air. The impression from such a spectacle is much stronger.
Where to start making butterflies on the wall?
First, decide on the outline of the application. In the event that your own solutions seem less effective than you would like, you can always find a myriad of ready-made models of applied decor online. Next, you should decide on the shapes of the butterflies and their colors. Taking into account the individuality of the design of each home, it is important to choose the most suitable color range of the intended decoration, which should organically fit into the overall concept of the interior. At the same time, do not forget that each element (butterfly) should be bright and stand out on the wall. The shape of butterflies requires special consideration.
Of course, you can be content with the butterfly stickers you need purchased in special stock stores or on order. color range. We are talking exclusively about self-production decorative elements for future application. It is this principle that underlies the recommendations for beginning craftsmen. A sketch of future butterflies can be created using simple and affordable computer programs for drawing or adjusting images. According to the sketch, templates of various sizes are then made for cutting from the selected material. Are you good at drawing yourself? Great - make the templates by hand on tracing paper or plain paper. Do not try to add grace by increasing the number of bends and ruffles on the wings of the moths, if only because you will have to painstakingly cut it all out with scissors or a scalpel with a template.
Take the advice of practitioners - do not resort to strict symmetry of each individual element. There is no need for “mirror correct” wings here. It is better if they are slightly different in size from each other. This will add some volume and dynamism to the finished decoration with any mounting option on the surface.
You shouldn’t be too zealous with asymmetry either. Still, measure comes first.
The sketch has been created. We slowly move on step by step. We decide on the format of the decoration, the number and method of securing the butterflies. Now the selected butterfly template can be printed in different sizes for subsequent stencil making. It's not that difficult here - place the printout on a cardboard sheet and carefully cut out the internal fragments along the contour.
An excellent option for decorating walls with butterflies is origami. You don’t have to be sophisticated in artistic cutting. You just need to master the “assembly” of origami. It's easy and very entertaining. Numerous videos about master classes on creating all kinds of origami, which can easily be found on the Internet, will help here. Which means the problem is solved! Next, let's get acquainted with the features of distribution and fastening of our butterflies to the wall.
 butterflies on the wall - origami technique
 Compose a single drawing
As stated above, the shape of the future decor is selected by viewing options on the Internet or created by your own imagination. You can depict a scattering or a whirlwind of butterflies in places where they harmoniously emphasize the wallpaper pattern, decorative plaster or any other room wall material. From a small flock of butterflies you can create the illusion of them moving from one corner of the room to another. Distributed in small groups, accumulated in the shape of a flower or a heart, they will wonderfully decorate and refresh the atmosphere.
A “ripe” idea is initially fixed on paper, then transferred to the wall. Here you can use a pencil or chalk. Using thin strokes, draw the main directions in which the butterflies will be attached. Do not draw lines with pressure. They are almost impossible to remove, which will certainly spoil general form compositions and your mood.

Selecting the material
To cut out butterflies, you can use a wide range of materials: cardboard, paper, film, vinyl self-adhesive film, fabric. The listed materials have multiple advantages.
Paper butterflies on the wall
Butterflies are the easiest to cut out of paper and can be colored using any available means. Quantity consumables unlikely to matter given how cheap it is. You can use colored paper purchased at any store or department stationery. If you don’t want to arrange monochromatic butterflies, colorful glossy magazines (already read) are great. Moths cut out from printed pages can be arranged by color and used this technique to create a wall decoration. Paper decorative elements Easily attached to walls in any available way. Butterflies glued completely will not create a visual relief, while butterflies fixed at a distance will be able to “move” their wings from air vibrations.
Cardboard butterflies on the wall
Cardboard butterflies are many times more reliable and stronger. The complexity of cutting is compensated by the ability of cardboard to be molded. This material is easy to accept the required form and saves it long time. Parts of cardboard wings, and the entire wings, can not only be bent, but also formed into round shapes. It is worth moistening the cardboard blank a little and bending it with the help of a weight to the desired configuration. It should be remembered that cardboard is heavier than other materials, and therefore requires more reliable fastening.

Butterflies on the wall made of film
Thick polymer multi-colored film and special vinyl “self-adhesive” are ideal materials for wall decor. Butterflies made from glossy film delight not only with their shapes and colors, but also with their sparkle, brilliance and shimmer depending on the lighting in the room. Technically, the figures are made similarly to cardboard elements. Regular polyethylene film attaches to the wall surface exactly like paper. Self-adhesive film It won’t cause any trouble at all - remove the protective layer and glue the figurine to the chosen place on the wall. If you want the wings to move, remove the strip protective film in the center of the butterfly figurine.
Butterflies on a fabric wall
Fabric decorative elements go well with plain liquid wallpaper, draperies, visually and tactilely soft bases. Fabric butterflies have the same “warm image”, fitting perfectly into an existing design with a bright, colorful element.
It is better to completely “plant” fabric blanks on glue. With the help of little tricks you can create a relief picture. It is enough to use an aqueous solution of PVA glue or any soap. It is preferable to use a soap solution to treat especially thin fabrics. The technology is similar to that used to process cardboard blanks: fabric cut out from a template is soaked in a solution and allowed to dry in the desired shape.
We fix the decoration
You have prepared the required number of butterflies. You are looking forward to the finale. Let's decide on the option of fastening all the elements of the composition in their places.
Glue
Butterflies partially or completely “planted” on glue will adhere to the surface very firmly. PVA glue and trellis glue are equally applicable. It is important not to overdo the amount of glue - it should not protrude beyond the edges of the elements. This is a classic and extremely simple way to attach a butterfly wall decoration.
Pins
You can use a wide variety of pins. Decorative pins with heads made of pearl balls or small figured decorations are especially good. They will help add a little more charm to the overall idea. Pins as fasteners “work perfectly” on surfaces made of wood or plastic lining, cork or bamboo trellises, drywall. For walls covered with paper or non-woven wallpaper, you can also use pins, having first bent their tip at a right angle. The folded part goes under the wallpaper and secures the butterfly. The easiest way to glue pins to the figures themselves is with “Moment”, “Second” or similar glue.
Styrofoam pieces
A butterfly is glued to a small piece of this material. The dried “structure” is attached to the wall with its free side. This option has a drawback - loose foam breaks quickly, and it is quite difficult to remove its remains from the wall.
Pendant on threads
This mounting option is perfect for decorative elements made using the origami technique. With thin, colorless fishing line or threads, butterflies are suspended from a window cornice or directly from the ceiling. With the help of such fastening, you can create full-fledged spatial installations.
Without a doubt, such decoration of planes will require a lot of time and painstaking work. But a dream brought to reality is worthy of admiration. Any interior concept will benefit from a decorative man-made panel of butterflies. Find suitable model and start creating with passion...
Video: DIY butterflies on the wall, decor master class
If you don't have money right now new renovation, but you want to decorate your apartment, this can be done with the help of homemade panels, stencils or other accessories. In this article we will tell you how you can decorate your walls with your own hands, decorating them with butterflies, as in the photo. It won't take much time, but the effect will be very beautiful, it will look especially good in a bedroom or nursery.
This type of decor involves applying drawings to the walls. Stencils can be either drawn by hand or printed using special blanks and then cut out. In fact, there are many ways to decorate an interior using a stencil. Let's talk about the main options.
Thanks to lighting and loose mounting, a volume effect is created
It turns out especially beautiful if the butterflies are of different sizes and are not placed chaotically, but in the form of a pattern, or are used to zone a room. In the video you can see examples of the use of butterflies in the interior:
Let's start production
First of all, you need to decide on the form of the future application. If you are bad at drawing, it doesn’t matter – you can download and print ready-made examples stencils with butterflies. Of course, they also buy ready-made stickers, but we do everything ourselves, so even if you don’t have a printer, you can order a stencil print from a photo workshop. Well, if you -
If you are a born designer, you can easily draw butterflies on paper yourself.
Butterfly stencils (click to enlarge): 


Advice! If you need large drawings, you need to look for them in vector format, then after printing, stretched pixels will not be visible.
Then we’ll decide on the color – make monochromatic silhouettes, or paint them. If you choose too many colors to paint your wings, the result may turn out to be motley and disappoint you. Try to choose colors that match your interior, while the decorations should be contrasting so as not to blend into the background.
Manufacturing methods and materials
You can decorate walls from almost any available material. The most popular methods are:
- Paper. The most affordable way. You can print it out, decorate it yourself, and cut out any curls the easiest way. The main advantage is the low price of the material. The paper is easily attached to the wall in any way, and the wings of the butterflies move well from the air currents. If you get tired of decorating the walls with butterflies, you can easily remove it without regretting the time and money spent.
- Cardboard. Decorations cut from it will be many times stronger than paper ones. It is more difficult to cut out the curves, but the cardboard will be able to take the desired shape of the wings. If you wet it and put it under a press, then after drying the cardboard will retain this shape. Some butterflies with raised wings can be made this way.
- Self-adhesive film. You can find thick polyethylene or vinyl film in a variety of colors with a glossy finish.
Advice! To achieve the desired effect, you can combine various methods. Use decor of different colors and sizes, from different materials, mix with other pictures. For example, butterflies will look great in combination with flowers, dragonflies, birds, and grass.

- Textile. Perfect if you want to decorate curtains or walls with a soft finish.

- Tough. Original butterflies are made from tin. If you want to surprise your guests, make butterflies from this material. When cutting, be careful not to cut your fingers. If you have small children, place the butterflies out of their reach.

- Wallpaper. If you are sure that such a pattern will not get boring, then you can purchase wallpaper with butterflies for the walls. This option is perfect for the corridor, hallway, kitchen, nursery, bedroom. If you decide to use this method, read our article about.
- Dye. Having made a stencil, you can easily paint the design on the wall. The disadvantage is that you will only get a monotonous silhouette.

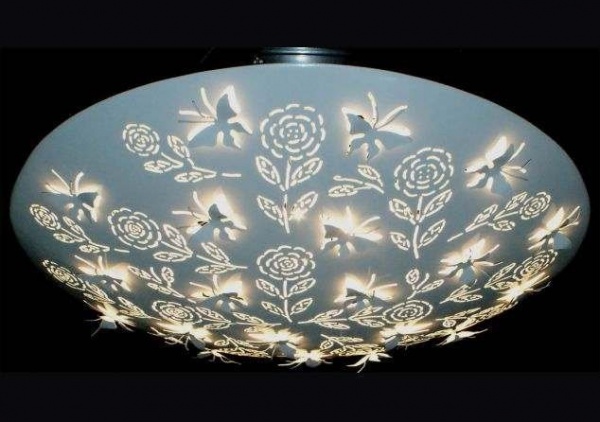
- A chandelier with butterflies is also a good option, which looks very impressive due to the lighting. You can make it yourself from a lampshade from an old lamp. First, paint it in a suitable color, and then glue the butterflies, which can be painted acrylic paints, add LEDs and rhinestones to them. Thin chains and wire decorated with beads are also used for fastening.
- Origami butterflies. In this case, you do not need to cut out paper, but you need to be able to assemble origami. It's not very difficult, the main thing is to do one thing, and the rest will go automatically. The main advantage of this option is that you can make a three-dimensional composition.

How to decorate walls with glowing butterflies
To decorate walls with glowing butterflies you will need stencils, luminescent paint (several colors), brushes and glue. After securing the stencils to the wall with glue, apply paint. We wait for it to dry completely, remove the stencils, turn off the light and admire the glowing butterflies! 
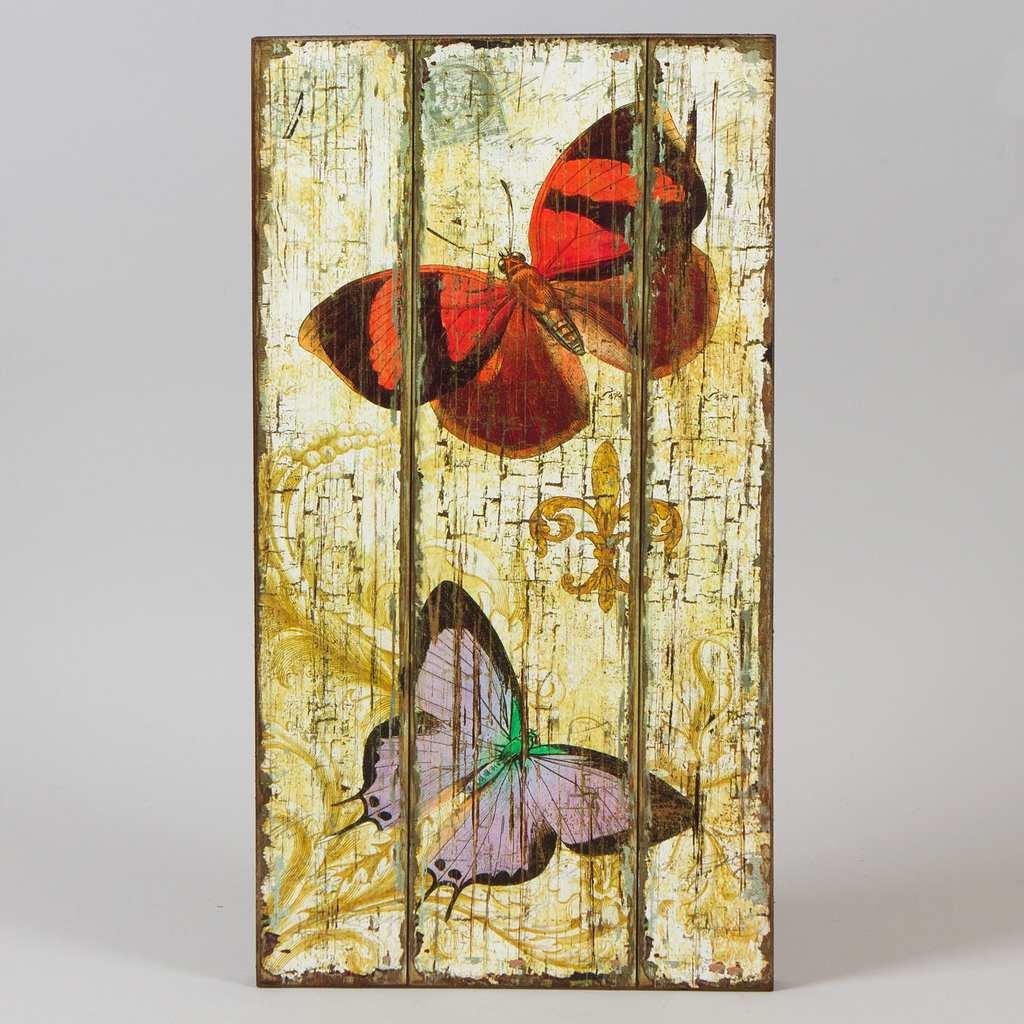
Butterfly decoration in the form of a painting
If you are hesitant to glue or paint butterflies on the walls, ideal solution will be placing butterflies in the form of a picture. Butterflies are cut out of any material convenient for you and hung on the wall in a frame. If the painting is under glass, dust will not settle on the butterflies and the fragile elements of the crafts will not be damaged. 
Forming a general composition

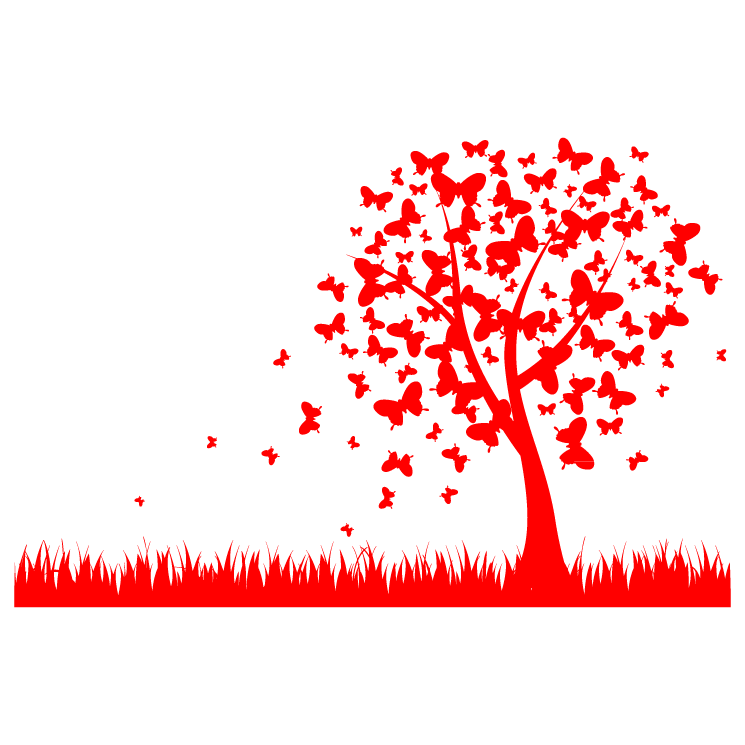
To obtain maximum effect, you need to pick optimal location butterflies on the wall. This can be done in many ways: in the form of a swirl, a heart, a flower, a tree, at the head of the bed, or randomly in suitable places. To accurately repeat the desired contour, first make a barely noticeable marking on the wall with a pencil, which you can then erase.
Attaching the decoration

To securely secure the decoration elements, you can use one of the methods.
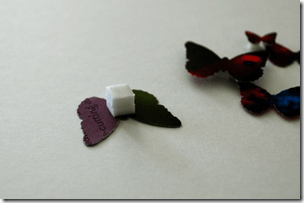
- Glue using regular PVA or wallpaper glue. It is important not to let it stain the front part. The easiest and most affordable way. To make the wings flutter from the air, glue the butterflies to a small piece of foam.
- Pin fastening is suitable for fixing on plastic panels, wallpaper and fabric. Once removed, the pins will leave almost no trace.
- Hang on threads, chains, wire. This method is best used for mounting on a ceiling or chandelier.
- Attach with double-sided tape.
Summarize
As you can see, butterflies on the wall can become excellent decor, which will add romance and spring mood to the house. This way you can pleasantly surprise your other half while enjoying the process. Choose the most best option for yourself, and start making!
Today there are many options for decorating a living space. And if the decor is created according to all the rules and with soul, then the entire interior takes on a harmonious, holistic and complete appearance.
Popular elements modern decor are considered butterflies. And this is understandable, because they, being symbols of summer, lightness and beauty, create a festive and at the same time cozy atmosphere in the room. In addition, creating decorative elements in the form of butterflies is not at all difficult and does not require a lot of money.
Butterflies in residential premises for various purposes
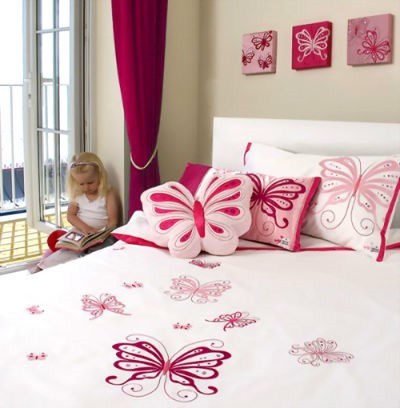
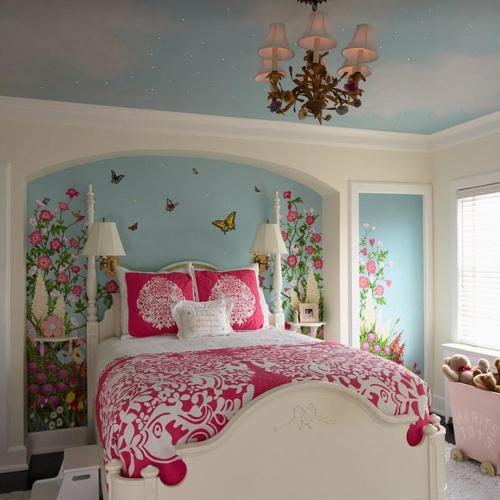
Children's room
Decorative butterflies will look great in a girl’s nursery. Multi-colored beauties surrounding the little princess will contribute to the development of her imagination, and will also relieve her of negative emotions and impressions. They can be located on a wall panel, bed linen, or ceiling. They can be made in the form of drawings, stickers, paper applications and even made of plaster.
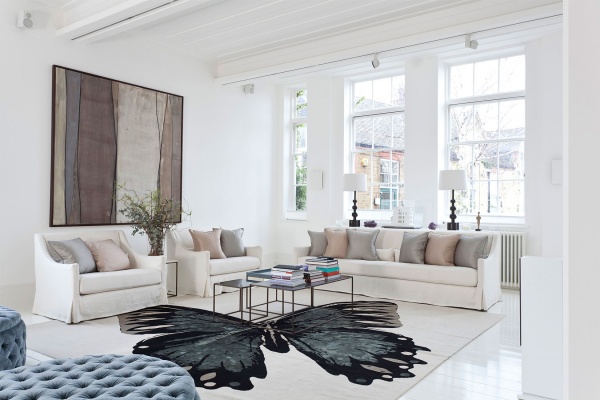
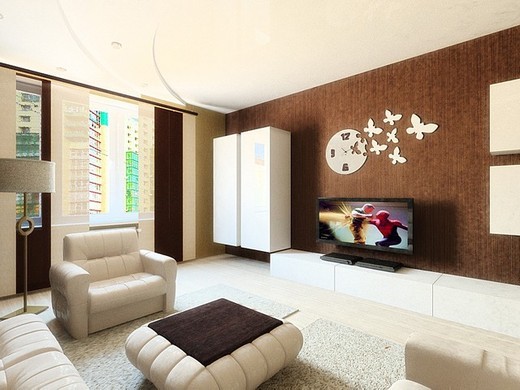
Living room
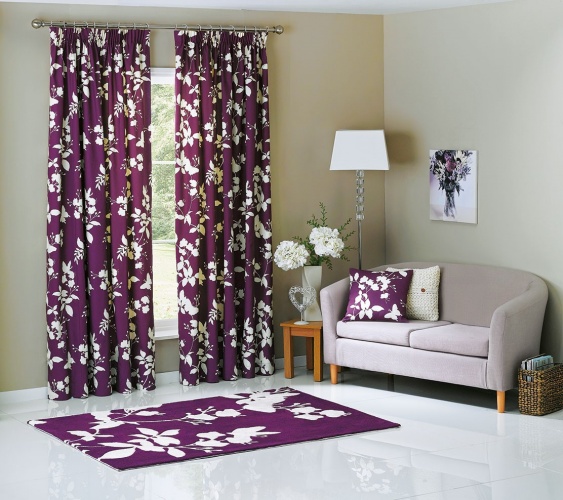
In this room a large number of butterflies will be unnecessary. Therefore, you should limit yourself to placing only a few elements with this type of decor here. So, you can buy a stylish floor carpet with the image of a large butterfly, or a cozy blanket decorated with them; these cute insects can also be depicted on curtains or walls. This decor will undoubtedly help create a warm and cozy atmosphere in this room.
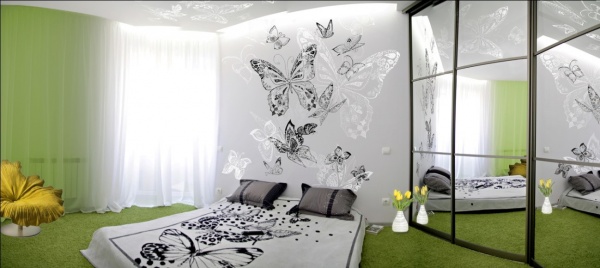
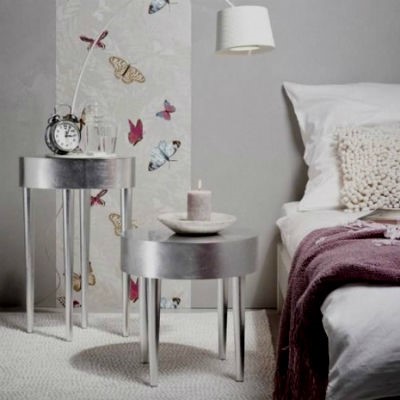
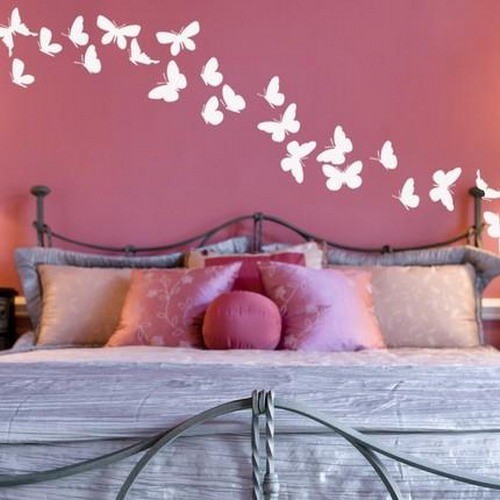
Bedroom
Images of butterflies in the bedroom will help get rid of autumn-winter depression. After all, when you fall asleep and wake up, you will always see these cute creatures, and a smile will involuntarily illuminate your face. In the bedroom, made in classic style, butterflies will look wonderful as images on the doors of a glass wardrobe, bed linen or wallpaper. Patterns of light wings at the head of the bed or their three-dimensional models made of vinyl films or cardboard look original.
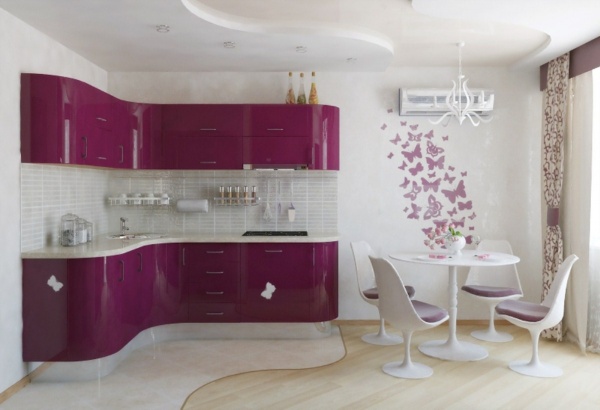
Kitchen
In the kitchen, butterflies look great on dishes or walls. If there big windows, then you can place stickers on them in the form of these fluttering insects or decorate the curtains with butterflies-clothespins. There are many original options decoration, for example, creating multi-colored butterflies from pasta, wine corks or tin cans.
Ways to decorate the interior with butterflies
Wallpaper
Probably the most primitive option would be to use wallpaper depicting these beautiful creatures. This wallpaper can be used to cover all walls. But a room in which the main surface of the walls will be monochromatic, and in several places strips of wallpaper with images of butterflies will be glued, or only one of the four walls will be completely covered with them, will look more interesting.
Stencils
You can draw butterflies on the wall using a stencil purchased at a specialty store or made by yourself. With its help, butterflies can get absolutely any color and position themselves the way you want. This decoration option is well suited for use in a children's room.

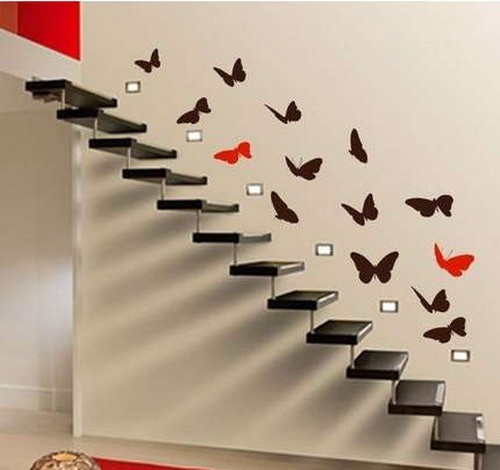
Stickers
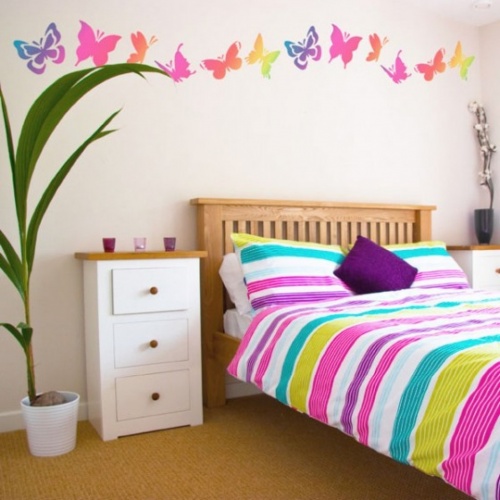
Butterflies are always associated with flight, so pasted in an ascending line above the bed or on the wall parallel to the stairs they will look not only very cute, but also harmonious.
Paintings
You can decorate the walls with paintings depicting winged beauties. You can find a huge variety of such paintings on store shelves. But it is much more interesting to create your own exclusive work of art.
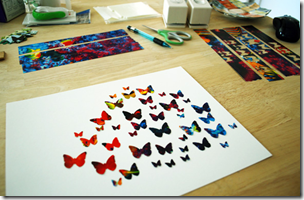
In order to create a three-dimensional picture with butterflies you will need:
- colorful magazine;
- stencils in the form of butterflies of different sizes;
- double sided tape;
- plain cardboard or thick paper;
- scissors;
- Frame.
First you need to cut the brightest pages from the magazine into strips.
Then, applying stencils to them, you need to cut out butterflies of different sizes. There can be any number of them, the main thing is that they all fit into the photo frame and do not overlap each other. Then we place the resulting products on the cardboard on which they will be attached, but do not glue them until a perfect composition is obtained. To make the product more harmonious, achieve a gradual color transition. When the composition is complete, you can proceed to gluing.
Each butterfly needs to be glued with a piece of tape. It is better to use adhesive tape with a foam base. If you only have flat tape, you can put foam rubber between two pieces of it.
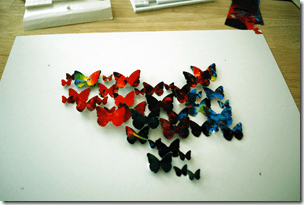
The completed product is placed in a frame. The picture is ready.
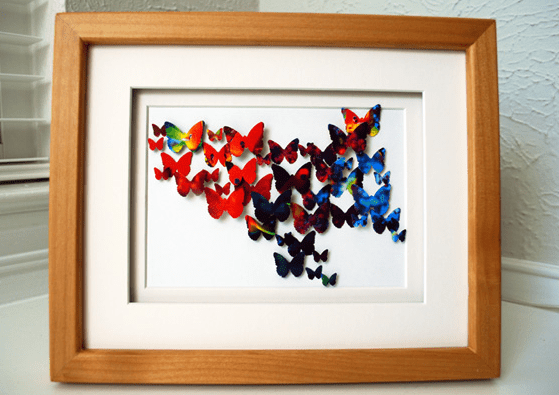
Advice ! Such a painting, made by yourself, can decorate not only your interior, but also become a wonderful gift for your friends.
Butterflies from improvised means
Butterflies for interior decoration can be created from seemingly unnecessary and useless things.
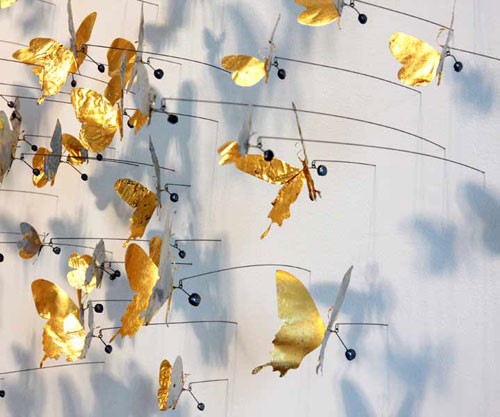
For example, you can cut them out of empty tin cans and attach them to the wall with thin wires to get a kind of mobile that will sway at the slightest movement of air, and the butterflies located on it will come to life.
Volumetric butterflies can be created from foam plastic. To do this, a design is applied to the foam plastic, then it is cut out, painted with acrylic paints and attached with tape to the wall or interior items.
You can even make something original out of burlap and wine corks. decorative panel with the image of these cute insects.

Decoration of interior items
Butterflies can be located not only on the walls of the room, but also on windows, furniture, chandeliers, household appliances and other interior items.
Butterflies attached to fabric lampshade, will look great both in a vintage style interior and in a minimalist or shabby chic style.
Butterflies can have any color, the main thing is that it is in harmony with the surrounding design.
Watches made in the shape of these fluttering creatures, or with their image on the dial, will teach you to appreciate time.

You can decorate a room not only with hanging butterflies. They can also be shown on sofa cushions, lampshade, even the carpet on the floor can be made in the shape of a butterfly.
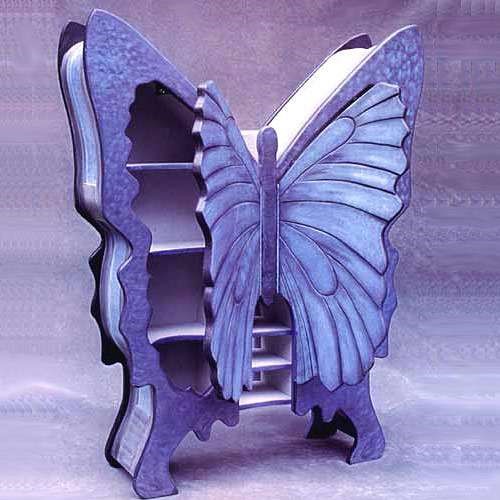
Furniture can also have the shape of the wings of this insect, for example, the head of a bed, table legs or hinged cabinet doors.
Butterflies can also live on the table: printed on the tabletop or table legs, in addition, they can be placed under the glass table top, which looks very original.

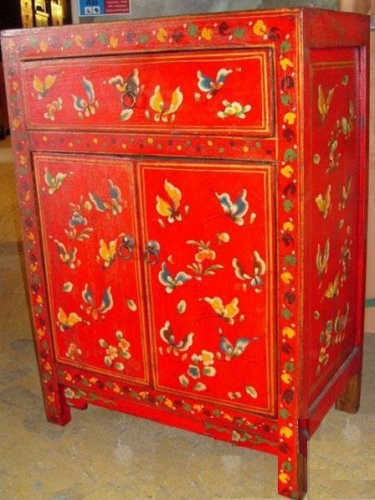
Of course, you will have to pay a lot of money for such an interior detail. But you can also save money by decorating furniture using the decoupage technique. For this you only need: a suitable theme, PVA glue, scissors, brushes and varnish.
Decorating the ceiling and windows
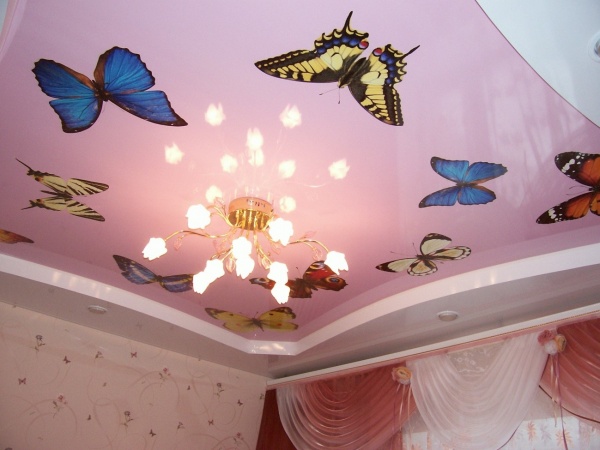
Butterflies on the ceiling can change the perception of the interior of a room. Their images can be made plain or colored, matte or glossy, alone or in the form of a whole swarm flying into the light emitted by a chandelier. To do this, you only need to acquire a fairly large stencil, and the larger its size, the more original the decor will look.
Using stencils, stickers or stained glass paints, you can depict an original composition on the windows. If this image is translucent, then the light from the street passing through it will create a special magical atmosphere in the room. Using this method, you can also decorate glass doors.
Interesting ideas for decorating the interior with butterflies are shown in the following video:
What Feng Shui says about butterflies
Many people associate these gentle creatures with carefreeness, well-being and, of course, sensuality. The Chinese, in general, call this beautiful insect a talisman of joy and say that where a butterfly lives, love lives. Therefore, lonely people who are in search of their soulmate simply need to decorate the interior with these cute creatures. And then, a romantic meeting will not keep you waiting, and the newly emerging feelings will quickly develop into true love. They will strengthen the already decorated butterflies family relationships. Try relaxing on pillows or bedding with their image and the result will surprise you.
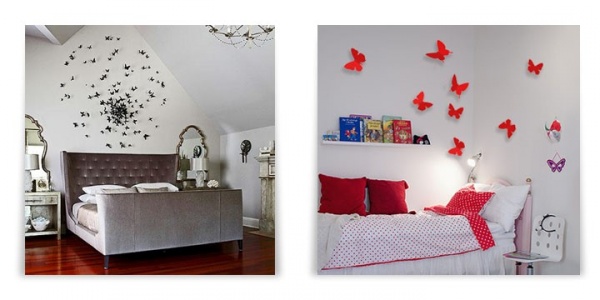
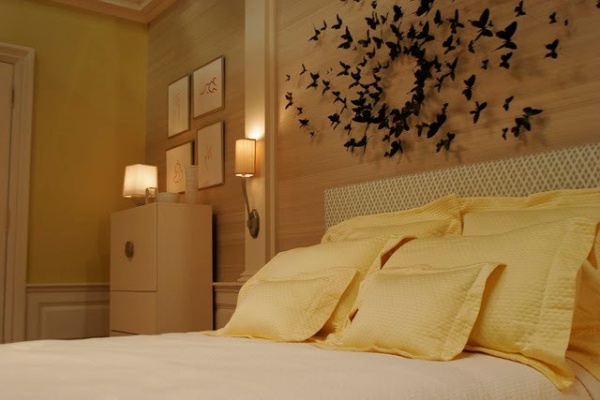
According to Feng Shui, butterflies should be placed in such a way that it looks as natural as possible. They should have a variety of sizes and be located randomly. They should not be lined up in rows or columns. A wonderful decor option that matches Feng Shui would be a panel located at the head of the bed.

Decoration rules
About the fact that butterflies have become popular and fashionable option decor is not worth mentioning. But, as with everything, you need to know when to stop, otherwise your home risks looking like a motley summer lawn, where only a cow with a bell will be missing.
Be careful with small details so as not to accidentally create the impression of many small bugs crawling around your apartment.
If you use bright decorative elements, then the walls should be plain and painted in discreet colors. This also applies to cases where the interior contains furniture with upholstery that has a pronounced pattern.
But if the furniture is plain and made in calm tones, then this, on the contrary, will emphasize the originality of the design of the walls, floor or ceiling.
As can be seen from the above, despite the fact that the technique of decorating the interior with butterflies is far from new, it does not lose its popularity. Butterflies can add lightness and individuality to an interior made in absolutely any style: from strict classicism to high-tech. Translucent beauties will help drive out melancholy and loneliness from the darkest room and fill it with warmth, light and joy. Place them in your apartment and you will see how your life will change for the better!
Nature is one of best places to find inspiration. Paper butterflies are one of the most popular shapes for interior decor because they are beautiful, delicate, bright and graceful, and are ideal for any interior decoration. There are many creative ways to make butterflies. Listed below are some of them that you can do yourself to decorate your home in your own unique style.
Whether you plan to decorate unique project yours workplace, decorating a child's room or simply creating cute details for the living room as a family, we invite you to consider unique design ideas. Be inspired by how colorful, airy and light the space of a kitchen-dining room, living room or hallway can become if it is complemented with such a creation. We'll show you detailed, illustrated, step-by-step instructions to create a variety of different, easy-to-make paper butterflies.
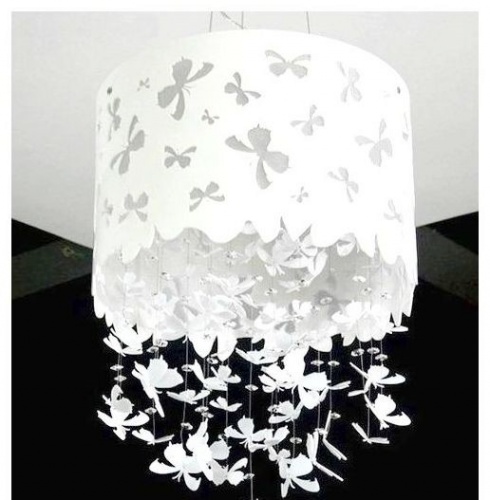
Butterfly chandeliers
 This nice handcrafted chandelier is perfect for any room, you can make it in suitable color and size. To work you will need:
- hoop;
- fishing line;
- paper;
- scissors;
- inspiration.
It will be much easier if you take a ready-made butterfly stencil for cutting out of paper in templates: 
Or use the origami technique: 
Instead of paper you can use plastic bottles: Using the template, cut out the shape and paint it with nail polish. You will get a realistic butterfly from a magical forest.

Wall decoration with butterflies
 Why spend money on expensive wall decor when it's so incredibly easy to make these beautiful butterfly decorations by hand? With a minimum amount of materials and plain paper, you can come up with exciting results.
To make these beautiful butterflies, you will need plenty of paper sheets, a butterfly stencil, a pencil to trace the outline, and scissors to cut out the shape. Pay attention to special soft versions of adhesive tape for walls, so as not to spoil the repair in case the decor needs to be removed in the future. Do this project with your kids - you can let them put up the finished pieces themselves to encourage their creativity.
Depending on what resources you have, you can use either ready-made cardboard (or thick paper) or regular White list with its further painting. Always use gouache or acrylic as paints - these two dyes give an intense color after drying. bright shade which will look especially attractive.
To get a matte finish, use gouache. For a glossy look, you'll need acrylic.
So, step by step guide:
- Prepare paper butterfly templates that you can print from this page or use your favorite butterfly shape.
- Cut out the outline and fold the shape in half, leaving the central part for fastening.
- Use soft tape or double-sided tape duct tape to mount free-form art on the wall.
Butterflies will give special atmosphere any part of the house, although this particular option will look most magical in the bedroom to let your imagination soar with them. 
In just a couple of hours, you can create several dozen ready-made figures - provided that the whole family is involved in the project. You can choose a monochrome pattern, using one color and creating some clever design with butterflies, or you can choose an unstructured collage - either way, you will be amazed at the results!
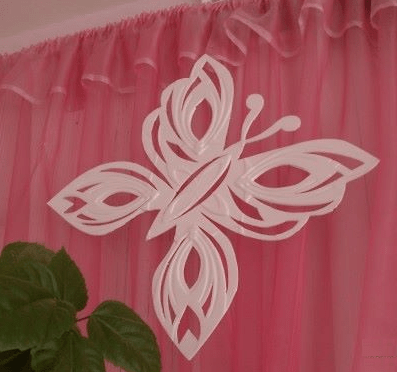
 The heart design pictured here is one of the favorites for the butterfly stencil, but you can also choose stars, flowers, or a favorite name.
Magic flying lantern
 Your kids will love this magical butterfly lantern idea. A lantern is a great way to create a cozy atmosphere and add depth and expression to a space, both indoors and out. In addition to providing illumination, it also helps delimit the space for a special mood. You can do this project with your children to game form experiment with shadows!
You will need:
- small glass jar capacity about liter;
- a piece of thin wire;
- scissors;
- paper;
- pencil;
- ruler;
- glue;
- a thread;
- candle-tablet;
- butterfly stencil.
Step by step guide:
- Draw silhouettes of butterflies on a piece of paper and cut them out.
- Wrap the paper around the jar and cut out the appropriate size, leaving about 1cm extra.
- Make a cylinder shape out of a piece of paper by gluing the edges, then glue the butterflies to it.
- Make a curved shape from the wire and attach one side of it to the neck of the jar, and hang the butterflies from the other side using a thread.
- Glue the butterfly cylinder to the jar.
- Place a candle at the bottom and your lantern is ready.
If you follow the instructions, your butterflies will dance!
When choosing a crafting jar and wire length, keep in mind that too close quarters hanging butterflies from a candle flame can cause them to ignite. If the paper is protected by glass on the sides, there will be no such protection on top, so make sure that they are on safe distance from fire.
Crepe paper cake decoration
 What could be more beautiful than colorful butterflies fluttering around your cake? The trick to these easy to make paper shaped butterflies is that the paper's texture lends itself perfectly to creating these butterflies.
 Necessary materials:
- crepe paper;
- bamboo skewers;
- multi-colored wire;
- scissors;
- acrylic paints;
- brushes;
- permanent markers;
- hot glue gun.
 Step 1: Cut out butterflies from crepe paper by folding the paper in half. Be careful to cut the crepe paper from the side and not from the top or bottom. The butterflies shown in the picture are made in size about 8 cm on each side, and the diameter of the circle is approximately 5 cm.
Step 2: Crumple the crepe paper in the center of the circle using a back and forth motion with your fingers.
Step 3: Secure the center of the butterfly with wire. Cut off the ends.
Step 4: Spread, fluff and smooth the top and bottom wings.
Step 5: Decorate the wings using acrylic paint and markers. Let dry.
Step 6: Hot glue the butterflies onto the skewers.
Step 7: Insert into cake and serve!

 This craft option can be used as a gift decoration and in interior design. Here are ideas for inspiration with ruffled butterflies in your home:

How to make a paper butterfly is as easy as shelling pears. Look at this option for a children's room: butterflies on clothespins. This decor can be made even with the smallest children: just cut out a simplified butterfly shape with your child from crepe paper, and then fasten it in the middle with a regular wooden clothespin. The clothespin can be painted with gouache as in the photo or in another way. Such butterflies are attached to the wall or furniture with ordinary double-sided tape.
Paper butterfly garland
 This cute paper accordion butterfly is the easiest option out there, and you most likely have all the materials you need to make it. So if you need to brighten up a space or throw a party, just make these butterflies.
 For each butterfly you will need:
- 2 sheets of 15x15cm double-sided colored paper. While double-sided color is best, use whatever you have or cut out squares from pretty gift wrap.
- Thread a thin wire 15 cm long into yarn, thin ribbon or rope.
How to do:

The garland is ready!
 Aren't they beautiful? They are very easy to make. you can use different colors paper to make colorful butterflies. Additionally, you can combine two colors to create one butterfly, making it unique. You can hang each paper butterfly individually to create a floating effect.
  Or combine them to make a beautiful and colorful garland. They are great for decorating a room, garden, and are also great for parties.
Paper butterflies for wall decor from cupcake baskets
 Here's a super cute idea on how to make it. beautiful butterfly from cupcake baskets and clothespins. It's super easy and perfect for a kids craft. You can use these butterflies as stand-alone decorations for your home or as an addition to other decorative elements - for example, for hanging on curtains.
You will need:
- plain white cupcake baskets;
- wooden clothespins;
- dye;
- shine;
- ink;
- rhinestones.
Start by creating some colorful butterfly clips.
For large butterflies use 4 baskets, for small ones - two. 
Fold them in half. 
Fold in half again to make a quarter. 
Then glue them together at the corners and in overlapping pairs as shown in the picture. 
You can add shape to the wings by trimming the edges. 
Add definition and texture with colored ink on the outer edges. 
Paint the clothespins with soft acrylic paints and sprinkle them with glitter. 
A piece of natural twine is perfect for antennae. 
Add a few drops of glue to the ends and dip them in glitter. 
Take dried clothespins, tendrils and some rhinestones to make the body of the butterfly. 
Be sure to glue the antennae to the top of the clothespin, as if you glue them from the back, they won't be visible under the clip. 
Glue a clothespin in the center between the wings. 
Instead of rhinestones, you can use a tiny ribbon flower in this place. 
All kinds of materials can be used for decoration. 

Make some baby butterflies using miniature clothespins and 2 mini baskets. 
You don't have to cut out the baskets, it looks fun too. 

Butterfly stencils
Having printable templates of any type is a big advantage for DIY enthusiasts. Home designers can save a good amount of time by having templates at arm's length. Just print them out and use them as you wish.
Create your own collection of elegant butterflies made from cardboard, fleece or plain paper, even in complex shapes of repeating patterns, using our butterfly cutting stencils in different sizes. Here we have a collection of amazing butterfly patterns that you can use in your projects.
Simple butterfly pattern

Beautiful butterfly pattern

Butterfly for cutting, template for printing


Butterfly wings pattern


Applique with butterfly

Butterfly patterns for coloring

Cute butterfly pattern

This butterfly outline is perfect for crafts at home.
Another butterfly pattern. 
This butterfly template displays a butterfly with its wings spread. She has heart shaped wings and a beautiful and mesmerizing design.
Pattern for dark butterfly
 The sketch of this dark butterfly template is good and nice even if it is not colored at all. It seems that the wings also have eyes that look directly at you.
Beautiful butterfly with stripes

Beautiful butterfly pattern

Simple dark butterfly pattern


Print out the butterfly template, color it and cut it out - and your idea for interior decoration is ready.
DIY origami butterflies - video
The beauty of the apartment is the most important thing, since it is the small various details that make it more attractive and cozy. A good option for decorating a living space would be a DIY butterfly panel. Butterflies are considered the most fashionable trend of the latest season, and regardless of the time of year, a panel of butterflies will look perfect.
Butterflies are called winged flowers and therefore they will be an excellent addition to any interior. A panel of butterflies on the wall adds airiness and lightness to the room, and also fills it with charm. And according to folk beliefs Moths, whether alive or artificial, can become a symbol of good luck, joy, love and luck. That is why it is far from surprising that on the walls of many houses you can see panels with paper butterflies and more.

Making a panel of butterflies with your own hands is not that difficult; once you start, it will immediately become clear that this is a simple and entertaining process.
For such work, you do not need professional skills or attending a meeting such as a master class, but just scissors, glue and the desire to create.
It is important to note that making such a panel will help not only to create a beautiful picture with your own hands, but also to have a pleasant emotional rest, since psychologists recommend just such a pastime to relieve stress.
The composition of butterflies is mainly made on plain walls. For example, you can place a family of butterflies on a plain decorated wall.
Flocks of butterflies can be located in different directions and groups, and such butterfly paintings as:
- Vortex;
- Heart;
- Spirals;
- Chaotic order.

If the background for placing butterflies is colored, then the butterflies themselves should be bright, but not in the same tone as the wallpaper, otherwise they will merge and will not be visible. Before work, you should definitely sketch out a sketch according to which it will be carried out, and to be more precise, on the wall itself, using chalk, you should make notes on the location of the butterflies, so that after making them you do not waste additional time on marking.
What material should you choose for a panel with butterflies?
A stencil for butterflies on the wall can be made from cardboard or plain paper, and it can be the remains of boxes or simply unnecessary materials left over from previous works. Thickened stationery film and fabric would also be a good option.
Ideas for making paper butterflies are the most optimal and simple, since it is easy to handle, so there will be no problems with such a process as cutting out templates, regardless of their shape and dimensions.

Also, paper stencils can be very easily given symmetry. Paper has another big advantage, and that is the availability of this material, since it is sold in many stores and at a fairly reasonable price.
It is important to remember that making stencils from cardboard will allow you to use them much longer than from paper, since it is denser and stronger:
- Cardboard perfectly retains its given shape, but cutting out a butterfly will require a lot of effort.
- The result of a long and labor-intensive process will be a strong, durable stencil from which you can cut out a huge number of butterflies for room decoration.
Quilling is a method of decorating a room that does not require stencils, because it is prepared directly on the panel without preliminary preparations.
Thickened film can be stronger and more attractive than cardboard; it is simple and easy to work with. A wide variety of butterflies are cut out of the film, regardless of their type, and they are attached using ordinary glue, and even a glue stick can be used for this.
In order to create a beautiful original picture or, in other words, a panel of butterflies, you should use a combination of glossy and matte films, and if you place them at a certain slope, then a 3D effect is quite possible.
If you purchase already prepared film stencils, then small squares of adhesive fabric are attached to them at the factory, and to decorate the wall with them you just need to remove the protective layer.

A moth system is sometimes created as one fluttering wing, but it all depends on exactly how the wings are curved, how the light falls on them, and even what shade they are. It would seem that such trifles, but they can become important point when decorating a room with your own hands. Some novice designers install butterflies so that they catch a draft in the room and thereby come to life, which delights everyone who watches it.
How to make a panel with paper butterflies (video)
How to attach butterfly panel ideas to walls
You can install ready-made stencils on the wall different ways, since it all depends on the personal preferences of the decorator. In particular, the pannoquilling butterfly is attached with glue, and for other types of decoration you can use pins and polystyrene foam. Glue is considered an ideal way to create panels on the wall, but it is important not to overdo the dosage so as not to spoil the look with the remains of material peeking out from under the base of the butterflies.
Pins can be used in cases where the canvas on which the panel is attached is made of soft material, since the mace will need to be pierced into the wall so deeply that the wind currents do not tear them out and carry them around the room, which may be far from safe.

Not many people know that you can decorate a wall with butterflies using foam plastic.
Fixation occurs by gluing pieces of polystyrene foam onto the moth, after which it is coated with back side and is applied to the wall. Thus, you can make the panel more voluminous than simply fixing it on the wallpaper. It is important to know that only lightweight structures can be fixed using foam plastic.
How to make a butterfly panel step by step
Before you start cutting out butterflies, you should choose a specific design, which will be an important component of the applique. To select, you need to carefully examine the wall on which the panel will be located, and also evaluate the scale of its location. Naturally, if the wall is wide, then you can make the most voluminous drawing, but in small rooms you should not overdo it with such decor, as it will put pressure on the psyche and is unlikely to help you relax.

After this, you should move on to developing the decor of the butterfly, choosing color and material.
It is worth remembering that this panel should become the brightest and most memorable spot on the wall, but it should not violate the overall harmony and atmosphere.
It all depends on the space, on nearby interior items, and also on how large the composition will be.
Creating a panel of butterflies (video)
The creation of templates or cutting out moths in another way should be done using a stationery knife. The shapes of the moths must remain symmetrical for the picture to be truly gorgeous. The last step is to attach the moths to the wall using the previously described methods.
Examples of butterfly panels (photo)