How to increase the efficiency of a potbelly stove without the help of a specialist and serious financial investments. Potbelly stove: device, application, varieties of homemade and factory-made, drawings Do-it-yourself potbelly stove made of metal drawings
Quite often situations occur when you need to heat a room well in a short time, for example a garage, a small warehouse or a repair shop, in order to perform certain work in comfortable conditions, without significant financial costs. To solve a similar problem perfect option- a small potbelly stove. How to cook a potbelly stove yourself? It's not difficult, you just need to have metal on hand, a set of tools and be smart.
As a consumable material for making an ordinary potbelly stove, you can use an old thick-walled barrel or concrete. But at the same time, the thickness of the metal wall of the product should not exceed eight millimeters, otherwise it will be quite difficult to heat it. As a result, low efficiency, loss of thermal energy, and higher fuel consumption.
Most the best option counts metal container, having a wall thickness of four millimeters. This design will have the highest heat transfer.
A potbelly stove is an oval, rectangular container that has a firebox with a door, an ash pan, and a chimney.
The most suitable material for a potbelly stove in a garage is cast iron or stainless steel. For a cast iron stove, you can use any fuel, but you must remember that it is enough brittle material who is afraid of sudden cooling.
Types of industrial potbelly stoves
- pyrolysis;
- oven with a hob;
- potbelly stove with a casing designed to increase heat transfer.
main feature homemade potbelly stove- use of any available material: metal boxes, barrels, cans, other old metal containers.
Furnaces may differ from each other:
- consumables: brick, steel, cast iron;
- fuel: liquid, solid;
- functionality: gas generator, heater, with a hob.
Work tool
To cook a potbelly stove in living conditions You need to have a certain set of tools on hand:
- welding unit, electrode wire, protective suit and mask;
- grinding machine (grinder), special wheels for cutting and grinding metal surfaces;
- For the manufacture of some elements you may need a gas cutter;
- drill with metal drills;
- metal brush;
- skimmer;
- hammer;
- pliers;
- chisel;
- measuring tape, meter, chalk.
Step-by-step instructions for making a potbelly stove
- All design details are marked on a metal sheet - these are 6 rectangular walls of the stove itself, one rectangle for the smoke deflector, grate plates, door latches.
- Next, the marked sheet must be cut. It is better to do this not yourself, but at a metal warehouse using a guillotine, then you will not have to additionally straighten the parts, as is the case with an angle grinder.
- The stove body is rectangular in shape. All sides should be 90 degrees apart.
- In order to avoid mistakes when welding the box, do everything correctly, initially the sides are grabbed together, then a control check is made to ensure the horizontal and vertical arrangement of the parts. If everything is fine, the seams are completely welded.
Important! All seams must be sealed, so they must be welded very well. And to check the tightness of connections, you can use kerosene and chalk.
- After graduation welding work the seams are cleaned with a metal brush.
- Three sections are formed inside the stove: firebox, ash pan, smoke chamber. The ash pan is separated from the firebox by a grate, for placement of which to the side and back wall Corners 5x5 cm are welded inside the potbelly stove at a distance of about 15 cm from the bottom.
- To make the grating, thick steel rods are taken, strips 3 cm wide. Steel rods with a diameter of 2 cm are used as stiffeners, to which steel strips (rods) are welded.
- Under the hot gas reflectors, two strong rods are welded to the inner walls of the stove from the top 15 cm down. Reflectors are made of a thick sheet of metal; they should not completely cover the oven.
- When all the internal elements of the stove are welded, you can weld the upper part of the box, after which you need to make a hole for the chimney.
- Lastly, the front part of the potbelly stove is welded.
- Doors are being installed.
Important! The doors must be fitted as tightly as possible to the stove body, for which they must be perfectly aligned and, if necessary, sanded with emery.
This DIY potbelly stove can be installed to heat both a workshop in a garage and a small country house.
The potbelly stove is a long-time human companion. The simplicity of the design, the ability to obtain heat in the shortest possible time and the low cost of the unit made this device very popular. Most designs of potbelly stoves are so simple that amateur craftsmen can make them without much difficulty.
Design features
The design is simple and consists of the following main elements: combustion chamber, chimney, ash pan, grate. There are many options for designing such a stove.
In general, this is metal constructions in the form of a parallelepiped or cylinder, which are installed on legs and equipped with doors and a chimney pipe. If the potbelly stove has frame device, then it is made from corners to which sheets of metal are attached. To store fuel, a grate is mounted at the base of the structure, under which an ash box is placed. The combustion process is controlled using special doors equipped with valves with holes.
Used as a chimney standard pipe, which is given the required shape. This device has two sections. One section is designed to remove combustion products, and the other plays the role of a heat exchanger. The first is located outside and removes smoke to the street, and the second is located inside the heating device.
The appearance of a potbelly stove is closely related to design features, since the body represents the front side of the unit. The first stoves of this type had a primitive and unattractive appearance.
Modern products are distinguished by their unique elegance and can be decorated using artistic casting, special overlays, heat-resistant coatings or colored glazes.
Stove in the interior
Advantages and disadvantages
Potbelly stoves have a wide range of models, each product of which has certain characteristics. In general, these devices have the following advantages:
- High speed of kindling. To achieve the required temperature regime indoors only takes a few minutes. In comparison, a brick oven must burn for several hours to achieve the same result.
- Satisfactory efficiency value. In some devices this value can reach 80%. Design improvements and the use of convective heat transfer make these units competitive.
- Uniform heat transfer. No matter where the stove is located in the room, it is capable of heating the entire surrounding space.
- Ability to operate on various types of fuel. Various models heating units and operating conditions determine the source of thermal energy. In addition to traditional firewood, sawdust and peat, potbelly stoves can be operated using waste oil or waste from the paint and varnish industry.
- Low manufacturing cost. Assembling a potbelly stove is simple, so the cost is significantly lower compared to a fireplace or masonry stove.
- Economical. The cost of servicing the units is relatively low. Especially when compared with electrical devices. An exhaust furnace provides 60% savings compared to electrical appliances.
- Multifunctionality. The stove can be used for cooking, heating water and acting as an exclusive element of the interior.
The general disadvantages of potbelly stoves include:
- Inability to retain heat for a long time. Such devices are capable of heating the room only during the period of fuel combustion. When the flame goes out, the oven immediately cools down.
- Constant need for fuel supply. The burning rate of the energy carrier is such that the interval between fillings is a maximum of three hours. Moreover, this applies to improved modern designs.
- The chimney is of considerable height. For normal operation The unit requires the creation of good draft, which is only possible with a chimney length of at least four meters.
- Constant maintenance of the chimney is required. The regularity of cleaning activities with a small pipe diameter is within a week. As it increases, this interval increases to six to eight weeks.
It should be noted that the low cost of potbelly stoves compensates for the entire complex of the described shortcomings.
Types of potbelly stoves
To make a potbelly stove, a material with heat-resistant properties is required. These include steel and cast iron. Cast iron structures have a longer service life, since the characteristics of the alloy allow them to work at high temperatures without deformation and rapid wear. When creating a thick-walled cast iron body, it becomes possible to retain heat quite long time.
 Potbelly stove
 In addition to primitive designs, there are a number of devices that differ in their functionality:
- Equipped with a hob designed for cooking food and heating water. The design does not exclude the possibility of installing an oven.
- Devices equipped with a casing located along the body area. It is made of metal or ceramics. This design features improved heat transfer. This becomes possible due to the suction of heated air into the space of the casing, while it heats up and evenly transmits thermal energy into a heated room.
- Potbelly stoves of gas generator type. They have two chambers in which combustion occurs. The lower one is intended for fuel gasification, and the upper one is for afterburning gaseous substances.
- Small-sized devices. As a rule, such stoves are used as an emergency heat source.
Making a potbelly stove from metal
The shape of such heating devices can be round or rectangular. When making a potbelly stove yourself, it is recommended to use available materials to construct the body, which will greatly simplify the work and reduce the cost of purchasing materials.
Potbelly stove made from a milk can
In addition to the old can itself, you will need metal rods with a diameter of no more than 6 mm, a hammer and chisel, as well as a chimney pipe.
To create a blower, a rectangular window is cut out, which is located below the neck of the container. The edges of the rectangular hole must be processed with a file.
Using a chisel and hammer, a hole is made for installing the chimney. Its installation implies the tightest possible fit of the parts to be connected.
The grate is created from wire, which is bent in the form of a snake. Its design should ensure easy installation in the neck. After installing the grate inside the can, it should be leveled.
To increase the stability of the structure, it is advisable to build a stand using steel pipes.
To regulate the intensity of fuel combustion, a damper is provided as a blower. After installing the potbelly stove in a designated place, the chimney is connected.
Potbelly stove from a pipe
To make a potbelly stove, a piece of pipe is often used large diameter or old barrel. To create a grate, wire is used, which is fixed by welding inside the housing. Below it is a hole that will serve as a blower, and above it is a firebox window. Doors are hung on them. In the upper part of the body there is a hole necessary for installing the chimney. Its diameter must correspond to the size of the pipe so that no gaps arise when welding these parts. This design of the heating device is capable of short term warm up the room, and can also be used for cooking.
 From such a pipe it may well turn out to be a potbelly stove.
 Potbelly stove from an old gas cylinder
The cylinder, which acts as a body, can be positioned vertically or horizontally.
The vertical arrangement of the device will save space when installing it indoors.
The sequence of operations when assembling such a unit occurs as follows.
The locations of the ash pan and combustion chamber are marked and rectangular holes are cut out using a grinder. To close these openings, doors are made, which are equipped with hinges and locks in the form of a latch.
To make it more convenient to continue work, the legs are welded and the workpiece rests on them.
To make the grate, fittings are used, which are mounted inside the housing in holes that are drilled in advance. You can provide for fastening differently, and mount shelves from corners.
The top of the cylinder is cut off, and a hole is created into which the chimney is mounted. A pipe is welded into the hole and a pipe is inserted.
Finally, the ashpit and firebox are closed with doors, which are hung and glued with an asbestos cord.
After removing all irregularities and burrs on the front side of the stove, it is painted with a heat-resistant coating.
 Potbelly stove made from scrap material
 The manufacturing process of a rectangular potbelly stove is carried out similarly to the technology described above. The difference lies in the need to create a frame for mounting the steel sheets.
Making a potbelly stove during mining
Assembly technology
The design of the potbelly stove has two parts. When assembling the device top part installed on the bottom as tightly as possible. Then the chimney is installed. It is carried out at a certain angle inside the room and goes outside vertically to a height of at least four meters.
The lower part of the furnace is assembled by welding. The result should be a sealed seam that will prevent fuel leakage.
The top part and the cover are connected to each other using rivets. Its function is to regulate the supply of air and fuel.
During operation of the unit, the upper surface heats up to high temperatures, so it is advisable to use it when preparing food and heating water. By installing a fan, you can increase the rate of heat transfer, which will increase the performance of the furnace.
Due to the fact that the upper surface of the heating device is constantly exposed to high temperatures, its service life does not exceed more than one year. To increase the service life, it is recommended to use a sheet with a thickness of at least 3 mm for this part of the stove.
 Potbelly stove - the simplest stove
 How to use a potbelly stove
Fuel is poured into the stove through the filler neck. In this case, the container is not completely filled, since space is required to add kindling material. The ignition process must be carried out in compliance with safety measures. The normal combustion process of a potbelly stove during mining is accompanied by a hum of low intensity.
Fire hazard of a potbelly stove
A potbelly stove during testing is characterized by increased level fire danger. In order to prevent the occurrence of ignition, it is necessary to keep the area near the heating device clean. The placement of flammable items is also not allowed. Be careful not to allow water to enter the fuel container.
A prerequisite when organizing the room in which the stove is installed is the creation of good ventilation to prevent the accumulation of carbon monoxide.
It is strictly prohibited to refuel a running unit. You definitely need to wait for its temperature to drop.
Compact heating stove small room, popularly known simply as a potbelly stove, will soon celebrate its 100th anniversary. Having appeared in the 1920s, such metal stoves with a chimney became simply irreplaceable during the Great Patriotic War. The potbelly stove has not given up its position to this day, remaining a necessary attribute of a garage, greenhouse or country house. Such a stove is needed wherever people need to warm up and cook food, despite the lack of central heating.
A potbelly stove has its advantages and disadvantages. TO absolute advantages Such a heating device can be classified as:
- energy independence and autonomy;
- cheap fuel in the form of coal, firewood, sawdust, wood chips, peat, waste technical oil, diesel fuel, paint and varnish waste, etc.;
- fast heating;
- small dimensions;
- installation without foundation;
- no capital required;
- ease of operation;
- low financial costs if you make your own stove.
However, the potbelly stove also has disadvantages:
- required good ventilation in room;
- high fuel consumption;
- the need for constant monitoring of fuel levels;
- rapid cooling (however, this drawback can be corrected - to increase the efficiency, the stove can be lined with bricks).
Note: If you feel the need for such a device, then you have two options - buy a metal stove industrial production or make it yourself.
First, let's talk about purchased potbelly stoves, the cost of which starts from about 4,000 rubles (for example, the Ugolek stove) and rising to 40,000 rubles and above (this cost is typical for potbelly fireplaces with beautiful names"Bavaria", "Baron", etc.).
With heat exchanger 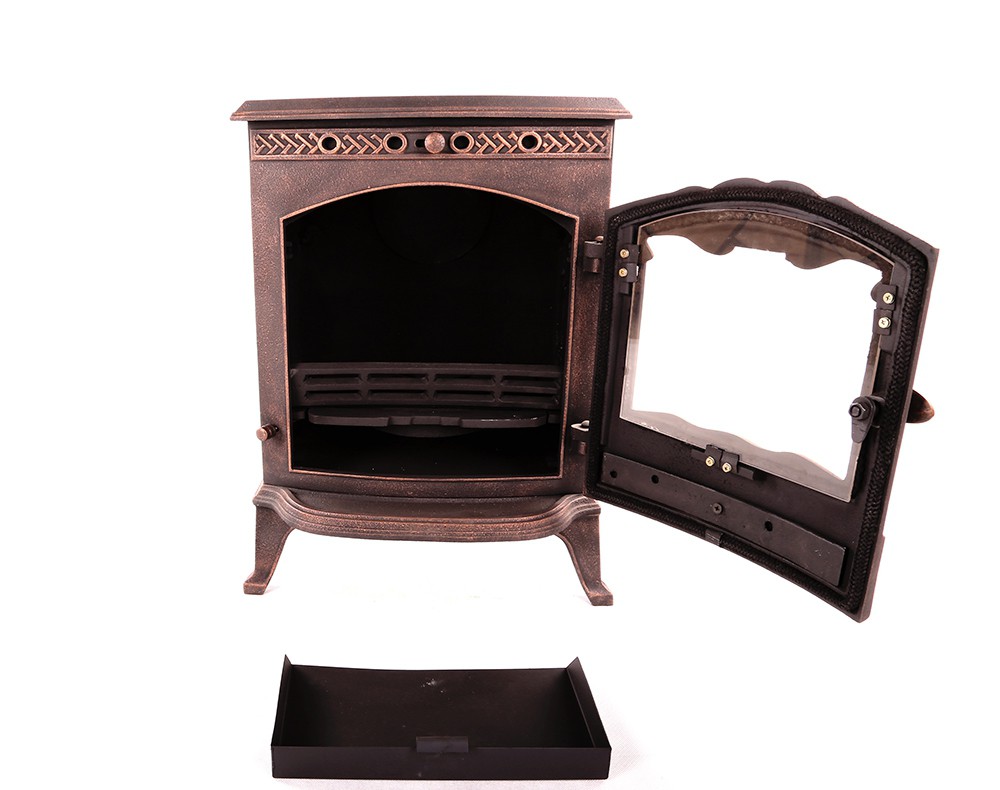
In the middle of this price range fall, for example, potbelly stoves with a water heating circuit and a heat exchanger, an army cast-iron stove, and a long-burning potbelly stove of the Klondike type.
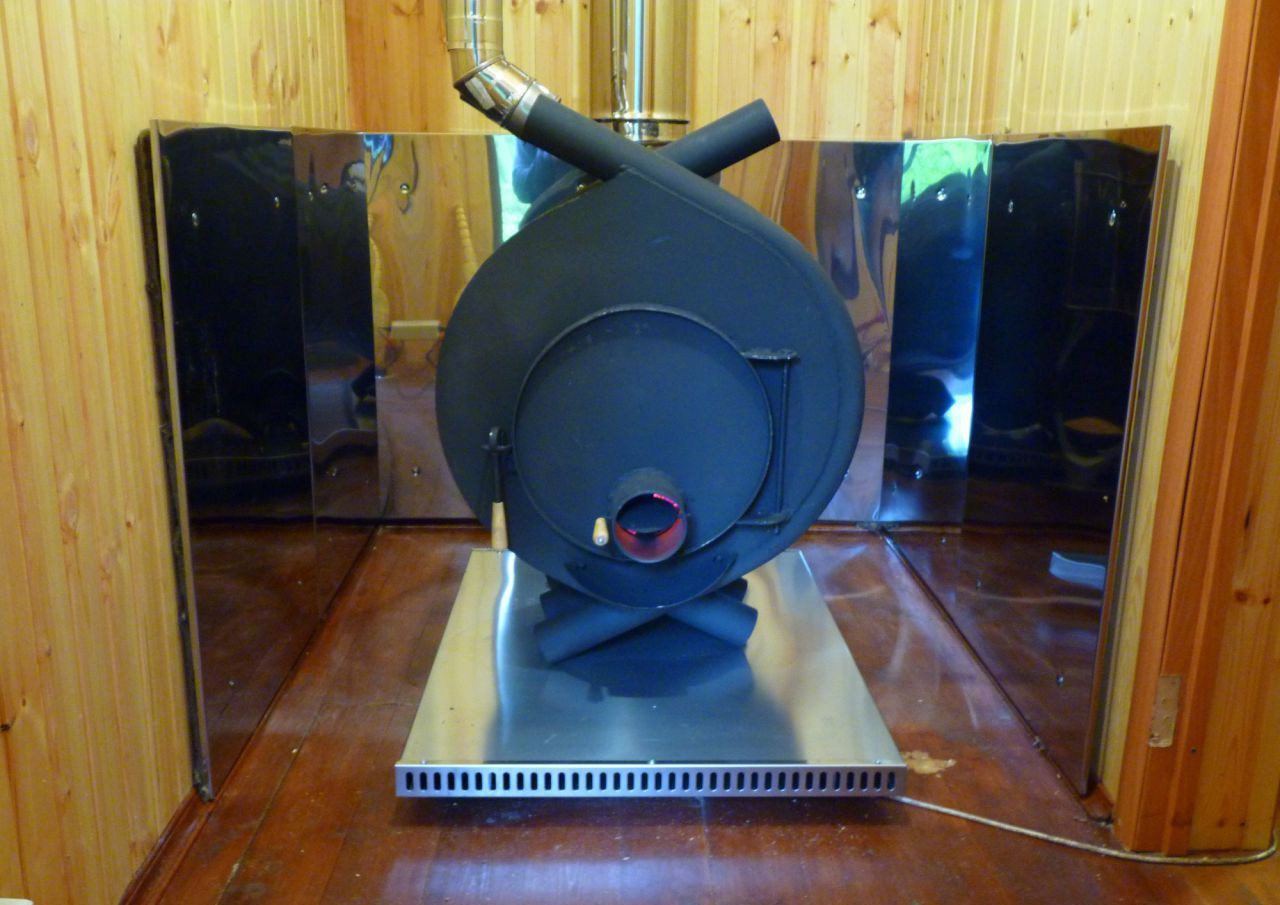
The materials for stoves and potbelly fireplaces manufactured in workshops are usually stainless steel and cast iron. The standard drawing assumes the presence of a bunker with a firebox door, an ash pan, and a chimney pipe. However, it happens that a potbelly stove is equipped with a hob, burners and even an oven. The enterprises also produce heater stoves, as well as potbelly stove fireplaces, in which, to increase efficiency, a ceramic or steel casing is installed, which significantly increases heat transfer. If you wish, you can buy a fireplace-stove for your home or just a stove with a gas generator.
Homemade potbelly stove
It’s not difficult to make a potbelly stove with your own hands, even without a drawing. Available materials are suitable for work, be it gas cylinder, a milk can, a barrel, a piece of pipe or sheet metal lying around in the garage. Having decided what you can put into action, choose a drawing of a rectangular or round section combustion chambers.
For example, you need to do the heating yourself country house and you have an unused milk can (for arranging the stove itself), a bent piece of pipe (for creating a chimney) and a piece of metal fittings with a diameter of at least 6 mm (for the grate). To make a stove out of all this, you just need to be familiar with the tools, as well as use a little ingenuity.

The can is installed on its side - this is the basis of our home-made potbelly stove, its combustion chamber. A rectangular blower is cut out under the neck, the edges are processed with a file. The blower can be left in this form, or you can attach a damper to it, resulting in an output stove with adjustable draft.
In the upper part of the bottom of the can you need to make the markings yourself for the chimney (it should be 2-3 mm less than the diameter of the pipe). We cut out a hole and tightly push a piece of pipe adapted for the chimney into it. Half the work is done.
Next we deal with the insides of the potbelly stove. With our own hands we make a grate in the form of a “snake” from a metal rod. We insert the rod into the neck of the can and position it so that the grate stands horizontally in the future combustion chamber. That's all! If desired, you can place the resulting stove on an iron pallet and a rack of bricks. This will help avoid heating the floor and also reduce the likelihood of a fire to a minimum.
Note that a similar algorithm of actions can also be applied if you want to have a potbelly stove from a barrel. Long burning Such stoves cannot boast, but they cope well with the function of quickly heating the room.
Second life of a gas cylinder
A good idea for a small stove is to reuse containers that can withstand high heat. We have already talked about barrels, but how do you like, for example, a potbelly stove made from a gas cylinder or even two? These containers are good because they allow you to make your own stove for a country house or garage, both vertically and horizontally.
To create such a potbelly stove you will need the following tools:
- welding machine;
- grinding machine with wheels;
- drill with drills;
- brush with metal bristles;
- tape measure and construction pencil for marking;
- hammer, chisel, pliers.
The materials you need to make your own stove are:
- 1 or 2 gas cylinders;
- Metal sheet for the ash pan and hob (thickness must be at least 3 mm);
- cast iron doors (old ones, for example, from wood stove, or made with your own hands from sheet metal);
- chimney pipe;
- thick metal fittings for making legs and grate.
Before starting work on a gas cylinder, open the valve and leave it in this state for at least 12 hours to ventilate the container. Another way to clean a bottle is to fill it to the top with water and then empty it completely.
For a vertical stove-stove, the gas cylinder is placed in its standard position, the neck is emptied and markings are made for the future firebox and vent. The marked pieces are cut out with a grinder. The grate is made separately - for this, fittings cut to the required dimensions are welded in the places marked at the bottom of the cylinder.
Hinges are welded to the cylinder on which the doors are hung. Next, latches are installed, which are designed to protect and increase the efficiency of the potbelly stove. A smoke exhaust pipe is welded on top or on the side of the cylinder.
For a horizontal potbelly stove-stove, the cylinder is installed on the “legs” sideways. It's cut out square hole for the door and round for the chimney pipe. Instead of a grate, a series of holes are drilled at the bottom, and a rectangular container for collecting ash is welded below the cylinder. The stove is almost ready, all that remains is to hang the door with your own hands and install the chimney.
If desired, the set of vertical and horizontal stoves made from gas cylinders can be expanded by hob made from a sheet of metal attached on top.
Free fuel
Note: If you want to minimize the cost of fuel for your potbelly stove, consider making homemade design for heating using automobile oil drained from the car.
The potbelly stove is especially good for garage owners. Its design drawing includes two tanks connected by a pipe, as well as a chimney.
To create a stove for mining you will need following materials:
- Metal 4 mm thick for a potbelly stove.
- Metal 6 mm thick for the top tank cover.
- Metal rods for the legs of the stove (3-4 pieces of suitable thickness).
- Pipe made of heat-resistant material for connecting tanks (diameter at least 100 mm, length about 400 mm).
- Chimney pipe (length at least 4 m).
Work on the formation of a potbelly stove during mining is carried out in the following order:
- Legs are welded to the lower tank.
- A lid with holes made for oil and air is welded onto the top of this tank.
- At least 50 holes with a diameter of 9 mm are made on the connecting tube.
- Weld the tube to the lid of the lower tank.
- A second tank with a filling neck and a chimney pipe is welded on top.
Using this potbelly stove is easy. Oil is poured into a cold device through the filler neck almost to the top, not reaching the reservoir cap by just a few centimeters. Kindling material in the form of rags or newsprint is also placed there. All you have to do is set it on fire, and soon you will enjoy the warmth.
As a rule, such stoves “consume” from 700 to 2000 ml of waste oil per hour. Potbelly stoves during mining allow you to boil water and cook simple food. However, their operation requires the presence of good ventilation in the room to remove carbon monoxide, as well as compliance with the rules fire safety(you cannot place flammable materials near the stove, use flammable materials such as gasoline, acetone, etc.). The waste tank must be protected from water. Refilling with oil is carried out only after the stove has completely cooled down.
Sheet metal
How to make a potbelly stove from metal? This project can be completed yourself if you have experience in welding and necessary tool. The following materials will be needed:
- sheet metal (its quantity determines the size of the stove);
- steel corners 5 mm thick;
- metal tube about 30 cm long;
- pipe with a diameter of 180 mm.
To obtain a potbelly stove-stove, you need to weld a rectangle of metal sheets joined end-to-end (without a lid yet). On one side, place the ash pan and the firebox door. Inner space The stove is divided into smoke circulation, firebox and ash pan.

In the last two compartments, a grate is installed that will hold solid fuel. To do this, steel corners are welded inside the potbelly stove on the sides at a height of up to 15 cm. A pre-welded grate is placed on them (it can be made from steel strips welded to thick metal rods at a distance of about 5 cm). It is better to make the grate removable, so that later, when it burns out, you can easily replace it. In addition, the removable grille design makes cleaning the heating device easier.
Let's return to the construction of the stove. To increase the efficiency of the potbelly stove, you can make fastenings for a removable reflector (a metal sheet with a thickness of at least 12 mm), which will separate the firebox and smoke circulation. To do this, two metal rods are welded on top. After installing the reflector, you should have a smoke channel.
Having arranged the insides of the potbelly stove, you can weld the top metal sheet, which will become the lid of the structure. A hole is made in advance to secure the chimney pipe. Next, the stove is equipped with jumpers that delimit the doors made for the ash pan, reflector and grate. As a rule, a small door is installed under the ash pan, but two steel doors are made to fit the full width of the stove, so that it is convenient to remove the reflector and grill.
The next stage is welding the latches and legs to the structure (metal tubes with a diameter of up to 3 cm and a length of 10 cm are suitable for them), as well as chimney pipes from a curved pipe with a diameter of about 18 cm (note that the chimney is placed on a 20-centimeter sleeve ). The sheet metal potbelly stove is ready.
Warm brick
A potbelly stove using wood, coal and other types of fuel can significantly increase its efficiency. To do this, it is enough to build a screen of baked clay bricks around it with your own hands. If you look closely at the drawings of such a mini-building, you will see that the bricks are laid at a short distance from the walls of the stove (about 10-15 cm), and, if desired, around the chimney.

Bricks require a foundation. Do you want the masonry to last a long time? Then fill the base one at a time to form a monolith. It is better to take concrete as the material for the foundation, which should be reinforced with steel reinforcement yourself. It is advisable to place the reinforcement layer at a distance of approximately 5 cm from the surface of the concrete pad.
Below and above brickwork make holes for ventilation that will ensure air movement (heated masses will go up, cold air flows will come from below). Ventilation also prolongs the life of the metal walls of the potbelly stove, delaying the moment of their burning due to cooling by circulating air.
Bricks laid around the stove accumulate heat and then release it for a long time, warming the air in the room even after the stove goes out. In addition, brickwork additionally protects objects surrounding the stove from fire.
If desired, you can completely lay out the stove from brick. Such a structure is advantageous in that it will last long years without additional effort on the part of the owner. However, there are also certain disadvantages. The disadvantages of this option include the following:
- the process of laying out such a stove is quite labor-intensive and is suitable only for those people who have experience in masonry with their own hands;
- a brick stove is quite expensive, as it requires the use of fireproof materials, including special clay for mortar.
In order to get a small potbelly stove with wood, it is enough to lay out a cone measuring 2 by 2.5 bricks, 9 bricks high. In the combustion chamber, rows 2-4 are laid out of fireclay bricks. An ordinary fired clay brick is suitable for a chimney, into which you must remember to insert a stainless steel sleeve.
Whatever the method of making a miniature stove or potbelly fireplace with your own hands, whether you make them according to a drawing or by eye, the main thing is that at the end you get an effective heating device, and in an extended configuration also hob for cooking food. Look around for suitable materials (barrels, sheet iron, etc.) and go ahead to your own homemade stove or even a potbelly stove!
Winter in Russia is more than winter. It's no secret that at this time of year it is uncomfortable to be outside a room with heating, but what to do if there is such a need? For example, you need to visit a garage and spend some time there. And the love of the stronger half of humanity for gatherings with friends in the company of their iron horse is known to everyone.

Of course, gatherings with even a slight “minus” outside rarely bring joy if the garage is not heated around the clock. There is a way out if you manage to install a homemade potbelly stove in the garage.

Features: pros and cons
The advantages of a homemade stove made from a barrel usually include:
- fast heating with minimal fuel consumption;
- simplicity and accessibility;
- the opportunity to make it with your own hands from the most different materials, even assistants;
- unpretentiousness when choosing fuel (firewood, mining, diesel fuel, coal, peat, etc.);
- Sometimes, for better heating and heat exchange, a kind of “labyrinth” of metal sheets is installed on the stove.


It will also be quite true to say that a stove made from a barrel probably has more disadvantages than advantages:
- large heat losses and, as a result, significant fuel consumption during long-term use;
- if you make a potbelly stove from an ordinary barrel, then you need to be prepared for the fact that it will not last a relatively long time due to the insignificant thickness of the walls - they will quickly burn out;
- poor ability to regulate temperature;
- if the potbelly stove is made in horizontal version, it will take up quite a large space in the limited space of the box;
- the vertical orientation of the stove will benefit the use of space, but the walls will burn out faster than a horizontally placed potbelly stove;
- due to burning out of the walls, the stove can be a fire hazard and will require more attention when heating;
- such a stove needs a high chimney with a height of more than 4 m, which will have to be cleaned regularly.

Most of these shortcomings can be eliminated by making the body of the potbelly stove from a gas cylinder. It has thick heat-intensive steel walls that are well welded.

Preparing an old cylinder for welding is very important due to the likely presence of explosive gas residues inside, even if the neck is removed.
There are several preparation options: you can simply fill the cylinder with water and leave it for a long time, or add alkaline substances to the water to neutralize the gas. However, this method is considered the most reliable:
- the cylinder in a vertical position must be securely buried in order to cut a hole with a grinder;
- fill it completely with water, wait a few hours;
- mark the cutting line;
- cut with a grinder until it appears through hole– water will begin to flow out;
- complete the cut and drain the water - the risk of fire is guaranteed to be eliminated.


Principle of operation
Let's take a closer look at the operation diagram of a homemade potbelly stove:
- Combustion air is supplied through the ash pan to the furnace firebox;
- During the combustion process, heat is released, which heats the bricks and walls of the furnace;
- smoke, soot and combustion products are drawn out through the chimney;
- combustion regulation to obtain the necessary heat transfer is carried out by increasing/decreasing the open gap of the blower door;
- a potbelly stove is heated using different kinds both liquid and solid fuel(firewood, mining, diesel fuel, coal, peat).

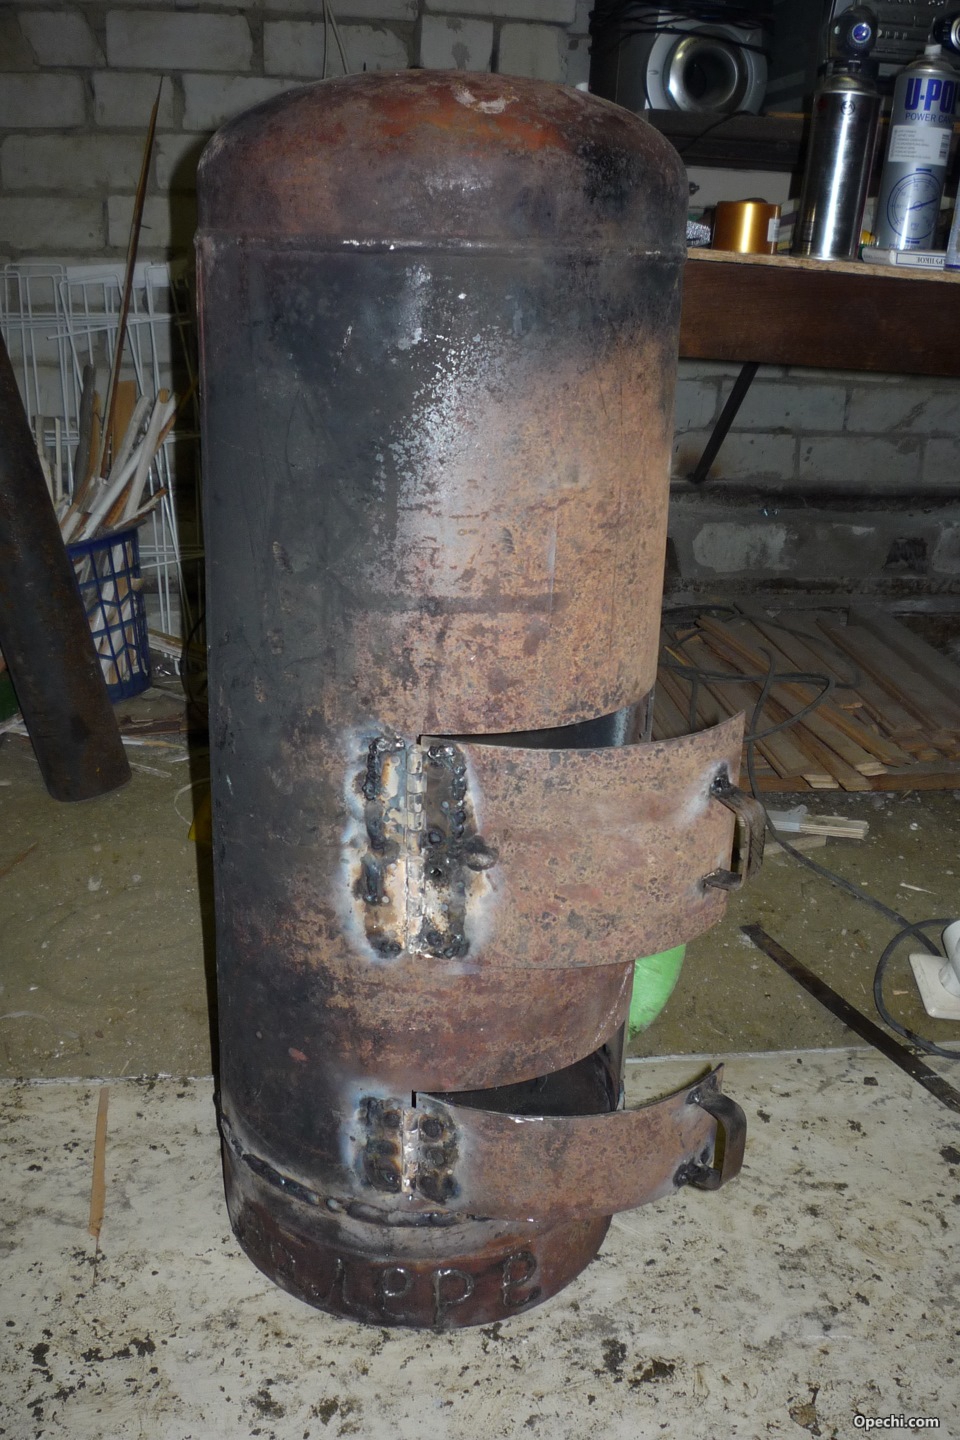
Potbelly stove under development
A potbelly stove, the fuel for which is not wood, but waste oil, has its own characteristics. It can be either a small stove for a regular garage or a device designed for heating large areas. In any case, all models work on the same principle and have similar designs and operating principles.
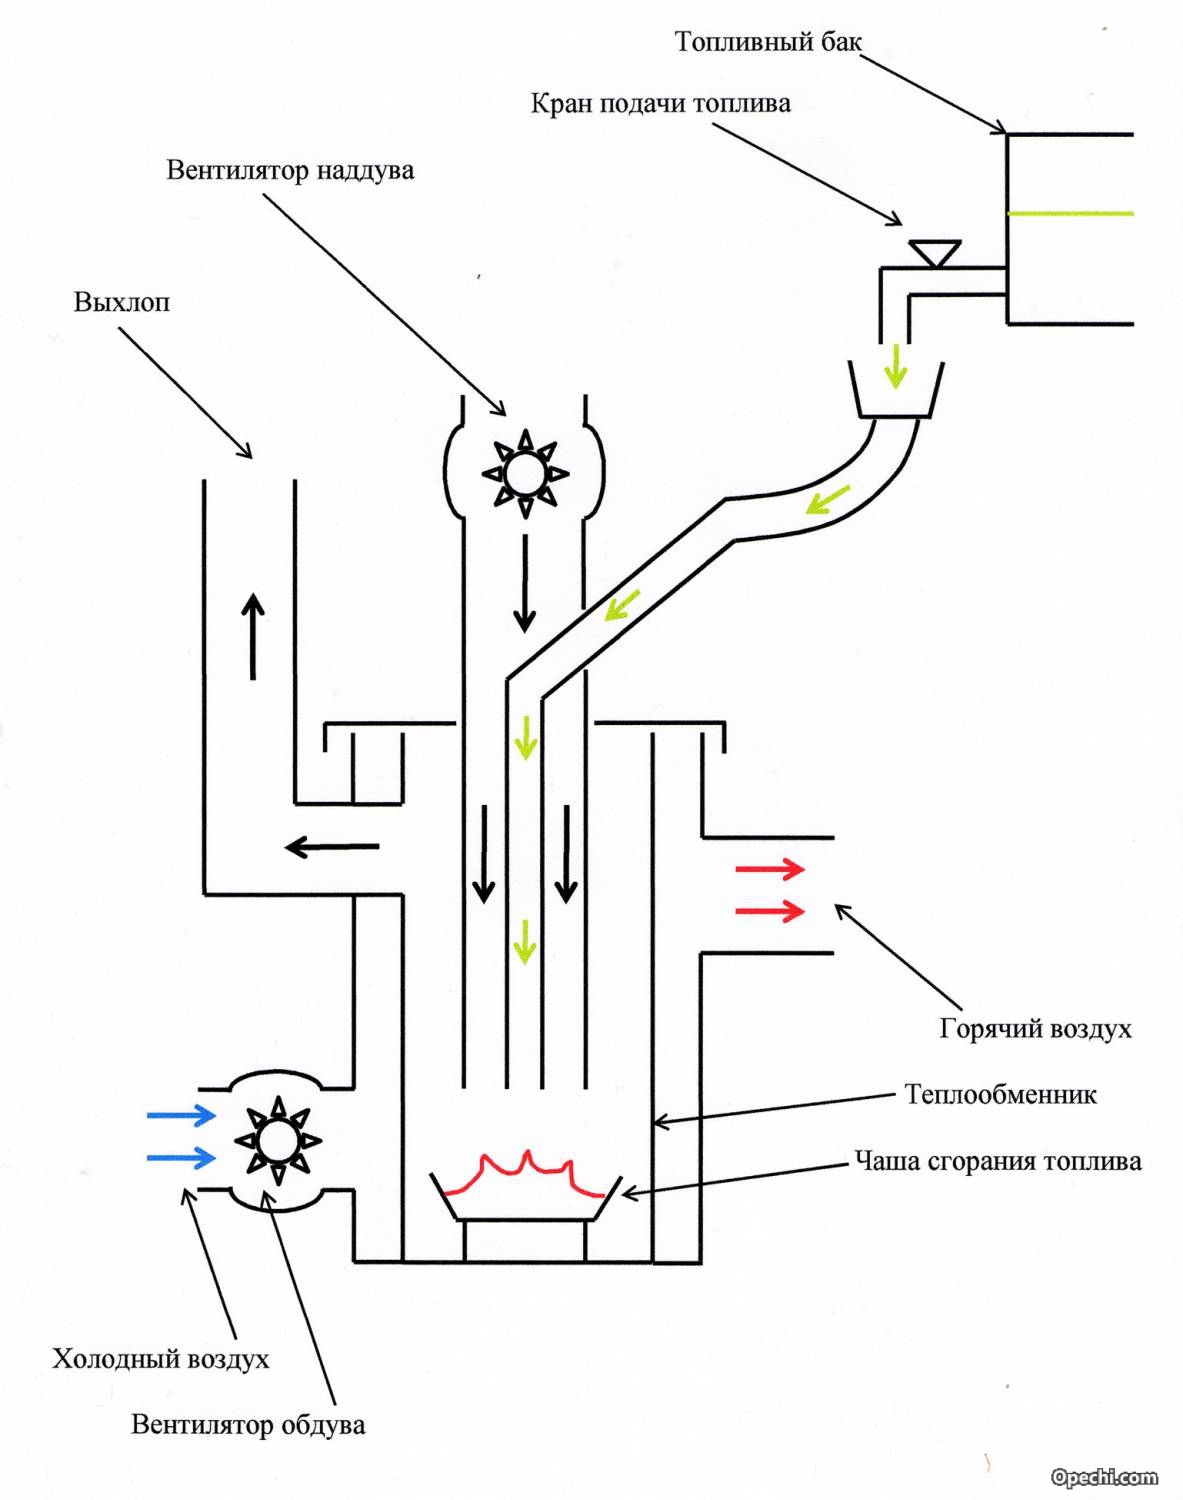
- The potbelly stove has 2 parts. IN bottom part used oil is added, where it is heated and brought to a boil.
- The vapors are drawn through a perforated pipe for oxygen access, where their initial afterburning occurs.
- The vapors are completely oxidized and burned in the upper part connected to the chimney.
- The temperature in the lower container is relatively low; the upper chamber heats up to the maximum, heating the room. Its walls can even glow from the heat. Accordingly, this affects the choice of material for making cameras.


Drawing diagram of a potbelly stove during testing with conventional sizes and proportions.

Let's consider the advantages of potbelly stoves during testing.
- Unpretentiousness and “independence”. There is no need to constantly add firewood or perform any actions; the main requirement is the correct adjustment of the filler neck gap (10-15 mm).
- Efficient heat dissipation.
- There is no soot from the chimney, the stove does not smoke.
- Relative fire safety, since waste fuel is difficult to ignite, and only oil vapors burn.

Flaws:
- noisiness;
- a characteristic odor (sometimes it is eliminated by installing a water circuit or an air heat exchanger with a supercharged fan, which directs part of the air from the chimney to another room for heating);
- the combustion chamber (connecting pipe with perforation) and the chimney have to be cleaned quite often;
- the coked layer of burnt oil in the lower chamber is also quite problematic to remove.

When using a potbelly stove with waste fuel, you must adhere to the mandatory rules.
- It is not allowed to use waste oil with gasoline or other flammable impurities.
- Filtration of waste from solid particles is required.
- Water should not be allowed to enter the mining area.
- Strong drafts are not allowed.
- Compliance with all fire safety regulations when installing a stove indoors.
- Reliable ventilation is a must.

- It is strictly forbidden to leave the stove unattended or sleep while the stove is running.
- Do not use water for extinguishing!
- Horizontal sections of the chimney hood are prohibited. The permissible angle of inclination of the chimney is 45°.
- The chimney should have a length of 4 to 7 m.
- It is recommended to pour waste into the furnace to a height of less than? volume of the lower chamber.
- It is necessary to have a powder fire extinguisher and/or sand in the immediate vicinity of such a stove.

DIY making
Drawings and dimensions
The potbelly stove will produce maximum efficiency provided that it complies with the calculations made.


Let's look at the design of the chimney.
- The vertical part (up to 2 m) is covered with fireproof thermal insulation.
- The pipe is inclined or parallel to the floor (2.5-4.5 m), the distance from the ceiling in the absence of heat-resistant protection is 1.5 m, from the floor – 2.2 m;
- The diameter of the chimney must be calculated with great accuracy so that its operating speed is less than the rate of fuel combustion, and it does not throw out all the heated air along with combustion products outside immediately, but allows it to heat the walls, which is what main feature this type of stove. The calculated permeability of the pipe should be 2.7 times the volume of the firebox. That is, with a firebox with a volume of 40 liters, the chimney should have a diameter of 106 mm.
- If there are grates in the potbelly stove, the height of the firebox is calculated from the top of the grate.
- Complete combustion of fuel can be ensured by creating high temperature, which can be achieved by using a metal or brick three-sided screen around the potbelly stove. Install it with a gap of about 70 mm from it. Heat reflection also has a fire-fighting function.


- Bedding or a fireproof surface under the stove is strictly necessary, because:
- thermal radiation from the furnace emanates in all directions, including downwards;
- the floor can become very hot, which can lead to a fire.
Sheet metal is used as bedding; the area is 350-400 mm larger than the vertical projection of the stove on the floor (preferably 700 mm). You can use sheets made from other fireproof materials with a thickness of more than 1 cm.

Chimneys are installed differently in different rooms.
- Part of the pipe is routed through the wall of the garage; this is the most common type.
- The chimney is completely left inside the garage box and exits through the roof. Thus, the garage is heated better, but the installation process itself is much more labor-intensive.


Required materials and tools
For self-made potbelly stove in the garage will require the following materials and tools:
- sheet metal for making an ash pan and a hob if the stove is located horizontally;
- metal for the chimney pipe (preferably with two elbows);
- materials for fixing grates and supports;
- oven doors;


- cast iron discs;
- welding machine;
- sander;
- welding wire/electrodes;


- hammer;
- tape measure/measuring tape;
- chisel;
- pliers;
- drill;
- metal stripping brush;
- chalk pencil.


Let's look at the manufacturing process step by step.
- As already mentioned, the stove can be manufactured in horizontal and vertical versions.
- The dimensions of the stove are selected based on the dimensions of the garage box, taking into account all fire safety measures.
- The walls must be welded from sheet metal with a thickness of more than 4 mm.
- The grate is welded inside the firebox or placed on fastenings welded to the walls of the firebox from the inside (removable version). It can be purchased in retail chains or made with your own hands from a sheet of steel by drilling holes no more than 20 mm in diameter, or from thick wire.
- Weld the bottom.


- Cut a convenient hole for fuel supply and 5-7 cm lower for the ash pan.
- The doors can be made from sheet steel yourself, or you can purchase a ready-made cast iron block.
- The stove is installed in the selected location in the garage.
- At this stage the chimney is attached. The longer its area indoors, the warmer it is in the garage, since it also heats the air around it.
- On last stage work, you need to put the potbelly stove on legs. They are made from profile pieces, joined by welding or screwed to the body. You can also use a metal box without a front wall (used as a woodshed), and the materials for the base can be bricks or forged elements.


Where to place it?
Compliance with fire safety rules when using a potbelly stove in a garage is vitally important. Here we're talking about both about the safety of the car and about preserving the life of the person himself. The location of the stove is one of the important tasks. Most often, the corner of the garage box formed by two walls, which is located opposite the gate, is chosen. Direct contact between the stove and the car is strictly prohibited.
The distance must exceed one and a half meters. Similar conditions must be observed for the distance from flammable substances and objects.

The surface of the walls near the stove must be covered with fireproof material. They can be additionally lined with brick. If the garage is wooden, then the distance from the surface of the stove to the nearest wall should exceed 1 m.
If a potbelly stove is used for heating or cooking, it is very important to follow the rules of its operation. Their implementation, in addition to fire safety, will help increase its service life.
- Before the first kindling, the stove must be checked and made sure that all connections and components are tight, and any defects must be immediately corrected in order to avoid the penetration of combustion products and carbon monoxide into the garage.
- For certain reasons, the chimney must be vented outside. The part of it located inside the garage space must be sealed.
- The chimney is strictly prohibited from being vented into ventilation system. Even if the stove is installed in the basement, it must have a separate chimney.
- The passages of the wall or ceiling of the smoke exhaust pipe must be insulated with fire-resistant, non-fire-hazardous materials.


- A box of sand and a fire extinguisher must be kept in the garage in accordance with fire safety regulations.
- A potbelly stove is also used as a stove and for boiling water. To do this, install a hob with burners on it (usually it is made of cast iron stove) or a tank for heating water.
- The potbelly stove heats up quickly, but also cools down quickly. This disadvantage can be partially compensated for by a brick screen that accumulates heat and returns it to the room as it cools after the potbelly stove goes out.
Direct contact between the screen and the potbelly stove is prohibited. The gap between them is left at least 10 cm.


- Typically, a brick screen has a significant weight, so it will most likely require its own foundation. Let's consider the stages of its manufacture.
- Dig a hole about 50 cm deep.
- The bottom of the pit is covered with a layer of sand (average sand consumption is 3-4 buckets) and compacted.
- The next layer is 10-15 cm of crushed stone, which is also compacted.
- The laid layers are leveled, then filled with a layer of cement mortar.
- Wait for the cement layer to completely harden. How longer time hardening, the better (usually the period of time is more than a day or longer, this will give the foundation additional strength).
- Then several layers of roofing material are laid.
- The screen itself is laid out in half a brick, the initial two rows are made with continuous masonry on roofing felt. In the 3-4th row it is necessary to make ventilation gaps, then again continue laying the brick in a continuous layer.

Correct ways Cleaning a potbelly stove mainly comes down to removing contaminants inside the chimney, which is done relatively rarely. Mostly a brush is used. It is quite possible to make it yourself from a cylinder-shaped brush, tying it to a rope.
It is best to use brushes with plastic or iron wire bristles. The diameter of the brush is selected in such a way that there is no significant resistance when passing through the chimney.

Cleaning is used to increase the passage of smoke flow through the pipe and improve heat transfer. Sequence of the cleaning process:
- plug the combustion hole with a rag;
- make 2-3 careful movements with the brush so as not to break the seal of the chimney (stop if the brush moves freely);
Beautiful a budget option heating and cooking stove - potbelly stove. It is incredibly convenient and easy to set up and operate. Such a device is good to have at the dacha, in the workshop, in and many other places. A water stove can heat several rooms. On sale today there are many of the most different models, from unassuming functional to sophisticated retro. But their price cannot be called low. Therefore, craftsmen who have some experience, have tools and suitable metal, you can try to make an effective potbelly stove with your own hands.
 Cutting out from a balloon
 The simplest version of a potbelly stove can be made from scrap materials. A thick-walled barrel, an old industrial can or a gas cylinder (empty, of course) is suitable for this.
Resourceful craftsmen use pipes of suitable diameter, rims from dimensional wheels and sheets of metal.
When choosing the initial tool for work, you should take into account that too thin metal when heated strongly, it will deform and the product made from it will lose its shape. Optimal thickness material is 3-4 mm.
For convenient and effective work on making even a small potbelly stove with your own hands, you will need the following:
 There are potbelly stoves different types, but the essence is the same
 - – angle grinding tools, as well as special consumables To her - grinding wheels and cutting discs.
- Wire brush.
- Welding machine with electrodes, protective mask and work suit.
- Hammer for removing slag.
- Tools for measuring: tape measure, marker, chalk, metal ruler, folding meter.
- Chisel, pliers, hammer.
- Metal drill with a set of drills.
The choice of a specific model depends on many components: location of future placement, its size, purpose of the furnace. For residential premises, it should have a more aesthetic appearance, so for indoor placement it is better to prefer the option made from a piece of pipe or from metal sheets.
 Neat DIY potbelly stove
 Events with balloon No. 1
Several rows of holes are drilled in the bottom of the potential firebox (the side of the cylinder), which will act as a kind of grate. The ash pan is located along it - in our case, a box made of thick metal. It must be equipped with a sealed door that does not allow ash and hot coals to get outside.
The legs of the structure should be welded on the sides of the ash pan. A round hole is made on top of the lying cylinder.
The vertical part of the potbelly stove will stand on it. It is convenient to make the door from the head of the second cylinder; a pipe with a valve is not welded into it - to regulate the combustion intensity. If the door hinges are placed at the top, then the lid, under its weight, will fit tightly to the opening of the firebox, which will reduce air suction to a minimum.
Events with balloon No. 2
 The most important thing here is cutting out a shape according to the markings that will fit exactly on the first cylinder: they are connected by welding. In this part of the furnace (vertical) there will be an additional heat exchange chamber. Once it gets into it, the smoke lingers, not going straight into the chimney, but circulating for some time.
Metal plates with holes made are welded inside a vertical cavity at a distance of 25-40 cm. The holes are located closer to the edge of the jumper circumference, and correspond to the holes on the adjacent plates.
The best option– three equally spaced jumpers. A vertical cylinder with jumpers on top is welded to a horizontal one, and is equipped with a pipe for the chimney (using welding).
Potbelly stove from a barrel
 A barrel stove is larger than others, and it also requires more space. But it can also heat a much larger room.
Like the first model, a potbelly stove made from a cylinder, it can be made in both horizontal and vertical versions.
Both are suitable for heating technical, utility and residential premises. To work you need: a pipe for a potbelly stove 10-15 cm, a sheet of metal and the barrel itself.
Vertical model
On the surface of the workpiece, mark the future location of the firebox and blower doors, and the location of the cut.
 The barrel is cut in half, with each part having to be worked on separately. A circle is cut out of a sheet of steel along the diameter of the barrel, in which a hole is made for the chimney pipe.
A hole is made in the upper part of the workpiece itself to align with the same one on the hob.
The chimney pipe is welded into the hole prepared for it in the barrel, and the hob is threaded through the hole at the top and installed. It is welded to the sides of the barrel itself. The air space between them will allow the hob to retain heat longer without cooling down.
 grate(a prepared round part with holes) is welded to the bottom of the upper part. When the top panel and the bottom of this half are ready, you can cut a hole for the firebox (its door). The opening is scalded with strips of metal, the door is equipped with a handle with a latch and hinges.
They are carefully welded to the barrel so that the door can easily move back and forth, and the valve fits into the hook holder. At the very bottom of the barrel an opening is made for the ash pan (blower). The door is made and hung in the same way as for a firebox. Both halves are reconnected into one whole by welding.
Horizontal model –
the process of its manufacture is almost completely similar to the manufacture of a horizontal stove from a cylinder.
Easy with your own hands: potbelly stove “Gnome”
 A compact oven made from thick metal sheets is one of the most popular homemade stoves of such a type. It looks factory, intelligent and neat, and will fit perfectly into the design of any room. In terms of size, this is a wonderful potbelly stove for: it takes up little space, while wonderfully heating the room and being used for cooking.
You can make a regular one, the simplest case, divided into an ash pan and a firebox. If you equip it with partition plates inside, it will acquire additional heat transfer properties. Such a device will allow you to retain heat longer, and sometimes this is extremely necessary.
 Drawing of the stove "Gnome"
 To make this model, you need a thick sheet of steel (0.3-0.4 cm), a steel pipe, a suitable sized corner of 5/5 or 4/4 cm. The cover for the burner can be found in a specialized store, or you can make it yourself .
We provide you with drawings, based on which you can begin work. The outlines of future stove parts are applied to the blanks. These are its future walls, plates for placement inside, a grate. The front panel has holes for the blower and firebox (rectangular).
Doors are made from the metal pieces obtained in the process: are scalded with a corner, equipped with hinges and latches, and mounted on the front panel. One of the prepared plates is welded onto it, but from the inside. It should be 10 cm smaller in size than the side walls of the product.