Make an original lamp. Do-it-yourself original lamps and lampshades
Find out how to make a lamp out of wire and mesh so that flowers can grow inside it. How to turn a snag into a lamp, and tree branches into a floor lamp?
How to make an original lamp?

A very interesting design item is made from the simplest materials, most of which are left over from a picnic. If you go out with friends or family, you definitely need to clean up the trash after you. This not always desirable task will become more enjoyable if you ask to stack the plastic spoons separately. If you have children with you, arrange a competition to see who can throw the most spoons and the fastest into a separate trash bag or bag.
You will also need water cans. After a fun picnic, when you arrive home, after some time, you can make original lamps from the containers left over after the feast. Give them to friends, keep them for yourself to hang in the hallway, kitchen or garden.
So, here’s how to create such a chandelier with your own hands or with the help of your family. First put next to each other:
- 5-liter oval-shaped plastic bottle;
- disposable plastic spoons;
- cable with socket and plug;
- low power LED light bulb;
- pliers;
- glue gun;
- screwdriver;
- stationery knife.
To prevent such original lamps from leading to a fire, take an LED rather than a regular Ilyich light bulb.
For information: 4–5 W LED light bulbs correspond to 40 W, and 8–10 W correspond to 60 W of conventional electric ones.

Carefully, so as not to cut yourself, remove the bottom of the canister with a knife.

Also, observing safety precautions to avoid injury, cut off the handles of each plastic spoon completely. Apply a little hot glue from a gun to the cut edges of the “blades” and glue them to the bottom tier of the bottle. Usually 17 pieces go here. Then, overlapping, attach the second and subsequent rows, arranging the elements in a checkerboard pattern.

To cover the neck, glue 10-12 spoon blades together, forming them into a ring.

Pass the socket with the light bulb and cable through the cut bottom hole in the bottle. If this "electrical" part is a problem for women, call your husband. If you don't have one, buy a cable from a hardware store with a socket and plug already screwed to it. You can borrow this working part of the lamp from an old one.

Place a “ring” of spoons on the top of the canister and screw on the lid. To do this, let your husband drill a hole in it with a drill, and you yourself can do this manipulation with a hot nail or self-tapping screw, holding it with pliers. The original lamp is ready.

3 models of designer lampshades with your own hands
Ideas are in the air. If you are at the dacha and don’t have this piece of furniture there, it’s easy to make it yourself from what you have on hand. Take:
- hollow dishes;
- wire;
- polyurethane foam;
- gloves;
- paint;
- brush;
- pliers.
You can use unexpected things as a base: an old saucepan, a flowerpot, an already unnecessary children's potty.
Turn any of these auxiliary items over and place them upside down on a flat surface. Wind the wire, its turns repeat the shape of the future product, they should be the same as the lampshade. With your own hands, but wearing gloves, take the can in your hands, squeeze the foam out of it little by little onto the frame, covering the wire, let it dry.
After this, use a knife to make the contours more even, cutting off the excess. Paint it in your favorite color, white looks airy and elegant. Such a lampshade, made with your own hands, will decorate summerhouse. You can make a few and hang them here. By avoiding big expenses, this way you decorate the space.

This lampshade looks stylish and modern, while the next one has classic look. For it use:
- thick wire;
- pliers;
- small plastic bottle of water.
Now roll the wire into a large outer ring. We will fasten it. To do this, cut 4 identical pieces of wire with pliers, secure the first end of each to the small ring, and the second edge to the large ring. Top part the lamp is ready.
The dimensions of the lampshade depend on whether it is made for hanging from the ceiling or for table lamp. The first one is larger than the second one.
Roll the bottom ring from the wire; it is the largest. Connect it to the second top five pieces of wire, distributing them evenly. All that remains is to decorate the frame of the lampshade. To do this, pass the wire through the second ring, curling it into waves and twisting it through the base. Also design the second ring.

All that remains is to cover it with fabric. Attach a flap from the second top to the bottom ring, cut to size, adding to the seam. Hem big sides the resulting rectangle. Sew the fabric on the side directly on the frame, decorating this place with braid. That's it, you've made a wonderful lampshade with your own hands.
If you want to get acquainted with the most modern ideas on this topic - please! IN in capable hands And construction mesh will turn into a stylish lampshade.

With your own hands or by calling a man, cut a rectangle from it with metal scissors. To secure the socket, twist a circle out of wire and secure it on top of the lamp with four pieces of wire.
If you don't have coarse mesh, use pliers to trim off the excess sections to create more space between the wire strips. Paint the lampshade and the frame is ready.
And now the magic begins. You can do original lamp, which will benefit not only people, but also plants. Attach a flower pot with a flower at the bottom of the lampshade. You can tie it, woven using the macrame technique, to the lower turns of the wire with a thick rope. Check that the fastening is secure.
If there is a man in the house and welding machine, call on this tandem to make a metal ring with “rays” that need to be welded to the bottom of the lamp.

If you have a home climbing plant, for example ivy, pass its lashes between the lattice cells. The original lamp will become a house for a flower. It is better not to use ordinary light bulbs, as they are very hot and can burn plant leaves. In addition, the air around the flowers will be too hot. Screw in an LED or fluorescent light bulb.
For such an original lamp, you needed:
- construction mesh or strong wire;
- brush and paint (optional);
- pliers;
- light bulb with socket;
- flower.
You can secure cups with seedlings well on such a lampshade, thereby finding additional space for growing them and conditions for lighting in the evening.
We make a floor lamp and a table lamp with our own hands
While walking in the forest, do not pass by a florid piece of driftwood lying around. Put it in a bag and take it with you. Wash it at home, if there is bark, peel it off with a knife. Sand the surface with fine sandpaper if necessary. Cover with wood varnish.

In order for the table lamp to hold well, the driftwood must be screwed to a durable pedestal with self-tapping screws. It should be quite heavy. Oak is suitable for it. If you find a broken branch of this tree in the same forest, saw off a circle 5–7 cm thick from the thick part.
It will also need to be sanded and varnished. When these wooden blanks dry, connect them with self-tapping screws of sufficient length, first passing them through an oak stand, and then plunging them into a piece of driftwood. You can also use bolts and nuts.
You already know how to make a lampshade with your own hands. Therefore, make it and attach it to the driftwood, wrapping it with wire.
If the old floor lamp stand is no longer pleasing or you just want to decorate it, also use wood for this. Look how good the birch stands look. Attach a branch of this tree to the lamp and see what kind of floor lamp you could make with your own hands.

How to crochet a lampshade?
If you are tired of the old floor lamp, you can transform it with your own hands, giving it a “zest”. Take an openwork braid and sew it on the top and bottom fabric lampshade. You can decorate with glitter by gluing them in the form of a pattern, evenly or randomly.
A floor lamp or chandelier will turn out unique if you knit a lampshade for it with your own hands. This can be done with crochet or thin knitting needles. For the first option, you will need:
- hook;
- cotton threads;
- pattern for knitting napkins;
- water;
- starch;
- ribbons.

Measure the top circumference of the lampshade, we need its diameter. Knit a chain from air loops. Next, knit in the round, based on the napkin pattern. Measure the height of the lampshade and the diameter of its bottom circle. Based on this data, draw a trapezoid or rectangle (depending on the shape of the lampshade). Crochet this figure. Sew to the side.
Using single crochets, tie the top circle of the lamp and this trapezoidal or rectangular part.
Boil a glass of water, stirring, pour in 200 ml cold water, in which 1.5 tbsp is diluted. l starch. Boil for 1 minute, remove from heat, cool. Place a knitted lampshade here, wet it well, then wring it out, let the water drain, and the fabric will dry, but remain slightly damp.
Place it on the lampshade. To ensure that the knitted lampshade holds well, you can pass several ribbons or ribbons between the loops and tie them.

Lampshades look very beautiful if they are decorated with crocheted flowers.

A solution of starch or PVA will help give the shape of a knitted lampshade. Put it on the frame, apply glue, let dry.
In the second case (when knitting needles are used), you need to make calculations for knitting, draw a pattern based on the measurements of the lamp, and knit a trapezoidal or rectangular lampshade. Similar models are suitable for floor lamps and strictly shaped chandeliers. If you need to crochet a semicircular lampshade, first make wedges and then connect them with single crochets.
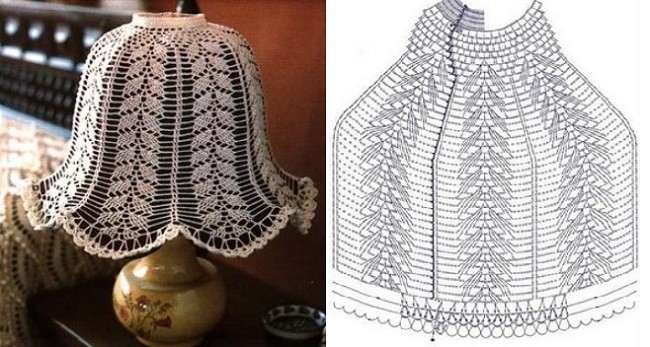
Here is another openwork chandelier. It’s nice to make muslin with your own hands and decorate the bottom of the product in a circle. But first you need to create the lampshade itself. The crochet pattern for this beautiful thing is presented right there.

A table lamp will look amazing on your bedside table if there is a lampshade like this on it, the knitting pattern for which is also given.
If your son or daughter won’t let you finish your work, demanding your attention, invite the children to make a lampshade too, and let them roll strips of paper into tubes with their own hands. It’s better to wrap them around a thin pencil or a wooden sushi stick, and then glue the free edge so that it doesn’t unravel.

Now you need to glue the resulting blanks, using an object of a suitable shape as a frame, for example, a 5-liter canister. Having made the first inner layer, let the child move on to the second. There should be several of them to close the gaps. When the PVA has dried, cover a table lamp with this lampshade or hang it from the ceiling. It looks original and extravagant.

If you are interested in other ideas on this topic, watch the video:
A very interesting version of a lamp made from disks:
![]()
There is no doubt that properly executed kitchen lighting sets the tone for the entire interior. A chandelier can become the central element in this cozy and warm room.
Using scrap materials - or even waste - you can make a lampshade from threads, an eco-style lamp from jute twine or plastic bottles, or you can make a real masterpiece – beautiful chandelier from wooden or glass beads.
You can also not only hang a lamp made by yourself in the kitchen or dining area, but also give it to your loved ones as a gift.
Method 1. From scrap materials - anyone can do it!
The simplest DIY lamp is made from threads. Indeed, even a child can handle such a design. So, to make a chandelier from threads, we will need:

- Threads - you can take regular jute twine or thick cotton threads, total length at least 100 meters, the color is chosen based on your imagination and the existing interior;
- PVA glue and brush for applying it;
- Petrolatum;
- 2 balloons - one for work, the second for testing; It is better to take a round ball, not an ordinary one, then the shape of the lamp will be the correct shape.
Advice! A children's or rubber beach ball will also work. For very large lamps, a fitball, for example, is suitable.
Work on creating a ball of thread is carried out in the following sequence:
- Inflate the balloon to the required size. Do not forget that the resulting lampshade made of threads will repeat the shape of the ball. Using a marker, draw one or two circles at the top and bottom (more at the bottom).
- Pour glue into a container and carefully process the threads. And the ball itself can be coated with Vaseline with a brush.
Advice! You shouldn’t apply glue to all the threads at once - it’s better to move along the winding area.
- Next comes winding the threads around the ball, taking into account the drawn holes - the density of the winding determines how your lampshade will turn out in the end.

- After the ball is wrapped, you need to leave the future chandelier to dry for at least 24 hours.
- The ball bursts and its remains are easily removed from the now solid structure. The result was a lampshade made of solid threads.
- A hole is cut at the top to accommodate the cartridge.
- You need to check the strength - another balloon is inserted into the lamp and inflated. This will demonstrate the flexibility of the design.
In this way, you can also create local lighting in the kitchen by creating several lamps from threads with your own hands. Or you can hang it in the dining area, as shown in the photo.


Do not forget that for a ball of thread you can make additional decor in the form of interesting coloring, beads, butterflies or artificial flowers, or you can make a whole bunch of balls of different sizes.

Using the same principle, you can come up with your own unique design lamp For example, from lace, or ceiling lamp as in the photo below.


Method 2. Creating a masterpiece - you need to try!
You can get excellent kitchen lighting if you make your own lamp from beads or fabric. You will get a lamp in style or a real candelabra chandelier.
For this job you will need:
- An old hoop, garden basket, hanging metal planter, or wire to create a frame;
- Decorative chains;
- Beads, beads, ribbons, strong threads;
- Lamp socket.


The lamp will be a two- or three-level structure of rings located one above the other and connected by chains or wire.
Rings can be taken different sizes, creating a lampshade in the spirit of a vintage classic, or the same - this is exactly the kind of lighting that is performed in.


The base of the lamp is certainly painted, wrapped or decorated, after which they begin to string the beads.

The consumption of beads in this project is as follows:
Bottom part: beads with a diameter of 16 mm, 15 pcs. on a thread;
Upper part: beads with a diameter of 12 mm, 31-32 pcs. on the thread.
Here you can vary the degree of tension and the number of threads.
Advice! The work should be carried out by first hanging the chandelier and inserting a socket into it.
By analogy, you can create a chandelier from artificial fruits for the kitchen. And subdued lighting will be achieved if you use fabric to cover the frame. As a rule, such a lampshade is made for country and country styles.
Method 3. Lamps made from waste materials - for a modern kitchen!
The most original lamp can be made from this waste material, How plastic bottles and disposable spoons are beautiful, cheap and environmentally friendly!
We make a lampshade in a minimalist style and - no additional decorations from threads or beads, only matte white or colored plastic. To make such dim kitchen lighting with your own hands, we will need:
- Base made from a 5-liter plastic bottle;
- Cartridge with wire and lamp;
- Glue for high-quality fixation;
- Lots of disposable spoons.
To make a chandelier with your own hands, cut out the bottom of the bottle and cut off the handles of the spoons (not completely, so that a small handle remains). Using glue, fix the cut spoons on the base bottle. They need to be placed evenly, in a row, then the lampshade will look attractive.
Advice! Each next row overlaps, without gaps.
The resulting chandelier will resemble fish scales. However, it should be remembered that this design is quite dense, which means that additional lighting will definitely be needed in the kitchen.
The shape of the lamp can be different, for example, in the shape of a lotus.

You can also make such decorations from disposable spoons.

A lamp made from plastic bottles, or rather from their bottoms, made with your own hands, may seem like lace or consisting of many small flowers.

Advice! Such a lampshade can be made not white, but colored - which means you need to take colored bottles or paint it with paint original color: copper, gold, steel, pink, black, etc.
The resulting lampshade can be hung in the kitchen or above the dining table.
Let your kitchen be cozy and bright! We wish you creative success and present some more wonderful ideas for making kitchen lamps with your own hands from improvised materials.


Lighting plays an important role in the home. A well-chosen light source is a combination of the correct brightness and power with beautiful design lamp Good decision will become a chandelier, floor lamp or lamp under a lampshade. But if neither the styling is suitable for the interior last century, neither a modern product, a lampshade can be made with your own hands!

Popular materials
Interior elements made according to individual project, conveniently and beautifully integrated into home environment. They are made from those materials and in those colors that are combined with the design of the rooms and are key to a particular style direction.

But appearance- That's not all. Any product must not only match the interior, but also perform its functions. Before learning how to make a lampshade with your own hands, it is important to determine what to make it from. The choice of materials is influenced by the following nuances:
- Lampshade placement. Several options are common: ceiling lamps, floor lamps on a high leg, wall-mounted, table lamps. It is difficult to imagine on a bedside table the same dimensional structure as under the ceiling. In turn, a small bedside lamp will not cope with the functions of a chandelier in the living room.


- Dimensions. The larger the diameter of the lampshade, the more difficult it is to make it from small elements. If you only need a meter of material for a fabric lampshade, then for a shade made of ice cream sticks you will have to eat more than a dozen popsicles.


- Purpose. Lampshades are suitable for many occasions. They create a romantic setting for a date, a cozy intimate setting for friendly conversations, and add zest and lightness to the interior. The more light a room requires, the thinner and lighter the materials should be; the darker the lighting is planned, the denser the materials and the more saturated the colors.


- Price. Not all materials will be cheaper than purchasing a ready-made lampshade. Thus, lace, velvet, and some other noble fabrics are many times higher than the cost of a product made from scrap materials.
Lampshades made of fabrics, leather, various types of paper, fragments of wood, ropes and ribbons, beads, and metal are very popular. No less common are products from “junk” items and “alterations” that have received a new life.


Textile
Not every fabric is suitable for sewing a lampshade. Conventionally, it can be divided into two types: transparent and dense.
Transparent is intended for chandeliers and floor lamps that need to illuminate a large area. This fabric allows you to create beautiful designer lampshades without compromising the technical characteristics of the lighting. Light veils, airy items made of thin lace, and “knitted” openwork lampshades are suitable.
Transparent fabrics should be kept at a great distance from incandescent lamps, and lace fabrics should preferably be starched so that they retain their rigid shape even without a frame.


Thick fabrics are needed to create a chamber atmosphere. These include satin, jacquard, linen, matting, flock, silk, staple, fabrics with photo printing. There is also a fabric on a lighting canvas intended exclusively for lampshades of geometric shapes.
Thick fabrics are more variable in terms of design. They come in any desired shades and can have a pattern: geometric patterns, different kinds cells, plots, birds and animals, floral and plant motifs. Separately, it is worth noting leather products, corrugated fabrics and the possibility of using adhesive tapes and ribbons for forming folds of any shape.


Save on creation original lampshade Recycling old things from fabric will help. You can use holey jeans that you didn’t dare throw away, a sweater that moths have eaten, pieces of burlap and any worn-out clothing.
Tree
In the design of lamps, the base is often made of wood, while the lampshade requires less heavy materials. However, this does not prevent the use of small, light wooden parts non-trivial shape to create a lampshade.

These can be wicker products made from strips of wood (like a basket or box), flexible thin branches (willow, hazel, birch), thin wood cuts with a diameter of up to 10 centimeters, strung on ropes like curtains for a doorway. A lampshade, the frame of which is made from an old trash can, and the shade is decorated with even rows, looks more original. wooden clothespins. Budget options include a lamp decoration made from sushi sticks or a simple and elegant lampshade made from a knitting hoop.
Solid wooden lampshades are also found on the market. These are the thinnest cylinders that retain the texture of wood and transmit light, but they are difficult to manufacture and require some carpentry skills. In addition, due to the material and production technology, they are highly expensive.
Metal
When many people hear the phrase “metal lampshade,” they associate them with bulky candelabra under the ceiling of Gothic interiors, but modern technologies make it possible to produce elegant and laconic products from aluminum and metals with similar properties. They have a variety of shapes, dome depths, and can be solid or consisting of only “ribs,” like a bare frame.

You can easily make a budget option with your own hands from wire (aluminum or copper). Aluminum is larger in diameter, suitable for products of fancy shapes, but without decorative elements. Copper wire is thinner and more flexible. It produces not only intricate lampshades, but also beautiful decor any degree of complexity. Ready product wire can be painted entirely or in separate fragments.
To give the wire the desired shape, use a small bucket, a salad bowl on a leg, a shaped vase, a fruit basket, or any other item that can be wrapped around the top and then removed.

Another option for home creativity is a coin lampshade. If you have old money from the Soviet era at home, then these depreciated rubles can be turned into an original lampshade if you glue them together with edges using superglue. Metal circles of different sizes should form a deep bowl into which the light bulb will fit.
It is important to consider that this is painstaking work, and you will need a lot of coins even for a small product, so you should not choose this option for decorating a chandelier in the living room. But in quality decorative decoration It will be very useful for a table.


Gypsum
Plaster lampshades are a rare occurrence. Semicircular and figured sconce lampshades are more often used in interiors in a historical, especially antique, style.
It’s not difficult to make it yourself. All you need is a plaster mixture, water, a medical bandage and a base on which the future lampshade will be formed. The work is carried out using the papier-mâché technique, only instead of pieces of paper, small fragments of bandages soaked in a plaster mixture are used.
After drying, the plaster product will be textured and uneven. It can be left like this or sanded with fine sandpaper until smooth.


Plastic
Ready plastic products amaze with the variety of shapes, sizes and colors. No fewer original plastic lampshades can be made with your own hands using household items from this material. Among the popular ones are products made from bottles, cups, disposable spoons and straws. The most convenient are large-capacity drinking bottles.


Colored plastic is used to cut out small parts. For example, you can make leaves, circles, ovals, diamonds, and then attach them to the frame. Transparent plastic serves as the basis for painting with acrylic and stained glass paints.
Bottles of 5 liters or more produce a finished lampshade if you cut off the bottom part of the container. The remaining top already has a hole for the cartridge, and the lower edge can be cut off, set on fire (heated plastic takes on bizarre shapes), and trimmed with another material. All that remains is to apply the drawing.


Paper
Paper lampshades are one of the cheapest, most convenient and easiest to make. They are lightweight and versatile. As with textiles, they can be more transparent or dense.
Lightweight and transmitting a lot of light, such lampshades are made of parchment or rice paper. Before cutting out the parts, the sheets must be smoothed with an iron. Thick lampshades can be made from cardboard, wallpaper, newspaper pages using the papier-mâché technique.

Threads
The most popular and simple option is a product made from threads (twine, sisal, twine, jute), which are soaked in a large amount of PVA glue and wrapped around balloon or an inflatable ball. Due to the fact that when the glue dries, it becomes transparent, there will be no marks left on the threads, even colored ones.
A rougher-looking and more complex lampshade is made from braided clothesline or rope. It will not be possible to give it a round shape, but a classic semicircular, cone-shaped or cylindrical lampshade will be ideal for rooms in nautical style and loft interiors. Wicker lampshades made of wicker, twine, and macrame technique also look interesting.

Available materials
With good imagination and skillful hands, you can make a lampshade from less pliable materials: beads, seed beads, scraps satin ribbons, used CDs, shells, book sheets or unwanted music books, corrugated cardboard, muffin tins and many other little things that have no use anymore.


Style direction
Choosing a specific style direction for interior design requires adhering to it even in the smallest details:
- If the interior is dominated by one of the classic trends, you should give preference to high-quality materials and noble shades. Suitable fabrics, lace, bronze, gold and silver elements, elegant shapes, white, beige, burgundy, emerald, brown colors, as well as ivory and shades of precious wood. A lampshade that looks as if it was inherited from an intelligent great-grandmother will look especially advantageous.


- Ethnic design implies the presence of the national flavor of a particular country. European styles tend towards primness and elegance, the Asian region is more characterized by lightness, airiness, simplicity, East style embodies fairy tale motifs, bright colors, precious jewelry, a combination of a large number of shades.

- Russian style, contrary to ideas, is not a heap of national symbols, but wealth, solidity, beauty and good quality; American - freedom of expression and original materials, for example, a lampshade made from tabloid pages.

- Styles, close to nature, favor natural and simple materials– wood, straw, coarse threads.


- Modern directions free from restrictions as much as possible. They allow the use of absolutely any materials, waste items and the most unexpected solutions: lampshades made of rope, candy wrappers, used discs with a mirror surface, paper cups and cocktail straws. And these are just a few variations on the theme.


Master class on making
At first sight, self-production lampshade may seem like no easy task, but detailed description will help you figure it out in a few simple steps. The easiest ones to make include frameless products made of paper, twine, and lace.
To assemble a paper accordion lampshade for a chandelier, floor lamp or table lamp, you will need:
- Prepare a piece of paper (or wallpaper) 150 cm long and at least 30 cm wide;
- Using a simple pencil along a ruler, outline the “edges” of the accordion, 3 or 5 cm long;
- Assemble the accordion, focusing on the outlined lines;
- Using a hole punch, make holes in the lampshade along the upper edge and insert a ribbon or string into them to adjust the width of the upper edge of the lampshade;
- Glue the two ends of the accordion with superglue.

To create the most popular spherical lampshade You will need: 20-25 meters of cotton-linen thread (thick) or soft rope, scissors, PVA construction glue, water, a container for glue, a marker, a thick one-color inflatable balloon, medical gloves, Vaseline, a base for a lamp.
Actions are performed in stages:
- Prepare work surface. It is most convenient to perform actions on a table covered with film;
- Dilute glue with water in a ratio of 2 to 1, lower a ball of thread into the resulting solution. It should be thoroughly wet. If necessary, you can add more solution during operation;
- While the threads absorb the glue, inflate the balloon until the right size, around the tail of the ball, mark with a marker a circle whose diameter equal to diameter light bulbs. Lightly brush the ball with Vaseline;

- Tie the tail of the ball with a thread and wrap it in a chaotic manner until the threads run out. It is desirable that the weaving be thin and cobwebby;
- When the weaving is finished, the tip of the thread must again be secured around the tail of the ball and the excess must be cut off;
- Hang the ball in a dry place for 48 hours until completely dry. It is important to take into account that glue will drip from it, so there should be a container at the bottom.
- Puncture or deflate the balloon and remove it from the lampshade. The product is ready.


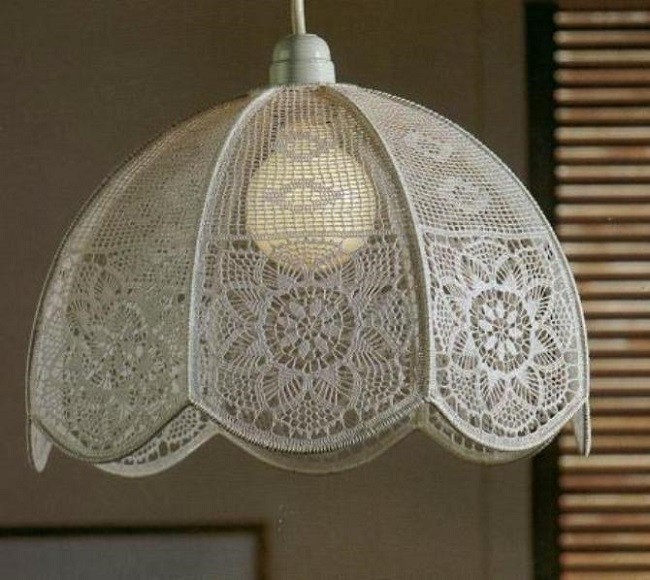
Lampshades made from round lace doilies look incredibly beautiful. They add sophistication and romanticism to the room, and at the same time are very simple to implement.
Since the basis of lace is thread, the manufacturing technology is similar to the previous version:
- Prepare workplace and everything you need: scissors, white glue without yellowing or transparent, lace or lace napkins, water, a contrasting inflatable ball without a pattern;
- Dilute glue with water, immerse napkins for decoration in the mixture;

- Inflate the balloon, mark the hole for the light bulb, grease the surface of the balloon with Vaseline;
- Lay out the lace circles overlapping, moving clockwise from the intended hole for the light bulb;
- Leave for 24-48 hours to dry completely;
- Secure the socket and lamp.
Frameless lampshades also include products made from metal, plastic and wooden fragments that are glued together to form a semicircular or round lampshade. For example, from coins, gears, cups, branches.

A frame is necessary for more complex products made from thin paper or fabric. It allows you to assemble lampshades different forms, size and complexity.
How to make a frame?
The base from an old lampshade is ideal for realizing your ideas.
If it is not there, you can make a new one from the following materials:
- Wire.
- Metal hangers for clothes.
- Plastic containers from under drinks.
- Plastic and wicker baskets.
- Embroidery hoop.

The wire frame is the most labor-intensive, but the product made from it is reliable and strong. The main advantage of the wire is that it allows you to give the base any shape: cone, cylinder, square, tetrahedron.
For assembly you need steel wire 2-3 mm thick, wire cutters, pliers (pliers), round nose pliers, hammer, wooden block, sandpaper, enamel for painting, soldering iron.


Progress:
- Straighten the wire on a wooden block using a hammer.
- Cut the wire into pieces in accordance with the diameter of the upper and lower rings and the height of the “ribs” of the frame.
- Clean the finished fragments from unevenness and rust sandpaper; Using pliers and pliers, give them the desired shape. The classic frame is two round bases different diameters and 4-6 ribs.
- Cut the ends of the base blank at an angle and set them aside.
- At the upper end of each piece of wire for making ribs, make a small buttonhole and thread them into the upper ring of the frame. Distribute at equal distances.
- Wrap the ends of the wire on the upper ring and the junction of the base with the ribs with thin copper wire, press with pliers and solder.
- Use pliers to bend the loops at the lower ends of the ribs, place the bottom ring of the base on them, adjust the distance, press with pliers, wrap with wire, press again with pliers and solder.
- Cover the finished frame with enamel light color so that after some time the wire does not begin to darken and does not leave dirty spots on the fabric lampshade.

A frame made from old metal coat hangers is assembled according to the same principle as a wire one, but requires less effort and is less durable.
To make it, you need to untwist the hangers into long wire strips, from which parts are formed using pliers and round nose pliers the desired shape and size. You can bite off the excess with wire cutters. The parts are connected to each other using construction adhesive, thin wire or electrical tape.
Empty plastic bottles with a volume of 5 liters or more can also serve as a good base for a lampshade if you remove the lid and cut off the bottom. The resulting lampshade can be painted, painted, and decorated with plastic parts.
Three-kopeck plastic baskets for used paper and outdated wicker baskets provide great scope for imagination. They are almost ready to be used as a lampshade; all that remains is to make a hole in the bottom for a light bulb, and if you use your imagination and decorate them, no one will recognize yesterday’s trash can in the luxurious floor lamp.
The last type of frame is also based on the use of a familiar object in an unusual way. For making simple and convenient wooden base You just need embroidery hoops of different diameters. The rings are connected to each other using a rope, braid or cord using any convenient knot or through holes drilled around the perimeter. You can arrange them by size in ascending order for floor lamps and in descending order for ceiling chandeliers.


How to sew from fabric?
To sew a classic fabric lampshade in the shape of a cylinder, you will need a pattern, textiles, the upper and lower frame rings, PVC film for lampshades or white cotton, textiles and a spool of thread in color, sewing machine, iron, glue, scissors, clothespins, wet wipe, weights.

Step-by-step instruction How to reupholster an old lampshade with new fabric or cover a new frame with a cover includes several steps:
- Preparation of the workplace.
- Creating a pattern drawing. It is enough to measure a cylindrical lampshade with a centimeter tape, and a conical one needs to be “rolled” over a sheet of paper to draw a pattern. Having marked the beginning, it is applied to the line on the paper so that it coincides with the mark, and rolled along the sheet, marking a new point at the top and bottom every 3-5 centimeters until the “beginning” mark touches the paper again. A second line is drawn at this point. To the finished drawing you need to add 2-4 cm along the edges, then transfer the pattern to fabric and PVC film. Cut out the part on the film.
Lamps are not just a source of artificial lighting in the interior, but also important element decor, without which the composition looks incomplete. You can create bright accents by making a lampshade for a chandelier with your own hands, because it is not at all necessary to spend huge amounts of money on purchasing designer models. Read about the nuances of work in our article!
Where to begin?
When creating a lampshade with your own hands, keep in mind that using a regular incandescent lamp is not the best idea. It is better to opt for energy-saving light bulbs that do not heat up so much and, accordingly, do not heat nearby parts, thereby ensuring safety. In addition, they are quite economical, which allows you to save money on electricity, and are also durable.
When choosing a material for a lampshade, focus on both aesthetic properties and specifications. Firstly, these must be environmentally friendly, preferably natural, bases that will not distribute unsafe substances with minimal heating.
Secondly, the lampshade should not collect a lot of dust: some surfaces, like fabric ones, are more prone to this than others. Choose an option that is easy to clean and can be easily wiped with a damp cloth. This does not apply to paper, but due to the cheapness and simplicity of the material, such a chandelier can always be replaced if necessary.
Thirdly, the chandelier should illuminate the room well without darkening it. However, for some interiors, dim lighting is more suitable: in a nursery, bedroom or living room for an intimate atmosphere. In such cases, you can show your imagination by making a lampshade that creates light patterns in the room. You, as the author, can implement any of your decisions - and this is probably the main advantage of homemade lampshades.


Selecting a lampshade to match the interior style
The chandelier can become bright accent in the interior or as an inconspicuous but important addition. With any choice, the lampshade should harmoniously match the style of the room.
Unfortunately, not every product can be created with your own hands. For example, classics are characterized by elegant crystal, glass or hardware, which you can’t make yourself. But there are other options.
Minimalism
A laconic and laconic composition of minimalism can easily be disrupted due to one extra detail, which will be especially noticeable in such an interior. Regardless of the type of room, simple geometric shapes, the absence of hanging elements, as well as a uniform color scheme that is included in the overall palette of the space will look appropriate here.
Metal ones work well frame structures, which slightly darken the light, or paper shades without decorative details.


Loft
This is where you can really go wild, in a loft interior, in which they will look organic homemade products from unusual materials. It’s not scary if the appearance of chandeliers reveals their non-manufacturing origin, because many details of this style highlight their imperfections as their main advantage.
It is permissible to use even familiar objects for lampshades: transparent jars, metal appliances, frames made of thread or wire. If the ceiling height allows, then a long one would be an excellent option. pendant chandelier with a minimalist cap.

Scandinavian style
Despite its northern origin, this style of interior design looks very cozy and modern. Minimalistic in nature Scandinavian style prefers natural materials, as well as light, mostly white, colors.
There are many options for chandelier design - the style does not greatly limit the shape. But not everything can be created independently. Ball-shaped, airy models made of thread or paper are suitable.


Provence
Coming to us from distant French villages, Provence prefers a simple, cozy aesthetic. natural materials, floral patterns, as well as light shades. This is approximately what a lampshade for a chandelier should be like.
Products made of fabric or lace with a round shape look appropriate. With a small level of skill, you can decorate a glass dome with decoupage, thereby saving money - after all, despite its simplicity, authentic Provence involves significant costs in the arrangement.


Paper lamps
Despite the fact that paper is not considered the most reliable basis for lampshades, the ease of working with it and its noticeable low cost have made this material very attractive among handicrafts. In addition, with its help you can update your interior at least every month, creating new crafts.
Origami lampshades
Who wasn’t interested in origami as a child, designing little animals or complex modular paper products? Now you can use your skills for more practical purposes. However, even people who have encountered this activity for the first time can also easily master it and make origami lampshades for a chandelier with their own hands.
These are laconic designs of different geometric shapes that will fit perfectly into modern interior. It is not recommended to use very strong paper, as it does not transmit light well.


Figured products
However, lovers of more varied decor can create the most varied lampshades from paper. various forms. For example, surround the lamp with paper houses, butterflies or envelopes.
The appearance of such a lampshade also depends on the surface - plain, patterned, newspaper, and so on. By combining these materials, completely different effects can be achieved.

Chinese lanterns
If you have paper lanterns at home, do not rush to use them as an independent lamp, because this is an excellent basis for other experiments.
You can paste it over with anything you like, but to avoid homemade look— we suggest decorating the ball with small paper flakes or long “feathers” that will gracefully hang down to the bottom.


Lampshades made of threads
Various threads and ropes are an excellent base for a lampshade, which is suitable for creating an intimate atmosphere due to the darkening effect.
Graceful cocoon
A round lampshade made from randomly twisted threads looks very simple and at the same time stylish. In order for such material to hold the desired shape, it is fixed with glue on a balloon, which is delicately removed after finishing the work.
Although the field for creativity here is small, you can always experiment with colors, weaving in several shades.

Knitted lampshade
This solution made from threads looks less chaotic. The main conditions for making it are the ability to knit or the presence of a grandmother who will kindly knit a napkin for you. The finished product must be placed on any base - metal carcass, transparent container, Chinese ball. Similarly with the first option, you can attach the lampshade to the balloon using glue.


Bottle lamps
Stylish chandeliers for rooms different types You can even create them from bottles. This includes both glass and plastic containers.
Glass bottles or jars
The principle of working with such a base is simple: choose the most beautiful one and hide the lamp in it. Elongated bottles or small jars can be used. It is necessary to make sure that the glass transmits the amount of light required for the room, and if there is not enough light, several sources can be used.
If the chandelier plays more decorative function, the bottle can be covered with acrylic paint or painting.


Plastic lampshades
Plastic bottles should not be used untouched. But to make cheap parts out of them for homemade lampshade is quite real.
Luxurious (as far as this word is generally applicable to plastic) look chandeliers from the bottom regular bottles, which are shaped like a flower. They are fastened together with wire for better fixation, creating a variety of compositions.
Another option is a 10-liter eggplant covered with plastic spoons, which are lined up in several rows, like scales. The design will transmit muted but uniform light, which will further decorate the product.


Lampshades made of metal elements
Enough unusual solutions Metal products are also offered for chandeliers. Fortunately, you don’t need to make them yourself, so you don’t need any special skills in working with metal. But a spectacular appearance is guaranteed in any case.
Kitchen appliances
Don't rush to throw away old spoons and forks - you will need them to create original design. By placing a dozen fixtures around the lamp, you will get an excellent shade for a kitchen chandelier that fits perfectly with the theme.
The same effect can be achieved by using, for example, a grater. In general, you can experiment with any devices, especially if your interior is decorated in a loft style. Just make sure that metal parts didn't get very hot.


Gear dome
If you want to add a little steampunk into your life, make a chandelier shade out of gears. You can get them by dismantling an old bicycle or buy them at a flea market. But the result is definitely worth the effort!


We looked at the features of making lampshades for chandeliers with our own hands and the most popular solutions from various materials. But interesting options, of course, much more - as evidenced by our selection of photographs. Enjoy watching!


Problems with choosing lamps are familiar to many. Lamps are purchased last, so combining them with all other interior elements can be difficult. But there is no need to despair. After all, you can make spectacular lamps yourself without spending a lot of time and money.
1. New Year's decor on the chandelier

Plastic beads, which can be purchased in the department New Year's decor, can be decorated ready-made lampshade. Bright colors and shine will turn the lamp into a real decoration of any interior.
2. Cityscape

The outlines of city roofs, cut out of dark paper, are pasted onto a light lampshade. This application will easily transform a boring monochromatic lamp.
3. The whole world at your fingertips

In every home there are old maps that have been lying around unused for years. You can make a lamp from them with your own hands. Simply wrap a piece of appropriately sized card around an old lampshade. For a neater look, the paper can be coated acrylic varnish.
4. From papier-mâché

To make an original lamp with your own hands, you will have to remember the papier-mâché technique, familiar to everyone from childhood. The paper needs to be torn into small pieces and left for a couple of hours in an aqueous PVA solution. Then the paper pulp is applied layer by layer to an object of the desired shape - for example, an inflated balloon. After the papier-mâché has dried, the lampshade is ready.
5. Second life of old newspapers

Simply covering the lampshade with newspaper, artificially aged with tea or coffee, is too simple a solution. Cut out circles from it and glue them so that they partially cover each other. Interesting game light and shadow guaranteed. Additionally, it is better to varnish the lampshade.
6. Eternal lampshade

From an old metal basket or ordinary wire, you can make a lamp with your own hands, which will become a champion in strength and durability. In addition, this lampshade is also completely fireproof.
7. From bright cocktail tubes

A lamp made from cocktail tubes looks democratic, but at the same time impressive. Just glue the tubes on one side to the old lampshade using silicone glue. If you cut the tubes in half, the lamp will be smaller.
8. Chic and shine

Beads that have no use can be used to decorate a lamp. Thread them onto thin jewelry wire (available at craft stores) and attach it to the metal base of the lampshade.
9. Clear geometry

Cocktail straws painted in gold or silver colors will become the material for making a lamp with your own hands. They are fastened together with threaded thread.
10. Lace patterns

Simply cover or cover a plain lampshade with contrasting lace. In the first case, it is better to use elastic lace: they will fit more tightly to the surface of the lampshade and look neater.
11. Paper chaos

Regular White paper, rolled into tubes, becomes the raw material for the original lampshade. Glue them together in a chaotic manner, moving from bottom to top.

12. Cozy lamp for needlewomen

Any unused buttons can be used to make a cute lamp. String the buttons onto strong threads and secure them to the top of the lampshade.
13. In harmony with nature

An intricately shaped branch will be an excellent basis for unusual lamp. In addition to this, you will need several light bulbs in sockets. Simply wrap the wires around the branch.
14. Almost edible chandelier

The base from an old lampshade, decorated with cutlery, looks quite brutal. This lamp will fit perfectly into the interior of a country or loft style kitchen.
15. Delicate textile petals

To make such a lamp, a fabric is selected whose edges do not fray. Petals cut from it are attached to the lampshade with glue.
16. From decorative rope

Generously spread the base for the future lampshade thick and wrap tightly with a rope with a rough texture. It is not at all necessary to use an old lamp as a base. It will even do old dishes, such as glasses or bowls.
17. Lamp in a skirt

Translucent textiles, for example, tulle from old curtains, can find a second life. Gather it into folds at the top and secure it to the boring lampshade.
18. Patchwork style

Many multi-colored scraps are tied on the base of an old lampshade. The more there are, the better.
19. From favorite postcards

Often postcards and photos, even those you like, lie idle for years. Cover a boring lamp with them and it will instantly be transformed.
20. Our whole life is a game

Playing deck, which is missing several cards, should not be thrown away. Thick glossy paper with a contrasting pattern is an excellent material for decorating a lampshade, practical and beautiful.
So, the lighting problem is solved. It's time to get acquainted