Siding installation technology: secrets and features. Do-it-yourself siding installation: stages of work and detailed instructions What you need to install siding
Due to its availability, ease of installation and aesthetics, siding is gaining popularity and becoming worthy competitor other types of facade finishing.
He not susceptible rotting, is not afraid of moisture and temperature changes, does not warp, does not require painting, and is easy to clean.
Types of siding:
- Polymer siding made from polyvinyl chloride and acrylic plastics. Does not rot, does not delaminate, is not flammable and non-toxic. What makes him different is low price and ease of installation.
- Metal siding More often used for finishing industrial and commercial premises, less often for residential construction. It is a galvanized steel profiled sheet covered polymer composition. It is fire-resistant, strong, durable, and not afraid of corrosion. The service life is 30-50 years. Requires careful processing of attachment points and cutting areas to avoid corrosion.
- Fiber cement siding made from cement with the addition of cellulose fibers. Does not burn, does not rot, environmentally friendly. Does not deform and is not affected by temperature changes. Has higher sound insulation properties than plastic and metal types. Fastened with self-tapping screws or shaped metal plates. Demanding on the quality of installation - errors can lead to a decrease in strength and resistance to moisture.
Vinyl siding installation technology
Even beginners can install vinyl siding without much experience construction work. The material is plastic and during installation the likelihood of damage and injury is very low.
For installation you will need:
- tape measure and construction (preferably laser) level;
- electric jigsaw or knife for cutting siding;
- drill or hammer drill;
- screwdriver
Important: It is permissible to use a grinder to cut siding, but since at high speeds the cut can heat up and become deformed, you need to ensure that the tool is used only at low speeds.
Before installation must be removed from the surface to be sheathed climbing plants, drainpipes, fastenings, lights, ebbs - all elements that interfere with the installation of panels.
For horizontal siding, the sheathing is installed vertically in increments of 40 cm, with vertical installation- done horizontally. When installing need to be constantly checked level using a building level, plumb line or rule.
Simultaneously with the installation of the sheathing the wall is insulated- the space between the bars is filled with heat-insulating material. The thickness should be equal to the thickness of the bars.
Rules for installing vinyl siding
Basic rules for installing vinyl siding:
- It is nailed in such a way that there are no obstacles to its changes under temperature changes. To take into account its expansion and contraction, leave 5-6 mm between the end edge of the siding strip and the J-planks.
- If installation takes place at a temperature below 0ºС (installation is permissible down to a temperature of -10ºС), the gap must be increased to 9-10mm.
- There is no need to attach the panels too tightly to the surface. When driving nails, leave a gap of 1-1.5 mm between the nail head and the strip.
- Screws and nails are driven strictly at right angles and only into the middle of the fastening hole, observing a step of 30-40 cm. After covering the entire surface, the panels should move freely within the fastening holes.
- Each panel needs to be connected to the bottom panel and pushed up, clicking the lock, then nailed. It is necessary to avoid fastening too tightly and too loosely.
- When installing platbands, shutters, wiring, holes are drilled with a margin of about 5 mm in diameter for thermal changes in the panels during temperature fluctuations.
Panel installation
 For installation starting bar
You should find the lowest point of the surface to be sheathed, using a building level, and apply chalk markings. The starting bar is installed with the top edge along the marking line.
For installation starting bar
You should find the lowest point of the surface to be sheathed, using a building level, and apply chalk markings. The starting bar is installed with the top edge along the marking line.
External corner provided for closing end edges at the corners of the house and matches the sheathing of perpendicular surfaces.
If necessary, the inner and outer corners can be joined by cutting off the side parts of the upper edge at 2.5 cm, leaving the central part. Next corner panel overlay with a gap of about 0.5 cm.
Connecting H-bars are installed in the middle of walls to highlight openings, on blank walls of a large area, at junctions with extensions. In their locations, an additional profile in the sheathing is required.
Being vertical elements, they are installed in the same way as corner strips - the first fastener is mounted in the upper part of the upper hole, the rest - strictly in the middle. The openings are finished, using J-straps.
Finish panel installed flush with the cornice at the top of the wall. Top cut last panel snaps into the groove of the finishing strip.
Installation of soffits and cornice boards
For installation of soffits and cornice boards necessary:
- An additional sheathing strip is mounted in the middle of the eaves overhang for subsequent installation of fasteners.
- Soffits are installed before the last siding strip is installed. The elements in which they will be installed are mounted parallel to each other. One receiving profile is installed on the eaves overhang, the other is mounted on the wall at the desired height, using a level.
- To install the soffit into the receiving elements, you need to measure the distance between them along the inside and cut the panel 6-8 mm smaller than this size.
- Insert the soffit into the receiving element on the wall, then into the element installed on the eaves.
- Soffits are connected at the corners of the roof at angles of 45º and 90º.
- When installing soffits on eaves overhangs, it is more convenient to use fillets (eaves moldings) to install the last siding panel. Since they are attached not to the wall, but to the eaves of the roof, they can be fastened at the distance necessary to engage the siding panels.
 Cornice moldings can also be placed on top of a facade finished with siding. Additional holes are made on the last strip of siding using a hammer drill.
If necessary, a wooden leveling strip is mounted under the siding panel. The fillet is mounted on top of the siding panel and covers the mounting holes.
Horizontal installation of panels
In addition to the usual requirements, for this type of installation rules are followed:
- installation starts from a corner or from a door; fasteners - from the middle to the edges;
- the last fastening is mounted 10-15 cm from the end of the bar;
- You cannot install horizontal strips inside vertical elements until they stop;
- you need to check the level of each row of panels.
Installation of planks on walls adjacent to the roof
It is more correct to install here siding without overlap using solid panels. In cases where it is impossible to do without an overlap, it is made “from the roof” so that the snow slides off easily without clogging the cracks.
If roofing iron is used as waterproofing, when installing the receiving profile, it must be move it 2-2.5 cm from tin sheets heating up in the sun.
 Ordinary stripes Metal siding is installed in the same way as vinyl siding. Subsequent rows of planks are installed on the previous rows until the lock clicks with tension.
If necessary, the lower part of the bar can be pushed up. Galvanized steel is used to fasten metal siding. self-tapping screws with seal. They are matched to the color of the front side of the planks.
Unlike vinyl siding, additional metal elements can be ordered in the desired configurations with the only limitation on length. Siding is successful as a finishing material, including due to its ease of care.
To maintain a good appearance, it is enough to wash it periodically warm water with addition detergents. Can not use in this case, bleaches and powders with abrasive particles. When washing with a hose, the stream should be directed from top to bottom.
With a little effort and strict adherence to installation recommendations, you can save money at the work of builders and achieve excellent results.
For an educational film about vinyl siding installation technology, watch the video:
Materials for self-finishing There are many facades. However, covering a house with siding with your own hands stands out among them due to its low cost and extreme ease of installation. Most often, home craftsmen choose vinyl for such cladding of their cottage. façade panels, the installation technology of which we will consider in detail in this article.
Components and start of work
To properly cover a house with siding from the street, you must strictly follow the manufacturer's instructions. Most of the complaints about self-stuffed PVC cladding then arise precisely because of non-compliance with the banal rules of its installation.
There are several types of vinyl siding planks:
Types of components
Initial – starting rail, the first lowest element;
The main panel is the basic segment of siding covering a house;
Finish – the topmost stripe;
Connecting (docking) – H-profile for joining short panels;
Hinged - ebb protecting the windows and base of the house from precipitation;
Near-window (wide J-profile) – platband for decorating slopes;
Corner (external and internal) – for covering the ends of siding panels at corner joints;
Soffit – ceiling panel for sewing cornices and gables of houses;
J-trim – narrow universal J-profile.
The variety of plank shapes only simplifies independent cladding. There is a set element for every corner and ledge of the house; you just need to correctly calculate the required number.
Calculation of material for cladding and necessary tools
For calculation Supplies you need to calculate the area of the facade covered with siding, and then divide it by the square footage of the selected panels. In this case, it is necessary to take into account the sizes of windows and doors that the house has, removing them from the calculations. You also need to take a 10% margin for adjustment so that everything can be finished without problems or restrictions.
To decorate a house with siding you will need the following set of tools:
Level and plumb;
Ladder;
Screwdriver;
Scissors and hacksaw for metal.
If the walls of the cottage are built of concrete or brick, then you will need a drill to drill holes for the dowels of the sheathing. Will not interfere with siding self-cladding at home and grinder. It will make cutting the panels easier and faster.
Insulation and waterproofing of the house
Before you start covering the house, you need to clean the walls and seal the cracks in them. Under the siding old paint and the plaster will not be visible, but it is better to get rid of them. If the house is made of wood or aerated concrete blocks, then a vapor-permeable waterproofing film must be attached to it under the sheathing.
The insulation is placed between the guides of the frame, which is stuffed under the finishing material in question for the facade of a private house. Next, another layer of waterproofing is laid on top of it. Moreover, everything is done so that an air cushion remains between the membrane and the heat insulator on the walls of the house.
DIY siding installation
To attach vinyl panels to the sheathing, you can take:
Screws (self-tapping screws) with a diameter of 3.5–4 mm
Nails with a stem section of 3 mm and a head from 8 mm
Their consumption when decorating a house with siding is calculated based on the step between these hardware on the strips of 30 cm. Fasteners in wooden slats or metallic profile the frame must fit at least 20 mm. In this case, a space of 1 mm should be left between its cap and the PVC lining. If this is not done, the vinyl siding of the house will warp and ripple when the outside temperature changes.
Assembling sheathing for cladding a house with siding
The sheathing is made vertical or horizontal with a distance between the slats (profiles) of 30–40 cm. These guides must be placed across the main vinyl planks. But by definition there should be no crossbars between them. You need to cover the house with siding yourself so that there is space under the panels for natural air circulation.
To ensure reliable fastening of the PVC cladding, additional support rails are installed around the openings and along the corners of the building. They are also needed in places where lamps and drains are hung on walls. It is required to securely fasten not only facade panels for exterior decoration of the house, but also various decorative elements on them.
House sheathing
Installing the starting bar
The first to be fixed to the walls is the starting bar. To do this, a rope is pulled level around the house on nails at a height of 3-4 cm from the lower edge of the mounted sheathing. The starting profiles are attached around the perimeter of the building not end-to-end, but at intervals of 5–6 mm in case of thermal expansion.

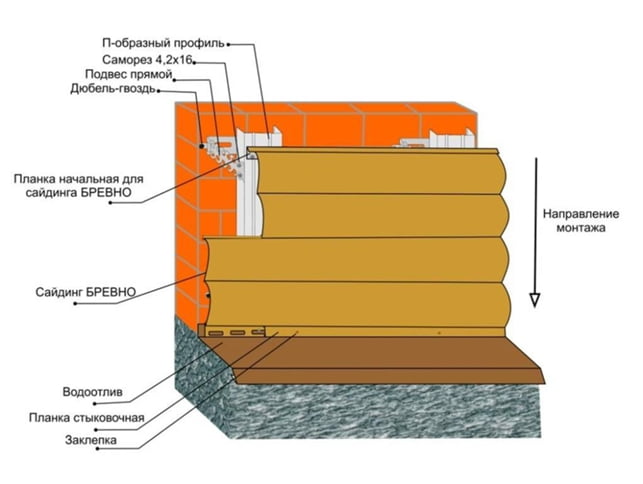
Installation of low tide and starting bar. Low tides are installed from the corner of the house. The starting profile is mounted 30-40 mm above the ebb strip.
When covering houses with siding, it is extremely important to fix the starting strip correctly and evenly. It serves as the basis for the entire structure external cladding. The clarity of the geometric lines and the overall appearance of the siding decoration of a private house depends on it.
Setting internal and external corners
Next, the external and inner corners, installed at the junctions of two walls. Their lower edge should be located just below the starting strip already attached to the house. The first self-tapping screw is screwed into the top hole for fasteners so that the corner hangs on it.
External and internal corners are installed so that the bottom edge is 4-6 mm below the starting profile, and top part 1-3 mm below the soffit or cornice
Then the corner is aligned strictly vertically. The remaining screws are screwed down the bar in 30 cm increments in the middle of the holes and not all the way. This is the only way the PVC cladding of the house can “breathe” and not deform.
Building up corner elements is done overlapping. At the bottom of the top bar, the inner side edges are trimmed by 25 mm. It is inserted into the bottom corner by 20 mm, which leaves a gap of 5 mm for thermal expansion.
Installation of strips on door and window openings
The next stage is covering the house openings for windows and doors with platband. In order for everything to turn out beautifully in the end, you will have to work hard here. In the upper horizontal J-profiles you will have to make cuts in the sides with a bend of the cut part of the panel, and in the lower ones you will have to make an angled cut at 45 degrees.

Trimming the window profile
The vertical strips are cut at an angle at the top, and cut out at the bottom with a similar bend on the side. The purpose of all these manipulations is not just to cover the house beautifully with siding, but to join the platbands so that water cannot seep into the joints anywhere.
Installing the main panels
With basic planks everything is much simpler. The first of them just needs to be inserted into the starting profile, and then fixed to the sheathing. The rest will follow one after another. It is the ease of installation of the main panels that allows you to decorate your house with siding with your own hands in literally a day.

If there is not enough siding length, we join several planks through an H-profile. To do this, do not forget to install and secure the connecting H-profile in advance. The distances below and above are the same as for the outer or inner corner
Installation starts from the starting profile and ends with the finishing profile or molding

Don’t forget to make “hooks” at the top of the panel

The finishing strip is attached to the upper edge of the wind board using “hooks” similar to the molding.
Soffits are installed between the molding and the J-bevel
The planks should be fastened from the middle to the edges, placing the screws exactly in the middle of the holes on the edge. The finishing touch to the vinyl cladding of houses is the installation of the finishing panel with the insertion of the topmost main PVC strip into it.
What to consider in order to properly sheathe a house with siding
The technology of work is such that house cladding can be done all year round. But when sub-zero temperature The siding should be taken outside in advance to allow the material to acclimatize.
If the house is old, then there should be no problems with vinyl paneling. But the new building must be allowed to settle completely, otherwise the façade decor will necessarily be deformed. No amount of clearance will help in this situation.
Numerous photos of houses covered with siding are pleasing to the eye. To self-installation everything turned out no worse, it is extremely important to follow the installation instructions and leave gaps where necessary to compensate for the expansion of the material when heated under the sun.
Table of temperature gaps
When installing vinyl siding, consider the air temperature according to the table below. For example, if you are installing at a temperature of +10 degrees, then the main strip 3.6 m long can be more warm weather lengthen by 8 mm, and in colder weather shrink by 12 mm.
In a private home there is always something to repair, for this reason it is better to have your own tool. If you don’t have the tool, you can buy it before finishing the house with siding. Believe me, it will not gather dust idle after laying the siding with your own hands is finished. So, to carry out the work you will need to purchase:
- A screwdriver is the main tool, which is simply impossible to do without, since it is with the help of it that most work is carried out. For example, the screws for fastening metal hangers are tightened, the profiles and the siding panels themselves are fastened;
- The building level is necessary for leveling frame elements and siding panels. You can use either a regular building level or a more expensive laser level;
Tip: when working with a metal siding frame, it is convenient to use a regular building level, which is additionally equipped with magnets. Using magnets, the level can be installed on the profile and not held, this greatly facilitates the work on leveling the subsystem.
- Drill with impact drilling function or hammer drill. The tool is necessary if you plan to decorate with siding a house whose walls are made of brick or concrete. Additionally, you will need to have a drill or drill, the diameter of which will correspond to the diameter of the dowels used;
- Metal scissors. The tool is simply necessary, because when assembling the frame, you will need to trim the metal profile, and this is impossible to do without scissors;
- Roulette. To carry out siding installation work, it is convenient to use a tape measure with a magnetic tip;
- Angle grinder (Bulgarian). Convenient to use for trimming metal profiles, as well as siding, regardless of what material it is made of;
- Construction stapler and staples, for installation vapor barrier material;
- A stationery knife or any other sharp knife for cutting insulation and vapor barrier;
- Stepladder or ladder for access to the upper part of the facade;
- You will also need an axe, hammer and nail puller. When finishing a house yourself, there is always something to pull out, knock on, and trim.
Advice: to facilitate installation in the upper part of the facade, special scaffolding. If the height of the house is more than one floor, such scaffolding can be built up, thereby providing access to the highest point.
Work algorithm
Next, let's move on to studying how to install metal siding with your own hands. The instructions for dummies include the following sequence for covering a house with siding with your own hands:
- Calculation required quantity materials;
- Preparatory work;
- Installation of vapor barrier;
- Installation of insulation;
- Marking for subsequent installation of the frame;
- Subsystem installation;
- Siding installation;
- Installation of additional elements.
Material calculation
To carry out the installation of siding panels, it is necessary to calculate in advance the required amount of materials. To do this, you need to measure the length and height of all walls that need finishing, and then calculate their area.

Tip: to calculate the required amount of materials, only the clean area of the walls is used. To determine it, it is necessary to subtract the total area of all windows from the rough area.
To determine the required amount of metal profile in linear meters, you need to multiply the net area of the walls by a factor of 2.2. The resulting result can be divided by 3, thus finding out the number of pieces of the profile.
To install each profile, six metal hangers are required, thus, by multiplying the number of profiles by six, you can find out the exact number of hangers.
It is not difficult to calculate the required number of screws or dowel nails for attaching hangers. You will need two of them per suspension, so you need to multiply the number of suspensions by 2 and get the required number.
Insulation, for sale cubic meters, respectively, multiplying the net area of the walls for finishing with siding by the thickness of the insulation, you can find out the volume of material that will be needed for the work.
The siding itself for finishing a house is calculated quite simply, since you can calculate the area of one siding panel, then divide the net area by the area of one panel and find out the required quantity.
Self-tapping screws for assembling the frame and fastening the panels are calculated based on the clean area that needs finishing. For each square meter area, you will need 50 screws.
After everything has been done and the material has been purchased, you can begin installing the metal siding yourself. The step-by-step instructions advise starting work from the preparatory stage.
Preparatory work
Advice: If work is carried out in a new house that does not yet have window trim, preparatory stage integrity can be checked sealing material windows and, if necessary, foam the defective areas using polyurethane foam.
The preparatory stage includes the following work:
- Dismantling of window sills and slopes;
- Removing drain pipes and their fastenings;
- If there are lighting fixtures on the walls, they also need to be dismantled, and after work on siding the house, the lanterns will be mounted back on the wall. Work on removing and moving lighting lamps must be carried out in compliance with safety precautions. Most the best option, is to entrust such work to a professional electrician;
- Inspecting walls for defects and eliminating them. Seal cracks using polyurethane foam; if the house is wooden, you can treat them with an antiseptic solution, which will prevent corrosion of the material and additionally protect against negative impact moisture.
Installation of vapor barrier and insulation
After the preparatory work, before assembling the frame, it is necessary to install a vapor barrier and insulation.

Important: if polyurethane foam is used for insulation, then there is no need to install a vapor barrier and you can immediately begin marking and installing hangers. Work on the insulation of the facade can be carried out both after the frame is installed and before its assembly, and after the frame has already been assembled.
The vapor barrier is fixed vertically with an overlap of 10–15 cm. If the walls of the house are wooden, then the work is carried out using construction stapler, otherwise for fastening you will need additional dowels, with washers placed under the screw head.
After installing the vapor barrier, thermal insulation is laid and secured using dowels for insulating materials. At this stage there is no need to secure the insulation to the a large number of dowels, since in the future it will be securely fixed using hangers for the metal profile installed on top of it.
Marking
When marking, you need to remember the basic rules for installing the frame; adhering to them, you will not be able to make mistakes when installing the frame. The basic rules for installing a subsystem include the following mandatory requirements:
- The frame must be installed in such a way that the distance between the nearest profiles does not exceed sixty centimeters;
- At the corners of the walls, at a distance of no more than 10 cm from them, a profile must be installed without fail;
- If you plan to install vinyl or acrylic siding, then it is necessary to make special corner jumpers onto which the corner strip will be attached in the future;
- Profiles must be installed on all sides of windows and doors;
- The pitch of the hangers holding each of the profiles should be no more than sixty centimeters.
Frame assembly
Work on assembling the frame begins with the installation of the outer profiles. They must be secured strictly vertically. The location is controlled using a level. Next, between the outer profiles, for ease of installation of the remaining frame elements, you can stretch several rows of construction cords. As a rule, three rows are made (at the very bottom, in the center and at the top).
After the frame is assembled, you can check its correct installation using metal rule or profile. To do this, you need to press the rule to the frame, capturing at least three profiles. If the rule is pressed tightly against all three elements of the system, it means that the assembly was carried out correctly, otherwise, when curvature is observed and the rule is not pressed tightly, it is necessary to carry out work to eliminate the causes of this phenomenon.
Installation of metal siding panels
Metal siding, unlike its plastic counterparts, has sufficient rigidity and can be installed without additional elements. For example, such as corner or near window trims.
You need to start work on attaching the siding to the frame from the bottom and gradually work your way up. To attach the first strip of siding, you can use a starting strip, which must be leveled horizontally and firmly attached to the frame using 13mm psh-tapping screws.

If desired, you can do without the starting one; in this case, the siding strip is immediately leveled and attached. To prevent the lower part of the siding from dangling, it is secured to the profile with self-tapping screws.
Important: when attaching metal siding without additional starting line, the bottom row of screws holding the strip of siding will be visible. If this is unacceptable, you must use a starting strip for installation.
The length of one strip of siding is six meters. In the event that this is not enough to cover the entire width of the wall, a special connecting profile is used to connect the siding strips. It is installed strictly vertically, in the place where the siding panels are planned to be joined. To install a connecting profile in a place where there is no frame element, you can make horizontal jumpers between two adjacent profiles. The distance between jumpers should not exceed 0.6 m.
After the first strip has been installed and its horizontal position has been checked, the next strip can be installed. To do this, the technological bend on it is installed in the groove of the already mounted strip, after which it is secured in the upper part. The siding is fastened using PSh self-tapping screws, no more than 13 mm long.

Tip: if preparatory work and the work of installing the frame can be carried out alone, it is not so easy to cope with the installation of six-meter strips of siding alone. It is much more convenient to carry out installation with an assistant.
Fastening plastic strips of siding
Unlike metal siding, plastic version does not have sufficient rigidity and for this reason must be installed in compliance with the manufacturer’s recommendations and together with additional structural elements. Therefore, installation work plastic siding begin with the installation of corner and, if necessary, connecting strips. All recommendations for correct installation siding can be found on the product packaging. But especially important points, we'll still look into it. The first point is the need to maintain gaps that compensate for the thermal linear expansion of the product. The gap should be at least 0.5 mm and no more than 1 cm.
The second point is that plastic siding, unlike metal siding, must be secured in such a way that the installed panel can be freely moved to the left or right, to the distance provided for by the technological perforation. To achieve this result, when attaching plastic siding panels, the fastening screws should be installed approximately in the middle of the perforation and not tightened to the end.
By observing these simple rules installation, you can be confident in the quality of the final result.
Below you can watch a video description of how to install siding with your own hands; the video shows step by step the entire process of finishing the facade; in fact, these are instructions for installing siding, with a step-by-step process discussed in video format.
Conclusion
Above, we familiarized ourselves with how to install siding with our own hands. Described step-by-step instruction, is quite detailed, but still does not include all the necessary information. Siding installation work is not difficult if you follow the instructions. The main thing when installing plastic siding is to maintain the gaps and install the fastening screws so that the siding panel can move freely to the distance provided for by the mounting perforations.
The siding installation diagram may differ depending on the material from which it is made. Sheathing a house with metal siding is a little easier for a novice craftsman than studying the instructions for installing plastic siding and carrying out the work, following the required procedure and technical recommendations of the manufacturer of this material.
Siding is a popular material for cladding facades. A practical homeowner chooses this type of decoration for the external walls of the house. Siding has a lot of undeniable advantages. Among them, presentable appearance panels and ease of installation.
The market offers two types of siding: vinyl and metal. Fundamental differences These materials are not included in the installation. But there is a significant difference in characteristics.
Vinyl significantly more susceptible to temperature environment. When heated it expands and when cooled it contracts. This feature is taken into account in the production technology of the panels: they are designed in such a way that during installation, the damping gap necessary to compensate for the expansion and contraction of the lamellas remains.


Vinyl siding has significantly lower frost resistance than metal siding. Therefore, with prolonged exposure low temperatures becomes fragile. This feature of vinyl must be taken into account by those homeowners who live in regions with harsh climates. When you hit a fragile frozen vinyl lamella, cracks will certainly appear on it.

Unlike metal ones, plastic panels do not have fire resistance. But they can be used as additional insulation facade.
IN last years a modernized type of vinyl siding has appeared, which is more resistant to ultraviolet radiation (does not lose its color saturation from sunlight) and has a lower coefficient thermal expansion. This is siding “like a rounded log”. It looks more attractive than the flat panels that line kiosks and industrial buildings. Therefore, it is able to make the facade of a residential building cozy and impressive.


Features a wide color scheme, but is much less often used for cladding private houses.

There are several reasons for this:
- it has the property of heating up in the cold, thereby reducing the thermal protection of the walls;
- When it rains, quite loud sounds characteristic of metal appear.

To cladding wooden house vinyl or metal siding was made with the highest possible quality; at the same time as the panels, additional elements that are required for finishing window and doorways, gables, slopes, These are elements such as:
- start and finish bar;
- soffits;
- J and H profile;
- external and internal corners.


To cover a wooden house with siding, there is no point in purchasing full set additional elements. In choosing their type and quantity, they are guided by architectural and design features building. But starting and finishing strips are always required, no matter what. The set of panels begins with the installation of the starting strip and is completed with the installation of the finishing strip.

Siding prices
The appearance of the cladding of the house depends on how well the sheathing is built. A frame installed in accordance with all the rules can hide any flaws and irregularities in the walls and gables of the building. The lathing is the base to which the finishing material sheets are attached.
When installing metal and vinyl slats, two types of frames are used:
- from wooden blocks;
- from a metal profile.

Any of them is suitable for installing facing material on wooden walls. A correctly installed frame allows you to lay any of the modern heat insulators on the walls. The lathing also provides the ventilation gap required to eliminate excess moisture.

Installation of the frame is not necessary if the walls of the wooden house are perfectly smooth. You can safely attach siding to such a surface without using a structure of additional supports.

Prices for mineral wool
Rules for installing a metal frame
To install this type of lathing, you will need a metal profile, which is used for the device plasterboard walls, ceilings and partitions. These are PN 28x27 and PP 60x27. These planks will be attached to the wall of the house using special hangers, which craftsmen call “pawns”.

If it is necessary to install a two-tier metal carcass, which assumes the presence of a protrusion under the roof or at the top of the wall, special “crab” fasteners are used to connect the metal strips. They are designed for strong joining of vertical and horizontal planks. SMM 3.5x51 self-tapping screws, which experts call “seeds,” are used as fastening elements.

Stages of installation of metal lathing

Step 1: drawing up a sheathing diagram
At this stage of the work, it is necessary to decide what step between the sheathing posts will be optimal. This distance depends on what material is chosen for wall insulation. If this mineral wool in rolls, then the pitch between the frame posts should be 3-4 cm less than the width of the sheet. This will allow the insulation to be laid in the openings between the sheathing posts so that there are no gaps between its sheets.

Step 2: marking
Markings corresponding to the scheme are applied to the wall. Use a marker.
Step 3: installation of hangers

Using wood screws and a screwdriver, attach the hangers to wooden wall Houses. These metal strips are placed horizontally, aligning the marking point with the center of the wide slot in the middle part of the suspension. On initial stage When installing siding, the perforated “legs” are not folded back, but are left pressed against the wall.
Step 4: Installation corner posts battens


Corner posts consist of two PP 60/27 profile strips connected at right angles. They will serve as the basis for installing external and internal corners siding. When installing corner posts, it is important not to make a mistake and install the corner exactly as needed: for external corners with the protrusion outward, for internal ones - with the protrusion inward.
Step 5: installation of intermediate vertical sheathing posts


It is important that all vertical supports of the frame are located in the same plane. If you stretch a thread between the corner posts, installing the intermediate posts will be easier and faster. The lower and upper ends of the PP 60/27 profile are inserted into the PN 28/27 guides and secured with self-tapping screws. Thus, the frame acquires the required rigidity.


Step 7: installation of frame for windows and doors


The metal frame around window and door openings must be a strong frame of regular geometric shape, exactly following the contours of the opening. It is necessary to take into account that the slopes and ebb should have a slight slope from the window installed in the house. Therefore, the frame is mounted in such a way that its vertical and horizontal slats are located at a distance of 1-2 cm from the window lines. The same requirements apply to doorways.

Prices for popular models of screwdrivers
Screwdrivers
Rules for installing a wooden frame
Having figured out how to make a metal frame for siding, it’s easy to install a wooden sheathing. It is installed according to the same rules. But other materials and tools will be required:
- wood screws;
- hacksaw;
- bars with a section of 3x4, 4x4 or 4x5 cm.
Lumber must be treated with an antiseptic solution to prevent premature destruction of the wood. It is recommended to apply a double or triple coat of this composition. The bars must be well dried and smooth. A plane is used to eliminate flaws.

The installation of wooden sheathing under siding does not provide for the installation of guides. The ends of the vertical posts are connected to each other by similar wooden blocks.


Features of installing a frame for covering the base with siding
Siding is suitable not only for cladding walls and gables. It is also suitable for covering the foundation. Since the base is more often exposed mechanical impact than walls and gables, it is recommended to install metal sheathing. Please note that each basement siding panel must be installed 4 vertical racks. The distance between them should be the same.
Installation of siding on sheathing

During installation of the panels, trimming will inevitably be required. Sawing is carried out using a grinder and a circle for metal 1.5-2 mm thick. It is suitable for working with both metal and vinyl siding. You can use metal scissors to cut panels and additional elements.
Step 1: Setting up the starting bar
The quality of all products will depend on how correctly the starting bar is set. further work. Therefore, this process must be taken with full responsibility. The starting profile must be installed strictly horizontally along the entire length of the wall. In order to fulfill this condition, self-tapping screws are screwed into the lower part of the corner posts of the sheathing so that the thread stretched between them is positioned strictly horizontally. It will serve as a guide when installing the starting profile.
It is important that when building up, there is a gap of 0.8-10 mm wide between the slats.


Video - Installing the starting bar
Video - How to insert siding into the starting one, installation using the example of Docke siding (Docke)
Step 2: installing the corner profile
The lower border of the profile should be 0.5-1 cm below the starting bar. When building up the corner profile, trim the side perforation. The optimal overlap of the lower part with the upper part is 2.5 cm. There should be a gap of 8-9 mm between the perforations of the upper and lower corner profiles.
If during work it turns out that the length of the corner profile is not enough to cover the corner, do not rush to the store. You can use existing starter bars. They need to be connected to each other so that it turns out desired angle: internal or external.


Step 3: design of window openings
If the opening is in the same plane as the facade, install two vertical and two horizontal near-window profiles.


If the window openings are recessed into the facade, installation of slopes and ebb will be required. It is important to correctly connect the window strips to each other so that water does not get inside the facing layer.

Step 4: installation of the first panel


Siding panels are simply inserted into the H-profile maintaining a gap of 5-6 mm
When attaching siding and any additional elements, it is necessary to leave a gap of 1-2 mm, without screwing the screw tightly into the frame. Otherwise, the skin will be deformed under the influence of compression-expansion forces.
The end of the first panel is inserted into the corner profile and the locking connection of the starting strip. After this, they begin to attach the siding to the sheathing. When extending panels, 4-5 cm of perforations are cut off.


Step 5: Panel Set
During installation of the panels, it is necessary to regularly check their correct position using a bubble level of at least 80 cm in length.


Step 6: Installing the finishing strip
Having reached the top of the wall, you may find that there is not enough space to mount an entire panel. In this case, measure the distance from the locking mount of the last installed panel to the top of the wall. After that, they take a new panel, apply the appropriate markings on it with a pencil and cut off the excess. The siding is attached to the sheathing and the finishing strip is installed on top of it.


Under the window everything is about the same - the topmost strip is cut to size and simply snapped onto the lower siding lock
Prices for aluminum stairs
Aluminum ladder
How to install window connections correctly and economically
To form slopes, use a plastic or metal L-shaped strip (L-profile). Measure the length and width of the window block and cut strips for the top, bottom and sides of the window.
In order to compensate for the difference between the thickness of the manufacturer's near-window strip and the width of the L-profile, two strips of the same length will be required for each side of the window. One will be inserted into the other, which will simultaneously strengthen the profile.
Take one strip and attach it to the top of the installed window block. Use self-tapping screws SMM 3.5/51. The L-profile is attached in the same way around the entire perimeter of the window.
In order to form the protrusion necessary for installing the near-window strip, a profile of the same length is inserted into the profile fixed to the window. But first apply super glue to it. It is important not to forget that the glued profile must be dry and clean. The L-profile is inserted opposite the one fixed to the window so that the short shelf is connected to the long one.
At the lower corner points of the window towards the frame it is necessary to strengthen similar double strips of such length that it corresponds to the required in this case width of the slope. These twin short strips should sit on the previously installed metal flashing.
Measure the required length of the window strip and cut it with metal scissors. On each side of the plank you need to make a cut at an angle of 45°, which will allow you to form a beautiful slope. Before attaching the planks, cut off the excess perforated junction.
The near-window strip is inserted into the L-profile so that its rectangular perforated protrusion is closely adjacent to the sheathing post located nearby. Carry out fastening.

The self-tapping screws used to secure the siding must be screwed strictly into the center of the factory holes. But the final top trim panel can be secured directly through vinyl or metal.


The finished result - the pediment is sheathed, soffits are installed
Video - Step-by-step installation of factory window connections
Video - How to cut a window profile
Video - Installation of overlapping siding on a wooden frame
Video - How the siding ends at the top
Siding panels are a spectacular design for the facade of a house. Thanks to modern technologies this finishing material can imitate almost any surface - stone, wood, brick. The popularity of such decorative panels due to low cost, as well as excellent quality characteristics. You can install the siding yourself. This does not require any special skills. Just use the instructions below for installing siding with your own hands for dummies.
The sequence of work when installing siding is almost always the same. Here are the main stages of arranging the facade of a house using this technology:
- Installation of decorative panels always begins with the installation of a starting profile. Later it will be completely hidden by the first plate. If the starting profile is not fixed level, then subsequent panels will lie unevenly on the wall, so you need to constantly monitor the correct installation.
- Each siding plate is equipped special lock, with the help of which it is fixed with the previous one. There is perforation at the top of the panel. It is through these holes that the plate is fastened.
- After the wall is completely assembled, the work must be completed by installing the finishing strip.
When installing siding, you should take into account possible linear expansion and contraction of the material due to temperature changes. To prevent the panels from bursting when weather conditions change, it is necessary to create temperature gaps. Siding should not be inserted tightly into vertical and corner strips. The head of the screw/nail that secures the plate should not press it tightly against the frame. The panel should be fastened in the middle of the perforation hole, which will ensure its mobility when temperatures change.
There are no specific rules at what temperature to install siding. It is advisable that the temperature outside is at least minus 10 degrees. But the size of the temperature gaps depends on the time of year in which the installation is carried out. In summer, the side gap should be about 10 mm; in winter, it should be increased to 12 mm.
Rules for installing vinyl siding yourself
Installation of any siding begins with the assembly of the frame. It can be vertical or horizontal. Most often, a vertical frame is suitable for panels such as shiplap or blockhouse.
Arrangement of a vertical frame
First, a vertical line is drawn at the corner of the house using a building level and prepared plumb lines. Holes are drilled along the line at equal distances on both sides for attaching hangers or mounting brackets into which the metal profile is installed. Next, the same guide is attached to the opposite corner of the wall and a construction cord is stretched between them. Adhering to the given level, the remaining guides are attached in increments of no more than 40-50 cm.
It is necessary to additionally install frames made of profiles around windows and doors. In these places, near-window strips or casing will be attached. Additionally, reinforcement of the frame will be required in those places where it is planned to install lighting fixtures or a split-system motor unit in the future.
Panel assembly

Once the frame is completed, you can begin the sheathing process. Panels different manufacturers have various designs additional elements and fixing locks. But instructions for connecting them usually come with the kit. vinyl siding. However, there are general principles panel fastening:
- corner profiles are attached strictly vertically;
- fix the siding panels starting from the middle to the edges;
- When attaching the plates, the self-tapping screws or self-tapping screws are not tightened to the very end.
Helpful advice! To get a gap between the screw and the siding plate, screw it until it stops and then unscrew it one turn.
Assembly begins with the installation of starting and corner strips. Ordinary ones are subsequently inserted into them vinyl panels. Since corner strips are quite flexible, they can be used to create both obtuse and sharp corners. To obtain an obtuse angle, the bar is pressed down a little, and for an acute angle, it is compressed.
A special H-connector is provided for joining row panels. It is necessary when the length of the plate is not enough to completely cover the wall. You can do without using this element. Then the plates are screwed together with an overlap.
Rules for installing metal siding: instructions

The principle of covering a facade with metal siding is the same as with vinyl siding. For installation you will need:
- internal and external corners;
- starting rail;
- connecting profile;
- finishing rail;
- platbands.
Installation of metal siding begins from the corner of the building. The first row of panels is attached to the starting rail with a bottom lock. The following rows are secured with the lock of the previous row. This is how the entire wall is gradually covered. The top row is fixed with a finishing strip.
Helpful advice! If during installation it is necessary to lengthen the corner strips, then the upper part should be mounted on the lower part with an overlap of 2-2.5 cm.
Installation instructions for basement siding
To install basement siding, you will also need to install sheathing. It is performed by creating the same frame as for the walls. If there is no concrete or tile covering around the house, then the lower ends do not reach the ground by about 7-10 cm. Additionally, before you begin installing the basement siding, you need to check how level the foundation is. To do this, measure the height of the base along the entire perimeter. If the height is the same everywhere, then a starting profile can be used for cladding. But if there are significant differences, then you will have to trim the very first panel.
Usually the sides of the plinth panels are stepped, so the protruding parts near the corners will have to be cut off. A straight edge must be inserted into the corner profile. It is also necessary to match the size of the panels and their number with the long wall. The final plate should not be less than 20 cm. The finishing touch can be considered fastening the J-profile around the entire perimeter of the base. It is necessary to protect against moisture.
Photo instructions for installing siding


