Make a hammock yourself from scrap materials. Instructions for making a hammock for outdoors and indoors
Singletracks.com
This hammock can be made from ordinary cheap lining fabric, tarpaulin, linen, cotton, burlap - or anything. It looks simple, but it can be assembled in literally minutes.
What do you need
- 2 thick strong ropes 3–4 m long.
How to do
Fold the fabric in half lengthwise, fold the edge like an accordion and make a small loop out of it. Thread a rope through it and tie knots as shown in the video. Tie the second rope to the other edge of the fabric in the same way.
You can first prepare a hammock to which the ropes will be tied, or you can first tie the ropes to the support and then to the hammock. The knot described below is suitable for both methods. Just choose the one that is more convenient for you.
Wrap the rope around a tree, pole or other support. Make a small loop at the long end of the rope to which the hammock is attached. Thread the same side of the rope into it and tighten it. Thread the other end of the rope into the resulting loop and tighten again.

Carabiners will make the design more convenient and mobile.
What do you need
- 2 carbines;
- 2 thick strong ropes 0.5 m long;
- a rectangular piece of fabric (approximately 3 × 1.5 m or less);
- 2 thick strong ropes 3–4 m long or 2 lashing straps 1–1.5 m long with loops at the ends.
How to do
Attach a carabiner to the middle of a short rope. Fold the fabric in half lengthwise, fold the edge like an accordion and make a small loop out of it. Thread the fastened carabiner into it and tie a knot, as shown in the video. Tie the carabiner to the other end of the fabric in the same way.
You can attach carabiners to a rope or to tension straps.
Tie the rope to the support in the same way as in the previous method. Thread the long end of the rope into the carabiner and pull it out. Wrap the elongated part around taut rope four times and tie a knot as shown in the video.
The advantage of such a knot is that it allows you to adjust the height of the hammock. The knot moves freely along the rope, but remains motionless when tensioned.

If using a strap, wrap it around the support, thread one end of the strap into the loop at the other end and tighten. Attach the carabiner to the loop on the long side of the belt.
 bonniechristine.com
A simple option for those who don't want to bother with knots.
What do you need
- a rectangular piece of fabric (about 2 × 1 m or more);
- threads;
- needle or sewing machine;
- 2 thick strong ropes 4–5 m long.
How to do
Fold the fabric on both narrow sides by 10–15 cm and sew. If possible, it is better to use sewing machine. The seams must be very strong.
 outsidemom.com
Thread the ropes into the resulting loops and pull the fabric in the middle. Then tie the ropes to the supports with strong knots.

Laconic, convenient and quite simple design.
What do you need
- a rectangular piece of fabric (approximately 2.5 × 1 m or more);
- threads;
- needle or sewing machine;
- scissors;
- 32–36 large eyelets;
- drill;
- 2 metal rings;
- 2 strong ropes 10–15 m long;
- 2 carbines - optional;
- 2 strong ropes 3–4 m long or 2 lashing straps 1–1.5 m long with loops at the ends.
How to do
Fold the fabric on both narrow sides by 5–10 cm and sew by hand or by machine. Make holes for eyelets on these folds at the same distance and secure them to the fabric.
 littledogvintage.blogspot.com
Using a drill or other tool, make holes on the slats at the same distance as between the grommets.
Thread the rope into the metal ring and leave an end of 30–40 cm. Thread the long end into the first hole in the rail, then into the grommet from the outside. From the wrong side of the hammock, thread the rope through the next eyelet, through the rail and again into the metal ring.
From the eyelet you can thread the rope into the same hole on the rail through which it passed before. This method will provide an even stronger attachment. But to do this you need to take a longer rope and make wider holes in the slats.
 littledogvintage.blogspot.com
Secure the remaining ends of the rope to the ring with strong knots. Make the same design at the other end of the hammock.
You can attach carabiners to the metal rings and hang the hammock from the supports as shown in the previous methods. You can also thread other strong ropes through the rings and tie them to the supports.

This option is more complicated, but such a hammock will become a real decoration of the garden plot.
What do you need
- a rectangular piece of fabric (approximately 2 × 1 m);
- 30 not too thick ropes 50 cm long - optional;
- stationery pins - optional;
- threads;
- needle or sewing machine;
- 14 beads - optional;
- scissors;
- 2 wooden slats according to the width of the fabric for the hammock;
- 24 small nails;
- hammer;
- 2 metal rings;
- 2 strong ropes 15 m long;
- 2 carbines;
- 2 tie straps 1–1.5 m long with loops at the ends.
How to do
You can decorate the hammock in advance if you want it to look more interesting. Fold the long edges of the fabric a couple of centimeters, place the ropes vertically at equal distances and pin them together for security. Then sew the fabric along with the ropes and weave them into a pattern, as shown in the video. You can add beads for beauty.
On the narrow sides of the fabric, make 5cm long cuts approximately 8cm apart. In the middle of each slats, nail 12 nails at a distance of 3-4 cm. Place a ring 60 cm from the slats, thread ropes through it and weave a pattern, as shown in the video.
You will get two parts from rings and ropes. To attach them to the hammock, thread each loop of rope under the slits on the narrow sides of the fabric. Fold them over, pin them and sew them. Then hang the hammock using carabiners and straps.
Hammock using macrame technique
With wicker elements you can not only decorate a product and give it strength, but also make a hammock out of them from scratch.
What do you need
- drill;
- 2 wooden slats 1 m long;
- 10 braided cords 9–10 m long;
- 2 metal rings;
- 2 carbines - optional;
- 2 tie-down straps 1–1.5 m long with loops at the ends or 2 strong ropes 3–4 m long.
How to do
Using a drill or other tool, make 20 holes in each rail at the same distance from each other.
Take one cord, fold it in half, thread it into a ring and tie a knot. Tie all other cords to the ring in the same way.
For convenience, hang the ring on a hook. Thread each cord through the holes on the rail. The distance between the ring and the rail should be about 20 cm. Then weave the pattern as shown in the video.
Finally, thread the cords through the holes of the second rail and tie to another ring. You can tie such a hammock using carabiners, belts or ropes, as in the instructions for fabric hammocks.
By the way, if you have absolutely nothing to tie the hammock to, you can make the supports yourself. For example, massive wooden stand, resembling a boat:
Or a simple support of two beams:
 minartanddoori.com
Perhaps the most unusual way make a cozy place to relax. A hammock chair will not take up much space, so it can be hung not only in the garden, but even on the veranda or balcony.
What do you need
- padding polyester;
- scissors;
- 1 metal hoop with a diameter of 95–100 cm;
- threads;
- 1 strip of fabric 3 m long and 20 cm wide;
- needle;
- stationery pins;
- square piece of fabric (approximately 1.5 x 1.5 m);
- 4 tie-down straps, approximately 3 m long.
How to do
Cut several strips of padding polyester approximately 20 cm wide. It is necessary to make it more comfortable to sit in the hammock. Wrap the padding polyester around the hoop and tie with thread.

Then wrap a strip of fabric around the hoop and sew it so that the padding polyester is not visible. For convenience, secure the fabric with pins.

Place the hoop in the middle of a large piece of fabric and cut a circle, the diameter of which should be 20-25 cm larger than the diameter of the hoop. Cut small symmetrical notches on the fabric blank with four sides. They are needed to provide a place to hang a hammock.
The hoop should be located exactly in the center of the fabric circle. Pull it lightly under the hoop, bend it and sew it very firmly to the hoop.

In those places where there were notches in the fabric, the hoop will be visible. Thread a belt through this hole and sew it up so that a loop is formed around the hoop. Sew three more belts in the same way.
Tie the straps to the supports so that the hammock hangs at an angle.

This chair will appeal to both adults and children.
What do you need
- drill;
- nails or screws;
- hammer or screwdriver;
- a rectangular piece of fabric (sizes will be stated in the description);
- threads;
- needle or sewing machine;
How to do
Using a drill, make holes in two thick slats on both sides at a distance of approximately 9 cm from the ends of the slats. The diameter of the holes should be such that thin slats can be inserted into them.
After 5 cm from these holes, make one more hole a little smaller diameter. The rope will be inserted there. Insert thin slats into wide holes on thick slats and secure with nails or screws.
The width of the fabric should fit between the small holes for the ropes, and its length should be greater than the length of the prepared one. wooden structure. Firstly, the fabric will need to be folded, and secondly, it should sag a little so that you can sit in the chair.
Wrap the narrow side of the fabric around the thick slats and sew by hand or machine. Insert a short rope into the free holes in the top rail of the hammock and tie each of them with a strong knot near the rail. In the same way, tie two long ropes to the bottom rail.
Then tie all four ropes to the third thick batten. Make two more holes in it for the rope, insert it, tie it and hang the chair by some hook or thick branch.
This hammock looks more impressive, but it will take a lot of cord to make.
What do you need
- drill;
- 3 thick wooden slats approximately 80 cm long;
- 2 thin wooden slats approximately 90 cm long;
- nails or screws;
- hammer or screwdriver;
- 2 thick strong ropes approximately 1.5 m long;
- 3 thick strong ropes approximately 2.5 m long.
- 16 braided cords 8–9 m long.
How to do
Make exactly the same wooden frame as for the fabric hammock chair. You can immediately tie ropes to it and connect it to the third rail, to which the frame will be suspended. This is also done in the same way as in the previous method.
But the seat itself will be woven from cords. Fold each of them in half and tie it to the top rail of the hammock (if you immediately connected the structure to the third rail, then the rail you need will be in the middle). Then you can weave a chair in the same way as a regular hammock made using the macrame technique. But you can make a more original pattern.
When you tie all the cords to the rail, you will have 32 cords hanging down. Take four of them and place the first cord under the last one.
 hunker.com
Place the last cord under the middle two and pass it through the loop. To finish the knot, repeat the same steps again. Then make knots from the remaining cords in the same way.
 hunker.com
In the second row and in all even rows, repeat the knot, starting from the third cord from the beginning, and in odd rows - from the first cord.
 hunker.com
The entire hammock will consist of identical nodes, which alternate with each other in a checkerboard pattern. This is what this weaving looks like:
To tie the hammock base to the bottom rail, wrap four cords around it and tie a strong knot.
The hammock is hung in the same way as the previous one.
And in this article I’ll tell you how to weave a net with your own hands with a shuttle.
A simple way to weave nets by hand for beginners
Hammock – captivating nets for sleeping and comfortable rest at the dacha or in the apartment (whichever is more convenient). Let's start our selection of master classes on weaving hammocks from the very simple option(it is shown in the photo below). The network of such a hammock is woven from a single cord, and it is intertwined without a single knot on the fabric.
If you are weaving a wide net, you can additionally add rope. But not in the middle of the canvas, but first in a new row. Later, when it comes to the diagrams, you will understand what I mean.
Before you begin the step-by-step photo master class, watch Discovery’s video on how to make a hammock with such a seat. By the way, this is a very good video lesson.
And another useful video. Here the hammock is woven at home and from other materials. In addition, pay attention to the design on the wall, which makes it very convenient to weave nets.
Of course, I wouldn’t recommend making holes in the walls in an apartment, but in a garage you can. For those who want to weave a hammock at home, you can build a U-shaped structure from slats or pipes (it is not necessary to use iron pipes - pay attention to plastic/polypropylene ones).
In addition to hammocks, such a network produces excellent hammock chairs - we mentioned them in the article: “”.

Weaving a net for beginners
So, let's move from lyrics to actions. Before weaving the hammock fabric, you need to connect the base chain with small links.
Video tutorial on weaving a warp chain with small links.
And a small step-by-step photo instruction from me. I have ordinary yarn and two pencils as a base (a mini version for demonstrating the weaving technique in the photo).
Before knitting the chain, make a knot with a loop. My version of the knot is shown in photos No. 1-4. As a result, I got a knot that slides along the thread, i.e. You can adjust the size of the loop.
You can use any other knot - the main thing is to secure the thread.
I tightened the loop on the pencil and began to directly knit the warp chain. The progress of the threads is marked with arrows. And then we simply duplicate the actions until we get a chain of the required length.
The finished chain should be equal to the desired length of the hammock + the free end of the cord for attaching to the base. Therefore, you may not immediately cut the cord from the main skein. Tie the chain and then cut it - this way you will definitely have enough rope for the length you need, and on the contrary, there will be no excess.

View of the finished base.

Now you need to weave the main cord into it; the beginning of the work is shown in the video.
Since I have yarn, I resorted to using a crochet hook. In the video from Discovery and presented just above, the thread is threaded into every 6 loops. On my mini version this is too much - I threaded it through one (photo No. 13). So we move the end of the thread from left to right and tie its end (on the right) to the base.
If you are weaving a large hammock from thin threads, then it is also better not to make a large indent. This way the chain links will look neater, and the network will be stronger.
We wrap a thread with a ball (a shuttle with wound threads) around the warp as shown in photo 15. Below in the supplement diagram I will draw your attention to how to wrap the thread behind the warp on the left and right.

The lace on the left and right is drawn around the base differently, and so are the rows themselves. When you go from left to right ( top part photo), the ball must be inserted into the loop from bottom to top. Accordingly, when you go back (from right to left), you push the shuttle from top to bottom.

On a large scale, the network looks like this: we lead the thread back and forth.

We continue to weave like this until we get the desired length. If you need to add a thread to the fabric, tie the end to the base, knitting a full row. Tie a new one to the base on the same side and continue to weave the network according to the pattern (you can also fly in threads of a different color).

Video of weaving a net.
I prefer how the young man weaves a net in the video below (from 2 minutes 31 seconds). Pay attention to how, after knitting a row, he immediately tightens the cords. The result is a beautiful and very neat network.
The hammock seat ends just as it began. You need to weave another chain, the same as weaved at the very beginning, and tie the fabric to it.
Video tutorial on completing the network.
Since I was weaving an inferior hammock, but only a mini net, I did not complete it. Please note that the finished fabric has neither a back nor a front side - it is the same on both sides.
At the beginning of my network, I specially made a raised loop (wrapped in red). As you can see, the network looks the same from both sides.

It was a little stretched between the pencils. Here he lies at rest.

It stretches very well.


In general, a hammock from such a network will turn out to be gorgeous. And if you weave a chair into a hammock (the net is narrow but wide), then, in my opinion, the result will be even better. In the captivity of such a network you can bask at full length.

Below are some examples for inspiration. Please note that both on the hammock and on the hammock chair you can crochet a beautiful fringe - this will significantly improve appearance finished hammock and give it individuality.


How to weave a Mexican hammock with your own hands
Thanks to the inventive Mayan Indians, we can admire the hammocks presented below.

Let's watch a video from the production of hammocks.
Well, are you scared? Amazing technique and speed!
Don't worry, the devil is not as scary as he is painted to be.
First, watch a confidence-inspiring video tutorial with instructions on how to weave a Mexican hammock with your own hands. Don’t worry: I’ll comment on everything and attach it step by step photos and I’ll add diagrams.
So, first, step by step photos from the video. In a Mexican hammock, threads are wound around the pillars of the warp (they are called sleepers), and they are braided with others - workers (their specific name is dancer). The author in the video braids five sleeping threads in steps of 2/3.


Schematically, it looks like this: we thread the thread under 2 sleepers, from above we bring it out over 3, then, on the contrary, we put it under 3, we bring it out over two. We alternate actions until the end of the row.
The next thread (red) goes down one row relative to the first (blue). But we need five threads again, so in each new row from the bottom we add one new cord (marked in green).
Number 2 showed the progress of weaving if you stand facing the net, weaving rows in one direction or another reverse side. And number 3 is the view if you walk around the hammock.

Network at scale. Pink are the initial five threads wound, green and yellow are added with each row.
Blue are those with which the warp threads (dormant) were braided.


And now a correction: the hammock above is woven from thick twine, so it is woven without a base. However, a Mexican hammock is often woven from thin soft threads, and they cannot do without a base. The photo below shows soft mesh hammocks with a special base.

How is it done? The load-bearing/sleeping threads are first knitted with special knots, in several rows - we form columns. Along the length, we make the columns at a distance of eight to ten centimeters. The photo of the instructions showed how they are tied. We tie two threads, in the next row we add one new one and take one from the previous pair, etc.

For greater clarity, watch the video lesson.
By the way, the network in this hammock is woven according to the 2/1 principle - three threads per warp per row (in the previous version we considered 3/2 - five threads per row). As you understand, you can change the number of braided threads to your taste.

As a matter of fact, the first network can be woven using this principle. And by the way, you can easily make it multi-colored. For example, you wind white threads around the warp and braid them with blue cords.

This makes it more convenient to weave a multi-colored net for a hammock.

Well, a little inspiration: if you wish, you can weave a “family” hammock in which you can fit the whole family!

Besides hanging chair This technique is also beautiful.


What to choose thread or cord
A few words about what yarn or cords to weave a hammock from. In general, you should have noticed the external difference between hammocks made of thick cords and thin threads. If you dream of a soft, enveloping, incredibly cozy hammock, give preference to thin threads.
If you are weaving a hammock for your home/apartment (room), you can use cords/threads made from natural fibers (cotton threads). But for outdoor hammocks it is better to choose a more reliable material, such as polyester cord, nylon threads or best option weatherproof acrylic yarn.
How much thread does it take to make a Mexican hammock? – on average, for a hammock measuring 1.27 m wide and 2 m long, you will need 900 m for a sleeping person and the same amount for a dancing one. Those. about 1800 m - this is approximately. The thickness of the selected yarn plays a big role. The thinner the threads, the more of them you will need.
That's all I wanted to tell you about wicker hammocks. For a deeper dive into the material, take a look at the article: how to make a hammock with your own hands.
Inspiration to you and successful experiments!
A comfortable hammock will always be a favorite place to relax for the whole family. How nice it is after work personal plot relax on fresh air and swing in a comfortable hammock among tall trees. And you don’t have to buy it in a store, since such a piece of dacha exterior can be easily made with your own hands.
Types of hammocks and their features
The hammock first appeared among the Indians of the Caribbean islands. Since it was impossible to sleep on the ground, enterprising aborigines came up with such a device as a hammock. Seeing such a comfortable and safe bed, the Spaniards immediately adopted it, and later it was used by numerous residents different countries. Naturally, over time, the hammock has been significantly modified and modified, and now we can choose any hammock design at our discretion: fabric, wicker, wood, etc.
According to their design, hammocks can be:
Types of hammocks
- The Brazilian hammock is a modification of the Mexican design and is intended for people who are used to maximum comfort. It can be suspended on ropes if you use special straps and a rigid cross beam. The width of such a product reaches two meters. This is a rather expensive and difficult design to manufacture, since certain loads from hanging points are “distributed” along the fabric much more difficult than along the mesh, so installing such a product requires a large number of branches and drawstrings.
- A Mexican hammock can be made of fabric or ropes. Has no hard parts. Since it consists of only a piece of fabric and a few strings for stretching, it can be carried with you in a bag, backpack or backpack. The disadvantage of such a product is the need for large quantities fabric (about 3 meters long and 1.5–2 meters wide). To hang it between the supports, a large distance is required. It cannot be made double, since you will need a fairly large piece of fabric that will roll up into a tight “cocoon”, which will make staying in it not entirely comfortable. You can stay in such a hammock for no more than two hours, since then your back starts to hurt and there can be no talk of comfort.
- A Vietnamese or Malay hammock is made from a strong fishing net and hung on several support branches with varying degrees of load. Since this design was not very convenient, residents of Asian countries decided to supplement it with transverse bars - traverses. This is a comfortable bed that can easily be made into a double bed. You can stay in such a hammock for an unlimited amount of time without experiencing painful inconvenience.
- The Brazilian seating hammock is a smaller and simplified design, which is mounted on a trapezoidal suspension. This hanging chair can be made with a semi-rigid structure or a completely rigid one. That is, the hammock-chair can be completely wicker from natural or artificial rattan.
Photo gallery: hammocks of various types and designs
 The wicker hammock chair has a stable wooden frame
  Hammock rocking on metal frame can be installed anywhere
  A wooden hammock chair will perfectly decorate country cottage area or children's Corner
  You can make a bright and spectacular knitted hammock chair with your own hands
  Fabric hammocks are stronger than wicker ones
  A hanging fabric hammock with two fastenings can be taken with you on a hike.
  Frame hammocks can be various forms and any color
  Sleeping in a hammock is not only comfortable, but also useful
  Since the hammock is used in hot weather, it is very important that the material is environmentally friendly and has good air permeability
  It is easier to maintain balance in a hammock without cross bars
  If there is no suitable trees, hammocks can be placed in the gazebo
  Wicker hammocks will decorate your home and street
What is the best material to make a hammock from: the pros and cons of fabric and mesh
Regardless of the design and type of hammock, there are a few things you need to know general rules, which will help in the manufacture of a comfortable and durable product.
- Fabric for making a hammock. Properly selected fabric will significantly extend the service life of the product and increase its strength characteristics. To make a hammock durable and reliable, you need to choose dense fabrics such as canvas, tarpaulin, teak, denim or camouflage.
Materials made from synthetic fibers are no less durable, but they do not allow air to pass through, so being in a hammock in the hot summer will not be entirely comfortable.
- The fabric for a hammock should be as durable as possible, but at the same time allow air to pass through well.
Ropes or ropes for wicker products are also selected based on their strength, practicality and comfort. It is best to purchase products made from cotton threads. It is more convenient and easier to work with such ropes, they knit into knots and weaves more reliably and tightly, and are also pleasant to the body.
It is best to purchase ropes made from natural threads Regardless of what you choose to make your hammock (fabric or ropes), you should not settle for cheap ones. synthetic materials
. If we talk about what is better: fabric or woven rope mesh, then it all depends on the preferences of the owners of such a design. The fabric is denser and less breathable, so even in cool weather this hammock will be comfortable and cozy. The mesh product is ideal for hot and sweltering summers. Blown from all sides by even a small breeze, a wicker hammock will create a wonderful bed for relaxation.
If we talk about the complexity of making a hammock from fabric, then making it will be much easier and faster than weaving a fishing net yourself or learning the macrame technique. Therefore, you can simply buy a ready-made durable mesh, which will serve as the basis for making a rope hammock.
Preparing to make a hammock: drawings and diagrams

Before you begin, you need to know some rules for making a hammock structure.
We will sew a fabric hammock measuring 3x2.2 meters. For this we need a durable mattress teak, calico or camouflage fabric. To make the hammock comfortable and roomy, we focus on an adult (male). Therefore, we use fabric across the entire width. We use it as a frame for a hammock wooden parts
To fasten the structure, we need a strong rope or clothesline made of cotton fibers.
Material calculation and tools for work
For the manufacture of various options we will need fabric hammocks certain materials and tools.
Fabric hammock with crossbars
Materials:
- durable fabric - 3x2.2 m;
- padding polyester - 50 cm;
- sling - 5.2x3 cm;
- nylon halyard - section 4 mm;
- wooden block - section 4 mm;
- sandpaper;
- acrylic paint.
Tools:
- metal ruler - meter;
- chalk for marking fabric;
- wood hacksaw;
- chisel;
- small brush;
- scissors;
- basting and regular needles;
- centimeter;
- sewing machine;
- iron.
Ironed parts are thinner, easier to stitch and there is no need to hold the fabric with your hand.
Stages of making a hammock
- On the wrong side of the material we draw two rectangles measuring 1.5x2 meters. We cut out the patterns and fold them right sides to each other.
- We retreat 1.5–2 cm from the edges and sew the short sides of the fabric on both sides. We turn the workpiece inside out. The lower part will serve as the back, and the upper part will serve as the face. Iron seam allowances on one side.
- We sew the sling onto the long part of the part with a 5 cm indentation along the edges. The sling is laid along the back along the entire length, and on the front side at a distance of 35 cm from the seam. Further bottom part We wrap the workpieces on the top, without cutting the sling.
- We prepare 4 pieces of sling, 70 cm long. We sew them to the indicated fastening points, facing the back. Hem the edges to create holes for the crossbars.
- We sew the long side sides of the product along the front side in increments of 30 cm from the edge. We cut out strips of padding polyester measuring 25x125 cm and put them in the prepared pockets. Then we fold, baste and stitch the edges so that we get some kind of rolls on the sides of the hammock on the long sides. In order to secure the padding polyester well, we stitch the pockets using the quilting method in several places.
- We saw a wooden block into two equal parts. We mark approximately 2 cm from the two edges and make a notch about 1 cm in size. Use a chisel to remove excess shavings. Sandpaper we clean the sawn parts and paint the bars acrylic paint. Let it dry.
- We retreat 5 cm from the two ends of the product and sew drawstrings to thread the crossbars into them. By threading the bars, we evenly assemble the base of the hammock on them.
- We tie a nylon halyard to two crossbars, so that the knots are in the grooves.
Fabric hammock with eyelets
You can make a slightly different modification fabric hammock on grommets with wooden posts.
Materials and tools:
- durable material - 2.7–3 m;
- eyelets - 22 pcs;
- tools for inserting them;
- rope 35 m long, diameter 6 mm;
- large metal rings;
- electric drill and drill bit 12 mm;
- beams 30x50 - their length should correspond to the width of the hammock;
- sewing machine;
- chalk for marking fabric;
- scissors.
Manufacturing stages
- We measure a piece of fabric and cut it 2.7 meters. We bend the edges by about 6 cm and stitch them on a typewriter. Then we iron them, fold them again and stitch them.
- We mark with chalk on the fabric the width of the places where the eyelets are attached with the same spacing. We will get 11 pieces on each side.
- We cut small holes in the marked places and attach eyelets to them with a special tool. Our hammock canvas is ready.
- For spacers, we take 2 bars with holes drilled in them at the same distance as the eyelets on the hammock. They will keep the fabric from folding under the weight of people.
- We pull the ropes through the holes.
- We install the hammock straps. For this we make a special frame. But you don’t have to do it. To do this, we attach a metal ring to the hook, lay the hammock on the floor and secure it with a heavy press.
- We make a spacer on the frame. We pass each sling through the grommet, and then through the hole in the spacer and the ring. We return the rope back. After completing all the work, we tie its ends. We braid the ring with the remaining ends of the slings. We do the same on the other side of the hammock. We hang it on supports.
We sand all wooden structural elements and then coat them with an antiseptic. After this, they can be coated with varnish or paint.
Video: how to make a fabric hammock
Hammock swing
Such a small hammock for sitting can be easily made from a piece of fabric and a children's metal hoop (hula hoop).
Materials and tools:
- durable fabric - 3x1.5 m;
- hoop with a diameter of 90 cm;
- padding polyester - 3x1.5 m;
- durable grosgrain ribbon - 8 m;
- sewing machine;
- scissors;
Stages of work
- We cut out two equal squares from fabric, measuring 1.5 x 1.5 meters.
- We fold each one four times.
- To make a circle out of it, draw a circle from the central corner with a radius of 65 cm and cut it out. We also do the second circle.
- We mark the holes for the slings: fold the circle in four and iron it so that the folds are guidelines. The first pair of lines will be located relative to the bend at an angle of 45 0, the second - 30 0.
- We also cut out the padding polyester.
To make identical slits on both circles, connect the pieces of fabric and pin them together
- We lay the padding polyester between the two parts of the material.
- We sew two identical covers on a machine. Then we sew them together, placing a metal hoop between them.
- We tie a grosgrain ribbon to the hoop in four places, cutting it into 4 equal parts.
The ribbon can be stitched or simply tied with a sea knot
- We tie the free ends to a thick tree trunk or other frame at the required height.
We have created a comfortable and small hammock that does not require several support posts.
Video: how to make a hammock chair
Wicker hammocks have been known for a very long time, since in our country they were used everywhere, unlike fabric ones. For the most part, their base resembles an ordinary fishing or volleyball net, which is suspended between two trees.
Consider a hammock 2.5 meters long and 90 cm wide.
Materials and tools:
- two wooden slats thickness - 1.5 m;
- ropes or thick rope 170 meters - diameter 8 mm;
- scissors;
- electric drill and drill bit;
- brush;
- varnish or paint;
- antiseptic;
- metal rings - 2 pcs.
Weaving stages
- We drill holes in the planks in increments of 4–5 cm.
- We cut off 20 meters of rope, which will be used for fasteners. And we cut 150 meters into equal parts of 6 meters.
- We fasten each rope with a loop and tie a knot on the bar.
- We choose any weaving pattern with a cell size of at least 7 cm.
- Having finished weaving, we attach the ends of the rope with knots to the second plank and make fasteners for the two planks. For this we use metal rings.
The ropes are fixed to wooden plank using loops and knots
- We check the strength of the product and attach it to the supports.
Video: how to make a wicker hammock
How to hang a hammock
In order to hang such a hammock on two trees, it is necessary to stuff special support bars onto the trunks. They will prevent the halyard from sliding down.
But it is best to use metal or wooden poles, driven at a certain distance from each other. Special hooks must be welded to the pillars at a height of about 1.5 meters. If this wooden supports, then you can make special hoops with hooks.
Wooden frame for a hammock
You can make your own wooden support frame for a hammock portable type. To make such a design we will need:
- wooden beam - 80x80 mm;
- board - 100x30 mm;
- studs, M10 bolts and nuts;
- hooks for hanging a hammock;
- sander;
- electric circular saw;
- electric drill;
- keys;
- paint or varnish;
- antiseptics.
Assembly steps
We will make the lower support from two 3-meter bars and two 1.5-meter cross bars. Two side mounting beams are made of 2-meter timber and two 1.45-meter supports.
- First we make the jibs. This is the side part of the stand on which we will hang the hammock using hooks. To do this, we fasten the beam and the stop together and saw it off at the bottom so that we get a vertical, but strong and stable part with a camber at the upper points of at least 4 meters.
The finished structure must withstand not only the vertical load created by the weight of a person, but also the overturning load
- We install and fasten the side elements between 2 longitudinal bars. They should be in a mirror image of each other.
The width of the legs must be more than 1 m
- We make the crossbar from two boards, 1.3 and 1.5 meters, and place them one on top of the other to ensure maximum stability for our structure. At the end, we fasten the longitudinal bars with transverse strips at a distance of 60 cm from each end.
To assemble the structure, you can use bolts or screws
- We sand all the wooden parts with a sander, cover them with an antiseptic and let them dry. Then we cover it with paint or varnish.
Second frame option
The second design is more convenient and requires the same materials and tools as the first option.
In this case, we make the jib in a slightly different way, and also add a handle with which you can easily rise from the hammock.
Metal structure
Using the same principle, if desired, you can weld a metal support for a hammock from profile pipes square or round.
Video: metal hammock stand
If you stick to correct technique making a hammock, then you will get a comfortable product where you can relax in hot weather summer days. A fabric or wicker hammock is a great option that will replace a bulky expensive one. garden furniture, and thanks to their mobility, such a structure can be hung in any convenient place on a personal plot.
The invention of the hanging stock is attributed to the Indians South America. Traveling through the endless jungle, they came up with an easy-to-carry bed - a hammock.
Suspended at a low height between the trees, it protected a person from mosquitoes and poisonous creatures crawling on the ground.
The advantages of the compact hammock design were quickly appreciated by the sailors who were the pioneers of the American continent.
They equipped their ships with hanging canvas beds and shared the invention of the natives with the European inhabitants.
Today, the hammock is loved by summer residents who prefer outdoor recreation to staying within the four walls of a city apartment. Modern designs hanging boxes have become much more complex and convenient than the simple “cocoon” of the Indians. The choice of materials for their manufacture has also expanded significantly.
In this review we will look at what a hammock for a summer house is and what options ready-made structures available for sale. Lovers of homemade products await brief instructions on the topic of self-assembly.
Design options for hammocks
The simplest type of hammock is the one used by the Indians. This is a piece of durable fabric, the ends of which are gathered into a tight bundle and tightly intercepted with ropes tied to trees or poles. Strong fixation of the ends of such a bed is ensured by a rope knot, which has received two names: “cow” and “lark’s head”.
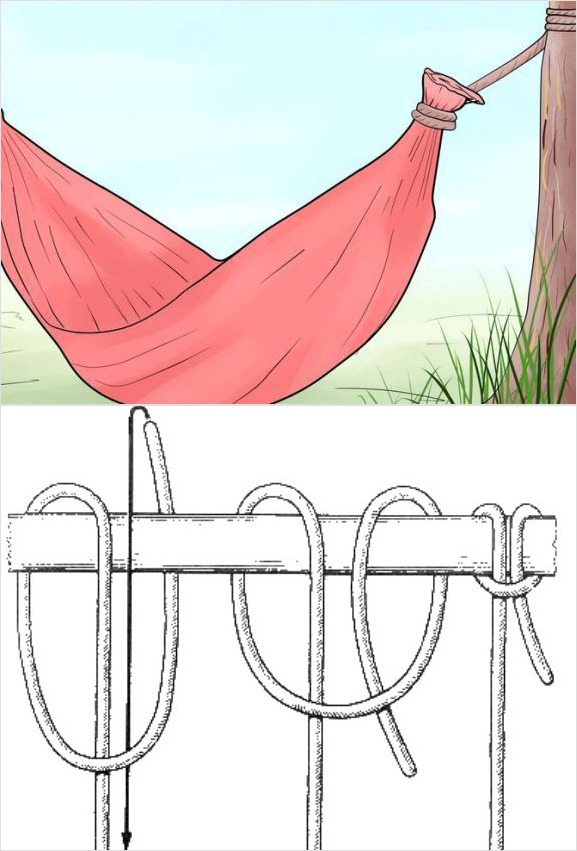
Construction of a simple hammock and tying a cow knot
Simplicity is good, but such a hanging bed does not have enough comfort. Those who like to spin around in their sleep will not find it comfortable to rest in such a dense “cocoon”. For this reason, a blade with end slats is more often used, expanding and leveling sleeping area.

Classic wicker slatted hammock on the veranda
By the way, regardless of the type of hammock, placing it on the veranda will give you a wonderful place to relax and read books.

However, openwork weaving is beautiful, but not practical. Hard knots put pressure on the body, and the cold breeze blowing from below can chill the back muscles. Therefore, the rope base of a hammock structure is often replaced with fabric - dense, smooth and impenetrable to wind.

A fabric hammock bed is more comfortable than a woven rope one
In addition to the base material, there is another fundamental difference between hanging beds - the type of fastenings used. There are hammocks that are installed on a frame. On next photo we see a suspended stock, the ends of which are attached to two inclined wooden posts.

A hammock on a frame is simple, mobile and reliable
The main advantage of this design is mobility. Wooden frame can be moved to any place convenient for relaxation. The shape of the hammock stand can be not only straight, but also curved in the form of an arc.

Original frame made of bent wooden segments
You don’t have to buy a reliable hammock stand in a store. You can build it yourself. To do this, you will need several meters of steel pipe and the skill of a welder.

Frame made of steel pipes easily moves around the site
Except single rooms frame systems, currently very popular are hammock beds, suspended from a frame at four points.

Double hammock bed on a wooden frame with canopy
A lightweight tent roof is a useful addition to this design, protecting the sleeping area from the sun and rain.
A hanging bed allows you to not only relax comfortably, but also have fun. That's why garden swing-hammocks are popular with adults and children.

Sleeping outdoors on a warm summer night is not only romantic, but also very pleasant. Only mosquitoes can disturb the idyll. Therefore, make your choice, give preference to systems that can be completely closed mosquito net.

Hammock on a frame in the form of a house - best protection from mosquitoes, wind and scorching sun
The hanging bed idea has found its way into other original designs. An example is a hanging hammock chair, which, by the way, is not so difficult to make on your own.
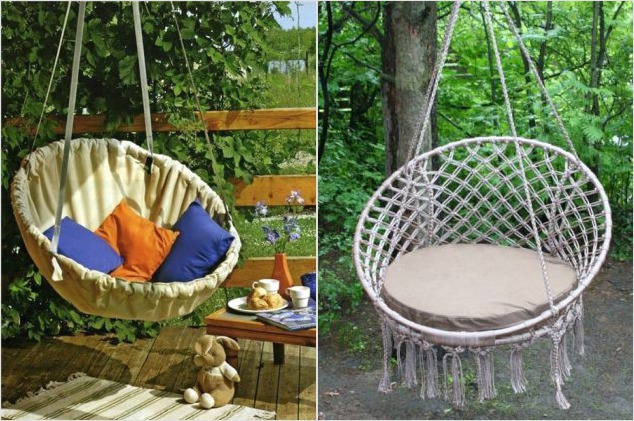
Round hanging chair – comfortable place for reading and sweet dreams
Using a steel hoop of suitable diameter as a basis, durable fabric and a few strong beams, you can build a round bed for adults and a cozy cradle for a baby.

Round hammock with an awning suspended on inclined supports
The idea to make a hammock from a hoop turned out to be very fruitful. The simplest and easiest way to make such a design is using a small trampoline. Suspending it on cables to a powerful ceiling beam in the gazebo, we will get a comfortable bed for relaxation.
Children will not suffer from such alterations, since the structure can be used not only as a sleeping place, but also as a jumping area.

Hammock trampoline. If you want, rest, if you want, jump
We should not forget that a hammock is not just a comfortable hanging bed, but also original item to decorate the area. By securing it to the posts of a decorative pergola-pergola and providing it with a stepped podium, you will create a picturesque corner for privacy.

Approximate prices
The lowest cost is for hanging hammocks without load-bearing frame. High-quality single models (woven from rope and fabric) can be purchased at a price of 1,800 rubles.
A hammock with a frame for a summer house is significantly more expensive. Price tags for it start at an average of 10 thousand rubles.
For a two- or three-seater hammock swing, equipped with an awning and a mosquito net, you will have to pay approximately 18-40 thousand rubles, depending on the model.
Popular among lovers of country holidays, hammock structures made in the form of a chair can be bought for 5-7 thousand rubles (without frame) or more. A hammock chair complete with a frame will cost no less than 16 thousand rubles. The prices of the most sophisticated models reach 50 thousand rubles.
How to make a hammock at home?
Anyone who masters the technique of mesh weaving will be able to make a hammock with their own hands entirely from rope. For those who are not familiar with the art of knot knitting, we offer the option of a fabric bed mounted on wooden slats.
Before starting work, you must carefully study step-by-step photo instructions or a thematic video. Sewing machine You will also need one that can work with thick fabric. In addition to durable material, you need to buy a skein of thick rope (the footage depends on the design of the hammock) and two planed wooden blocks (section 3x3 cm).
The first step is making a stock pattern. It will require a piece of thick upholstery or canvas fabric measuring 1.20 x 2.10 meters. At the corners of the pattern you need to cut four square pieces of material measuring 15x15 cm to fold the edges of the fabric along the long and narrow side. Inside the gates we will pass the ropes (along the fabric) and insert the bars of the hammock (across the fabric).

Having smoothed the hemline marked with chalk with an iron, it needs to be sewn on a typewriter. After that we move on to the bars. You need to drill 4 holes in them for ropes (two at the edge and two inside at an equal distance from the center).

Rings for passing ropes and hanging a hammock can be made from water pipe, cutting off several pieces from it with a grinder. By sanding them on an emery wheel to remove burrs, we will protect the ropes from chafing.

The last operation is to adjust the position of the ropes and level the hammock. It is most convenient to carry out this by hanging the hammock on hooks driven into poles or tied to tree tables.
If making a hammock seems too complicated and time-consuming for you, you can buy ready product, and make the frame for it yourself from wood. As an example, consider the simple design discussed at the beginning of the article.

To work you need to buy 3 wooden beams with a cross section of 10x10 cm and a length of 3 meters each. Two of them will be used for the production of inclined racks. Let's cut the third beam in half and get two supports. The struts and the lower part of the frame cross member can be made from planed boards with a section of 5x10 cm.
Assembly begins with the lower support frame. Two boards are cut into two short sections of timber (lower supports) and secured to them with bolts, nuts and washers. After this, struts are symmetrically attached to the supports at an angle, leaving space between them for passing inclined beams.

The support beams are temporarily fixed with self-tapping screws to the struts and frame boards, after which holes are drilled in place to install the bolts.

Pulling the structure threaded connections, on the beams mark installation points for hooks for hanging the hammock.
In the designated places, drill holes for the hooks, with a diameter 2 mm less than the thickness of the screwed rod.
This hammock is a symbiosis of a chair and a swing. It can be hung in the house on a hook screwed into the ceiling, and outside - on a crossbar or a fairly strong tree branch. To ensure that the hammock itself is strong and reliable, choose the appropriate fabric (thick cotton, tarpaulin), threads, cord and carabiners.
You will need:
Wooden plank (optimally oak),
Durable cord
About 2 sq. meters of durable fabric,
A durable carabiner (2 pcs.),
Sewing machine and strong threads,
Iron and ironing board.

1. Fold the fabric in half and cut it as shown in photo 1. Tuck the parallel sides of the piece and sew on the machine (photo 2).

2. Now on the two raw sides of the part you need to make drawstrings into which the cord will be threaded. When measuring the width of the drawstring, be guided by the thickness of your cord. Tuck and stitch the fabric as shown in photos 3, 4 and 5.
3. Drill two holes at both ends of the board, as shown in photo 6.

4. Thread the cord through the drawstrings and into the holes of the board as shown in the photo. Be sure to tie the knots tightly.


5. All that remains is to organize a place to attach the hammock and hang it.

2. Wicker hammock using macrame technique: master class

Macrame is the art of knot weaving from cords or thick threads. To make such a wicker hammock, you need to master a couple of the simplest knots of the macrame technique - it’s not difficult.
You will need:
Durable thick cord in one or more colors,
Scissors,
Ruler,
Two dies for the edges of the hammock (in in this case we took dies from an old hammock, you can drill holes in strong planks of the length you need).

1. First, one of the hammock dies will serve as the basis for weaving. Secure it in a position convenient for work (mounts for the curtain rod are used here, but you can come up with something else).

2. Cut 21 pieces from the cord, each about 730 cm long. Fold each piece in half and secure it to a die, as shown in the photo.

3. When all the pieces of cord are secured, start tying knots. Step back a few centimeters from the die and proceed as shown in the photo.

4. Continue making knots. You should end up with something like this:

5. Having weaved the first row of knots, step back some distance from it and start a second row of the same knots in a checkerboard pattern. Continue in this manner until you have a network like the one in the photo.

6. Now remove the loops from the die. Trim the lower ends of the work and tie it to form loops. Thread ropes into the upper and lower loops and secure the edges of the hammock to the dies. Tie the ropes at the top and bottom in a knot, making a loop to which the hammock will be attached.

3. Hammock with leather loops: master class

Another version of the classic hammock is with hinges made of durable leather. If your machine will not accept thick leather, replace it with a fairly thick and wide braid made of cotton or synthetics.
You will need:
Hammock fabric (thick cotton, tarpaulin, other durable fabric),
Fabric for strengthening the edges of the hammock,
Machine and strong threads,
Leather for loops (option - braid for loops),
Twine or strong rope,
Scissors, pins.

1. Decide on the length and width of the hammock you need and cut out a piece of appropriate size fabric. Tuck the long sides of the piece and sew on the machine.

2. Finish the sides of the hammock to which the loops will be attached by making the hem wider and strengthening it with an additional strip of fabric folded in half on each side.

3. Cut the leather into pieces for loops. Focus on the thickness of your hammock cord.

4. At equal distances from each other, mark places for attaching the hinges.

5. Sew the loops as shown in the photo.


6. Thread a rope through the loops. Tie the ends with a knot on each side, making a loop (see photo). Wrap both loops with rope for strength.


4. A simple hammock in 10 minutes: master class
This hammock option is one of the easiest to make. In addition, it turns out to be very light (due to the low weight of the fabric) and mobile, since it does not have heavy and rigid parts. It is convenient to take such a hammock with you to the forest or park for a walk.
You will need:
Lining fabric (3x150 cm),
A pair of carbines,
About 6 meters of strong rope.
Follow the instructions shown in the video.
More hammock ideas:
1. This hammock can be made from a rug or blanket.

2,3. Two options for hammock chairs - in different colors look completely different.

Photo: decoritem.com, deas4homes.com