DIY table from. DIY coffee table - a creative design for decorating your home interior
A coffee table is an optional piece of furniture. Moreover, its presence makes any living room more comfortable. You can put a newspaper on the table, put a cup of tea or coffee. We will make this piece of furniture ourselves, making it truly original and comfortable.
Low table - practical interior decoration
The very first coffee table was created back in the mid-19th century in England. Within a couple of decades, this furniture adorned the living rooms of everyone. European houses. In the 20th century, fashion came to our country. True, in Russia the tables we are interested in are called coffee tables, not coffee tables. But this does not change the essence of the matter. This piece of furniture is understood as a small table with a height of no more than 40–50 cm, which can have any ergonomics, appearance and design. It all depends on consumer preferences.
In furniture stores, low tables are sold in a wide range. You can also find inexpensive design, and a designer item that can make any interior chic and unusual. But many home craftsmen want to make an original table themselves, using a variety of available materials. We put a piece of our soul into homemade furniture. This means that it will turn out to be really comfortable and will be able to fill your home with comfort and warmth.
Coffee tables are made of wood and glass. Also unusual and beautiful designs can actually be assembled from:
- old window and ordinary books;
- unused heating radiator;
- wooden pallets or boxes;
- dismantled interior or front door;
- car tire;
- wicker basket;
- reels from electrical cables.
There are a lot of options for making a table for tea drinking. You just need to show your imagination and listen to the advice of experienced craftsmen who are engaged in decorating their homes on their own. Next, we will describe the most popular ways to construct coffee tables. And you will choose the most suitable option.
Making furniture from chipboard is as easy as shelling pears!
Chipboards are the most affordable material for creating. Chipboards can be processed without problems, are easily cut to the required sizes, and have affordable price. To assemble low tables, it is recommended to use laminated boards, as they are characterized by an attractive appearance, and the products made from them are durable. There are many sites on the Internet where it is not difficult to find various drawings with dimensions for making furniture from chipboard. We suggest making a table based on the sketches below.
.jpg)
Our planned design consists of the following elements:
- shelf dimensions 500x700 mm;
- table top 736x736;
- 4 strips 100x464;
- 4 plastic corners and the same number of legs (or wheels);
- 2 bottoms (dimensions of each of them are 500x700);
- 4 strips 100x464.
We will fasten the indicated elements with cofirmats; you will need 8 of them, and 16 3.5x16 mm.
We make the table step by step. First (position 1 in the diagram) we make a shelf from chipboard (preferably, as mentioned, laminated) board. We do cutting electric jigsaw, using a file with small steps. Such a tool will eliminate the possibility of chipping. Then (position 2) we attach the planks to the tabletop (we place them on plastic corners). We mount a shelf in the center of the vertically installed slats (item 3). We make holes in it with a cross section of 4.5 mm (you will need a drill with an appropriate drill bit). We fix the shelf with confirmations. Without them, our tea table may not be very stable and reliable in use. Using confirmations, we screw the bottom of the structure (item 4).
After this, screw on the legs (item 5). They are attached not from the very edges of the table, but at a distance of about 15 mm from them. Instead of legs, it is allowed to install small wheels (fixed with self-tapping screws). Then we will have a mobile coffee table that can be moved throughout the home. All that remains is to bring homemade furniture to mind. We glue all the visible joints of our table with melamine edge. Visually, a structure made of laminated chipboard will look perfect! By the way, instead of wood chips, you can use MDF (wood fiber products). The result will be approximately the same.

Glass table - stylish and elegant
Interiors designed in a modern theme are perfectly complemented by compact glass tables. They are installed on wooden or chrome-plated legs. It is advisable to use frosted glass. It usually has a special film that protects the tabletop from mechanical damage. In addition, on frosted glass, stains from carelessly spilled tea, coffee, other drinks and fingerprints will not be so noticeable.
The recommended tabletop width is up to 120 cm. There is no need to build a table with large parameters. It will be difficult to fit into the interior standard apartment or a small private house. Choose any design shape. But if you are making a glass coffee table with your own hands for the first time, it is better to stick to a rectangular configuration. We can buy chrome legs at a furniture store. And it’s easy to make components from wood yourself. Table drawing with standard sizes presented below.
.jpg)
Let's get to work. First, we cut out the glass according to the specified geometric parameters. This operation must be performed slowly. Place the glass on a flat surface. We outline the cutting lines with a simple pencil. Wet the glass cutter sunflower oil(or other lubricant). Apply to the intended line metal ruler. Carefully (without strong pressure) we go through the markings with a glass cutter. Then we move the glass from the surface, ensuring that the excess pieces of material are suspended. We tap our fingers along the marking line and press lightly. After these steps, unnecessary parts of the glass are broken strictly along the lines made.
The cut material must be processed. First, we clean the edges of the glass with a file, then with a grinder equipped with a diamond tool. Additionally, it is recommended to sand potentially unsafe parts of the glass with sandpaper (fine grain). Then we take thin felt, mount it on the edges of the tabletop and press it against it. This way we will protect our furniture from scratches. Turn the table face down. We make marks for mounting the legs. It is advisable to install them at a distance of at least 50 mm from the edges of the tabletop.

We drill holes at the top of the bases of all legs. They will be needed to attach the suction cup. Everything is simple here. We treat the suction cups with adhesive, install them in the prepared holes, and press the elements as tightly as possible. After the glue has set, we turn the homemade structure over to its normal position and wait about two days. After 48 hours the coffee table will be ready for use.
We will build a structure from wood - a win-win option
Wooden tea tables are suitable for any living space, no matter what type of decor is implemented in them. Wood products look great in both classic and modern interiors. Do wooden furniture DIY is really simple. Moreover, we can build a table of any design - the simplest one, with many additional drawers, stands, shelves. With the right approach to business, we will end up with a piece of furniture no different from expensive store-bought tables.
We will not offer a drawing of a wooden structure. Any craftsman is able to draw up a simple sketch of such a structure with the required dimensions. But let’s say a few words about the materials and tools that will be needed to complete the work. Stocking up:
- blocks or scraps of wooden boards (from which we will make table legs and crossbars);
- two thick boards;
- varnish and stain;
- grinder, sandpaper;
- wood saw;
- glue;
- electric drill.
Let's start creating. We cut thick boards to the required sizes to make a tabletop. We connect them together with glue. We are waiting for the structure to stick together firmly. At this time, we make crossbars and legs from scraps of boards or bars. Give the tabletop the selected shape. It can be rectangular or square (it’s easier), but tables with various roundnesses and curves look better. Wood is easy to process. Using a hacksaw, we can easily create a tabletop of the configuration we need. After this, using grinder, carefully processed ready-made elements. Additionally, we rub their surface with sandpaper.
We apply stain to the tabletop, legs, and crossbars. This composition gives the wood a noble appearance, providing the effect of antiquity. These elements are completely treated with stain. We need to apply it not only to the surfaces, but also to the end parts of the coffee table parts. Nuance. The ends of wood products can be covered decorative materials, for example, butterflies often used for these purposes.

Next, we attach the crossbars to the tabletop, assembled from two boards. The operation is performed using glue and round spikes inserted into pre-made holes. The latter are drilled in the right places with an electric drill. We fasten the legs in the same way: we make holes, lubricate the tenons with glue, and insert them into the grooves. The tea table is ready. Let's coat it with varnish to make the structure look perfect, and we'll enjoy the new piece of furniture in the house.
Books, waste paper and an old window - you can even make a table out of them!
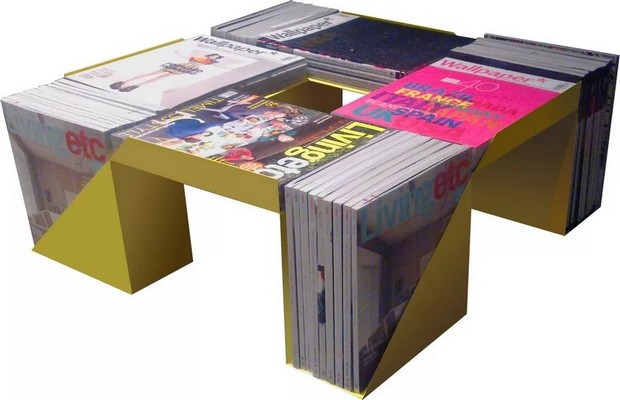
As we have already noted, it is possible to make an original coffee table from various available materials. If you have a lot of old magazines and newspapers, you don’t have to throw them away. Let's make an unusual table out of them according to the following scheme:
- 1. Roll waste paper into tight tubes.
- 2. Secure the resulting blanks with rubber bands.
- 3. Immerse the prepared tubes in a bucket filled with a water-polymer based emulsion.
- 4. Wait for 5-7 minutes.
- 5. We take out the soaked paper blanks and hang them on a rope on wire hooks. Drying should be done in a dust-free room. Let's not forget to put it under the rope plastic film. Streams of water from waste paper will flow onto it.
- 6. From the dried tubes we form a cabinet for a coffee table - we simply glue them together (as tightly as possible) with PVA glue.
The created cabinet is usually secured with strong threads and left to dry. Then we cut our homemade table up and down. We get a neat bedside table. Glue regular or mirror glass using silicone, which is used for repairing aquariums. Advice. The glass should have a thickness of 1.2–1.5 cm. Thin countertops will be unreliable in use. One careless movement and they will crack.
In cases where the old window structure in a home is replaced with a new one (for example, a plastic one), the dismantled product can also be used as a coffee table. A minimum of difficulties awaits us. We remove the hinges, handles, and other fittings from the window and wash the canvas well. If necessary, we tear off old layer paints, polish the surface and paint fresh composition. We have a finished tabletop in front of us. It can be installed on any legs. A great option is to make them from volumes that are collecting dust on bookshelves in the home for decades.
We fasten the books to each other, forming them into legs of the required height.
We carry out the procedure using superglue. Another option is to drill neat holes in the books and thread a steel rod through them. We install the updated window frame on homemade legs and rejoice at our ingenuity. These coffee tables are good for interiors in retro, vintage, and Provence styles. Instead of a window, by the way, it is allowed to use old doors, a mirror, or simply a large board that did not have a place in the household.
Furniture for tea parties made from pallets and boxes - simple and original
Wooden pallets are products used for transporting and storing a variety of goods and cargo. Pallets perform the same function. But they are considered more modern designs. Both the first and second are ready-made countertops. They make great low tables. Moreover, the entire process of making homemade furniture from such products requires a minimum of time and labor from the home craftsman.
We just need to thoroughly clean and wash the tray, treat it with a grinder and sandpaper, and paint it in the chosen color. It is not necessary to apply a single color paint. Color the table to your taste. Apply any ornaments and symbols to the pallet. And if you wish, you can not paint the workpiece at all, leaving the wood in its natural form. Small chips, scratches, cracks will highlight the natural texture of the structure.

We install the prepared tabletop on low wooden blocks or on wheels. Here you need to understand that the weight of the pallets is quite serious - up to 15–25 kg. Therefore, wheels and legs for a pallet table should be selected wisely. They must withstand a given load. However, a pallet of sufficient height may not be equipped with legs. The design will be comfortable and reliable without them.
If there are no pallets at hand, you can actually make a table from any empty wooden boxes. Containers for wine, vegetables, and fruits are suitable. From two drawers you can build a small coffee table, and from four drawers you can make a spacious structure for gatherings with friends. We assemble the boxes into square or rectangular furniture. We fasten them together with nails, and putty the places where the hardware is installed with a mixture of glue and sawdust. We decorate the structure and cover it with varnish. We get a chic table.
.jpg)
Place a vase or flower pot in the free space between the drawers. You can also cover it with a suitable sheet product. Nuance. Design experts advise covering the tabletop with plastic if the interior of the home is made in the style of minimalism and modernism. For high-tech and art deco decors, it is better to use a sheet of polished steel. Country style interiors are perfectly complemented by wooden coverings. And glass placed on a table made of drawers will harmoniously fit into any room decor.
Other ideas for assembling structures - a little more creativity
You can actually build a massive coffee table from an old one. cast iron battery heating. It is enough to tint it a little, install it on strong wheels, and cover it with glass on top (if possible, with rounded edges). The functionality of such a design is, of course, in question. She, however, weighs 60–80 kilograms. But she is not lacking in originality. Not a single guest of your home can ignore such an unusual piece of furniture.
And car lovers have the opportunity to make a comfortable table from old tire from his iron horse. Very often, tires are used for garden decoration. But even in the house they are proper preparation will look appropriate. To create a table from a tire in the now popular eco-style, you need to stock up on:

Table made from an old tire
- two circles cut from a plywood sheet (we take their cross-section slightly smaller than the diameter of the tire used);
- superglue;
- cord, braid or decorative rope;
- varnish;
- self-tapping screws, electric drill;
- wheels.
We attach plywood circles to the tire on both sides. Products can be attached to superglue or (which is more reliable) to self-tapping screws. If you want the homemade plywood lid to open, one of the circles should be installed on small hinges. Then you can store a variety of household items in the tire niche.
After that, we proceed to decorating the coffee table. We make a small circle out of a rope (bundle). Coat the middle of the plywood table top with glue. Carefully secure the rope element to it. In the same way, going from the center to the edges, we decorate the rest of the surface. Then we turn the tire over and continue braiding it on the sides. The bottom of the structure does not need to be decorated. TO bottom sheet Let's attach the legs (as an option - wheels). The table is ready. All that remains is to cover it with varnish or a special wax composition.
Fantasize boldly! Original tables for tea parties can be made from other available materials. The more creative the craft looks, the more positive emotions you will experience looking at it. Decorate your home with something unusual homemade furniture, creating unique interiors. Good luck.
Buying new expensive furniture is a financially expensive option. As alternative option For those who love exclusive and unusual interior details, the handmade method is suitable.
Minimal experience in using tools, imagination and creative thinking- that's all that's needed.

You can start by making a coffee table, for which a variety of and unusual materials are used.
The finished product will decorate and diversify any room, living room or nursery. Often unusual furniture is installed in country houses and on summer verandas, where it emphasizes style and brings the desired atmosphere.

Tools and materials
The basis of the future table is the material from which it is planned to make the tabletop. There are many options for imagination, we will consider them below.

In addition, the work will require the following tools:
- hammer;
- scissors;
- pliers;
- fasteners (nails, screws, etc.);
- carpenter's table with a set of knives (if available) or a hacksaw.

Work for carpenter's table requires additional skills. If you have them, you can use a chisel, cutter and plane. When working with wood, they can be used to perform more delicate work.
Using a sharp chisel or a set of special knives, you can expertly decorate a coffee table.

Need to stock up additional materials, such as:
- glue;
- sandpaper;
- paint (preferably in the form of a spray);
- primer;
- decor (fabric, multi-colored plastic, lace, glass parts, etc.).


Wooden coffee table
The most common material in the manufacture of furniture structures is wood. Even if it is chosen as a basis, the creator has several options.

The product can be made from:
- pallets;
- whole stump;
- logs

A beautiful and practical coffee table made from pallets is made in several stages:
- At the first stage, it is necessary to determine the dimensions of the future table and make markings on the pallets.
- Cut out the core of the pallet. It is important to consider that outer side should be smooth, and the reverse should be embossed.
- Treat the legs with primer and let them dry.
- Paint the countertop on all sides. Tinting can be done in several layers. In this case, each layer must be treated with fine-grained sandpaper.
- After all the parts have dried, secure the elements using metal fasteners: nails, screws, etc.
Making your own table from a solid stump is even easier. The difficulty lies in choosing a piece of wood that is suitable in size and shape. From an aesthetic point of view, a pine, birch or poplar stump is suitable for such a table. The choice should be made on a flat and wide specimen with unusual rings.

The material can be used in different ways depending on the size of the table:
- short with thin metal legs;
- middle, where the base of the stump serves as a support;
- low on wheels.

According to the artist's idea, the stump can be subjected to minimal changes, limited to painting or varnishing. Give classic look The product will be helped by grinding and installing wheels.

Note!

Another option for lovers of natural style is a coffee or coffee table made from logs. Its production does not differ significantly from previous versions.

The appearance of the finished product depends almost entirely on the appearance of the prepared wooden log house. Options may differ in the width and expressiveness of the ring pattern.

First you need to treat the logs with a piece of sandpaper. To maintain the most natural appearance, leave the bark on the sides and bottom. Legs made of metal or from an old table will give a more formal look. If desired, the supports can also be made of wood.

Making a coffee table out of wood is not a difficult task. This product brings a certain amount of pristineness and natural comfort to the home decor.

Chipboard coffee table
Exclusive furniture based on chipboard is a cost-effective option for those who want to work on the product themselves. This photo of a coffee table shows that such furniture is in no way inferior in appearance to a wooden product.

Note!

You need to start work by developing a drawing of the future table. The finished patterns of the base and legs are placed on a sheet of chipboard and outlined with a pencil, and then scratched along the contour with a nail.

Thus, you need to cut out two tabletops, one of which will be the surface of the table, and the other will be the bottom shelf. You need to attach flanges to them, and secure the wheels with bolts.

It is preferable to use rubber wheels because of their reliability. Will diversify the appearance glass shelf between the table top and the base. Varnishing will protect the item from premature destruction.

You can make such a table yourself from old unnecessary furniture. Decorative elements will help renew and inspire new life into an old interior element.

There are many interesting options for coffee tables made of: glass, a radiator, a window and books, an entrance door, a cabinet or chest of drawers, a suitcase, a reel (cable), etc. Anyone with imagination and a sense of style can come up with additional options.
Decoration
The decor of the coffee table is the final and very important stage of the work. Any ideas that fit into the interior of the room are suitable here.
Note!


Let's consider the most correct and harmonious options:

A table made of pallets, stumps or logs will be decorated with a carved design. The tabletop may not be made of solid glass, but of many pieces glued together.
The use of fabric in decoration should be careful. Material with thin pile is suitable for this purpose. Use your old coat as a base and secure with small nails and rivets.

Vintage notes will be added by lace and fringed ribbons attached around the perimeter of the item. It looks as if there is a tablecloth on the coffee table.

Fashion trend in Lately began the use of twine and coarse hemp rope. It's quite easy to attach it. You need to lubricate the surface of the table with glue, and tightly wrap the base and legs of the table.

The decor in the form of a mosaic looks bright and unusual. Varnishing the surface will add additional shine.

Decoration using decoupage technique. This type of decor allows you to apply any image to the surface of the tabletop. To do this, you will need special napkins for decoupage. The quality of the result depends on the availability of the necessary technical skills.

In any decoration, it is important to consider the practicality of the finished coffee table and its stability. To do this, use additional fasteners, stain treatment and varnish.

Implementing ideas in practice is not difficult if you approach the process with intelligence, imagination and great enthusiasm.

DIY coffee table photo


A coffee table cannot be called essential furniture, but it does not take up much space in arranging a living room or bedroom. last place. Modern tables are endowed with a lot of functions, representing a storage system not only for the press, but also for other useful things. Many models are equipped with spacious drawers and compartments, a transforming system, turning into an oversized dinner table. Among other things, the coffee table is a significant decorative element that successfully complements the stylish design. It’s quite possible to make such a thing with your own hands if you apply some imagination and patience, and our article will provide interesting ideas for designing a coffee table at home.
Materials for production
Many different materials are used in the manufacture of modern coffee tables. Unlike previous times, when standard rectangular structures were stamped from MDF, today's models surprise with their diversity. One of the more expensive options is wooden tables made from natural solid wood. Such a thing will decorate any interior and will always look chic and respectable. The designs come in a wide variety - from strict, rough tables to Scandinavian style to classic ones, decorated with forging or carved decorations.
Since wood is quite expensive, chipboard and MDF boards can help replace it. If we talk about durability, they are, of course, inferior to wooden ones, but they look no worse. Design tricks allow you to compensate for the simplicity of the material, for example, transformable tabletops, built-in sockets, etc.
Metal also takes part in the design of coffee tables. Frames are formed from metal pipes, which are then supplemented with countertops made of other materials. The graceful curls of forged elements with glass tabletops look very beautiful. Sometimes you can find designer designs in which the table consists entirely of metal.
In modern furniture production, you can increasingly find glass interior items that bring a certain lightness and airiness to the atmosphere. The products are made from heavy-duty tempered glass, resistant to various types of influences, so you don’t have to be afraid that such a piece of furniture will break or become deformed under the influence high temperatures. In some models, only the surface of the tabletop is covered with glass.
Plastic is used much less frequently, as it is not very durable, but has greater color palette and low cost. Most often it is found as components of a wooden or metal structure.
IN homemade For original coffee tables, the choice of material increases significantly, since, in addition to traditional materials, various improvised means are used.


How to make a coffee table: beautiful ideas
To make coffee tables with your own hands, plywood is most often used, which is relatively inexpensive and easy to process. You can also use various available materials and build the most bizarre designs. More complex parts, e.g. curly handles, legs, wheels, accessories and others decorative elements, can be purchased at a furniture store.
Modern style plywood coffee table
Making such an original coffee table will not require much time, but the product will take its rightful place in any interior with a touch of minimalism. To work, you need to purchase a sheet of plywood, three legs with fasteners, thick thread, a pencil, a tape measure, a jigsaw and paint (preferably white or black).
So, the first thing you need to do is cut out the tabletop. On the back of the sheet, select a point that will be the center and drive in a small nail. Cut a piece of thread the length of the radius of the future table. We attach one end of it to a hammered nail, and tie a pencil to the other and, stretching the structure, draw a round shape for the tabletop. Next, you can dream up and give the canvas a more original shape. It is noteworthy that to make such a table you will not need any drawings or measurements at all. We cut out the drawn shape of the tabletop using a jigsaw, sand it and paint it. When the structure is completely dry, we attach the legs. The table is ready.


Coffee table made from pallets
This original design fits perfectly into many styles. It will most successfully complement a daring loft or natural eco-style. It is not difficult to design such an exclusive table: for work you need to get a pallet, metal legs or wheels (at your discretion). You also cannot do without screws and a screwdriver, a saw, paint or varnish with a brush.
Step by step, all work on constructing the table will take place in the following order:
1. Mark the dimensions of the table on the pallet and saw off the excess part.
2. We take planks from the leftovers and cover the gaps in the main structure with them to create a continuous surface, fixing them with self-tapping screws.
3. Turn over and form five transverse strips: two on the sides (the legs will be attached to them) and one in the center for stability.
4. We mount the supports and open the structure with varnish or paint.


Tire coffee table
An old worn-out tire can be a great base for creating a beautiful home coffee table. Additionally, you need to prepare the plywood. Before you begin construction, you must thoroughly wash and dry the tire. Next, you need to measure the diameter of the tire and cut two circles from plywood: one - the tabletop - should correspond to the diameter of the tire, and the other - the base - should be a few centimeters smaller. You can immediately attach legs, wheels to the base, or leave it without supports at your discretion. We attach round sheets of plywood to the tire using self-tapping screws or sit them on construction glue - the base is ready.
Next, we choose one of two methods: we wrap the rope either completely around the structure, or only at the sides. In the first option, you need to think about how to treat the countertop - perhaps paint it or coat it with a shiny varnish.
You should start wrapping from the center: fix the end of the rope with a self-tapping screw or a glue gun and begin the movement of winding circles, gradually moving to the sides. There is no point in wrapping the base, unless you decide to make the table half two-color. At the end of the winding, the entire structure should be coated with transparent varnish to extend its service life.

Coffee table made from drawers
If you have wooden vegetable boxes lying around your household, don’t rush to throw them away. Just four of these containers can turn into a beautiful and useful part of your living room interior. If you don’t have drawers, the hardest part of making a table will be getting them. Then everything is simple: the boxes need to be sanded, painted and folded, as shown in the photo. We use a sheet of plywood, which must be screwed to the bottom side of the structure so that it does not fall apart. So our coffee table is ready. The advantage of this design will be the organization of spacious storage areas for various magazines, books and other things.


Coffee table for travel lovers
Nowadays, traveling around different countries became available to many. But there is a special category of people who simply cannot live without constant travel to remote corners. They are the ones who will surely like a coffee table reminiscent of certain pleasant voyages. Any one is suitable for making old suitcase with hard walls, not suitable for its intended purpose. You will also need a sheet of thick plywood, a screwdriver with screws, paint and, if desired, legs or wheels.
We cut out two sheets of plywood with an area equal to the base of the suitcase, attach them from the inside to the base and lid. Screw on the legs or wheels. Next, you need to decorate the table - different methods are used for this. One of simple options– paint it white, and when the structure is dry, use sandpaper to make abrasions indicating the antiquity of the item. This product will suitably decorate a living room in a shabby chic style. The black color of such a table will harmoniously fit into a loft living room, and the decoration using the decoupage technique will become a real masterpiece of Provencal design.


Coffee table made of driftwood
The uniqueness of furniture made from stumps and driftwood lies in its uniqueness - what is created by nature itself does not have similar patterns and textures. Such products always attract the eye with their curves and weaves. In addition, getting the source material is not so difficult - it can be found in the forest, on the shore of a reservoir. The snag needs to be washed, cleared of bark, and rotten waste removed. Next, you need to make adjustments, level the shape to fit the tabletop and base, and let the workpiece dry thoroughly (if there are large holes in the wood, it can be puttied).
The dried driftwood is carefully sanded, covered with stain (you can choose the shade you like best) and varnish. The base is ready. The tabletop can be attached using construction adhesive or self-tapping screws (depending on what it is made of). Very popular now glass table tops, through which the winding wooden branches are clearly visible.


DIY coffee tables – photo ideas
We looked at only a few options for making coffee tables with our own hands. Our gallery will provide much more information and photos of finished products, where you can learn a lot interesting ideas. Enjoy watching!


The coffee table is a decoration and highlight of the interior. And an item made with your own hands is doubly valuable. It can be made from wood, glass, plastic and other materials. It's not difficult at all. You will need drawings and a little patience. A beautiful table will be a place where you can relax and read the press or sit with friends over a cup of tea. Step-by-step instruction with a photo will simplify the manufacturing process.
Preparatory work
In order to make a coffee table yourself, you will need not only drawings, but also materials and tools. Stock up on the following construction equipment:
- wood (solid wood);
- varnish for coating water based;
- solvent;
- acrylic paint;
- brushes;
- self-tapping screws;
- jigsaw;

- screwdriver;
- grinder;
- milling cutter;
- drill.
As for wood, the best choice would be solid pine 2.5 cm thick. In accordance with the drawing, the parameters of the coffee table, which you plan to make yourself, are 1.5 m x 0.5 m.
Attention! The table does not need separate legs.
Varnish is necessary to cover the finished structure; in total you will need about 0.3 liters of it. It is better to purchase acrylic paint with glitter. With its help you can give unusual look interior item. The table will be assembled using self-tapping screws. Their size should be 4 x 60 and 4 x 40 mm. As for other tools and materials, there are no special requirements for them.
Installation features
The first stage of making a coffee table is selecting drawings and cutting out the corresponding parts. Suitable diagrams can be found on the Internet or drawn up yourself.
Attention! It is much easier to use ready-made drawings and the table manufacturing process will be completed faster.
So, when all the parts are ready, you can start assembling the future interior decoration.
- All joints and roughness of wooden parts must be primed. This can be done using wood glue or PVA. Then let all components dry completely.

- The slats and legs should be fastened with the self-tapping screws specified in the list of required materials.
- Coffee table resin can be easily removed with a solvent. The most popular product remains white spirit. Moisten a dry cloth a little with the product and wipe the surface of the table.
Advice. Do these manipulations in an open space, because in the apartment this smell will not disappear soon.
- The table is almost ready. But it needs to be decorated. To do this, you need to mix varnish and acrylic paint with shiny splashes. Cover the entire surface of the table.
- After the paint and varnish have dried, the coffee table can be placed indoors and used for its intended purpose.
Table made of wooden boxes
This is the simplest and original way make a decorative table. A handmade designer item will rightfully take its place in the living room or bedroom. To make a table you will need wooden boxes. Precisely wooden ones, not plywood. Wood has good performance qualities, which cannot be said about plywood.
But still, this material will also be needed for a coffee table made of drawers. Take a few minutes for the instructions and you will definitely succeed!

- Prepare a sheet of plywood. This is done so as not to burden the structure. Wooden boxes are not an ideal geometric object.
- In this regard, the boxes should be laid on a horizontal, flat surface. Before cutting the plywood sheet, draw the contours. And cover the sheet of plywood with varnish or stain.
Advice. For a coffee table made from drawers you will need wheels. They can be purchased at any hardware store or hypermarket. It's best to buy wheels small size and low.
- The wheels should be fixed at the corners, and the drawers should be attached to the lower tabletop.
- All that remains is to varnish the coffee table. After applying the varnish, you need to let it dry and only then cover it with a new layer. This procedure is repeated several times.
Advantages and disadvantages of wooden tables
Wooden tables are a popular option that will easily fit into any interior. It is only important to choose a suitable shade that will be in harmony with the rest of the furniture. Like all objects, such designs have their positive and negative sides. The advantages include:
- large selection of wood (soft, hard);
- variety of shades and textures;
- ease of manufacture and pliability of the material;
- naturalness and environmental friendliness;
- versatility.
In addition to the positive aspects, it is necessary to note the disadvantages. There are few of them, or rather, only two: the high cost of the material and susceptibility to mechanical effects (scratches, abrasions, etc.).
Popular ideas for making coffee tables from wood
Instances made of wood have always been environmentally friendly and beautiful. And how many interesting ideas can be turned into reality! It would seem that a simple table made of wood, what could be original about it? We offer you several popular options for making a coffee table.

- Pallet table. For its manufacture, ordinary pallets are required, to which the wheels are fixed. Distinctive feature This design has a small height. Just screw on the wheels and the table is ready. Some go further and decorate it with a tabletop and various shelves.
- Table from an old door. If you recently replaced the doors, then the old ones can be used as material for making a coffee table. The door needs to be cut into three parts: a table top and two legs. They are attached to each other using corners.
- Table made of wooden logs. Everything is very simple. You need to select or cut identical pieces of wood. Taken plywood base. Movable wheels are attached to its lower part, and tree logs are attached to the top. The material used is birch, aspen or beech.
- Table made from a stump. It is enough to attach wheels to it, coat it with varnish and the decorative table is ready.
A handmade coffee table is an original way to decorate a room. The design, dimensions and other characteristics of the item depend entirely on the selected drawing and your preferences. It is worth noting that to make a table, you will need a minimum amount of materials.
DIY wooden coffee table: video
Wooden coffee table: photo


A table with your own hands can be made even by a home craftsman who does not have any accumulated experience in carpentry. Of course, this will become possible if the design of the table is quite simple and understandable.
For example, it is not always possible to find a suitable ready-made table model for a kitchen that is extremely small in size. Purchasing custom-made solid wood furniture is quite expensive. Therefore, sometimes you have to take up the tools and construct your own “work” yourself, starting from the specific dimensions of the place where you plan to install the table.
In addition, there is often a desire to show one’s creative abilities in a summer cottage, especially since there is always a desire to beautifully arrange a veranda or gazebo in a suburban area. If you have suitable materials and tools at hand, then you can either sit down to draw up a drawing of the future table, or use finished project, and then get to work.
To figure out which type of table you can build with your own hands, it is advisable to consider several options for this piece of furniture.
Tools for work
Before starting work, it is necessary to prepare the appropriate tools that will be required for the manufacture of any wooden table. The amount of material for each model will be different.

You can use regular, traditional hand tools, which carpenters have always worked with. This list usually includes:
- A plane used to level wood and cut parts to the required size.
- Chisels for sampling various holes and grooves, removing small protrusions.
- Saws different sizes and modifications that are used to cut thick boards or make small cuts.
- Pencil, tape measure, corner and ruler.
- Screwdriver Set.
- Clamps for temporary fixation of glued parts.
- Sandpaper for grinding.
Many of the tools can be replaced with more modern and convenient devices:
- An electric jigsaw will do all the work that the various saws mentioned above were previously used for.

 Rating of jigsaws
 - A sanding machine will help make surfaces smooth and polish them to a shine, eliminating the very tedious procedure of manual sandpaper.

- Milling machine with a set of cutters. This device will help round sharp corners, drill shaped grooves for furniture hinges, and, if necessary, certain experience, then you can use it to decorate the table with a relief pattern.

- will significantly speed up the work, since you won’t have to spend several minutes tightening each screw. In addition, during certain operations it is possible to install one of the milling cutters or ordinary drills in it, for example, in order to process an edge or make a perfectly even large or small hole (groove).

- The construction level will help make the product even and neat, as it will show all possible irregularities and distortions.
 To ensure that the finished furniture does not turn out “crooked”, the assembly is controlled by level
 An easy-to-make table for a summer cottage
 Anyone can make a table like this
 Necessary materials
For such a country house, having a tabletop size of 1680×850 mm, you will not need too much wooden blanks. You need to prepare the following:
- Beam, cross-section - 750×100×50 mm - 4 pcs. (table legs).
- Self-tapping screws, bolts and possibly metal corners.
- Wood glue.
- Board size:
- 1680×100×25 mm – 4 pcs. (longitudinal frame elements);
- 850×100×25 mm – 2 pcs. (transverse frame parts);
- 1580×100×25 mm – 2 pcs. (cladding boards for the side elements of the frame);
- 950×100×25 mm – 17 pcs. (boards for tabletops).
All wooden elements must be treated with compounds and have a prepared smooth surface. If you plan to “darken” the wood, then it is covered with stain, and to reveal the textured pattern, the top is carefully sanded with a grinding machine. Fine-grit sandpaper will remove the stained, raised parts of the wood grain, making them lighter than the depressions.
Installation of a garden table
When all the parts for the frame are prepared, you can proceed to assembly.
 Frame or “box” of the table
 - The first step is the details of the tabletop frame - four longitudinal boards measuring 1680x100x25 mm and two end boards 850x100x25 mm, laid out on big table or on the floor. The location of the internal and external boards is marked on the end boards. Using a ruler, based on the drawing, the required distances are measured and marked with a pencil. It is imperative to accurately mark the width of the longitudinal board at the junction with the end board, especially if the connection will be made using the tie-in method.
The elements can be connected in different ways:
 Connection with a choice of “quarters” and using metal corners
 - using a steel angle - this is the simplest and reliable way;
- the insertion method is more the hard way, since it requires exact dimensions not only in the width and length of the connecting elements, but also in the depth of the board;
 Several types of joints based on the tongue-and-groove principle
 - “groove-tenon”, shown in the second figure a), b), c), d) and e) such a connection is also quite difficult for novice craftsmen with no experience;
- connection with dowels is shown in fragment e) - this method also requires perfect accuracy when marking and drilling holes in the parts to be connected.
- All connections are usually made using glue. The only exception is the fastening of parts end-to-end with a metal corner.
- The frame must have perfectly aligned right angles, so after connecting all the elements, you need to carry out control using a construction angle and measuring and comparing the lengths of the diagonals.
- If parts are secured with glue, they must be fixed in clamps and left until it dries completely, otherwise they will not be connected securely.

- When the glue dries and the frame acquires a certain rigidity, facing boards measuring 1580 × 100 × 25 mm are attached to the outer longitudinal sides. The place of their attachment also needs to be marked, since there should be a distance along their edges for mounting the legs. The facing boards are also installed with glue and fixed with self-tapping screws, the heads of which should be recessed into the wood by 1.5 ÷ 2.0 mm.

- The next stage is the transverse cladding of the tabletop with boards 950×100×25 mm. The place where they are attached must also first be marked, starting from the middle of the frame, since they must be installed at a distance of 5 mm from each other. The protrusion of the tabletop above the frame should be 25 mm on all four sides.
- Next, each of the boards is fixed in four places to the longitudinal elements of the table “box,” and the outer boards are also attached to the end sides. In order for the heads of the self-tapping screws to be recessed, recesses with a diameter of 8 mm are drilled into the boards to a depth of 2–3 mm, then, in the center of these recesses, through holes are drilled with a drill of a smaller diameter (usually 3 mm), into which the self-tapping screws will be screwed. To avoid cracking of the boards during installation work, through holes must be drilled.

- After that, to the edges longitudinal boards Legs made of timber with a cross-section of 750×100×50 mm are fixed; they must exactly match the width of the tabletop.
 The next step is installing the legs
 - The legs can be secured to the frame with self-tapping screws, but it is better to fix each of them with two bolts, placing them diagonally at the connection point. Through holes are drilled for the bolts, and the nuts are tightened on them from inside the frame using a wrench.
- The final stage of manufacturing is sealing the heads of the screws with a mixture made from carpentry or epoxy glue and sawdust. Use this homemade putty to fill the recesses above the caps and level them well. After the glue has dried, the entire tabletop, and especially the areas covered with “plugs” of glue, must be sanded well.

- After this, the table can be covered with varnish or water-based paint. After waiting for the decorative or protective layer to dry, the product can be installed in summerhouse, on the veranda or terrace in the recreation area.
If desired, it would be easy to make a bench to go along with the table.
Small folding table for the kitchen

This small folding table is perfect for a small kitchen or a very small room.
- Its design is designed in such a way that the tabletop cannot fold on its own if the table leg is accidentally touched, so the table is quite safe for installation in a children's room.
- The presence of a spacious double-sided bedside table will allow you to store various small items and small toys in it.
- The table is equipped with a tabletop of sufficient size so that the child can do homework while sitting at it.
- In addition, there is room on the tabletop for a laptop or books necessary for study.
- If necessary, this small table can easily replace an ironing board if you lay a soft cloth on its surface.
Considering all of the above, the table can be called multifunctional, despite its very compact size.
Find out how, and also check out several models with detailed instructions, in a special article on our portal.
Necessary materials and parts for a folding table
To assemble such a convenient piece of furniture, you need to prepare all the parts that make it up. The list of necessary blanks is given in the table below, and how to make them will be described and shown below:
 Diagram of the table with the numbers of assembly parts marked (the illustration is clickable - click to enlarge)
 | Part number on the drawing | the name of detail | Quantity, pcs. | Part size, mm | Material of manufacture, thickness, mm |
|---|---|---|---|---|
| 1 | Folding part of the table top. | 1 | 600×600 | |
| 2 | Fixed table top of the cabinet. | 1 | 600×475 | Multilayer plywood 25 mm thick |
| 3 | 2 | 530×30 | ||
| 4 | 2 | 120×30 | Multilayer plywood 18 mm thick | |
| 5 | The upper end part of the groove that limits the movement of the leg. | 1 | 122×30 | Multilayer plywood 18 mm thick |
| 6 | Groove element for leg movement on a folding tabletop. | 2 | 530×20 | Multilayer plywood 18 mm thick |
| 7 | A groove element for the movement of the leg on the tabletop of the cabinet. | 2 | 120×20 | Multilayer plywood 18 mm thick |
| 8 | The lower end part of the groove that limits the movement of the leg. | 1 | 122×20 | Multilayer plywood 18 mm thick |
| 9 | Side walls of the table cabinet. | 2 | 720×520 | MDF 19 mm |
| 10 | Horizontal parts of the cabinet that form shelves. | 3 | 520×312 | MDF 19 mm |
| 11 | The lower vertical part of the internal partition of the cabinet. | 1 | 418×312 | MDF 19 mm |
| 12 | The upper vertical part of the internal partition of the cabinet. | 1 | 312×184 | MDF 19 mm |
| 13 | The middle horizontal part of the cabinet. | 1 | 310×250 | MDF 19 mm |
| 14 | Cabinet door. | 1 | 477×346 | MDF 19 mm |
| 15 | Cabinet shelf. | 1 | 310×250 | MDF 19 mm |
| 16 | Cabinet drawer front panel. | 1 | 346×209 | MDF 19 mm |
| 17 | The front panel of the drawer (located behind the front panel). | 1 | 418×312 | MDF 19 mm |
| 18 | Drawer side panels. | 2 | 341×250 | MDF 19 mm |
| 19 | Back panel of the drawer. | 1 | 272×120 | MDF 19 mm |
| 20 | Drawer bottom panel. | 1 | 341×272 | MDF 19 mm |
| Handles for drawers and cabinet doors. | 2 | Ø 30 mm | Wood | |
| Upper leg element. | 1 | 80×80×18 | Multilayer plywood 18 mm thick | |
| Mobile table leg. | 1 | Ø top 55, bottom 30, height 702 | Wood | |
| Furniture hinges for connecting two parts of the tabletop. | 2 | Ø 50 mm | Metal | |
| Furniture door hinges. | 2 | The size depends on the shape. | Metal | |
| Bottom end panels covering the gap under the cabinet. | 2 | 20×300×5 | Plywood 5 mm |
The pictures show a drawing of a table that can be relied upon during the process of manufacturing and assembling elements into a single structure.
 Main dimensions of the table (illustration is clickable - click to enlarge)
  Individual table components – drawer and a guide channel for moving the leg (the illustration is clickable - click to enlarge)
 To manufacture all the parts listed in the table, you will need modern electric tools that can bring the workpiece to professional perfection.
Find out how to do it with a photo and description in a special article on our portal.
Installation of a folding table-cabinet
You should start making a table with its most important and largest part - the tabletop. Since the table is folding, this element will consist of two parts - stationary and “mobile”, that is, one that can be folded down if necessary. When folded, this table can easily serve as a regular compact cabinet.
| Illustration | Brief description of the operation performed |
|---|---|
 | The first step is to cut out blanks for the tabletop, measuring 600×600 and 600×475 mm, from plywood 25 mm thick, using a jigsaw or circular saw. |
 | Next, markings are made on the larger panel - a semicircle is drawn, since the front of the table should be rounded. In order to achieve the correct shape of a semicircle, you can use a large construction compass, or make one yourself - from a nail, pencil and rope. |
 | Then, along the marked line, the tabletop is rounded. This can be done using a jigsaw or circular saw, installing the appropriate compass attachment on it. |
 | Next, a cutter of the desired configuration is installed on the milling machine, which will make the edges of the tabletop smooth, or, if desired, even or rounded. |
 | The semicircular part of the panel is processed with a milling cutter, leaving the side that will join the second part of the tabletop flat. Then its edges are processed in the same way. |
 | The next step is to place the two processed parts of the tabletop on a flat table at a distance of 5 mm from each other. Markings are being made for installation furniture hinges. They must be placed at a distance of 100-120 mm from the edge of the tabletop. Furniture hinges can have different shapes, so they should be laid in the marked place and outlined with a simple pencil. Then, using a router, special shaped grooves are made in the plywood, the depth of which should be equal to the thickness of the furniture hinges. The hinges are fixed into the finished holes using self-tapping screws. |
 | After connecting the two parts of the tabletop with hinges, in the middle of the panels, markings are made on their lower side to secure the parts that will form a closed channel for the movement of the moving table leg. The guides should be fixed at a distance of 30 mm from the junction of the two parts of the tabletop. For the manufacture of parts, plywood with a thickness of 18 mm is taken. Then, 10 elements are cut out of it and processed with a milling cutter: 530×30 mm - 2 pieces, 530×20 mm - 2 pieces, 120×30 mm - 2 pieces, 122×30 mm - 1 piece, 120× 20 mm - 2 pcs., 122×20 mm - 1 pc. It is important to remember here that long slats should have 45˚ cuts on one edge, and short elements on both sides, so that when joined, they form a right angle. In addition, the upper long and short parts, fixed on top of the lower rails of the guides, are cut off from the ends, also at an angle of 45˚. These cuts are necessary so that their angles do not interfere with the movement of the leg along the formed channel. Then, the parts are glued with wood glue to the marked area of the rounded, and then to the rectangular part of the tabletop. First, the longest slats measuring 530×20 mm are fixed with glue and then screwed with self-tapping screws; then a piece of 122×20 mm covers the channel. On top of the long and short fixed slats, second ones are glued, having the same length, but greater width; they are also additionally screwed with self-tapping screws. Thus, an even channel is formed between the tabletop and the top rail, along which the leg will move. It is very important to calculate the location of the places where the screws are screwed in so that the upper ones do not collide with those that secure the lower slats. Four parts are fastened to the rectangular part of the tabletop in the same way. All elements must be processed until smooth and perfectly evenly fastened to each other, otherwise the leg will bump into obstacles and jam when moving. |
 | The leg is usually made using lathe. If it is not there, then you can order it from a master or purchase it ready-made. As a last resort, you can make it square by processing the timber of the required height until smooth. Then, using a dowel and glue, a square plywood guide plate measuring 80x80x18 mm is attached to the upper end of the leg using a dowel and glue. |
 | Next, after the glue has dried, the leg can be installed in the channel intended for it and tested for its free movement, without jamming. If necessary, minor adjustments and modifications can be made. |
 | The finished tabletop is painted or coated with water-based varnish - if the goal is to preserve textured pattern plywood. After this, the finished tabletop is put aside and proceed to the manufacture of the cabinet. |
 | The elements of the cabinet do not have complex configurations, therefore, to make them, it is enough to accurately transfer the dimensions of the parts indicated in the table on an MDF panel or thick plywood and carefully cut them out using a jigsaw or saw. After the parts are made, their end parts must be processed smoothly with a milling cutter, otherwise they will look sloppy. |
 | If you plan to cover the visible end parts of the cabinet parts with a special laminated edge tape, then this process is carried out using a regular iron. The tape on its inner side has a layer of glue, which heats up under the influence of heat and ensures reliable fixation of the edge on the surface of the end parts of the MDF panels. |
 | The next step in the cabinet door panel is to make shaped grooves into which furniture hinges will be installed and secured. The holes are made in the same way as in the countertop using a milling cutter, but in this case the milling cutter can also be installed in a screwdriver, since MDF has a lower density than plywood and is easier to process without chipping the material. The hinges should be placed at a distance of 100 mm from the edges of the door - before starting drilling, it is necessary to carry out careful markings. A similar procedure is carried out with the wall of the cabinet on which the door will be attached. Then the wall and door are joined together to check the correct installation and to mark holes for the screws. |
 | In addition to the hinges, you can immediately screw the prepared handle to the door. To do this, step back 50 mm from the edge of the panel and find a convenient height position, mark the point through which to drill through hole to secure the handle. |
 | All manufactured parts of the cabinet are painted with paint of the selected color using a roller and brush. Paint will not only make the product aesthetically attractive, but will also protect the material from the negative influence of a specific kitchen humid environment. |
 | Next, you can proceed to assembling the bedside table. Professionals carry out this process using special tools, but they can be easily replaced with improvised devices. For example, you can carry out the assembly on a flat table, and for ease of installation of the cabinet, it is additionally installed on flat bars. Mutual fastening of parts can be done using wooden dowels, metal furniture corners or self-tapping screws - the latter option is the simplest, but also the most unreliable. In addition, the screw heads will have to be masked with various compounds after assembly. The assembly process proceeds as follows: - The bottom panel is placed on the stands. - One of the side panels is leveled on it and using a construction angle, and its location is marked with a pencil. -The location of the fastening parts is immediately marked on the horizontal and vertical panels. - Exactly the same procedure is carried out with the second side and dividing middle wall. - Then holes are drilled at the marked points on the bottom and the end sides of the side panels for installing dowels. - After this, before gluing the parts together, locations for installing shelves are determined on the side walls. Then, shelf support brackets are mounted in the marked places, for which holes are also drilled. - Next, dowels coated with glue are installed in the holes drilled in the bottom, and the side walls are put on their upper, protruding part. - Fixed shelves-lintels are mounted in the same way, simultaneously with the side walls. |
 | Before continuing work, you need to make sure that the glue in the assembled structure has dried well. To make the cabinet stand more rigidly, it is laid on its side and pressed with clamps while it dries. |
 | While the glue dries, you can start assembling the drawer. Since it will be completely assembled from MDF, the installation of the box can also be carried out using dowels. The sides are attached to the bottom of the box, and a line is drawn along them with a pencil, and then marks are made of the places where the dowels will be installed. Then, the sidewalls are removed, and at the marked places, holes are drilled in their end for installing fasteners. The same is done on the bottom panel. Next, the dowels are coated with glue and carefully inserted into the holes, connecting the sides to the bottom. |
 | The sidewalls are screwed together using self-tapping screws, the heads of which are recommended to be recessed into the wood, and the holes to be sealed with a mixture of epoxy glue and sawdust. Another fastening option can be furniture corners, which are screwed from the inside to the sides with self-tapping screws. Each side will require two corners. |
 | When assembling the box, it is necessary to control the evenness of its corners using a construction angle and changing the diagonals, otherwise a skew may occur. |
 | If you plan to install metal roller guides for easy movement of the drawer, then first, the location of their attachment is determined on the sides of the drawers and on the inner walls of the cabinet. To do this, using a pencil and a ruler, draw a line along which the guides will be fixed. |
 | Next, a front panel is installed to the front of the drawer. It is screwed from the inside of the box, through pre-marked and drilled holes. In addition to self-tapping screws, it is recommended to use glue to fasten the panel: it is applied to the front panel, and then the front panel is pressed against it, and they are tightened with four or five self-tapping screws. After the glue has dried in the center façade panel a hole is drilled through which the handle is screwed. |
 | Finally, the long-awaited moment comes - connecting the cabinet and the countertop. It is recommended to first glue the stationary part of the tabletop to the surface of the cabinet, and then secure it with self-tapping screws that are screwed in from the inside of the lower cabinets. But first, the tabletop needs to be positioned correctly. Part of the channel located on the permanently installed tabletop panel should rest against the side of the cabinet - it will serve as a stopper for the movement of the leg towards the table. The tabletop should extend beyond the edges of the cabinet on the side of the drawer by 50 mm, open shelves by 30 mm, and from the side of the leg - by 120 mm. |
 | Having secured the tabletop, they proceed to the final installation and screwing the bedside table door onto the screws. Then the drawer is inserted, and the shelves are installed on the shelf supports. |
 | When closed, the table is compact, so it does not take up much space and looks quite aesthetically pleasing. If desired, you can choose other colors to decorate it, which will better harmonize with the interior of a particular room. |
 | When open, the table also does not take up much space and fits perfectly into one of the corners of the room. Thanks to its “light” design, it does not weigh down the interior, and the shape of the tabletop makes it safe for children. Therefore, this table option can be considered ideal for small apartments with small kitchens and rooms. |
If there is a need to save money, or simply have a great desire to express yourself in carpentry, then do not delay self-made. Moreover, the assembly will become not only an interesting and useful activity, but also very enjoyable, especially at the moment when the work is successfully completed.
For those who are confident in their abilities, we offer one more interesting option round table, which can easily serve both at home and on the site.
Video: example of assembling a round table
And one more idea for a kitchen table, which, if not true, would also be within the power of a skilled owner to implement on his own:
Video: lightweight kitchen table with collapsible design