Beautiful candles. DIY wax candles: master class with video
3 67 018
Handmade is gaining more and more popularity. Extravagant jewelry, paintings, toys, decorative elements, gifts - this is only a small part of what passionate craftsmen and amateurs create with their own hands. Today we will talk about how to make a candle at home.
This process does not require special skills or equipment. After reading our recommendations and detailed master classes, even beginners can begin this exciting process.
Creating a candle: where to start
Making your own candles is much easier than you might think. And the main advantage of such an activity is that the necessary materials are easily accessible. If you look hard enough, you can even find them in your home.Materials for a homemade candle

Wax, stearin or paraffin are best suited for the job. Moreover, it is better for beginners to start getting acquainted with the latter; it is the least demanding to use. You can buy paraffin at the store or use leftover old white candles.
Wick
It is best to use natural threads as a wick, ideally thick cotton ones. Do not try to use synthetics: such a wick will quickly burn and leave behind bad smell. To check if the thread is natural, simply set fire to its tip. If it melts, forming a hard ball at the end, you have synthetics.
If you have an unusual candle in mind and are thinking about how to make an original wick for it, then use colored floss threads. This is an excellent and natural material.
Remember important rule: the thicker the candle, the thicker the wick should be.
It's easy to make it yourself. To do this, prepare a solution: in a glass of water, dissolve 1 tablespoon of salt and 2 tablespoons boric acid. Soak cotton thread or floss in it for 12 hours. Then dry them and twist them into a rope or braid them.
If this process seems tedious to you, carefully remove the wick from the finished household candle and use it.
Candle mold
First of all, decide on the configuration of the desired candle, and then try to find a hollow object of the same shape. You may find it useful:- cardboard bags for milk and juices;
- plastic cups from yoghurts and desserts;
- egg shells;
- silicone baking molds;
- glass goblets, wine glasses, glasses and glasses;
- baby beads;
- shaped ice cream molds;
- tin and glass coffee jars;
- empty tin cans.
Another interesting option- pour candles into beautiful transparent glasses. You won’t be able to get them, but they will look very stylish and unusual.
Sometimes scented candles are made in tangerine or orange peel. The fruit is first cut in half and the pulp is carefully removed. You can also use large shells or coconut shells.

Dyes
A white candle is elegant but boring. Naturally, the question arises of how to color paraffin in order to obtain bright decorations interiorFor lovers of candle making, the best and cheapest option is to take wax crayons for children's creativity. Want to get a special candle? Look for pearlescent crayons - your creation will be unique.

Do not try to use water-soluble gouache or watercolor - you will fail. The dye will inevitably settle to the bottom or fall out in flakes. The finished product will look very unpresentable.
Paraffin melting utensils
In order to melt the paraffin, you will need a small saucepan for a steam bath and an iron bowl. Experienced craftsmen recommend heating paraffin in a steam bath, considering other methods, including the microwave, to be fire hazardous.To begin with, we recommend that you also use this method, proven over the years: place a bowl of paraffin in a container of boiling water. If you plan to have a colored candle, add the chalk immediately and stir the melted mass several times to obtain a uniform color.
Flavors and decor
Any available materials are suitable for decorating candles. First, decide on the topic of your work. Pebbles and shells will effectively complement candles in nautical style. For a New Year's theme, use beads, small cones, small decorative balls, ribbons and bows. Decorate Valentine's Day candles with hearts, sparkles, bows, dried flowers, coffee beans, etc.It is best to scent homemade candles with essential oils, which can be purchased at your nearest pharmacy. Another option is to find vanilla cinnamon in your kitchen. You should add flavors to the melted paraffin at the very end, after coloring.
Step-by-step master classes
We bring to your attention a selection of accessible master classes that will help beginners learn basic techniques and techniques. If you already know how to create candles with your own hands, you can draw interesting ideas from them to implement in your creativity.Coffee candle
Want to create a romantic mood? Light a coffee candle - its divine aroma will take away all worries, leaving only good mood and peace. This is especially pleasant in rainy autumn or cold winter. And also this great gift for any reason and even without.
To work you will need:
- paraffin;
- whole coffee beans;
- two plastic cups or boxes of different sizes;
- wick holder - teaspoon, wooden stick or plastic coffee stirrer.
If you don’t find paraffin, take household candles, you can also get a wick from them.

Crush the paraffin into small pieces with a knife to speed up the melting process. If you took store-bought candles, gently crush them blunt side of the knife so as not to damage the wick.
Place paraffin in glass jar and put it in a saucepan with warm water. Heat the water over low heat until the paraffin is completely melted in the jar - it should become transparent.

At this time, prepare the mold for pouring. Place the smaller one in a larger plastic cup (or whatever mold you have), after filling it with water. There should be a fairly wide space between the walls of the cups. Pour coffee beans up to half the height between the walls.
Pour the melted paraffin into the mold to the level of the grains, wait about 10 minutes. Then pour the paraffin to the edge of the mold and let it harden completely. This will take about an hour.
Carefully pour the water out of the inner glass and remove it from the paraffin ring. Lower the wick into the workpiece so that it reaches the bottom of the glass. Tie its upper end to the holder and place it on top of the glass, centering the wick.

Pour melted paraffin into the middle of the candle. Place a few grains on top for decoration. Now you will have to wait 4-6 hours until the candle hardens completely.
Carefully remove the frozen candle from the glass. At the same time, it can be cut with scissors to facilitate manipulation.

If you want the grain to be better visible, blow the sides of the product with hot air from a hairdryer. The paraffin will melt and the surface will become embossed.
It turned out to be an excellent aroma candle, isn’t it? Do you want to make it even more romantic? We invite you to use the same technology to create heart-shaped candles that will become an unforgettable gift for your significant other for Valentine's Day or a birthday.

Still have questions? Watch a detailed video of creating a fragrant coffee candle and you will see that everything is even simpler than it seems at first glance.
Rainbow candles
Want to add to your home bright colors? Interior rainbow candles will help you with this self made.To make them you will need the following ingredients:
- paraffin;
- stearin;
- cylindrical shape;
- dyes corresponding to the colors of the rainbow.
Multi-colored candles in layers
Spectacular multi-colored candles in a transparent glass will become the highlight of your interior. How to make them, see our master class, illustrated with step-by-step photos.Another one interesting idea- square multicolor candle. Wax pencils are also used to color it. If you are a beginner, be sure to check out the clear video tutorial, with its help you can easily make such a cool craft as a gift for friends and family.
Openwork candles
Decorative candles can be of the most varied designs, because talented craftsmen never tire of amaze with their imagination and creative experiments. To confirm these words, we invite you to familiarize yourself with the method of making an unusual openwork candle.
To work you will need:
- paraffin;
- optional coloring and flavoring;
- wick and holder for it;
- cylindrical shape;
- small ice cubes.
Place the wick in the mold so that it reaches the bottom. Don't forget to secure it on top with an improvised holder. Fill with crushed ice, not reaching a couple of centimeters from the edges.
Pour the melted candle mass into the mold. Leave the workpiece until the paraffin has cooled completely. In this case, naturally, the ice will melt, and cavities will form inside the candle.

Carefully drain the water and remove the product by pulling the wick.

Be careful, this beauty is quite fragile and requires careful handling. This unusual openwork candle will be a wonderful gift for your family and friends. If you use paraffin from old candles for your work, you will get this beauty completely free.

You will receive visual instructions for action from detailed videos creating openwork candles. After viewing them, you can make such beauty yourself at home.
Video #1:
Video #2:
Option #3: And if you are thinking about it, surprise them with a handmade red openwork candle. It will be an unforgettable gift and will bring a holiday feeling and Christmas mood to your home. Watch the master's work and be inspired by your own masterpieces.
Massage candles
The main ingredient for creating a massage candle is soy wax. By adding useful components to it, you can get a product that has healing properties. It no longer acts as decor, but as home cosmetic product, which makes the skin soft and well-groomed.
Healing properties of essential oils:
- Helps rejuvenate skin and clean pores essential oil lemon.
- Orange the oil has an anti-cellulite effect.
- Rose oil stimulates the regeneration of skin cells and promotes skin elasticity.
- Can clear the skin of pigment spots and make it smooth rosemary oil.
- Oil does a great job of moisturizing patchouli.
- Lavender the oil will delight you with its healing effect.
Solids are also added to massage candles. vegetable oils. For example, cacao butter used to moisturize and tone the skin. And with its regular use, cosmetologists promise you smooth and soft skin.
Exotic foods can save dry skin from flaking Shea Butter. Coconut oil, rich in natural antioxidants, can smooth the skin.
General algorithm for creating a massage candle:
- melt the wax with solid oils in a water bath;
- let the mixture cool slightly and add liquid oils;
- Cool the mixture a little more and add essential oils, extracts and vitamins;
- pour the resulting candle mass into the mold, after inserting the wick into it;
- wait until the candle has completely hardened and remove it from the mold;
- The hardened candle is ready for use.
Recipe No. 1
- soy wax - 85%;
- avocado and shea butter (aka shea butter) - 5% each;
- patchouli essential oil - 2.8%;
- ylang-ylang essential oil - 2%;
- vitamin E - 0.2% (a few drops).
Recipe No. 2 “Massage candle with a calming effect”
- soy wax - 80g;
- shea butter - 40g;
- almond oil - 40g;
- cocoa butter - 20g;
- essential oils of sage and lavender - 2 g each.
Recipe No. 3 “Massage candle with anti-cellulite effect”
- beeswax - 100g;
- cocoa butter - 60g;
- ground chili pepper - 5-10g;
- essential oils of orange and grapefruit - 3 g each.
Regular massage will help get rid of the hated " orange peel", will make the skin soft and elastic.
Decorating candles using decoupage technique
If you don’t have dye, but want to create something bright and memorable, don’t worry. The simplest candle made from cinders can be turned into a work of art. To do this, you need to have a little patience and decorate the product to your liking.Candle decorated with dried flowers
Dried leaves, stems and flowers will help you create an exclusive candle that will be almost impossible to repeat. Usage natural materials limited only by the local flora and your imagination. That's when the skill will come in handy.
To work you will need:
- any dried flowers;
- 2 candles - for decoration and regular;
- tea spoon;
- tweezers;
- nail scissors;
- paraffin for final coating.
Heat a teaspoon over a regular burning candle ( internal side above the fire, because the spoon will turn a little black, and in order not to stain the candle, then we will carry out all manipulations with the other side of the spoon).

Place a dry flower on the candle to be decorated and gently stroke its petals external side of the spoon so that they melt to the paraffin and do not stick out. Thick stems may need to be ironed several times while heating the spoon.

Carefully trim off any excess stems that extend beyond the candle with scissors.
Glue the remaining elements in the same way, choosing the desired location for them. Make sure that the edges of the leaves and petals do not stick out.

All that remains is to consolidate the result. Melt the paraffin in a water bath, pour it into a container into which you can completely dip the decorated candle.
Holding the candle by the wick, immerse it in melted paraffin, place it on a flat surface and let cool. If the petals were not smoothed well and protruding ends remain visible, repeat this procedure again.

Such an elegant candle will conquer any heart and will not go unnoticed. Complement it with a beautiful candlestick and it will become a unique decoration for your home.
Decoupage candles with paper napkins
The desire to decorate a candle could come instantly, but there are no dried flowers at hand. In this case, you can get by paper napkins. With their help you can easily decorate a candle for any holiday.
Choose a napkin with the pattern you want. Cut out necessary elements from a napkin. Carefully remove the bottom two layers of paper from the resulting blanks. Further, the principle of operation is similar to decorating with dried flowers.

Place the prepared element on the candle and iron it with a hot spoon. Sand the cooled surface with the rough side of a regular kitchen sponge. There is no need to immerse the candle in melted paraffin with this method.

Your masterpiece is ready. Compose beautiful composition made from candles in New Year's style, fir branches and colored balls. It will bring a good mood and a festive atmosphere to your home.
Photo design ideas
Want even more inspiration? Browse our selection of decorative candles. You will definitely find one that you want to repeat immediately.


We were able to convince you that it is possible to create unique masterpieces even from scrap materials? That is why candle making has become a favorite pastime for many, beginners and not only masters.

Original form templates:


Now you know what and how candles are made from, you can get to work. Don't try to use the photo you like as a template and an unconditional ideal. Be inspired by ready-made projects to create your own unique candles. A little effort and perseverance - and your masterpieces will become a standard to follow.
Useful tips
IN modern world candles are more used as parts of decor, decorating the interior and creating a more comfortable overall atmosphere. To make a candle at home, you need to know a few rules, for example that properly made wick It has great importance, since the evenness of the candle’s burning depends on it.
It's also worth knowing that The thickness of the candle depends on the number of threads which are used in its preparation. For example, to make a candle with a thickness of 2 to 7 cm you need to prepare 15 threads, and for a candle with a diameter of 10 cm you need 24 threads. A candle with a diameter exceeding 10 cm needs 30 threads.
Go to the desired section:
Some useful information about making candles

Use a double boiler to melt the wax. It can be replaced electric oven. IMPORTANT: do not use glassware.
There are many types of wax, but almost all of them melt at a temperature of 90 degrees Celsius.
Also It is advisable to have a thermometer nearby, which will help you monitor the temperature. It is better to use a thermometer with a steel rod and a scale on top. It can be purchased at specialized laboratory equipment stores. A thermometer with a steel stem can be used to stir the wax.
Use caution if you decide to melt the wax over an open fire, as this may cause the wax to catch fire.
For stewing use baking soda, but not water. It is also worth knowing that overheated wax will begin to release acrolein is a toxic byproduct. Don't forget to take care of good ventilation in room.
How to make a candle with your own hands

Prepare:
Old saucepan for melting paraffin;
An old bowl;
Heat-resistant forms in which future candles will be located;
Several wicks, which can have either a paper or wire core;
stick;
A special holder to tension the wick in molten paraffin.
To make 3 candles prepare:
40 g stearin powder;
400 g of granulated paraffin;
Dye to give color to the wax;
Fragrance (you can replace it with essential oil).
1. We make the base for candles:
Place a bowl over a saucepan of boiling water and pour stearin powder into it;
Wait for the stearin to melt and add 1/4 tablet of wax coloring to the same bowl;
Place paraffin in a bowl and heat the water to 80C;
Stir thoroughly all the time;
After the entire mixture has melted, add a few drops of essential oil or fragrance.
2. Prepare the wick
Immerse the wick in melted paraffin for 5 minutes;
Let it dry on the foil.
3. Let’s proceed directly to making the candle

Cut the wick - its length should be slightly greater than the height of the mold;
Pass one end of the wick through a special holder and clamp it with pliers, and the other needs to be wrapped around a stick (a pencil, for example) and secured;
Lower the holder along with the wick to the bottom of the mold and begin pouring paraffin;
After you have poured paraffin to the brim, you need to place the stick on the edges of the mold in such a position that the wick is in the very center;
Wait until the mass hardens;
Trim the wick.
4. Something special
If you want to make your candle unique, you can use your favorite flower, souvenir, or a spruce twig or pine cone if the candle is for the New Year. You can also draw something on the form (you can use a holiday stencil).
Useful tips
It is better to look for wax that is usually used in the manufacture of church candles;
To color the candle, use powdered dyes (the best option), oil-based aniline dyes, or natural substances.
How to make a gel candle at home

When making candles, you need to be careful and follow all safety rules, especially if you want to place any decoration inside the candle. Also choose the type carefully aromatic oil and dye.
Now you need to decide what kind of candle you want to make. Gel candles come in different varieties and are divided into several groups:
Aquariums, Terrariums and Treasure Candles;
Beer glasses and cappuccino with foam;
Coca-Cola and other cocktails;
Rainbows, swirls, fireworks and neon glows;
Canned fruit;
Ice cream and desserts;
Festive decoration.
After you have decided on the topic, select the appropriate one glass vessel for a candle. Alternatively, you can take a square vase, glass, jam jar or mug.

It is better to use shapes that have a diameter of at least 5 centimeters (this will prevent the flame from being too close to the edges of the vessel);
Look for a clear or colored shape (a candle will look nice);
The glass in your mold should be durable.
To prepare you will need:
Flavor;
Dye.
Example of a gel candle
As an example, consider preparing an aquarium candle that will contain marine decorations.

Prepare:
Gel for candles (several colors available);
A few clean decorative items that will go inside the candle to decorate it. Since the theme is marine, you can use, for example, shells or marine-themed toys.
1. Place the candle gel in a water bath;
2. use low heat to heat the gel to 100C;

3. strengthen the wick with the stem at the bottom of the mold with glue so that the wick is in the middle, which will ensure the best burning of the candle; you also need to secure the wick on top of the mold (you can use regular threads);
4. it's time to use decorative items, which you can arrange as you wish at the bottom of the form - naturally, all of them should not be flammable; you can put several items on initial stage, and others a little later;
5. Decorative items inside the candle should not be placed closer than 6 millimeters to the wick, and preferably closer to the walls of the mold so that they are better visible;
6. before you start pouring the gel, it is advisable to warm up the mold, and this can be done with a hairdryer - this way you can get rid of the bubbles;
7. Monitor the temperature of the gel, and when you cool it to 80-90C, you can begin to slowly fill the candle;
* the most the best option will be filled in layers, i.e. first, pour in a little gel and after a while, when the gel at the bottom of the mold hardens a little, you can fill in a new layer, and so on until the mold is filled;
* you shouldn’t wait long if you don’t want the boundaries of the layers to be visible;
* if you use several colors, you can make them shimmer smoothly in the form, but you also need to wait a little until the bottom layer hardens a little, otherwise the colors will mix;
8. You can use the candle within a day.
VERY IMPORTANT

* melt the wax only in a water bath and follow the instructions of the mold or wax, since the temperature at which the wax melts depends on factors such as: the quality of the wax and mold, as well as the type of candle you want to make;
* overheating of wax is dangerous to health and its vapor can ignite if the temperature reaches 180C;
* for extinguishing burning wax DO NOT use water- use a rag.
* use a clean and dry form;
* the souvenirs with which you want to decorate the candle must be clean and non-flammable (you can wash them with warm mineral oil).
Carved candles are a unique and inimitable decoration for any celebration or. In addition, handmade candles are an unusual and universal gift for holidays, such as New Year, Easter, and weddings. Decorative candles can be bought ready-made or made at home. Home production DIY decorative candles will be required special equipment and materials.
Several designs of homemade carved candles
The following master class will help you understand the intricacies of making carved candles.
Creating carved candles is a complex but interesting process. At the same time, it is important to prepare the equipment, which requires great responsibility. To do quality products It is important not to make a mistake with the choice. High-quality paraffin, dyes and machine are the guarantee that decorative candles will please the eye, and at the same time will not contain harmful components which may be released during combustion.
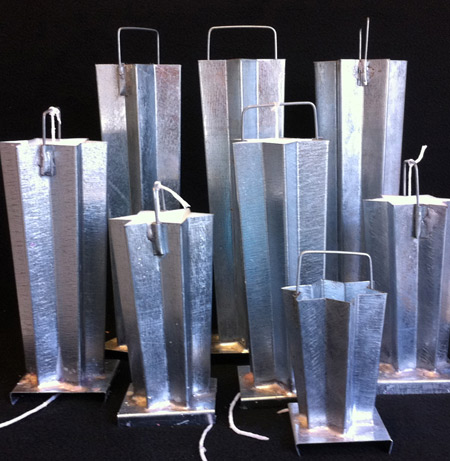
Paraffin melting bath
A paraffin furnace or melting pot is a container made of stainless or galvanized steel, divided into several compartments. In order for the paraffin in the containers to be liquid, an electric heating element is located under the melting bath, which must maintain a stable temperature of 80-90 degrees.
 This is what a paraffin melting bath looks like
 Specialized companies offer equipment for carved candles of different depths and compartments, for several colors of paraffin:
- four;
- six;
- eight.
On request, the store can make a paraffin melter for 10 or 12 colors. Also, the equipment can have different depths; the height of the finished handmade product will depend on it. Typically, the depth of containers is 20 and 30 cm - for medium and large candles. Equipment for carved candles can be purchased for an average of 13 to 30 thousand rubles.
But there are also compact options that can be placed directly on kitchen stove. Such smelters take up little space, are easily portable, and cost less - from 8 to 9 thousand rubles.
To do carved candles at home, and not on a production scale - a compact option is quite suitable. Of course, with certain skills, you can make equipment for melting paraffin with your own hands.
 Example of handmade carved candles
 For this you need welding machine, sheet steel, electric heater. Problem homemade options– constant monitoring of the temperature of the molten paraffin will be required. More serious production requires special equipment.
Molds for carved candles
Molds for carved candles can be purchased in specialized stores. Finished goods come with a device for fixing the wick and have different configurations. Typically, a master class on making carved candles suggests using a blank cast in the shape of a five or six-pointed star. You can also make a base of the following shape:
- cylindrical;
- pyramidal;
- spherical;
- ovoid;
- rectangular.
You can make wedding carved candles from a thin piece of round or faceted shape.
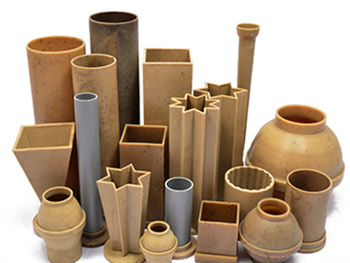 Various patterns of shapes for carved candles
 The material used for molds is different: plastic, silicone or metal.
- main knife – has a straight blade and is suitable for creating most carved parts;
- loop knives – used for cutting special patterns;
- knives for decorating the top of a candle - have different shapes and sections depending on the diameter of the candles.
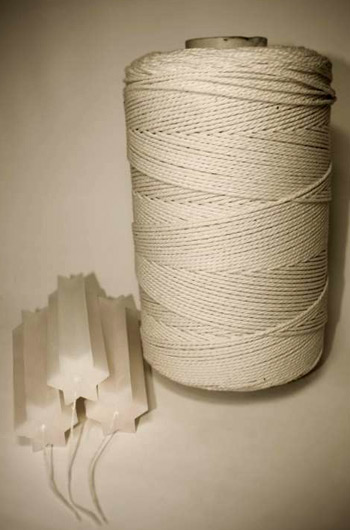
Materials for carved candles
Making handmade candles is impossible without the following materials:
Master class on making carved candles
Once all the materials and tools are prepared, you can begin to make original candles. A master class on making carved candles at home includes the following steps:
- production of paraffin blanks;
- preparing containers with paraffin;
- layer-by-layer painting of the workpiece;
- cutting and decorating candles;
- cooling the product and coating it with fixing varnish.
A master class on creating carved candles is not particularly difficult. Although the carver should definitely have artistic taste and imagination.
A novice craftsman or someone who wants to try their hand at making carved candles does not have to make the base for the candle themselves.
 The process of making a carved candle
 You can choose a special store that sells ready-made samples of blanks various forms and sizes. When choosing a ready-made candle base, there is no need to make or purchase molds and wicks yourself. Paraffin blanks can be purchased from 90 to 200 rubles, depending on weight and shape.
Complete master class on making carved candles:

Of course, it is unlikely that you will get a masterpiece the first time; you need some skills and knowledge: at what angle to make the cuts and how to form this or that pattern. You will have to watch more than one master class and make more than one candle before you receive a handmade product that can be given as a gift or even put into production.
Undoubtedly, making carved candles is very exciting - it is an opportunity to combine an interesting hobby and get an additional source of income. Carved candles are especially in demand for holidays, weddings or as original gifts. Another positive point – own production and it’s easy to set up a store even at home.
Hello, my darlings! Six months ago I became interested in this type of skill called candle making. Of course, it’s difficult to call me a master in this matter, but nevertheless, I already know how to do something. Basically, I make them for myself, as a gift to family and friends. I want to say that I get great pleasure from the whole process of making a candle.
Just a little bit of history......
Candles appeared in everyday life back in the Middle Ages. Only rich people possessed them, since their cost was very high. They were made from various materials– paper, papyrus, plants, fat. Later, American colonists came up with a technology for producing wax. Then some research and experiments were carried out, but everything was wrong. Until, in the twentieth century, a group of chemists invented paraffin. Since then, it has been the most common material for the manufacture of these products. The most common, but not the only one...
This article is suitable for beginners, people who just want to start making candles with their own hands. For experienced craftsmen This article will most likely not be of interest. But don’t rush to close the page, at the end of the text you can watch a slide video with decor ideas. I hope you will enjoy!
First of all, I want to briefly tell you what candles are made of, what materials and substances are used to make them.
Type of candles
Wax– as the name suggests, they are made entirely from beeswax, this group also includes church candles(long and thin), created for some ritual. When burning, you can hear a crackling sound. They are considered the most useful, because the material of nature itself is used for their production. They do not contain harmful impurities, even dyes are not needed. Beeswax candles are yellowish in color and emit a pleasant aroma when burned. In addition, it is useful to light them for colds, to cleanse and disinfect the air. Lately natural and environmentally friendly products have become very popular wax candles. This is the same beeswax, only with an embossed honeycomb pattern. The melting point of wax is about 60 degrees. But the higher the quality of the wax, the higher the melting point. They can be stored for decades, and the quality will not suffer from this. In my opinion, such candles do not need decoration. The only negative is the high cost.
Paraffin– are made from a fairly cheap material – paraffin. This substance is a product of petroleum refining. Most commercially available candles are made from it. It is believed that they are much inferior to wax ones in terms of environmental friendliness. For their manufacture, only the highest quality and purified paraffin should be used. He has White color and does not have a pronounced odor. But, unfortunately, our industry neglects this and often sells us cheap paraffin mass. When burned, carcinogenic substances are released that poison our body. They burn much less time than wax ones. Most often, this type of candle is decorated and scented, which is why it is very popular. There are no limits to imagination in this matter.
Gel candles Mostly poured into transparent glass containers. They look very beautiful and modern, and the decorations for them are beads, shells, flowers, etc., which are added to the candle mass. The main advantage is the duration of combustion, transparency, and the absence of any unpleasant odors during combustion. They are completely safe for humans. When burned, the jelly-like mass completely evaporates, leaving a small residue that is easily washed off with water. Their duration of use is 4 times longer than that of a paraffin candle.
What form should I take to make a candle?
It can be different, depending on what size and shape you prefer. Transparent glass containers, tea cups, baby food jars, thick cardboard boxes, plastic cups (for yogurt, cottage cheese, cookies, etc.), orange peel, aluminum molds (for tea candles) are also suitable for these purposes.
DIY wick for candles
You can buy it ready-made, take it from a finished candle if you are melting it, or make it yourself.
For this we need:
- balsa wood or bamboo sticks
- olive or sunflower oil
- scissors
- napkins
Cut the stick to the required length, place it in olive oil for 20 minutes. This will extend the burning time of the wick. Take them out and blot them with a paper towel.
And the second option for making a wick from cotton thread. We will need:
- cotton thread, you can take floss threads
- salt
- water
- borax
Cut several strips of cotton thread. In a glass of water, mix 1 tablespoon of salt and 3 tablespoons of borax. Place the threads there and leave them to soak for 12 hours. Next, let the threads dry completely.
Weave several dried threads together. Soak them in melted wax or paraffin. Let dry thoroughly. The wick is ready.
Flavors
Essential oils are ideal as flavoring agents. As they evaporate, they saturate the air with notes of aroma that have a healing effect on our body. If desired, you can make a mixture of oils for a specific purpose, for example, for relaxation, stimulation, uplifting, air disinfection, etc. The more essential oils you add to the candle mixture, the more intense the scent will be. Also, beeswax candles are best avoided. I do not accept synthetic liquid or dry flavors, only plant esters. But if you are not against using them, then pay attention to quality and naturalness. As they say, do no harm!
Combination of essential oils for a scented candle
Dyes
The next component for making candles is dyes. This is also an optional ingredient. You can easily do without it. An ordinary wax crayon for children can act as a dye. First, it should be ground into fine crumbs and added to the already melted candle mass. Liquid food coloring will not work as it is made from... water based. They can be replaced by oil paints or special ones intended for candle making.
How to make a candle with your own hands at home?
So, we have decided on the shape, dyes, flavors and the candle mass itself. It's time to make the product itself.
Let's repeat what we need:
- paraffin or wax
- form
- flavorings (if needed)
- dyes (if needed)
- a saucepan with water and metal container for melting the base in a water bath
- wick
- glue gun
- wick support sticks
The first thing to do is place the wick in a container where we will pour wax or paraffin. With help glue gun glue it to the bottom of the jar and fix it with a wooden stick (pencil).
Melt the candle mixture in a water bath. As soon as it takes on a liquid form, you can add dyes and flavors.
Pour it into the mold. Let cool for several hours. Trim the wick as needed.
Decor
A huge amount of material can be used as decoration. Some of them are easy to prepare yourself. For example, dried citrus fruits are suitable for aroma candles: oranges, tangerines, grapefruit. To do this, cut them into slices, place baking paper on a baking sheet and place them in one layer. Set the oven to 60-70 degrees. It is at this temperature that the fruits will not be baked, but dried. When you notice that the preparations have taken on the appearance of dried fruit, you can take them out.
Another decorative option for candles is ribbons, lace and decorative threads. Since these are flammable materials, you need to be careful when handling them. It is better to tie it, attach it to the candlestick itself.
Cinnamon sticks, whole coffee beans, pine cones and shells are great for this purpose. The main thing is to show imagination and creativity. As for gel suppositories, there can be no restrictions at all.
In order for your imagination to run wild and inspiration to come, watch the video presentation that I specially prepared for you. I'm sure you'll find a ton of creative ideas for yourself.
If you prefer aromatherapy and plan to make scented candles, I recommend using essential oils good quality, not cheap flavors. Esters can not only give a charming, special atmosphere thanks to their scents, but also provide benefits.
OK it's all over Now! Now you know how to make candles with your own hands. Enjoy your creation! I hope you understood my master class! Leave your comments at the bottom of the page. I kiss everyone! Bye bye!
Decor
Candle as a source lighting, has been used by humans since the 3rd millennium BC. It was expensive, and only a wealthy family could buy it. Today the candle does not have its former value, and in interior is used for decor or aromatherapy. And the candles made with your own hands, is also a wonderful hobby, an excellent option for a gift.
From what materials and how to make a candle at home Houses– read our article.

Wax candle - step-by-step master class
To make a candle you will need:
- wax or paraffin (household candles are suitable);
- cotton thread or floss;
- water bath pan;
- molds for candles (tin, glass or plastic);
- wooden sticks for attaching wicks (1 candle mold = 1 stick).
Advice! If this is your first time deciding to make a candle with your own hands, ask someone close to you to help you. The wax hardens within 15 minutes, so you need to act quickly.
Place a cotton thread in the center of each candle mold. Secure the upper edge of the thread to a wooden stick.

Place on water bath container with wax (paraffin). To speed up the melting process, you can cut it into small pieces or grate it. Melt the wax over low heat, stirring constantly. The finished consistency should be uniform, without lumps or pieces of paraffin.

Pour some melted wax into the bottom of the mold. This will fix the bottom edge of the wick in the right place. If necessary, adjust its position. Wait about a minute for the wax to thicken and the wick to set before moving on to the next step.

Fill the mold with the remaining melted wax.

A day later, after the candle has completely cooled and hardened, trim off the excess edge of the wick.


Note! The cooled candle does not have to be left in the jar - after making it, it can be removed from the mold. Before starting work, select a container for filling with a straight, even edge that is not narrowed at the top. You can also use plastic cups, ice cube trays, or homemade tetra pack templates.
Colored and scented candles
Having understood the essence of manufacturing, you can diversify the variations and create more complex homemade candles with your own hands.
To make a colored candle, place pieces of wax crayons in a melting container along with paraffin. The shade of the finished candle will match blossom added pencil. The combination of several multi-colored pencils will paint the candle in a bright rainbow print.

Idea! Consistently melt and pour wax into the mold in layers different colors– you will receive an original striped candle.

Use essential oils when making - and you will succeed. scented candle with your own hands. To add scent to the candle, add a few drops of oil to the melted wax before pouring the mold.
Oil combination lavender and bergamot has a relaxing effect, and lemon and rosemary eliminate negative thoughts. For peace of mind and for peace of mind, add one part of oils to the wax geraniums And roses and two parts lavender oil. The combination of orange and clove oils lifts your spirits, while lemon and cedar oil relieves stress.

Transparent gel candles at home
At home, you can create another type of candle - a gel candle. Its manufacturing technology is the same as that of paraffin. The difference is that the mold is filled not with wax, but with a special candle gel.
Gel for making candles – transparent. This makes it possible to create incredible beautiful products. Inside the candle you can place shells, beads, stones, glass beads, beads, buttons, twigs colors, and even candied fruits or pieces of fruit.
Advice! You can choose the location of the decor inside the candle yourself. Elements lowered to the bottom before filling with gel will remain on the bottom, and those added to an already filled form will “hang” or remain on the surface.
Form for gel candle must be transparent (glass or plastic) - otherwise the beauty created inside will not be visible. Special gel dyes will help give a color tint. You can also add aromatic essential oils to this type of candle.
Advice! Before pouring the melted gel, heat the prepared mold. This will prevent the formation of bubbles.
“Delicious” candles – fruit and coffee
You will surely enjoy making candles at home and will definitely want to create something creative and extraordinary. Candles made from fruit peels - oranges, limes, grapefruits - look interesting and unusual. Candles created with the addition of coffee beans. Be creative and experiment, and a couple of our ideas will help you with this.
Candle made from half a lemon
- wax or paraffin;
- four cotton wicks;
- water bath pan;
- container for melting wax;
- two lemons;
- purple food coloring;
- lavender essential oil;
- dried lavender flowers.
Cut the lemons lengthwise into two pieces. Carefully remove the pulp.
Melt the wax in a water bath. Add lavender flowers, essential oil and food coloring to it, stir.
Place a wick in the center of the lemon half. Fill the “fruit candle holder” with melted wax.
Place the finished candles in a cool place until they cool and harden completely.
Important! Do not refrigerate candles refrigerator– the wax may harden unevenly!
Candles with coffee beans
Option 1
The easiest way to create a coffee candle is to add coffee beans to melted wax, or pour them into an already poured mold.
To do this, you will need all the same materials as for a regular candle, plus coffee beans.
Coffee beans vary in shape and size and, when added to wax, they also harden differently. Therefore, each candle you create will have a unique design.
Option 2
Another manufacturing option would be to decorate the finished candle with coffee beans.
For this, in addition to coffee beans, you will need glue.
Advice! Coffee beans can be glued without glue - on still hot soft wax. To do this, carefully remove the uncooled and unhardened candle from the mold and “cover” it with coffee beans, lightly pressing them with your fingers.

Candle decorated with coffee beans