Using a gas stove for your home. Gas stove for the garage - buy or make it yourself? Gas oven by yourself
1.
2.
3.
4.
Many owners of private and country houses. The comfort in the house depends on how correctly the heating device and the heating system itself are chosen. Today, the most popular is a simple gas stove for the home, which is in great demand. And how effective it will be depends on which gas stove is chosen for heating the house. You can see what these devices look like in the photo.
In progress gas oven The grate heats up, and the heat flows to the walls of the firebox. This ensures uniform heating of the air. If you install gas burners in the firebox at the lower level, the lower masonry of the stove will warm up more efficiently, and accordingly, the volume of the firebox will be used more wisely.

The firebox of a gas furnace in the upper part borders on the chimneys, and in the lower part it communicates with the blowers. Through this element, air enters gas stoves for the home, without which combustion of fuel becomes impossible.
Flue gases entering under the influence of draft from the firebox give off heat to the chimneys. Gas furnaces for the home are designed in such a way that gases pass through channels connected in a sequential order. These channels have no more than five smoke circulations. Gas stoves are strictly prohibited from being installed in houses with horizontal ducts. Like wood-burning boilers, gas appliances should be located at some distance from the walls.
Stove gas heating: types
The power, efficiency, efficiency and safety of the furnace depend on which burner is used. In it, the gas is mixed with oxygen.Burners come in several types depending on the type of power control:
- single-stage products (fuel supply is either on or off);
- two-stage (the oven can switch to an economy mode, which reduces the heating power);
- with floating adjustment (power changes smoothly).
- atmospheric (air is sucked in through draft), they do not depend on electricity, but the efficiency does not exceed 90%;
- supercharged (air is supplied by a fan when the chamber is closed), they depend on electricity, and the efficiency exceeds 95%.

Gas stove for home: advantages
Using gas stoves for your home has the following advantages:- Possibility of operation at any time of the year and day. There are no interruptions in heating systems of this type.
- High efficiency. Gas stoves help create a comfortable temperature in the house at any temperature outside, even in severe frost. Unlike solid fuel boilers, gas units do not require space to store fuel, and natural gas is a relatively cheap fuel.
- Easy to use. Pechnoe gas heating it is very convenient to use, the cost of servicing the heating system is kept to a minimum (read also: " ").
- Durability. Gas furnaces are durable - they last for several decades, so the likelihood that they will fail over the next 10 years is minimized.
Installation of gas furnaces
Connection gas devices connection to a centralized gas pipeline will not be cheap; not all owners of private houses can afford it. Therefore, if the building is not yet connected to the gas main, then it is worth considering other options for creating heating or buying cylinders (more details: " "). If gas is already supplied to the site, then the device heating system will cost much less.
After a gas heating unit has been installed in the house, it is necessary to check the operation of the equipment. Any errors during the installation process can negatively affect the comfort in the home and heating efficiency. Besides, gas equipment If installed incorrectly, it can cause harm to humans - natural gas is a dangerous fuel, and this should not be forgotten. Read also: "".
Gas stoves must be connected by specialists. After this, the correct installation must be checked so that no unforeseen situations occur when starting up the heating equipment.
A gas heating stove is an efficient, durable and economical device. It does not require regular maintenance, but it is important to install it correctly so that the stove is safe and the house is maintained comfortable temperature without extra costs fuel.
Modern gas stove for home on video:
Building a stove with your own hands means helping your home warm up faster in cold weather. In addition, this is another point of increasing self-esteem. Folded the stove - increased the level of skill. Upon closer examination, there is nothing difficult about learning how to install a stove with your own hands. You can study all the necessary literature and practice as an assistant to one of your furnace friends. Or maybe even take baking lessons from a master.
Gas heating stoves
When building a stove, a true prudent home owner wants to save money and at the same time build a high-quality stove with maximum efficiency. This opportunity is provided thanks to a gas stove, which significantly saves on fuel and at the same time has simple masonry. This type of stove is divided into two categories based on the type of material used: steel and brick (or stone).
A stone gas stove looks almost no different from a real Russian stove. The only difference is the location of the heater in its design - it is located directly above the burner and, when built, is placed in a metal container, rather than on concrete or a sheet of steel. A novice stove maker may not be able to cope with this complexity. Outwardly, it resembles a trough with sides that protect it from water. But such a stove can fit into almost any corner of the design.
Simpler are gas metal stoves, which are easy to lift and do not require such large quantity bricks or stones.
True, preference in our country is still given to the traditional Russian stove, especially if it needs to be built in a bathhouse.
What we have on hand
The main beauty of building a stove with your own hands is the ability to use the materials that are at hand.
So, what do we need to create at least the simplest gas oven with our own hands?
First of all, this gas cylinder high degree strength, but not too much.
A brake disc will be placed at the base of the furnace, which should not have any flaws.
Three pipes will be required, one of which will serve as a chimney (100mm in diameter), the second will supply gas, and the third will become an air duct (these two pipes are 50mm each).
Gas burner: atmospheric type.
Connecting structures with various fittings and other details.
The gas cylinder is cut off at the top, thus turning into the main part of the “body” of the future furnace. Moreover, the hole must coincide in diameter with the brake disc. It is advisable to weld the brake disc itself. It is also possible to secure it with bolts, but this type of connection does not guarantee that any foreign object, dust or dirt will not get into the space between the bottom and the disk.
IN gas pipe and the air duct needs to be drilled with a dozen holes of 5mm each. At the bottom of the cylinder you need to drill a hole that will be two millimeters larger than the diameter of the pipe. This will include pipes, and the outer part will be 20 cm in length. All seams must be hot welded, after which the stove can be painted.
DIY heating stove (video)
Of course, when building a stove, there is a desire to expand its functions from heating to heating and cooking. For such a stove you will need easy care , and the benefits from it will be many times greater. This type of stove has several varieties. In particular, the stove designed by Korobanov and Samarin, an ordinary potbelly stove and a simple Russian stove. The laying of each of these types of furnaces has its own requirements. This is a fairly large topic for discussion, so we will only touch on a few. important properties
this type of oven and the benefits it provides.
The stove firebox is essentially a stove for cooking, which saves time and fuel.
The heat released during the combustion of gases is used to heat food.
While cooking, you simultaneously warm the room, which is very convenient in cold times when additional heat would be useful. There are some design features
, which should also be taken into account.
The volume of the firebox is much smaller than that of other types of stoves.
The combustion temperature of the fuel is reduced due to the fact that the firebox is located under a metal covering.
As practice shows, it is precisely such stoves that are the most common in our country, since they sufficiently allow high-quality heating of the room, and at the same time you can cook food on them. And the design of the Russian stove also allows you to equip a stove bench, which can be used not only as sleeping area
heated, but also a place for drying mushrooms, herbs and things. It is especially pleasing to the heart to look at a Russian stove, which is a symbol of Russian history and life. Natural gas can be called the most inexpensive view
fuel. And thanks to such efficiency, gas stoves are becoming more and more popular, including when used in baths. Devices that run on gas are very compact and easy to maintain. Today we will look at how to make a gas stove for a sauna with your own hands and what you need for this.
Features of gas furnaces
Today, a gas stove can seriously compete with a wood stove. It is much cleaner, simpler and cheaper to use. It can warm up the steamy air quite quickly: in three to four hours in summer, and a little longer in winter. It takes about eight hours for the sauna to warm up well. But high-quality heating provides comfort, warmth and coziness. One of the main advantages of a gas bath, as we have already said, is efficiency. This fuel is the cheapest and most economical, so you can save a good amount. For wood and electric ovens

it will cost three times more! A gas oven does not require special attention from you. The combustible waste is very small, so the heating box and chimney ducts are practically not polluted. There are rules for installation gas boiler
in the bathhouse, which are very strict, but ensure high safety of use. The service life is approximately twenty-five years, and if you regularly perform preventive maintenance, the stove will operate for a long time and not break down. If you do not take into account overly strict safety rules, the only disadvantages include the mandatory presence of a centralized gas pipeline.
Construction of gas furnaces
Gas cylinders are placed in a special container in accordance with all safety regulations. As practice shows, a gas cartridge of five cubic meters can warm a room up to two hundred square meters within one heating season. It is worth noting that propane has a higher heat supply capacity when compared with natural gas. Such furnaces can have different capacities, the calculation of which depends on the volume of the bath.

You should know that 0.4 cubic meters accounts for 252 kilocalories of heat. Therefore, you can easily calculate how much gas you need. Gas sauna stoves do not require periodic heating, so they should be turned off during use. Such ovens work very well simple principle- air is mixed with gas before entering the furnace. Separate part air passes into the firebox.
You can regulate the amount of air supplied to the gas sauna stove using the bottom door, which also allows you to clean the burner. Using a special flexible hose, gas is supplied to the burner (or a cylinder is used).
Classification of gas furnaces
There are many different modifications of a gas furnace. You must determine for yourself what kind of bath you want and, based on this, make a decision. Most a good option- This is a brick oven with an inflatable burner. A simpler option is a metal stove lined with brick. Gas boilers They are divided according to purpose - they can be heating, heating and household. As a rule, heating stoves are used in baths, which differ in material, water heating technology and burner type.
Materials for a gas sauna stove
Homemade gas stoves for baths can be built from stone, metal or brick. Stone and brick take longer to melt than metal, but also retain heat for a long time. But metal gas furnaces heat up very quickly, but also cool down quickly. It is worth noting that metal stoves are the most compact. They are very easy to install and use. If a metal stove is lined with brick, its appearance will not differ from a brick one.
Gas-burners
There are two types of gas burners: atmospheric and inflatable. Atmospheric burners are the simplest and cheapest. Their operation does not require an automation system or complex equipment. Gas combustion is supported by air that enters the combustion chamber through the ash pan or ash door. The efficiency of operation depends on the amount of air inside the bath, so a small amount of oxygen can lead to problems. There are also inflatable burners, but such equipment is more complex.

The design of such burners depends on a fan, which blows air from outside and depends on electric current. The price of gas sauna stoves with inflatable burners will ultimately be the highest, since this option is more expensive in terms of electricity consumption, but also more efficient. It is often used in so-called combined stoves, which can be heated not only with gas, but also with other fuels, for example, wood.
Methods of heating water
There are gas stoves with a built-in water tank and a remote option. The first option is more convenient, since the water is heated due to fuel combustion products. The chimney must be installed so that it can pass through the heated volume of water. Heating the tank also produces heat that comes from the heater. This option allows you to avoid cluttering the bathhouse with unnecessary appliances.

For a gas furnace with a remote tank, it is usually placed on a nearby wall or in another room. The two elements are connected by a system of pipes through which hot water passes, which is heated inside the firebox.
Do-it-yourself gas stove for baths
Please note that to install a gas stove in a bathhouse you must obtain permission. The most best combination humidity and temperature can be created by a brick oven. It may seem that this option is very difficult to install, but with diligence and compliance with all construction technologies Any good owner can handle this task.
Preparatory work
First you need to design everything and choose the most appropriate place. As a rule, the stove is placed near a partition or wall, since it must heat the steam room and maintain optimal temperature in the rest room. The main elements of a homemade gas stove: base, chimney (insulated mineral wool), heater, burner, sheet of fire-resistant material, cover plate, control unit.
When creating a stove, you can use leftover materials that were not needed during the construction of the bathhouse, but it is better to buy new ones. We recommend that you do not skimp on quality, because a good stove will provide you with its reliability and durability. In the process of work, you will need the following materials and products: red baked brick, clay, galvanized sheet, reinforcing bar, metal pipe, grate, sand, ash door, asbestos-cement pipe, firebox doors, water and gas pipe and a sheet of steel.

Before you make a gas stove for a bath, you need to build a foundation. Its construction begins with a pit, the bottom of which should be located below the freezing point of the soil, which takes about seventy centimeters. At the very bottom, its width should be slightly larger than the main recess. This technique will help to avoid unnecessary hassle in case of ground movements. The bottom of the pit must be covered with sand fifteen centimeters thick. The sand is filled with water, soaked and covered with stones and broken bricks about twenty centimeters deep.
After this, crushed stone is applied, formwork is made and a reinforced frame is installed. Next, it is necessary to pour concrete, after which the formwork has set, the formwork is dismantled, and the surface is covered with tar in several layers. The area that has been cleared of boards can be filled with fine gravel and coarse sand. Don't forget to install a moisture barrier at the top of the foundation.
Furnace wall arrangement
After arranging the foundation, you can begin installing the walls. First, a protective wall is made that can protect the bathhouse from possible fire. It is made of cut bricks, which are held together cement mortar. For a brick bath it is better to use a sand-clay solution. As a rule, clay is taken at a depth of at least half a meter of soil.
It is poured with water in a special container for a day and mixed thoroughly. The sand must be cleared of debris and sifted. After this, sand and clay are mixed in a 1:1 ratio, then mixed again with the addition of water. When the solution reaches an absolutely even consistency without lumps, construction can begin. It is better to prepare the solution in small batches as it is used.

The very first brick laying plays a very important role. A waterproofing layer made of bitumen is first placed on the foundation, on which the first layer is placed. All bricks are wetted with water, ideally you need to place the brick in the water and wait about ten minutes. When the brick is laid on the mortar, you should hold it a little with a construction pick.
Carefully check that the bricks fit tightly together and that the seams are no thicker than five millimeters. The second and subsequent rows are laid in such a way that each brick subsequently overlaps the joint of 2 bricks of the lower row. Before laying the bricks in the mortar, builders recommend laying them out dry so you can see the full picture.
Each stage of construction must be coordinated with the drawings of a gas stove for a bath. When laying the third row, it is necessary to build in a blower door, which is secured with galvanized wire or cut strips of steel sheet. In the fourth row there is a well for ash and a grate. To place it securely, it is necessary to make indentations and leave room for its expansion (one centimeter is enough).
Installation of accessories
The sixth row should complete the installation of the blower door, and the seventh row should complete the placement of the grate and the firebox door. Cast iron doors are considered the most durable. In the eighth row, a partition is installed - the beginning of the chimney. The bricks are laid up to the fourteenth row, on which the channels are placed.
Make an opening in the front wall for a container in which water will be heated and which is installed on the channels. The container is held vertically by the side walls. The fifteenth row is made from halves of bricks and placed at an angle. The halves will be the basis for laying the dividing wall. The next three rows are laid in exactly the same way as the first ones.

At the level of the nineteenth row, you can install a door that releases steam. Thin strips of mild steel are placed between the twentieth and twenty-first rows, after which a container is placed hot water, which is surrounded by fragments of bricks. From the twenty-third row, a chimney is installed, which is selected based on the modification of the stove. The pipe above the roof should rise at a distance of at least half a meter.
A massive gas boiler for a bath should have a large and heavy pipe, and a small one should have a light pipe. Remember that the thickness of the pipe must be at least half a brick. The cross-section for the passage of smoke must have the same dimensions. Here it is better to use a solution of lime or cement. The clay composition can be washed away by rain, leading to destruction.
Final works
After all work is completed, the stove must be plastered. This procedure will improve appearance and will serve as additional protection against fire. Plaster can be made from any solution by adding alabaster to it. You can also use gypsum, but keep in mind that it tends to harden very quickly. An excellent option for plaster is clay, gypsum and sand mixed together (you can omit the gypsum).
Before plastering, it is necessary to prepare the stove wall. It is cleared of frozen solution down to one centimeter. After this it is better to putty. If you are going to heat the sauna using liquefied gas, the cylinder should be placed outside. Many bathhouse owners bury gas cylinders a few meters from their location. Let us remember that liquefied gas has a higher calorific value.

If you are assembling a gas boiler for a bathhouse with your own hands, it is better to give preference to the SABK-8-50S automation system. This system perfectly maintains the set temperature and is familiar to all craftsmen. It is also as safe as possible - due to four degrees of automatic protection.
This automation has the property of turning off heating equipment when emergency situations: when the flame goes out, if the gas pressure drops below the set mark, or if the pulsed automation system depressurizes. Such a furnace takes eight to ten days to build and dries for two weeks. After this, you can begin to gradually melt it, but do not immediately bring it to strong heating.
Security questions
To properly make a sauna stove, you should study the instructions for the gas sauna stove and strictly follow them. As you know, a gas boiler is an explosive structure. To reduce the risk of fire, it is recommended to adhere to the following rules:
- The stove must be located at a distance of at least half a meter from structures that may catch fire. This distance can be reduced by installing a protective barrier made of fire-resistant material (for example, iron). If the wall next to the stove is made of fire-hazardous material, it should be installed opposite the door special screen, which has the size of two combustion openings.
- When installing the stove and chimney, you must use a pipe made of of stainless steel. Pipes must not be pulled through residential premises. The chimney must be up to five meters from the burner level. Do not forget to tightly connect the chimney to the stove.
- The opening for the burner should have the following dimensions: height from 470 to 550 millimeters, width from 350 to 450 millimeters.
- It is necessary to carefully insulate the chimney from heat loss. This is done where it passes through the roof and ceiling. The chimney is also insulated.
- The refractory base, which is located under the stove, should protrude one hundred millimeters from the edges of the device.
- The height of the room must be at least two hundred and twenty centimeters. It should be arranged exhaust ventilation and a window with a window was installed. All doors should only open outwards.
- The gas pipeline, according to the diagram of a gas stove for a bath, is made of copper or steel.
- Flexible connections must be solid, resistant to pressure and temperature, marked “gas” and have a diameter of ten millimeters.
- If a centralized gas supply is not provided, a vent of combustible products to the atmosphere should be installed.
- A metal sheet with a heat-insulating layer underneath is laid on the floor in front of the stove.

A gas stove is perfect for baths and saunas. Today this option is the most convenient and economical. If you decide to make a gas boiler for a bathhouse with your own hands, you should take safety rules seriously and obtain permission from the relevant authorities. Subject to all construction technologies and appropriate operating rules, your stove will serve for a very long time and without interruption.
To date gas heaters provide great competition to older wood-burning stoves. Gas-powered stoves, unlike previous versions, are much simpler and cheaper, and after heating the room there is no debris, soot, etc. desired temperature, which is important for steam rooms.
Cost-effectiveness is the main advantage. The heating box and chimney ducts are almost not dirty, which is also positive side these structures. Rules  The installations are strict, but they ensure complete safety of using the stove for 25 years. The only disadvantage of such structures is the need for a gas pipeline running next to the bathhouse.
Design
A gas stove consists of a housing, a fuse, which is necessary to stop the gas supply in case of extinguishing, a sealed gas chamber, a thermostat and a chimney. Gas baths do not need to be warmed up periodically, so they can be turned off immediately after  use. The principle of operation of the stove is simple - gas is mixed with air before entering the firebox. Gas is supplied to the burner using special gas pipes.
Classification
Eat different variants gas stoves that are suitable for heating a bath. The best option for a public bath - a brick oven with gas burner, which has positive reviews. A simpler option is a metal stove lined with stone or brick. Gas boilers are heating or heating. Heating stoves are usually used for baths; they can differ from each other in the method of heating water, as well as in the type of burner.
Materials for making stoves
 Homemade gas stoves are built from stone, brick or welded metal structure. Stone and brick structures take longer to heat up, but retain heat for a long time. Metal stoves heat up very quickly, but cool down just as quickly. Some of the simplest and most compact gas furnaces are metal ones. By covering such a structure with brick, you can ensure that it retains heat longer.
Water heating options
Stoves can be with a built-in tank for collecting water or with a remote option. The built-in tank is a more economical design, since water is heated from gas combustion. This option makes it possible not to clutter the bathhouse. In systems with a remote tank, two elements are connected by pipes, through which hot water flows.
Do-it-yourself sauna gas stove
In most cases, the stove is placed near the wall, since it must heat the steam room and at the same time maintain a normal temperature in the adjacent room. In order to  For safety reasons, when building a stove according to this scheme, you should not use the material left over after the construction of the bathhouse.
To work you will need:
- Red brick;
- clay;
- sand;
- galvanized sheets;
- fittings;
- grate;
- ash door;
- two fireboxes;
- metal, asbestos and gas pipes.
The construction of the furnace begins with the construction of the foundation, so first of all you need to dig a pit, which will be 10-15 cm below the floor level. The bottom of the pit must be filled with sand and compacted well. Next, a layer of crushed stone is laid out and a reinforced frame is installed. After this, concrete is poured, which, after setting, is covered with several layers of tar.
After the foundation has been erected, you can proceed to the construction of walls. Initially, you need to build a protective wall that can protect against possible fire. For the construction of walls, red brick and sand-clay mortar are used. The first row of bricks is laid on the foundation, where a bitumen pad is previously placed. Before laying, the brick is moistened with water and laid on the mortar.
The next row should be laid out so that the bricks overlap the joint of the two bricks below. In order to see the overall picture, many builders advise laying out several rows of dry floors without mortar. At the stage of laying the third row, you need to install the blower door. In the fourth row there is a well for ash and installation of grates. In the sixth row, the installation of the blower door should be completed, and in the seventh row, the placement of the grate and firebox door should be completed.
In the eighth row you need to place a partition where the chimney begins. Next, the brick is laid without changes until the 14th row. In the front wall, after laying the 14th row, you need to prepare an opening for installing a container in which the water will be heated. The fifteenth row is constructed from brick halves located at a certain angle. The remaining three walls are built using the same principle. From the 21st row a chimney is installed; it is selected for the modification of the stove. The smoke exhaust pipe must rise above the ridge by at least 0.5 m. Upon completion construction work the stove can be plastered. Next you need to install automation. It is best to seek help from specialists with this issue.
A potbelly stove is a small homemade metal stove that became widespread in the first half of the 20th century. Later, with the advent central heating, her popularity fell. The second wave of its mass use occurred during the Great Patriotic War, and the third - in the 90s of the same century, for heating country houses. Today, potbelly stoves are more often used in garages or utility rooms. In their pure form, without modifications, they are uneconomical: they “eat” fuel like bourgeois, and if you stop “feeding” them, they quickly cool down. The easiest option to make is a potbelly stove made from a gas cylinder. The body is already ready, you just need to cut holes for filling the fuel and ash pan, attach doors to them, weld the legs and the chimney (diameter 150 mm and no less).
The cylinder in such a stove can be placed vertically or horizontally. It heats up quickly, but also cools down immediately after the fuel stops burning. However, in order to quickly remove the garage or cottage from subzero temperature or heating in autumn/spring bad weather is a great option.
Which cylinder should I take for the stove?
It is clear that a gas cylinder will be used for the body. But they are different sizes. The smallest 5-liter ones should not be used for making stoves: the volumes are too small and they won’t be able to heat anything. There are also 12 and 27 liter cylinders. They will make a low-power unit for absolutely small room: You can’t get more than 3 and 7 Kilowatts of heat from them. In principle, this can be a hiking option, but the weight will be considerable.

The best option for a stationary stove in a garage or country house is a 50-liter gas cylinder. Height 850 mm, diameter - 300 mm. The volume and wall thickness are large enough for any fuel to burn. At the same time, it is not very heavy, you can work with it alone. A potbelly stove made from a 50 liter propane cylinder is the best option.
Industrial 40-liter gas tanks have approximately the same volume, the diameter is smaller - 250 mm, the height is larger, and the walls are thicker. It will be more difficult to make a stove from a freon cylinder, with the same power that can be obtained from it: the mass is large, and it is long. By shortening the height to about 700 mm, you can make a small, thick-walled potbelly stove, which will take a little longer to warm up, but will also “keep” the heat a little better.
Important! When working with gas cylinders, follow safety precautions!
How to safely disassemble a gas cylinder: watch safety precautions in this video.
What and how to make doors from
Doors for potbelly stoves can be purchased cast. You will need a small height for the blower and bigger size- for loading fuel. There are ready-made blocks - a flow door with a blower in one design. In this case, a frame made from corners welded to size is welded into a hole cut to size, and the casting is already bolted to it. To prevent air from blowing out of the cracks, a small edge is welded around the perimeter of the cutout under the door - a 1-2 cm strip of metal.

You can not buy doors, but use a cut piece of a balloon wall. Then you will need some kind of hinges or replacement parts. It’s clear with the hinges: mark the places, weld them. There is such an interesting option homemade loops: several links of thick chain.

A latch will need to be welded to such a door.
With grates or without?
In the very simple option no grates are provided. If the cylinder is small or stands horizontally, then selecting a part inside is problematic. In this case, the design of a potbelly stove made from a cylinder is quite simple: the body is placed on legs, one door, a connection pipe is welded in the upper part chimney. All. The whole stove.

The photo above shows examples of such simple ovens. In order to improve heat transfer, metal strips are welded to the outside of the body. In the upper part, in addition to the smoke pipe, there is another outlet - a lid is installed on it, and this outlet is used as a stove for cooking food and heating tea.
If you still want to make grates in a potbelly stove from horizontal installed cylinder, you will have to weld the ash collection tray from below. Below there is a drawing and photo of the practical implementation.


IN vertical options potbelly stoves are most often installed from a cylinder. In this case, it is easier to allocate space. Usually, thick reinforcement bars are welded inside: a cast iron grate of a suitable size is difficult to find. But this option is bad because the reinforcement quickly burns out, and repairs are complicated: remove the old reinforcement and weld in a new one. You can weld pieces of thick corners or reinforcement inside (as in the photo), separately weld grate bars from the reinforcement and lay them on the corners.

This video tells you how to make a stove from a gas cylinder with your own hands - the grates are made of reinforcement.
We improve heat transfer
The most a big problem potbelly stove: inefficient use of heat. Most of it literally flies into the chimney with flue gases. This disadvantage is effectively combated in top combustion furnaces with afterburning of flue gases according to the type (also, by the way, can be made from a gas cylinder) and.
A variant of a potbelly stove made from propane cylinders with secondary combustion - the efficiency is higher than that of “conventional” models.
Another way to improve heat transfer is to make the chimney longer, thereby increasing the amount of heat that will remain in the room. When designing such a broken chimney, it is better to avoid horizontal sections, and even more so areas with a negative slope.

This gas cylinder stove runs on wood. We increased heat transfer by making a long broken chimney
Another option to use the heat of flue gases is to weld a vertical cylinder-smoke pipe to a horizontally located cylinder-housing. Due to the larger area, heat transfer will be higher. You just need to create good draft so that the smoke does not go into the room.

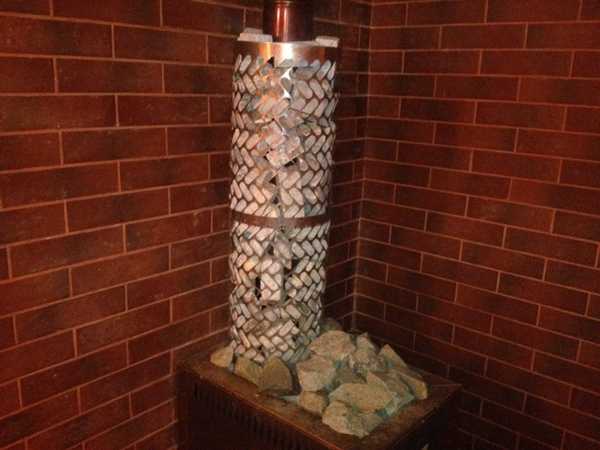
You can do it the way they do it in sauna stoves: around metal pipe put a net in which to pour stones. They will take heat from the pipe and then release it into the room. But. Firstly, until the stones heat up, the air will warm up slowly. Secondly, not all stones are suitable, but only the round ones that are along the rivers. Moreover, they are uniformly colored without inclusions. Others cannot be put to sleep: they can high temperatures explode no worse than a fragmentation shell, or emit radon, which is very harmful in significant concentrations.
But this solution also has advantages: firstly, the pipe will not burn. The stones produce even heat. Secondly, after the furnace goes out, they will maintain the temperature in the room.
Often you need to quickly heat a room. To do this, you can use a regular fan that will blow through the body and/or pipe of the furnace. But the same idea can be implemented with a stationary version: weld a potbelly stove into the cylinder in the upper part through pipes. On one side, attach a fan to them (heat-resistant, preferably with several speeds, so that you can regulate the temperature).

Another option to achieve active movement air along the walls of the case and do not use a fan: make a casing around the case at a distance of 2-3 cm, but not solid, but with holes at the bottom and top. Metal sauna stoves also work on this principle.
One of the options for such a casing around a horizontally located cylinder is visible in the photo below. Through the gaps at the bottom, cold air located near the floor is sucked in. Passing along the hot body, it heats up and comes out from above.

The principle is not new, but it is no less effective. Look at the photo below to see what the finished stove looks like with such a casing.

Here is another implemented casing, around a potbelly stove made from a horizontally located cylinder. Please note the non-standard door fastening.

A homemade boiler from a gas cylinder for water heating can be made using the same principle: weld a water jacket around the cylinder and connect it to the radiators. Just don’t forget that the system must have an expansion tank with a volume of 10% of the total displacement.
You now know how to make a potbelly stove from a gas cylinder and how to improve it. Watch another video about interesting option a combined stove for a cottage or garage made of brick and a gas cylinder.