Ideas for the week! Taming the kite. Fix Price Kite Sport&Fun How to assemble a flying kite diagram
A basic DIY kite consists of three strips glued to a sheet of paper. dense material. A tail with a small weight is attached to the end, serving as a rudder. It is important to place the center of gravity in the middle of the body, then the structure can rise into the air. The lighter the kite load, the higher the takeoff will occur. It is necessary to take into account the fact that as the lift of the kite increases, the thrust from the ground increases. Basic structure is exposed to air pressure, so the material for manufacturing must be strong and rigid.
What is a kite
Initially, such aircraft were made in China in the shape of a dragon - not a single traditional ceremony was complete without this symbol in the sky. And although the manufacture of structures has long gone beyond the borders of China, the name has stuck. Multiobject different models flying devices can be with a base, frameless, flat or multi-plane design. The finished apparatus is held in place by a long rope called a handrail. The aerodynamic shape promotes stability, and the strong thread helps keep the kite at the desired airflow angle.
Design
The design of a simple kite, from a flying frame with a tensioned covering, can be assembled at home. It will not gain much height, but it will good start to gain initial design skills. There is a single principle at work here, based on aerodynamic, physical properties items. Slings are attached to the corners of the body and combined into a bridle for stable control. Each model is decorated and stabilized by a tail. Maneuverability will be improved by additional cargo or multiple tails.
Operating principle
The main condition for a high launch is wind speed (3-4 m/s). It is recommended to launch the finished model in an open area where there are no trees or wires. A well-made structure will be lifted by the air masses themselves. You need to stand against the wind, releasing the rope 10-20 meters. In light winds, you can run to catch the moment when to send the flying device into the air. It is better to cope with this task together. The smoothness of the flight depends on how correctly the tail and the length of the lines are adjusted to the size of the structure.
Species
There is a choice for your choice a large number of models: flat, volumetric, curved, frameless, triangular or consisting of several links. The latter are different from the flat kite high stability designs. Multi-cell form, with a large number of individual links, connected in the form of polyhedra. A group of interconnected flying devices looks impressive in the sky. The width of such a product is suitable for attaching a small camera to it for aerial photography from a height.
How to make a kite with your own hands
To make a flying kite at home, you need to choose a model that determines the shape of the frame and the surface material. Determine the number of support rails that support the canvas in tension . Sheets of paper, fabric, plastic bags, and cardboard are used as canvas. The slings can be secured in one or two places on the base. Good aerodynamic force can be imparted to both uncontrolled (single-line) and controlled (multi-line) models. The thread winding spool will eliminate tangling during startup.
From paper
You can make a kite out of paper as follows:
- Fold a square out of thick paper.
- Label the axis of symmetry.
- Fold the sides in half.
- Fold the corners to form an accordion.
- Pass a long thread through the center of the accordion.
- Attach the adjustment rail.
- Connect a bundle of threads prepared in advance.
- Decorate the free end of the ponytail with bows or rags.
- Pull the tail through the hole and secure it securely with a rope.
From fabric
Develop an original pattern to make a flying kite toy from wire using fabric:
- Wrap a piece of flexible wire with threads and secure them at the ends.
- Shape the wire into the desired shape.
- Trace a piece of fabric along the contour of the frame, leaving an allowance of one and a half centimeters.
- Glue the fabric to the wire blank.
- Decorate the surface.
- Tie the rope in several places.
- Bring the ends of the ropes to one point, retreating 30 centimeters from the kite, and secure them together.
- Tie the line.

Made from polyethylene
DIY kite made of polyethylene:
- Prepare two planks, one being twice as long as the other.
- Fold them, moving away from the top of the long bar.
- Secure the connection point with tape.
- Wrap the strips with tape and make small cuts.
- Pull a strong thread through the cuts and secure it.
- Trace the outline of the finished frame on polyethylene, adding one centimeter.
- Cut out and tape the edges.
- Tie a 30 cm long thread onto a short stick.
- Snap on top part a long stick, a piece of fishing line.
- Connect all three ends of the fishing line to each other and secure the thread of the lower corners, by which you will hold the kite, with tape.
- Decorate the product with ribbons.
Dragon Kite
Design big size, with contours resembling a dragon, is performed as follows:
- Select materials for the frame and covering.
- Make a support base for the desired shape of the flying dragon.
- Secure the connected structures with thin rope.
- Make a drawing of the model on paper, use it as a template.
- Cut out the outline of the kite for the airfoil.
- Decorate the surface with homemade designs or stickers.
- Attach the outer trim to the frame.
- Attach the slings, tie the rail.

box kite
The box kite is a multi-plane kite. It's done like this:
- Make 4 long wooden slats and 6 slats half shorter.
- Secure the short ones crosswise with a self-tapping screw.
- Attach the long slats to the small ones in the center and ends.
- Tie the larger sides at the corners with wire or rope in a crisscross pattern.
- Wind the rope around the slats, secure it with tape in shape rectangular parallelepiped frame.
- Attach the plastic strips to the slats, making a complete rotation around the object.
- Stretch a rope over the cellophane covering around the perimeter of the square and glue it tightly to the surface.
- Make loops of wire for tying the line.
Diamond Kite
You can assemble a kite with your own hands so that the design has improved aerodynamic characteristics. The description will help you:
- Make 6 long wooden slats and 4 slats half as long.
- Make small crosses.
- Cover the sides with wire and secure.
- Attach long slats to the sides of the crosspieces.
- Coat the wooden slats with drying oil.
- Tape the frame around each cross piece.
- Align the frame perpendicular to the position of the slats in the crosses.
- Cover the body of the kite with two layers of tape, being careful not to damage the shape.
- Tie a strong thread to each rail and secure with a strip of tape.
- Attach the fishing line to the wide side of the diamond at both ends of the batten.
Video:
The Chinese have long believed that a kite soaring in the sky takes away all illnesses, misfortunes and worries. In addition, flying a kite is always a spectacular and quite simple activity. The main thing is to choose the right place and take into account some nuances.
What child doesn't dream of flying a colorful kite? What could be stronger than the delight with which children watch a toy soaring in the sky? “Daddy, let’s make a snake!” - says your beloved child. And the father, in response, scratches the top of his head with concern, since assembling a kite and flying it seems especially difficult. But it's not like that at all.
Theoretical minimum
Before you fly a kite, you need to familiarize yourself with the basic concepts:
A lifeline is a thread that is used to control a flying toy;
The bridle is the strong threads woven together that secure the kite to the rail;
Load-bearing area - the size of the kite's projection onto a horizontal surface;
Load-bearing capacity is the lifting force of one unit of bearing area;
The center of pressure is the center of the bearing area.
How to make a toy fly?
How to make a kite so that it floats? To do this, its surface should not be flat, but curve upward under the pressure of the air flow. That is why, when making a kite, it is not recommended to pull the material (paper, oilcloth, fabric) too tightly. Sometimes it is enough to secure just the corners. The center of gravity must be shifted towards the tail, otherwise long soaring will not be achieved.
The leading edge of the kite must be carefully taped or reinforced to avoid turbulence. For those who do not yet know how to fly a kite, it is better to give preference to flying models that have a long tail - it gives proper balance to the entire structure.

Another important element- This is a bridle that should consist of two threads. But such a kite is quite difficult to control, so beginners are better off using a triple bridle.
Home workshop - manufacturing stages
1. To assemble the simplest type of kite, you need to take two thin pine, bamboo or plastic slats 30 and 50 cm long. We measure 15 cm from the end of the longer plank and fasten the small slats at a right angle using strong threads. This creates a crosspiece for a flying toy.
2. At the ends of the planks you need to make round notches into which a thin, strong thread is pulled. You should get a quadrangular frame.
3. Then you need to take thin paper or oilcloth and cover the existing workpiece. To do this, the resulting frame is placed on a sheet of prepared material and outlined with a pencil or marker, adding a small distance to the allowances for fastening.
4. The pattern is cut out, after which the frame is thoroughly lubricated with glue and attached to the material. You can decorate the kite with felt-tip pens, drawing cartoon characters on it (which will delight your children), or depict the slender legs of your beloved woman on it (which will delight you).

5. Now you can start attaching the bridle. To do this, take a spool of fishing line, which is attached to the left corner of the workpiece. Then you need to stretch it to the nose of the kite, and from there to the right corner to determine the length of the bridle. Cut the thread and attach the tip to the right corner of the kite (you get a long thread from one edge to the other). Now we take the reel again, fasten the fishing line in the bow of the structure, measure the distance to the left corner of the kite, add another ten centimeters, cut it and tie it to the middle of the first thread.
6. The tail of the kite can be made from a thin cord or strong nylon thread, measuring 3.5-4 meters. The tail can be decorated with paper bows.
7. Flying a kite is impossible without a leash. To do this, a long strong thread is tied to the bridle, at the end of which you can tie a small stick for ease of control.
Flat flying structures
Such kites are the simplest and most famous. The frame is made of pine or any other light wood. The covering is made of film or paper. Paper does not provide structural stability, so it must be durable (micalette, tissue or rice). If film is used, it should have poor stretch, but at the same time stick well to the frame (it is best to buy acrylic).

What does a snake monk look like?
This flying model got its name due to its resemblance to the hood of a monastic robe. This kite is perfectly centered, so a two-lead bridle is sufficient to launch it. The tail is used as a balancer and should be light and thin. It is better to choose dense material for such a kite, since under gusts of wind it wrinkles too easily and falls.
Bow flying design
This is one of the varieties of flat kite. The frame is built from a pair of slats, which ensures lightness. In this case, the front rail gives rigidity to the entire structure, but there is greater sensitivity to wind. Beginners are not always able to master flying this type of kite the first time.
Box design
This type of homemade kite looks quite solid, but is quite simple to perform. He doesn't need a tail. Moreover, such snakes can lift small loads, making it possible to place small digital camera, having previously turned it on for video recording or burst shooting. This way you can get completely unique aerial shots. But the box-shaped structure stays well in the air only in strong winds.

How to fly a kite: choosing a place
To ensure that nothing interferes with the flight process, you should choose open areas without any obstacles. Trees, kiosks, and buildings located nearby interfere with the direct passage of air flow and create unnecessary turbulence. The sea coast with its breeze is perfect (unless, of course, you have to jump over the bodies of vacationers). It is better to stay away from roads, airfields and power lines.
How to fly a kite (instructions)
First you need to determine the direction of the wind by simply slobbering on your finger. Now the kite is solemnly presented to a friend (girlfriend, child, wife). You need to stand opposite your assistant, who must hold the kite above his head, perpendicular to the ground. The wind should be blowing at your back, the reel with the line should be in your hands.
So how to fly a kite? First, you need to slowly move away from your friend at a distance of about 20 meters, while unwinding the leash. Having given the command: “Let go!”, sharply pull the rail towards you. If the wind is strong enough, the kite will soar in the air, and all you can do is watch its flight in raptures. Otherwise, you will have to run around the field a little more until the structure catches the air flow.

How to fly a kite correctly different strengths wind? If it flies only when the person driving it runs, then the wind is too weak. With fairly strong air currents, the flying structure floats in the air with ease, and no additional effort is required. The optimal wind speed for launching a paper model should be 3-6 m/s.
If the tension of the leash thread is too strong, then it should be unwound a little. If the wind subsides, the snake is pulled towards itself. To return the structure to the ground, you need to gradually reel in the rope and go home with a sense of accomplishment.
www.syl.ru
How to assemble a kite: detailed instructions for balloonists
- Assembling the finished kite
- DIY flying miracle
- Flight rules
Is there a better family pastime than flying a kite? Such entertainment will surely make any child take a break from computer games, and will remind fathers and mothers of childhood. How to assemble a kite and how to fly it?
Assembling the finished kite
Despite the fact that kites can be very different - from those assembled “on the knee” to expensive sports ones - in general they have a similar design. They consist of the following elements:

- frame of two or more slats;
- canvas or sail (fabric, paper, cellophane), which is stretched over the frame;
- tail - not only decorates the snake, but also plays the role of a stabilizer during flight, which is not the case with all models;
- lifeline - a rope or thread with which the kite is controlled;
- bridle – connects the handrail to the sail;
- reel for a lifeline, usually a small carabiner is used.
How to assemble a kite - instructions for brave balloonists:
- You need to take the frame with the canvas and insert the bridle from the front side into the special holes.
- Next, a rail is attached to the bridle on the front side.
- The hole for the tail is at the bottom, where you need to insert it.
Now he is completely ready to conquer the skies.
DIY flying miracle
No matter how good a purchased kite is, it will never compare to one you made with your own hands. It is enough to spend less than half an hour to create such a miracle yourself and then enjoy watching it proudly soar in the sky. What you need to make a kite at home:
- two wooden slats approximately 40 cm long (you can use pieces of stiff wire and even twigs);
- a spool of thread or fishing line, preferably at least 15 m long;
- scotch;
- black marker;
- cellophane (you can cut a large bag).
- Both slats need to be marked with a marker exactly in the center. On the second one, put an additional 1/4 mark.
- The marked slats need to be placed crosswise on a sheet of cellophane (the first slat is placed on the 1/4 mark made on the second slat). All points of the frame are marked with a marker, then connected along the contour to form the outline of a sail (that is, something resembling a diamond).
- Then you need to cut the sail along the contour and glue the cellophane to the slats with small pieces of tape on the inside and outside.
- From other bags you need to make a tail, the longer the better, its width should be 3-4 cm. The cellophane pieces are fastened together with tape. The finished tail is tied to the batten at the top of the sharpest corner of the sail.
- A puncture is made in the crosshairs of the wooden slats, through which a fishing line (thread) is threaded and tightly tied or taped to the slats - this is how to make a kite at home from improvised materials.
The winged “scaly” is done in 15-20 minutes, and the tail takes the most time. It flies just as well as the store-bought ones, except it makes a little rustling noise in flight.
If you want to make a more complex toy, then the article will help you: How to make a kite at home.

Flight rules
Ideal place To fly a kite - a seashore with a strong wind. In the absence of a sea nearby, any large open area will do - the main thing is that there is no tall trees, power lines and crowds of people. You should not fly a kite near airports or during a thunderstorm - this is a sure way to “attract” lightning.
If the wind near the ground is strong, the kite, picked up by air currents, will fly on its own; you just need to unwind the coil. If the wind is weak, you will have to slowly unwind the reel and ask someone to throw the kite up.
Flying a kite is great fun for both kids and their dads and moms.
www.rutvet.ru
How to fly a kite - assembly, kite control
Who didn't fly a kite as a child? For many of us, this was a favorite pastime to do. with my own hands there was no difficulty. We made the simplest paper kites and rejoiced at how our creations flew in the wind. Nowadays you can find a variety of kite models in stores, from small children's kites to huge professional ones. And now, having already become parents ourselves, we go with interest to the sports department to buy this bright toy for our children. Let's remember together how to assemble a kite, and in what ways it can be lifted into the sky.
Assembling the kite
Regardless of the level of complexity, all kites consist of a standard set of components. The most important thing in any kite is a strong frame that holds the shape of the structure during flight. It can be made of two or more slats. A fabric made of lightweight material, which creates an obstacle to the wind and allows the kite to float in the air. It is important to know that when launching the kite, it must be positioned in such a way that the canvas is in front of the frame, and the wind hits it. In some kite models, a tail made in the form of beautiful ribbons is attached to the canvas, which is designed to smooth out gusts of wind and stabilize the kite in the air.
The kite is controlled from the ground using a rope or thread, which is also called a lifeline. It should be very strong, but light enough so as not to interfere with flight.

The thread is wound on a special convenient spool. Often kite manufacturers make the ropes with carabiners so that people can release them. The place where the thread joins the kite is called the frenulum. Depending on the number of attachment points, this can be:
- A single fastener bridle that requires no mid-air adjustments. The snake is corrected only by its tail.
- a bridle with a keel, made in the form of a single piece from a cloth of the same material. Also requires no adjustments during flight
- a bridle with two or more fastenings, which involves controlling the kite. To do this, it has a ring that allows you to adjust the flight angle.
How to fly a kite
Flying a kite is easy, the main thing is to choose a suitable place and catch the wind. To do this, we find a large open plot of land, preferably on a hill, where air currents moving from bottom to top. If you are surrounded by trees and houses, it will be more difficult for the kite to rise due to the uneven wind, and it will only be able to stabilize at a height of about 50 meters.
Important to remember:
- Never fly a kite under power lines, near highways or airports, or during a storm with thunder and lightning. Even if the place seems perfectly flat and spacious to you, and the wind in a thunderstorm is simply ideal for flying a kite, such games can be life-threatening.
- Never fly heavy kites over people or animals. If you lose control, this entire structure with a rigid frame can fly towards a person at great speed and injure him. If you want to play with your children on the beach by the sea, a lightweight paper kite that will not harm anyone is suitable for this.
- Wear sunglasses when flying a kite in sunny weather. Being carried away by the game and looking intently at the sky, you may not notice how the bright sun will harm your eyes.
- Be sure to protect your hands. Use gloves and a reel. Do not wrap the line around your hands under any circumstances. A strong gust of wind can lift the kite up, and the quickly unwinding thread will burn your skin.
Before sending your kite into the sky, place it facing you, stand with your back to the wind and pull the threads. Flying a kite depends largely on wind speed. If the wind is strong enough, the kite can be launched directly from your hands, placing its nose in the wind and slowly unwinding the rope. If the wind is not very strong, you may need help. Spin the reel 15-20 meters, pull the thread and ask someone to throw the kite up. It happens that the wind is weak near the ground, but quite strong above. This is evidenced by the swaying tree tops. In this case, the kite will only fly at a certain height. But in order to raise it to this height, you will have to run a little against the wind.
Carefully monitor the thread tension. If the wind has died down and the tension begins to weaken, wind the thread onto the spool or simply pull it towards you. If the wind gets stronger, the rope needs to be unwound a little, or, for example, you can take a few steps in the direction of the wind. When the kite begins to fall and the situation cannot be corrected, release the rope so that the impact on the ground is softer.
Controllable kite
When you have the opportunity to control the flight of a kite, it is always interesting. Only to fly such kites you need strong wind, because in a weak wind, holding two reels in your hands, you will not be able to run backwards. It is advisable to have an assistant during startup. But you can also cope on your own, although most likely not on the first try.
As the kite takes flight, keep your hands at chest or hip level. Try pulling the right thread towards you. You will see the kite fly to the right. If you pull left hand, you can straighten it or tilt it, respectively, to the left. Movements should be smooth. If you pull the strings, the kite will quickly fall. Do not unwind the thread too much. First get used to the kite's maneuvers. And after a little training, release it higher. Don't worry if the threads get twisted a few times, it won't affect the control in any way.
IN in capable hands the kite can draw different shapes in the air, and also perform tricks such as the figure eight, loop and spiral descent. If you are not yet able to control the kite, do not worry, very soon you will master all the subtleties of flight, and your kite will soar in the air for hours to the delight of you and your children.
bambinostory.com
How to make a kite with your own hands at home: options with drawings and dimensions + photos and videos
It's not just children who love flying a kite. For adults, a fun hobby allows them to return to a carefree time for a short time and feel the joy of flying. You can buy a finished product, but it is much more interesting to make a kite on a string with your own hands. Using available materials and drawings you can easily cope with this task.
Types of kites you can make yourself
In order to make a kite with your own hands, you need 5 things: basic labor skills, materials, drawings, desire and patience. All designs are made according to the same principle: a base with aerodynamic properties different shapes and rope. The kite can be flat and voluminous, simple or consisting of several links.

Kites can be different forms and sizes
Such a thing can be found in a store, but it will be a standard replicated version. It’s better to make a controlled kite yourself, and then fly it and enjoy the result.
The first who came up with the idea of launching a structure in the form of a kite or dragon into the sky were the Chinese. They took up this fascinating business in the 5th century BC.
Flat kite made of paper, nylon or polyethylene
Together with your children, you can make a simple version of a homemade kite called “Monk”.

The simplest paper kite
- Take a sheet of thick paper of any color, A4 format. Place the lower right corner to the long left side so that it aligns with the short one. It turns out to be a triangle with an upper single part. Cut it off, unfold the sheet, you get a square.
- Mentally or with a pencil, draw a straight line between two opposite corners of the square - mark its axis.
- Bend the piece of paper so that the right and left sides of the square “lie” on its axis.
- Bend the corners twice upward according to the accordion principle.
- Glue a thread 30 cm long into the middle of the accordion on both sides. The result is a “bridle”.
- Tie a rope strictly in the center of the bridle to launch and control the kite.

After manufacturing, it is necessary to secure the rope to control the kite in the air
It is impossible to control a snake without a tail, so do not forget to make a rope from ribbons or threads intertwined and tied at the bottom with a tassel.
- Make 20 pieces of regular threads or 5–6 from wool. Their length for a small kite should be at least 50 cm.
- Place the cut pieces together and tie them with a tassel towards the end or braid them. You can decorate the tail with bows or paper triangles.
- Make a hole in the bottom corner of the kite, thread the tail through it and tie it in a knot or glue it.
- If you are using ribbons or strips of fabric instead of thread, thread them through the hole, fold them over, and hem the top to the bottom.
In addition to their decorative and entertainment functions, the first kites in China were used in construction. With their help, ropes were thrown across reservoirs and ravines for the subsequent construction of bridges.
Homemade kite in 5 minutes - video
Paper, fabric and wood construction
Compared to the “Monk”, there are some complications in the manufacture of this kite. In addition to paper, you will need thin wooden slats and fabric.

An easy to make kite from paper, fabric and wooden slats
To make such a kite, prepare in advance:
- 2 notebook sheets;
- 3 slats (2 60 cm long, 1 – 40 cm);
- durable nylon thread;
- colored fabric.
Instructions for creating a flat “Russian” kite with your own hands - video
Diagram of a triangular kite made of polyethylene
The triangle kite is another type of flat design that is more difficult to manufacture. But the result of your work will definitely please you. The snake has a classic triangular shape, bright and very beautiful.

A triangular kite is more difficult to make, but it can last longer than a paper kite.
Materials you will need:
- plastic bag, better bright and dense;
- slats (straight sticks made of bamboo, willow, linden, pine or just window beads);
- rope or fishing line with a reel.
Dimensions finished product depend on the size of the package and the height of the launcher. Use percentage notation as shown in the diagram. Decide which number is taken as 100%, and then use a calculator to calculate the specific values.

For accurate marking, substitute your values and calculate the parameters of the kite in centimeters
- Cut out the “body” of the kite from the bag according to the drawing.
- Prepare 4 slats of appropriate sizes: two side slats of the same size, one long longitudinal and one short transverse.
- Secure with any glue first the side slats on the sides, then the longitudinal one in the middle, and finally the central transverse one.
- Attach a keel in the middle of the kite using tape.
- In the center of the bottom of the canvas, cut a hole into which to thread a tail made from scraps of bags.
- Tie one fishing line to each corner and fasten them together with a knot.
- Attach a fishing line with a reel to the resulting “bridle” for launching and control.
Interesting fact. In ancient times, kites were used for military purposes: for reconnaissance, sending messages or gunpowder into enemy territory.
Drawing of a diamond-shaped product
This design is made according to the same principle as a triangular kite. You will need 2 slats (60 and 30 cm), a plastic bag, fishing line and tape.


Tie the tail to the bottom corner of the kite
In order for a kite to fly well, its tail must be 10 times longer than its base.
Interesting fact. In the 13th - 14th centuries, aerial structures were used to study natural phenomena and weather observations.
You can also use the diagram to make a kite.

A triangle-shaped kite can be made from any lightweight material.
Making your own diamond-shaped kite - video
How to make a bird-shaped design
To get a kite that resembles a bird in flight, use one trick: secure the string between the side parts. Under the pressure of the wind it will either stretch or weaken, making the structure “winged”.
- 8 sticks with a diameter of less than 1 cm and a length of 30.5 cm, 3 sticks of 91.5 cm and 3 of 150 cm from linden or pine;
- nylon or polyethylene film;
- fishing line;
- coil.

In flight, a kite - the bird seems to flap its wings
- Place 150 cm long rods parallel to each other in front of you.
- Place a 91.5 cm stick across, 59.75 cm from the edge.
- Tie it with threads so that there is a distance of 30.5 cm between the first and second, and 61 cm between the second and third.
- Stepping back 30.5 cm to the larger side, apply a second stick 91.5 cm long.
- Tie 4 short slats at a distance of 30.5 cm from each other at an angle so that at the bottom they converge into a triangle (see diagram).
- Closed ends short planks cover with the last lath 91.5 cm long. The result is a “manger” tied in the center of the structure.
- Tie everything together with threads coated with glue.
- Fasten the ends of long sticks that have been previously soaked in water. You need to wet them so that they do not break when bent.
- Stretch a fishing line between the ends of the “wings”.
- To make the “body” of the snake, cut out a pentagon from fabric (top and bottom sides are 30.5 cm each, height 91.5 cm + 2 cm for the hem). Make a square in the center with a side length of 30.5 cm.
- From the bottom corners of the square, measure 59.75 cm to the left and to the right.
- Draw segments from the ends of the top and bottom sides of the pentagon to the resulting points. The result was a canvas with a window in the middle.
- Sheath and glue the wooden frame of the kite.
- Additionally, cut out 4 inserts for the “manger”. Each size is 30.5 x 30.5 cm. Insert them into the “windows” and glue them.
- Make a tail from rope and leftover fabric, attach it to one side of the “manger”.
- On the other side, make a bridle from two fishing lines tied together and tightly tie a thread with a reel (rail) to them.
To ensure that the structure does not fall on one side and does not fall apart in the air, strictly adhere to the dimensions and firmly tie the parts together.
It is problematic to fly such a kite alone, so call your comrades and get a surge of joy from launching the “bird” into the sky.
DIY air raven - video
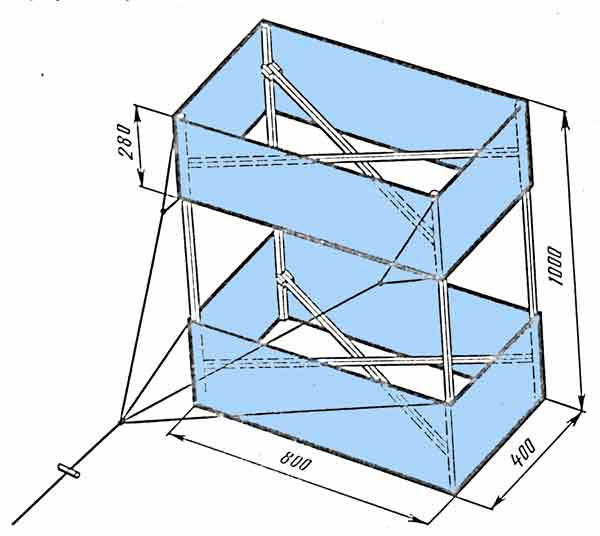
Volumetric (box-shaped) kites
To create a volumetric kite you will need:
- wooden slats (window beads can be used) - 4 pcs. 1 m long and 6 60 cm;
- large garbage bags;
- a durable nylon harness on a spool from a hardware store;
- scotch;
- ruler;
- square;
- scissors;
- glue.

A voluminous kite flies high and beautifully, and you can make it yourself
Secrets of a successful launch
You can fly a kite alone, but this requires a certain skill. It’s more convenient and more fun to do it together. One holds a kite, the other a spool of fishing line or thread (rail). The main condition for a successful launch is the presence of wind from 3–4 m/s, as well as open space no trees or wires.
- The person holding the rope stands so that the wind blows at his back, unwinds 10–20 meters of rope and pulls it tight.
- The second one moves back the length of the rope, runs up and launches the kite. He must seize the moment and pull the rope.
- If the wind is not strong enough and the kite begins to lose height or cannot rise at all, the “leerman” will also have to run.
If you want to have a great time and get creative with the whole family, make a kite. Making it yourself is not at all difficult. The spirit of unity, joy and fun will be a reward for the time and effort spent.
A kite is the very first flying device that man was able to lift into the sky and give it movement with the help of gusts of wind. Kites come from China, a country where every holiday was and still is accompanied by colorful images of dragons.
Kites did not always serve as a toy or a beautiful holiday attribute; for example, at the beginning of the 20th century, cameras (for aerial photography), radio antennas, etc. were raised with the help of such devices. Kites can be of various types and designs: box, monk and flat.
Rules for making kites
Firstly, there must be a center of gravity on the body of the kite. It is better if it is located on the line that divides the body in half. If the center of gravity is shifted, the kite simply will not be able to rise into the air.
Secondly, the lines with which the aircraft is controlled must be selected to a convenient length and secured in certain places.
And thirdly, do not forget about the serpent's tail: it is not only beautiful decoration, but also the steering wheel. This is why the tail must be well and correctly adjusted.
Basic requirements for a kite
The body of the kite should be made rigid and durable so that the wind does not deform it. At the same time, a flying kite must be light, otherwise it simply will not rise to a height. The ability to easily fold, unfold and transform is also required condition.
How to make a kite
So, what do we need to make our kite fly above the clouds? All the “ingredients” can be easily found at home:
 - newspapers or plastic bags;
Wooden sticks 91 and 83 centimeters in length;
Fly strip (or ribbon);
Wood knife;
Strips of fabric.
The ends of the wooden sticks (make recesses in them in advance) need to be wrapped with tape.

On a long stick, measure 25 centimeters on top and tie a second stick crosswise at this distance. Wrap the joint with tape to make it stick better.

Then take a strip of ribbon and wrap the kite so that it goes through all the notches you made. Now seal each notch with a ribbon with tape.

Now the made frame needs to be placed on a bag prepared in advance and cut to shape. After this, secure the cut package tightly to the frame using ropes or tape.

Now let's turn to the slings. Unwind a rope 3 meters long and tie it to the bottom of the kite and to the place where the sticks cross, and decorate every 20-30 centimeters of the rope with bright fabric strips.


If you did everything correctly, then your kite will fly very beautifully and impressively! Happy flying and beautiful kites!

Prepared based on materials from the site podelkidlyadetei.ru
Almost everyone is familiar with the concept of a kite. You immediately imagine a string on which is attached an object that is moving through the air. In fact, the world of kites is much more diverse. There are many various types kites. They differ in size, design, and purpose.
People have long been interested in the abilities of flying kites. They were widely used in life. And now, it’s no secret that designing and flying a kite is one of people’s favorite pastimes.
How pleasant it is to experience the ease of flight when launching a kite into the sky, to feel like you are part of this aircraft. Especially if it is made by yourself. You put part of your soul into it when creating it, and when you see it rise into the heavens, you feel joy for your justified and rewarded work.
Since 1985, International Kite Day has been celebrated around the world on the second Sunday in October. On this day, various competitions and master classes are held. Kite festivals are held all over the world where every amateur or professional can fly their own flying kite into the air.
Such an extraordinary and unique activity as creating a kite with your own hands and flying it is available to everyone. You just need a little time and desire.
The history of flying kites
A flying, or otherwise aerial, kite is one of the most ancient flying structures. Its origin is attributed to countries such as China and Malaysia. It is believed that it was in these countries around the second century BC. e. The first mention of a kite appeared. So, for example, in China a similar design resembled a snake with the head of a dragon.
This is where the name snakes come from, which continues to this day. The very idea of creating a flying kite was taken from nature. In order to say how and under what circumstances this happened, there are many stories, but none of them has exact confirmation. The significance and popularity of this invention has overshadowed the details of such things.
Application
From the very beginning of its development, the kite found application in such areas as military affairs, everyday life and ritual activities. In warfare, kites were used to measure the distance of enemy territory and objects when planning military operations, as well as to demoralize enemy troops by intimidating them with such aerial structures. Since the mid-18th century, flying kites have been found practical use. So, they are starting to be used in scientific field when conducting experiments. Lomonosov, Euler, Newton are among the many who used kites in their experiments. Kites have found application in research in areas such as meteorology, terrain photography, sports and many others. For the development of the wings of the first aircraft, valuable material was the information obtained in the process of studying the aerodynamics of flying kites. Now the kite is mainly used for sports (for example, kitesurfing) and entertainment purposes.
Techniques for making different types of kites
Flat kite "Monk"
This type of flying kite is the simplest. To directly receive necessary design, you need to cut a square sheet
Necessary materials:
- A4 paper (a sheet of newspaper, polyethylene, nylon is also suitable),
- thread 30 cm long, ribbons, threads (both regular and wool).
- Threads or strips of some fabric will be used to make the tail of the snake.
Kite making technique:
- Prepare a sheet of A4 size, and the paper should be thick. Then position the bottom right corner of the sheet so that it touches the largest left side, which in turn aligns with the smaller left side. Thus, if we do not take into account the upper strip, we get the figure of a double expanding triangle. After the top rectangle is cut off, you will be able to achieve an even square sheet.
- Draw the axis of the square with a pencil or pen, connecting its two opposite corners with a line.
- Position the right and left sides of the square so that they are adjacent to its axis. And like an accordion, bend the corners up twice.
- Get the so-called “bridle” by gluing a 30 cm long thread into the middle of the accordion. Moreover, this is done on both sides of the accordion.
- Prepare a rope to launch and control the kite. You need to tie a rope in the center of the bridle.
To make a tail for a kite, you need to follow these steps:
- Achieve a length of threads of at least 50 cm. This is approximately what is needed for a medium-sized kite. If the threads are ordinary, then you need to make 20 pieces; if they are wool, then 6 will be enough.
- Connect the prepared sections and tie them closer to the end so that you get a tassel, or you can also make a pigtail. To make the snake more colorful, you can add some bright objects to the tail. They can be cut out of paper.
- Attach the tail directly to the kite. You need to insert the tail prepared according to the previous point through the hole made in the lower part of the kite. Then glue it with glue or tie it in a knot.
“Russian” kite made of paper, fabric and wood
The design of this kite has some complications and also requires more materials.

Necessary materials:
- Two notebook sheets
- thin wooden slats 3 pieces, two of them are 60 cm long, and one is 40 cm long,
- fabric of any color,
- strong nylon thread,
- scissors,
- glue,
- file small size,
- ruler for ruling,
- pencil.
Kite making technique:
First you need to assemble the frame. In order to do this, you need to follow these steps:
- We take two slats, each of which is 60 cm long, find the middle in them and put one on top of the other in the middle area. The middle can be marked with a pencil. We secure this position with a rope in the middle.
- We place a 40 cm long slats so that its ends touch the two ends of the other slats, that is, at the very edge, so that a triangle is formed. We secure them with rope at the points of contact.
- We take the thread and tie it around the remaining perimeter, slightly pulling it, so that a closed square is formed, and inside it there are intersecting diagonals in the form of slats of 60 cm each.
Afterwards the fitting is done using the steps below:
- We take two notebook sheets and glue them along the edge of the larger length (the unfolded side).
- We place the previously prepared frame on top of the glued paper and cut the paper to the size of the frame, leaving 2 cm from the edge of the frame for folding.
- We fold the paper along the edge of the frame and glue it with glue.
To make the paper taut better, you can spray it with water and leave it to dry.
- We take a pin and stick it where the slats intersect. We tie one of the ends of the thread to one of the upper ends of the frame. We wrap a thread around the pin and then tie it to the other upper end. We mark the place where the thread touched the pin and remove the pin.
- Now we use the second thread of the bridle. We turn the kite over, placing it on the tight cover. We tie a thread to the intersection of the slats in the center.
- In the center where a pin or nail was inserted, depending on what you used, make a small hole. You can use scissors for this. Through this hole we pass the thread obtained in the previous step.
- We draw this thread to the upper border of the kite and at the very end, where the thread reaches the rail, we make a mark on it with a pencil.
- We place the thread under the first part of the bridle, which interacted with the upper ends, wrap it around and make a knot, tightening it so that it is tied at the place of the pencil mark from the previous step.
- We find another mark on the first thread and move the knot to this mark, tying another knot for strength. The knot should be exactly in the middle of the structure.
To make a tail, you need to perform the following sequence of actions:
- We take a thread 60 cm long, tie it to the bottom edge of the frame, then to the second bottom end to make a semi-arc.
- Set the frame aside. We make strips of any fabric 7-8 cm wide.
- We tie the strips together with ordinary knots until we get a tail length of 4 - 4.5 m. A loop is made at one end of the tail, but it is not tightened to the very end. Next, take a thread 15 cm long and pass it through a loose knot, tie the thread well and make a strong knot.
- We take the kite and create a loop right along the central part of the tail frenulum, make a knot and connect it to the thread at the tail. The snake is ready!
Polyethylene triangle kite
It is too flat design snake, but requires a lot of effort to make. The kite will be obtained in the shape of a clear triangle and will look very beautiful when using bright materials. It turns out to be more durable than a paper kite, and, therefore, will last longer. Such snakes are unpretentious to the weather and are easy to disassemble.

Necessary materials:
- A polyethylene bag of any color and dense in structure,
- 4 slats,
- rope or fishing reel.
A triangular, or in other words, delta-shaped kite consists of four elements: two side slats, a central rail, and a transverse one. It is better to make such a snake according to the drawing. The dimensions are also calculated from the drawing; first you need to take some part, for example, the length of the central rail, as the base one and start calculating all other dimensions from it.

Kite making technique:
- Take the prepared package and, looking at the drawing, cut out the snake.
- Prepare 4 slats, the size of which is calculated in accordance with the drawing: a long longitudinal one, a short transverse one, two side ones, the size of which is the same.
- First, glue the side slats on the sides. Then glue the longitudinal part along the central part. At the very end, use glue to secure the central cross section. Attach the keel along the middle part of the kite with tape.
- Insert the tail into the hole made in the central part of the bottom of the canvas. The tail is constructed from pieces of bags obtained by trimming.
- Tie along the fishing line to the corners. Then tie them together with a knot.
- In order to launch and control the kite, it is necessary to connect a fishing line with a reel to the “bridle” made.
This type of flying kite is similar in design to a triangular kite.

Necessary materials:
- A rail with a length of 60 cm
- rail with a length of 30 cm,
- scotch,
- polyethylene bag,
- fishing line
Kite making technique:
- First, you need to arrange the slats in a cross in such a way that a 30 cm long slats can intersect a 60 cm long slats at a height equal to one-fourth of the total length.
- Afterwards you need to bandage the slats in this position using tape. Place the resulting cross on the prepared plastic bag.
- Then cut out the canvas, shaped like a diamond, leaving some margin.
- Stretch the resulting fabric onto a cross of slats. As for the stock, it must be tucked and hemmed or glued with glue.
- Tie one fishing line both to the corner at the bottom of the diamond and to where the sticks intersect. It’s good to secure all this with a few turns.
- Get a bridle. To do this, you need to connect the fishing line with a knot. Don’t forget to attach the fishing line and reel to the knot.
- The last thing to do is attach the tail with tape to the end of the axle stick. The tail can also be cut out of cellophane.
You can achieve better kite flying if you follow following proportions: The size of the snake's tail is 10 times the size of the base.
Kite in the form of a bird
This type of kite actually resembles a bird due to the resulting design effect. The result is a kind of wave, similar to the flapping of a bird's wings. Helps you see the bird and special cuts in the form of feathers on the wings.

Necessary materials:
- 8 sticks, the diameter of which is less than 1 cm and the length is 30.5 cm,
- 3 sticks with lengths equal to 91.5 cm,
- 3 sticks with lengths of 150 cm (sticks can be made, for example, from pine).
- You will also need fishing line
- polyethylene film,
- coil.
Kite making technique:
- First you need to arrange the 150 cm rods in parallel.
- At a distance of 59.75 cm (counting from the edge) place a stick with a length of 91.5 cm. This must be done across.
- Tie the stick with threads. Moreover, between the first two slats the distance should be equal to 30.5 cm, between the second two it should be 61 cm.
- Then make an indent equal to 30.5 cm in big side. Attach another stick, the length of which is 91.5 cm.
- Place 4 short slats at a distance of 30.5 cm from each other. They need to be placed at an angle, which would allow them to converge into a triangle at the bottom.
- Get a “manger” attached to the central part of the kite structure. Place the last strip on the meeting ends of the short planks. The length of the slats is 91.5 cm. And then tie everything together with threads soaked in glue.
- Moisten the ends of long sticks in water and connect them. The wetting procedure is carried out so that they do not break when they begin to bend.
- Pull the fishing line between the tips of the resulting “wings” of the kite.
- To construct the body of the kite, you need to cut a piece of fabric shaped like a pentagon. Moreover, the top side should be 30.5 cm, as well as the bottom, height equal to 91.5 cm + 2 cm for tucking. You also need to make a square in the middle with a side of 30.5 cm.
- Measure 59.75 cm to the left and right sides from the bottom corners of the square. And stretch the sections from the end of both the upper and lower sides of the pentagon-shaped piece of fabric to the points marked after this, which will result in a fabric with a cutout in the center.
- Sheath the wooden rod of the kite. Also use glue to glue the rod.
- You will need to cut out 4 more inserts. Their size should be 30.5 x 30.5 cm for the “nursery”. Place them in the cutouts and glue them.
- Then you can make a tail out of rope. Also, some leftover fabric can be used to create the tail. And finally, attach it to one of the sides of the “manger”.
- You also need to make a bridle from connected fishing lines and tie a thread tightly to them. (Thread with a rope).
A box kite is no longer a flat kite, but a three-dimensional one. Unlike flat kites, it has more lifting force. The design of such a kite has a body, a fetter and a cord. This snake has no tail.
Necessary materials:
- Reiki 4 pcs. 100 cm each,
- slats 6 pcs. 60 cm each,
- garbage bags (preferably large ones for 60 liters or more) or cotton or silk fabric,
- nylon harness on a reel,
- scotch,
- ruler straight and with an angle,
- scissors,
- glue.
Kite making technique:
- The frame of the kite should be made in the shape of a parallelogram, the term box shape is often used. The sides of each rectangular face are proportional in size as one part to three parts, or one part to four parts. The shape of the box is created using slats.
- It is also necessary to install diagonal slats in the body of the lower and upper edges. The dimensions of the slats must match. Slats with both round and square cross-sections are suitable; there is no fundamental preference.
But it would be better if all the slats were of the same section and not bent.
- The slats are connected to each other in such a way that the ends of the slats protrude 5 cm from the place of its attachment with another slat. To make this possible, each slat is made 10 cm longer than the intended size. The slats must be tightly connected to each other, usually the place where one slat is placed on top of the other is tied with a rope or strong thread, and can also be additionally secured with glue.
- After the body of the kite is ready, it needs to be covered with fabric or film, depending on what materials were prepared, but not completely, but only the lower and upper parts, leaving the middle uncovered. For strength, secure the sheathing with glue or sew. It is not necessary to make the kite frame in the shape of a parallelogram; it can also be made in the shape of a rhombus, that is, the body must be made in the shape of a parallelepiped.
- To improve flight performance, you can also add wings to the side surfaces of the body. The wings are cut from the same material from which the body was covered, in the shape right triangle. The dimensions of the wing are determined according to the fact that it must cover the entire side to which it is attached, and in span extend to a length equal to the length of the kite frame. They are also attached to the side with glue and threads.
- Attaching the kite to the cord is made of two lines, which are connected together with a knot or ring. If you use a ring, then it is easier to attach a cord to it for starting. The dimensions of the attachment to the cord do not depend on the chosen frame shape.
- Since this type of snake does not have a tail, for convenience, the lower skin is taken for the tail. When flying a kite, they try to regulate its position in the air masses, creating a balance between the upper part of the skin and the lower part - the tail. But balance is not so easy to achieve! It is necessary that the kite is positioned at the desired angle in the air masses. Straightaway desired angle will not work, it must be adjusted when launching the kite, changing the position of the kite fastenings, that is, the lines, and their length.
- There are several nuances that can tell you what to do with the kite mounts. For example, if a kite does not take off at all or flies at a low altitude and does not rise higher in any way, then this means that the constructed kite has too massive a lower skin, that is, a tail. In order to correct this situation, it is necessary to either replace the lower fastening strap with a longer one and adjust the new connection point of the slats, or replace the upper fastening strap with a shorter one. You may have to do this several times until the kite starts to fly normally. Another example. If the kite twists too much in the air, this indicates that the lower skin is underweight, too light. IN in this case the opposite is done: the upper line is taken longer or the lower one is replaced with a shorter one.
- The larger the box kite, the more lifting force it has. But to launch a larger kite, it is better to use a light cord or fishing line.
The concept of "Kite Train" was introduced by Sergei Alekseevich Ulyanin, creating a design of 7-10 kites connected into one flexible system, capable of lifting four observers. Such designs began to be actively used in military operations in order to land one’s own man or conduct a reconnaissance operation on enemy territory without incident, since when one of the components failed, there was only a decrease in lift and a decrease in altitude, and not a collapse of the entire system.
To make a “Kite Train”, you need to make several flying kites, not necessarily of the same shape or size, there is room for your imagination to run wild, and connect them into a single system. Then you will get a composite structure, consisting of flying kites in a row, connected as one whole.

Successful launch of a flying kite
To fly a kite into the air, much preparation and special skills are not required. The main thing is to find right place and the right wind.
As for the location, it should be an open space without any objects that could interfere with the successful launch. Obstacles can include trees in which the kite can get stuck, buildings, hills, etc. The most suitable places There is a field and coastline where you can fly a kite. Also, as a rule, cities have specially designated places intended for launches. They bring together all amateurs and professionals who want to fly their kite into the air. Typically, an area of 1600 square meters is sufficient for kite flying. m.
As for the wind, it should be from 3 to 4 m/s. If there is too much wind, there is a risk of putting yourself and others in danger, as well as damaging the kite itself. It is important to take into account such a wind parameter as its direction. It is recommended to place the kite in front of you, and keep your back to the wind.
There are several types successful launch kite:
- So, the first includes a regular launch, which involves two people and a flying kite of any type. In this case, one launch participant will hold the kite, and the second will unwind approximately 20 meters of the line, maybe less, but not more. The latter should position himself with his back to the wind, and facing the kite, carefully pulling the line. Next, the person holding the kite runs up and launches it into the air. If the wind strength is not enough or the kite begins to sink to the ground, losing height, then the participant with the lifeline will need to run back until the kite flies higher, catching the wind.
- The second method of launching a kite is called “Hand Launching”. For this type of launch, one participant is enough to launch the kite without a bridle or with a short bridle. The launcher holds onto the line next to the kite and pulls towards himself, slowly lifting it off the ground. As soon as the kite rises into the air, it is enough to unwind the line. With a properly constructed kite there should be no difficulties.
- The last type of launch, “Pull-up and release,” involves a small space for flying a kite and either one participant or two. This method is especially convenient when it is not possible to fly the kite over a large space, since it does not require running up to increase the kite's position in the air. The launch begins similar to a Hand Launch or with a line that is unwound as much as possible and a kite held by a second participant. The first participant goes back, the rope does not unwind. The kite is raised to the maximum height, taking into account the length of the line, and then, lowering the line, he ensures that the kite completely lowers the height, thereby unwinding the line. By repeating this sequence of actions, it is necessary to raise the flying kite to a height with an acceptable wind for the kite to be lifted into the air on its own.
Safety precautions
In order to fly a kite and protect yourself from injury and death, as well as not cause inconvenience to anyone, you must follow following rules security:
- Do not fly a kite near power lines, railroads, airports, or near highways.
- Make sure the kite design is correct and durable
- Avoid launches during storms and thunderstorms
- Observe airport flight rules
- Do not fly the kite near, behind or over people
- Do not fly a kite near large animals, such as horses.
- When operating a kite, use a reel or gloves to avoid injuring your hands.
Creating a kite and flying it is an amazing activity that will bring only the warmest and most joyful emotions to you and your loved ones.
I have always been fascinated by kites flying in the sky! Any flow of air can change his flight and it seems that he is about to break free.
Every summer my boys ask us to buy a bird or a fish.)) And this year we will make a kite ourselves. Let's stock up on knowledge and move on to practical exercises at the dacha or in the park!))
I have collected information from various sources and am happy to share it with you.
What we need:
2 simple wooden sticks (preferably bamboo, if not, light slats);
- nylon thread (fishing line, 2 mm in diameter);
Scotch tape, superglue, spray adhesive;
A large sheet of thin paper (or cellophane);
Hacksaw, scissors, marker and paint.
What we need to do:
1.
Cut the slats to the required length. Make a mark on each slate. At the end of the rail we make slots of several millimeters for deepening. They serve to pull nylon thread through them.

2.
Indicate the exact center of each of the planks and tie them together with fishing line to create a cross shape (90 degree angle). The horizontal rail should be at a height of approximately 2/3 of the vertical one. Remember that must be saved exact angle 90 degrees - otherwise balance will not be maintained.


3.
Stretch a nylon thread around the frame, getting into the cut you made. The tension should not be too strong (too much tension can bend the frame). The kite frame design is ready.

We fix it on top with tape so that the nylon thread (fishing line) does not jump out of the cut.


4.
Then we place the kite frame on our paper. Draw an outline with a red felt-tip pen, at a distance of about 3 cm (1.5 cm) along the line of the cord. Cut out the sketch from paper along the red lines. 

5.1.
Apply a few drops of glue to the ends of the slats (highlighted by a rectangle). This glue will help keep the paper on the slats in correct position. We are waiting for it to dry.
We bend the borders of the edge of the paper (3 cm) and glue it with adhesive tape, but it is better to use spray glue because of its lightness. 
BUT! From this point on, different sources fix it differently. Below I will give other master classes, you can see.
5.2.
We wrap the edges of the film inward around the fishing line and secure them with tape. The "body" of the snake is ready.

5.3.


6.1.
Cut a piece of cord 30 cm long. At the intersection of the rail, make small holes in the paper and thread a nylon thread. Fasten it securely; you can secure the knot with tape. The cord should hang freely. 
ABOUT cut a very long piece of fishing line. It will be needed to release the kite. Tie one end of it to a 30 cm cord, wind the other on a reel.
All is ready! Now you can paint the paper in variegated colors (to your liking) and run it in good weather
6.2. I have seen models in which the line used to hold the snake is tied directly to the crosspiece, but the bridle allows the snake to be held correct angle attacks against the wind. Therefore, it’s better not to be lazy and do it.
To do this, we tie two pieces of fishing line AO and GO to the edges of a short stick at points A and D (see drawing) with a length equal to side AB (for us it is 25 cm) - these will be the side parts of the bridle.
Don't forget to add a binding allowance. For reliability, we coated all the knots with superglue, because it is difficult to make a strong knot on the fishing line.
And we tie the long side of the bridle to the upper end B (see drawing). How the kite will fly depends on its length. Therefore, it is better not to firmly fix the place of attachment to the main fishing line, but experiment with the angle of inclination. In our case, it turned out that, oddly enough, the kite flew best at VO=0. Those. it was possible to do without a bridle, and tie the fishing line to the upper corner of the kite. I think this parameter is very dependent on the specific launch conditions and the specific kite.


After this, we tie all three ends of the bridle together at point O and tie the handrail there. We additionally secured this place with tape.

7. Now we make the snake's tail. It is not needed so much for beauty. how much for proper balancing. It is by adjusting the length and weight of the tail (by tying or untying pieces from it) that the flight qualities of the kite can be improved.
The snake's tail can be made from rope, ribbons and bows, but we only had plastic bags on hand. Therefore, the tail of our kite is made from them. To do this, the bags were cut into pieces. 10 cm wide.
After this, the strips of polyethylene were tied together to form a rope about 3 meters long. We attach the tail to the lower end of the kite (at point D) using tape.


A few more options:


A very easy option on how to make a kite:
Where and how to fly a kite?
You need to fly a kite at large open areas
. If possible, it is better to launch on a hill or hill in order to take advantage of the rising wind currents.
IMPORTANT:
Never fly kites near power lines, wires, etc.
Never run near highways or airports.
Never fly a kite during a thunderstorm.
All this is life-threatening!
If the wind is strong enough.
You can easily fly a kite directly from your hands. Standing with your back to the wind. Pointing the kite with its nose up, initially holding onto the rail near the kite itself. Slightly pulling the thread towards you, lift the kite up, gradually unwinding the rope.
You can fly a kite together.
Your helper holds the kite upright, nose up. You unwind the rope about 20 meters and step back. Giving the command to the assistant to release the kite, while slightly throwing it up into the air. Watch how your kite quickly takes off while keeping an eye on the tension of the thread - more on that below.
If the wind is not strong enough:
Standing with your back to the wind, place the kite on the ground perpendicular to the direction of the wind, i.e. facing us. Gradually unwinding the rope, we move away, holding the kite in this position.

When you move about ten meters away, pull sharply and run a little until the kite gains the required height, feeling how the kite has caught the wind and is rushing upward, where it can soar with ease. Provided that there is a strong enough wind at the top for maneuvers. Otherwise, you will have to run like this to keep the kite in the air.
Let's launch together.
The whole difference is that the snake is in the hands of an assistant. This option is more suitable for starting with a child. You will play the role of an assistant. Your task is to raise the kite as high as possible, keeping it perpendicular to the direction of the wind, strictly with the nose up. After unwinding a couple of meters of rope, ask the baby to run. All you have to do is release it while slightly tossing it up (for children over 2 years old).
Older children need to be explained how to proceed. After your kite catches the wind, you will feel resistance, you can stop and begin to adjust the flight. For achievement maximum height, if at the height where it soars without any of your efforts, it is enough to simply unwind the rope to the desired distance.
How to fly a kite.
- The wind died down- the kite began to fall - pull the rope towards yourself by lowering your hand down or taking a couple of steps back. Make sure that the thread is always taut.
- The wind increased- unwind the rope or loosen the tension by raising your hand or taking a couple of steps towards the kite.
Your task is to periodically tighten during the moments of falling and loosen the tension of the thread during a rapid jerk upward.
- If the kite’s flight is not stable sometimes it soars, sometimes it quickly falls down; you should understand the dynamics of movement. The kite flies in the direction the kite's nose is pointing.. Therefore, pulling the thread can both raise the kite and speed up the fall. Watch the direction of your nose. At the moment of a rapid fall, slightly release the rope and allow the snake to straighten out under the influence of the wind. As soon as the bow turns upward, pull the rope under the pressure of the wind; it will quickly gain altitude.
Another piece of advice: if a fall is inevitable and you cannot correct the situation, then loosen the ropes, thereby not provoking an intensification of the blow.

I wish you a fair wind for your kite!)))