DIY vase decor is a simple art of transformation. How to decorate a vase with your own hands - decor ideas How to make a vase from a decanter with your own
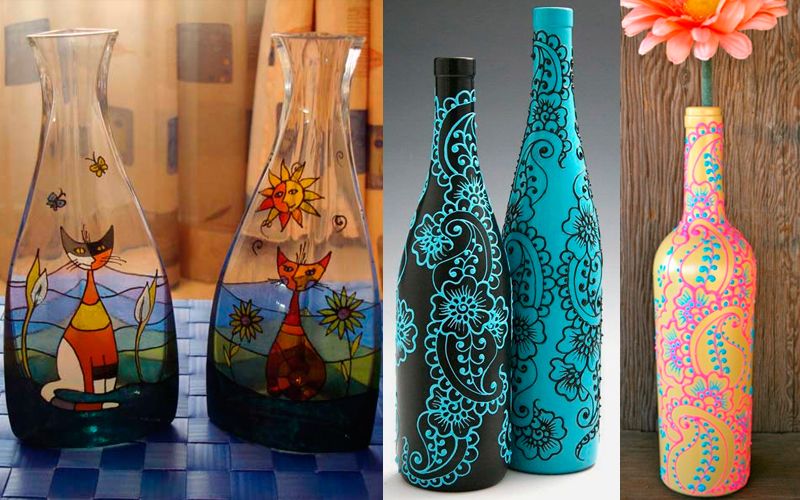
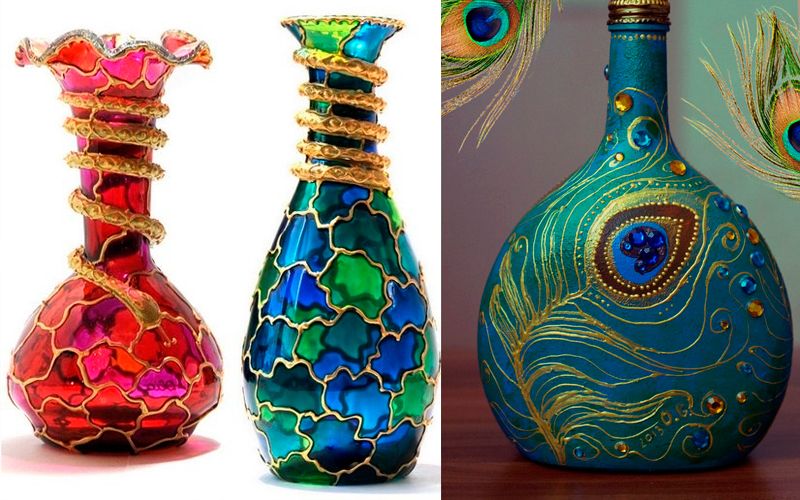
Every housewife dreams of having something unusual and suitable specifically for her interior. It’s especially nice when this thing is made with your own hands. Stained glass painting has always fascinated me. It turns out that decorating a vase with your own hands at home is possible. The main thing is to determine the degree of complexity of the work being performed and relate it to your capabilities. If decorating vases is new to you, then I advise you to start with simple work. Let's start with a simple technique - applying geometric patterns.
Geometric patterns
For this job you will need:
- acrylic or stained glass paint for glass surfaces. You can also use spray paint;
- brush (we use a synthetic one for acrylic paints, natural – for stained glass);
- scotch;
- alcohol;
- cotton wool

Drawing technique:
- Degrease the glass surface with alcohol or any degreaser;
- We paste strips of tape over the vase to create a pattern;
- We paint the parts without tape, going over it. This is necessary to ensure that the edges of the picture are neat.
- We are waiting for the paint to dry. At this time, it is better to remove the vase to avoid accidental touches and smudging of the paint. Each paint dries differently, read the directions on the paint package.
With this technique you can achieve a wide variety of patterns from parallel lines to various intersections. You can also cut out various geometric shapes and stick them on the surface of the object to be decorated. Do not apply a thick layer of acrylic and stained glass paint to the surface, as this may cause smudges.
For the first work, I do not recommend choosing rounded shapes; they are more difficult to work with. Faceted vases work better. We work with one edge, wait for it to dry completely and move on to the next. The easiest way to work will be with spray paint. It is applied in an even layer and the spray paint dries very quickly. As for stained glass paints, their drying time can be significantly reduced. To do this, just put the painted vase in the oven for 15 minutes at 150 degrees.
This technique came to us from antiquity. Distinctive feature Pique painting is the size of the dots, the spacing between them, the combination and color scheme.
Drawing technique:
- Degrease the glass surface with alcohol.
- Apply the outline with a dotted touch.
If you are a beginner artist, you can draw a sketch of your drawing on a piece of paper and attach it from the inside.
You can also use ready-made sketches by downloading your favorite picture from the Internet. Before applying the outline to the vase, test it on a piece of paper. This is done in order to feel its thickness. Only then proceed to drawing on the vase.
If you go beyond the line, you can quickly correct the defect before the contour dries out. Wipe off with cotton wool and alcohol and continue working. Consider the transparency of the vase; place the design on one side or at different levels.
This is necessary so that the image does not overlap. Try to maintain the same spacing between dots.
I used 2 types of fills in my work: Marabu and Decola. They are on different bases and behave differently in their work. Decola paint was in a tube on water based. And Marabu is alcohol-based in a jar and needs to be applied with a brush. It is more liquid and can be mixed to create different shades. Decola paint cannot be mixed, so shades and transitions in one contour are more difficult to create with this material. Color transitions can be accomplished by breaking one contour into smaller ones.
 Painted floor rainbow vase
 Do not leave voids in the contours when painting and make sure that the contours are closed. This is done so that the paint does not leak. I would recommend starting with faceted vases as they are the easiest to work with. If you do get to work with a round vase, then try to apply the fill in a thin layer to avoid paint leakage.
Vase decor with fabric and ribbons
You will need:
- ribbons;
- lace;
- textile;
- glue.
Decoration materials can be of all kinds. The only limitations may be the size of the bottle and your imagination.
Decor of vases with beads
You will need:
- glue or glue gun;
- beads strung on a thread or individual beads.
You can replace the beads with more natural materials: cereals, watermelon seeds, coffee beans. You can also use pasta that can be spray painted.
Decoupage
The word decoupage literally translates from French as “cutting.” In other words, the essence of decoupage is to perform appliqué. In my opinion, this technique Quite simple and does not require special skills.
But you need to be patient and scrupulous. To perform decoupage work, you must adhere to the following tips.
Technique for performing the work:

Decorating a vase with natural materials

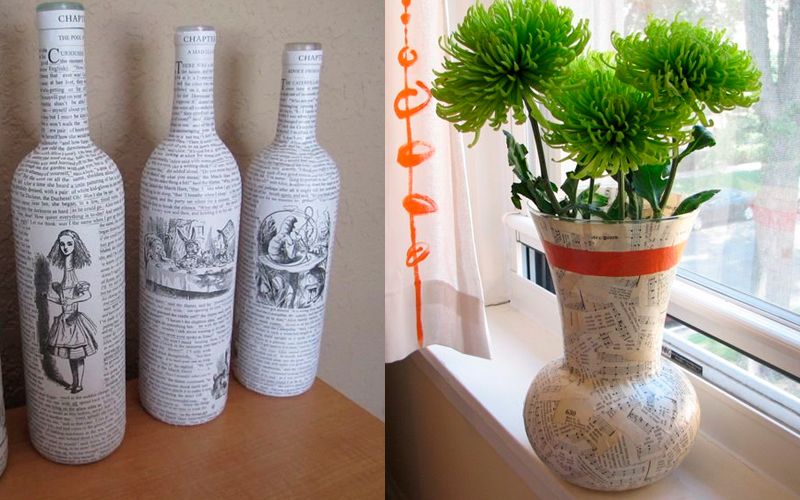
Do you like flowers? The answer is obvious! Of course, they are on their own great decoration at home, but in combination with an unusual vase the bouquet will be simply excellent.
In this master class, let's learn how to make vases from jars with our own hands. Such vases will not only diversify your interior, but will also fit perfectly, for example, on small table for breakfast if you decide to please your partner. And if you accidentally picked a flower at the dacha or in the garden, but don’t want to place it at home, a convenient bottle vase will help you out here too!
Vases from plastic cans from under the shampoo
We were wondering how to make something out of a jar beautiful vase, and you think it’s impossible? Scroll through the photos below and see that making a vase with your own hands is very simple, beautiful and very inexpensive!
We have identified the 6 most popular and simple ways How to make a stylish vase out of a jar, this is: painting, glitter, decor with paper, linen and lace.
Learn how to make a vase from a jar in the next master class.
A very simple and straightforward method is to apply glitter or glitter to glue or hairspray. This method is great if you need a festive vase or for New Year. Detailed non-application technique with photos - see this article « «.

Festive vase with glitter

Great for wedding
Method No. 2: Wall vases from baby food cans
If you have a few small baby food jars accumulated, they will make excellent wall vases. These vases are perfect for decorating your yard or cottage!

Wall vases

This vase is perfect for a balcony or cottage
We will need the following items:
- Old shabby board;
- Baby food jars;
- Clamps for clamping jars;
- Drill;
- Cogs;
- Hammer;
- Metal punch/screwdriver;
- 2 (or more) hooks;
- Rope;
- Brush with iron bristles;
- Marker.

Tools for making a vase
Vase making technology
Step 1
Clean the board with an iron brush. Using a hammer and a punch, make a hole in the clamps (if you don’t have a punch, use a screwdriver).
The hole should be on the opposite side of the clamp tie.

Step 2
- Take them one by one (most importantly, don’t get confused if the jars are different) mark where you want to place the jars on the board. Mark the drilling points with a marker and drill them.
- Place the jars in the clamps and, until they are screwed, insert the screws into the holes drilled in the clamp, securing them firmly in the holes in the board.

Step 3
- Decide where you want to insert the mounting hooks and drill holes there.
- Insert hooks into them and tie a rope to them, with which you can hang the resulting craft on a terrace, fence or wall .


And the best part is that all you have to do is decide what flowers you will put in your vases! You can, as in the photo, pour water into the upper ones and put petioles, and shoots with roots into the lower ones.
Or you can even light small round candles and carefully place them inside - late in the evening it will be especially pleasant to sit on fresh air and admire the lights. Just don't forget about fire safety!
Method number 3: Painting cans
Painting jars is the most popular way of decorating and it’s not surprising, since it can radically transform even the simplest jar into a beautiful and elegant vase:
What we paint with:
- Acrylic paints apply easily, dry quickly and are odorless.
- Aerosol paints in a can - dry quickly and ensure smooth application.
For a complete guide on how to paint a jar, read this material “ .


Master class: Vases from plastic cans
Stylish vases can be made from plastic jars, such as shampoo or conditioner. They look especially nice when there are several of them and painted in 2 tons. Let's watch a detailed master class.

Prepare the following:
- Plastic bottles for mineral water and/or detergents(carefully wash all chemicals out of them);
- Adhesive tape;
- Scissors;
- Aerosol waterproof paint in different colors;
- Hairdryer, sponge and oil (jojoba or sunflower);
- Old newspaper.

vase tools
Painting technology:
Step 1
- We direct a stream of hot air from a hairdryer onto the labels on the bottles. After 1-2 minutes, the paper should easily peel off from the plastic..
- Rub the oil sponge onto the glue on the bottles and then rinse with water. Rinse the detergent bottles again.

Heat the label with a hairdryer

Remove remaining glue using a sponge
Step 2
- Slice duct tape into thin strips (choose the width of the strips as you wish) and randomly glue them onto the bottles. If desired, you can overlap the stripes to form patterns.
- Run your fingers well over the entire glued tape, leaving no uneven or poorly glued areas.

Apply masking tape or adhesive paper in stripes to the bottle
Step 3
Lay out an old newspaper and place the bottle that you will paint first on it. Using a can of paint, carefully, at a certain distance (otherwise the paint will be distributed unevenly and will flow), begin to paint the bottle.
It is advisable to paint outdoors, but if this is not possible, paint in a well-ventilated room.

Let the paint dry for 1-2 hours

Removing the adhesive tape
Step 4
Wait until the paint is completely dry and carefully remove the adhesive tape. You can pour water into the resulting vases and place flowers in them.

Even more IDEAS: - Master classes with photos here
Master class: Multi-colored vase with acrylic
This bright vase will delight you with its elegant look!

Modern vase from a jar
Take the following:
- Any glass jar;
- Acrylic paints (3 or more colors);
- Old newspaper.

Take milk or acrylic paint
Step 1
- Remove the label from the jar.
- Spread out an old newspaper and place the jar on it, bottom up. Slowly begin pouring paint into the bottom of the jar; the paint will begin to flow along the walls - this is how it should be.
- After watering, for example, with white paint, take paint of a different color and pour directly on top of the previous one, thus mixing them together.
- Thus, make a layer of all the paints that you have prepared.

Pour several layers of paint one after another
Step 2
Leave yours to dry vase within 2 days. Even if after a few hours it is dry when touched, the paint inside has not dried and if the dry layer is damaged, it will leak out.

In this master class, you learned how to use unsightly, useless jars to make cute decorative items for your home. With your imagination, you can make even more unusual flower vases suitable for different rooms your home, and if you master this craft perfectly, you can even make vases as gifts for your family.

Leave to dry for 2 days
Everyone is pleased to receive a cute and useful thing for the home, and even made with their own hands! And if a thing is made by hand, it means it is safer and more valuable - a person invests his time and love in making it.

Very stylish vase for creative people
Method No. 4: Decorating vases with paper
It will also turn out original if you cover the jars with paper; either decorative paper or any handy material will do, for example, old sheet music or sheets from long-forgotten books.
Thin paper sticks best to a jar using homemade glue: boil flour with water. It is completely saturated with glue and envelops the glass. This method will not work for thicker paper; it is best attached with thin double-sided tape.

![]()
Master class: Vase with craft paper decor
An unusual vase will harmoniously fit into a rustic interior or country style.

To make this vase, take:
- Round glass jar;
- Double sided tape;
- Kraft paper;
- Scissors.
Step 1
Wash the jar thoroughly and remove the label. Cover the jar with double-sided tape.

Take any barrel-shaped jar

Cover the jar with thin double-sided tape
Take kraft paper and cut into narrow strips, which carefully, trying not to tear, twist into flagella.

We make strips 5 cm wide

Rolling the paper
Slowly paste around the circle jar with rolled kraft paper, lightly pressing it against the tape. The vase is ready - pour water into it and place the flower so that it begins to delight you with its aroma!

Method number 5: Decor with canvas
Decorating a vase with canvas is perfect if your apartment is decorated in a Rustic or Provence style. Where can I get the canvas? Simple advice: canvas bags are sold at any market or hardware store; their cost is a pittance. We cut it into strips and decorate it with whatever you want.
ATTENTION: The canvas is very dense material, Holds it best assembly adhesive for construction in a gun on any basis. When gluing, you must press it very tightly to the jar!


Method number 6: Decorate the jar with lace
It's very easy to make a vase from a jar by gluing old lace onto it. Installation of lace on a jar is best done with silicone glue or mounting gun. The thinner the lace, the tighter it will adhere to the glass, so give priority to synthetic lace.


3 ratings, average: 5,00
out of 5)
Reading time ≈ 11 minutes
Making a vase from scrap materials with your own hands is a great way to pass the time with benefit and pleasure. So you can give a second life unnecessary things, get an original thing for your home and transform it. Let's look at several simple master classes on making vases from tin cans available on the farm, glass bottles and vessels, other containers.
Examples of vases with your own hands.
Decoration materials
In the master classes offered below self-production The vases will use materials that you are likely to find at home, and only a small part of them may have to be purchased. Certainly, we're talking about about decorating a finished waterproof vessel, since making a vase yourself from scratch will be an impossible task for most.
You may also be interested in:
You can use many materials to decorate a vase:
- textiles of all types, textures, colors, including ribbons, yarn, ropes, burlap;
- buttons, beads, beads, sequins;
- colored (printed) tape;
- enamel painting, glitter;
- coffee beans, cereals, seeds, coarse salt;
- natural plant materials: twigs, chestnuts, acorns, leaves;
- sea shells, natural pebbles;
- kraft paper, cardboard;
- clothespins;
- coins.

Materials for needlework.
For fastening, it is best to use transparent glue, which when dried does not give a tint and does not stain the materials. And as a base, a great variety of containers that do not allow water to pass through are suitable:

If you are not going to place fresh cut flowers in a vase in water, then the product can be made of water-permeable material (cardboard base, for example a reel or reel).

Cardboard bobbins.
Vase made from a jar and twigs
To create a vase you will need materials that you can probably find at home:
- glass jar with a volume of 0.5, 1 or 1.5 l;
- twine or thin rope;
- a small piece of burlap;
- chopped twigs of small diameter (about 0.5 cm);
- glue.
Advice: glass jar can be replaced with any other cylindrical container.

Step-by-step production of a vase from twigs.
Step-by-step production:
- Cut the collected branches with a hacksaw into pieces of equal length. They should be similar to the height of the glass container.
- Using twine, secure the branches at the top and bottom ends, tying the twine into knots. As a result, you should end up with a kind of canvas of twigs.
- A piece of burlap, equal in length to the circumference of the jar, needs to be wound around the vessel, the upper ends wrapped inside the jar and glued. The neat bottom can be left free.
- Next, a web of twigs needs to be wrapped around the container and tied into knots.
Alternatively, you can not use burlap, but plant the branches directly on the jar with glue. Finally, it is advisable to fasten the structure with a rope wrapped around the can in several turns. The product will look just as decorative and aesthetically pleasing as the version with burlap.

If you use thicker pieces rather than thin branches, the vase will turn out to be a rougher design, but no less original:

Another product option.
When using jute
This master class also requires the use of a glass jar or bottle. You will also need:
- glue;
- twine, jute or other beautiful rope, thick rope will also work.

Twine decor.
Manufacturing step by step:

As a result of the work done, you will get such a laconic and effective do-it-yourself vase using improvised materials:

Ready product.
With a fairly impressive size of the vessel, the vase can be used as a floor vase.
Vase made from a painted bottle
This master class is also very simple and will take you no more than half an hour. Necessary materials:
- glass bottle for any liquid ( mineral water, champagne, dairy products);
- universal spray paint desired color.

Painted bottles.
Step by step process:
- Wash the bottle inside and out, remove all labels and traces of glue.
- Place the bottle on a metal or wooden rod and turn it over - this will act as a kind of support.
- Now the container can be painted. It is advisable to use paint in a can for an even and uniform layer without smears.
To get a geometric or any other pattern, first cut out strips (other shapes) from adhesive tape and stick them on the container before painting.
For a more festive and elegant look, you can use glitter of an adjacent shade. With the help of paints and sparkles you can create very impressive ensembles.

Decor with sparkles.
You can cover not the entire vessel with glitter, but only part of it:

Partial decor.
There is another option for painting the bottle - from the inside. To do this, you can use paint in cans. You will also need a metal baking tray and a mesh. The bottles need to be prepared, then pour a small amount of paint inside and carefully distribute it over all the walls, turning the bottle over. To dry, the vessel must be turned upside down and left for a day.

Painting the inside of bottles.
Vase made of clothespins and tin
The following vase is suitable for a miniature bouquet delicate flowers. For production you will need can, set of clothespins.
Tip: to make the vase neat, it is important to use a small jar, the walls of which can be completely hidden under the clothespins.
- Clean the jar of dirt and remove the label.
- Place the clothespins tightly onto the sides of the jar. For reliability, you can use glue. To make a vase, we recommend purchasing a set of plain wooden clothespins– they look as aesthetically pleasing as possible.

Manufacturing process.
The finished vase can be decorated with cutouts or stickers. In fact, it’s not really a vase, but rather a . Inside such a stand you can place a glass glass with a bouquet.

Finished vase.
Vase for artists
You can make the following creative vase in 20 minutes, the main thing is to have all the necessary materials on hand:
- any cylindrical container that does not allow water to pass through;
- strong glue;
- packaging of pencils/markers/brushes.

Decor and pencils.
The photo shows that to make a vase, the container must be carefully and tightly covered with pencils. For beautiful view It is advisable to use a pack of new pencils of the same length. The finished product can be tied with a decorative ribbon.
If you use brushes, the vase will look like this:

Tassel decor.
Using fabric
To create the next vase we will use a simple set of materials and tools:
- glass container (preferably glass, as it looks beautifully from under the areas not covered with fabric);
- a small piece of fabric (you can use several harmoniously combined colors, plain fabrics can be supplemented with printed ones);
- glue;
- scissors;
- for decoration: twine, buttons, beads, ribbons, lace, etc.
Idea: Instead of buying new fabric, it is better to look for unwanted pieces among your needlework materials, and also go through old, unworn items. Natural materials will look the cutest and most tender: linen, cotton, natural lace.

Necessary materials.
Step-by-step manufacturing process:

On next photo Another version of this technique is presented:

burlap decor.
Knitted texture
For this next super simple tutorial you will need some scrap knitted items or yarn and knitting needles (if you have knitting skills) and a vessel. The point is to make a kind of cover for the container. To do this, you can cut off a sleeve from an unnecessary knitted item if its diameter matches the vessel. One edge needs to be carefully folded and placed on the container - voila, the decor is ready! If you know how to knit, then an original cover can be made in the evening. To avoid seams, it is better to knit on four needles.

Knitted cover for a vase.
By the way, using the same principle, covers are made for stationery stands, candlesticks, cups and thermoses, and even furniture.

Variations of covers.
Mini vase made from a light bulb
The next vase made from an incandescent light bulb is small in size, so it is suitable for placing a small bouquet or a single color. However, if you put together an ensemble of several “vases”, you will get a very impressive picture.

Vase made from a light bulb.
For manufacturing, prepare the following materials and tools:
- several burnt out or new light bulbs;
- twine or thin braid;
- pliers;
Step-by-step production:
- Use a sharp knife to pry off the soldered part (insulation).
- Next, you need to remove all the “stuffing” from the light bulb: the plug, the electrodes, the thread. It is important not to damage the base.
- Next, you need to wind twine around the base and make a small loop - our vase cannot stand, so it will have to be hung.

Manufacturing process.
The product is ready! All that remains is to manipulate the remaining light bulbs and make a set.

Ready product.
An ensemble located on a tree of branches will look very original:

An ensemble of vases made of light bulbs.
Ensemble
This composition looks very festive, elegant, gentle and at the same time, you will have to spend very little time to create it. The main thing is to choose containers that are identical in size and design. It is not advisable to fasten them with glue - this way, if necessary, you can disassemble the ensemble. A much more practical and elegant option would be a beautiful satin or grosgrain ribbon with several turns, tied in a bow. If the containers have a narrow neck, you can only fit one flower into each.

An ensemble of containers.
Putty decor
Finally, we’ll tell you how to decorate a vessel with putty and paint. If you have some putty left after the renovation, this option is just for you!
What you will need:
- glass vessel of any shape and size;
- putty;
- acrylic paints and varnish (paints should be in contrasting shades);
- floral mesh;
- sponge, fine-grained sandpaper and a small spatula.

Putty decor.
Step-by-step production:
Video: DIY putty vase.
If you have just recently made renovations at home, then there is always a heap of unnecessary garbage left and our advice: do not rush to throw it into the garbage chute, in this heap you can always stumble upon items that will be useful in inventing fakes - these can be various design details and different decorations for your home. Most often, unnecessary items are those left to no one. necessary pipes, from which you can invent a wonderful designer vase. There are several methods for reproducing our vase.
So, first, let's look at the types of vases made from plastic pipes.
Installation
We will decorate with the help of unnecessary nylon stockings.

But before we use stockings, we'll take a look at creating a vase silhouette using plastic pipes. It would be great if these pipes were intended for sewerage. They are perfect in shape and material.

Now let's move on to the manual, which will describe the sequence of work and actions:

Composite decoration for a vase
The sequence of actions is practically no different from the first version of creating an invention, but there is still a slight difference and it lies in the fact that the decoration methods are different.

Now let's move on to the process of inventing a vase using this method:
- We put it on the pipes, which we prepare in the same way as in the first option, hosiery on both sides so that there is a small empty gap in the middle of the pipe.
- We apply a small amount of PVA glue to this empty gap so that it is spread over the entire area.
- Now we pour any type of cereal onto this smeared gap, depending on your imagination.
- Let's wait until the glue hardens, and attach the pipe sections to each other and paint them in different colors, depending on your wishes.

At this stage we finish making the vase using cereal.
Making a vase from a metal alloy pipe
In case you still have unnecessary metal pipe, whose edges are cut evenly, then it will be useful for creating our craft. If the pipe has an edge, then it is perfect for us because there is no need to create a stand for the vase, it will be ready immediately.

Using this type of pipe, we will be introduced to the technique of creating it using consistent actions:
- To begin with, we will take a roll of ordinary cheap toilet paper and glue our pipe in a circle so that there are no empty spaces left. The formation of small folds is allowed.
- Now we need black paint, and with its help we paint the pipe in two layers to give it a natural look.
- Next, take powder with a powder effect and apply it with gentle movements over the black paint.
- For special beauty, you can decorate the vase with beads or beads.
- Using installation foam we create the bottom of our product. We do it this way: we put the craft on a plastic stand and we put the foam stream in a vertical position. After waiting until the foam dries, you can paint the bottom with spray paint of any color.

Take note! We can decorate the edges of our beautiful vase with welding device, having cooked them a little. The result will be beautiful metallic lace.
I hope you understand that you won’t be able to place fresh flowers in this type of vase as they require water, and you won’t be able to pour it into such a craft, but don’t be upset, it’s perfect for placing dried or non-living flowers of various types into it. In it they will look aesthetically pleasing and tasteful.

Making a vase from a cardboard product

If during the renovation you ordered the required amount of linoleum to your home, then note that a cardboard tube is placed inside each such roll so that it does not wrinkle or move apart. But for the end result,
you just need to show a little of your imagination. 

Decorating a vase with your own hands is quite an exciting hobby. Copyright, unique vases in finished form they are quite expensive, and a do-it-yourself vase will definitely suit your interior, because you will select materials according to color and style to match the already finished room. Another advantage of decorating a vase yourself is its uniqueness. You will never find exactly the same one, even if you use materials from a specific master class.
A vase in the interior is not just a vessel in which you can put a bouquet of flowers. This is a work of art, an interior item, and a thing that can be used to cover an empty space. And in combination with the bouquet itself, the vase will become an integral part of your interior.
To decorate a vase with your own hands, you may need available materials and various instruments, but also of course, your hands. Decorating a vase with your own hands is a creative process that can be a fun activity for the whole family. Well, we will give you ideas and tips on how to decorate a vase with your own hands in this article.
There are many ways to decorate, the most popular of which are:
- glass painting;
- decoupage;
- decoration with fabric;
- using colored or corrugated paper, newspapers, sheet music;
- design using pencils or brushes;
- decoration with twine, rope or colored threads;
- using artificial flowers;
- decorating with edible materials - pasta, seeds;
- using improvised materials, for example, buttons, coins, beads;
- decorating a vase with ribbons and lace.
Let's look at some of them - do-it-yourself vase decor with photos.
Twine is an excellent material for decorating bottles, glasses and vases. Its flexibility (literally) allows you to decorate even the most complex shapes. Along with twine, you can also use other materials: rhinestones, beads, buttons, threads, fabric, ribbons. Both regular PVA and hot melt glue or “moment” are suitable as glue.


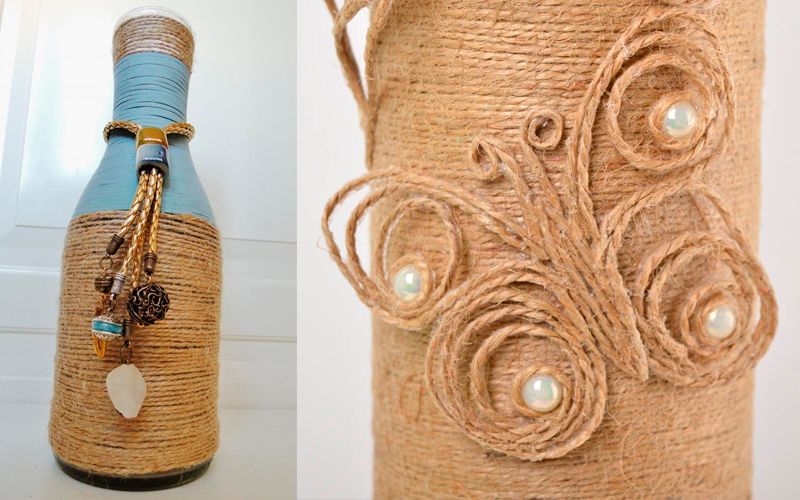
Natural materials can also complement twine or rope: pine cones, shells, dried leaves, small pebbles or other stones.


Certainly, art painting not for everyone. But a vase painted with your own hands will look expensive and unique. For painting on glass, use stained glass paints or special acrylic paints marked “for painting on glass.” You can go another, more economical way: first, the vase is coated in two layers with PVA glue, and then a drawing is applied to it using ordinary gouache.
Important! Before starting work, the vase must be thoroughly degreased - wiped with either alcohol or an alcohol wipe.
In order not to spoil a large vase without painting experience, you can practice on an ordinary glass or bottle of wine or champagne.

To create a relief contour, use a special acrylic contour on glass.

The fabric can be used not only for sewing clothes or home textiles. It is also an excellent material for decorating various interior items.
You can decorate a vase using fabric in different ways: sew a cover on it, paste it with pieces of multi-colored fabric, wrap or tie the vase.


You can decorate with fabric not only a vase, but also any other container, for example, a bottle. For this you need following materials and tools:
- textile;
- bottle;
- glue;
- paints;
- decorative elements- beads, buttons, shells, ribbons.
The fabric should be soaked in glue and wrapped around the bottle. Then glue the decorative elements and paint.

A vase decorated with lace and ribbons is no less beautiful and elegant. To glue materials to the surface of the vase, you can use hot glue, moment, or PVA. Also combine with artificial flowers, buttons, rhinestones, beads and beads.


Decorating a vase with lace is quite easy, and you get a unique and original pattern.


Any natural materials can be used as decoration for a vase with your own hands: wood, twigs, pine cones, shells, pebbles, dried leaves and flowers, straw.
How to decorate a vase with your own hands using natural materials? Just like other materials for gluing, you can use PVA, hot melt glue, and moment. Before applying glue, the vase must be degreased.


One of original ways decorate a vase with your own hands - cover it with pasta different shapes and size. Thanks to the huge selection of pasta in modern supermarkets, vases turn out to be unique and original. From above, the entire pattern is covered with paint and varnish for durability.


Old newspapers can be used to decorate a vintage style vase. Aged paper or sheet music are also suitable for this purpose. Simply cover the vase with pieces of newspaper and decorate with twine or thread.