Homemade accessories for drills. Drill attachments: types of devices and features of their use
Drill attachment - Malco Turboshear TSNS1 scissors. Can handle both slate and slate.
Did you know that a regular drill can do much more than just drill? Its capabilities are significantly expanded by special attachments, attachments and various devices.
Surely not every owner of a drill knows that it can not only drill holes, but also saw, mill, and even turn into lathe or a pump for pumping liquids. An ordinary electric drill owes such an enviable versatility to the abundance of a wide variety of attachments, attachments and accessories. It is hardly possible to find another power tool for which there are as many attachments as for an electric drill.
Of course, the multifunctionality of the drill created by the attachments is in no way capable of replacing a fleet of special professional tools (in terms of cleanliness of processing, accuracy and productivity). But at the household level, all the additional functions acquired by the drill will fully satisfy the needs of the home craftsman.
 |  |
The SC 165 quick clamp ensures quick fixation of the workpiece when drilling. The drill holder allows you to quickly secure the drill and perform stationary work. Can be rotated 360 degrees, just like vertically. The same goes horizontally.
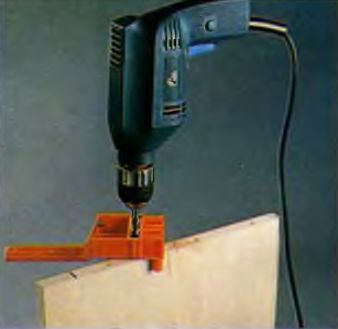
Most widely represented drill stops. The simplest stop, installed on the auxiliary handle of the drill (attachment set: auxiliary handle and stop with a metric scale), allows you to drill holes to the desired depth. With it, you will never accidentally drill through a workpiece or a thin partition.
It is more advanced because it controls not only the depth of the hole, but also its verticality relative to the surface being processed. This type of attachment is produced both for construction (drilling in walls and ceilings) and carpentry (furniture) work. The attachment for construction purposes is professional and is a single unit with an additional handle installed on the powerful drill. Some models have a built-in dust extractor connected to the vacuum cleaner.
The simplest stop for a drill is an additional handle. It has an adjustable drill depth stop (metric) |
The professional stop is more reliable and has a convenient metric depth limiter scale. |
The parallel stop, in addition to the depth of the hole, sets its perpendicularity. Model for working on vertical surfaces. |
A dust removal attachment is also necessary for a drill. They are equipped with certain models of professional stops. Connects to a vacuum cleaner. |


Carpentry attachments are structurally similar to the racks of hand cutters, but are manufactured less accurately and are intended only for home use minor works. And more is not required here: a drill is a low-speed tool (relative to an electric mill) and does not provide high precision when machining a surface. The drill is clamped in a basket, which easily moves along two vertical guides.
Angle drilling accessories and attachments They will allow you to drill a hole where it is simply impossible to approach with a conventional drill. Depending on the design and manufacturer, the drilling angle may be different. The most common attachments allow drilling at an angle of 90º.
 |  |
 |  |
This The attachment allows you to limit the drilling depth, ensures strict verticality of the hole and allows you to make (corresponding attachments) some milling work. This is especially important when making furniture at home: inset furniture hinges, holes for assembly fasteners and dowels or grooves. The stop can be equipped with various inserts for side drilling in round parts or with complex profiles. Some models of stops have a dust extraction device connected to the vacuum cleaner. But a professional will prefer a manual milling machine (same operating capabilities, but high quality surface treatment and precision).
Of course, holes in parts can be made most accurately and quickly on a drilling machine. But the drill, complete with it, shows excellent result. As a rule, such a stand is equipped with a convenient clamping vice (for the workpiece). The vice can be moved along the stand frame to the desired position.
 |  |  |  |
A drill (almost any) is easily and quickly clamped into the “basket” of the stand and the drilling machine is ready for work. The compact dimensions of this attachment, smooth feed and accurate metric scale make it a valuable acquisition for a small workshop.
A home craftsman can get by with the simplest parallel stop: made of plastic, the dust is localized within itself. |
Parallel fence for carpentry work: guide groove and inserts for side drilling of bars and round parts. |
Removing dust and sawdust in this attachment is necessary. With it, the drill can already work like a simple hand-held milling machine. |
There are additional functional holes on the platform of the console, with which you can install a side stop. In this case, the drill is capable of performing all the operations of a manual milling cutter, for example, selecting a groove exactly (with the appropriate attachment). |
||


Can't help but arouse interest. The attachment is easily attached to the table and the machine is ready. Available in several design options. As a rule, a certain set of accessories is offered for it and cutting tool. This type of attachment does not pretend to be a professional tool, but many parts for custom furniture or country house You can make it quite well with it. But if you start mass production of turned table legs or balusters using this attachment, it will quickly break, and the drill will not withstand such violence. Our photographs give a clear idea of the design and operating principle of this attachment.
|
|
| A compact wood lathe is the dream of any home craftsman. There are several types of turning attachments for drills. They differ not only in their design, but also in the set of cutting tools offered for them. | |


The most famous and widespread are the prefixes that turn drill into electric sharpener. Here we will introduce you to only two specialized attachments of this type: one is for sharpening blades circular saws and the other for drill sharpening, chisels and plane knives. The value of attachments lies in the fact that they allow you to avoid the expensive services of professional sharpeners of such tools. With them you will not have problems with either the sharpening angle or the perfect cutting edge (even if you have never done this before). Installing such attachments on a drill does not cause any difficulties.
A drill stand plus a drill is a convenient drilling machine. The design of the frame allows you to mount a clamping vice on it to fix the workpiece. |
Vises for racks come in different modifications. But their mounting holes must correspond to the grooves in the rack frame. |
The vice on the bed can be moved. There are options with the vise rotating around an axis and even with a changing angle of the stand. |
A drill mounted in a stand plus an abrasive attachment allows you to create high-quality concave surfaces. |


Noteworthy: easy to use and compact milling attachment grooves in the ends of parts of cabinet furniture or joinery (for corner joints). It is very simple to work with it: there is no need to clamp the workpiece on a workbench, the quality and accuracy of processing is high, the depth of the groove and its level can be set by simple adjustment. This attachment will completely satisfy a professional furniture maker.
For those craftsmen whose work is very diverse, it will not be superfluous to long flexible or angle drive for drill. They are simply installed in the drill chuck and have their own clamping chuck, suitable for any attachments (drills, grinding stones, bits, etc.). These attachments allow you to work with a drill in the most difficult to reach places. It certainly wouldn’t occur to anyone to use a drill to pump liquids.
But this is quite real and not without meaning if you use pump attachment installed in the drill chuck. Of course, it is not intended for long-term continuous operation and has low productivity, but pumping paint (viscous) out of a barrel or dirty water It can be used from the basement and is quite convenient. By changing the speed of the drill, you change the speed of pumping out liquid. As a rule, the entire body of such a set-top box is made of plastic: the service life is short, but the price is low.
The attachment for sharpening disc blades allows you to do it yourself, without resorting to the expensive service of a professional. |
The grooves for corner joints can also be selected using a drill, equipped with a special attachment. It has a dust extraction device. |
A long flexible drive with a chuck is another great addition to a drill. It works with any attachments. |
A small attachment to the drill will help you sharpen a drill, chisel or plane knife to high-quality sharpening. The sharpening angle is adjustable. |
The drill can be used as a screwdriver, suitable for working even in hard-to-reach and inconvenient places. |
The drill can work as a pump. Nozzles come in different capacities (suitable for paint and even dirty water). |
Professional template: durable, reduces the labor intensity of marking and drilling standard holes for furniture assembly. |
The furniture template for drilling holes has standard sizes: holes, distances between them and from the edge of the part. |
This template ensures that the hole is vertical and centered. A plastic template is enough for a home craftsman. |


It is generally accepted that templates significantly speed up many operations and increase the accuracy of processing parts and their assembly. This can be confirmed by the abundance of existing drill templates. We show only the most common patterns that are most often in demand when working with a drill. Among them there are both professional ones (durable and maintain the accuracy of their dimensions) and for home craftsmen (made of plastic).
Template (jig) for drilling precise holes for dowels.
But regardless of this, they contain all the basic standard sizes of furniture holes: for inserting hinges and locks, for furniture ties and dowels, as well as the distances between them and from the edges of parts. Some templates allow you to dispense with the rip fence.
 |  |  |
 |  |  |
Sometimes you can’t do without a good dust removal and garbage collection system when working independently. The DeWALT DWA500DC dust collector will help with vertical drilling in the ceiling.
Filigree channel drilling
Concern A&M developed special attachment for drilling wood. Under the MILWAUKEE brand it is called Pathfinder, and under the AEG brand it is called 3D bit. The use of such a special drill attachment will greatly facilitate the work of builders, carpenters, carpenters and mechanics, as well as electricians and plumbers, because it can be used to drill inclined holes in hard-to-reach places, gutters and channels for installing cables and pipes.
|
|
|

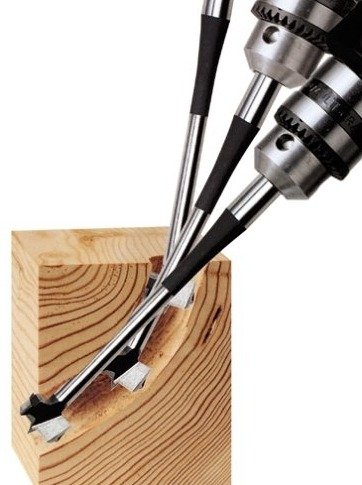

The cutting action of this nozzle is carried out in three directions and allows you to cut into material where conventional drills are powerless. The drilling speed with the new attachment is three times higher than with feather drills, and the selection of channels, grooves and grooves is much more accurate, so the holes are even, smooth and without chips. The drill has six edges, which are sharpened with a regular file or emery stone.
|
|


We advise you to decide in advance on the nature of the work that you will most often and in large quantities perform. And only after that, start looking for the attachments, attachments and accessories you need for the drill.
Drill attachments for cutting sheet materials
Perhaps it is worth highlighting in a separate category special attachments for the drill, turning it into a unique tool for cutting all kinds of sheet materials. With the help of such an attachment - scissors and a regular one, even cordless drill, it will be possible to easily cut metal sheets up to 1.5 mm thick., metal mesh and thick plastic. Manufactured by Malco (USA), a whole family of scissor attachments is called Turboshear.
Such scissors are capable of cutting both along the axis of the tool and perpendicular to it, which allows you to cut squares and rectangles. The attachment will work on both a cordless screwdriver and a powerful mains-powered drill. But don't think that all this will cost a penny. The cost of such attachments - scissors - ranges from 4,000 to 7,000 rubles.
 |  |
 |  |
Corner Grinder, simply “grinder”, has three main areas of use.
- cutting hard materials;
- Grinding with abrasives;
- Cleaning surfaces with brushes.
The technology involves holding the angle grinder with your hands while working.
However, for convenience and expanding the capabilities of the tool, many devices have been invented. Let's carry out short review:
Tripod for angle grinder

Industrial tripods for mounting angle grinders. Allows you to make it out of a regular grinder cutting machine.
This mini machine solves the main problem when working with an angle grinder: if you hold the tool with both hands, it is extremely difficult to fix the workpiece. IN in this case, an angle grinder with a cutting disc is operated with one hand, and the other can be used to hold and move the piece of metal being cut.
Moreover, the tripod allows you to install correct angle cutting, and the disk moves strictly vertically. The work is done efficiently and safely.
Craftsmen have long learned to make accessories for grinders for cutting metal and other solid compact workpieces on their own.
The beds are assembled from metal profile, car shock absorbers, or even plywood. A well-made machine is no less reliable and safe than a factory one.

IMPORTANT! When working with any machine - factory or homemade, you must remember the correct position of the protective casing.
If your structure is strong enough and provides operator protection, you can use a tripod for sawing wood. The main thing to remember is safety.
In this case, main reason injuries - an uncontrollable grinder that escapes from the hands when the disc gets jammed in the wood has been eliminated. But the disc itself can still cause injury.

Homemade tripod for attaching angle grinders.
Therefore, when manufacturing such a device, it is better to make the switch non-fixed. For example, in the form of a foot pedal. Then you can instantly turn off the power if the device gets out of control.
When there is no need to work with wood, but only need to cut a large number of metal blanks - there are simpler options.

Such a mount can be made in an hour, and the ease of use will increase by an order of magnitude. If you know how your hands “fall off” after cutting fifty pegs from a metal corner, this design is for you.
Clamp for grinder
The second most popular way to add convenience when working with an angle grinder is to fix the tool motionless on a workbench or in a vice.
The advantage of homemade products is that at any moment the tool can be removed from the device for its intended purpose. The shaft of the grinder is brought out into the hole of the workbench, a chuck for milling heads is put on it - and you can process wood that is not too hard.
A screwdriver or drill is available in every home. But how often do you use them for their intended purpose? But this is, first of all, a powerful motor in a safe housing and with a comfortable handle. Therefore, it is enough to add accessories for a drill, and the functionality of the tool will be expanded.
There is a whole industry for the production of such “gadgets”; their number is in the dozens. Let's look at the most popular ones.
Drill holder - what is it?
The drill can be used as a grinder, grinder, milling cutter In all cases, it is necessary to fix the tool on the workbench. Considering the complex shape of the case, simply pulling the drill to the table will not work, the spindle axis will not be parallel work surface. The manufacturer has provided a special recess - a neck on the body.

Its main purpose is to attach the second handle. And since the neck of the drill is a power element of the structure, it can be used as an attachment point.
The holder for the drill is a clamp (as a base), a clamp is attached to it, in which the neck is clamped.
- fixed clamp – the tool is positioned motionless and parallel to the table
- rotary clamp allows you to rotate the tool around a vertical axis
- The holder with two degrees of freedom adjusts both the horizontal and vertical angle of position.
Important! The typical diameter of the clamp is designed for a neck of 43-46 mm. Before purchasing a device, check the dimensions of your tool.
There are also unique devices that have an unlimited degree of freedom. However, the cost of such devices may exceed the price of the instrument itself.

You can make a simple holder yourself. Typically this is a horizontal stop with two attachment points.
The main (power) clamp for clamping the neck, and the rear bracket for giving the drill axis a horizontal position.
Mixer - attachment for mixing paints
Another popular device is the mixer attachment for a drill. It's about not about food processors. Although, by attaching a hand whisk or pepper mill to the cartridge, you can mechanize the tedious process.
Using various attachments, construction mixtures and technical compositions are mixed. This is a simple device, however, you cannot make it yourself.

When choosing a mixer attachment, you should consider the power of the drill. During stirring, a lot of force is applied to the mixer axis. The motor is designed for a certain torque; if the load increases, the windings may burn out.
Drilling machine from hand drill
Quite hard to hold hand tool strictly vertical. Therefore, when drilling holes in thick workpieces, it is more practical to use a drilling machine. At home (especially in an apartment) it is inconvenient to maintain such a mechanism. But you can use another device - a stand for a hand drill.
You get a real drilling machine that can be disassembled after use. However, this device costs money. Despite the complexity of the design, a homemade drill stand can be made from scrap materials.
The simplest option is a vertical guide. The device ensures straight movement of the drill, and there is no feed mechanism - you just work with your hands.

For manufacturing you will need 10mm thick plywood and guide slides for cabinet furniture. Non-separable slides with two rows of bearings are used.
The stand consists of two parts
- The base (bed) must be heavy and stable. It is assembled in the form of a box, fastened with screws or screws. A sled is vertically fixed to the frame and set to a strict vertical according to the building level. A handle is attached to the side of the bed to hold it while drilling. If the bed is mounted on a workbench, no additional handle is required
- The carriage is attached to the moving parts of the slide and serves to temporarily secure the electric drill. The holding mechanism can be anything, the main thing is to ensure a tight fit of the tool without play during operation. During installation, it is necessary to ensure vertical travel along the axis of the drill
How it works
Having fixed the workpiece, you habitually take the drill by the handle and bring it to the drilling site. The stand will ensure vertical drilling and allow you to control the force of pressure on the drill.
Homemade drill stand with feed mechanism
It is more convenient to drill on a machine when you hold the part with one hand and move the feed lever with the other. This is how all drilling machines are designed. You can create such a device with your own hands.
For production you will need:
- water pipes of different diameters
- steel strips 3-4 mm thick
- tension spring (door spring will do)
- fastener
- access to electric welding
Looking at the design, you will understand how you can replace the listed materials.
The most important part is the clamp for holding the drill. It is made of a two-inch plumber's nut, onto which eyes are welded for a tightening bolt. This mechanism perfectly holds a drill with a 46 mm neck.
The rod with a return spring can be hidden in a thin-walled glass. Geometry is not needed here; there is no need to achieve strict verticality.
The guide bushings are brass (you can use fluoroplastic, whatever material you have on hand). With a little lubrication, the sliding will be smooth, without jamming.
The lever is made according to the simplest design - a groove in which the axis moves freely. The backlash is adjusted with a self-locking nut. The bending of the lever depends on the size of the drill itself.
The design is simple and reliable. Such a machine can be made in one day off (if you have the tools, of course).
Angular attachment for a drill or what is it?
Often you have to drill holes or twist screws in hard-to-reach places with limited space. The drill does not fit there, but there are devices akin to a pistol that shoots from around the corner.
The angle attachment is a pair of bevel gears that transmit torque at an angle of up to 90° with virtually no loss. Despite the obvious advantages, the device has a serious drawback - there is a high risk of breaking the drill. Therefore, it is preferable to install an attachment with a fixation on the neck of the drill.

And we move on to exotic devices.
Feather attachment for drill
Can a hammer drill be used to pluck poultry? Probably not. But a hand drill is easy.
The attachment is a crown bit (like those used for milling recesses in walls for sockets). Rubber fingers are inserted into the cylinder. It is these rubber bands that grab the feather and clean the carcass. Similar devices are commercially available.

However, most poultry farmers make them themselves. Only the main elements are purchased - rubber fingers.

And the structure itself can be easily made from a piece sewer pipe and steel pins. Plucking of poultry occurs at low speeds, so special alignment is not required. The main thing is the reliability of the connection of the clamping plugs.
In this video we will show a few more options for existing homemade nozzles on a drill
obinstrumente.ru
Making a drilling machine from a drill with your own hands is not difficult, the main thing is to decide on its appearance.
Anyone who uses a hand drill knows how difficult it is to hold a strict vertical line with your hands. When drilling thick workpieces, there is a risk of breaking the drill. Every time there is a desire to guide the tool along the guide, but this is not possible.
The second common task is to drill many of the same type of holes in one workpiece. Holding a drill in your hands, doing such work is long and inconvenient. Since ancient times, metalworking workshops have used drilling machines of varying power. But their cost is too high for home purchase.
Besides House master does not drill into industrial scale. Consequently, such a purchase will never pay off. There are factory-made vertical drilling attachments that can turn a hand drill into a full-fledged drill press. Many of them are equipped with coordinate plates and movable vices.
 Vertical stand for drilling holes with a drill
 This is a really convenient purchase, but the cost of such a machine is comparable to the cost of a drill. Therefore, home craftsmen often make a homemade drilling machine. The main advantages of the design are low cost and the ability to create a device that is ideally compatible with your hand drill. If there is an unnecessary photographic enlarger, microscope or other mechanism with a vertical feed of the working unit in the house (barn, garage), the task is simplified.
 Homemade stand from an old microscope
 All that remains is to adapt the drill to the product. If there is no such bonus, the stand is made from scratch.
How to make a machine out of a drill using scrap materials
What should a guide stand for a hand drill consist of:

In practice, your drill does not always have such a seat ring. In this case, the tool is secured to the body with clamps. With this method, it is important to achieve good alignment of the axis of rotation, and, of course, its ideal verticality.
 Homemade option machine made from mounting plates
 IMPORTANT! The axis of rotation of the drill is always vertical. To drill at an angle, reorient the workpiece.
There are also more original designs for fastening power tools. Appearance doesn't matter. The main thing is reliability and ease of use.
 Drill mount made of plywood
 - Drill switch.
- Workplace lighting lamp.
This design element is important because, in addition to convenience, it ensures work safety. If you plan to leave the power tool in the machine forever, you can remove the button and install a stationary switch on the machine body instead. If the drill will be periodically used as a hand tool, the best way to resolve the issue would be to install a socket and a power button in a convenient location on the device.
There are many options for creativity. The main thing is that it is really necessary. Let us separately dwell on the method of fastening the workpiece. A machine with a vice is undoubtedly more convenient, but it is necessary to provide for the possibility of dismantling it. When processing large parts, the surface of the bed must be flat.
Let's look at the most successful models of homemade machines
These options show polar levels of technology. From primitive, collected from waste, to relatively technologically advanced, using ready-made components.
A structure assembled literally from scavenged materials
No drawings are required for assembly; all parts are adjusted as work progresses. To make the frame, a 50x50 cm chipboard sheet is used. We use round timber as a support for the stand. It will also add stability to the structure, lowering the center of gravity. The moving mechanism is made from a guide for furniture drawers. Of course, none of these things are bought in a store, but rather pulled out of the trash in a shed or garage.
The furniture guide can be used to make a home loom
The bar stand is screwed to the round timber, and a guide is attached to the opposite side.
Attach the guide to the wooden stand
The drill bracket is made from a small piece of wood, in which a suitable hole is drilled with a crown. The only part that is made using welding is a corner with a jib for rigidity, with which the bracket is attached to the guide.
We make a mount for a drill from a piece of board or plywood
We assemble the lifting mechanism and check the vertical movement and freedom of movement. The lifting lever is made from a suitable thin block. A metal corner is installed on the round timber, and the lever axis is attached to it. The bracket is connected to the lever by a metal rod. When moving the structure up and down, no jamming occurs.
 We attach the drill bracket to the stand and attach a wooden lever
 Thanks to the stability of the bracket, there is no need to come up with any complex fastenings. A regular clamp of a suitable size is sufficient.
IMPORTANT! After the first tightening of the clamp, you must wait until it shrinks and then tighten the screw again.
This mount is quite strong, and you can always dismantle the drill and use it as a hand tool.
Check the fastening of the drill with a clamp for tightness
We attach the entire structure to the frame using strong metal corners. It is this element that will account for half of the drilling effort. Also, the fastening of the round timber must withstand the weight of the entire mechanism and the hand drill itself.
The round timber plays the role of a counterweight and serves as the basis for attaching a stand with an angle grinder to it
The drill stand must be equipped with a return spring. Its power is selected in such a way that the bracket with the drill rises smoothly without force on the lever, and the drilling process is not tiring for the operator. Be sure to install a stand for drilling so as not to spoil the bed. Quality doesn't matter, it's factual consumables. As a large number of holes form, the stand is simply replaced with a new one.
The machine drills confidently, the lever works effortlessly. Despite the simplicity of the mechanism, the hole is strictly vertical, horizontal vibrations no drilling occurs. Metal workpieces are also easily drilled, the drill does not overheat and the drills remain intact. In principle, the design can be considered successful.
Steering rack drilling machine
Quite popular among domestic kulibins is the design drilling machine from the steering rack. This steering element, after being replaced with a new one due to play, has sufficient strength to be used as a lifting mechanism for a drilling machine.
 If you have an old steering rack from a car, you can make a drilling machine with your own hands
 Manufacturing requires some skill and the use of more quality materials than in the previous version. The dimensions of the steering rack imply a more massive drill; accordingly, the bed and stand are made of metal. A flywheel or other rotating mechanism is adapted to the place where the steering column is attached.
 It remains to figure out how the steering rack drive will rotate.
 A drill bracket is installed on the carriage for attaching the steering rods. It should also be made of metal, since the weight of a hand-held power tool will be large.
 We make the carriage for attaching the drill from a metal plate
 The return spring is also chosen more powerful, in accordance with the weight of the structure. In terms of reliability and workmanship, this design is close to factory analogues, and the cost will be no more than 10% of the purchase price. Therefore, this option can often be found in private auto repair shops or in the arsenal of locksmiths.
In this video, the guide for the drill is made from ordinary scraps of metal, which will not be difficult to find and make yourself. The result is an excellent homemade stand, practically a drilling machine, which is not inferior in functionality to conventional industrial designs intended for household use. But much more economical in monetary terms.
Which design will the reader choose? The main thing is to maintain a balance of cost, necessity and availability of materials.
Do-it-yourself drilling machine from a drill video tutorials
First lesson. Making parts for a plywood frame
Lesson two. Frame assembly
Lesson three. Connecting all nodes and first start-up
obinstrumente.ru
DIY guides for a household drill: options, materials and manufacturing technology
A drill is usually used to create holes in the wall. But there is no guarantee that it will turn out smooth. Therefore, to eliminate this drawback, it is necessary to use additional devices in the form of a drill guide. Using it, you can do this work with less physical effort. However, difficulties arise when drilling a hole at an angle of 90 degrees, and during certain work, the angle of the hole created often must be 45 degrees. In this case, it is necessary to carry out appropriate preparation of the working tool in order to fulfill this requirement.
 It is quite a difficult task to create a hole in structures made of too hard materials. This causes the drill to slip out during operation, creating a hazard for the operator and those around him who may be injured. You can avoid such unpleasant consequences and at the same time simplify this process by using a device such as drill guides. If necessary, they can be made independently, and the presence of a large number of options allows you to choose the most preferable among them.
The simplest guide attachment for a drill with your own hands
 When considering this attachment option, you should take into account the fact that you will not need to spend any money to implement the idea. But at the same time, there will not be any particular difficulties in making a guide for the drill. But at the same time, the created device can only serve for a short time.
It is important to note that it should not be considered as a full-fledged addition to the tool. In the event that you have to create a hole at a considerable distance from the workshop and there are no other alternative devices, then it is with the help of such a nozzle that you can most effectively solve the problem. In addition to this, it will bring significant benefits to those home craftsmen who do not work with a drill very often.
Materials
To make a guide, you need to prepare following materials and tools:
- plastic bottle;
- plastic cover;
- drill;
- stationery knife;
- felt-tip pen;
- universal glue;
- ring drill;
- sandpaper;
- drill.
Manufacturing process
 First you need to perform certain manipulations with the drilling tool. To do this, twist the nut and the fixing drill from the drill. Then you need to mark its diameter on the plastic bottle as close to the neck as possible. Then draw a circle corresponding to this diameter using a felt-tip pen. The end result should be a complete circle.
This template, which must be cut out later, should also be marked on the bottle cap, and care should be taken to ensure that its width is sufficient for this.
The next step is to cut the bottle or jar. The choice of the structure to be cut should be approached very carefully, since this will subsequently affect the depth of the holes created using the guide.
Particular attention should be paid to work safety. To do this, it is recommended to sand the edges of the jar to make them even and smooth.
The holes that were previously marked on the bottle and its cap should be cut exactly along the intended line using a stationery knife. The processing should be carried out with the edges of the cuts, which need to be thoroughly sanded. Then they take the lid and place it face down in the jar, applying physical force to it to ensure the tightest possible fit. It is in this area that it is glued.
The strongest possible connection can be achieved if, after applying the adhesive, a strong compression is provided, which must be maintained until the adhesive dries. Considering that doing this work manually is associated with certain difficulties, it will be useful to attach several thin rubber bands on top, thanks to which you can maintain the required pressure.
After waiting for the glue to dry, the drill attachment can be used for its intended purpose. A drill is inserted into it, after which, using a plastic nut, it is fixed on the tool and drilling of the hole begins. Although it does not have a choice of depth, this problem can be solved by making several similar attachments and using the most suitable one as needed.
Guide for making straight holes
In a situation where you have to drill a hole with a fairly massive drill, certain difficulties arise due to the need to provide the hole with a 90-degree angle and eliminate its oval shape. If the master does not have the devices and tools in his arsenal with which to make a guide, this problem can be solved by using improvised materials.
Even before creating a hole, you need to take care of the presence necessary materials: for this you can take a square block made of wood or other material.
The block must be positioned against the wall so that it is closely adjacent to the hole that needs to be processed. Moreover, the edge of the drill should touch it, so that the drilling process will proceed smoothly.
To increase the convenience and accuracy of drilling, two different bars can be placed at right angles, with the drill inserted into the inner corner between them. It seems a good idea to place the bars so that they form a "T" shape together. Thanks to this, it will be possible to give it the necessary position and the owner will be able to protect his hands from injury.
A drill, used in combination with a guide, can play the role of a small, simple drilling machine, with which you can perform various operations that require precise dimensions.
Important nuances
When deciding to create such a device with your own hands, you need to take into account such important points:
- moving elements must be tightened extremely tightly. For effective operation of a self-made drill attachment, it must have the ability to select a suitable reach and stroke. Moreover, if the guide post has quite a significant weight, then this only simplifies the process of creating holes.
- In some cases, the stand can be used in combination with a vice, thanks to which you can fix the workpiece. In this case, such a design can easily be converted into a full-fledged drilling machine. Moreover, it is not necessary to purchase such a vice in order to expand the functionality of the equipment. If you have enough experience, you can also make them yourself.
Conclusion
Drilling work is one of the most frequently performed during manufacturing various designs. Moreover, a home master most often solves this problem using a household drill. However, for the most part, the hole created is no different exact dimensions. And this can create certain difficulties when using it for its intended purpose.
You can get out of this difficult situation with the help of drill guides, which you can make yourself. This idea seems quite attractive for the reason that any owner can make such an attachment, given that any available means can be used for this. However, having realized all the attractiveness of the guide, it is necessary to remember that it cannot become a full-fledged device for drilling tool, therefore, you should use this attachment only in emergency situations. Otherwise, the drill guide will soon fail.
stanok.guru
DIY power tool accessories
For household repairs and work on summer cottage Various power tools are used. Specialized additional instruments and devices are produced for them, many of which can be manufactured with my own hands. It is better to get complex industrial devices ready-made, but workbenches, tables, attachments and almost everything else can be made without the help of others. Handmade devices for power tools can be adjusted to the required technical specifications.
Classification of devices for power tools
Do-it-yourself power tool accessories are usually systematized into the following categories:
- Tools and attachments for processing. These are hand-held devices, which include grinding attachments and bars for grinders and drills.
- Devices for modifying the position, mounting a certain cutting angle, drilling and the rest. These are the main surfaces, standards, guides. They can have different external types, often made of metal or wood.
- Dust removal devices. Similar devices are used to remove sawdust, dust, and shavings from the working plane. It is not so difficult to make such devices with your own hands; as a rule, pre-existing fan holes in the equipment are used for mounting.
- You assemble grinding attachments, structures or bars designed for surface treatment with your own hands. For example, to polish a wooden surface or clean an alloy, you can use a wooden plate with a handle on top. Sandpaper of the required grain size is fixed on its working side. The platform model can be anything, it is only important to choose the right abrasive material.
Diagram of the milling table device
 Attachments for power tools vary, but sometimes they are large scale, as is the case with milling machines and saws.
It is recommended to choose an improved table that will contain everything, without exception, necessary for a comfortable and comfortable dangerous work. The most common type is a milling table, made in the form of a large board with an opening for a router and a guide board. The scale of the worktop can be different, everything without exception depends on what kind of work will be carried out. The most ideal type is a table with legs of the required height. And the working and guide boards are made from chipboard sheets. In this case, vices and clamps can be taken into account on the surface. It is generally better to make table legs replaceable and provide a backup set.
Workbenches for power tools
 To work with numerous devices, you will need to improve your workplace. For a home workshop or a car garage, a small, small-sized and universal workbench. It is not so difficult to make it without the help of others; you just need to specifically improve your choice of what functions it is needed for. In general, it is more correct to make a workbench that can be used at any height, including on a table.
Then it will be possible to position the power tool comfortably and change its position if necessary. For work, it is recommended to use various hard woods; a common material is maple, which is easy to process and yet has the required hardness and strength. To register on the table, it is possible to attach comfortable legs or clamps to the installation. A workbench requires a vice; they are often used in work, which guarantees an improvement in its quality.
Drill attachments
During operation, the drill may need various attachments. They make it possible to simplify work, make it simpler, more comfortable, and faster. A huge number of homemade products are used for the drill, which numerous manufacturers today have taken as the basis for the study of specialized kits. The list of devices that you can make with your own hands is huge.
Accessories for power tools:

Various accessories for power tools are needed in order to make the work more convenient and simpler.
It is not always possible to buy such devices, of course, and they are often only needed for a couple of times. For this reason, it is much easier to do them without the help of others, spending not so much time.
The capabilities of the grinder can be expanded not only through various attachments, but also by installing it on special homemade devices. As a result, you can get a cutting machine, with which you can accurately cut metal workpieces at any angle. In addition, the grinder can be mounted on a carriage, and the resulting machine can be used for cutting sheet steel.
In order to understand how to make a cutting machine from an angle grinder (angle grinder), you can look at various drawings on the Internet. But they will be of little help, since all the dimensions of the parts will still have to be selected based on the size of the grinder you have. Options for making devices can be either simple or more complex, requiring the ability to operate a welding machine.
Option 1
To make this device for an angle grinder, you will need welding skills. So, you need to do the following.
First, cut 2 small pieces from the corner (50x50 mm). Their size is selected based on the dimensions of the gearbox of your angle grinder.
Next, drill holes with a diameter of 14 mm in them and screw the corners to the angle grinder, as shown in the following photo. If you do not have suitable bolts, you can use M14 threaded studs. Just be careful that the bolts are not too long. Otherwise, in some models of angle grinders they may cling to the impeller located in the gearbox housing.


Without removing the corners from the angle grinder, secure them by welding. After this, the corners can be removed and scalded well.

Clean the welds sanding attachment for the Bulgarian.

Then you need to make rotating lever support, on which the device will be attached. To do this, select 2 pipes of such diameters that one can fit into the other without much effort.
For a more precise cut, you can glue masking tape to the tubes and draw a line on it.
Then, turning the tube, carefully cut it with an angle grinder. Pipe section smaller diameter should be 20 mm shorter (the thickness of 2 bearings) - it will serve as a spacer.

For a thicker pipe, select 2 bearings suitable for its inner diameter. After this, insert the thin tube into the thick one and press the bearings on both sides.

Then insert the pin into the bearings. Be sure to place a washer in front of the nut.

When the rotating mechanism is ready, you need to weld a small piece of corner to it.

The next stage is done rack for rotary mechanism from the same corner 50x50 mm. To ensure that the pieces are the same length, the corners can be tightened with a clamp and trimmed.


Also, without unscrewing the clamp, they can be drilled immediately.

Attach the angles with drilled holes to the ready-made rotary block using nuts.

Weld a longer corner to this rack, as shown in the following photos.


Now you need to decide lever length, on which the angle grinder will be attached. This is done by selection based on the dimensions of your angle grinder. You can lay out the parts on the table and calculate the approximate dimensions of the lever, which is best made from 2 pieces of square profile pipe 20x20 mm.

The pipes also need to be clamped with a clamp and cut to the same size.

Once all the parts are ready, they can be welded together, as shown in the following photos.


In the next step you can attach to finished design Angle grinder and check again what came out of it.

A ready-made pendulum mechanism for an angle grinder can be easily installed on any flat surface, For example, on the workbench. This structure can also be installed on a table specially made for it. For a more rigid fastening of the mechanism, you can weld small sections of the corners on both sides of the long corner and drill holes in them.

In the following photos you can see how a ready-made attachment for an angle grinder is mounted on a table (in this case a metal frame is used).


It is very important to set a right angle between the plane of the cutting disc and the plane of the table. Place the square on the table and move it towards abrasive wheel, installed on the angle grinder. If you initially managed to weld the fixture so that the angle between the planes was 90 degrees, then that’s good. If you notice a deviation from a right angle in one direction or another, then you can correct the situation using a crowbar or a long profile pipe, for example, 60x20 mm.

To prevent the part from moving when cutting, you can screw a corner onto the table that will serve as a stop. Also, for precise cutting, the table can be easily improved with a simple vice, made from a nut welded to it and a pin of the required length screwed into it.

Next you need manufacture protective cover . It is done taking into account the maximum diameter of the cutting disc, which can be installed on a specific model of angle grinder. To make it easier to determine the size of the casing and the places for its attachment, you can first make a template, for example, from a piece of cardboard.


In this case, the casing will also serve as a limiter for the cutting tool, preventing it from going too deep into the table while processing the part.
It would not be superfluous if for a lever with a grinder attached to it make springing. In this case, it's easy to do: insert with reverse side rod with a smaller tube and attach a spring to it, as shown in the following photo.

At this point, the manufacture of a cutting machine with your own hands, in which an angle grinder is used as a drive, can be considered complete.

Option 2
The next version of the device for the grinder, with which you can cut metal workpieces, is done as follows.

Thus, we got a simple cutting machine. To add additional rigidity to attaching the device to the lever, you can use clamps by first placing, for example, a wooden block between the angle grinder body and the pipe.
For precise cutting, so that the workpiece does not move, you will need to screw a corner to the table.
For a little Bulgarian A similar version of the device is also suitable, only the angle grinder will be attached to a metal strip: on one side with a bolt to the angle grinder itself, and on the other with a clamp.

For powerful angle grinders the device is made according to the same principle, but from profiles bigger size than in the pictures above.

It is not necessary to use dumbbells as a counterweight. All you have to do is find a suitable spring.
Option 3
This device option is the simplest for making it yourself. It is made without a traditional stand (stand) for the rotating block. All you need is one door hanger, a metal strip, and an elastic band (you can use a rubber band from a hand-held resistance band).

The design is done as follows:
- in the metal strip, on one side, drill holes for the door canopy, and on the other, for a bolt, which will be used to fasten the strip to the angle grinder;
- screw the angle grinder and canopy to the strip;
- screw the canopy to the table;
- fasten one end of the elastic band to the edge of the table, and the other to the holder (handle) of the angle grinder.
In just a few minutes you will get a high-quality cutting machine. This device It is also mobile, because it can be carried with you in a suitcase with tools, and, if necessary, mounted on any flat surface.
When installing this device, do not forget to attach a corner to the table to rest the workpiece against it.
Cutting sheet hoists using an angle grinder
For cutting sheet metal will need to be purchased special carriage, which moves along a guide (profile square pipe).

But as practice shows, the cost of a good carriage is high (more than $100), so you can make it yourself. Since this process is quite difficult to describe, you can understand the manufacturing technology of this slider from this video. Using the device, you can cut not only steel, but also ceramic tiles and porcelain stoneware.
Please note that cutting ceramics generates a lot of dust. Therefore, it is recommended to adapt a dust collector with a pipe for a vacuum cleaner to the angle grinder casing.
How to make a homemade dust collector
The simplest dust collector for an angle grinder can be made from a plastic motor oil bottle.

The nozzle is made as follows.

After these simple steps, you can use the grinder to process materials that create a lot of dust when cutting.
The well-known angle grinder, with its cutting, grinding and cleaning capabilities, has turned out to be capable of several more functions. Expanding the functionality requires doing some work with your own hands in order to obtain the necessary devices for the job.

This device is a small machine that makes cutting easy, safe and very precise. metal pipes, profiles or rods. It consists of a base or small table attached to the ground or to a bench.
The machine is assembled in a simple sequence:
- install a hinge on the base;
- We weld the supporting pipe to the hinge;
- We attach the U-shaped plate for attaching the grinder to the pipe;
- We put a rubber handle on the supporting pipe;
- install the disk and check its position.
As a result of some simple work, we got a machine or stand for an angle grinder. Now the grinder can rise and fall down on a hinge onto the part installed for cutting. In order for the angle grinder to rise up without loads, we install a spring on the pipe.
It is necessary to install two fixing angles on the table. At the base of one corner we make a groove around the circumference for a bolt. It will be needed when a pipe or profile needs to be cut at a certain angle. Then we install this corner with a slot at the same angle to the plane of the grinder’s cutting disc.
Parallel to the corner with the arc slot, we install a corner that can be moved towards the part to fix it on the table. The pipe or profile will simply be inserted between two corners. This is enough to perform fast and precise cuts.
By installing a supporting transverse metal bar on the machine table, you can strip the material using a steel brush mounted on the angle grinder shaft.
Simple cutting machine + (Video)
You can make a cutting machine based on an angle grinder yourself in one day. It is necessary to select a bed for the machine - metal plate grounds. Attach the hinge to it. Weld a supporting frame with a plate for attaching the grinder to the hinge.
Any suitable part can be used as a hinge. In this case, the hinge is made of rotary hinges passenger car. The hinges have already served their purpose, but they fit the machine very well.
Do-it-yourself wall chaser from an angle grinder + (Video)
A groove is a groove that must be cut in the wall for installation electric wire or cable. The difficulty of this work is that the groove must be of constant width and depth. Then the wire will be laid evenly and less mortar will be required for laying.

A wall chaser is rarely used in practice, so buying one for your home will be expensive. But it can be made on the basis of an angle grinder - our favorite grinder.
The main task is to install two diamond discs on the angle grinder shaft with a distance of at least 1 cm:
- install the first disk and secure it with a nut;
- install the second disk and secure it with a nut;
- measure the resulting distance between the disks;
- install protection on the grinder;
- checking the work.
But, if for some reason it is not possible to install two disks on the shaft, the groove can be cut using the usual method with one installed disk. You'll just have to cut a second parallel line.
 Work with a wall chaser is carried out indoors. This creates a huge amount of dust. Even a respirator can't save you from it. To eliminate this negative phenomenon you need to make a protective casing that would cover both disks and have a pipe on top for connecting to a vacuum cleaner. A similar device is available on electric jigsaws for collecting small sawdust.
Sometimes there are amateurs to this casing rational use The tool is equipped with 2 or 4 rotating rollers. When the wall chaser moves along the surface of the wall, it will move on rollers without creating additional stress on your hands.
To make a tool for a wide groove, it is necessary to make special bushings to mount the disks to the desired width. With such a wall chaser it will be possible to make grooves for laying pipes.
But the protective casing will also need to be made wider. On the casing of the wall chaser for both wires and pipes, it is necessary to install a screw for adjusting the immersion of the cutting tool into the wall. In this case, the casing will consist of two parts connected by a hinge and a immersion adjustment unit.
Grinder milling cutter + (Video)
Sometimes there is a need to mill a hole or surface, but there is no familiar milling machine operator, and there is nowhere to look. But there is an angle grinder - an angle grinder. This is the solution to the problem. We choose a machine from two options - a movable machine and a movable table.

In the first case, we secure the workpiece or material that needs to be milled, and the grinder is attached in a vertical plane to the frame. On the frame it is possible to move the plate to which the grinder is attached left - right and forward - back. In other words, we can move the angle grinder relative to the workpiece.
In another version, the grinder is fixed rigidly, and the workpiece moves, by analogy, left - right and forward - back. These are the main directions for milling. For milling along the up-down axes, it will not be difficult to supplement the device.
Having chosen the machine option, you can begin implementation. The only place, which will require the involvement of a turner - a cutter holder. It is machined from a hexagon of at least 16 mm, because the thread of the grinder is 14 mm. Collet type holder. It is easy to manufacture and does not have large runouts. A regular jaw chuck does a worse job.
The advantage of such a machine, like all machines based on an angle grinder, is that they can easily be transformed back into an angle grinder. As a type of milling cutter, you can make a drill from a grinder.
Pendulum saw + (Video)
It’s not difficult to make accessories for an angle grinder with your own hands. You don't even need drawings here. It is enough to know the principle that is embedded in a particular machine. A pendulum saw based on a grinder is no exception. This is the same cutting machine, but its weight is distributed almost in half.
It is somewhat similar to a children's swing. The frame is located on the movable bushing, and an angular Sander. The counterweight can be any weight in combination with a return spring.