A device for controlling a walk-behind tractor. Types of attachments for walk-behind tractors
The walk-behind tractor is indispensable on the farm and is equipped with various attachments: the machine can hill potatoes, remove snow or prepare firewood for the winter. At the same time, the list of units that are connected to the most expensive walk-behind tractor models is limited to 2-3 types of attachments.
In this article you will learn how to make attachments for a walk-behind tractor with my own hands and how to use it.
Did you know? The walk-behind tractor is a small-sized tractor, but it has the same parts as the tractor.
How to make a potato planter
Planting potatoes in several large gardens takes a lot of time and effort. Planting can be simplified if you use a potato planter, which you can make with your own hands and then attach to the walk-behind tractor.
It would be best to use a walk-behind tractor with low power. The potato planter will pave the planting furrow itself, throw potatoes into the holes and cover them with soil.
You will need the following parts to assemble this device:

- sprockets (there should be 32 teeth on the gear: both on the drive and on the driven)
- channel size eight.
There is also another scheme, but it is more complex in design and more interesting in terms of assembly. The main task of the device is to plant potatoes at the same distance and at the same depth.
This homemade equipment for a walk-behind tractor, it is used on pre-treated soil. In this case, the potatoes are planted evenly, and the result will be reflected in the potato harvest.
This unit is used as in a small garden, so and on a big field.
Important! The potato planter is suitable not only for potatoes, but also for other vegetables.
To create such equipment you will need drawings on paper. A frame is taken for the base, and all the components are attached to it. The frame is welded from channels and steel strips.
The arch is welded to the front of the side members, and the fork for the center link is welded. Fasteners are used for the lower link. The plates are attached as a support to the side of the frame.
Steel strips reinforce the frame. For the bunker you will need plywood 1.5 cm thick. Parts are cut out of it and fastened with corners. After this, the bunker is painted and covered with rubber on the inside. This prevents damage to the potatoes when planting.
 The resulting frame is attached to the ripper and the wheel axle. When the work is done, you need to weld the pins. The wheel axle is secured with steel clamps.
Steel sheets are used for the wheels. The shape of the wheels should be cylindrical in order to crush the soil less. Also, the wheels should have two hubs, and they should have one bearing. Spikes are placed on them to prevent the bearings from becoming dirty.
To avoid making wheels, You can buy wheels from another agricultural machine. A square rod is used for the ripper holder. Clips are welded from sheet steel to the ends of the rod, and cultivator tine stands are mounted inside.
Steel or cast iron pipe will be used in the form of a potato seeder. Its thickness must be at least 10 cm in diameter. A device is welded at the bottom of the pipe that will make grooves.
After adjusting the furrow cutter, you need to tighten the stepladders tightly.
Such a device is heavy, so before installing the equipment on the walk-behind tractor, you need to install a counterweight.
This will help the unit not to tip over from the potato planter.
The potato planter must be operated with four hands. One person sits down at the walk-behind tractor, the other at the potato planter. Potatoes are poured into the hopper. The walk-behind tractor should move at a speed of 1 km/h so that there is an optimal distance between the planted potato bushes. You don’t need to fill up the planted potatoes yourself.
The backfill discs we make will do this for you.
Did you know?After planting potatoes, traces remain on the field. You can remove them using paws; they are installed on the cultivator.
The first prototypes of the walk-behind tractor were created back in the 20th century.

The potato planter looks something like this:
DIY potato digger
Another homemade option for a do-it-yourself walk-behind tractor is a potato digger.
A potato digger makes the process of harvesting potatoes easier.
The ploughshare is the movable part of the potato digger, which is created using steel rods and several pointed steel plates.
 The sharp ends of the plowshare structure must be blunted to prevent damage to potato tubers. For a welded frame, you need a corner made of metal, the size of which should be 60 by 40 mm, as well as a profiled pipe and a section of channel No. 8. The dimensions must correspond to the dimensions of the walk-behind tractor. The editorial node is main detail potato diggers.
To create this unit, two metal cylinders are required. They act as glasses for connecting bushings. This ensures the interaction of the drive and driven shafts. Hubs are made from a metal pipe with a diameter of 25 mm, and transmission sprockets are welded to them. Bushings are attached to the sprockets using keys. The peeling drum is a complex part of the potato digger. The design of the equipment consists of a pair of roller chains of 94 links. They are put on the rods, and this part is attached to two axles, which are then fixed. This will ensure the mobility of the equipment during rotation.
By the force of the engine shaft, the potato digger share, which is attached to the movable casing, changes the angle of inclination as the walk-behind tractor moves. The angle of inclination is adjusted using a slider. It can be created from fluoroplastic.
Did you know? The parameters are selected in accordance with the characteristics of the main unit.
One of the first walk-behind tractors was issued to the Swedish citizen Konrad von Meyerburg in 1912 under the Siemens Bodenfräse brand.

A potato digger looks like this:
How to make additional cutters and plow yourself Some of the types of attachments for a walk-behind tractor are cutters and a plow,
you can create them with your own hands. The cutter allows you to process layers after plowing wetlands. A plow is used to plow the land. Milling cutters are used on soft and constantly cultivated soil. The plow is used in virgin lands. The cutters are safe to use due to their saber-shaped shape.
When the walk-behind tractor hits a root or stone, the cutters lift the equipment like a car wheel. If the cutters are straight, they cling to an obstacle, which can cause the walk-behind tractor to tip over. The knives are attached with plates to the base of the cutter. They are welded to the shafts under different angles
. This helps the cutters enter the ground smoothly. Carbon steel is used for knives. To create other parts, steel grades St-25, St-20 are used. They are easy to weld. You can also make soil cutters in the form of “ crow's feet Used when working with hard ground. They can be installed on any walk-behind tractor.
Crow's feet are used for plowing soil for potatoes.
The axis diameter for four-row cutters for a walk-behind tractor is 30 mm.
Making a reversible plow
 Before you start creating a plow with your own hands, you should consult a specialist, as difficulties may arise during the manufacturing process.
The simplest and most suitable design for beginners is the single-body plow. The top of the body has a curved feather, which allows you to process the overturned layer of earth. This unit is suitable for processing hard soil.
Important! Follow all instructions when creating the plow. The slightest inaccuracy will lead to negative manifestations while working with it.
To create a plow you will need steel 3-5 mm thick. First we make a ploughshare, which should be removable. The cutting part is beaten on an anvil and sharpened. The next thing to do is make an oval. For the workpiece, use a pipe with a diameter of 0.5 m. The walls should be 5 mm thick. Using gas welding, a workpiece is cut out according to a template, which is polished with a grinder. Having made two parts from steel 2-3 mm thick, they make the body of the plow, after which the entire device is assembled.
This plow is designed for crumbling and turning the topsoil. The plow is connected to the walk-behind tractor using a hitch. The unit must be adjusted so that the side edge of the field board is aligned with the wall of the furrow when working. The share must be horizontal. Device reversible plow allows you to roll off a layer of soil in one direction.
Did you know?
Do-it-yourself walk-behind tractor trailer
 The walk-behind tractor makes work easier when plowing soil, planting and harvesting crops, and can also carry more than 400 kg of cargo.
Any agricultural worker often has a need to transport crops, remove garbage, Construction Materials. Motoblocks and attachments for it, such as a trailer, will help with this.
We invite you to read the instructions for creating a trailer with your own hands.
To begin with, it is best to draw a detailed drawing. The equipment should be drawn from several sides, and the size or length should be marked on each part.
Important! A separate plan is required for a knot or hitch.
Now with this diagram we can visualize the scale of the work and make a list of materials and tools for creating a trailer.
Basic moments:
1. What are the main components that will connect the trailer (bolting or welding);
2. How the movements of rotating parts (bearing, hinge, axle) will be realized;
3. Need for a tipper;
4. Are parking stands needed?
 The dimensions of the cart for the walk-behind tractor depend on the load capacity. The standard dimensions of the body are as follows: length - 1.5 m, width - 1.15 cm, height - 28 cm. This cart can withstand 2.5 quintals.
Main trailer parts:
- welded frame with coupling device,
- driver's seat,
- frame,
- body,
- one or two axles with wheels.
Important! An old wheelbase can also be used as an axle.
The container for the body is made of iron sheets or boards. It would be best to reinforce the corners with metal corners. The upper edges are reinforced with a channel or strips of stainless steel. The body is attached to the frame using three wooden beams on the bolts screwed to it.

Since the cart will be mounted on a standard bracket, it is necessary to prepare the necessary console, for example, a hiller. The lower part of the console is the axis. The swivel unit is attached around it with two bearings. To avoid structural damage, the gap between the bearings is lubricated. The drawbar is driven into the hollow longitudinal hinge and secured with a locking ring.
After this, we secure the driver’s seat and install the wheels. You can also make a footrest for convenience.
Making a disc hiller for a walk-behind tractor with your own hands
The disc hiller ranks second in importance after the plow and winch. He cuts furrows for planting and fills them in planting material after planting. To manufacture this unit, you need to select the type of wings. The discs must be made of steel sheets 2 mm thick. They should have bent bottom edges.
Important! The disks must be symmetrical. In the case of asymmetrical disks, the design will deviate to the side and make work difficult.
To arrange the structure, you can use plowshares. They can be removed from a seeder that has served its useful life.
The elements can be connected by bolts or welding. The discs are connected using adjustable adapters. The main parts of the tool are: T-shaped leader, screw lanyards and stands. The turnbuckles are adjusted along the vertical axis of rotation of the disks. It is attached to the walk-behind tractor using a beam with wings.
 When manufacturing and assembling the unit, it is important to calculate the dimensional ratio and fastening design. There are two options for creating a disk hiller: with a fixed or variable wing width.
To facilitate work with the unit, it is important to provide for the arrangement of sliding bearings. During the process of assembling the structure, a hitch bracket without a beam is used to attach the unit to the walk-behind tractor, that is, the hiller leash is attached to the bracket using bolts. The stopper is inserted inside square pipe, and then pressed to the surface from the outside. The disc hiller is ready.
Did you know? In the 1920-1930s, the first walk-behind tractors appeared in other developed countries, such as Switzerland, England and America, but the peak of popularity came in the post-war period.
How to make a snow shovel, tuning a walk-behind tractor in winter
In winter, removing snow with a regular shovel takes a lot of time and effort, in this case you can use the walk-behind tractor engine.
Roofing iron is used to create the body of a snow shovel auger. To create the sidewalls, 10 mm thick plywood is used. The frame is welded from a metal corner. A 40 mm thick pipe is used to make the handle, and a 20 mm thick pipe is used to make the auger shaft. The through cut is used for fastening metal plate. Blade parameters – 120 by 270 mm. The shovel is designed to throw away snow when the shaft rotates.
 In this design, the snow is moved to the blade by a double-threaded auger. It is made from transport tape 10 mm thick. You can cut four rings from a one and a half meter tape. This can be done with a jigsaw. The diameter of the rings should be 28 cm.
Welded to the pipe metal corners perpendicular to the plates. To fit the shaft into the closed bearings, you need to make a couple of cuts at the ends and tap them. After this, the shaft diameter decreases. For the sprocket key, a groove is made on one side of this shaft.
Important! Bearings must be sealed, because Snow is not allowed to get into them.
The structure must be placed on skis. They can be made from wooden blocks and plastic covers attached to them. This will ensure better gliding on the snow.
The rotary chute is made of plastic sewer pipe not less than 160 mm in diameter. It should be fixed to the pipe smaller diameter. This is attached to the auger body. A piece of sewer pipe is attached to the gutter; it will direct the release of snow.
The diameter of the rotary chute must exceed the size of the auger blade. This does not delay the advance of the snow mass.
22
times already
helped
Attachments for walk-behind tractors have always been of particular interest to DIYers. The simple and at the same time universal design of the power unit of medium and heavy walk-behind tractors allows you to create several types of mounted implements. This means that all these relatively simple devices will make the walk-behind tractor a real competitor to the modern tractor.
Homemade attachments for walk-behind tractors
 For medium and high power walk-behind tractors today, suppliers and manufacturers offer a huge amount of attachments and accessories that provide mechanization of many operations. However, despite such attractive offers and ready-made options supply of kits, many owners prefer to make attachments for the walk-behind tractor with their own hands. And the reason is not that homemade ones are cheaper. Not at all, if we take the cost of materials, then this is absolutely not true. The problem lies elsewhere. Do-it-yourself tools for a walk-behind tractor are, for the most part, tools that are universally selected according to their quality parameters and meet the needs of a specific person.
This approach to the formation of a fleet of agricultural machinery makes it possible to take into account in the process of designing and assembling equipment all possible features of both the site and the owner himself.
The equipment being developed for the unit is conventionally divided into equipment:
- universal purpose;
- highly specialized focus;
- auxiliary equipment and devices to simplify the control of the walk-behind tractor.
TO universal means These include primarily adapters and various types of trailers, making them a universal transport platform both for transporting goods and as a convenient vehicle. Some models of walk-behind tractors are capable of reaching speeds of up to 25 km per hour. Although the comfort of a mini tractor is still far away here, you no longer have to walk.
Highly specialized types of equipment are most often designed to perform only 1 or a maximum of 2 operations. However, these are the tools that are most in demand in terms of consumer qualities for high-quality soil cultivation, performing operations to care for crops, harvesting feed, and even used in construction. In part, it should be noted that among homemade products special purpose prevail relatively simple types tools - plows, cutters, . This is something that can be done from scrap materials and using the simplest power tools. But more complex elements are manufactured using units from other equipment.
And, of course, what makes it easier to control is a counterweight on the walk-behind tractor, wheel weights and anti-slip chains - all this allows you to work with the unit all year round.
Homemade products for walk-behind tractor
 The question of where to start designing attachments for walk-behind tractors is quite reasonable. The fact is that almost all walk-behind tractors are equipped with factory-made trailers, designed for the use of standard types of equipment. It is necessary to clarify, however, that it is the standard equipment that does not satisfy the needs of customers - trailed systems turn out to be too delicate and fragile when used in harsh operating conditions.
For domestic walk-behind tractors, trailer hitches are mainly made of welded steel, but for mass-produced made in China it is basically cast iron, or an alloy of metals. It is clear that for one body plow even the most powerful cast iron adapter will not withstand.
Therefore, the first thing you need to create is a do-it-yourself plow towed to a walk-behind tractor. Here it is better to take as the basis of the design standard scheme- the adapter is a hinge with the ability to fix the plow in different positions, which is especially convenient for plowing small areas when using a plow with both a left and right blade.
This option will help you use it for plowing, hilling, and for installing a seat adapter for a mower or a rake for turning hay in haymaking.
Universal trailer for walk-behind tractor
 The presence of a trailer ensures mobility, because it’s one thing to drive a walk-behind tractor with already installed units, another when a plow, cutter, or is simply loaded onto a trailer and transported by the walk-behind tractor itself.
You need to calculate the parameters of trailed equipment for a walk-behind tractor based on its power, the principle here is simple - 1 liter. With. means the ability to transport 100 kg of payload on a trolley. The simplest and most reliable design is a single-axle trailer with a load on the central axle. And although the carrying capacity of such a trailer is small, only up to 500 kg, this is quite enough to install a seat on the trailer and operate a walk-behind tractor while sitting on the trailer.
 The most difficult thing here is to select the necessary components. Easiest to use finished parts. For example, a do-it-yourself hub for a walk-behind tractor is made from an automobile one, for passenger cars. This allows you to use standard car wheels and tires for the equipment of the unit. On the other hand, the hub from the VAZ classic is perfect for making other useful homemade products- lugs, winches, wheel weights.
For the trailer, a structure made of a rectangular pipe is mainly used, but a channel and an I-beam can be used as a frame base. It is better to provide removable sides for the trailer. It is preferable to immediately provide for the possibility of installing several types of sides on the platform:
- wooden or metal for transportation of bulk cargo;
- light, mesh for harvesting green mass for animals;
- folding, with the possibility of increasing the usable area for transporting hay.
But in order to move comfortably on the roads, it is worth making wings on the walk-behind tractor. If possible, immediately install mudguards on them. After all, not all roads have asphalt and hard surfaces.
Name a walk-behind tractor with a trailer vehicle According to the law, today it is impossible, but this does not mean that the trailer should not be equipped with light signaling devices.
Be sure to install at least 4 reflective elements on the trailer - 2 red at the back and 2 white at the front. This will help the car driver identify the cart in the dark.
Tillage tools - do-it-yourself plow and plow for a walk-behind tractor
 Before attaching a walk-behind tractor to tillage, you should decide what is more important and set priorities in terms of technology for cultivating the site. For large areas used for planting potatoes, root crops, grain crops the best option I would like a do-it-yourself plow for a walk-behind tractor. Make it simpler and easier. But for the beds under vegetable crops, for processing strips between the rows of the garden or final processing for planting, it is better to use a milling cutter. This will make further work much easier.
When the coupling to the walk-behind tractor is ready, the most difficult thing in making the plow is its shape. The body has a shape that is difficult to mold and therefore it is better to make a plow from several components. It is better to make a coulter for a walk-behind tractor with your own hands from steel. The large force that this element will experience should not lead to its deformation. Moreover, it is the coulter that is responsible for the depth of lowering of the plow.
 The plowshare should be made of the hardest possible metal. This is the part of the plow that cuts into the ground and cuts its layer. The strength and power of this element will allow you to work with the plow both in the conditions of cultivated arable land and to do preliminary processing of virgin soil. Despite the complexity of the blade design, it is quite simple to make. For a curved blade, it is better to take a ready-made round or oval-shaped workpiece. Make a dump out of it according to the drawing. Craftsmen usually use pipes for this big size from 350 mm in diameter or gas cylinders. This results in an almost ideal blade shape.
One of the questions on how to make a plow for a walk-behind tractor will be the production of a field board - a stabilizing element for the plow, which sets the direction of its movement when working on arable land.
A do-it-yourself plow for a walk-behind tractor, just like a plow, is assembled from several elements. True, to use a plow in soil cultivation, it is better to provide a blade made of reinforcement, so that during cultivation the soil is loosened as much as possible when the formation is turned. In the design of the plow, it is better to provide not a frontal blade, but a double-sided blade with reinforcing bars.
Do-it-yourself cutter for walk-behind tractor
 Attachments for a walk-behind tractor in the form of a soil cutter can be used mainly for light and medium-sized units. For heavy models with a separate power take-off mechanism and transmission of torque to trailed units for a walk-behind tractor, cutters with a chain drive will be optimal.
 The simplest cutters for loosening the soil can be four segmented reciprocating cutters. Structurally, such a cutter is a pipe on which reciprocating cutters are rigidly mounted. For medium and light units, the axle shafts for the walk-behind tractor are made collapsible. This way you can adjust the width and speed of tillage. If two segments are installed on each side of the gearbox, the processing speed is significantly higher. True, the width in this case will be small. For axle shafts consisting of two or even four elements, the working width can be increased to 1.5 meters.
Do-it-yourself attachments for walk-behind tractors are made from profile pipe. The profile is easier to install on the wheel gearbox. Yes, and connecting them when building up is much simpler and easier.
Simply insert them into each other and secure with pins. Do-it-yourself axle shafts for a walk-behind tractor are made from a square or hexagonal pipe with thick walls. For 1 set of cutters you will need:
- pipes for the axle housing with a wall thickness of 2.5-3 mm and a length of 50-80 cm;
- for connecting pipe segments of smaller diameter 50-60 cm long;
- 8 saber elements for the working body;
- clamps on the axle shafts - 4 pieces;
It is recommended to make the cutters themselves from a steel strip with a thickness of 5 mm or more. The most The best decision for the manufacture of cutters - the use of forged metal. In this case, the strength is higher and there is no need to sharpen the tool frequently. When developing the shape of a cutter for a walk-behind tractor with your own hands, it is recommended to use drawings of the most successful models - a saber cutter, a curved cutter, or a cutter with a triangular pointed element.
Disc cultivator for walk-behind tractor
 One of the most popular types of attachments for a walk-behind tractor during the summer plant care period is a cultivator. You can make a weeder for a walk-behind tractor with your own hands:
- following the example of a classic cultivator in the form of a trailed ripper;
- in the form of disk hillers used for processing root crops.
The processing technology involves passing a walk-behind tractor between two rows of crops or when using a multi-hull cultivator of three or even four rows.
 The hiller ripper can have several types of tools installed in one housing:
- ripper;
- two double-moldboard flat-cutting plows;
- 2 disc harrows for the formation of ridges;
- two disks for plant protection.
Do-it-yourself plant protection discs for walk-behind tractors are usually made of sheet steel. Depending on the purpose of the device to which they will be applied, their diameter is calculated. For cutters, the diameter is usually 5-7 cm smaller than the cutters, and for a cultivator they should be 30-35 cm in diameter. It’s just that when milling an area, the plants usually have a small height. But cultivation is carried out when the plants reach significant growth, and their breakdown at this stage can result in the death of the vegetable crop.
Medium-sized disks can also be universal, with a diameter of 20-25 cm. In this case, it is necessary to provide a universal type of fastening to each type of attachment.
Auxiliary equipment for walk-behind tractor
 Among the necessary improvements to the walk-behind tractor in the form of attachments, it is recommended to make, in addition to all of the above, the following elements:
- wheels with lugs for working on loose soil;
- lift;
- mounted bucket-blade for snow removal.
 For wheel designs used as movers for walk-behind tractors on arable land, wheels with rubber tires. Experience and ability to work with ready-made structures, for example, steel rims from car wheels, will tell you how to make wheels for a walk-behind tractor with lugs yourself.
To do this you need:
- 2 steel wheels from a car;
- corners 25x25 cm;
- electric welding;
- Bulgarian;
- tape measure and pencil.
The corner is cut into segments of 35-40 cm. The rims of the disk are marked into equal segments. It is best if there are 8 or 10 of them. Marks are made and corners are welded at the marks.
It is better to make a do-it-yourself lift for a walk-behind tractor from a piece of pipe with a diameter of 100 mm. The lift itself is made in the form of a roller on a bracket. If necessary, it changes its position and makes it possible to lift the walk-behind tractor onto a support. In its normal position, the lift shaft is located in front of the unit and is used as a support roller when overcoming ditches and ruts.
The ladle can be made:
- from sheet metal thickness 1.5-2 mm;
- hard plastic with a knife at the bottom made of a metal strip;
- from plywood 8-10 mm thick or OSB boards 10-12 mm.
 The bucket is rigidly fixed to the walk-behind tractor frame. To make work easier, you can make a rotating device to change the angle of inclination of the cutting plane to the road surface.
To make the bucket work for a long time, the support ski is carried in front on a bracket. This will make cleaning safer. The cutting surface will be at a certain height above the ground and will not touch the ground.
You can improve your home motorcycle equipment to suit your requirements without high costs. After all, you can assemble attachments for a walk-behind tractor yourself, doing everything yourself.
Work of a walk-behind tractor with attachments - video
Preface
There are a huge number of models and brands of attachments for walk-behind tractors, and you need to be well versed in the purpose of the devices in order to choose them correctly for work on the site.
A modern walk-behind tractor is very reminiscent of an ancient plow, only equipped with a powerful engine and therefore not requiring draft power in the form of a horse or ox. However, there is a more than significant difference in how exactly the motorized assistant can be used. We’ll talk about cultivating the land later; first, let’s look at individual attachments. Let's assume that the area has already been dug up and prepared for planting, now you need to choose, depending on the situation, which attachment for the walk-behind tractor you will need. If you are planting grains, you need a seeder, but if you plan to grow potatoes, a special planter with a hopper for root crops, a plow and a hiller is attached to the walk-behind tractor.
When the land needs watering, it is useful to use an attachment such as a walk-behind pump, with a capacity of 15 cubic meters per hour and a water supply height of 30 meters with a suction depth of up to 5 meters. But the need for water supply does not happen often, especially if there is heavy rainfall, after which everything grows, such as grass. And this is where you need a mower, a segment blade mower or a rotary mower, which can be installed both in front and behind the walk-behind tractor.
The plow was previously mentioned for good reason; it is this attachment that is considered the main one for preparing the soil for the upcoming sowing by plowing. But the use of this device should be determined by the large area of the allotment; for small areas it is enough to use cultivation with cutters, which are installed instead of wheels or hung as separate equipment for walk-behind tractors. They perform loosening, as well as. For greater efficiency, the walk-behind tractor can move on lugs, which provide contact with the soil better than conventional treads..
Separately installed cutters are convenient because the wheels give the walk-behind tractor smooth movement, and the blades rotating in the opposite direction easily sink into the ground without being pulled out of it on hard areas.
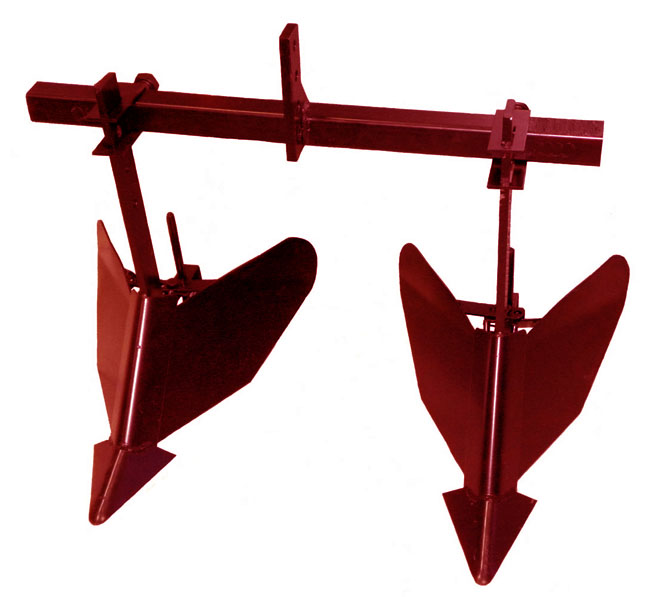
An important device is the harrow, the main purpose of which is to loosen the soil by breaking up large lumps, as well as removing dry plants and pulling out weed roots. Attachments of this type are rotary, disk and toothed. Very often, to form even rows of beds, hillers are needed, which are V-shaped plowshares that, when paired, easily rake the soil into a high furrow. There are also disk models, the paired rotating elements of which are installed at an angle of 45 degrees to the motion vector.
During the time of year, the area must be kept in order, which means that it is necessary to promptly remove fallen leaves and mown grass from the ground, sweep paths, and clear snow from them in the winter season. Once the mower mentioned above has completed its task, it is best to use a mounted rake, which is usually equipped with counterweights and a handle to control the lift.
It is more convenient to sweep leaves from the lawn and paths with a special rotary brush; the height of its rotation above the ground can be adjusted. Using the same attachment for walk-behind tractors, it is easy to deal with freshly fallen snow. If quite substantial snow masses have accumulated overnight, they can be dealt with by a rotary auger cleaner with a mounted “cannon” that shoots the snow crushed by teeth at a distance of up to 20 meters. If the snowdrifts are too large, a special blade is used, or, in other words, a bulldozer knife, which acts like a.
Now is the time to consider a device that provides maximum convenience in operation, namely, an adapter trailer with which any walk-behind tractor and accessories for them are compatible. In essence, it is a fairly long rod with an attached wheel pair, which is called a riding module. Above the axle connecting the wheels, there is a rigidly fixed seat for the operator, behind which there is a hitch for attachments. The front of the boom has footrests as well as a hitch control lever.
There is another similar narrow-purpose trailer; it is equipped with a body under which the axle of the wheel pair passes, and the seat is installed on the front side. The hitch bar has footrests, a brake lever, and often controls the body, which can be manually tipped or tipper. The weight of transported cargo rarely exceeds 500 kilograms. At the same time, a walk-behind tractor with such a trailer does not reach a speed of more than 10 kilometers per hour.
To expand the capabilities of the walk-behind tractor, it is supplemented with attachments. For all models, manufacturers offer a wide selection of plows, hillers, potato planters and potato diggers.
Considering the cost of industrial attachments for a walk-behind tractor, some of it can be made with your own hands.
1 Additions to walk-behind tractors
The most labor-intensive process on earth is plowing, which is why they are sold together with a rototiller and a plow. Sometimes their equipment includes devices for weeding and hilling. For heavy walk-behind tractors, the kit often includes a plow, a potato planter and potato digger, and a rotary mower.
2 From motor cultivators to mini-tractors
Front adapter for walk-behind tractor makes it easier to work on site and significantly improve productivity. Even with the simplest adapter (with a steering wheel, wheels, and an operator’s seat), diesel walk-behind tractors turn into real mini-tractors. From experience, with the adapter it speeds up at least twice.
2.1 DIY front adapter for walk-behind tractor
You can make an adapter similar to the industrial one yourself. When designing your first homemade adapter, it is advisable to start with simple designs. For example, from a device based on metal pipe approximately 1.5-1.8 m long and pair of wheels. On one side of the pipe it is necessary to weld a transverse rod, and to it - the wheel stands.

To make an adapter for a front-type walk-behind tractor, the wheels of a car trailer, motorcycle strollers, etc. old technology, construction wheels or . The pipe cross-section and diameter depend on the power of the diesel walk-behind tractors used.
The length of the cross member is selected depending on the required track width. For most types of work, 50-60 cm is enough. At the top center of the crossbar there will be an operator’s seat post and a brake lever. It is supposed to be welded at the second end of the pipe. The hitch is a rod with a welded tee, not fully inserted into the pipe and clamped with a bolt.
Aerobatics is to make a design with steering control.
For this purpose, you can use a steering rack with tie rods, for example, from a car or truck. There are also which include steering with traction.
The column is fixed to the frame in front of the adapter. A downward-pointing lever is welded or bolted near the hitch, and a steering rod is attached to it. The do-it-yourself attachment to the walk-behind tractor with steering control is ready. When the steering wheel rotates, the rod will turn the walk-behind tractor.
The design of both attachments and homemade adapters for walk-behind tractors is not complicated. If you have a workshop and parts from unnecessary equipment, it is quite possible to improve the motorcycle assistant yourself. The upgrade will increase the speed and quality of work and make the process more comfortable.
The design and structure of any walk-behind tractor implies the mandatory use of attachments. And since modern engine blocks have heavy and high-torque motors with power take-off systems, it is not surprising that manufacturers of power tools create more and more interesting attachments and attachments for walk-behind tractors every season.
What an Attachable Tool Kit Can Do
The universal nature of the walk-behind tractor design means that additional working tools and equipment are used exclusively as attachments for the walk-behind tractor. During operation, it can be easily removed and replaced, without interfering with the design of the walk-behind tractor.

The vast majority of attachments for walk-behind tractors are developed and produced primarily for cultivating soil and growing vegetable and grain crops on small areas personal plots. Therefore, all attachments can be classified into three categories:

Important! Thanks to high degree unification of the design of the main unit with the motor, owners different models walk-behind tractors can partially adapt attachments and attachments for “foreign” models to their units. Especially when it comes to “Soviet” models.

Typical attachment options for walk-behind tractors
Manufacturers of equipment for walk-behind tractors have divided the entire range of attachments into two groups:

The simplest attachments and attachments for a walk-behind tractor
Such devices include a number of plows, milling cutters, and hillers for universal purposes.
Most of them are single-row, but for heavy models of walk-behind tractors, multi-row ones can also be used, most often these are cutters and cultivators.

For each walk-behind tractor model, the manufacturer produces a whole range of extensions and attachments that can increase the wheelbase and increase the stability of hitches for installing a plow or knife hiller. In some cases, using hitches, you can attach small harrows or rakes to the walk-behind tractor, the use of which can significantly increase the efficiency of working with mown plants and their remains in the ground.

A mandatory tool is lugs installed on walk-behind tractors for heavy work - plowing or milling the soil. To work on particularly difficult areas, you can use additional reinforced lugs with hanging loads.

The second most popular after the plow are cutters for cultivating land. Usually they use double ones, but if desired, you can supply tools with an increased number of knives.

Attachments for salute walk-behind tractor
Currently listed additional devices For walk-behind tractors, the most popular are relatively new models - seeders, potato planters, harvesting devices and snow removal tools. Nozzles and mechanized units for planting seeds allow sowing to be carried out at the most optimal time, when the deadline is days or even hours.
For example, additional devices for sowing small seeds and grain crops. The design of the attachment is very similar to that used for full tractor-mounted seed drills.
Potato planters KS-1, with a weight of just over 40 kg, allow approximately 100-120 kg of seed potatoes to be planted in a prepared furrow in an hour to an hour and a half. The seed is loaded into the hopper and driven by the planter's chain drive to be placed into the soil at precisely measured intervals. It is clear that before operating the attachment, it is necessary to cultivate and cut furrows in the ground.
No less interesting is the equipment for digging and harvesting potatoes. You can simply dig the tubers out of the ground with a special type of plow, but it is better to use more universal option attachments that help even partially harvest the crop.

It is worth mentioning a separate category of attachments used for mowing green mass. For example, a rotary mower for Salyut with a chain drive cutting tool allows you to mow the grass many times faster than when using self-propelled lawn mower. The hinged design of the GPM-1 rake allows special effort remove cut hay.

A disc hiller or flat cutter is perfect for hilling and cultivating row spacing.

In addition to cultivating the land and harvesting crops, you can use special attachments for Salyut, designed for watering and spraying shrubs and trees. This is a water pump capable of creating pressure up to 5 atm.

Snow removal attachments
Experience working with walk-behind tractors has shown that, when properly equipped with attachments, a walk-behind tractor works perfectly as a snow blower. One of the most good options a mounted snow blower can be called a mounted kit SMB-1.
With the help of a rotary blade and ejector, the snow blower is able to remove road surface compacted snow up to 200 mm thick, and the entire mass of snow is thrown onto the side of the road at a distance of up to five meters. An alternative to using such equipment may be using a tractor or working with a shovel.

To clear wet snow, you can use a mounted plow blade. A blade one meter wide makes it possible to lift and remove heavy snow saturated with water and ice up to 30 cm thick. At the same time, the installed equipment includes an additional handle that allows you to change the direction of the cut. If desired, and if you have a sufficiently powerful engine, you can even cut it with a walk-behind tractor. top part turf on sandy soil. Essentially, a blade shovel and adapter can turn a walk-behind tractor into a miniature bulldozer
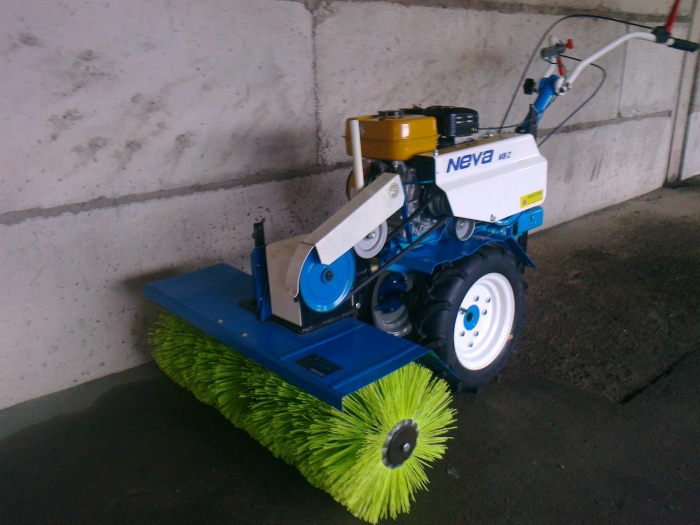
The final final sweeping of the canvas can be done using a snow blower based on a rotary broom. This attachment will not only remove dirt and stone from road surface, but also capable of removing ice and compressed frozen snow up to 10 mm thick.
Transport attachments
A walk-behind tractor with a sufficiently strong motor can be easily converted into a small cargo vehicle capable of carrying from 100 to 400 kg of cargo. This will require special type mounted hitch and single-axle trailer.

The average speed on rough terrain is up to 10 km/h, on the road you can move up to 15-18 km/h. Most of the inconveniences associated with the use of such equipment are due to the fact that the transmission gear ratios do not combine well with the optimal speed and speed of the walk-behind tractor. Considering the lack of full-fledged control and braking controls on the walk-behind tractor, in order to control the unit on a hitch with an overloaded trailer, quite serious experience and skill in driving such motor-units is required.
If desired, using an additional attachment adapter, you can turn the walk-behind tractor into a microtractor that is quite maneuverable and powerful. By adding grass cutting equipment to it, you can get a full-fledged motorized lawn mower.

Quite a lot interesting specimens attachments for the walk-behind tractor were created by the hands of enthusiasts, for example, a tracked transporter. Or a system for spraying and chemical plant protection. Most of these models are subsequently copied quite successfully and used to develop industrial equipment designs.

Conclusion
Additional units and accessories turn walk-behind tractors into full-fledged agricultural machines. They cost a lot, but when used correctly they reduce physical activity by an order of magnitude, while the quality of work remains consistently high. In some cases, such as snow removal, there is practically no alternative to using a walk-behind tractor with an installed snow blower. The market for these types of products continues to grow rapidly.