How to make a plastic threshold for a balcony. How and with what materials to decorate the threshold of a balcony door with your own hands How to sheathe a balcony threshold
A balcony threshold connects the main room, bedroom or kitchen to the balcony. The main problem with these spaces is that the transition between them is uneven. Therefore, you should take care to do it correctly for your own convenience.
photos
Advantages and disadvantages
Before deciding how to properly make a threshold for a balcony, you need to familiarize yourself with all its features. First of all, a correctly arranged exit to the balcony makes the room more beautiful. In addition, the threshold in front of the door to the loggia will serve as additional protection against cold air entering the room. In the same time balcony threshold will make the transition between two rooms much safer.
Its disadvantages include the possibility of its deflection, but this is true if it is made of plastic. But this only happens if it is installed incorrectly.


Kinds
The balcony threshold can be made from different materials. The main thing is that they can fit into the overall interior of the entire room.
Laminate
This material is an alternative to many expensive types of wood. However, its service life is not as long as theirs. To extend it a little, the threshold Be sure to always keep it dry. In addition, all joints must be treated with sealant.
The option with a laminate threshold is best suited for glazed balconies that are heated.


Tile
If you make a threshold between rooms from ceramic tiles, then you won’t have to change it for a very long time. After all, such material is considered to be of quite high quality and easy to care for. Besides, you can use tiles. It is thinner and lighter than the previous material, and its price is much lower.
The disadvantages include the fact that a threshold made from such material will be slippery.


Plastic
Another popular material today is plastic. It is very easy to install. But there is also a drawback - the material is short-lived. But during all this time it pleases with the fact that it retains heat perfectly. In addition, using a plastic coating, you can hide all the shortcomings of this transition.
An advantage for housewives is that the plastic can be washed well and without any problems.

Cement mortar
Another type of material that is perfect as a threshold for a balcony is a mortar made of high-quality cement. It hardens quite quickly, and after that it can be repainted in the most suitable shade, or finished with tiles.
Among the advantages, it is worth noting its durability, and the disadvantages include the rapid fading of paint.


Brick
Most often, such material is used where the distance from the door to the floor is quite large. Using a brick you can hide this small gap. If desired, it can be decorated in some way later.

Finish options
To know how to make your balcony threshold beautiful, it’s worth considering possible options finishing in more detail.
Using a brick
First you need to start preparing the floor. It is necessary to remove all the old and excess coating, then clean everything well. Only then can a layer be applied starting putty to make the surface rough.
In addition, you can add a small amount of gypsum mixture, which will significantly improve the application of the solution.

First you need to lay a layer of cement, and then 1 row of brick. It is imperative to take into account that when the tiles are laid on top, a small gap must be left between the balcony door and the brick. After this, you can begin laying the next row of bricks. For leveling you should use a building level. On last layer


brick, you need to apply putty, and when it dries, you can start laying the selected tile.
Threshold based on cement mortar In the case where the height of the transition between the loggia and the adjacent room is very small, you can use high-quality cement mortar
. In addition, the whole process will not take too much time, especially if all the materials are prepared in advance. First of all, you need to clear everything of old material and clean the surface well.
After this, you need to make formwork from wood, the height and width of which must fully correspond to the dimensions of the threshold. Next, you can start mixing the solution; You can use a special construction mixer for this. When the mixture is completely ready, it can be poured into the prepared space and smoothed out well. When the poured solution has set, after about half an hour, you can dismantle the constructed structure. All uneven seams must be treated with sanding plaster.


You can decorate the threshold with tiles or simply paint it.
You can decorate the threshold using plastic. This option is especially good if there is a metal-plastic door leading to the balcony, moreover, in the color of the threshold.
To make a plastic threshold, first you need to clear everything of debris. After this, you need to take measurements and cut a piece of plastic of the required size. Then you need to apply a layer of glue to the old step and attach the threshold. Additionally, it is necessary to install special screws into the wall. Next, everything needs to be filled with construction foam. But we must also take into account the fact that it will double, and use it with this in mind.


. After the foam has set well, you need to check how securely everything turned out. Excess foam must be trimmed using a special knife. The corners can also be further decorated. To do this, you should buy special corners at a hardware store.
Wooden threshold
First you need to make a frame from a wooden beam according to the size of the threshold. All sizes can be adjusted on site. To make the case more durable, it must be strengthened not only with self-tapping screws, but also with metal plates. Holes must be made in the corners so that the prepared threshold can be firmly secured. When the structure is completely installed, you can close it using chipboard. To do this, you need to cut a piece of the required size from the sheet and secure it with self-tapping screws. As a result, the finished threshold


It is recommended to varnish.
Threshold from the window sill Very often, to transition to a balcony or loggia, they make a design from a plastic window sill. To do this, you need to install support blocks made of wooden beams . In this case, the tree must first be treated with a special antiseptic. After this, you can install the plastic step. If there are any gaps left, they must be sealed using polyurethane foam or.
silicone sealant

The ends of the threshold must be closed using special plugs.
Using tiles This is another suitable option for.modern apartments It is best to lay the tiles on the finished threshold.
A layer of special glue must be applied to a flat surface. This can be done using a notched trowel. In this case, it is imperative to ensure that all seams are identical and even. For control measurements, you can use a building level. In addition to the threshold, you can also tile the wall above it.
When the glue has completely hardened, all excess must be removed and the seams sealed with a fugue. This will make the threshold more beautiful.
When choosing a tile for yourself, you need to choose one so that it is impossible to slip on it.


Using laminate
Great alternative wooden coverings will become laminate products. Most often, one laminate strip is enough to finish the steps. After all, their width can be easily adjusted. You can cut the desired piece of this material using a hacksaw with fine teeth. If possible, you can also use a jigsaw. The cut piece needs to be checked again and then glue needs to be applied to it. It is best to use liquid nails.
After this, the laminate must be pressed tightly to the surface of the step. When the glue dries, you can attach a corner of the desired width.

Using linoleum
First you need to take measurements and then cut out the desired piece of linoleum. After this, its entire base must be coated with special glue and pressed well to the step. At the end you need to attach a metal corner, which can prevent any damage to the linoleum at the joints.

Beautiful examples
Let's consider several options for a beautiful threshold to the balcony.
The threshold on the balcony is an integral element of the interior of the room adjacent to the balcony. If the appearance of this element leaves much to be desired, then what beautiful room adjacent to the balcony or loggia was not old or a poorly finished threshold will be conspicuous and spoil the integrity of the picture. And if it still blows, then installation or replacement is simply necessary.
In this article we will look at how to make, replace and finish a threshold on a balcony step by step without the involvement of specialists, since this type of work does not require additional skills there is an opportunity to save.
The first step is to make the base. There are two options for creating a base for the threshold: from brick or from cement-sand mortar. If you already have a level base suitable in height, then you can skip this step and immediately proceed to finishing.
Note!
The height of the base of the threshold is made taking into account the fact that a layer of finishing material will be laid on top. The point is that the finished balcony threshold does not interfere with the opening and closing of the balcony door.
Instructions for creating a brick base:
The brick base is made when there is a large difference between the balcony frame and the floor (not less than the height of the brick).


After all these steps, the threshold will be smooth and you can proceed to finishing.
Instructions for creating a base from cement-sand mortar:
This method is suitable if the height of the base of the future threshold is less than the height of the brick.

The base is ready. Now you can start cladding with any material you like.
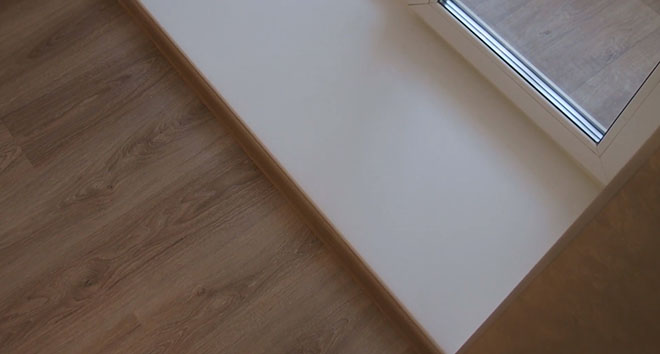
Threshold made of plastic window sill

A plastic threshold on a balcony is considered the most practical, inexpensive and versatile option. It looks most aesthetically pleasing if the whole thing is made of plastic.
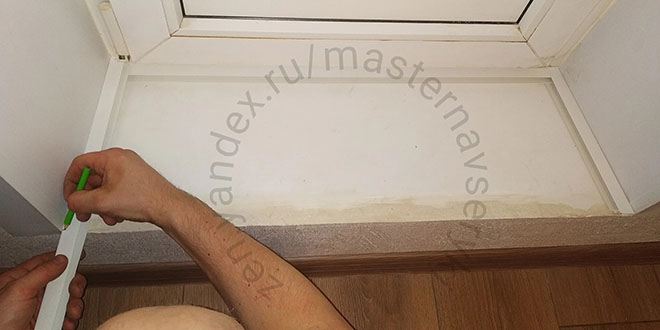
Instructions for installing a plastic threshold from a window sill:
- The surface under the threshold is cleaned of dust, debris and primed. If there is an old threshold, it must be dismantled.
- Next, you need to lay out the beams on the base of the threshold. We do not recommend installing the threshold only on polyurethane foam - it is unreliable. The threshold will be laid on the bars. The size of the bars must be selected in such a way that the finished threshold does not interfere with the opening and closing of the balcony door.

- The next step is to cut the plastic window sill to the size of the threshold.

- Next, we place the threshold and check whether everything fits and check the evenness of the surface with a level. If necessary, we trim the threshold. If the threshold is suitable, but the surface is not flat, it is necessary to install it under the support bars. Substrates can be any available materials (for example: pieces of drywall or plastic).

- After the threshold is adjusted to the level, we proceed to applying polyurethane foam. Carefully remove the threshold and apply an even layer of polyurethane foam between the bars, and liquid nails can be applied to the bars themselves.

- Next, carefully glue the threshold. It should be noted that foam tends to expand, so after installing the threshold it is necessary to place a weight on its surface.


- The threshold from the plastic window sill is ready.
Tile threshold

The tile is durable, beautiful and practical option. A variety of sizes, textures, colors and patterns makes it possible to choose tiles to suit any design and interior.
Instructions for finishing the balcony door threshold:
You should not choose tiles with a glossy surface as they are slippery.

In addition to the text version of the instructions, we recommend that you read the instructions in video format, where the installation is shown in more detail with an explanation of the nuances.
Laminate threshold
How to make it yourself - instructions:
- The first step is to putty the threshold.
- Measurements are taken and the necessary laminate elements are cut out. In most cases, one strip may be enough, since laminate comes in different widths and it is possible to choose optimal solution. When cutting the material, use a wood saw with fine teeth, a hacksaw for metal or a jigsaw.


- For beautiful design Starting guides are used for joints between the wall and the laminate. We cut them to size and fix them around the perimeter.
- Apply silicone sealant or liquid nails to the base of the threshold and glue the laminate.

- The final stage is cutting to size and installing a decorative corner.

Linoleum threshold

To cover the threshold, it is necessary to prepare the surface, outline the contours, measure the length, width and height. Then cut the tiles into pieces required sizes. Cut the tiles using a special machine.
After this, proceed to the implementation of formwork, which will require wooden blocks. Next, prepare a cement-sand mortar (in a ratio of 1:3), pour it into the formwork and lay tiles on top. Allow at least 24 hours for the solution to harden. After this, remove the formwork and grout the seams. You cannot step on the finished threshold for 2 days; the structure must gain strength.
We make a threshold for the balcony from laminate or install a plastic one
Nowadays, the balcony is no longer exclusively an auxiliary room in the house. It can serve as a bedroom, guest room or kitchen. Therefore, renovations in this part of the apartment should be carried out conscientiously, using modern technologies and materials. When you are arranging a loggia, an important stage of work is laying the floor and decorating the threshold.
Some owners of apartments with balconies even dismantle this step between the room and the auxiliary space, mistakenly believing that it is not needed. However, the balcony threshold fulfills several useful functions. Firstly, it makes the balcony structure more durable. Secondly, it keeps the room warm. When the door to the loggia is located in line with the floor, cold air easily penetrates into the room. Protect this area from low temperatures it won't be easy. Hence, best option- raise the door a little. Thus, the threshold acts as a heat-insulating element.
How to install a threshold on a balcony
Let's remember plastic - this is an inexpensive and versatile material from which you can make a threshold. If the step is not high, then you can make it out of plastic. This threshold looks especially good if you have installed a new metal-plastic door white.
The advantage of this material is its speed; you can complete the task in a couple of hours. But there are also disadvantages - fragility, so in a year you will have to return to this issue again and think carefully about what material to make the balcony threshold from this time.
Making a plastic threshold:
- you need to install guides into the wall - self-tapping screws will do;
- You need to attach a plastic threshold to the fasteners - this is just a fitting for now;
- will be needed construction foam, just try not to blow out the foam too much, taking into account the fact that it doubles in volume;
- immediately set the threshold and press firmly;
- We fix the threshold using self-tapping screws. There are 2 methods – open (the fastening element will be visible) and closed;
- Once the foam has set, you can check your work. Just be prepared for the fact that a plastic threshold will not last long.
Removing the threshold
Sometimes there is a need to combine a loggia with an adjacent room. In this case, the threshold is removed. In panel houses this can lead to damage load-bearing wall, therefore, it is better to coordinate such redevelopment with the relevant organization.

Removing the balcony threshold
In the case where the threshold is not very high, the floor level on the loggia can be raised. This is especially convenient if additional thermal insulation or installation of a “warm floor” system is required. First, make a screed using cement mortar and level the surface. Remember that before this the floor is well cleared of debris. In this way we obtain a flat floor surface without elevation.
Before you begin dismantling the balcony threshold, you need to pull out the doors and disassemble the balcony frame. When the threshold is removed, the block is placed in its original place, but its lower part is no longer needed - instead, a wooden strip or a special metal plate is installed.
However, it is necessary to take into account some nuances of dismantling the threshold on the loggia. The folding mode for opening the balcony door will no longer work. The tightness of the joint between the door and the floor surface may weaken. It is necessary to carry out high-quality insulation of the balcony door. If your balcony is located on the ground floor of the house, it is better not to remove the threshold. Wooden step on the balcony you can dismantle it yourself, but it is recommended to entrust the dismantling of the concrete threshold to professionals.
Door thresholds become a kind of barrier to cold air and drafts, protecting the room from dampness. They also perform a soundproofing function. A step at the entrance to a loggia or balcony is by no means a useful element that connects a room with an external extension. Therefore, you should take a responsible approach to the issue of installing and finishing the balcony threshold. If the renovation work is carried out taking into account all the requirements, your apartment with a balcony will become even cozier and more comfortable.
High threshold Installation process floor tiles at the entrance to the balcony Threshold with tile trim Threshold made of laminate Appearance of a plastic threshold Door threshold on the loggia Dismantling the balcony threshold Decorating the threshold on the balcony
Interesting on the topic
Simple and affordable cast-in-place construction made from cement mortar
Cement-sand mortar at the base of the balcony threshold is the simplest and most affordable solution. The arrangement will require some work to prepare the space in front of the door.
If initially the balcony door does not have a threshold (see photo), then you need to clear the space between the slopes from the walls to the door frame of the old floor covering. The base under the threshold must be free of dust and dirt, and must be repeatedly primed for optimal bonding. 
The formwork is installed on the prepared base with a dried primer. A wooden board up to 3 cm thick will be enough. The solution is prepared in a standard proportion of cement and sand (1:3). Liquid glass added to the solution will increase the water-repellent properties of the threshold.
The cement-sand structure requires time to dry - at least 5 days. Only after this period is the external formwork removed and completed
finishing the balcony door threshold with materials suitable for the overall interior, for example, stone, tiles, laminate or carpet.
French glazing of a balcony with a sliding door structure will require the installation of a pouring threshold in several stages. At the initial stage, only half of the mixture is poured, on top of which a metal mesh is laid, tying the sheets together with wire. Only after this the rest of the solution is used to fill the threshold of the required height.
The height of the sill is adjustable depending on the performance requirements.
Functional purpose
A properly designed threshold performs several tasks:
- strengthens the window structure, sometimes providing it with additional strength (it is not advisable to remove it when it is present);
- protects the room from rainwater;
- provides thermal insulation;
- facilitates exit from the room to the loggia;
- provides convenience;
- aesthetically connects the floor coverings of the balcony and the room.
When Entrance door installed at floor level, then cold air will easily enter the room. The threshold will serve as an obstacle and keep the heat in the room.
If the doors are located a little higher (the floor levels of the balcony and the room do not coincide), then the difference can be easily and neatly decorated with a threshold
This is especially important if additional insulation was carried out or finishing was done with any materials.
Do not worry that the threshold or doorway will create difficulties when moving. If there are children in the family or elderly people live, then the step should be made as low as possible. Usually the correct solution is not to remove the threshold, but to correct and finish it.
Flood threshold
The easiest thing to install is a threshold filled with cement-sand mortar. To arrange it, it is necessary to clear the space in front of the balcony door from the floor covering, if any, remove the laminate or parquet boards so that the space between the slopes and from the level of the wall to the door frame can be filled with mortar. The base on which the threshold will be installed should be cleaned of construction dust, primed twice with an acrylic or silicate primer, which will completely bind the remaining dust and will not allow the filled threshold to peel off from the base in the future.

After the primer has dried, it will be necessary to arrange the formwork. IN in this case One board, 2.54 cm thick and the appropriate width, screwed or pressed with heavy objects flush with the wall in which the balcony door is installed, will be enough. The solution is prepared from a mixture of construction sand and cement grade 200-400. The proportion is standard: 1 part cement / 3 parts sand. To increase the speed of setting and give the threshold additional moisture-repellent properties, you can add liquid glass to the solution.
The threshold can be made of any height, but if it is high enough, you can use expanded clay gravel or broken red brick as a filler, which is laid in one layer in the resulting niche and filled with mortar on top.

After the solution has set, it is allowed to gain strength, that is, the use of such a threshold should begin no earlier than 5-7 days after pouring. When the solution has completely set, the outer formwork is removed, and the threshold itself can be finished with laminate or linoleum, or lined with ceramic tiles or decorative stone.
If the door is wide, more than 80 cm, or the balcony door design is sliding (French doors), then the threshold should be filled in two stages.
First, pour half the thickness of the mixture, then lay a masonry mesh (metal) on it, tying the individual sheets together with steel wire, and then pour the threshold to the required height.
Laminate threshold
Compared to a wooden threshold, laminate is a more profitable option. And since laminate flooring is quite popular, this will be the type of threshold good decision without damage to the interior. The best option, if you wanted to completely change the flooring and immediately make a threshold.

Balcony threshold made of laminate
To create a laminate threshold you will need:
- wooden blocks;
- saw;
- tape measure and pencil;
- hammer;
- wedges;
- liquid Nails;
- corner for decorating the edge of the threshold;
- laminate.
Before starting the main work, you need to clear the work surface of various debris and, if possible, eliminate any unevenness. As with creating a wooden threshold, you need to make a frame. Once the structure is ready and secured, you can begin laying the laminate. It is recommended to fasten this material with liquid nails, and coat the joints with a gyro-insulating compound. This will prevent moisture from penetrating into the structure. After installing the laminate, a decorative plinth is attached to the edge of the threshold. The threshold is ready.
The choice of material for the threshold depends on height differences, availability of funds, appearance. If you have an idea about dismantling a concrete rise, you should first contact specialists. Perhaps in this case it is unacceptable to dismantle the original threshold. In the case of old wooden structures, you can safely dismantle them yourself.
Metal profile threshold
In some cases, when we're talking about When arranging a door threshold of a complex (non-rectilinear) shape, it is necessary to use a metal profile used for installing plasterboard and waterproof plasterboard with a thickness of at least 10 mm. No preparation of the base is required, except for cleaning it from excess construction debris and dust.

According to the pattern, or markings on the floor, a metal profile is mounted to the base, screwed to the concrete base with dowel screws or anchors, then the vertical racks the required height, fastened to the profile using fastening units and metal screws, and then an upper horizontal contour, symmetrical to the lower one. It should be taken into account that the threshold will be under constant load, therefore the number of fasteners and the frequency of their location when arranging the threshold should be increased by at least 3 times, compared with the recommended frequency of their use when facing plasterboard walls or ceilings.

For additional thermal insulation, the space between the concrete base and the upper plasterboard panel of the threshold is filled with mineral wool or filled with expanded clay gravel. If the threshold being installed has curved lines, the facing of the end surfaces should be made of ordinary (non-moisture-resistant) plasterboard 5 mm thick, previously soaked in water, to give it flexibility. After installation, the end part of the threshold should be puttied with oil-adhesive putty to impart water-repellent properties.
Other types of materials
To finish the threshold on the balcony door, you can use other materials:
- Natural wood. Eco-friendly, holds heat well. Looks appropriate in interiors made in eco or country styles. Working with it requires certain skills and abilities. The main disadvantage is the high cost.
- Laminate. It is a cheaper analogue of wood, but has good aesthetic and thermal insulation properties.
- Linoleum. One of the most inexpensive and easiest to work materials.
- Cork. An environmentally friendly material that gives originality and exclusivity to the interior. Has excellent thermal insulation properties. The main disadvantage is softness and instability to damage.
So, it’s not difficult to give a finished look to a balcony door. Carefully consider the design solution, and then carry out the work correctly - as a result, the room with a balcony will become even more cozy and comfortable.
Purpose of the balcony threshold
Not every resident of an apartment building fully understands why this strange “step” between the balcony and the room adjacent to it is needed. She actually has several appointments.
- Strengthens the entire balcony structure. If there is already a threshold, you can only correct it if desired, but under no circumstances remove it.
- They provide additional thermal insulation, since polyurethane foam alone is usually not enough to keep the room warm, especially if the balcony is not glazed or insulated.
For reference!
If balcony door installed at the same level as the floor, cold air can be blown into the apartment through the gap, and it will be extremely difficult to insulate such an area. Therefore, heat can be preserved if you raise the door a little and build a transition.
- Eliminate heat loss through foam areas where cold bridges can form.
- Protects against moisture caused by external factors. Rainwater that gets onto an unglazed balcony can flow into the room through the cracks, and the threshold can prevent this.
- They provide a smooth transition, which reduces the likelihood of tripping over the threshold structure and makes the transition through the balcony door more comfortable.
- They add aesthetics to the doors to the loggia or balcony and increase their visual appeal.
Setting a threshold has many nuances. Accordingly, how to make a threshold on a balcony correctly is a rather important task. Transitions may differ in size, height, material and shape. They are most often rectangular because they are easier to install and use.
Old and reliable tree
 Wood can be used both for high threshold heights and for low ones; the difference will only be in the material consumption. Such designs are also often found in apartments, like all previous options.
Wood has many advantages over other materials, among which are the following: wood is easy to work with; the material does not allow cold to pass through, especially if such a threshold is additionally insulated with mineral wool; tree is natural material, and therefore environmentally friendly.
For work you may need: wooden blocks (their height and width must correspond to the dimensions of the future structure); a sheet of chipboard (it will act as the top of the threshold, such material is quite durable and can withstand heavy loads); carpentry tools (hammer, hacksaw); an ordinary household drill (you can take an impact drill, it will be more convenient and faster); dowels, corners (to strengthen the structure), screws.
First you need to make a frame, which will be a frame of bars according to the size of the threshold. You can adjust the size using a hacksaw. The bars themselves are fastened with self-tapping screws, the corners need to be reinforced with metal corners.
You also need to make holes in each corner through which the frame will be attached to the floor. Once the frame is sized, lay it in place.
Use a pencil to mark its location. Then, using a drill, you need to make holes on the floor for the dowels. The next step is to attach the frame to the floor.
Once everything is securely fastened, you can begin installing the chipboard sheet. Mark it according to the size of the threshold and saw off the excess. Then secure the sheet to the frame using self-tapping screws. The threshold is almost ready, all that remains is to refine it and give it a beautiful appearance.
As you can see, making a threshold for a balcony yourself is not a difficult task. You can use any of listed options, it all depends on the distance between door slat and the floor in the room, as well as your preferences.
All work will take no more than one working day, but as a result your balcony will have a finished look.
 The threshold to the balcony is a very important and necessary thing, which most owners forget about.
If there is no threshold, then there will be constant air blowing from under the door leading to the balcony or even a glassed-in loggia, which means that the room will be cold in winter. You can correct the situation if you install the balcony threshold yourself.
Before starting work, you need to familiarize yourself with the design of the thresholds and select the appropriate material
Pay attention to the threshold in your home; if you see that the step to the balcony is high enough, then this is even good.
Thus, during the construction of the house, the balcony structure was strengthened. There is no need to demolish such a threshold, it is even dangerous, but everyone can fix the situation and make it attractive.
It also happens that the apartment does not have a threshold to the balcony, then you can make it yourself. You should not give up this small but very necessary attribute.
Using bricks
 Brick is used where the distance from the plank door frame the floor to the room is quite large.
Using cement mortar in this case can be quite expensive, but brick can easily eliminate these discrepancies.
Initially, you need to prepare the floor surface. Remove all uneven surfaces and old coating, then apply putty.
It is better to take one that, after drying, leaves a very rough surface, so the bricks will stick better.
The next step is to prepare a mixture of cement and sand. They are taken in a ratio of one to three, respectively. For better adhesion, you can add a little gypsum mixture. Then we begin laying the bricks.
The first layer must be made of cement mortar, and the first row of bricks must be laid on it. If you decide to finish the threshold with tiles, then you need to leave space from the top level of the bricks to the level of the bottom door strip. Also leave some space at the ends.
After the bricks are laid, cover them with a layer of cement mortar and level them with a spatula. This will prepare the surface for laying tiles.
After the mixture has dried, finishing can be done. Laying tiles or simply laying linoleum is up to the owner. In any case, the durability of such a design will be ensured.
. After the foam has set well, you need to check how securely everything turned out. Excess foam must be trimmed using a special knife. The corners can also be further decorated. To do this, you should buy special corners at a hardware store.
 Source: obustroeno.com
Wood - wonderful material, which is both beautiful and environmentally friendly. True, from a design point of view, such a threshold is not suitable for every balcony. For example, in combination with plastic trim it will not look very harmonious. But if the balcony is lined with clapboard, the materials will successfully overlap.
- wooden plank;
- wooden corner;
- bars for placing under the threshold;
- perforator;
- dowels;
- screws;
- screws or nails;
- protective composition for wood processing;
- varnish or paint.
Let's start work.
- We prepare the surface.
- We make a frame from bars. Its thickness should be such that the required height of the threshold is obtained (but do not forget to add the thickness of the board there as well).
- We drill holes in the bars and in the floor, then insert dowels into them, and drive screws into them. Thus, we get an even, strong and stable frame.
- We place a board on top of this structure and secure it around the perimeter using self-tapping screws or small nails. This should be done close to the edges.
- Using liquid nails, glue the wooden corners to the appropriate places.
- We treat our threshold with a special antiseptic.
- Finally, coat it with paint or varnish. This must be done in several layers, with each subsequent one applied only after the previous one has dried.
So we looked at all the ways you can make a threshold near the balcony. You now know how installation differs, depending on the material used, and you can consciously choose what is best to carry out the work in your specific case.
 Source: obalkonah.ru
In conclusion, we would like to talk about the benefits that such a threshold brings. In addition to aesthetic functions, it also performs protective ones. In particular, it becomes an additional barrier to the penetration of cold from the balcony, and also does not release heat from the room. Therefore, spare no time and money. Moreover, very little of both is needed here.
What are they needed for
There are three main areas of use:
- Application in design. New styles, technologies, materials sometimes shape unique interiors, where several floor coverings can be combined in the area of one room. It is the thresholds that allow you to carefully close the border between them.
- Joints between rooms. Such places are most vulnerable to mechanical impact. Especially if they are used to join materials or cover the difference in floor height between rooms. In addition, flooring manufacturers set a limit on the installation area without a threshold. It's connected with technical features. Any material can change its linear dimensions under temperature changes. In such cases, thresholds are needed.
- Anti-slip corner profiles. Used for stairs lined with tiles or natural stone.
Thresholds perform the following functions:
- Aesthetics. Close technical gaps and boundaries between materials.
- Safety. If the joint is not covered with a protective strip, then over time the edges of the material will bend. They can cause you to trip and fall, causing serious injury. Safety is also ensured by corner anti-slip profiles. Their use on marble or tiled stairs is more than justified.
- Fixation. With the help of thresholds, the edges of floor coverings are firmly secured and hidden, which ensures their long service life.
Considering the scope of application and functions that thresholds provide, their importance for high-quality floor finishing cannot be overestimated. . If you are interested in how to lay porcelain tiles on the floor with your own hands
read this article.
If you are interested in how to lay porcelain tiles on the floor with your own hands. read this article.
Read about whether laminate flooring can be laid on laminate flooring here.
Method 2. Filling the solution
This method is appropriate if the threshold just needs to be raised a little. To a height that is less than the height of the brick (6.5 cm). But in some cases you can resort to it, regardless of how high the threshold is supposed to be mounted. This method is quite popular, and, according to many builders, it is more convenient and faster than the previous one.
From building materials we will need:
- cement-sand mixture M-150. It is perfect for these purposes; moreover, it is relatively inexpensive. At the current exchange rate - ≈100 ₽ – 1 bag (50 kg);
- penetrating primer and brush for applying it;
- board for constructing formwork. Its thickness should be ≈25 mm, its length should be ≈10 cm greater than the width of the doorway (10 cm on each side), and the height should be what is needed (depending on how high the finished threshold should be);
Here is a small list of tools that will be useful to us during our work:
- a bucket (metal) in which the solution will be mixed (or other suitable container);
- drill mixer;
- putty knife;
- construction float for grinding the surface.
Work on filling the threshold occurs according to the following scheme:
- preparation of the base. It is necessary to remove all small (and large, respectively) debris, cut off the protruding foam, apply a layer of penetrating primer to the surface;
- installation of formwork. To do this, the board needs to be installed across the passage with its edge - and securely fixed. Any one is suitable for fixation heavy object: bricks, bag of mortar and so on;
- preparing the solution strictly according to the instructions;
- filling. If the layer is thick enough - 10–15 cm - then construction waste can be placed into the thickness of the concrete - fragments of bricks or ceramics, crushed stone can also be used. If it is possible to lay reinforcement, great! Nobody says to knit a full-fledged reinforcing belt. You don't have to connect anything at all. Moreover, it is not necessary to use exactly the same corrugated reinforcement that is usually used when pouring. As we have already mentioned, improvisation would be quite appropriate: any metal products will do - even pipe scraps and other old plumbing fixtures, even metal grid, even fragments of old equipment. In general, any metal will do. This makes the structure more durable and reliable;

- after the top layer has dried, grout with a construction float (as, indeed, in the first case).
We'll talk about finishing later. In the meantime, we are waiting for a third option to resolve the issue.
What to choose from
 Threshold configuration depends on its function
The variety of floor thresholds is due to the combination of the complex functions that it has to simultaneously perform. Depending on the installation location, not all the properties included by the manufacturer may be constantly in demand, but, nevertheless, they must be taken into account when choosing.
Important features based on which elements such as floor thresholds are selected for the interior of an apartment come down to several main groups:
- the size of the closed gap (wide clamping part or narrow);
- profile, flat or with a difference in levels (the edges of adjacent floor coverings can form a step);
- combination with the main tone of the floor (the top of the plank can also contrastly separate the materials and emphasize the doorway);
- load intensity (service in the main passages or especially unloaded parts of the room);
- appearance (the same materials have a different pattern of the surface open to the eye; they can be made with hidden fastening, anti-slip pads).
Each manufacturer claims a long service life for their product. It should be remembered that plastic, aluminum, wood and brass floor thresholds will look different if the next renovation does not take place soon.
Plastic
 Each material has its own advantages under certain operating conditions. Polymer compositions have proven themselves in rooms with high humidity(kitchen, bath, toilet). This category also includes a more flexible variety - rubber frames.
Curvilinear boundaries are created with a special flexible edging that evenly fits onto the complex shaped edges of the floor coverings. The light reflected from its figured line will not show signs of violence when installed with your own hands.
Additional options for plastic threshold models are an option with a cable channel. The insulator protects the owner from accidental exposure electric current, dense polymer – wiring from mechanical damage.
 Wooden thresholds are a low-budget option
Wooden interior thresholds can harmoniously complete the rectangle of a doorway or merge with the textured tone of laminated flooring.
This type of threshold is quite expensive and is more often used to complete the design of a wooden floor in country residence. If a flexible connection is required, a cork threshold is used.
For wood-look laminate, use MDF components that match the color and pattern.
 Metal strips press the linoleum well and cover the joints
The most popular floor threshold due to its strength, reliability in operation, durability and pleasant appearance.
Metal thresholds are made from brass and aluminum, less often - from stainless steel (the hardest option). When installed, more flexible aluminum floor planks will easily cover minor unevenness and hermetically press linoleum, carpet, and tiles. It is important that a sufficiently soft metal, when pressed, will not damage the base material.
To give a varied and noble appearance, the aluminum alloy is anodized to look like bronze, gold or silver. These colors are suitable for almost any flooring material, they favorably emphasize the main tone of the floor with their frame, and add completeness to the atmosphere.
The sprayed layer reliably protects the aluminum threshold from aggressive chemical influences using the film formed.
Some installation points
Rigid threshold profiles are produced in standard lengths. In each individual case, the material is cut to size using a hand or circular saw. If the screw heads are visible, it is advisable to cut the strip for the doorway so that it looks symmetrical - equal parts on each edge. Learn more about how to install different types thresholds, watch this video:
Some manufacturers produce flexible thresholds in rolls, so they can be purchased by the total footage, cutting them locally yourself.
Simple flat thresholds can be mounted without technical difficulties on liquid nails.
 Screws for surface mounting may be included in the sales package. They are screwed through until the cap is completely immersed in the countersunk hole. In some modifications, the caps can be hidden under linings, including non-slip composites.
Another type of fastening is locks for hidden fixation. In this case, the hollow part of the lock is firmly fixed to the base, and the protruding element of the covering strip is enough to be aligned with the groove and pressed until it clicks. For more information about the flat sill, watch this video:
With any installation method, the tightness around the edges should reliably prevent water from penetrating under the closed space. This can trigger the development of putrefactive processes under the floor materials.
 What to do first: floor or walls
 How to remove polyurethane foam from linoleum
 How to remove paint from linoleum
 How to remove mouse glue from the floor
Dismantling

Working on the threshold
Removing a threshold is much easier than building a new one, but there are some nuances here too. It is not at all difficult to dismantle wooden products, but if it was made of brick, then everything is much more complicated. You need to do everything as carefully as possible, since you will have to use a hammer and chisel. If these tools don’t help, then it’s time to use the hammer drill.
IMPORTANT!!! In places near the wall, it is better to work with a grinder with an attachment for working with stone. If the disk is missing in some places, then we try to work with the previously mentioned hammer and chisel
Finish options
It goes without saying that on a threshold made of concrete or brickwork should be laid flooring. Although, perhaps, it should be placed on a wooden threshold. In any case, all options provide a good basis for laying any finishing coating.
So, we will consider several options for the development of events.
Option 1. Tiling
The tile will fit perfectly on brickwork or on concrete base. Here's what you need to do to properly tile the threshold:
- apply a primer to the surface to increase adhesion;
- While it is being absorbed, calculate the location of the tiles and take the necessary measurements. The tiles should lie evenly and symmetrically;
- prepare the tiles for laying. To cut the tiles evenly, use a tile cutter or a regular grinder;

- prepare tile adhesive according to the instructions on the package;
- Apply the finished composition to the back of the tile using a notched trowel;
- To ensure that the grout joints run smoothly, use special plastic joint crosses. The width of the seam should be from two to four millimeters;
- fill the grout joint with a fugue, which will protect the material from moisture and give the work a finished look.
Keep in mind that the presence of seams when laying tiles is mandatory (!) This is not just a decorative element. These seams prevent cracking and peeling of the material from the working surface due to temperature changes. Essentially, this is the same delatation gap. Simply put, this is the play that allows the tiles to expand freely as the temperature rises.

If desired, you can also tile part of the wall under the threshold - depending on your design solution and the possibility of bringing it into reality. Read more about working with tiles in another article: "". If you have a question: “What does the wall have to do with it?!”, I will answer: the principle of working with tiles is almost always the same, regardless of the plane in which the action takes place. Enough about the tiles. Now let's move on to the next option.

Option 2. Laying flooring
The second option can be summarized by calling it “flooring installation.” But floor coverings are different. First, let's look at the laminate trim on the threshold. The algorithm of actions in this case is as follows:
- necessary measurements;
- cutting the laminate according to measurements. As a rule, one board is quite sufficient. For cutting, you can use either a hacksaw or a jigsaw. The main thing is not to cut off extra centimeters, so as not to spoil the board;
- fixing the laminated board to the surface using liquid nails;
- fixing the corner. These are usually sold in hardware stores in the flooring department.
In addition to laminate, you can attach other flooring to the threshold. For example, linoleum carpet or vinyl tiles (art vinyl). This option is even simpler, since the materials mentioned are quite soft and can be cut with an ordinary stationery knife. Plus, you don't need a large piece, and at the hardware store you can select a small piece from scraps, which come in a variety of sizes and are usually sold at a discount. The smaller the fragment of flooring in area, the greater the discount on it. Some are sold for only 20% (or even less) of the cost for square meter roll coverings.
If you decide to use linoleum/carpet, simply take measurements and then trim the excess from a piece of flooring according to these measurements. Then simply glue it to the surface using linoleum and carpet adhesive. But if you have liquid nails or other glue at your disposal, use it. After all, buying a bucket of special glue (even a small one) just to glue such a small piece is impractical. When the covering is glued, fill the corner, which will protect the protrusion from damage during operation.
Installing a plastic threshold on point supports
PVC plastic(the same one that is used for window sills) - the simplest and inexpensive solution when decorating a threshold for a balcony door. There is an opinion that it bends, and therefore is not suitable for installation on surfaces that are intended to be stepped on. But this only happens if the installation technology is violated. Two installation methods are practiced:
- on point supports– the cheapest and fastest;
- on a slab of mortar or polystyrene foam– more expensive and labor-intensive.
Let's consider the first method in detail. It is convenient because it does not require preliminary leveling of the base and the cost of mixtures or slabs. Installation of such a structure can be completed in a few hours. Sequence of work:
- Clean the base from dust, dirt, and foam residues.
- Take measurements and make a preliminary sketch.
- Cut the blank for the future threshold from a plastic window sill with maximum precision so that the joints between the threshold and the adjacent walls are minimal.
- Prepare wooden blocks with a cross-section of approximately 10*5 cm and a height equal to the distance from the floor to the lower edge of the threshold.
- Place the bars in a row first on the left and right. Check the level.
- Then lay a few more rows (for a threshold length of up to 1 m, 5-6 rows are enough). If you deviate from a strictly horizontal line, file or extend the bars.
- Try on the threshold, check the entire structure with a level again.
- Remove the workpiece, apply polyurethane foam, but not too much, since when it hardens it expands and can displace the structure.
- Gently press the threshold against the supports.
- Place a weight on top.
- After hardening, apply sealant or liquid plastic at the junction points, and close the ends with plugs.
Installing a plastic threshold on a pre-erected slab is done in the same way.
Using brick as a base
In cases where there is a significant difference in height between the room and the balcony space, additional support for the mounted door frame is required. And the choice in favor of brickwork will be very visible. After all, the implementation of this kind of design will allow you to firmly place the door and create the necessary developments for the subsequent decoration of the doorway. Carrying out this type of construction work will require the following operations, taking into account which a strong and durable threshold based on brickwork will be formed. 
Namely:
- The relevance of the threshold implementation will be detailed measurements, which will allow further placement door frame and remove it properly significant difference in two rooms.
- Next, you should practically and efficiently clean the existing area where the brick is located, removing dried mortar or other dirt. After which a primer is applied and sprayed to ensure uniform adhesion of the cement-sand mortar and the existing base.
- When making brickwork, it is worth using a cement-sand mortar, which will allow you to combine each of the placed bricks and create a reliable bond with the existing concrete base.
- It is worth noting that the masonry should be made of brick, which is not subject to excessive moisture absorption and air accumulation inside itself, and the existing holes will allow you to create a solution for heat exchange during the subsequent operation of the threshold.
- After laying the brick and evenly distributing the mortar, you should also worry about finishing the surface. And here you can resort to using tiles or decorative adhesive. Due to this, the threshold will acquire an unusually attractive and practical appearance.
It will also be important to complete all the necessary tools and building materials, with which you can begin the required construction works. . List:
- Mixer, stirring the adhesive base or cement-sand mortar;
- Perforated corner, if necessary, creating an ideal threshold contour;
- Adhesive mortar, or cement-sand mixture;
- Spatula, for uniform distribution of the solution or adhesive composition;
- Hammer for even placement of bricks;
- Plaster or, for the final finishing of the threshold;
- Level, creation of a flat surface and control of the threshold being laid;
- Tape measure, displaying the dimensions and required threshold parameters.
In this case, it will be possible to qualitatively complete the threshold on the balcony without worrying about a lack of tools or inappropriate quality control of the resulting solution. The created threshold will be able to perfectly perform its functions and change the options for using the balcony room.
It is worth noting that when making a balcony threshold made of brick from the outside, you need to take care of additional sealing. This will be necessary in the case of open balconies and the possibility of moisture ingress.
Dimensions and other characteristics
As for the dimensions in which the thresholds are presented, the width lies in the range from 20 to 150 mm. Length - from 900 to 2700 mm .
Another important factor is the method of attachment. There are two in total:
- Open. Such panels have prepared technical holes for fastenings. Dowels included.
- Closed. This method is carried out by gluing the threshold or fixing it on dowels through a special profile. It can be removable or integral with the main decorative part. There are some nuances during installation, but the result is worth the time spent.
Therefore, when choosing thresholds, a number of conditions should be taken into account. First of all, for joining what materials they will be used.
Cork products

Smooth transition from one floor covering to another
Cork thresholds are made in the form of a cork strip, which has excellent shock-absorbing properties. Therefore, very often such floor covering elements are called compensation slats.
They can be represented by the most in different forms, for example, zigzag or semicircular. The cork threshold is glued to the floor at the junction of the finishing coating, without protruding above it. As a rule, it is used as a single-level threshold for parquet.
MDF thresholds
MDF products are mainly used to hide laminate joints. They are laminated wood-tone profiles that are susceptible to moisture.
They are distinguished by their low cost and short service life - much shorter than that of wooden or plastic thresholds.
Wooden thresholds
Wooden thresholds are made from natural solid wood and are perfect for decorating parquet floors. In this case, the threshold should be selected to match the coating and from wood similar to the main finish.
To install such a product, you should use special slats that are attached to the floor at the joints, and only after that the threshold itself is fixed to them. The only nuance that needs to be taken into account when purchasing such a decorative element is that the wooden product requires constant care - sanding, varnishing or a special composition. The price of a wooden threshold is quite high, provided that you are offered high-quality material.
Plastic thresholds

Bend radius up to 60 cm
Plastic thresholds are made of polyvinyl chloride, have a wide range of colors and are used to mask the joints of laminate, linoleum and carpet.
The advantage of such a product is its flexibility, which allows the use of plastic thresholds for finishing curved connections. Single-level and multi-level PVC thresholds are inferior in cost to other products for decorating the floor.
Wooden structures for decorating a balcony ledge - what's special
The wooden threshold is distinguished by high level reliability is the main thing. The design is almost impermeable to cold and moisture even without additional insulation. Anyone can make a threshold from wood with their own hands using a technology similar to the technology for creating plasterboard construction with a metal profile at the base.
An environmentally friendly, beautiful and durable wooden threshold is made from wooden blocks, the dimensions of which must correspond to the dimensions of the structure intended for use. Additionally you will need:
- chipboard sheet for the top;
- a set of carpentry tools;
- drill;
- corners;
- self-tapping screws
If you need to change a plastic threshold to a wooden one, then the process begins with dismantling the old structure and preparing the surface for arranging a new one. The next stage is creating the frame. To do this, use bars, adjusting them to the size of the threshold with a hacksaw. The finished bars are fastened together with self-tapping screws, fixing the corners with metal corners. In each corner additional holes are prepared for mounting on the floor. 
The wooden frame is laid on the prepared area, its location is marked with a pencil, and then holes are drilled for the dowels. The next stage is installing the frame on the floor with screws securing the chipboard sheet in the upper part. The finished threshold is lined with suitable materials.
In conclusion, we note that the threshold is indeed an important condition not only for the aesthetic appearance of the area in front of the balcony, but also for maintaining heat in the room with the onset of cold weather. . You can build a threshold with your own hands from scrap materials, starting from an old plastic window sill and ending with wooden slats
You can build a threshold with your own hands from scrap materials, from an old plastic window sill to wooden slats. The main thing is to correctly calculate the dimensions of the structure, taking into account the distance from the floor to the door strip and think over the insulation material that increases the performance properties of the finished product.
It is also important to consider finishing options for the finished structure. The threshold should be harmoniously combined with the interior of the room, despite the fact that most of the time it will be disguised by curtains.
Video can't be loaded: The best decision on finishing thresholds (exit to a “cold” balcony or loggia) (https://www.youtube.com/watch?v=6ZNqreayWiQ)
Plastic threshold
Plastic as a material for balcony thresholds is very common. The plastic used is the same as in window sills, only in this case PVC will play the role of a step. For some, when dismantling and finishing the loggias, parts may have remained plastic window sills, which can be put into action.

Balcony threshold made of plastic
This material, used to create a threshold between the balcony and the room, has significant advantages:
- low price;
- protecting the room from cold air and moisture;
- installation of a plastic threshold can be done by anyone, without any specific skills;
- beautiful appearance.
The main disadvantage can be called fragility. This is due to the use of polyurethane foam during installation. Over time, the plastic begins to press through and crack. Another disadvantage is the fact that installing a plastic threshold implies small differences in height.
- plastic window sill;
- a special gun with a can of polyurethane foam;
- sealant, acrylic or silicone and gun;
- saw for cutting the window sill to size;
- building level.
Installation begins with cleaning and leveling the surface on which the plastic threshold will be installed. The next step is marking and cutting out the desired threshold shape. Next, you need to evenly apply polyurethane foam to the finished surface. Place the cut window sill on top, press it down evenly with a weight and leave to dry for a day. After the foam has dried, you need to seal the contact gaps between the window sill and the wall with sealant to prevent moisture from entering. To the edges plastic construction, if possible, you need to put on plugs.
Original tile threshold

Ceramic tile flooring is durable and easy to maintain. If you choose this type of material to finish the threshold, then in this case you cannot do without preliminary construction of the base, which can be done in several ways.
Brick base

This option is justified if the difference between the floor and the doorway is large enough (no less than the height of the brick). Please note that a layer of leveling mixture will be applied to the brick and finishing tiles– the finished height of the threshold should not block the door. Main stages of work:
- Clean the base as thoroughly as possible. The smoother the surface, the easier it is to lay the brick row.
- Prepare a cement-sand mortar in the proportion of 3 parts cement to 1 part sand. You can use store-bought mixtures that simply need to be diluted with water in accordance with the manufacturer's recommendations.
- Distribute the mortar over the base and lay out the first brick. Then apply the mixture to the end side of the brick so that all the seams are filled. Place the next block and so on. Usually one row is enough to build a threshold.
- Apply a layer of mortar to the entire upper surface of the brick row and level it.
- When the mixture dries, moisten the surface with a small amount of water and treat with a foam float. This results in an almost perfectly flat surface.
Filling the base with mortar
When you need to get a threshold of a smaller height than the size of the brick, it is rational to use this method. Many masters prefer it in most cases due to its ease of execution. The work is carried out in the following sequence:
- Prepare the base, remove debris and dirt, cut off excess polyurethane foam. Treat the surface with a primer.
- Install the formwork. To do this, you need a board slightly larger in width and height than the size of the threshold - you just need to press it tightly against the wall with any heavy objects.
- Prepare the solution according to the directions on the package.
- Place filler into the cavity of the future step: broken brick, stone, crushed stone.
- Carefully pour the solution so that it fills the entire volume. Level with a staple and remove excess.
- After a few hours, moisten the surface and rub with a float.
Selecting and laying tiles
Among the wide variety finishing materials you can easily choose the option that suits your needs general style and room design. There is no need to buy expensive brands for this area. Residual and even defective lots with different shades or chips are suitable - such material can be purchased at a significant discount. Tastefully selected details of different textures and colors and mosaics look original. The main thing is not to choose glossy surfaces– they can be very slippery.

You can tile not only the horizontal surface of the step, but also the partition underneath it, as well as the area of the floor adjacent to the door. It all depends on the taste of the owners and the characteristics of the room. Laying is done in the following sequence:
- Carefully take measurements, calculate the quantity, draw a layout diagram. Symmetrical installation looks better and neater, especially on large slabs. There should be whole parts in the middle, equally trimmed on the sides.
The asymmetry is striking
- Cut the tiles using a tile cutter or grinder.
- Coat each part with special glue and place it on the finished base in accordance with the diagram. Insert crosses between the tiles - this way the seams will be smooth and uniform. Control the laying process with a level.
- After hardening, remove excess glue and fill the seams with grout mixture.
Video instruction:
How to choose the right one
Before starting the selection, you should determine a number of questions:
- Lenght and width. For non-standard sizes, you may need to order a bar. The width of the threshold should overlap both sides of the joining material.
- The profile and design are selected depending on the type of joint and coating. For example, with strong differences in the floor, you can use a corner strip, and with a flat surface, a T-shaped straight threshold.
- Material. The most popular type is metal profiles with a laminated surface imitating natural fibers. The versatility of this fastener and the range allow it to be used with any type of coating.
- Color. There may be several options here. The classic choice is the color of the baseboard, door or flooring. But there are other options that depend on stylistic design. For example, a chrome profile will fit organically into a high-tech style. And if you want to emphasize the transition from one material to another, you can play on the contrast and choose a darker or lighter shade.
The choice of threshold also depends on technical requirements, design, and budget.
Tile threshold
A threshold made from tiles or ceramic tiles looks beautiful, but you need to have some skills to create it.

Balcony threshold made of tiles
If we talk about the advantages of such a threshold, then there are fewer of them than the disadvantages, namely:
- durability;
- beautiful appearance;
- 100% moisture protection
- a tile threshold can be made at any height difference.
The disadvantages include:
- long installation;
- skill is required for high-quality laying and jointing of tiles;
- high cost compared to other materials;
- the surface of the tile will always be cold (except for a mixture of tiles and warm floor technology).
To build such a threshold you will need:
- grinder or tile cutter;
- a drill with a special whisk for mixing the solution;
- floor tiles;
- primer;
- spatula;
- corners for tiles;
- perforated corner;
- building level, pencil and tape measure;
- container for mixing the solution;
- plaster;
- fugue;
- tile adhesive.
If the concrete threshold is not level, destroyed, or needs to be built up, cement, sand and edged boards will be useful to create formwork.
Installation begins with the construction of formwork and pouring cement mortar. After this, you need to wait a day before further work. If the unevenness is not critical and there is no need to increase the threshold, you can attach a perforated corner to the edge of the threshold. After this, cover the working surfaces with primer, wait for drying time and apply an even layer of plaster along the corner. Next, you can start measuring the tiles and cutting them to size. It is better to start laying tiles from the center and leave small parts at the edges. When laying tiles, you need to check the level. After the tile adhesive has dried, you can begin jointing the seams. The top of the fugu can be coated with a moisture-resistant compound.
Installation of such a threshold may take several days depending on the assigned work.
Summing up and talking about results
So, in this article we looked at two main ways of how to make thresholds on a balcony yourself so that it is beautiful and neat.
Before you start building a threshold, you should, of course, first decide which threshold is needed and which one will be most convenient. Since apartments and balconies are all different, and each case requires an individual approach.
After it is already clear what kind of threshold you need to start manufacturing, you need to prepare all the tools required for the threshold manufacturing process
It is worth paying attention to the fact that if in the process of work you will use tiles for the floor, then you must purchase a special machine for cutting them, in this way it will be possible to avoid cracking and breaking of the tile itself, and accidental injuries and cuts to the hands of the master himself. Such a machine is not very expensive, but it saves a lot of time and effort.
In the process of making a balcony threshold, you cannot rush - this work is very painstaking and unhurried, only then will there be an excellent result.
All materials that will be required during the repair process must be purchased of high quality, paying attention to their expiration date. After all, a balcony threshold is not made for one year, but forever, and it will be very disappointing and unpleasant, for example, if, due to poor-quality cement, after a few months the balcony threshold suddenly cracks and the tiles begin to slide off.
And the last, most important rule: when carrying out repairs or when building a new threshold on the balcony, you cannot rush! It is necessary to allow all materials to “set” and dry properly so that each layer hardens, if necessary, properly. And after the threshold is ready, you should also leave it alone for at least a couple of days, and then the beautiful and reliable balcony threshold will last a very long time and will be pleasing to the eye.


After installing a new balcony door, the need arises to make a threshold. At first you might think that there is nothing complicated about this, but when you start to figure it out, you will realize that there are a lot of nuances. Accordingly, today we will talk about how to make a threshold on the balcony with your own hands. It will be difficult for an inexperienced person at first. We strongly recommend that you follow the advice exactly. experienced builders, and then everything will work out, the main thing is to do everything according to the instructions.
The threshold to the balcony has two functions. The first is aesthetic, that is, a door with a beautiful threshold looks much better. The second function is insulating. Thanks to it, less cold penetrates into the house in winter.
The threshold to the balcony can be made from:
- wood;
- plastic;
- bricks (it is better to use silicate);
- properly prepared cement-sand mortar.
Dismantling

Removing a threshold is much easier than building a new one, but there are some nuances here too. It is not at all difficult to dismantle wooden products, but if it was made of brick, then everything is much more complicated. You need to do everything as carefully as possible, since you will have to use a hammer and chisel. If these tools don’t help, then it’s time to use the hammer drill.
IMPORTANT!!! In places near the wall, it is better to work with a grinder with an attachment for working with stone. If the disk is missing in some places, then we try to work with the previously mentioned hammer and chisel. The work is quite dusty, so we recommend purchasing a respirator and construction glasses.
Brick threshold

Most often, a brick threshold on a balcony is used in cases where the level of the balcony block is much higher than the floor level. Thanks to the brick, namely its thickness, this difference can be easily and quickly eliminated, thereby saving money on sand-cement mortar. The cladding is made of either laminate or ceramic tiles. Make sure that the brick is not too high, otherwise the door will not open.
To build a brick threshold we need:
- Putty knife
- Roulette
- Hammer
- Gypsum mixture
- Metal lighthouse
- Perforated corner
- Drill
- Drill attachment “mixer”
- Sand
- Cement
- Sand-lime brick
To begin with, it is advisable to tidy up, ideally wash the floor. After cleaning, we begin to prime everything. The primer helps improve adhesion. We advise you to choose a soil mixture that, after drying, leaves a slight roughness.

High threshold in doorway with your own hands
Next, mix sand and cement in the proportion of 1 part cement + 3 parts sand. To make the solution set faster, add isogypsum or satengypsum to the resulting mixture. The mixer attachment in tandem with the drill will thoroughly mix all the ingredients.
Take a spatula and evenly apply the mixture to the primed area and the edges of the bricks. This way the bricks will adhere not only to the floor, but also to each other.
A perforated corner is placed on the corner of the bricks, and a beacon is placed on the door. They are fixed with the same mortar as bricks; there should be no void anywhere.
Plastic threshold

The plastic threshold for the balcony looks great, but has a relatively short service life. Installing a plastic threshold takes no more than one day. All the work consists of installing parts on the profile using self-tapping screws. We recommend using polyurethane foam for the layer.
The most the best material For the manufacture of plastic thresholds, PVC window sills are considered to be well-known and available in almost every hardware store. They are strong enough to support a person's weight. With a beautiful threshold, the door looks completely different.
Wooden threshold on the balcony

The biggest advantage of a wooden threshold is that it practically does not allow cold air to pass through. If it is additionally insulated with high-quality mineral wool, the effect will be even better.
To begin with, we take wooden blocks and assemble the sheathing from them. It will have to be firmly screwed to the floor. For sheathing, use a board made of pressed wood chips. It can easily withstand heavy loads without deformation.
In the process of making a wooden threshold you will need:
- Self-tapping screws for wood
- Corners for connecting timber to the floor
- Drive-in screws with dowels
- Hacksaw
- Hammer
- Hammer drill
- Hardwood timber
To begin with, we take the prepared timber and make a frame comparable in size to the size of the future threshold. The self-tapping screws with which you will fasten the frame should be twice as long as the edge of the beam.

If the frame is completely ready, we place it in the place where the threshold should be, marking the internal edges with a construction pencil. By internal corners you need to drill holes for the dowels. Next, we put the finished frame in place and, using the previously made holes in the corner of the beams, fasten the frame to the floor. It should be strong and reliable.
Next, we cut out a sheet of particle board and carefully lay it and fasten it with self-tapping screws. If desired, the structure can be insulated with polystyrene foam or mineral wool. We recommend using as cladding good linoleum or laminate.
Threshold made of cement-sand mortar

If the threshold to the balcony is not high, we recommend making concrete option products made from good cement-sand mortar. This is the easiest and fastest of the above methods. First, we make formwork, the height of which corresponds to the height of the future threshold. To achieve maximum structural strength, it is necessary to use gravel or pieces of brick.
“Tip: Before pouring the mortar, be sure to putty the floor surface, install the formwork and mix cement, sand and water. The solution needed is the same as when laying bricks. Pour the finished mixture into the formwork and thoroughly level the surface.”
As soon as everything is dry, cover the surface of the dried concrete with whatever your heart desires: linoleum, laminate, tiles...
After the installation of the door facing the balcony is completed, it becomes necessary to make a threshold. Although not everyone attaches special importance to this element, a high-quality transition device can eliminate many problems, for example, trapping cold air.
When installing a door opening onto a balcony, the question usually arises of how to make a threshold on the balcony. Solving this problem is actually not difficult if you follow the recommendations of experienced master builders.
Purpose of the balcony threshold
Not every resident of an apartment building fully understands why this strange “step” between the balcony and the room adjacent to it is needed. She actually has several appointments.
- Strengthens the entire balcony structure. If there is already a threshold, you can only correct it if desired, but under no circumstances remove it.
- They provide additional thermal insulation, since polyurethane foam alone is usually not enough to keep the room warm, especially if the balcony is not glazed or insulated.
For reference!
If the balcony door is installed at the same level as the floor, then cold air can be blown into the apartment through the gap, and it will be extremely difficult to insulate such an area. Therefore, heat can be preserved if you raise the door a little and build a transition.
- Eliminate heat loss through foam areas where cold bridges can form.
- Protects against moisture caused by external factors. Rainwater that gets onto an unglazed balcony can flow into the room through the cracks, and the threshold can prevent this.
- They provide a smooth transition, which reduces the likelihood of tripping over the threshold structure and makes the transition through the balcony door more comfortable.
- They add aesthetics to the doors to the loggia or balcony and increase their visual appeal.
Setting a threshold has many nuances. Accordingly, how to make a threshold on a balcony correctly is a rather important task. Transitions may differ in size, height, material and shape. They are most often rectangular because they are easier to install and use.
Technology for installing a threshold on a loggia and balcony
on the picture different variants threshold on the loggia
Let's consider various options for making thresholds.
Cement

To install a low threshold on the balcony, it is advisable to use a cement mixture. This is the simplest and quick option execution of a similar design.
- Work begins with clearing the area for the future location of the balcony threshold, marking its contours and measuring its dimensions and height.
- Formwork is constructed from several wooden blocks of the required size, securing them in the designated places. The formwork must correspond to the selected height of the future transition. To strengthen the threshold, gravel or crushed bricks are often used.
- Prepare a solution by taking three parts of sand to one part of cement, and pour it into the structure to the level of its upper boundary. Excess concrete mortar that extends beyond the formwork is removed with a trowel.
For reference!
The newly created area will adhere more firmly if the side surfaces of the wall are rougher.
- Finishing of the threshold begins after the concrete has completely hardened, in about a day.
- For finishing, you can use any floor covering, for example, tiles.
Brick

This option is great for smoothing the transition from the floor to the door frame when the door level is much higher. Thickness sand-lime brick enough to eliminate such a discrepancy and at the same time you can still save on cement mortar.
When using this material to create a balcony threshold, a certain technology is followed:
- Mark the location of the future threshold and clean it of all kinds of dirt and debris. You may need a spatula for this work.
- The cleaned surface is primed several times. It is better to opt for a primer that forms a rough surface after drying. This will help ensure better adhesion of the brick to the mortar. This can be a plaster mixture diluted with water (per 1 kg dry plaster mixture- half a liter of water). It is laid in a layer of 1 cm.
- The bricks are laid on cement mortar. Experienced craftsmen advise adding gypsum mixture to it. In this case, setting will take place much faster.
- The solution is applied in an even layer, then the bricks are laid on it as tightly as possible, lightly moistening them with water to begin with. To fasten them to each other, you also need to coat the sides of the bricks. Lightly tapping the material with a trowel will help to achieve a good fit.
- Work continues after the structure has completely dried.
For reference!
When installing thresholds, turn around door slopes sometimes does not allow them to normally occupy its area. In this case, the angle is knocked down. For example, they cut down the outer bricks with a hammer.
- To decorate the corner of the bricks, a T-shaped perforated corner is used, and a small (about 0.5 mm) beacon is installed on the door side. They are “frozen” using the prepared solution. After the solution has set - this will only take a couple of minutes - pour in the plaster solution. To ensure that the surface is as even as possible, the solution is leveled along the way with a spatula. The surface should not be particularly rubbed, but there should be no voids left.
- When the solution on the threshold dries, it is primed with a primer deep penetration and again left to dry.
- Then the balcony threshold is finished with decorative materials: tiles, laminate and others.
Threshold made of OSB boards on a wooden frame

Unlike previous options, this threshold retains the cold and does not let it into the room. It can be additionally insulated, which will be another advantage of the design. It can be removed if necessary.
- To begin with, a frame of the appropriate size is mounted from the beams. It is also recommended to place the beam in the middle.
- The sides of the frame are fastened with self-tapping screws approximately 1.5 times the thickness of the timber. At corner joints, these are slope turns; the ends are cut using a hacksaw.
- The finished frame is placed in the place of the future threshold and the inner line along which the frame will be attached is marked. Mark the locations of the holes for the dowels and drill them using an impact drill, and screw the frame using wood screws.
- The dimensions are marked on the OSB sheet, cut out with a hacksaw and fixed with self-tapping screws. The slab must be carefully adjusted. The skin is strong enough, so the threshold will not sag under weight load.
For reference!
If desired, the threshold can be insulated, say, with mineral wool.
Threshold to the balcony from the window sill

The plastic threshold attracts with its low cost, simplicity and good heat-insulating qualities. It is often supplied complete with plastic window and balcony blocks. This material has some flexibility, so if it is not of high quality, it can quickly break when it is stepped on a lot. Choosing good quality plastic will avoid problems.
- The base is cleaned, excess foam is cut off.
- Measure the opening and cut out the appropriate profile from the window sill.
- They try it on and determine the height of the threshold, on which the method of fixation depends.
- If the height difference does not exceed 10 mm, then the threshold is usually placed on foam. The threshold is carefully glued onto the compound applied in an even layer and pressed down with a weight. Polyurethane foam not applied too generously. This is due to the fact that during the polymerization process the foam expands, which can cause the structure to rise.
- When the foam hardens, you need to inspect the resulting structure for any cracks. Through them, moisture can penetrate into the space under the threshold. Any cracks found are sealed with white silicone sealant. The ends are closed with plugs.
- If the height difference is more than 10 mm, the threshold is assembled on point supports made of bars or plastic plates. Before fixing the structure, it is checked for compliance with the level and for deflection.
- You should walk around it a little. After making sure that the threshold on the balcony is strong enough and its position corresponds to the level, the threshold is removed and its surface is moistened with water. Foam is applied to the supporting point supports in the form of transverse and longitudinal strips, and the plastic blank is pressed. For better fixation, a weight is placed on the threshold.