How to make a mini greenhouse near a polycarbonate greenhouse. How to make a polycarbonate greenhouse
With all the variety of structures closed ground A polycarbonate greenhouse remains one of the most popular ways to speed up harvesting at a summer cottage. The commitment of gardeners to these products is explained by several factors - the strength of the material and big choice models, and ease of installation and operation.
But the most important argument is usually the versatility of this design, because almost anything can be grown under polycarbonate - cucumbers and tomatoes, seedlings and strawberries, herbs and even mushrooms.
Polycarbonate is a strong and durable material
The use of polycarbonate for lining greenhouses has opened up new prospects for manufacturers of these structures. Since this material is highly durable, but at the same time remains flexible, it has become possible to create greenhouses various shapes and designs taking into account the characteristics of each crop being grown.
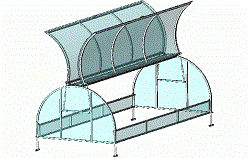
Butterfly greenhouse - beautiful shape and practical design
The butterfly greenhouse is a popular model among summer residents. The simple design with a swinging double-leaf roof is suitable for both forcing seedlings and growing cucumbers and other tall crops.
This shelter does not require building a massive foundation - in the photo, a polycarbonate greenhouse is installed on a simple formwork made of boards.

A butterfly greenhouse is convenient for growing many crops
Due to the fact that the roof can be opened on both sides, it is convenient to care for plants in such a greenhouse. In addition, it is convenient to ventilate it without creating drafts, and to control the humidity and temperature under the shelter.
This model can not only be purchased ready-made, but can also be easily assembled yourself using metal-plastic pipes or galvanized profile.
Snail greenhouse - original shape and maximum comfort for plants
“Snail”, or as it is also called “bread box”, is convenient for growing seedlings and short plants - greens, strawberries, low-growing tomatoes. The greenhouse got its name from original design roofs - the movable sash simply moves around the axis of the body. Thanks to this shape, there is no need to allocate a lot of space on the site for the “bread box” and it is convenient to serve the seedlings.

Installing the frame in the ground
A snail greenhouse can have one movable flap or two. There is no foundation for it, but sometimes for tall crops the “snail” is used as a roof on a glass or polycarbonate box.

In such a “bread box”, tender seedlings are reliably protected from bad weather
Belgian greenhouse with a pitched roof
The simplest polycarbonate greenhouses are the so-called “Belgian” ones. An ordinary lean-to box with a hinged lid does not take up much space; it can be installed under a wall or against a fence, on an apartment balcony or in garden beds.
You can assemble such a greenhouse yourself, especially since it does not require many materials - a few bars or a galvanized profile, polycarbonate and screws.
Most often, this design is used for sowing seeds, forcing seedlings and greens. The only drawback of this greenhouse model is that it is not very convenient to work with plants, since only the roof opens, and to access the bed you have to lean over the side.

It’s very easy to assemble a Belgian greenhouse yourself
Polycarbonate greenhouses - functional structures for high yields
Greenhouses are larger in size than greenhouses, so it is more convenient to work in them. But the dimensions and internal arrangement of these structures are much more complex, and depend on how the shelter is planned to be used - for winter growing vegetables, to accelerate the ripening of fruits, or for industrial purposes. The photo shows polycarbonate cucumber greenhouses, which are easy to assemble yourself.

Variety of greenhouse shapes
Classification of greenhouses by shape

Gable greenhouse made of polycarbonate on a wooden frame made of timber
The shape of polycarbonate greenhouses is also varied. Manufacturers most often offer arched models (this design is convenient not only for installation, but also for operation). But on the plots, gardeners independently build structures of various forms:
- single-pitched;
- gable;
- teardrop-shaped;
- arched;
- domed;
- greenhouses of complex shape (for example, according to Mittleider).

Polycarbonate drop greenhouse is suitable for growing flowers and vegetables
The choice of frame shape is determined not only by the characteristics of the agricultural technology of the crop being grown. Often the decisive role is played by the ease of self-construction and the cost of materials.
Therefore, polycarbonate greenhouses are often mounted on a wooden frame. simple shapes– with a pitched or gable roof.

Lean-to-wall greenhouse with glass
The agricultural technology features of some plants require the creation of special conditions inside. Therefore, for certain crops they create special designs, best suited to the needs of the species being grown. Thus, a polycarbonate greenhouse for cucumbers is equipped with a window on the facade opposite the entrance to ensure uniform ventilation and the necessary humidity.

Arched borage
Why is a greenhouse according to Mittleider attractive?
IN Lately Greenhouses of a special design, invented by the American vegetable grower Jacob Mittlender, became popular.
His invention - a two-level roof with vertical vents for ventilation - can significantly improve the microclimate and optimize the process of caring for grown crops.
This roof arrangement is used not only on classic rectangular frames. Modifications of arched greenhouses with vertical vents on the roof turned out to be more convenient than the standard version, as they can easily solve the problem of condensation and superheated air accumulating under the roof.

Arched "Mittleider" greenhouse
What materials are best to use for the frame?
When building a polycarbonate greenhouse with your own hands for cucumbers, tomatoes, herbs and other crops, it is very important to choose the right material for the frame. Typically, three types are used in home construction:
- wooden;
- metal;
- metal-plastic.
Wooden frames - advantages and disadvantages
The most affordable material for construction is wood. Timber and boards are relatively inexpensive. The wooden frame is easy to install, has high strength and stability, a long service life, and it is easy to attach polycarbonate sheets to it. It is not necessary to pour a massive foundation under such a frame; you can simply strengthen the support pillars well.

The wooden base is easy to assemble yourself
The disadvantages of wood include the ability to deform under the influence of high humidity and sunlight.
Therefore, for the construction of a greenhouse it is necessary to choose a material good quality– well-dried wood without signs of rotting or insect infestation. It is also recommended to treat the finished wooden building with moisture-resistant paint.
Pros and cons of metal frames
Very often, solid polycarbonate greenhouses are built on metal frames. The main advantages of such structures include their durability and strength. Large diameter pipes, profiles or fittings are usually used for construction. Under metal structures, a strip foundation is usually poured, into which pipe sections are immediately attached to secure the frame.
But metal frames also have disadvantages:
- high cost of materials;
- certain difficulties with the installation of structures (the need for welding work).

A frame made of profile pipes is installed and secured to the foundation
Metal-plastic and plastic pipes are the ideal material
Metal-plastic pipes are considered one of the most acceptable materials for the frame of a greenhouse or greenhouse made of polycarbonate. The costs of purchasing pipes are fully compensated by the lack of costs for protective treatment. In terms of strength and durability, such a frame is not inferior to a metal one, and in terms of ease of installation work, it is not inferior to a wooden one. Due to its flexibility, this material is ideal for the construction of arched greenhouses.

Frame made of PVC pipes easy to install in a summer cottage
The relative disadvantages of this material include the need to purchase special fasteners and connecting elements of the required diameter.
But this method of installation makes the greenhouse mobile - if necessary, the casing is removed, the frame is easily disassembled and transferred to a new site.

Scheme of a greenhouse for polycarbonate pipes
How to build a polycarbonate greenhouse for cucumbers with your own hands
It is not difficult to build a home greenhouse or greenhouse for cucumbers on your own. The easiest way to assemble such a structure is on a wooden frame with a gable roof. For construction you will need:
- cellular polycarbonate;
- drawing;
- wooden beam 10x10 cm for the frame;
- bolts for assembly;
- screws or self-tapping screws for fastening the casing;
- dye;
- concrete for the foundation;
- hinges for doors and windows.

Scheme of an arched greenhouse under polycarbonate or film
When planning a drawing, it is worth considering that a greenhouse for cucumbers made of polycarbonate must be equipped with windows and devices for tying up plants.
It is not worth building a frame with a height of less than 2 m and a length of less than 4 m - it is inconvenient to work in a low building, and in a shorter one it will be difficult to accommodate everything necessary equipment(lamps, heaters, irrigation systems).
How to build:
- After preparing the drawing and calculating the required amount of materials, you can begin preparing the site. The ground must be leveled and compacted. Mark the location for the foundation and installation of corner posts.

Wood construction
- Pour the foundation and pillars, leave the solution until completely hardened.
- Mount the lower and upper trim on the support posts.
- Install the windows and door, as well as support beams and roof ridge.
- Treat the assembled wooden frame with an antifungal compound and paint.
- After drying, you can begin lining the greenhouse with polycarbonate.
When building a polycarbonate borage plant with your own hands, it is important to remember that cucumbers require a special approach to growing - they need a lot of space to develop, they are afraid of drafts and high humidity, and are also very sensitive to sunlight. Therefore, when choosing a location, be sure to take into account the shading of the site and correctly orient the greenhouses to the cardinal points.
You can make a drawing of a relatively small greenhouse measuring 3x6 or 4x6 meters, which will be made of polycarbonate, yourself. It's important to choose correct option- arched, triangular or in the form of an extension. This will determine how much polycarbonate is needed, as well as how technically difficult the structure will be to complete. Then you need to select the location of the structure, decide on the materials and correctly distribute the space inside the greenhouse.
- they can be used for a long time (more than 10-20 years);
- easy and quick to erect (1-2 days);
- the substance is transparent and has a high refractive index, and this helps scatter rays winter sun throughout the greenhouse;
- the material is very light and allows you to avoid pouring a foundation even in areas with floating soil;
- the layer of air present in the sheets of the product creates a heat-insulating effect;
- When building a greenhouse, you can only do it yourself.
- 1. As a separate building, it can be located almost anywhere on the site, except for lowlands. It is advisable to perform it on a hill.
- 2. The best option is to make a greenhouse as an extension to a house or barn with livestock: chickens, pigs, cows. At the same time, one of the sides of the new building is already protected from frost, and it will not need to be insulated.
- decide on the design and material of the frame;
- draw a drawing or diagram of a structure;
- make calculations and determine the dimensions of the future building;
- consider whether a foundation is needed.
- 1. Arched option- the most attractive for summer residents. Used by many owners because of its practicality. In any bad weather and even in heavy snowfalls, the load-bearing elements of the greenhouse are minimally loaded, since the snow rolls off the roof. Typically, the width of the building is equal to the diameter obtained by bending a standard sheet and is 2-4 m.
- 2. House with a gable roof: it will take a lot to build it more material, but you can choose any size.
- 3. Triangular greenhouse: in areas with little snow in winter, you don’t have to make a frame when creating it.
- 4. Semi-arch or right triangle: most common when we're talking about about an extension to a house or other building.
- 1. Tree. Available in almost every village house (shafts, thick branches, slats, etc.). Although it is relatively inexpensive, it is not “favored” when performing any type of greenhouse. Due to the increased humidity inside the greenhouse, the tree quickly becomes unusable. Its main disadvantage is its low durability and the need for frequent repairs of frame elements.
- 2. Profile for drywall. Galvanized iron allows you to mount a lightweight and fairly durable structure. But for connections you need to drill a lot of holes in it, and for normal bending you need to make a large number of slots. However, sometimes you can find profiles in the form of ready-made arches.
- 3. Square or round metal pipes. The most commonly used sizes are 20x20 mm, 30x30 mm for square and 20-50 mm for round. This frame is durable, but its implementation requires skills in working with a welding machine. When choosing, for example, an arched option, you definitely need a pipe bending machine.
- 4. PVC or PP pipes. They are considered the best material for building greenhouses. Plastic almost does not decompose even in conditions of high humidity, and due to its increased elasticity, excellent arcs are obtained from this material.
- 1. When making an arch from a 6 m product, a simple calculation is performed - divide the length of the material by the number “PI” (3.14).
- 2. Dividing 6 by 3, we get a semicircle with a radius of 2 m (the height of the arc).
- 3. Its diameter will be about 4 m (the width of the arch), and its length will be 2.1 m.
- 4. To build a 6x2 m greenhouse, you need to install 3 such structures.
- When creating a project, organize the internal space so that there is an approach to each bed (preferably from two sides).
- In the greenhouse, the climate is warm and humid, so the best material for the frame would be a galvanized or plastic profile, because they rust less. If regular metal is used, it should be painted. When choosing wood, it is treated with antibacterial solutions, for example, copper sulfate.
- The structure must be ventilated. For this, opposite front door complete the window.
- The minimum width of the room should be 2.5 m. At the same time, the conditions for comfortable operation are observed (this is enough for two 80 cm beds and a passage of 1 m).
- Lighting on dark and cloudy days is best done with energy-saving lamps that emit white light.
- On frosty days, forced heating should be used. To do this, you should install an electric heater, a heat generator, a small “potbelly stove”, etc.
- external covering - 6 or 12-meter polycarbonate in sheets (thickness not less than 6 mm);
- frame elements - pipes (regular or rectangular), metal or plastic profiles and strips, beams;
- floor details - boards;
- door, windows;
- fasteners - wire, staples, screws, self-tapping screws, bolts with nuts and washers, clamps, etc.;
- scissors (regular and for metal);
- jigsaw for cutting plastic;
- grinder, electric drill with drills;
- hammer, screwdriver, pliers, wire cutters.
- 1. Screw. Place the ends of the 2 parts on top of each other with an overlap of several centimeters. Drill at least 4 holes and secure all with screws and nuts.
- 2. Welded. Fold and weld the ends of the profiles.
- 3. Adhesive. Coat the end parts of the elements with glue, clamp them with a clamp or heavy object and wait the time necessary for a reliable connection.
- drill through holes in the plastic and profile and secure with screws (this method is not very reliable) - the material may crack;
- make two holes in the sheets for the width of the profile and secure them with wire, clamps or staples.
Show all
Characteristics of polycarbonate buildings
Experts recommend making greenhouses from plastic - polycarbonate. This product has been chosen by gardeners and gardeners not so long ago, but is already used all over the world for similar structures, having overtaken film and glass in popularity. Its features – low price, ease of processing and elasticity. Structures made of polycarbonate are practical, functional, lightweight, look modern and attractive.
Winter buildings for plants made of this material have the following advantages:
Polycarbonate is transparent. In order to properly direct the flow of light onto the beds without allowing it to scatter, it is appropriate to cover part of the walls with a composition that has reflective properties or a special material with the same properties, for example, foil.

Preparation and selection of location
First, you need to create a greenhouse project with your own hands, based on its intended location and the size of the space that can be allocated on the site.
There are two location options:
If the choice fell on the second option, it makes sense not to make a separate door from the street, but to cut it into the wall of a house or barn with animals. In this case, heat loss will be minimal.
When preparing a project you need:

Types of frames and materials for their construction
There are many design options. The greenhouse should take up little space, but be multifunctional.
The most acceptable designs are:
The following materials are used to make frames:

Execution of drawing and calculation of dimensions
The dimensions of a standard polycarbonate sheet are 6x2.1 m. There is also another 12x2.1 m, but due to its dimensions it is rarely used.

But a greenhouse width of 2 m is not enough. If you leave a meter-long path for the passage of a cart, then there will be about half a meter left on each side for the beds.
It will be difficult to plant many sprouts on them. The normal width of the beds is 90 cm or more, and for this the diameter of the semicircle of the greenhouse should be about 3 m. You cannot make such an arc from one typical 6 m sheet, because to create an arch of this width you need about 9.5 m of plastic based on:
9.5/3.14 =3 (approximately).
The height of the greenhouse will be the same - 3 m. If it is reduced to 2 m (with a width of 3 m), the length of the semicircle will be about 8 meters. To create one such arch, you need about one and a half sheets of polycarbonate, if you overlap them, and to build a greenhouse 3x6 m we will spend 3 times more - 4.5.
If the greenhouse is made entirely of plastic, do not forget to add one or two more sheets to make the sides.
It should be taken into account that when purchasing 5 full sheets, the remaining part (3x2.1 m) can be cut into strips and used to cover the joints, gluing them on top of the greenhouse body. This will increase the reliability of the structure and help better conserve heat.
To create a 3x6 m greenhouse, you can abandon the arched version and make it in the form of a house or a triangle. This will greatly facilitate the work and save material, because the sheets can be arranged along their length without bending them. The “house” will take 5 sheets (2+1 around the perimeter and 2 on the roof), and for the gable version only 2 ( tall man in the triangle you will have to bend down).
Manufacturing features and basic rules
When building plastic greenhouses, experts advise alternating curved areas with flat ones. They recommend making straight walls and a horizontal ceiling with an arch in the middle. It will take up half the width.
The beds will be located under flat areas where reflection of daylight rays and glare is minimal. The heat of the sun will not be dissipated to the sides, as in arched buildings, but will be completely transferred to the plants.
Before starting construction, it is important to know the basic rules:
Construction of a greenhouse
If you have already drawn a drawing and decided on the location and type of greenhouse, you can begin building the structure. It will take about 2-3 days.
Required for construction following materials and tools:
Preparation of profiles and polycarbonate for the arched version
Profiles should be prepared. If they are small (for example, 3-meter elements were purchased), then they will have to be increased by using various types of fasteners.
Types of connections:
Remember! The sheets must be laid with an overlap of at least 50 mm, otherwise they may crack.
They are drilled in several places and connected with screws. It will be more reliable if you put a metal tape on each row of holes on both sides, drill the resulting package and secure the sheets.
Choosing a foundation
In areas where the soil does not freeze very much, you can do without building a foundation, but in the northern regions it will be difficult without it. According to unwritten rules, the place for the greenhouse should be well lit, level and located from west to east, so that the sun illuminates it most of the day.
For this structure, you can use any type of foundation and even combine materials in its manufacture. You can build a completely wooden foundation or reinforced concrete. Or make a concrete strip to install the frame, and cover the space in the middle with boards.
The type of foundation also depends on the soil. In loose soil, it is better to do strip laying around the perimeter. If the soil is dense and difficult to cultivate, limit yourself to the columnar option. It is considered the best and most durable, but expensive monolithic foundation made of reinforced concrete.
Making a greenhouse in the shape of a triangle
Drawing of an arched greenhouse
To make the shape of the correct arch, it is best to insert pipes when pouring the foundation. Then you need to make cuts on them (with a grinder or a hacksaw) about 1-2 m in length. After bending and inserting the arcs, they are secured in the pipes with screws, drilled through or filled with cement.
Polycarbonate can be fixed in different ways:
The side walls are cut out, doors and windows are inserted.
You can make arcs from PVC pipes, because they bend well. But attaching polycarbonate to them is much more difficult. It will be necessary to secure it with clamps or screw the longitudinal elements of the frame every 50-80 cm.
It can be done without a foundation. Many summer residents make the lower and vertical parts of the frame from bars or plastic sewer pipes. Crosses, angles or tees are installed at the joints. Holes are drilled in the resulting base and the side of the upper horizontal, mounted on the house. Arcs made of PVC water pipes are inserted into them, and corresponding holes are drilled in the base.
Then polycarbonate is fixed to the main and side parts. Most owners enter from the side, but this is not entirely cost-effective. When the door is opened, cold enters the greenhouse and the plant regime is disrupted. If the greenhouse is intended to be used for several years, experts recommend making an entrance from the house by cutting through the wall.
Standard greenhouse
This option can be built quite quickly. It will take little material, and the height will allow you to make multi-level beds and plant seedlings in them. It will take 5 sheets for the walls and roof (with dimensions of 3x6 m). But you will need to add another one to fill the triangular space on the sides of the house between the roof and the end wall.
Growing seedlings is a troublesome and quite labor-intensive process. It is very important to provide her with the right microclimate, the necessary conditions for growth and development. At the same time, everyone wants the plants to develop as quickly as possible, and not be threatened by wind and cold. It is for growing seedlings that summer residents use a mini-greenhouse. It happens different types and will help provide care for seedlings both at home and in the garden.

Every gardener needs a mini-greenhouse, and why is not difficult to guess.

The main functions and advantages of this structure:
- protects seedlings from negative impacts, including from drafts in the apartment (if there is a panic at home), rain and wind outside;
- does not block sunlight, but provides the correct microclimate for seedlings (the required level of humidity, temperature);
- allows you to carefully harden off seedlings;
- does not interfere with plant care procedures;
- It is low cost and can be installed in just a few minutes.

On a note! By the way, many people build mini-greenhouses even on the balcony, and not just in the garden.


The principle of operation of a greenhouse is easy to understand - it provides plants with heat due to the fact that it covers them on all sides from wind and drafts and is installed in a well-lit place. Warm air accumulated under the film is not carried away air currents in an unknown direction, and therefore the temperature in the greenhouse is much higher than in open space. This is very important for plants that love warmth and cannot tolerate excessive coolness. And a structure that is small in size will warm up faster and with better quality - a mini-greenhouse fully meets all these criteria.


What is recommended to grow in mini-greenhouses? First of all, these are, as already mentioned, seedlings of various garden crops who need warmth and careful treatment. As a rule, containers with seeds for germination are placed in home greenhouses, which are built on window sills. Peppers and some types of flowers respond very well to the use of a mini-greenhouse. In spring, the plants can be moved to an outdoor mini-greenhouse for hardening. Thanks to the use of these facilities for germination and growing seedlings, crops will begin to bear fruit earlier than usual.

 GrowBox - greenhouse for home
On a note! A home mini-greenhouse is, in fact, a structure that performs almost the same functions as regular film stretched over boxes with future seedlings. However, working in it is much easier and more convenient.
By the way, another advantage of using garden mini-greenhouses is that their miniature size allows you to install them in a small garden area. However, when the seedlings grow up, they will have to be moved to a greenhouse or open ground. But a mini-sized greenhouse will not be empty - other crops that do not require large spaces for growth and development can be planted in it.

Ordinary radishes can produce 3 or more batches of harvest per season, since in a mini-greenhouse you can start planting them very early and finish growing them much later.
In early spring or late autumn, onions, dill and other greens will feel great in a greenhouse, which will decorate your table and add vitamins to culinary dishes. In a small greenhouse you can even grow one that will bear fruit throughout the summer.

A mini-greenhouse will also help with the rooting of certain types of plants. For example, it has all the conditions for cuttings of raspberries, currants, and roses to take root and take root at the dacha.
On a note! In order to root shrub plants in the garden, it is best to make a separate mini-greenhouse, since this process is far from quick and lasts about a year, and a greenhouse may be needed for new seedlings.
Types of mini-greenhouses
Such greenhouses can be various types, shapes and dimensions - from very tiny, indoor ones, to quite spacious, outdoor ones. Let's consider the main types of these structures.
Table. Types of mini-greenhouses.
| Type of design | Description |
|---|---|
| It is small in size and can even fit on a windowsill. Seedlings begin to be grown in the first days of spring, or even in winter - it all depends on the growth rate of a certain type of crop. To shorten the development time of plants, and for the seeds to germinate and grow faster, just such greenhouses are often used. Roughly speaking, these can be exact copies of the usual outdoor greenhouses with arcs and film, even multi-story ones, or they can just be film shelters - it all depends on your wishes. You can make such a mini-greenhouse yourself or buy a ready-made one in the store. |
| It consists of several small arcs installed in a row, covered with film or agrofibre. In principle, it is no different from a regular-sized greenhouse, with the exception of very small dimensions. Can be installed in any illuminated place. |
| It is a small box that does not have a bottom, but has a lid covered with glass and film. A greenhouse of this type is easy to move and install in any garden bed. Typically used to protect plants planted in open ground, during unexpected frosts. It is also quite suitable for rooting cuttings of various fruit and flowering crops. |
| This is a greenhouse installed in a trench dug on the site. Its “sides” are formed using strapping, a fertile bed is arranged in it, and on top of this entire structure is covered with a lid made of polycarbonate and film. The soil itself serves as a thermal insulation material; in addition, it is possible to arrange additional heating of the greenhouse using biofuel, which we will discuss later. Often such a greenhouse is made with a single slope. |
| This is an external type of mini-greenhouse, differing in the way it is opened. It has two doors that, when open, resemble butterfly wings. In fact, such a design can have absolutely any size, but is usually small in size. |
| This type of greenhouse can also be quite large. The name “breadbox” was born due to the special way of opening the structure, which really resembles a full-fledged breadbox in appearance. The structure provides convenient access to plants and makes caring for them pleasant and easy. |


Growbox prices
growbox
Description and characteristics of materials
Before we begin to study the instructions for creating the simplest mini-greenhouses, we will understand the basic materials from which they are built. Each of them has certain pros and cons.
What can you make the frame of an arched greenhouse from? The simplest option is plastic or metal arcs; some even manage to make greenhouses from wooden arcs. If we compare these materials, we will immediately understand that metal will last much longer. longer than wood, as it does not rot. However, it is prone to corrosion in high humidity conditions. To slow down both processes, the wood is treated with special protective agents, and the metal must be painted.

On a note! Unlike a greenhouse, when installing a metal mini-greenhouse you will not need welding machine. Metal rods can simply be bent and stuck into the ground.
Plastic arches are good because they are not afraid of rot or corrosion. But it is a more fragile material than wood and metal, and breaks easily when the slightest effort. But it is also the cheapest.
By the way, the greenhouse box is usually made of wood, especially if it is a portable greenhouse or a “butterfly”. But make the “snail” out of metal - it’s easier and more convenient.
To cover the structure you can use:
- polycarbonate;
- agrofibre;
- polyethylene;
- glass.
Polyethylene film is the simplest version of covering material. It is easy to attach to any frame, and it is inexpensive. However, it quickly breaks and - even if removed for the winter - becomes unusable within 2-3 seasons. But in apartment conditions, greenhouses are closed with film.


Agrofibre is very good material, which transmits enough light and provides plants with a favorable microclimate. This is a fairly dense but porous material that allows moisture to pass through but does not release heat. It can be washed, and agrofibre serves when stored carefully long years. Costs more than polyethylene.

- a material that has long been known to all gardeners for its positive properties. It is quite durable, lightweight, and easy to use. They can cover both a small greenhouse and a huge greenhouse.

- good, but still not the best option for a greenhouse. The fragility and complexity of working with glass significantly limit the possibilities of its use. It is unlikely that gardeners will suffer with this material for the sake of a small greenhouse - except perhaps to cover the greenhouse.

Advice! We recommend using film, agrofibre or polycarbonate (depending on the type of product) to equip a mini-greenhouse. So, for “breadboxes” and “butterflies”, buy polycarbonate, for outdoor greenhouses would be better suited agrofibre, and for indoor use - film.
Prices for cellular polycarbonate
cellular polycarbonate
Heating a mini-greenhouse with biofuel
Biofuel will help insulate the greenhouse and provide it with additional heat. Its role is perfectly fulfilled by manure, straw, and old leaves. Setting up such a heating system for a greenhouse at the dacha is quite simple.
Step 1. In the place where the greenhouse will be built, make a small hole or trench in the shape of the future structure.

Step 2. Fill the hole about 2/3 full with the biofuel mixture. To do this, mix leaves, straw, manure with soil.

Step 3. Fill the “bed” with water and cover it with fertile soil, filling the trench to the edge.
Attention! The soil layer must be thick enough to plant garden crops in it.
Step 4. Place a greenhouse on top of the structure.

Due to decomposition processes, biofuel will heat up and give off heat more actively, and the greenhouse will accumulate it. This is how a natural heating system will operate in any greenhouse.
To ensure that the greenhouse is not blown away by a strong gust of wind, and that the entire structure is sufficiently rigid and stable, it is necessary to make a foundation. This will take very little time and will allow you to easily move the greenhouse to a new location if necessary. More details.
We make mini-greenhouses of different types
Depending on the type of construction, greenhouses can be made different ways. Let's look at some of them. Let's start with the simplest option - a frameless greenhouse. This is just covering a bed with seeds planted in them and covering plastic film or agrofibre. Simply cover the ground with material and press it down at the edges with bricks or stones, protecting it from blowing away by the winds. And this simple structure will already be considered a greenhouse.

You can also make your own tunnel or arched frame greenhouse.
Step 1. Purchase or make yourself several arches of the same size (usually choose arches made of metal or plastic). You will also need polyethylene, wire and clamps.

Step 2. Install the arcs at a distance of about 40 cm from each other, simply digging or sticking their ends into the ground 30 cm.

Step 3. Using wire or a wooden slat, connect the arcs to each other at the top point. This will give the structure stability.

Step 4. Cover the resulting structure with film and secure it on one side with plastic clamps or wire. On the other side of the film, screw a wooden strip with clamps or wire - the latter will help roll the material while opening the structure.
Step 5. The ends can be covered separately with pieces of film, or you can simply take a film of greater width and lower its sides onto the ends while closing the greenhouse.
Step 6. Fix to the film with stones or bricks.

This is one of the most simple options mini-sized greenhouse. But there are others.


You can also make a small portable greenhouse. To do this you will need lumber, screws, glass or polycarbonate, awnings and a handle.
Step 1. Put together a small frame without a bottom, reminiscent of a beveled box.

Step 2. Put together a wooden frame from thin pieces - this will be the base of the transparent lid.
Step 3. Insert a sheet of glass or polycarbonate into the frame.
 Alternative option- use of old window frames
Step 4. Secure the frame to the awnings on one side of the box (the higher side).

Step 5. Make a support for the frame from a block. You can also provide the frame with a hook for closing. The mini-greenhouse is ready.
On a note! By spending a little more time and putting together several polycarbonate frames, you can make such a greenhouse completely transparent.
This design is easy to move from place to place. The main thing is that it completely hides the beds with seedlings.

To grow seedlings and herbs on your personal plot, it is enough to build a small polycarbonate greenhouse with your own hands. For those who want to provide themselves with fresh vegetables all year round, you will have to spend money on installing a capital polycarbonate greenhouse. At the planning stage, it is important to decide on the purpose and dimensions of the building, the material used to make the frame, the type of foundation and the appropriate polycarbonate cladding technology.
Features of a polycarbonate greenhouse
Before making a polycarbonate greenhouse, you need to find out the basics of construction (optimal location, typical dimensions, assembly diagrams) by studying the theory and watching thematic videos. Careful preparation for construction and understanding of work tactics will help avoid a number of typical mistakes.
Portable mini-greenhouse made of polycarbonate
Location on the site
It is impossible to install greenhouses and greenhouses on any free space on the site. A competent and consistent approach to placement contributes to high yields and determines the energy efficiency of the structure. The amount of sunlight and wind protection depends on the electricity consumption for additional lighting, ventilation and heating.

Polycarbonate greenhouse tunnel
Aspects of choosing a location for a polycarbonate greenhouse:
- illumination;
- relief;
- cardinal directions;
- soil quality;
- proximity to communications.
Illumination. The primary criterion is sufficient light. The greenhouse should be exposed to the sun for as long as possible during the day. The proximity of trees, high hedges and fences is unacceptable.
Important! If it is not possible to provide access to light all day, you should choose an area where the sun dominates in the afternoon. The advantage of this installation is that it protects plants from scorching rays in summer.

Convenient location country greenhouse
- light falls unevenly on “sloping” beds;
- in lowlands, the soil is prone to moisture accumulation and frequent frosts.
A slight slope should be leveled - pour crushed stone and fertile soil. Compact the laid out “pillow”.
Accounting for cardinal directions. Experienced agronomists insist on choosing a location taking into account the dimensions of the greenhouse:
- large greenhouse complexes more than 6 m long - west-east orientation;
- compact buildings– north-south direction.

Orientation relative to cardinal directions
Soil Features. Clay, sandy and swampy soils should be avoided - on “soft” soil, even a monolithic foundation of a structure can “fail”. If there is no alternative, it is necessary to compact the ground with gravel.
Communications supply. When building a greenhouse next to the house, it is possible to install a single heating network, which will significantly reduce the cost of operating the greenhouse.
The place must be isolated from drafts, have a convenient approach and access to water resources.
dimensions
Dimensions depend on the purpose of the greenhouse (seasonal use, type of crop), the expected volume of the crop and the capabilities of the site. Three parameters are taken into account: length, height, width.
Standard dimensions of a polycarbonate greenhouse for early crops:
- width – about 1-1.2 m;
- height – up to 1.5 m.
When determining the dimensions of an all-season greenhouse, it is necessary to take into account a number of nuances of arranging beds, ease of use and heat capacity.
Width. The parameter depends on the number of proposed planting rows and the size of the row spacing. Optimal layout:
- two ridges of 90-100 cm each;
- passage – 40 cm;
- The total width of the greenhouse is about 2.5 m.

Typical version of a polycarbonate greenhouse
A 3.5 m greenhouse accommodates three narrow beds (60 cm) and two row spacing of 35 cm.
If you plan to use a wheelbarrow to harvest the crop, then the minimum width of the passage is 90 cm. If it is necessary to arrange a greenhouse with a longitudinal central rack (90-95 cm) and two passages, the width of the structure will be 3.8-4.3 m.
Height. The main requirement is that there must be space between the plants and the “ceiling” of the greenhouse. For example, if low-growing crops (peppers, cabbage) are planted in the soil, then the distance from the top edge of the door to the covering material can be 40-60 cm. When growing vegetables on high ridges, the height of the greenhouse is increased by the size of the racks.
- door height – from 1.8 m;
- greenhouse height – human height + free space for plants (40-60 cm), that is, about 2.3 m.

Regardless of the shape of the polycarbonate greenhouse, the height at the ridge should exceed the height of the side walls. Compliance with the norm ensures a sufficient roof slope at an angle of 30-50° for the smooth sliding of snow masses.
Length. The parameter is chosen arbitrarily. It is convenient when the length of the greenhouse is a multiple of 120 cm, 60 cm - polycarbonate is cut with fewer scraps.
Advantages and disadvantages of a greenhouse
The performance characteristics of a greenhouse are largely determined by the type of covering material. Polycarbonate is a thermoplastic polymer with a number of unique properties. For cladding greenhouses, a material with a honeycomb structure is usually used - triangular or rectangular honeycombs filled with air are visible in the cross-section of the canvas.
The material is characterized by increased resistance to external influences, excellent thermal insulation combined with transparency.

Cellular structure cellular polycarbonate
Advantages of polycarbonate greenhouses:
- Strength. The polymer shelter resists gusts of wind and hail. Polycarbonate is 200 times stronger than fragile glass.
- Thermal and biostability. Tolerable temperature limits: -40 °C, +130 °C. Polycarbonate can withstand multiple freeze-thaw cycles and is not damaged by rodents.
- Thermal insulation. The air gap and the thermal resistance of the polymer itself explain the low heat transfer value: 4.1 W/(sq.m*K) – with a thickness of 4 mm, 1.4 W/(sq.m*K) – 32 mm.
- UV protection. On outside The canvas is coated with a light-stabilizing film that retains harsh UV radiation. An additional action is the equalization of day and night temperatures inside the greenhouse.
- Lightness of the material. Polycarbonate with a thickness of 6 mm is used to cover greenhouses, specific gravity canvas – 1.3 kg/sq. m. When constructing a structure of standard width (up to 3 m), reinforcement of the frame is not required.
- Durability. Using quality product and technologically correct installation The service life of polycarbonate reaches 15-20 years.
- Versatility. Thanks to its elasticity, plastic sheathing Suitable for greenhouses and greenhouses of various shapes.

Arrow-shaped polycarbonate greenhouse
Disadvantages of using polycarbonate:
- Shelter susceptibility to chemical and organic reagents (cement, insecticides, alkalis, ammonia, methyl alcohol, acid).
- Risk of damage to UV protection. Without a film, polycarbonate quickly deteriorates under the sun. The coating is resistant to scratches, cleaning with abrasives and impacts from sharp objects.
Drawings and diagrams of polycarbonate greenhouses
In addition to the location and dimensions of the future building, it is necessary to decide on the shape of the greenhouse and develop a drawing. The polycarbonate greenhouse assembly diagram should show:
- all significant dimensions;
- frame material;
- elements connection nodes;
- number and location of stiffeners;
- installation locations, dimensions of doors and windows.
Consider several options for different forms of greenhouses and greenhouses with polycarbonate shelter.
Arched greenhouse . Compact structure in the form of a tunnel with a width of 2.7 m and a height of 2.22 m. The frame is a galvanized square section profile (30 * 30 mm, thickness - 1.5 mm). Thanks to the robust frame and small dimensions, vertical supports are not required. There are two doors and two windows for ventilation.

“Arch” made of metal profiles and polycarbonate
Greenhouse with a house. Spacious option from wooden beams. The basis is a strip concrete foundation. The classic version is easier to assemble yourself.

Gable wooden building
According to Mittleider. Variation gable roof with a ventilated channel. The model provides sufficient air circulation, but the heat capacity of the greenhouse is somewhat degraded.

"American" with asymmetrical roof
Lean building. Wall-mounted recessed thermos greenhouse with polycarbonate coating. The building is intended for year-round cultivation crops on raised beds.

Single-pitched greenhouse-thermos
Greenhouse-breadbox. Practical solution for a greenhouse. Despite the abundance of details, the project is simple to implement.

Greenhouse assembly diagram
Explanation of symbols:
- 1 – lower frame made of logs 120*120 mm;
- 2, 8 – wall frame with timber 35*35 mm;
- 3.6 – wall cladding with tongue and groove boards;
- 4 – cord for insurance;
- 5 – wooden rod;
- 7 – temporary technological scaffolding (35*200 mm);
- 9 – mounting brackets;
- 10 – loop;
- 11 – cover trim (40*30 mm);
- 12 – reinforcement frame (section – 5 mm);
- 13 – polycarbonate;
- 14 – sealing tape;
- 15 – handle.
Lean greenhouse. A simple version of a country greenhouse, assembled independently from 20*20 mm metal pipes. Timber strapping is suitable as a foundation.

Drawing of a greenhouse for low-growing crops
Construction of a polycarbonate greenhouse step by step
Having looked through the available options and diagrams and learned how to build a simple structure yourself, you can move on to practice. Below are two solutions: a greenhouse made of profiles and a greenhouse made of wood. In both cases, the covering material is polycarbonate.
Foundation construction
Greenhouses and greenhouses made of polycarbonate are characterized by significant windage; in order to prevent capsizing, it is necessary to “ground” the structure using a reliable foundation. This requirement is equivalent for structures of any shape and size.
Acceptable types of foundation:
- Wooden tape. Simple and cheap to make, but not resistant to moisture - it begins to rot and collapse. The method is suitable for seasonal and portable greenhouses.
- Concrete-brick. Universal option, used for heated greenhouses and large greenhouses. Strengths: light weight, ease of erection, resistance to deformation.
- Blocky. Easy to install and withstands external influences. Minus - insufficient heat capacity, the need for insulation.
- Concrete strip base. It is durable and reliable, but requires considerable investment.

Construction of a strip concrete-brick base
Step-by-step technology Laying a concrete-brick foundation for a greenhouse with your own hands involves several steps.
Step 1. Preparation. Remove debris from the site and apply markings:
- define boundaries;
- Place wedges in the corners, pull the rope;
- check the evenness of the diagonals.

Site preparation: marking the perimeter of the greenhouse
Step 2. Digging a trench. Dig a ditch 30-35 cm wide, 25 cm deep. Pour fine gravel onto the bottom and compact it - the height of the “cushion” is 5-10 cm.
Step 3. Installation of the reinforcing frame. Assemble a reinforcing “belt” from metal rods and install it in the ditch - the frame will add additional rigidity to the foundation.
Step 4. Mixing and pouring the solution. Mixture composition: cement, fine sand and broken stone (1:2.5:4 respectively). Fill the trench with the solution, cover with polyethylene and leave for three weeks. At temperatures above +23 °C, the fill must be moistened regularly.
After the concrete has set, waterproof it with liquid bitumen or roofing felt.

Protecting bricks from moisture
Step 5. Brick laying. Nuances of work:
- install mortgages in advance for subsequent fastening of the frame;
- place the brick with dressing, fill all the cracks with mortar;
- It is enough to lay 2-3 rows.

Laying a brick foundation
Selection of materials for the frame
In the construction of polycarbonate greenhouses, three are mainly used: frame material:
- wood;
- steel pipe;
- galvanized profile.
Tree. The material is accessible and easy to process. It is better to use wood to assemble a small greenhouse. At capital construction you should take care of a more resistant frame.
Disadvantages of wood: susceptibility to rot, the need for regular treatment with antiseptic compounds to extend its service life.

Polycarbonate greenhouse according to Mittleider
Steel pipe. The supporting frame, assembled from rolled steel, can withstand significant mechanical loads and does not deform under the weight of snow. Provided the protective layer of anti-corrosion paint is preserved, steel for a long time does not rust.
Disadvantages of a steel frame:
- complexity of assembly - welding skills and equipment for bending metal arcs will be required;
- the heaviness of the structure - arranging a “lightweight” foundation made of wood is unacceptable;
- high price.

Arched structure made of steel pipe 20*20 mm
Galvanized profile. The optimal solution for constructing a frame under polycarbonate. Using a galvanized profile has a lot of advantages:
- resistance to corrosion processes;
- lightness of profiles and the ability to rearrange the frame;
- assembly is carried out using fasteners, so the frame can be disassembled and reassembled;
- affordable price– the “skeleton” of a galvanized greenhouse is half the price of a similar design made of steel pipe.

Portable frame for polycarbonate cladding
The weak point of the galvanized profile is insufficient strength. During peak wind and snow loads, the profile may become deformed. In regions with a lot of precipitation in winter and gusty winds, the supporting frame will have to be strengthened with additional horizontal jumpers and vertical posts.
Frame installation
Construction characteristics:
- frame made of galvanized metal profile 50*40 mm using rack and guide profiles (horizontal parts);
- the presence of stiffeners - jibs on the walls and roof;
- fastening with self-tapping screws;
- the foundation is a concrete-brick strip foundation.

Dimensions and structure of the metal frame
The foundation laying technology is described above. The next stage of DIY construction is assembling and installing the frame. For work you will need: metal scissors, screwdriver, measuring instruments(roulette, level).
Sequencing:
- According to the drawing, cut the profile for assembling the front end.
- Fasten the parts into the frame, separate the door, mount crossbars and jibs.
- Perform a control measurement.
- Assemble the lower trim from the guide profile and secure it to the foundation through the mortgages.
- Install the first fragment - the front end.
The progress of the work is illustrated below.

Preparing the End Wall Parts


Metal profile frame ready for covering
Fastening polycarbonate sheets
To figure out how to make a polycarbonate greenhouse yourself, you need to know the cladding technology. Compliance with installation rules will extend the life of the greenhouse. The most popular are two methods of attaching polycarbonate.
No. 1. Permanent fixation through rubber pads:
- Place a sealed cover on the galvanized profile at the joints of the panels.
- On rubber compressor lay polycarbonate sheets.
- Place a “soft” and metal overlay on top of the casing.
- Twist the sheets with self-tapping screws and cover with a decorative strip.

One-piece polycarbonate joining technique
No. 2. Installation using a split profile. A special H-profile is used, consisting of two parts: a base and a cover. Elements snap and fix roofing screws.
To prevent the polycarbonate from sailing, it is additionally secured with self-tapping screws through a thermal washer. The open ends of the covering material are covered with perforated tape and covered with an end profile. These measures will prevent moisture from entering the plastic honeycombs.

Assembly via split H-profile
Instructions for assembling a mini-greenhouse
To build the simplest home greenhouse with your own hands you will need:
- wooden beam – 50*50 mm;
- boards 30 mm thick, 120-150 mm wide;
- slats with a cross section of 30*20 mm;
- metal-plastic pipes for water supply with a diameter of 25 mm;
- film waterproofing;
- wood antiseptic;
- metal corners.
Assembly order:
- Build a box about 25-50 cm high on a strip foundation. Fit the parts to each other and assemble them into panels using slats.
- Mount racks in the panel corners (bars - 50*50 mm), cut off the top of the supports at an angle of 45°. Treat the wooden box with an antiseptic and line the inside with waterproofing material. If necessary, insulate with polystyrene foam.
- Install vertical beams in the end walls corresponding to the height of the greenhouse. Cut transverse supports from the timber, connect them to the central and side posts through a 135° angle.
- Install intermediate posts and ridge beams.
- Bend rafter frames from metal-plastic pipes. The pitch of the rafters is 0.5-0.6 m. K bottom harness the pipes are fixed with metal clamps.

Photo illustration of mini-greenhouse assembly
Attaching polycarbonate to a greenhouse is carried out using one of the above methods.
Video: polycarbonate greenhouse on a summer cottage
A selection of videos on how to make a greenhouse out of polycarbonate with your own hands will help indicate general order actions.
Video: Homemade cucumber greenhouse made from steel pipe
Video: Step-by-step technology arrangement pile foundation and greenhouse assembly from galvanized profiles.
Video: Covering a metal frame with polycarbonate.
Even a novice gardener can build a small greenhouse on a personal plot with his own hands. It is better to entrust the construction of a capital all-season structure with heating to professionals. Alternatively, you can purchase a ready-made kit and follow the instructions to assemble a home greenhouse yourself.
It is quite difficult to create optimal growing conditions for vegetables without special shelter. During the day, plants will languish from the heat, and at night they will grow poorly due to the cold. By installing a polycarbonate greenhouse with your own hands, you can create comfortable conditions for various seedlings. We invite you to take a closer look existing species greenhouses and features of their creation.
Read in the article
What is the difference between a greenhouse and a greenhouse
To begin with, let us note what are the features of such covering structures. In the greenhouse, positive temperatures are maintained mainly by sunlight. It is permissible to use additional heat sources, for example, coal, wood, gas or fuel oil. This design is larger than a greenhouse. An adult can walk inside the greenhouse at full height.

The greenhouse belongs to the category of self-sufficient energy systems. Heating internal space provided by the biological breakdown of organic materials and the created sunlight greenhouse effect. Such buildings, as a rule, are made without doors. For access to plants, a folding or removable top part. The greenhouse is actively used for growing seedlings. There is not enough space for grown plants.

What a greenhouse and a greenhouse have in common is the conservation of thermal energy inside the structure. Based on this, it is worth carefully considering the design of each shelter and the materials used in construction.
Advantages and disadvantages of polycarbonate for the manufacture of greenhouses and greenhouses
The choice in favor of polycarbonate is made because of its undeniable advantages:
- durability. Compared to film coating, it can last much longer;
- safety. You don’t have to worry that during use it will break like glass;
- high throughput. A large percentage of sunlight passes through the formed coating;
- resistance to mechanical stress;
- sufficient plasticity. Polycarbonate can be used as a covering material for arched greenhouses;
- long service life reaching 20 years;
- attractive appearance and wide range of colors;
- light weight, allowing you to abandon the construction of a powerful foundation.
Among the disadvantages, the higher price should be noted compared to other covering materials.

Projects of greenhouses and greenhouses made of polycarbonate with photos of structures
You can independently create a structure of any shape and configuration. If you are thinking about the appearance of a future polycarbonate greenhouse, photos of finished options can serve a clear example. We invite you to get acquainted with possible solutions.

Polycarbonate greenhouse with house
Greenhouses with a gable roof have certain advantages. Polycarbonate greenhouse with a house correct location on the site is capable of providing plants with thermal energy throughout the day. We invite you to look at photos of interesting incarnations.


Mini-greenhouses made of polycarbonate
To grow seedlings you do not need a large shelter. Mini-greenhouses made of polycarbonate cope with this task perfectly, photos of which you can see below.


How greenhouses and greenhouses made of polycarbonate work
Based on their design, covering structures are usually divided into above-ground and in-depth. The latter are a trench with an upper lining made of bricks, boards and other materials. The roof can be of any shape: single-, gable or arched.
Attention! Deep greenhouses with pitched roof they are called Russian, with a gable - Belgian.

Ground-based structures are often portable. A heating pad is usually placed under a layer of soil. As soon as the “coolant” completely rots, you will have to add a new portion. If you decide to buy a polycarbonate greenhouse, it will definitely be above ground.

What types of support base are used when installing greenhouses and greenhouses
Various types of bases can be used to construct greenhouses. For buildings installed for a long time, you can choose a strip, brick or pile foundation. For seasonal greenhouses, a base made of wooden beams is suitable.
Attention! At high level groundwater It is worth abandoning the construction of a strip or brick foundation.

DIY polycarbonate greenhouse: materials for making a supporting structure
The greenhouse frame can be made of various materials. Many people make their own polycarbonate greenhouses from wood. Assembling such a structure is not difficult. The frame is stable and durable. With proper care, treatment with a special composition and the use of dried wood, it can last quite a long time. Easily attaches to a wooden base. A greenhouse does not need a reliable foundation. Enough support pillars.

If you decide to buy a polycarbonate greenhouse, then you will most likely be offered a product with metal frame. You can make such a greenhouse yourself from thick reinforcement or profile pipe. The elements are connected by welding. Due to its heavy weight, it requires careful preparation of the base.

Metal-plastic pipes with high performance characteristics can be used to make the frame. They bend well and are strong enough to support the weight of polycarbonate. Suitable for making arched structures.
The cheapest option is a frame made of polypropylene pipes. Using nodal elements, you can form a greenhouse of any shape and size.

How to choose polycarbonate for covering a greenhouse or greenhouse
Manufacturers offer cellular and monolithic polycarbonate. When choosing a covering material, you should immediately pay attention to the first type, which is capable of transmitting up to 88% of light and has good thermal insulation characteristics. An important criterion when choosing polycarbonate is its density. It should average about 800 g/m². This parameter can be visually determined by the absence of distortions in the lying sheets, bends and other types of deformation. However, it is better to check specifications from the seller. The thickness of the selected polycarbonate depends on the characteristics of the shelter being built.
Advice! If you decide to buy polycarbonate, contact a trusted seller. There is a large amount of low-quality material on the market.

Calculation of the required amount of building material
The procedure for calculating the required amount of materials depends on design features specific building. We invite you to watch a thematic video that will help you understand the intricacies of the calculation.
Preparatory stage before building a greenhouse or greenhouse made of polycarbonate
For those who have decided to make a polycarbonate greenhouse with their own hands, a drawing of the future design will help them decide required quantity material and the procedure for performing installation work. Except project documentation, the site where construction will be carried out should be prepared. You should decide on the location of the greenhouse in the allocated area.
Advice! For better illumination of grown vegetables, the greenhouse should be located from east to west.

How to build a greenhouse or polycarbonate greenhouse with your own hands - step-by-step instructions
If, instead of purchasing a ready-made structure, you decide to build a unique structure with an optimal configuration, we suggest you figure out how to build a greenhouse with your own hands from polycarbonate. Below is step-by-step instruction, allowing us to thoroughly understand this issue.

What tools are needed for the job?
The list of tools used depends on the design features of the greenhouse and the material from which the frame is made. Be sure to have:
- hammer;
- screwdriver;
- sledgehammer;
- measuring tool;
- building level;
- sharp knife.

Laying the foundation
The answer to the question of where to start and how to install a polycarbonate greenhouse with your own hands should be from the foundation. Work begins with marking the territory. It is necessary to drive in pegs to mark the contours of the future greenhouse. By their location it will be possible to determine how correctly the markings are made. When installing a pile foundation, instead of pegs, you can immediately install metal pipes. Before digging, pipes are coated with a special compound to slow down corrosion. Piles are dug to depths of up to 0.9 m, leaving about 20 cm on the surface.
For strip foundation a trench is dug, formwork is installed and mortar is poured. After the concrete has completely dried, they begin installation work. The base elements made of timber are pre-treated with a composition that slows down rotting. After this, it can be laid on bricks, dug in, or simply laid on the ground.

The video of installing a polycarbonate greenhouse with your own hands allows you to understand in more detail the features of laying the foundation.
A video on how to cover a greenhouse with polycarbonate with your own hands will help you understand the nuances of the process.
How to make windows and doors in a polycarbonate greenhouse with your own hands
Leftover polycarbonate is used to make windows and doors. They are attached to previously prepared places. To fasten the door you will need three hinges, for the window - two. When thinking about how to make a greenhouse with your own hands from polycarbonate, you should decide on the direction of opening the window. It can be opened up, down or to the side.

In the following video of assembling a polycarbonate greenhouse you can find interesting information.
 More details on Otzovik: http://otzovik.com/review_712853.html
 Review of the greenhouse “Element”
More details on Otzovik: https://otzovik.com/review_3072322.html
We hope the video on how to assemble a polycarbonate greenhouse was useful to you. Share in the comments how much time you spent on installing the greenhouse itself, what size it is and what it is made of.