How to make a scarf hanger. DIY scarf hanger: using improvised means and little effort Making a scarf hanger
Hi all!
A scarf hanger arrived to me, which I have dreamed of for a very, very long time. True, I constantly forgot to order it: Aliexpress, you know, it’s like this - you go there to look at the hanger, hang there for an hour, and forget what you actually wanted
Finally, I got my hands on this accessory, the order was placed, and exactly a month later I already had the hanger.
Cost 4.45 USD
For shipping it was folded three times. Bends/unbends easily.


Initially, I didn’t want to take a large one (they are different - for 8, 16, 24, 28 rings...), I was afraid that the more rings and more scarves hanging there, the more it would sag. I chose the middle option - 16 rings.
 The entire base is made of strong wire, wrapped with a durable paper rope on top. Wrapped well, neatly. I have no complaints.

Next photo will help you better imagine the “scale” of the accessory.
 Well, this is actually what I got after filling the hanger with scarves.

Everything is as I imagined:
Hanging/removing scarves is very convenient
Good overview, everything is visible (before scarves were in the chest of drawers, I constantly lost something, forgot about some scarves, but here everything is in full view)
The hanger did not bend and it is clear that this number of scarves is not at all a burden for her

******************************************************************************************************************
True, there is one thing: all my scarves, of course, did not fit on it))) But I knew about it, just as I wrote above, I wanted just such a small one and my plans were to have several of them, and hang scarves on them according to theme:
Summer (bandanas and scarves)
Demi-season
So far I’ve only ordered one to try, but I’m very pleased with the purchase, so I’m ordering two more for the remaining scarves, as I intended!
My great review of products from Aliexpress with photos of purchases can be found
*******************************************************************************************************************
I recommend purchasing a scarf hanger! By the way, you can order this not only for yourself! I am sure that any woman, even if she is not a scarf-maniac, will appreciate such a gift. This accessory organizes space, allows you to keep things in order, in a word, very convenient and practical! Can be used not only for scarves, but also for belts!

Happy shopping!
DIY scarf hanger
Every young lady has several light colored scarves in her wardrobe. They are the ones who add completeness to the outfit and create the right mood.
If you like variety, and you have more than a few different scarves, then the task of storing them neatly and compactly arises. Meanwhile, make it simple and convenient organizer for scarves couldn't be easier. This device will not only allow you to store all the scarves in one place, but also easily select an accessory of the desired color.
You will need very little to get started:
Plastic hanger with round bottom bar
Masking tape (it will be more convenient to use a narrow one)
The plastic rings that come with each shower curtain (or any other rings that fit)
Threads of any color and composition for decoration (optional)

1. We estimate the places to which we want to attach our rings.

2. And “reliably glue with tape” each ring to the bottom crossbar of the hanger.

3. It should look something like this.

4. And a little later - so.

5. Those who are the most impatient can finish the work at this point, because the organizer is essentially already ready. But for aesthetes, there is another task: attach a thread of an interesting color to the hanger and wrap it around the bottom crossbar, also capturing the places where it is attached to the rings, in order to decorate the unglamorous tape.

6. For greater strength, you can smear the crossbar with glue, but, as experience shows, the threads stick perfectly without glue. The main thing is to reel in “gently, but firmly.”

7. This business requires patience and love for beauty...

8. As a result, the scarf organizer takes on a neat appearance and individuality. By the way, you can wrap threads around the entire hanger - then you will become the owner of a truly designer piece.

9. All that remains is to hang up the scarves and enjoy the convenience that the scarf organizer will give to each of its owners.


- DIY scarf organizer
Every young lady has several light colored scarves in her wardrobe. They are the ones who add completeness to the outfit and create the right mood. If you love variety, and you have more than a few different scarves, then the task is to...
- Organizer
So I scraped together an organizer! Topic: Alice in Wonderland. Size A5, fabric cover (soft!), inner sheets designed in Photoshop and printed :) The rings are detachable :) So you can insert additional sheets. I didn’t decorate with paper flowers - they would come off...
- scarf
after the hat. For Sashka. My first scarf. I've never knitted scarves before. I'm not very happy with the result. When I tied it, it didn’t turn out very neatly. Maybe there are some tricks? I think that a scarf is better with single crochets...
- organizer for floss
My husband was getting ready to embroider a towel, bought a blank and threads, but from experience he knows how threads get tangled, and decided to make himself a mini organizer for threads, it took 20 minutes + time to rewind the threads, and this is what...
Do you love wearing accessories and scarves? How do you store them? Most of the time, hinges and accessories get wrinkled in a drawer or cabinet, and if you want to remove them, you'll have to dig and look. It is much more convenient to arrange the scarves on a separate hanger so that you can easily see everyone and choose the right one. Plus, hanging scarves on a hanger prevents them from getting wrinkled, and there's no need to iron them every time you want to use them.
If you don't have a special scarf hanger, you can make it yourself - see how.
Necessary materials
- 10 curtains for hanging bathroom curtain
- 1 trouser hanger
- usually glue
- Super glue
- paint, additional
- coloring sponge
- ink ribbon 
How to do it

1. Draw the wooden part of the hanger. You can leave the original color, but paint will give it more style and personality. To protect metal and plastic parts hangers, wrap them with paint ribbon. If you want, you can also paint the rings where the scarves should be hung, but use the best spray for them because the brush will take a lot of time. 
2. Once the paint has dried, place the rings in a V or triangle shape: four on top, three on the bottom, two and one on the bottom. Of course, you could experiment and create your own shape. When you are ready with the design, start gluing the rings one by one onto the bottom of one of the hooks. Don't place the rings in the middle between the two clips so you can use this hanging option later. 
3. Place small dots in the middle of the bottom of one of the hooks so you know exactly where to put the rings. Apply a large number of glue to ensure that the rings will not peel off under the weight of the scarves. 
4. When gluing the second, third, etc. rings, you need to put glue and sides to grab the ring by one in front of it. Keep the loops snug against each other while holding the glue to ensure they are glued together properly. Let the hanger dry before moving on to the next step. 
5. Once the glue has dried, strengthen the structure super glue. Don't try to lift and move the stand before going 5-6 hours - the glue will be tight enough to rotate the stand and repeat the same procedure on the other side. Challenge yourself with waxed paper under the counter that peels off easily, unlike regular ones that stick to the adhesive. 
6. Wait 24 hours to make sure the glue is dry, then hang your favorite scarves on their new hanger. 
It is simple and minimalistic, does not take up much space, but is functional and practical. In addition to the 10 hanging rings, you can also use panty garter pliers to hang shawls made from thinner fabrics.
How to properly organize storage of things in a closet? It seems simple enough, but sometimes, due to improper storage, there is not enough space even in a large closet. So that all things are in in perfect order, and the space was not overloaded, it’s worth knowing a few simple but effective secrets. How to organize your closet?
Get rid of everything unnecessary
Organize your closet
 First of all, you need to conduct a global audit and go through absolutely all things. It will take some time, but the result will pleasantly please you. So, when looking through things, you need to carefully look at them for defects, try on wardrobe items that have been lying idle for a long time. If things have not been used for a long time, but only take up space, it makes sense to get rid of them. You don’t have to throw them away, because you can make a lot of interesting decorative items from old things. For example, sew a cover for a chair or a blanket from scraps of fabric. But they definitely have no place in the closet anymore. Everything on the shelves
 Seasonal storage
Seasonal items can be hidden in baskets and put away on the closet
Seasonal storage
Seasonal items can be hidden in baskets and put away on the closet
 At the turn of the seasons, it is also necessary to sort through things and remove those that will not be used in the near future. You can hide them under the bed or put them in baskets and place them on top of the closet. Sometimes seasonal items are stored in the pantry or in suitcases, which can perform several functions at once - decorate the interior, act as coffee table or bedside table, as well as being a spacious storage system. Competent sorting
Sorting things by color
At the turn of the seasons, it is also necessary to sort through things and remove those that will not be used in the near future. You can hide them under the bed or put them in baskets and place them on top of the closet. Sometimes seasonal items are stored in the pantry or in suitcases, which can perform several functions at once - decorate the interior, act as coffee table or bedside table, as well as being a spacious storage system. Competent sorting
Sorting things by color
 Proper sorting will help you quickly find out what is where. There are several types of distribution of things: By color. So, you won’t have to look for a long time among all the variety of things for a yellow sweater or a pink blouse, and harmonious color transitions will only lift your spirits. By type of material. It's nice when silk blouses hang in one part of the closet, and cotton shirts are given another separate corner. Top bottom. This sorting allows you to divide things into “top” and “bottom”, that is, it is appropriate to place T-shirts, blouses, shirts and sweaters on the upper shelves, and hang skirts and trousers on the bar below.
  Little Helpers
Scarf storage
Little Helpers
Scarf storage
 When tidying up your closet, you shouldn’t ignore all sorts of organizers, hangers with clothespins, transparent containers, wicker baskets, and tie boxes. They save a lot of space and help organize storage properly. For convenience, you can label containers and cells or hang cute labels on them with the words “socks”, “tights” and others. Convenient clothespins on hangers
 Sock storage baskets
 Storing things in baskets
 Stylish storage
 "
Storage organizer
"
Storage organizer
 Convenient rods for storing scarves
 Storage of shoes and bags Shoes and bags should have their place in the closet. At the same time, it is better to allocate lower shelves for shoes and boots, or build a small rod for them. It is convenient to store high boots on it, after hanging them on hangers with clothespins. Thanks to this they will not lose their shape. For bags, you can select the upper shelves. To prevent accessories from getting wrinkled, you should stuff them with paper. Then they will keep their shape. Shoe storage
 Storing women's bags
 Storing wallets and clutches
 Storing things in drawers
The most difficult thing is to comply perfect order in drawers. To do this and fit as many things as possible, you need to carefully twist them and fold them in a vertical position. Cardboard partitions and tubes, which are sometimes left over after shopping, can be used as dividers. This makes it convenient to store underwear, T-shirts, tank tops, socks and scarves. The main thing is to fold things carefully so that they do not get wrinkled and can be used at any time. Storing scarves and shawls
Storing things in drawers
The most difficult thing is to comply perfect order in drawers. To do this and fit as many things as possible, you need to carefully twist them and fold them in a vertical position. Cardboard partitions and tubes, which are sometimes left over after shopping, can be used as dividers. This makes it convenient to store underwear, T-shirts, tank tops, socks and scarves. The main thing is to fold things carefully so that they do not get wrinkled and can be used at any time. Storing scarves and shawls
 Storing things in a drawer
 Bra storage
 Storing linen in a drawer
 Proper laundry storage
 Organize your drawer
 Some important recommendations:
Before putting knitted woolen items in the closet, they must be ventilated. Preferably in the fresh air. When sending knitted items for seasonal storage, they need to be washed, ventilated and placed in plastic bags. Periodically, the closet and all things must be ventilated so that odors from perfume or sweat do not linger on them. Pants and
Some important recommendations:
Before putting knitted woolen items in the closet, they must be ventilated. Preferably in the fresh air. When sending knitted items for seasonal storage, they need to be washed, ventilated and placed in plastic bags. Periodically, the closet and all things must be ventilated so that odors from perfume or sweat do not linger on them. Pants and

Long Dresses
It is recommended to throw hangers over the crossbar and then place them in the closet. This way things won’t get wrinkled or get dirty with dust, which often settles at the bottom of the closet.
Once a month the closet needs to be dusted and ventilated. Perfect order in the closet Hangers are indispensable for careful and neat storage of clothes in the closet. Next are a few ideas for increasing the functionality of ordinary hangers. To make it convenient to hang scarves, ties, gloves, glasses and belts, so that dresses and blouses do not slip off their hangers, you will need a minimum of materials and time.
1. DIY scarf and tie hanger
Light summer scarves, winter knitted scarves, ties and other accessories lying on a shelf or in a drawer sooner or later turn into colorful chaos, where it is difficult to immediately find anything. Great solution You can make a simple scarf organizer with your own hands. You will need several rings for the bathroom curtain, attached to the crossbar of the hanger. A hanger for scarves and ties will make it much easier for you to find what you need!
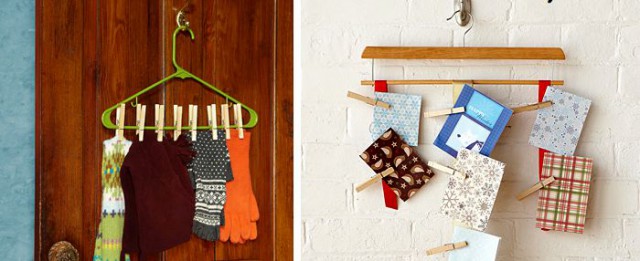
2. DIY glove and sock hanger
Attach it to a hanger with a thin bar large clothespins. This way you can store winter gloves, scarves and even socks!

3. Belt hanger
It is useful for belts to hang straight, without bends or kinks. Screw some hooks into your hanger! The men in the house will appreciate this

convenient improvement
ordinary wooden hangers. 4. Glasses hanger How do you store your glasses collection? Shelf, drawer? Here's another place for organized storage - just hang them on a hanger! 5. To prevent clothes from slipping off the hanger Smooth, thin hangers can be inconvenient to store items on. Take 3-5 pieces of these hangers, connect them with tape and wrap them with multi-colored yarn! Firstly, the hanger will become thicker, and secondly, silky and light items will not slide off the hanger. And thirdly, this

To make your closet comfortable, functional and spacious, you need to choose the right filling for sliding wardrobes - various stationary and pull-out shelves, boxes, rods and others necessary accessories. Jet-Systems specialists will help you choose inexpensive filling High Quality, will professionally perform all work to order.