Paper decor for all occasions. DIY room decoration: ideas, crafts Unusual room design
Many people, after completing an apartment renovation, are interested in the question: how to decorate the interior of a room with your own hands? Although the modern market offers many interior items that could act as decor, to save money it is better and easier to create such things yourself.
Before you decorate your home, you should decide on the main theme of the accessories. They must form a single picture. A wide variety, diversity and brightness of shades turn a home into a Chinese shop. The most common options are photo collages, paper products, small pillows or decorative mirrors.
Photography as decor
When wondering how to decorate the interior of rooms with your own hands, the first thing that comes to mind is decor from photo cards. In this case, there is room to use your imagination. The main thing is to choose suitable images.
There are several ways to decorate a room using photographs:
- It is best to select pictures different sizes and orientations (horizontal and vertical). Thus, the collage of them will not be monotonous and will gain volume.

- Photos can be hung on ropes, supplemented with clothespins. Garlands are also perfect for this purpose - such decoration will add coziness to the room in the evening.

- Great decorating idea - decorating a desktop or old window frame using photos. To do this, glue images reverse side to the table or from the front to a transparent and dense surface (plastic or glass).

Paper butterflies
This solution is very suitable for DIY interior decor, because paper butterflies are cheap, simple and at the same time effective way decorations. You can use butterflies to create all sorts of geometric shapes for the wall.. There are no restrictions on the color and quantity of these elements.

Due to their miniature size, paper butterflies do not overload the interior; they look elegant and not clumsy.
You can fill a wall with paper butterflies, make a poster, hang them on strings from the ceiling, and even stick them to a chandelier. Butterfly templates are easy to download from the Internet. Moreover, you can choose both the shape and various details, for example, curly slots.
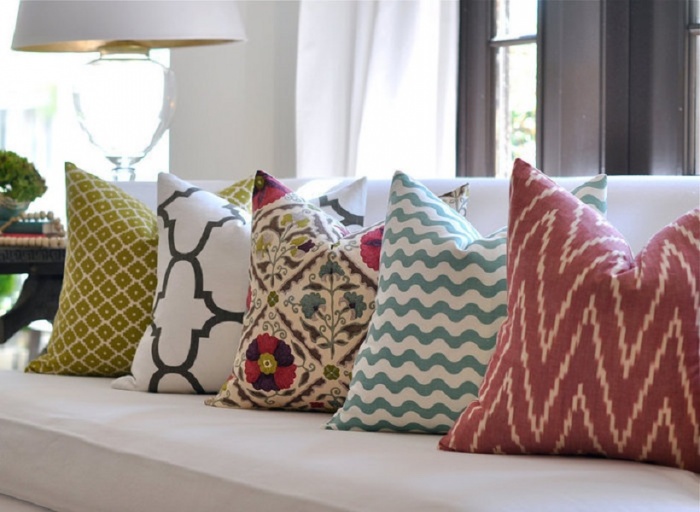
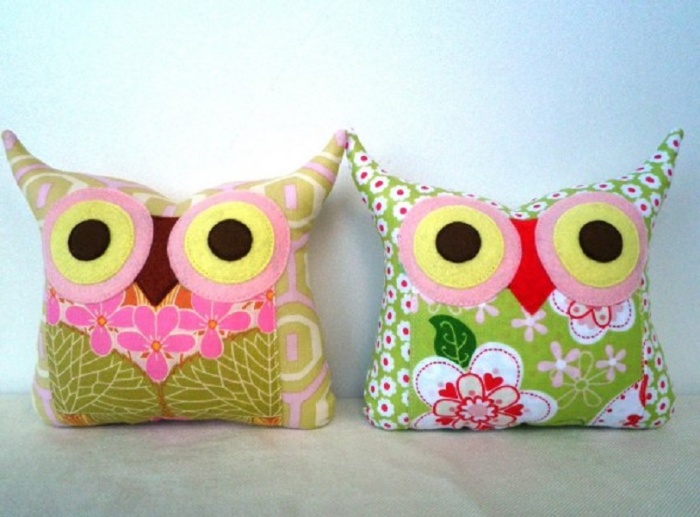
Decorative pillows
Decorative pillows fit perfectly into any interior, the main thing is that they match the color and design style. There are two options for creating decor - decorating a ready-made pillow and making it from scratch. The purchased product is complemented by interesting elements. You can glue or sew on voluminous flowers.
Pillows with pompoms look good. You can make them yourself from threads or buy them ready-made in craft stores.

We offer a small master class on creating small pillows for a sofa or bed from scrap materials:
1. Decide on the shape of the pillow. It can be in a classic version, having square shape, or be round, in the shape of a heart, star, cloud or favorite character.


Round pillow

Heart shaped

Star shaped

As a character
2. Choose your pillowcase material. It is not necessary for the pillow to match the sofa; it can differ in color and texture, the main thing is that it matches the overall background. Cotton fabrics are best for pillowcases. But if you want to fill your future product with feathers rather than foam rubber, then it is preferable to choose denser fabrics that do not allow fluff to pass through.

3. Prepare two pieces of fabric in the form of identical squares - this will be the base for the pillowcase. Turn them wrong side together and sew them on the sides, leaving one bottom edge free to allow for stuffing.

4. Decide how you will sew the pillowcase. You can sew a zipper or buttons to the bottom edge and make eyelets.

5. Next, the finished pillow cover can be decorated. For this, any available materials are used: lace, laces, fringe, satin ribbons, buttons, zippers, beads, beads, rhinestones and much more. The photo shows decor ideas that you can take as a basis.


Decor pillows with ribbons

Button decor


Decor with lace and knitted napkins
6. Synthetic fluff, foam rubber, holofiber and other polyester materials are suitable as filling. Foam rubber is well suited for pillows in the form of cushions.
On video: cool pillows with your own hands
Making a lampshade
Jewelry from unnecessary items They will also help revive the design of the room and create the effect of a design master class. Besides skillful hands must be good ideas. You can use both vintage and new trends to decorate your home. A good option retro decor is the creation of a lampshade. He will be able to bring an atmosphere of warmth and comfort to the house.
A similar lampshade is ideal for a child’s bedroom. Its peculiarity is that when the light is turned on, mysterious drawings are created on the ceiling and walls. The base for the lampshade is made of wire - one circle of larger diameter for the bottom, the second smaller diameter for the top. The circles are connected to each other with straight lines, also made of wire. Using these elements you can adjust the height of the product.
You can take it ready-made metal carcass from an old floor lamp.

The finishing is done with flaps. It's worth choosing for them different colors and drawings. The size of the fabric cut should be approximately 10 cm long and 1 cm wide. These flaps are tied to a wire base. It is necessary to ensure that the ends of the fabric pieces are symmetrical. You need to start from the bottom, gradually moving to the top of the structure. The knots should fit tightly to each other. When the lampshade is completely filled with flaps, you can hang it as a replacement for the chandelier.

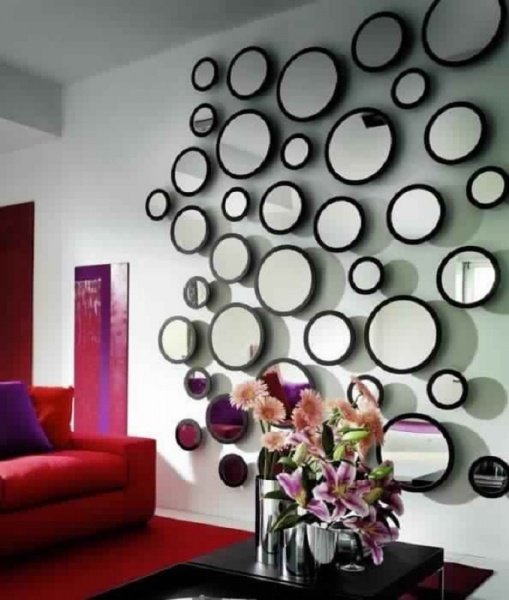
Mirror decoration
All interior items deserve attention. But a mirror is the thing that easily turns into a masterpiece. A master class on transforming mirrors includes the use of various trinkets unnecessary in the house:
- Shells. People always bring home memories of it in the form of shells from a vacation at sea. These can be not only large rapanas, but also smaller shells. Using these natural elements, you can decorate your mirror yourself. It is important to use shells of different sizes, colors and shapes, then it will look more natural. It is important to use a special glue designed for application to a flat glass surface to secure the shells.

- Plastic spoons . A round shaped mirror can be turned into a beautiful and bright flower using regular disposable tableware. To do this, take plastic spoons. Each of them should be removed from the handle and painted in the desired color. Special sprayers are used as coloring material. This will make the coating more even and dry quickly. Then they make a base from chipboard or ordinary cardboard in the form of a round frame, and spoons are glued onto it in a checkerboard pattern. The resulting base is glued to the mirror and reverse side attach a loop.

- Mosaic. The frame for the mirror is often made in the form mosaic tiles. To do this, first create a base, again, from cardboard. The material is covered with mosaic on top. Pieces of another broken mirror or small plastic tiles can serve as decorative elements.

If you want to transform your home, then the ideas listed above and a master class for making decor from scrap materials will be very useful. Don't be afraid to experiment, try to do it House master class and bring something unique into the interior, creating amazing jewelry with your own hands and putting a piece of your soul into them.
Top 5 master classes on how to create decor (1 video)
Ideas for creating interior decor (44 photos)


Decor with rhinestones or beads
Star shaped


Decor with lace and knitted napkins


To transform a boring interior, start major renovation not necessary. A budget option change the environment - bring fresh notes to the design. There are many different ways to decorate a room without significant material costs. Original home decoration ideas will help give the room individuality.
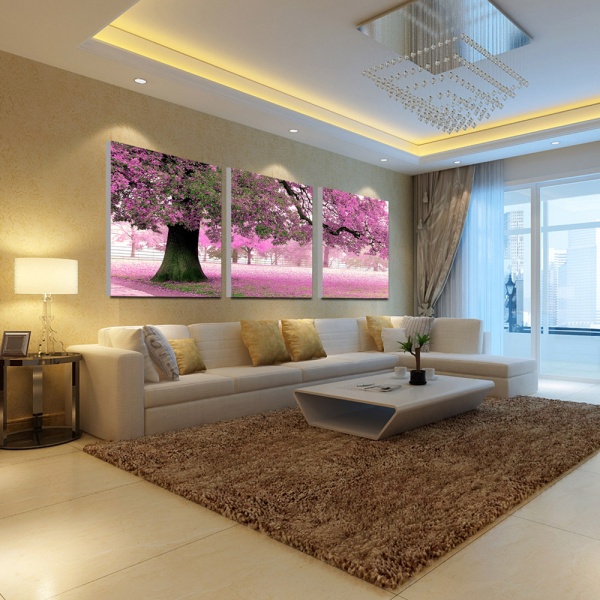
Textiles are a great helper when decorating a room
Textiles will help quickly revive the interior of a room. Curtains and decorative pillows are a favorite attribute of designers to create coziness in a living space. Besides key elements, tablecloths and napkins are actively used, the color scheme of which echoes upholstered furniture, curtains or carpet.
Window transformation
The question of how to decorate a window is always relevant. Correctly selected curtains can transform the interior of any room. They focus on window design in different ways:
- choose curtains with an unusual pattern or print;
- settle on good quality material without additional decorations;
- select an original pattern (all kinds of lambrequins or other cut options);
- They come up with unconventional curtain fastenings and interesting tiebacks.
Advice! If you want to emphasize the design of the room, the fabric of the curtains is selected brighter than the color of the walls by 1-2 tones.
The window should be decorated taking into account the general style prevailing in the room; replacing the cornice is welcome.

Selecting pillows
An inexpensive way to decorate a room with your own hands is to purchase or make decorative pillows. Their design is largely determined common interior. The classic direction involves decorating the soft part with pillows standard form: square, rectangular or round. Plain covers are appropriate if there are other accent areas in the room (a bright window or rug). The monotony of the interior is the perfect background to decorate the room with pillows with expressive patterns.
The modern interior of the room will be decorated with pillows of unconventional shapes in the form of puzzles, bolsters, letters or animal figures. The fabric for the covers is selected depending on the overall decor; it can be pompous velvet and tapestry or simple linen and cotton. In addition to attractive appearance, it is advisable to be guided by the following criteria when choosing textiles:
- hypoallergenic;
- resistance to washing;
- good shape retention.
Foam rubber and synthetic winterizer are the optimal fillers for decorative pillows. The following photo clearly demonstrates the freshness of the room’s interior due to well-chosen textile decor:

Nuances of phytodesign
Decorating a room with fresh flowers is both a pleasant and useful activity. Green spaces have a beneficial effect on emotional condition people, bringing the home atmosphere closer to natural sources.
Advice! In order not to turn the room into a greenhouse, it is enough to decorate it with 5-6 plants. If flowers small sizes, feel free to increase the number of copies to 8-9 pieces.
In addition to the direct choice of vegetation, pay attention to the pots. A single ensemble of containers will harmoniously decorate the interior of the room, especially if they are located close to each other. When placing flowers, take care optimal conditions for their development: install light-loving ones on the windowsill, individual species It is better to place it away from direct sunlight.

In addition to green spaces, shelves for them can also decorate the interior of a room in an original way. The choice is extensive:
- expensive forged coasters are appropriate in a spacious classical-style room;
- carved wooden shelves will complement the Provençal interior;
- a laconic combination of glass and chrome will decorate the interior in high-tech style and other styles of minimalism;
- if natural flowers are replaced by a herbarium and do not require watering, an interesting shelf can be made from a wide ceiling cornice.

If you do not have the skills to care for living vegetation, you can decorate the room with ikebana. Just don’t buy cheap artificial flowers, this is a clear sign of bad taste.

Decorating the walls
There are countless options for decorating a wall in a room. Hanging one or two large paintings or several small ones is the most common interior decorative solution. It is worth taking a balanced approach when choosing the theme and framing of the subject of painting. The interior of the living room will be decorated with all kinds of landscapes, images of animals, abstractions and various. It is better to decorate the bedroom with paintings that are conducive to peaceful philosophical reflection; dynamism is not appropriate here.
In addition to works of art painted in oil, you can decorate the interior of your bedroom with your own creations, be it beadwork, thread embroidery or leather paintings. There are other options to decorate your room with a creative twist.

Photo
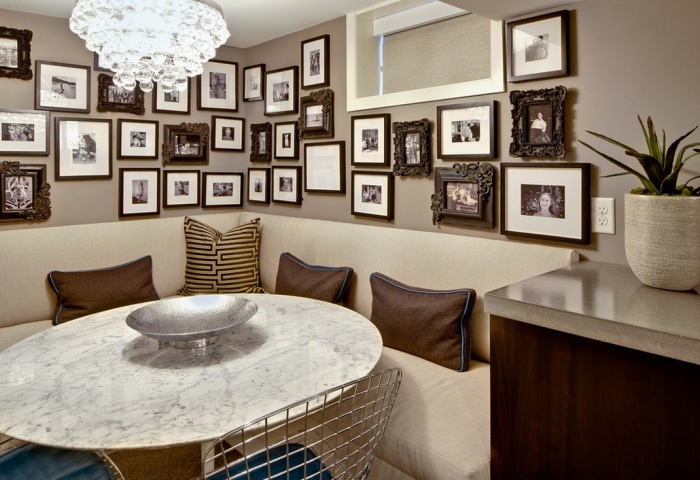
Atmosphere home comfort family photos are successfully formed in the interior. Images of loved ones can be placed in a frame on a nightstand or chest of drawers.
Comment! The height at eye level is the optimal place for photos on the wall. If they are framed, take care of their compatibility with each other and harmony with other interior items.
Modern approaches to design are varied. It is enough to place a mirror in an original frame near the photos on the wall, and place a large vase with flowers on the floor, and the goal of decorating the room without unnecessary costs has been achieved.
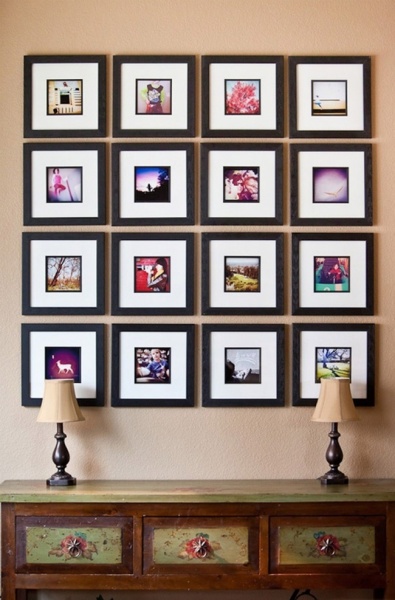
Collage art
It's quite easy to decorate your interior using a collage on the wall. To do this you will need:
- Prepare a square tablet of suitable size.
- Print any images you like with similar themes on a color printer.
- Treat the surface of the tablet with a thin layer of glue.
- Pin images.
For example, if you plan to decorate a room with a panel of 75x75 cm, you need 9 photos of 25x25 cm. But the sizes are chosen arbitrarily depending on the availability of free space on the wall. If a room renovation is just around the corner, you can use double-sided tape to stick images to the wall instead of a tablet.
There is also the opposite principle of decorating the interior of a room with an oversized image:
- find an interesting high-resolution picture;
- divide into the required number of parts (in our case 20), a separate picture corresponds to the size of the CD box;
- Each image is printed separately;
- The picture is placed in a case, after which it is fixed in the required order on the wall with double-sided tape.
This technique will help decorate the interior of a youth room.

Another simple way to decorate the interior is proposed at next photo:

Bring unconventional idea life is simple:
- print images with suitable silhouettes;
- cut out the shapes and transfer to thick black paper;
- stick the silhouettes onto the base and place them on the wall so that they interact with each other.
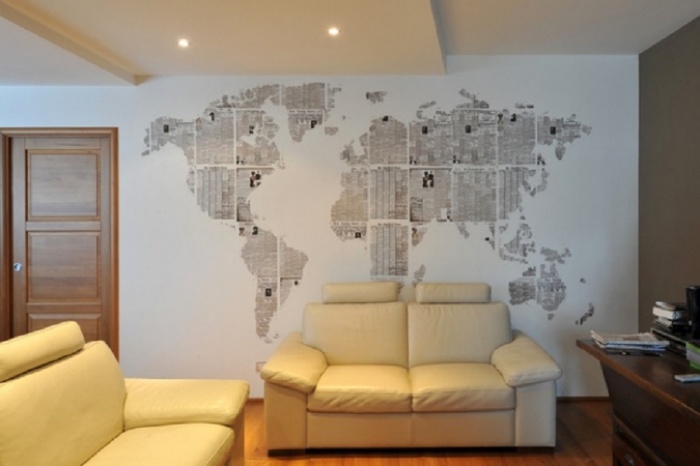
Geography lovers will love the idea of decorating the interior with the outlines of a world map:

Other creative approaches
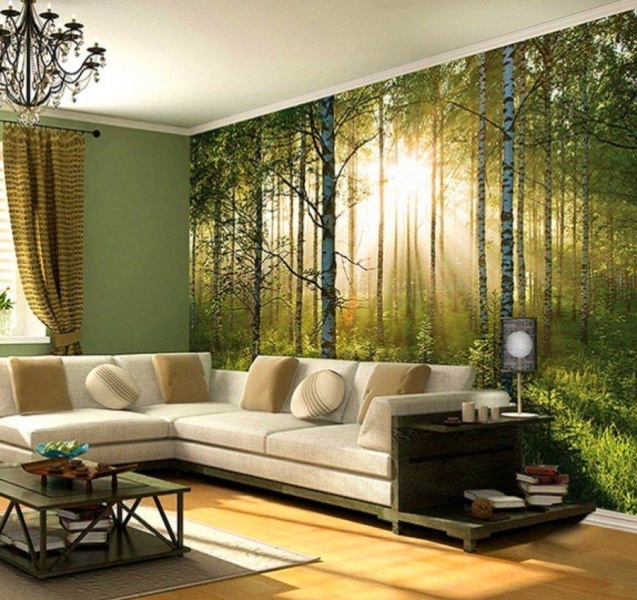
Photo wallpapers, the appearance of which is significantly different from the samples of 20 years ago, will help to add individuality to the interior. Sharp image, bright colors and vast themes make it easy to decorate the room according to the existing decor.

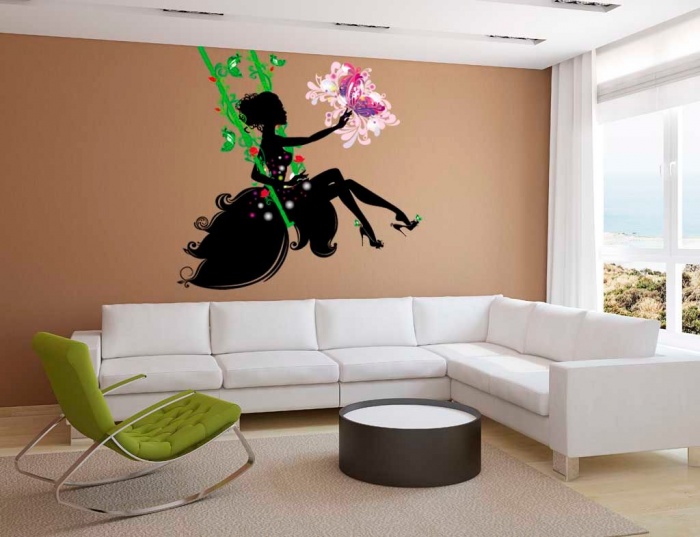
Relatively new trend in interior design - vinyl stickers all kinds of colors, sizes and shapes. They allow you to quickly decorate a room without any design skills.

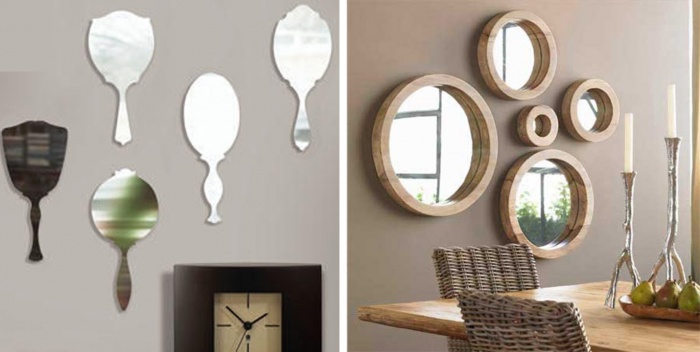
The visual expansion of space is facilitated by the use of mirrors. This is especially true when it is necessary to equalize the disproportionate dimensions of a room.

A popular technique that reliably decorates the interior is placing butterflies on the wall. Fluttering creatures fill the room with grace and lightness. The flock can gradually move from the wall to the ceiling. A fashionable decorative element can be simply cut out of colored paper according to a template or drawn by yourself.

Safety pins or a glue stick are ideal fastening options that allow you to easily remove the jewelry at any time. The second way to decorate the interior is to hang garlands in the room, where butterflies are connected by a thread and flutter at the slightest breath of air.

Lighting
Artificial lighting takes a leading position in achieving the goal of decorating the interior of a room. Complementing a traditional chandelier wall lamps with a similar design, you can achieve incredible results in transforming the interior.
Comment! The purpose of the room directly influences the choice of lighting: in the bedroom it is optimal to install lamps with warm light; for the office, cold radiation is more suitable, helping to concentrate.
Shape matters too lighting fixtures. The bedroom interior will be decorated with a lampshade that diffuses light; the living room needs bright lighting. Spotlights can completely provide the room with artificial light or work in tandem with a central chandelier. Usually the question of how to decorate a room with lighting is resolved at the renovation stage; installing additional sources without damaging the interior is problematic. An exception may be the simple replacement of an old model of a chandelier or sconce with a more modern copy.

A collection of original ideas for the living room and bedroom
Accessories play a significant role in achieving the goal of decorating the interior. Vases, figurines and other decorative elements can quickly enliven the decor of a room. When choosing items, you should observe moderation and not overdo it.
The principle of compatibility with general style interior design is required to complete:
- Frivolous trinkets in the form of brooms-amulets are only appropriate in the kitchen.
- Wicker fruit baskets will harmoniously decorate a rustic-style interior.
- Interior of a room designed in classic style, it is recommended to decorate with elegant figurines and original vases.
- It is better to display a collection of soft toys in a children's room.
Formation in the interior cozy atmosphere The presence of candles and fancy candlesticks helps. Live fire is always a symbol of the hearth. Interesting composition can be decorated by combining together a beautiful glass vessel, decorative stones, dried flowers and a candle. Just don't light it.

The interior of any room will be decorated with a vase, the decor of which is made with my own hands. Lately The art of decoupage became widespread. In addition, beads, rhinestones, and glass stones are actively used in the design of vessels. With minimal drawing skills, you can apply a beautiful pattern.

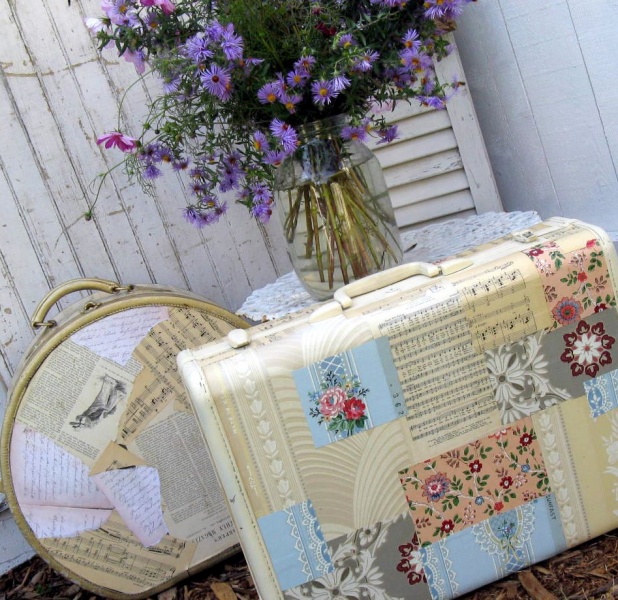
Even old suitcase will decorate the interior if it is pre-decorated with lace, paper or fabric, as shown in the following photo:
A dry branch of an interesting shape is another item that can decorate a room. For this you will need:
- choose a beautiful branch of the right size;
- remove remaining bark and wipe with a dry cloth;
- treat the surface with acrylic paints or spray paint;
- after drying, secure the branch in the pot using expanded clay;
- At the final stage, the driftwood should be decorated to your liking.

You can also paste over old table colored electrical tape:

Bathroom decor
There are several directions on how to decorate a bathroom with your own hands:

As an example, here are several options for how to decorate a bathroom:

Features of the design of a children's room
You can decorate the interior of a children's room in different ways: use the techniques proposed for the living room and bedroom, or find a special way.
What options are possible:

A teenager's room will be decorated with an inscription made in thread. For original item interior you will need:
- A wooden tablet covered with fabric, small nails, strong colored threads and a hammer.
- A simple image is drawn with a pencil, along the contours of which nails are driven in.
Often, extraordinary techniques for decorating a room with your own hands become the main highlight of the entire interior. But here it is important to take into account the style and design of the room: futuristic objects are a very dubious decoration for a living room in english style, wooden pallets with inscriptions in the rhythm of Provence are not suitable for the interior of a kitchen with high technology, just as aluminum signs are unlikely to fit into elegant Art Deco. When trying to create sophisticated eclecticism, you can easily make a mistake. It is very important to think through everything in advance, namely the location and fastening of decorative elements.
We suggest you consider interesting solutions for the room, in addition to paintings, posters and photos. However, let's not forget about them either.

Window as a decorative element of the interior
A window built into a wall that is interior partition, is a rather extraordinary technique for dividing space. Such a solution will not only become the main decoration of two zones at the same time, but will also allow more natural light to pass from one room to another.

A window frame can also be an extraordinary independent art object. Hang it on the wall or place it on the console - this technique will radically transform the atmosphere, adding lightness and elegant charm to it.


 An aged wooden frame with a large number of sections looks very colorful. It’s easy to make such a decorative item yourself at minimal cost.


A decorative window frame can not only serve as a decoration for a room, but also be a functional piece of furniture. So, mirrors with glazing like a window frame look quite interesting. A good example shown in the photo of the bedroom interior.

Door against the wall
In addition to windows, used old doors can become an unexpected decoration for the walls of a room. A sophisticated idea is to hang on them something obvious in traditional wall decoration, for example, paintings, panels, photographs.


Large scale panels
Decorating a room with a voluminous panel is an excellent opportunity to show off your creative imagination. Here, try experimenting with textures, colors, materials and other components.

The dimensions of the decorative panel must be correlated with the square footage of the room and the load on all other walls. Large panel in small room will look ridiculous: after all, its texture and color sometimes absorb space. Please note that panels and wallpaper are two different things! The larger the panel, the brighter its role in home interior, the more neutral the adjacent walls should be.
Take a fresh look at regular material. An old metal sheet suspended on a chain will become an original and extraordinary backing for a poster or photographs.

Squares from sections of simple fiberboard, painted with stain and silver (by the way, you can safely use painting and stencils) will be beautiful in the form of panels. In this presentation, it will fit perfectly into a luxurious industrial style loft.

You can also easily decorate one of the living room walls with your own hands. The composition of impressive large-scale tiles captivates with its originality and simplicity. You can fantasize about this topic endlessly.
Look how the tic-tac-toe on the accent wall unobtrusively spreads its playful mood throughout the room.

Panels with 3D effect
Appeared not so long ago fashion trend multidimensional decorative elements are rapidly gaining popularity. The 3D panels presented in the following photo literally attract the attention of others. Reasonable prices allow many to purchase such panels for decoration, while the texture and pattern can be chosen to suit your taste. There are many design options: engravings, plaster bas-reliefs, compositions from various multidimensional details.
Do not forget about the fragility of such products. Installing and transporting them is very difficult, but the visual result is worth it.

Decorating a room with shelves
Shelves in a room can serve not only as a functional piece of furniture, but also creative decor in the room. It is important that the shelves contrast in color with the wall. Think carefully about how to fill them beautifully and harmoniously - half-empty shelves create a feeling of some imperfection in the interior. Excellent decorative contents will include candles and lamps, hourglasses, original book holders, and colorful ceramics.

Even bigger decorative effect will create cute compact shelves non-standard shape(triangles, polyhedral cells, unnatural angles).


Posters and paintings
Decorating a room with paintings, photographs and posters is perhaps the most common decor today. In order for the result to live up to expectations, to look dignified and original, you need to carefully select elements of fine art.


Show your imagination, choose a non-standard approach: frame herbariums of plants instead of painted still lifes, tin panels and posters in retro style instead of flowers on canvas, pencil sketches of animals instead of waterfalls and beaches.

If you still decide to purchase something unique, buy paintings at exhibitions, special sites or on trips abroad.

Photos can be designed in a completely non-standard way.


Unusual Attributes
Giant letters in inscriptions, quotes in posters, deer antlers - all these objects are so often found in interiors that today we would hardly like to see them again. But even from these seemingly familiar details you can create an original combination in your own way. You just need to interpret them skillfully.


So, for example, a composition of five medallions with deer antlers already looks unusual, and inscriptions made in a non-standard font and placed on atypical canvases (not in rectangular frames, but at least in a hexagon) are perceived completely differently.


More ideas for do-it-yourself room decor are presented in the bright selection in the photo.

 Original decor from flowers and plants


In order for a birthday to feel truly festive, a delicious cake and gifts are not enough. The type of room where the celebration will take place also plays a very important role. Therefore, to make this day truly unforgettable, we offer you several ways to decorate the room for your birthday with your own hands.
It's pretty quick, easy and original way for your birthday. Materials you will need:
- rolls of colored paper,
- Whatman paper sheets (preferably thick),
- stationery knife, scissors and tape.


Now let's look at the manufacturing steps.
- You must decide on the color scheme. Sketch the design which you want to do.
- Of course, you can fix or change something later, but having a sketch will give you an idea of how it will ultimately look and will significantly speed up your work.

- Lay out whatman paper - this is the base on which you will work. Depending on the size of the embroidery you plan to make, you can take one sheet of whatman paper, or glue several together (with the edges to increase the area). It will be much easier to work with thick paper, since it will remain strong when you cut it and weave ribbons.
- Place the base from sheets of whatman paper so that it is convenient for you to work with both sides of the paper. You can place two chairs at a distance from each other so that you place the ends of the Whatman paper on the chairs, weighing them down with books or something heavy so that the Whatman paper does not fall.
- You can also hang whatman paper in doorway. But do not lay it out on the floor or table, as in this case you will only be able to comfortably reach the front side.

- Using a utility knife make two cuts in the paper, thread a ribbon into each of them so that a strip of ribbon remains on the front side, and both ends are on the wrong side: leave one end small and attach it to the paper (with glue or double-sided tape), the other is longer if you want to continue this weaving, or attach it too if this drawing is finished.
- Repeat the previous steps until Do not fill the entire Whatman paper with paper embroidery patterns. In this case, the cuts do not have to be strictly opposite each other, and the lines do not have to be even. Take ribbons of different widths and make your own design.
- Hang your creation on the wall and enjoy the work done and the festive mood!

We decorate a large room for little money
If you need to quickly decorate a large, spacious room, using a minimum of money and effort, this method is just for you. All you need is colored corrugated paper in rolls.


Then everything depends on the room you will decorate. Strips of paper can be pulled from the cornice, pipes, chandeliers, cabinets or shelving, in general, anything that will be there. Moreover, you can stretch the paper with different strengths so that the sagging is greater in some places and less in others.


TIP: You can also twist the ribbons. Hang colors in a random order.
You will definitely be able to create a joyful and festive atmosphere! Don't forget - there are a lot of ideas in the link
Idea: walls with balls!
Both children and adults are all crazy about balloons. So, by choosing this method of decorating a room, you will definitely cheer up everyone present!

For this you will need the following materials:

Follow these steps and you'll soon be admiring the colored ball powder on your walls:
- Divide the ball into 6 equal parts, tying knots on it.
- Using a pump, inflate the first part of the balloon until you get an inflated sausage, tie a knot at the end. Then cut off the inflated part of the balloon as close to the knot as possible. Then do the same with the next part of the ball, and so on until you get six small balls.
- Cover the knots with tape so that they don't stick out.
- Repeat the first three steps until you have hundreds of colorful balls.
- Attach the balls to the wall with small pieces of double-sided tape.

This decoration is perfect for an original party or photo shoot. And don’t forget to stock up on enough sweets, since the appearance of the room will definitely encourage you to eat something tasty.

Here's another great ideas for decorating with balls.


Decorating the walls with large homemade “lollipops”
Beautiful colored lollipops are not inferior to balls in their ability to create a great mood. With their help you can decorate a party or birthday and provide original photo– area for those present.


To create a festive atmosphere with your own hands you will need:
- wooden dowels measuring 12" x 1/2" (30 cm x 1.25 cm),
- acrylic paint (must be a wide range of colors: white, purple, dark blue, light blue, green, yellow, orange, red, pink, etc.),
- brush, stand for dowels (a glass or cup will do),
- palette, 4 sheets of A4 paper, scissors, pencil, foam disks measuring 10″ x 1″,
- glue gun, tape (regular or double-sided).
Assembly technique:
- Apply white acrylic paint on wooden dowels I. It's best to paint one half first and let it dry (in a container with the painted side facing up), then paint and dry the other side. While the dowels are drying, start making the candy itself.
- Cut out 8 identical curls from paper-stencils and place them on the foam disk as shown in the figure. Next, lightly trace the stencils with a pencil.
- Choose a paint color and use a brush to decorate with it. curls every other. First trace the outlines so as not to go beyond the edges. You can do several layers to make the color look more saturated.
- By this time your dowels should be dry. Use glue gun onto the end of the dowel and quickly press it onto the foam disk, holding it a little to fix it.
- Do the same with the other discs, using different colors for painting.
- Glue the finished candies to the wall. You can stick it with tape on the leg, or with double-sided tape on the lollipop itself.

That's all done, enjoy the beautiful background!
Make a volumetric figure
The big number will not only remain as a keepsake, but will also become the central photo area of the party. Detailed master classes


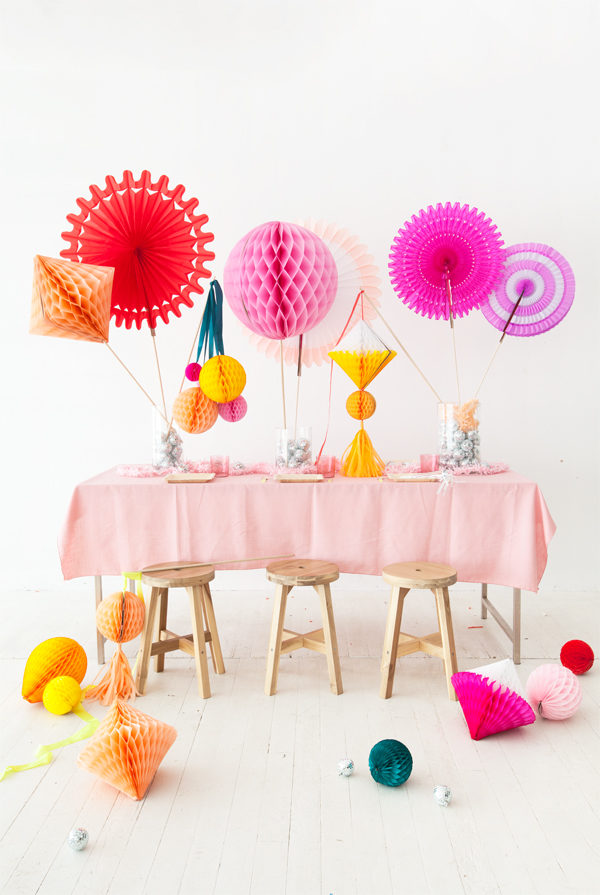
Fan garland for birthday
On hot days you crave coolness, and on cold days you crave reminders of warm days. This garland, which consists of many fans, will wonderfully help cope with both of these desires! Having made one, you will be transported to a fairy tale! And surprise everyone!


Materials:
- colored paper for scrapbooking,
- scissors, tape,
- colored cardboard, glue stick,
- ruler, stationery knife.
Steps for making a garland:
- If you immediately bought accordion folded decorative paper, you can skip this step. If not, fold the paper into even accordion shapes.
- Form semicircles from accordions.
- Cut out strips, circles, triangles or some other figures made of colored cardboard - you will need them to decorate fans.

- Cut out semicircles from cardboard(size should be smaller than fans). Attach them to some fans using a glue stick. They will perform two functions at once - decorative and strengthening, that is, they will not allow the fan to curl up.
- Stick on fans shaped cardboard molds by combining colors and creating your own own designs patterns. You can take the drawing as an example.
- Connect the fans together to form a garland. To do this, stick them all on tape. You can first fasten the joints of the fans with a stapler to strengthen the structure.
- Hang a garland and cheer up!


Making large paper Martenitsas
These decorations are made very simply and quickly with your own hands. You will need two A4 sheets - red and white, scissors and glue stick. If you want to make a lot of decorations, then take more paper, the main thing is that both colors are in the same quantity.

Products have such color scheme, since Martenitsa comes from Bulgaria and there is a ritual there to welcome spring with similar products of exactly these colors, since it is a talisman for good health of the whole family. But if you don’t delve into this folklore, you can take paper in the colors you like.
Let's now look at the manufacturing steps:


- Fold each sheet of paper in half (lengthwise).
- On each sheet, draw 10-12 straight lines, as shown in the picture.
- Make cuts along the marked lines with scissors.
- Unfold the leaves and glue their ends together, there should be glue on both ends.
- Form circles, securing them with glue.
- In the middle of the circles you can also attach strips of paper that differ in color from the circles themselves.
- Hang items around the room.

Garlands without using glue
Even a child who knows how to use scissors can make such a decoration, since the pattern is very simple. You will need: A4 paper (calculating one sheet of paper for 4 elements of the garland), scissors, pencil.


The order of assembling the garland:
- Cut a sheet of paper into 4 even pieces.
- Take one part, fold it in half (across), and then in half again (also across).
- Draw with a pencil the shape you will use to cut out.
- Cut out the shape and carefully unfold it.
- Connect together the individual elements of the garland (as shown in the picture), alternating colors.
- Hang the garland.


We offer you several alternative options sketches for this garland.

A little holiday in a box
On cold autumn and winter days, such a box of positivity will be simply a great gift and will definitely create sunny mood! You will need: box, small helium balloons, as well as paints (or ribbons, colored paper) to decorate the box.


How to make it yourself:
- Paint or paste over box with rainbow stripes, flowers or any other joyful patterns that come to your mind.
- Place small helium balloons in a box(the quantity depends on the size of the box. The ends of the ribbons tied to the balls can be attached to the bottom of the box if you want the balls to jump out to the length of the ribbon when opening the box, or not attached if you want them to effectively fly to the ceiling or into the sky.
- Close the box.
- Give a gift and watch carefully the surprise recipient's amazement!

IMPORTANT: It is important to remember that small helium balloons lose their ability to fly after about three hours. Keep this in mind when preparing a gift.


Just recently, your daughter was just a child, but today she has become a teenager. And this means maximalism, first love and the need for personal space. Now the room is not only a place for sleeping and playing - it keeps its own little secrets. How to decorate a teenage girl's room with your own hands so that everyone is happy?


Your task is not to interfere, but only to direct her plans in the right direction. Do not forget to help in choosing furniture and decorative items, monitoring their quality.
Things to remember
Entering adolescence, girls already consider themselves adults, but still remain children. Therefore, the room becomes something between a children's room and an adult room. Even if you didn’t plan to radically renovate your daughter’s home, some things are still worth changing.
First of all, choose the size of the bed, find higher chairs and choose different decor. It is important that you share your child’s interests in matters of repair.

The highlight of the entire interior can be independent decor for a teenager's room with your own hands. The fulcrum can be a favorite cartoon character, book, movie hero, musician, as well as an uncontrollable childhood fantasy.

Based on your child's hobbies:
- if a girl likes to draw, then you can select a part of the wall for drawing. Cover the wall with white slate paint, and after drying this area will turn into a kind of drawing board;
- if the child is a book lover, then equip several bright bookshelves where you can put your favorite books;
- if you are interested in sports, then make sure that there is enough free space in the room so that furniture and other interior items do not interfere with your activities.
Focus on one theme for decorating the space: it will be easier to implement and will not confuse the teenager in his own desires.

Every teenager will love it if there is something exclusive in his room that no one else will have. For example, chalkboard for notes.
It's very simple to create it:
- Stock up on primer, sponge, and brushes.

- Buy a wooden or plywood board.

- Cover the surface of the material with black or gray slate paint.

- Place the product on the balcony and wait until it dries.

- Attach the frame to the board.

Let the girl come up with a place for fastening - she will be pleased that her parents took a little care of how to decorate a teenager’s room with their own hands.
Color options: solution
The background color scheme should satisfy both parents and daughter. Listen to your child's thoughts, but correct them. Think about whether to choose gothic-informal colors or whether you can limit yourself to posters.
Do not forget that the psyche of a growing child is unstable, and therefore pay attention to calm shades. It is best to go with green, purple, blue, light blue, pink or peach. If your daughter loves bright colors, you can use them as interior accents.

Furnishings
At the family council, the question of buying new furniture will always come up. Heading to the store? Be sure to consider the quality and price of the headsets. Make sure that you have a high-quality orthopedic mattress on your bed.
It’s a good idea to equip a room with custom-made furniture. To do this, the designer should consult not with the parents, but with the daughter. She will decide what furniture to use and where to put it. The same goes for color design furnishings and their dimensions. Focus on space zoning rules.

In the girl's room there should be:
- sleep area – fold-out sofa or comfortable bed;
- work area - desk;
- storage area - shelves, racks, shelves;
- beauty area - dressing table with cosmetics and mirror;
- relaxation area – wide window sill, armchair or ottomans;
- dressing area - closet or dressing room.
To relax, play around the window. By lengthening it a little and widening the window sill, you will get a comfortable place. Soft mattress, plaid and small coffee table easy to build with your own hands.

Don't forget that your daughter will need her own mirror, it is the most favorite item in any girl's room. It can either hang separately on the wall or be built into a closet. Wall option provides DIY decor suitable for a teenager's room. The easiest option is to use shells collected from the sea.
DIY mirror decor
- You will need a round or square mirror, shells, beads, glue gun, bottle with transparent glue, glossy wood varnish, newspapers and a brush.

- Cover the table with newspapers and place a mirror on it. The glass itself must be covered with cloth or paper.

- Apply a layer of glue along the contour of the mirror, glue small shells.

- Warm up the glue gun, apply the composition to large shells, beads and other decor. The gaps can be filled with sea sand.

- Leave the mirror to dry completely for 24 hours.

- Apply varnish and leave to dry for another day.

The resulting beauty can be safely hung on the wall.
Wall decoration
This is perhaps the most painful moment for parents. It is difficult for them to explain to the child why they need to choose calm tones. Find an alternative - use photo wallpaper that will create special atmosphere. The girl will certainly be able to choose the right ones from the variety of options.
There are other options. They will help you on how to decorate your room with your own hands for a teenager. The easiest way is to use vinyl stickers in the form of fantasy plant motifs. They will add tenderness and sophistication to the room.

Can be done accent wall using expensive photo wallpaper. Progressive parents follow fashion trends, so their daughter will be delighted with the soft finish - fabric, leatherette with foam filling.
Encourage creativity:
- Hang photos printed from your smartphone in original frames. Offer the girl a photo print of pictures with friends as wallpaper for an accent wall. Don't want to ruin the finish? A girl can place a photo on a stand with buttons or on a rope with clothespins.

- Fans of graffiti can turn to professional artists or friends who draw well. If a girl is interested in art and knows how to transfer surrounding objects onto paper, give her... a wall. Choose a place for the future drawing together.
- Spectacular and stylish solution- volumetric letters. They place the right accents and can become a way for a teenager to express himself. Letters are made from plastic, wood, fabrics, etc. Find an option that your teenager will like.

If your daughter has agreed to a neutral finish, consider what details to use to bring the room to life.
Highlights of the program
There are a lot of options for decorating a room where a teenager lives. But they are realized only when you know how to do things self made. If you want to learn, use online tutorials, but base it on the style of the room. Designers recommend several simple ideas, which even a teenager can handle.
- Complete work area. It may contain creative Wall Clock, board for notes. A girl can create her own “wish card” - a collage of pictures cut out from the pages of old magazines.

- Collect all decorations in one place. Come up with an original organizer for them made of lace stretched over wooden frame, cardboard tree, real twigs coated with varnish. You can use figures made of papier-mâché or copper wire.
- Find something to do for your diligent child. If a girl likes bead embroidery, crocheting, or sewing Tilda dolls, then let these skills become useful. Original interior items are always appropriate, especially in a girl’s room.

- Clean out your wardrobe. Sweaters and jeans that the daughter no longer wears can become new pillows, upholstery for ottomans and chairs.
- Find places to keep secrets. Old suitcases, boxes and drawers are suitable for this purpose. Decorate them using decoupage or collage techniques.
- Find original places for jackets and raincoats. Get creative: take plastic glasses and attach them with glue to a board covered with beautiful paper.
- Give a second life old furniture. Chest of drawers, wardrobe, nightstand with original finish handmade items will take their rightful place in space.

- Use modern design ideas. Wooden furniture in ethnic style, romantic shabby-chic pillows with ruffles, an ultra-modern laptop, delicate curtains in the spirit of Provence and a comfortable Victorian sofa in bright colors will create an atmosphere of coziness in the space.
Create together with the girl, and joint ideas will not only decorate the room, but will also help you get closer to the child and understand his inner world.
