How to cover an old cabinet. Using self-adhesive film for furniture sets
Despite the fact that Soviet-era furniture is quite reliable and strong, it is not considered beautiful, much less competing with modern furniture. In addition, by this time it was pretty worn out and required repairs. Even in such conditions, the owners feel sorry to part with her. To buy a new, modern one, you need a lot of money, since furniture has always been not cheap, and it is not cheap now. IN in this case there is one Alternative option leaving old furniture and not buying new is to try to update the furniture with your own hands, giving it an attractive and modern appearance. Cabinet furniture can be remade quite easily, especially since all the materials necessary for this are available. In any case, purchasing materials for remaking furniture will be much cheaper than buying new furniture. One of the easy and accessible techniques is changing the color and replacing the fittings. There won’t be any special problems with the fittings, but changing the appearance is much more complicated. There are several options, but the two most common are painting and gluing special film or wallpaper.

The most affordable and simplest option is to paste old furniture self-adhesive film. On sale you can find film for every taste, both colored and monotonous, in various colors, shades and textures. Many people prefer wood-effect film, but there are other options that meet the spirit of modernity. This approach can really turn an old wall into furniture that will have an attractive and modern appearance. It’s not difficult at all; it’s enough to do your work slowly and carefully, which will allow you to get an interesting result that deserves attention. To verify this, just look at 2 photos. The first photo shows an outdated Soviet wall made of chipboard, and the second photo shows the same wall, but after updating.

The wall received a new appearance thanks to the use of compacted furniture self-adhesive film, cream color with a matte surface. Where there was an open part of the wall, there were glass doors covered with a translucent matte film. For the edging, a furniture layout was used, chrome-colored, and also self-adhesive.
The work consists of the following stages:
- The old wall is disassembled, everything that is not needed is removed, including the fittings.
- All surfaces are cleaned of dirt and degreased. To do this, use a soft cloth and detergent. After this, the product is washed off warm water with vinegar and finally wipe the surfaces with a dry, clean cloth.
- Fragments are cut from the film required size, with a margin of up to 1 cm. After pasting, the excess film is cut off with a stationery knife.
- Before pasting, the surface is irrigated with water from a spray bottle. A wet surface will allow you to accurately position the film, since it can be moved, or even peeled off if it was not possible to glue it properly the first time.
- Before pasting, it is removed from the film protective film, after which it is laid on the surface. Having correctly positioned the film fragment, begin to smooth it with a soft cloth in the direction from the middle to the edges. The main thing is that there are no air bubbles left under the film. In this regard, all work is performed slowly and very carefully.
- When bubbles form, they are pierced with a thin needle and the air is expelled from them. This operation is also carried out using a rag, moving from the edges to the puncture point. After this, this place is thoroughly rubbed with a rag.
- After the film is glued, a thin cotton fabric is taken and placed on top of the film, after which an iron with medium heating temperature is used. The fabric is ironed together with the film.
- Finally, the trim (edging) is glued and the fittings (handles) are installed.
- This technology is applied to every part being glued. Glass is glued in the same way, only from the inside. After complete assembly it will turn out completely new furniture wall. In this way, you can breathe a second life into items such as bedside tables, chests of drawers, cabinets and kitchen furniture.
After the wall was successfully pasted over, it was also updated old wardrobe and installed on the right. The result is that the entire wall is filled with updated furniture. Using the same technology you can update the old one kitchen furniture– apply self-adhesive film and replace the handles.

There is a second option for upgrading furniture, which is less expensive and, what’s most interesting, does not require disassembling anything. In this option, only furniture doors are covered, not with film, but with non-woven wallpaper. For gluing, PVA glue is used. To prevent the edges of the wallpaper from lifting, they are cut into blanks, the size of which is 5 mm smaller size door Judging by the photo below, the result is not bad at all.

The advantage of such a finish is that the finish can be replaced with new wallpaper at any time.
As a rule, a surface covered with wallpaper lasts for five years. A similar technology was used to decorate the kitchen set. To make the surface washable, the wallpaper is covered with two layers of PVA glue. The most important thing here is to do everything carefully so that no smudges form, since you will have to work with a brush.
As an option, the wallpaper can be opened with varnish, but before that it is better to experiment on not the desired wallpaper. It is important to determine what the reaction of the wallpaper to the varnish will be. When choosing a varnish, you need to know what acrylic and cellulose give transparent surface, and polyurethane, after a certain time, will turn yellow. Polyurethane varnish is practically resistant to solvents and, if it needs to be removed, you will have to resort to mechanical impact. Typically, coarse sandpaper is used for this or an electric drill with an attachment is used.
How to update a chest of drawers
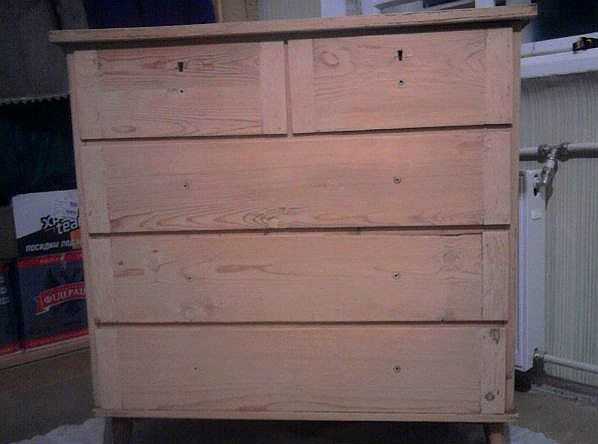
An old chest of drawers can sit in the attic for several years and lose only its appearance. As a rule, the old varnish coating cracks, but otherwise it can be envied modern furniture. It does not dry out and remains as reliable and strong as it was before. In this case, the chest of drawers undergoes a more complex update, using painting and decoration, using polyurethane molding and wallpaper.

Stage No. 1. All fittings are removed from the chest of drawers, after which the old covering is removed. As a rule, the old varnish coating is removed mechanically, using sandpaper (coarse) for this. All sinks, cracks and chips are sealed with putty and wait until it dries. After complete drying, the surface is sanded with fine emery cloth. The result is what is shown in the photo below.
Stage No. 2. Installation of polyurethane moldings. The main task is to choose the right moldings so that they are neither small nor large. Basically, products are selected up to 5 cm wide and very narrow if you look at them in profile.
The purchased moldings are very carefully and accurately cut into pieces of the required length, and the corners are cut at an angle of 45 degrees. At the same time, you need to make sure that the drawing matches. The molding is attached using PVA glue. Alternatively, you can use self-tapping screws for reliability. At the same time, before screwing them in, recesses are made for them. All recesses are filled with putty very carefully, otherwise there may be problems when the putty dries.

Stage No. 3. All surfaces for gluing are treated with a primer. As a primer, it is possible to use PVA glue diluted with water in a ratio of 1:2. After the primer has completely dried, begin painting. As a rule, 2 layers of acrylic paint are applied to water based. The color is coffee with milk, although the color in the photo does not match the one indicated due to poor color rendering.

Stage No. 4. Decoration is carried out on the basis of wallpaper made using silk-screen printing technology. Sections of wallpaper are cut precisely according to the dimensions of the inner part, bordered by the molding. The wallpaper is glued using PVA glue. After complete drying, the entire chest of drawers is coated with water-based varnish in 2 layers.

Stage No. 5. Finally, modern legs in the form of furniture wheels are screwed onto the chest of drawers and handles are installed.

If you carefully study the technology, everything is much simpler than it might seem. Although, all stages require a certain accuracy, otherwise appearance there will be problems. You can update your wardrobe in the same style. The result is not a bad set for a room or bedroom. It may not be entirely modern, but it is original and stylish, and most importantly, very cheap.
If old furniture has a varnish coating, it is very difficult to get rid of it. If there are no obvious flaws, it is better to use a primer for complex surfaces and only then start painting. This approach will minimize the effort to update old furniture.
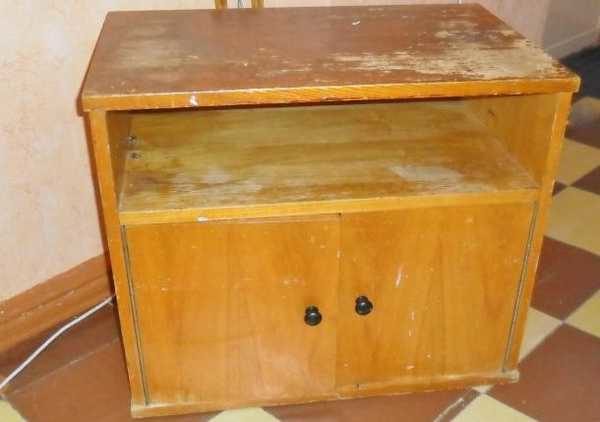
Updating an old bedside table
The photo below shows the process of updating an old polished bedside table. First of all, the polish was removed, after which the surfaces were filled and sanded. After that, it was painted acrylic paint in two layers. Finally, the paper from the gift bag was pasted onto the door, making it possible to get an original design. After this, the entire bedside table is covered with two layers of semi-gloss acrylic varnish.

All stages are not particularly difficult if you have the slightest skills. All processes correspond to the sequence of actions described during the restoration of the chest of drawers. The result exceeds all expectations.
 This old bedside table subject to update.
  This package will serve excellent decor for doors.
  The result of updating an old bedside table.
 Remaking furniture with your own hands is simple and accessible to everyone, if desired. Unfortunately, without desire nothing will happen. Below in the photo, you can see a bedside table that was redone using a very simple method: the bedside table was simply covered with embossed wallpaper and varnished twice.
How to remake a table
By adopting such technology, it is enough to simply transform an ordinary coffee table into the subject modern interior. They simply take it and cover it with wrapping paper. This is thick paper that sticks without problems and does not become limp under the influence of varnish.
First you need to work on the legs and edges of the table top. They need to be painted light color so that they fit better with the new style. After this, you can begin further work.
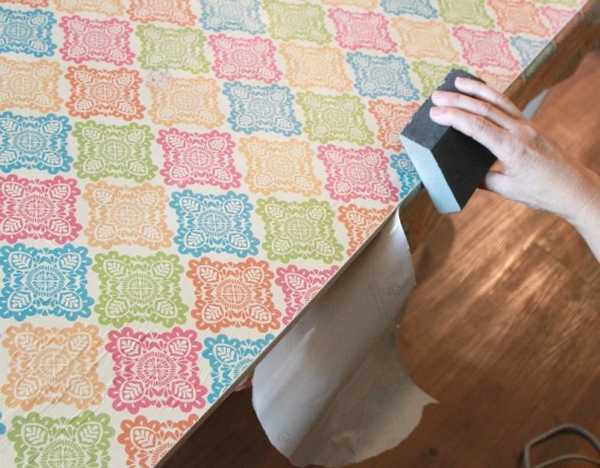
Before pasting, you should cut out a piece of paper several times. large sizes than the size of the tabletop. PVA glue is used for gluing. The surface is well rolled with a roller so that there are no air bubbles. The result should be a perfectly smooth surface.

After this, remove excess material by running a fine-grit sandpaper along the edge of the tabletop, pressing the paper against the tabletop. This method allows you to remove excess material very smoothly, which is more like a professional action.
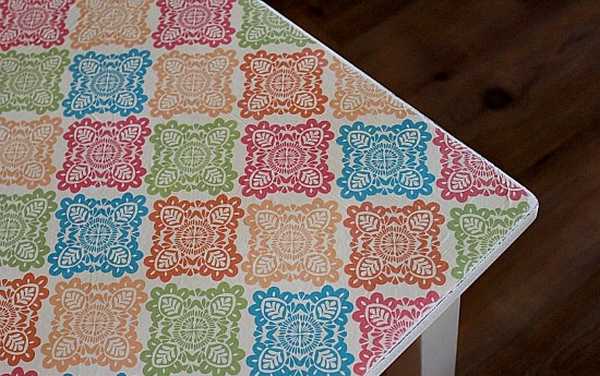
Finally, the surface is covered with two layers of varnish. At the same time, the layers should be thin. Each layer is applied perpendicular to the previous one.
Furniture remodeling: photo ideas
Very often you need to add freshness to the interior, you need to refresh furniture, or extend the life of new furniture. But, lack of finance sometimes becomes an obstacle to realizing your ideas. Do you have a question about how to cover old furniture?
Advantages of the material and a huge selection
Self-adhesive film for furniture will come to the rescue. Updating furniture with self-adhesive film is simply a great idea. It allows you to quickly and inexpensively repair things dear to your heart. And this material simply amazes with its wide range of applications. Self-adhesive decorative film for furniture stands out especially. To find out where to buy self-adhesive film for furniture, just look at specialized sites on the Internet. It can be purchased in stores building materials, and you can buy self-adhesive film in the online store. There you can also find out how to glue the self-adhesive film.
Advantages:
- Not affected by high temperature;
- A huge range of colors and textures;
- Various coating options and patterns;
- In addition to self-adhesive, borders and edgings are created;
- This material is used for functional and aesthetic purposes;
- Speed of working with this material;
- It does not collect dirt and dust;
- The material does not require frequent maintenance;
- Perfectly complements the decor;
- Long service time.
About types of film
Looks impressive self-adhesive reflective film for glass and printing on self-adhesive film. It is sold in rolls of different widths.

Self-adhesive film for the kitchen and other models consist of three layers:
- Facial;
- Adhesive for self-adhesive film;
- Protective.
To make the surface layer the following is used:
- Polymer film;
- Metallized foil;
- Paper.
To make the fixing layer use:
- Rubber;
- Acrylic.
To protect the surface of the glue, siliconized paper is used, which is removed during operation.
Self-adhesive furniture film is produced according to different technologies. Depending on the equipment used by manufacturers, it is divided into the following types:
- Molding;
- Calendered.
The first type is more convenient for work, it retains its original color longer, and provides more possibilities for use. This is a heat-resistant, self-adhesive film. And you only need to stick it on a flat and smooth base. It fits perfectly on chipboard. And, the fact that the casting material stretches without heat treatment allows it to cover rough surfaces with protrusions. It is convenient to repair not only furniture, but also doors. Before covering the door with self-adhesive film, you need to familiarize yourself with the advantages: it is resistant to shrinkage, the calendered material can “shrink” over time.
Varieties of flowers

Self-adhesive film for children's furniture is very convenient. Due to the fact that it is very popular, manufacturers produce it in many color options. There are more than seventy different designs in just one wood-look option. This ranges from the most standard, classic designs (for example, “Alcantara”), and including the most unusual (for example, “Chinese bamboo”).
Unusual drawings look very interesting. These are a variety of relief patterns, marble-like, brick-like, leather-like patterns, self-adhesive velvet film, and various motifs on children's themes. Using this material you can imitate wood, plastic, fabric, foil. A special effect is achieved when black self-adhesive film is used. Dubna self-adhesive film is also popular.
What materials are they used for?
Use:
- for the bathroom;
- for finishing furniture;
- for finishing work surface in the kitchen or office.
- Children's rooms;
- when finishing doors;
- when finishing windows;
- for glass surfaces.
What kind of furniture can this material be used on?
This is a very popular way to decorate and decorate furniture, old doors, refresh the look of glass, and boring walls. The main advantage is that it is a moisture-resistant self-adhesive film that is easy to clean.
Before sticking self-adhesive film on furniture, carefully prepare the base for work. And before you update your kitchen with self-adhesive film, choose one that is not afraid of moisture.
Just so that all the work goes smoothly, you must know some tricks and secrets of this work. Then you won't make mistakes. And you can cover the cabinet with self-adhesive film; self-adhesive film is suitable for kitchen units and other furniture.

If you are using film to decorate a kitchen or bathroom, then give preference to moisture-resistant models.
Criterias of choice
It should be immediately noted high quality, which has self-adhesive film oracal, and German self-adhesive film. When choosing, it is necessary to take into account the selection criteria for this material:
- Quality. This is worth paying attention to first. On the market, self-adhesive furniture for furniture is made from polyethylene. Its service life is not very long, so opt for a PVC product.
- What is the condition of the surface you plan to cover? If you haven’t asked yourself in advance: “Is it possible to glue on old film? and pasted over old and unstable furniture, various tears and peeling may appear. For such purposes, you should take material that is produced by the injection molding method.
- Possible damage. For areas that do not have rough edges or protrusions, metallized foil can be used. Metallized foil is not suitable for children's furniture. Otherwise, expect scratches and damage.
- Take into account the future aesthetic appearance. Color, shades, design – this is everyone’s individual decision. But, there are rules that cannot be ignored.
To cover furniture with a dark color, take a film with a pattern. If gaps appear over time, they will not be so noticeable.
Film application stages
The gluing process itself is not particularly difficult. Carefully read the recommendations on the protective layer and find out how to glue the self-adhesive film.
The work consists of the following stages:
- Preparation of the base;
- Fixing the material.

How to properly stick self-adhesive film on furniture? Preparation. Tighten the fasteners that connect the pieces of furniture. Make sure there are no cracks or delaminations. We fill in all defects with putty and sand after drying. sandpaper. After this it is necessary to degrease.
Furniture covered with self-adhesive film looks very good.
When you stick decorative material, and made some mistake, then until the canvas has set, you can correct everything. If several hours pass and everything is attached, then nothing can be changed.
Dry pasting
How to cover furniture with self-adhesive film correctly? Gluing to the prepared base is carried out in several steps:
- Carrying out the necessary measurements;
- Cutting pieces of film required sizes(in this case, plotter cutting of self-adhesive film is often used).

The same method is used to cover doors with self-adhesive.
If you don’t know how to stick self-adhesive film without bubbles, then during the work, make sure that there are no creases or air bubbles. The air must be removed using a thin needle.
Wet pasting
At the same time, the film on the chipboard can move, and this is very convenient when you need to correct it so that there are no unevenness. It takes twelve hours to set. Then the furniture covered with self-adhesive film can be used.
Some tips for working with film:
- If it sticks to the base too quickly, then sprinkle it with a little powder. You will have more time to qualitatively connect the drawing;
- In order for the sheets to adhere well to glass and metal, the base must be slightly wetted. To do this, add a little detergent to the water. Then remove the protective layer and place the sheet on a damp base.
When washing, do not use products that may leave scratches. Do not use them with aggressive substances.
It is very easy to clean, and it does not matter where it is: on the door, on the wall, on glass, or on furniture. To care for it, you should wash it with water. If the dirt cannot be removed, try removing it with an alcohol solution.
If something went wrong (how to unstick it correctly)
If you are bored with the film, then it is not recommended to paint it. Gluing a new layer onto an old one is also not the most convenient way. It will have to be removed. How to remove self-adhesive film from furniture:
- Before peeling off the self-adhesive film from the furniture, wet the surface hot water, and use a flat and sharp object.
- You can try using a hairdryer. An industrial hair dryer or fan heater is better suited.
- Residues of glue are removed with solvent, alcohol, or gasoline.
This material is almost universal. With it, you can completely change your home at any time without spending a lot of money. And life will sparkle with new colors. Furniture covered with self-adhesive film will become beautiful in a matter of seconds.
If you don’t have a big budget, but want to update your interior, we suggest you learn how to glue self-adhesive film to furniture. With its help you can restore an old kitchen set, give the desired texture and color to living room or children's furniture. And so that the result does not upset you, we will analyze in detail how to stick PVC film no bubbles, gaps or creases.
In addition to accessibility, self-adhesive PVC film has a number of advantages, which are highlighted by both amateurs and professionals. These include:
- increased resistance of the material to temperature changes, on average from –40 to +60 °C;
- moisture resistance;
- ease of film application;
- ease of use;
- a wide range of color palette, drawing, patterns and texture;
- suitable for most finishing surfaces (wood, plywood, chipboard, plastic, glass, wallpaper, ceramics and others).
Self-adhesive film is presented in wide range and is suitable for suitable for most finishing surfaces
Most often, pasted film with a decorative pattern can be seen on furniture, wallpaper, glass doors and windows. In the last two cases, it is preferable to use stained glass film with a mosaic pattern. And to protect other surfaces, we recommend transparent self-adhesive film. She will help hide small scratches, abrasions, cracks and other defects.
In the home, it is rational to use self-adhesive to update the kitchen set. With its help, you can change the color and style of facades, make an imitation of countertops like stone, wood, metal, marble, other natural and artificial materials. On work area We recommend sticking a self-adhesive film made of transparent polyvinyl chloride, which will protect it from dust, dirt and grease.
Due to its increased resistance to temperature changes, the film is used to cover dressing table, as well as walls and doors in the bathroom. This material is not afraid of moisture, so it will serve you for many years; if desired, the selected design can be easily changed.

Self-adhesive makes it easy to update your kitchen set
A children's room is another place where such decor would be appropriate. You can give children's furniture not only a bright color, choose materials depicting cartoon characters or characters from fairy tales, but also protect it from the playful hands of a child. Marks from markers, pens, pencils and paints that children love to leave on all surfaces, including furniture, can be easily wiped off the vinyl surface using alcohol or a cleaner. And if a child scratches the film, you can easily replace it with a new one. Just like in the kitchen and nursery, you can stick self-adhesive film on furniture in the living room, bedroom or hallway, choosing the appropriate color and texture.
Before covering a cabinet or other furniture with film, we prepare the necessary set of tools that will be needed to work with the material:
- scissors;
- stationery knife;
- Ruler and pencil;
- plastic squeegee with felt pad;
- dry cloth.
We begin work by unscrewing all the handles and other parts that will interfere with you during the gluing process. Next we prepare the surface. We degrease it with alcohol or a solution with detergent, wipe with a dry cloth. If you have varnished or polished furniture, this will be enough. And for better adhesion of a rough or matte surface (wood, plywood, chipboard), we recommend priming it with polyester varnish or methyl varnish wallpaper glue. Before covering furniture with self-adhesive film, make sure that there are no cracks or chips on it. If you find such defects, treat them with sandpaper to smooth out sharp corners, and then putty and open the furniture with acrylic varnish. If the surface to be glued is glass or metal, we recommend moistening them to make it easier for you to work with the film.
We measure the gluing area with a ruler. Taking into account the fact that this material is usually used to cover individual areas, centimeter markings are drawn on the back of the film on a paper backing. If your self-adhesive does not have markings, we make it ourselves. We cut off the required amount of film with a margin of 1–2 cm for hemming the edges with scissors or a stationery knife. Next comes the most important point: how to properly glue the film so that no bubbles form on it? The first thing to consider is that you do not immediately separate the entire film from the backing and do not apply the entire sheet at once. To begin, separate from paper base literally 5 cm of film and apply it to the intended surface. To make the surface as smooth as possible, smooth the film material from the center to the edges, as in the case of wallpaper, this is the most convenient way to glue the self-adhesive. Best tool to expel air from under the film - a plastic squeegee with a felt insert. Thanks to the plastic bottom, rigidity is maintained, the material does not slip out of your hands, and the felt pad does not break through the self-adhesive. Next, we continue to pull out the next fragment and level it with a squeegee.
When the self-adhesive film is completely pasted, use a utility knife to cut the outer protrusions at an oblique or right angle, bend one edge inward, and cover the joint with the other. We return the handles to their place. We find the holes on the facade and make a small cross-shaped cut in them, insert a screw and screw the fittings into place.

First of all, you need to measure the area to be glued
In order for the pasted surface to retain its original appearance for a long time, it must be looked after. For regular cleaning we use damp cloth(microfiber), and to degrease the surface, use a soap solution. We wipe off more serious stains with alcohol. Chemicals We do not use them containing aggressive substances, including chlorine and bleach.
How to remove annoying film from furniture - three effective ways
If after a while you want to update the design of your furniture, replace the old film with a new one, there are several ways. All of them involve exposure to heat, as a result of which the adhesive layer begins to gradually peel off and lag behind the surface. In order not to spoil the furniture, we offer three proven methods for dismantling old film.
Hot water. Wet the film generously with hot water. After the material gets slightly wet, take a spatula, preferably a plastic one, so as not to scratch the wood, and carefully remove the sticky layer.
Hairdryer If the first option with hot water turned out to be ineffective, use a hairdryer. This can be either normal or construction hair dryer. We bring it at a distance of 20 cm from the film and warm up the surface. The glue will gradually begin to come off and the self-adhesive can be easily removed with a spatula.
Fan heater. In winter, this device is used, perhaps, in every home. It's time to use it not only for heating, but also for removing film. We direct the hot air stream to the self-adhesive, setting it to full power, wait until external finishing will heat up and begin to peel off. In addition to the fan heater, you can use any other portable heating device.
After removing PVC, adhesive traces may remain on the furniture, which can be easily removed with ethyl alcohol.
It is quite easy to update kitchen and other furniture using self-adhesive film. This material allows you to make a facade of any desired color and pattern. If the design of the item is such that the internal walls are visible from the outside, then they are also subject to appropriate finishing. However, her color scheme may be different.
Self-adhesive film has many capabilities: durable, safe for health, low price, wide scope applications.
Quite often there is a need to give a more presentable look to bookcases, wardrobes and kitchen cabinets. This is mainly caused by furniture becoming outdated or damaged. This is especially true for those apartment owners who rent them out for temporary use. Since it is not difficult to cover a cabinet with film, you do not need to contact a professional about this.
Types of self-adhesive films
Any material of this plan consists of three main parts:

Self-adhesive films are used in rooms with high humidity because they are waterproof.
- surface layer (paper, metallized foil, polymer film);
- adhesive base (most often acrylic or rubber);
- protective backing (the part that is separated during the gluing process. It is made of siliconized paper);
Depending on the production technology, self-adhesive films can be calendered or cast. The peculiarity of the former is that they do not stretch when cooled, so they can only be used for gluing flat and smooth surfaces. Molded ones are capable of stretching without the use of heat treatment. This feature of the material allows application on rough surfaces, corrugated and having protrusions from rivets and screws. Films made by injection molding practically do not shrink, which is also an advantage over calendered materials, which tend to “shrink” over time.
According to the texture of the surface layer of the film, there are:
- matte. It is advisable to use these materials for pasting furniture installed in rooms with bright lighting;
- glossy. This surface is more suitable for darkened rooms; it will reflect light, and the design on it will seem more “raised” and voluminous.
Return to contents
Criterias of choice

Today, there are more than 500 colors and patterns of self-adhesive film in stores.
- If the furniture is old and unstable, when the walls are deformed, the film may tear or begin to peel off from wooden surface. Therefore, in this case it is preferable to use films made by injection molding. They retain dimensional stability better than calendered ones and have greater strength.
- For cabinets that have stud-like protrusions, optimal choice There will also be injection-molded self-adhesive films.
- If the furniture is made of dark-colored wood, you should not choose a plain material. It is better to buy a film with a pattern, as it will hide small gaps between the panels that may appear over time. Changing the cladding will be quite labor-intensive, so you need to provide for the possibility of a masking effect using the color and pattern of the self-adhesive film.
- If the closet is located in a nursery, you should not choose a material with metallized foil to cover it. It is quite easy to scratch it or otherwise damage the integrity of the surface layer. Here, cast or calendered films with a dense polymer coating are more suitable.
- For kitchen cabinets, the best choice would be a smooth matte or glossy film. The main requirement for it is an easy to clean surface.
Return to contents
Self-adhesive film
Despite its apparent simplicity, this work has its own characteristics.
They are simple and do not require special knowledge and skills, only attentiveness and accuracy.
What will you need for the job?
- Dry rags.
- Scissors.
- Sharp knife.
- Medium grit sandpaper.
- If necessary, use wood putty to seal cracks and other defects.
- Primer composition.
- A film smoothing roller or squeegee, which is available from any self-adhesive supplier.
- Acetone, solvent, glue thinner. They will be needed to degrease the surface of the cabinet.
Return to contents
Surface preparation
If you ignore this process, the film will probably soon come off the surface of the furniture, since the main reason for this peeling off is finishing material- insufficient preparation of the base or lack thereof. First of all, you need to ensure the evenness of the cabinet walls and their stability. Therefore, before starting work, you should tighten the bolts holding the wooden panels together.
If the furniture is made of chipboard, you need to make sure that there are no delaminations at the ends. If there are cracks, work is carried out to seal them using putty compounds. This job is easier to do if you're small. rubber spatula. First, the defects are degreased, primed, and only after that a leveling putty layer is applied.
The surface of the cabinet intended for finishing with self-adhesive film must be smooth and clean. It is especially important to fulfill this requirement when using glossy films, since in the glare of light the slightest roughness underneath immediately becomes noticeable. If calendered film is used, it is recommended that the sharp corners of the furniture be slightly rounded, which will prevent the film from tearing when it “shrinks.”
When your kitchen furniture has become dilapidated or you just don’t like it anymore, don’t rush to buy new ones, because, most likely, you can update it yourself. All you need for this is a couple of free hours or days, a well-thought-out idea for a remodel, some money and one of our instructions.
Method 1: Painting the kitchen with chalk paint
Do you want to update your kitchen set beyond recognition with your own hands? The best way To do this, repaint the facades with chalk (mineral) paint. Why chalk?
- The fact is that this type of paint has a thicker consistency and increased adhesive properties, due to which it fits perfectly on any surface - even on laminated chipboard/MDF. Moreover, chalk paints eliminate the need for tedious sanding and sometimes even without primer.
Chalk paints are also good because they give the painted surface a texture similar to that obtained when painting a wooden surface. Therefore, even the most ordinary kitchen with film facades will look much more noble after such an “update”.
- In Russia and the CIS countries you can buy chalk paints from designer Daria Geiler, foreign manufacturer Annie Sloan, Kazakh Vernenskaya Manufactory, etc. You can also make chalk paints yourself using recipes that are easy to find on the Internet.
Here are some photo examples of kitchens before and after restoration.
Photo of a kitchen with film facades before and after painting with Daria Geiler paint. Here the author of the alteration restored the peeling film on the facade near the stove, and then painted the furniture without removing or sanding the film

Old kitchen with veneer cabinets before and after painting with Annie Sloan paint. By the way, in this kitchen even the tiled floor was painted with chalk paint, and the patterns on it were painted using a homemade stencil


Inspired? Then it's time for a master class.
To paint the kitchen you will need:
- Primer (special for chalk paints or alkyd if the furniture was painted with oil stain);
- Chalk paints (preferably with a 10% margin);
- Matte moisture-resistant varnish (acrylic or polyurethane).
Useful tips
- Material consumption is calculated following the manufacturers' recommendations. It is especially important to correctly calculate paint consumption. If there is not enough of it, you will have to repaint the remaining areas with paint from another batch, which, due to the nature of production, will be slightly different in tone.
- Which varnish is better - polyurethane or acrylic? To ensure that the kitchen coating can withstand extreme loads, it is safer to use polyurethane varnish. However, if you rarely cook and you don’t have pets, acrylic lacquer It’s perfect, especially since it dries faster, doesn’t have a strong odor and is cheaper.
- Brushes: two synthetic brushes for primer and varnish, as well as one natural or synthetic brush about 4 cm wide (a natural brush gives a more pronounced texture);
- Degreaser, such as white spirit;
- Sandpaper with a grain of 100–180 microns;
- Ladder;
- Film and masking tape (to protect parts that cannot be painted);
- Screwdriver;
- Gloves.
How to paint a kitchen set:
Step 1. Preparation
First you need to remove the handles from the facades. Floor, walls, apron, countertop, glass inserts, fittings and other surfaces that you do not want to paint should be covered with film and masking tape. Next, clean all parts from grease (preferably with a degreaser), stains and dust.
- Do the facades need to be removed? It is not necessary to do this, but it is more convenient to paint this way.

Step 2: Primer and/or sanding
It is not necessary to sand the old paintwork, film or lamination, but it is necessary to treat it with a primer in 2 layers. In this case, each layer of primer must be allowed to dry, and then the primed surfaces must be sanded to even out the coating and enhance paint adhesion.
- However, if the lamination has a strong gloss, then it is advisable to remove its top shiny layer with fine-grained sandpaper - this will make the coating even stronger.
- If you are not too picky about the result (for example, if the kitchen is temporary, very old or got for free), then you can do without a primer. All you need to do is: wash the facades from grease, then paint them in 2-3 layers and finally cover them with 1 layer of varnish.
- Do you want to achieve the most even and durable coating? Then it’s worth sanding the surfaces after each layer of primer, paint and varnish (except for the finishing layers).
- Before starting work, test the paint on any object.
- If you want to save money, paint only the fronts and visible parts of the frame, and the interior walls and shelves of the cabinets can be painted cheaper or left unchanged.

Step 3. Coloring
Once the primer is dry, begin applying paint in 2-3 layers, allowing each layer to dry completely (one coat chalk paint It only takes about 30 minutes to dry.)
- It may take 5-6 coats to cover a dark finish with white paint.
Step 4. Varnishing
When the finishing coat of paint has dried, you can begin applying the varnish in 2-3 thin (!) layers with a synthetic brush (not used). It is advisable to allow each layer to dry completely for about 24 hours.
Step 5. Finally, we return the fittings and facades to their places.
Voila, old kitchen like new!

Method 2. Pasting facades with self-adhesive film
The fastest, most affordable and easy way restoration of kitchen furniture - decoration of its surfaces with self-adhesive film (self-adhesive wallpaper). Unlike painting, gluing film is also good because it allows you to return the look of the kitchen to its original state after some time. For those who live in rented apartment or just loves change, this method of updating the kitchen will help out with a bang.
- The service life of furniture covered with film will be 2-3 years in good condition.
- This remodeling method is most suitable for kitchens with solid facades without panels or relief details.
Below are photos of kitchens before and after film restoration.


It is possible to cover the kitchen with film only partially. For example, one of the tiers, the back of the set, the base or panels. Examples of such kitchen remodeling are presented in the following selection of photos.


If the facades of your set have glass inserts, then you can decorate with film only back walls cabinets

You can cut out patterns and designs from vinyl “self-adhesive” tape.


By the way, the film can be used to update the apron, table top or table top, and appliances.


If the refrigerator is not built into the set and does not fit into the interior of the kitchen, simply cover it and the furniture facades with film of the same tone


To remodel your kitchen you will need:
- Vinyl self-adhesive paper (with reserve);
- Sharp scissors and a breadboard knife;
- Ruler and centimeter;
- Squeegee for smoothing with hard and soft sides;
- Lint-free rags.
- Screwdriver.
How to cover a kitchen with self-adhesive film with your own hands:
Step 1. Using a screwdriver, remove the handles from the facades; if you wish, you can also remove the facades themselves - this will make it more convenient to paste them over.
Step 2. Wipe all surfaces, including the ends (!), clean and dry, especially paying attention to grease deposits - it is better to remove it with a degreaser.
Step 3. We begin to glue the film. Remove part of the backing from the film and attach the canvas to the facade, leaving a free 3-5 cm on the top and sides - we will later wrap this excess onto the edges. Take a squeegee and start smoothing the film, pushing out the bubbles, gradually going down and peeling off the backing. Movements should be smooth and slow. Having reached the bottom edge of the facade, step back 3-5 centimeters from it and cut the canvas.
- If you wish, you can pre-cut the canvas to the size of the facade with an allowance of 2.5-3 cm (for facades of standard thickness).
- The film sets completely only after a few hours, so don’t be afraid to make mistakes - all mistakes can be corrected.
- If there are small bubbles left on the film, they can be carefully pierced with a thin needle and smoothed out again.
- You can purchase the film in 2 colors to create a stylish contrast: light top - dark bottom.
Step 4. Now that the facade is almost completely covered with film, let's work on the edges and corners:
- First, cut the corner portion of the loose film at 45 degrees as shown in the photo below. This way you will have two “wings” along the two edges of the façade.

- Now carefully wrap the free edge of the film over one of the edges and smooth it out. Next, wrap the remaining corner onto the adjacent edge of the facade as shown in next photo, and cut off the excess.

- Cover the second edge with film in the same way, but this time cut the corner at a right angle.

- Finally, press the seams tightly and repeat the process on the remaining corners.

Step 6. Using the described method, cover with film all the front parts of the headset, visible areas of the frame and the base. If desired, you can decorate the shelves and interior walls of cabinets with vinyl. However, this is not at all necessary.
Step 7. On last stage put the facades back in place if you removed them, as well as the handles, making holes in the right places using a knife or awl.
You can also watch a visual master class on how to cover a kitchen with self-adhesive film in this video.
Method 3. Kitchen decoupage
Hand painting is very beautiful, but difficult or expensive. But even a beginner can decorate boring facades of a set or hide local damage (scratches, chips, stains, etc.) with drawings created using the decoupage technique. The result is guaranteed to be excellent! We offer ideas for kitchen decoupage in the following selection of photos.


Decoupage kitchen in shabby chic style


Decoupage buffet
Decoupage will help decorate not only the facades of the furniture, but also other kitchen furniture and even appliances.


To work you will need:
- Three-layer napkins with a pattern or decoupage cards;
- 2-3 flat squirrel brushes (for applying glue and drawings on the glue, as well as varnish);
- Scissors;
- PVA glue;
- Pencil;
- Acrylic varnish (matte, glossy or with craquelure effect).
- For do-it-yourself kitchen decoupage, decoupage cards are more suitable than napkins - the designs on them fit perfectly together and can be large in size.
- The main thing in remaking furniture using the decoupage technique is right choice drawings. They should fit into the kitchen interior in color and style.

How to transform a kitchen using decoupage technique:
Step 1. First you need to degrease the selected area with alcohol or degreaser.
Step 2. Carefully separate the layer with the pattern from the napkin, then cut out the desired print from it. At this stage, you can “try on” the drawing on the facade and at the same time make a note where it should be located.
Step 3. Now apply PVA glue reverse side cut out design and apply it to the façade in the right place. Next, carefully smooth the napkin with a brush, moving it from the center to the edges, and blot the excess glue and remove it with a slightly damp rag.
Step 4. Glue all the remaining napkins in the same way.
Step 5. If desired, the kitchen decoupage can be modified hand painted. When the glue and paints have dried, the design can be sealed using acrylic or polyurethane varnish in 2-3 layers (allow the design to dry completely between layers).
Some more useful information
- Do you want to turn minimalist kitchen with continuous facades in classical? This is possible by gluing moldings or carved parts onto them and then painting them following our instructions.

Also, before painting the headset, wall cabinets can be supplemented with figured brackets (they can be bought ready-made or cut out yourself), and the base can be supplemented with baluster legs.


- For the best result, it is worth approaching the “update” of the kitchen in a comprehensive manner and, if necessary, change not only the color of the facades, but also table top With an apron , curtains , dinner table and chairs.
- Sometimes the thirst for change can only be satisfied by replacing/painting furniture handles.

- Of course, before painting the kitchen or covering it with vinyl, it needs to be repaired: tighten/change the fittings, glue and iron the peeling film a little, polish the scratches, and fill the chips, cracks and holes from furniture handles with furniture putty.