Do-it-yourself greenhouse - instructions and tips for design and construction (120 photos). Do-it-yourself winter greenhouse: types of heating Building a greenhouse with your own hands
A greenhouse is a special zone, the internal climate of which is not affected by any vagaries of weather or negative factors. environment. Crops growing inside the greenhouse are not afraid of cold or heat, wind, snow or hail. Thanks to the microclimate created there, plants receive everything they need in sufficient quantities.
Everything that is done by hand is much cheaper than alternative options.
Creating a greenhouse with your own hands is not as difficult as it might seem. The main thing is to know about the basic elements of its design, the general rules of normal functioning and to have the desire.

What to consider at the initial stage
First you need to choose a location and decide on the crops grown in it. Choosing the location of the greenhouse is an extremely important stage, because in one place the soil may be too wet, and in another there will not be enough sunlight for the plants.
Choosing soil
The building must have the highest quality soil available on the site - with a flat surface and moderate humidity. A hole should be dug in the marked area to check the quality of the soil. If clay appears in the recess, the place is not suitable for us. To construct a greenhouse, you need to choose soil that has a layer of sand.
If there is no suitable plantation on the site, then you can dig a pit yourself, fill its bottom with gravel and make a layer of sand. Fertilized and disinfected soil is already placed on this drainage.

Choosing a place
The place should be sunny. Most often, greenhouses are used in the spring and summer, where there is no heating system, and the greenhouse is heated by the sun's rays. You need to choose a place on the site where the sun shines all day long and the shadow of trees or nearby outbuildings does not fall on it.
Wall greenhouse
Drafts are a big enemy of greenhouses. An incorrectly or weakly installed covering will result in wind getting inside the greenhouse. But even if everything is done correctly, the wind will cool the coating, and cooling walls are known to absorb some of the heat in the room.
The best option for steppe regions, which are characterized by the presence of constant gusty winds, would be a wall-mounted greenhouse, the design of which is attached to any non-residential building on the south side.
Once you have decided on the location of the building and its area, it’s time to think about its configuration.

What are greenhouses?
Before making a drawing of the future greenhouse, you should decide on its configuration and appearance. A wide selection of modern building materials allows you to create unimaginable masterpieces of various forms in this direction. The design can be of two types:
- Collapsible. It is constructed if the greenhouse is planned to be used seasonally.
- Non-separable. Built for year-round use.
According to the configuration of the greenhouse there are:
- Wall single-pitch
- Traditional
- Polygonal
Other variants of forms are mainly various combinations of these three main forms: tented or arched greenhouses are often built, the basis of which is the frame of the traditional or polygonal variety.

Design elements
In order to build a greenhouse with your own hands, you need to know about its structural elements. Any greenhouse consists of three main elements, which differ in shape and materials of manufacture:
Greenhouse base
Whether you are building a temporary or permanent structure, almost any greenhouse requires a foundation. The only difference is that you don’t have to make a particularly strong base for a temporary greenhouse (some even use plastic bottles for it). For the greenhouse whose use is planned all year round, a more solid foundation is needed. Thanks to reliable support, the structure will serve for a long time. The base of the foundation must be below the freezing level of the soil. He will tell you about the foundation for the greenhouse .

DIY greenhouse (video)
Greenhouse frame
Construction of the frame is perhaps the most difficult stage of greenhouse construction. You can purchase ready-made metal carcass, you can order a metal-plastic or aluminum glazed structure, when assembled you will get a finished greenhouse, or you can mount the frame yourself. The frame is the main part of the entire structure. When planning the shape of the frame and choosing materials for its construction, you need to take into account that the strength of the entire structure will depend on the strength of this element. For the manufacture of the frame, the following materials are most often used:
Wooden beam
A wooden frame is easy to assemble, but wood is not durable, therefore, when constructing a permanent structure, a wooden frame requires careful processing and regular maintenance during the operation of the greenhouse. But if you decide to build a greenhouse based on this material, then the information contained in the article will be useful to you.
Steel
The steel frame will be strong and wear-resistant, withstanding any load. Often, instead of a steel corner, it is used to build a greenhouse frame. If your choice falls on a steel frame, you should remember that the metal is subject to corrosion, so the material requires pre-treatment.
PVC
The degree of strength of a PVC frame directly depends on the strength and thickness of the profile used. The main advantage of polyvinyl chloride is its flexibility, which allows you to create structures of any shape that are completely sealed, allowing the owner to regulate the microclimate inside the greenhouse with his own hands.
Greenhouse covering
To protect the crops being grown from the negative effects of external environmental factors, care should be taken to provide a durable covering for the greenhouse being constructed. Today's construction market is overflowing with a variety of relevant products, so finding a coating that best suits the given selection criteria will not be difficult. The most commonly used materials for covering greenhouses are:
Glass
To cover a durable greenhouse, the operation of which is planned for many years, high-strength glass is used. Many people choose tempered glass or triplex for their greenhouse. If it is not possible to use durable glass to cover the greenhouse with your own hands, you can install ordinary glass in several layers. You can protect glass from wind loads and possible exposure to precipitation, such as hail, by installing an unbreakable protective coating on top of the glass.
Glass perfectly transmits the sun's rays, and with them ultraviolet radiation.
Foam
For covering greenhouses for seasonal purposes, film is the most inexpensive and popular material.
It perfectly transmits the sun's rays, scattering them, and prevents the plants from burning. At the end of the season, the film is carefully dismantled with your own hands and, if there are no obvious flaws on it, it can be left for reuse.
Polycarbonate
This flexible, high-strength roll material looks aesthetically pleasing, protects crops from ultraviolet radiation, allowing them to receive the maximum amount of sunlight. The material is durable and therefore resistant to precipitation and wind loads. The polycarbonate coating is designed for long-term use, its transparent color remains unchanged for many years.

Some professional advice will help you build a high-quality greenhouse on your own:
- Construction of a permanent greenhouse begins in the fall, so the selected area should be properly prepared: remove the soil using a shovel, removing plants from the top layer, and put it in a separate place for storage until next summer. Using any sheet material, we make sides to protect the soil from weeds.
- with a collapsible frame made of pipes, they are easy to transport, but difficult to install. Quick assembly will be ensured only by a frame made of ready-made welded modules. The fewer connections in the greenhouse frame system, the less play and other defects that reduce the strength of the building.
- If you are installing a polycarbonate greenhouse, there is no need to dismantle the covering for the winter. Polycarbonate is not afraid of stress. You can only remove the irrigation system and windows.
- The reliability of fastening directly depends on the choice of fasteners, good option- a design with a frame with welded hinges that allow it to be attached both to the ground and to the foundation.
- If the greenhouse is fixed using pipe piles, they should not be driven in completely, since the soil floats and settles over time, and the fastening may weaken.
- The greenhouse should be equipped with transoms on both longitudinal sides for ventilation. In addition, you can install plastic partitions that eliminate cross-pollination, a system and automatic windows.
Knowing the structure of the greenhouse, relying on the advice of experts and following the rules for selecting a location and soil for the future greenhouse, you can easily make a greenhouse yourself and grow plants in a microclimate favorable to them.
In order not to lose the material, be sure to save it to your social network VKontakte, Odnoklassniki, Facebook by simply clicking on the button below.
Many summer residents and gardeners become so accustomed to home-grown produce that they strive to receive fresh vegetables throughout the year. To realize such a desire, the farmer will need to move to the highest level of gardening skill - build a greenhouse. DIY greenhouse built on own plot, this is truly a great achievement, which, however, will require a lot of work, knowledge and resources. In addition, depending on the needs, not only the type of greenhouse will change, but even its location, size and shape.
How to build a greenhouse with your own hands? A step-by-step construction demonstration will be shown later in this article.
Advantages of greenhouses
In order for a little-informed gardener to fully understand and appreciate the value of a greenhouse, and then figure out how to make a greenhouse with his own hands, a number of main advantages should be highlighted. Of course, each type of greenhouse also has individual properties, but a certain general number of outstanding characteristics still stands out:
- Tightness of the structure to maintain temperature conditions;
- Ease of installation and, if necessary, dismantling of some types of structures;
- Durability;
- Polygonal greenhouses are able to absorb the maximum amount of sunlight;
- Environmental friendliness;
- Aesthetic appearance that allows you to fit into the surroundings of the winter garden or landscape design.

This is only a small part of the advantages that building a greenhouse with your own hands has. It should be noted that often, in addition to cost, such greenhouses have many more advantages than store-bought options. But first you will need to figure out how to properly build a greenhouse with your own hands. However, any greenhouses also have some common disadvantages, which should also be highlighted:
- Corrosion or rotting of the structure;
- Instability and vulnerability to weather factors (hail, strong wind);
- Uneven air heating.
Even a person far from construction can build a greenhouse on the site with his own hands. It is enough just to carefully select materials, carefully build the greenhouse with your own hands, and during operation follow the rules for maintaining the structure. However, those who decide to undertake such an event will first of all need to decide on the type, materials, dimensions, shape and installation location. We will look at how to build a greenhouse with our own hands and the step-by-step preparation process below.
Types of greenhouses
Today there is a wide variety of different types of greenhouses. We make a greenhouse with our own hands and decide on its type according to the following selection criteria and priorities.
Operation criterion
First of all, the farmer needs to decide how he plans to operate the greenhouse: all year round or seasonally. This will make it possible to understand whether the design of the greenhouse will be collapsible or not, and in addition, winter greenhouses have a more complex design and are more demanding in terms of operating conditions.

By location relative to ground level
If you decide for yourself that I am building a greenhouse with my own hands, then the most traditional option is to place the greenhouse directly on the surface of the ground. In the case where the greenhouse structure is planned to be heated, it can be deepened into the ground, as well as be an adjoining structure. If necessary, a special foundation can also be laid. In some cases, a greenhouse is built on the top floor of an existing building: a house, a garage, a barn.

By functionality
Everything here is determined by what exactly the gardener plans to grow, especially if it is a do-it-yourself vegetarian greenhouse. Among the main options: traditional garden crops, mushrooms, flowers, fruits, exotic plants. The choice will directly affect interior design greenhouses.

According to architectural solution
In this case, there are many options: one, two or three-slope greenhouses, combined, wall-mounted, arched or horizontal. Or maybe it’s an arched winter garden. The choice will directly affect the final cost of construction and the dimensions of the structure.

By types of building materials
The resources used to construct a greenhouse are divided into two types: frame and covering materials. Wood, metal, plastic or even brick can be used to construct the frame. The coating can be polycarbonate, conventional glazing and many other options. If necessary, the gardener can resort to a combined design.
These were the main criteria for preparing the construction of a greenhouse with your own hands, and among others, one can distinguish the division of greenhouses by type of heating, method of planting, etc.
An interesting point is that greenhouses are quite diverse structures, which can be different in design and interior design. It may be a good-quality, but hastily and primitively put together structure, or a sufficiently technological and equipped point for year-round cultivation harvest.

It is important to remember that all summer cottages are located in different conditions, i.e. even with careful selection suitable type greenhouses, the expected result and the final result, as well as DIY greenhouse ideas, can still vary greatly.
Thus, it is recommended that a gardener starting from scratch get acquainted with greenhouses and greenhouses, start with budget options, and also not aim at large areas and large volumes of harvest.
Selecting a location
The construction of greenhouses is one of the most important issues, which is determined by many factors and, in turn, affects a lot. There are a number of factors that must be taken into account.
Light mode
The greenhouse should constantly, and especially in winter, receive maximum sunlight. Therefore, we build a greenhouse by orienting it along its length from west to east.

Correct Orientation
Here you should take into account the direction and nature of the winds. In case they may violate the internal temperature regime greenhouses, you will definitely need to provide wind protection. For light and unstable structures, especially if we build a greenhouse with our own hands, the wind can pose a threat of a completely destructive nature. In this case, it is very important to ensure the stability of the structure as a whole, as well as all its fasteners and components in particular. It is important that the terrain is level and not in a low place where moisture would flow.

The soil should not be clayey, and ideally it should correspond to the type of plant chosen by the gardener.
Convenience
We are talking about a convenient and comfortable approach to the greenhouse, as well as working inside it. A wide passage and free space around the structure will ensure not only easier construction, but also operation. In addition, care should be taken to supply communications to the greenhouse, which will be especially needed there in winter.

Remoteness
Ideally, the greenhouse should be located in an open space and away from other structures on the site, as well as large plantings. This allows you to get rid of many problems by default and ensure optimal conditions inside the greenhouse. If the plot area is small or due to the chosen type of greenhouse, such an arrangement is not possible, then the construction of the greenhouse is carried out on the south side.
A deliberate approach to solving the issue of greenhouse placement will allow you to achieve the maximum possible effect, as well as eliminate a number of problems and unnecessary hassles.
Shape selection
The most common form for building a greenhouse or greenhouse with your own hands is arched and gable greenhouses. The greenhouse that you are planning to build can also have different geometric shapes, for example, an oval, a circle, a square (or rectangle) and even a trapezoid. Greenhouses in the form of a tent are becoming quite popular.

Depending on the location of the greenhouse, as well as the height of the plants grown, both the shape and size of the structure will directly depend. In some areas, the greenhouse is an integral component of the entire landscape design composition, and therefore its shape and size must be chosen to create maximum aesthetics.
One of the main advantages of building a greenhouse with your own hands instead of purchasing a ready-made store-bought structure is the ability to independently vary the shape and size of the structure to suit your own needs. With collapsible structures, if desired, you can even experiment every time, combining several options for greenhouses or testing new designs. Non-demountable structures can be built, providing for the possibility of their subsequent expansion or modification, without serious intervention.
Size selection
As mentioned above, the size of the greenhouse is determined not only by its location, but primarily by the height of the plants that will be grown in it. Of course, for each individual case the dimensions will be individual. However, the experience of gardeners shows that the most common and optimal options The greenhouse area is a structure three meters wide and six meters long. With such dimensions, the structure will not take up much space on the site, but at the same time will provide an impressive harvest. The length will be determined by the capabilities of the land plot, the assigned tasks, and the area of free space.

An important point is that when planning the size of the greenhouse, the presence of a wide path should be provided. This is quite an important point, both for the construction and operation of the greenhouse. This is explained by the fact that the gardener will need to regularly supply fertilizers, tools and other items. In addition, there should be free access to the plants themselves from the path, so that there is no need to constantly step directly onto the planted area. Thus, the recommended track width is about 0.6 meters.
Maintenance of the greenhouse in a bent position is unacceptable, and therefore the height of the structure should be at least two meters. In general, based on the experience of gardeners, the most optimal greenhouse height is in the range of 2.2-2.5 meters.
Selection of materials
When choosing a material, first of all we're talking about about the material directly for the main frame when deciding how to build a greenhouse. It is determined mainly by two factors: the type of future greenhouse and the size of the budget.
Greenhouse frame materials
To build the frame, all kinds of materials are used, each of which has its own purpose, as well as advantages and disadvantages.
How to make a greenhouse The most budget option is to use PVC pipes. Thanks to their lightness and flexibility, it is possible to quickly and easily build the structure of a future greenhouse with your own hands. Such a greenhouse will be of an arched type, since a pipe bent in an arc in the form of an arch is attached to the reinforcement driven into the ground. With the right approach, such a greenhouse can be erected in one day. It is best suited for those who are building a greenhouse for the first time and have not yet fully decided on its need on their site.

A more expensive and high-quality material for constructing a greenhouse with your own hands is wood. With minimal carpentry skills and tools, this material is quite easy to process and create a frame of the required dimensions from it. Then the future greenhouse can be glazed or covered with film. On any site, such a design will look beautiful and solid. To ensure its durability, you will need to not only take care of the reliability of all fasteners, but also protect the wood from rotting and other negative factors.

In order to save money, builders are recommended not to use expensive branded wood processing products, but to replace them with improvised options. As an example, wooden beams can be impregnated with resin, and then lubricated several times with drying oil and finally treated blowtorch. Protection from rotting and other negative factors will be provided to no less extent.
Metal is also one of the most commonly used materials for greenhouse construction. The advantage is that the iron is attached only by welding, but this is also a disadvantage, since it will require not only skills, but also equipment for welding. Alternatively, how to make your own greenhouse and prefabricated building that will be bolted on, however this is much more labor intensive and time consuming. Due to the increased mass of the iron frame, such a greenhouse often requires its own foundation. In addition, care should be taken to protect the metal structure from corrosion.

Coating materials
The frame of the future greenhouse can be covered with various materials to create the expected greenhouse effect. The most common are the following three options: glass, film and polycarbonate.
Polyethylene film for greenhouses can be of several types:
- Heat-saving. It contains an adsorbent that does not transmit infrared radiation from the soil at night. In addition, it increases the temperature inside the greenhouse itself;
- Ultraviolet stabilized. Allows you to increase the service life of the film under direct influence of solar radiation by almost ten times;
- Light scattering. Protects plants, especially seedlings, from harsh radiation sunlight, under its direct influence.

There are other less common types of film. In general, this is a short-lived material, designed to last for two years, in some cases up to four. The main advantage is low cost and ease of use.
Glass is the oldest and most traditional material. The main advantage is the extremely high light transmittance. Disadvantages include: heavy weight, fragility, difficulty of fastening and the need for a rigid frame. The glass must be strong enough to withstand the load exerted by wind, hail and precipitation. The best solution would be to use triplex or tempered glass.
It is worth noting that glass has a high transmittance of sunlight, but at the same time, along with useful infrared radiation, plants are also exposed to ultraviolet radiation.
Polycarbonate is a modern and practical material that combines the best qualities of glass and polyethylene. For greenhouses, cellular polycarbonate is used, which is represented by a two-layer sheet structure inside, which has stiffening ribs. This material is quite inexpensive and elastic. It is easy to install and, if necessary, dismantling, its service life reaches ten years. The structure of polycarbonate allows it to simultaneously provide good thermal insulation and dispersion of rays.

The variety of materials allows you to satisfy any budget, gardener’s needs and meet the characteristics of each site. Most materials are easy enough to transport and process that structures made from them can be erected literally within one day or weekend.
Choosing a foundation
Before you build a greenhouse with your own hands, you need to create a foundation on the selected site. To do this, you will need a flat and flat area, in which a small depression of a few centimeters should be made along the contour of the future greenhouse. Wooden beams or boards can be used as the main material for laying the foundation. It is important to remember that the finished foundation should fit tightly, and if there are cracks, they should be covered with earth.
Before proceeding with the installation of the foundation, you should plan and sand the surface of the boards, and then walk over it with protective substances.

In order to strengthen the future foundation, it is recommended to fix the entire structure with additional metal elements (brackets, corners). In the case of using wooden boards, metal corners are attached to internal joints, and if timber is used, then the use of staples will be more appropriate and they will need to be driven into external joints designs.
In the case when the greenhouse is removable and is used for a certain season, then there is no need to worry about a serious foundation. However, a greenhouse used all year round will require a well-prepared foundation. Ideally, this should be a monolithic strip foundation, whose base is located below the freezing level of the soil. The depth of the ditch should be about eighty centimeters, and the lower part is filled with crushed stone. In addition, it is recommended to strengthen the base with reinforcement or reinforced mesh.
Heating
A heated greenhouse is a great way to extend the growing season and fruiting, especially if it is a do-it-yourself greenhouse for flowers. There are several ways to arrange a heating system inside a greenhouse, which depend on the available budget, the area of the greenhouse and its purpose.

You can completely install the heating system for a greenhouse yourself.
Of course, heating systems are installed mainly in greenhouses with year-round use. Among the most effective ways heating systems for greenhouses can be distinguished as follows:
- Stove heating, with water or air circuit;
- Water heating based on a boiler (solid fuel, electric or gas);
- Gas gun;
- Electric convectors;
- Infrared heaters;
- Water heating pipes;
- Heating cable.
It should be noted that depending on individual needs, heating methods can be combined. Each of the presented methods is quite multifaceted and has many nuances.

Choice heating system is carried out not only by the factors mentioned above, but also by a number of other aspects. For example, the type of energy consumed and its quantity, operating principle (heating time, cycle duration, etc.), level of heating efficiency and useful work.
Ventilation
When deciding how to properly make a greenhouse with your own hands, you should take everything into account. The basis of the work of each greenhouse is the creation of a greenhouse effect, thanks to the special design of the structure itself. Of course, in conditions of almost complete tightness, exposure to heat and other factors, the air inside the room quickly stagnates.
This phenomenon is a favorable environment for the proliferation of pests, diseases and other negative factors, and, therefore, it must be combated. It is recommended to create a ventilation system to regulate the microclimate in the room, ensure the flow of fresh air, and maintain optimal air humidity. Of course, the ventilation operating mode should not conflict with the operation of other devices, such as heating or shading.

You should also worry about creating devices for greenhouse ventilation. These can be roof and side vents, as well as doors. The surface of these devices should be one fifth of the total area of the structure.
Ventilation promotes hardening of crops planted in a greenhouse, and is also useful for young seedlings. Before directly planting seedlings, it is recommended to regularly ventilate the greenhouse premises not only during the day, but also at night.
beds
Preparing beds in a greenhouse is a rather problematic process that will require a special approach. Success in growing any plants depends to a large extent on the location and design of the beds. When it comes to forming beds, many different factors are taken into account, and the main ones include the following:
- The total area of the greenhouse;
- Ease of access and approaches;
- Type and specificity of plants;
- Dimensions of the beds themselves (height, length and width);
- Location relative to cardinal directions.

In addition, you will have to take care of the frame for the beds, the bedding for insulation for the winter, the uniformity of watering, lighting and heating of the entire planted surface of the beds, because all this is the solution to the question of how to properly make a greenhouse.
Now you know enough theoretical basis to have a complete understanding of what you should know, understand and prepare before directly building a greenhouse with your own hands. The operating principle of the greenhouse and step-by-step instruction How to build a greenhouse with your own hands, these are topics for separate detailed articles.
- The protective layer on which the inscriptions are applied must be located on the outside of the greenhouse.
- To obtain the most durable structure, be sure (!) to pay attention to the location of the polycarbonate “honeycombs” - they should go only vertically, in inclined structures - parallel to the slope.
- When creating arches, keep in mind that polycarbonate sheets bend only in one direction - lengthwise, that is, along the line of the stiffeners.
- The joints of the sheets should be at the center of the frame post; the sheets are connected only in this way.
- This type of plastic is cut with a construction knife, jigsaw, or grinder. You can also use a hacksaw or a circular saw.
- To firmly connect the sheets to each other, special plastic profiles. Manufacturers do not recommend overlapping polycarbonate. In practice, when making a polycarbonate greenhouse with your own hands, it is not always possible to cut and fit the sheets perfectly. Some craftsmen even manage to do without connecting profiles, placing polycarbonate overlapping. The most important thing is that the joint must be in the center of the rack, and not sag in the air. Moreover, even with ideal installation, snow pressure can force the sheet out of the profile. In the case of overlap, this does not happen.
- It is not advisable to use a powerful drill for screwing in self-tapping screws - it will overtighten the fasteners and often slip off during operation. It is better to work with a regular screwdriver. Polycarbonate is drilled at low speeds with little effort. Next, turn off the tool, insert the screws and continue working.
- The distance between the screws to be screwed in is 25-70 cm. It all depends on the type of frame and the expected snow and wind load.
- When assembling polycarbonate structures, rivets are sometimes used instead of self-tapping screws. However, dismantling the greenhouse or replacing a damaged sheet in this case will be more difficult.
- When the temperature changes, plastic can change size. When making butt joints between the sheets, be sure to leave small space a couple of millimeters in size - a technological gap. Otherwise, cracks will form at the joint. For the same reason, the size of the holes for fasteners is made a little larger. To prevent the plastic from cracking, do not tighten them all the way.
- To compensate for expansion and protect against cold bridges, it is recommended to use special thermal washers for polycarbonate (screws are purchased separately). It is allowed to use EPDM roofing screws, equipped with a gasket or standard for metal with a rubber thermal washer, in which the threads have a small pitch.
Many owners of private houses dream of having a greenhouse on their property. This agricultural structure will help owners provide their family with herbs and some types of vegetables already in late spring or early summer. Well, some greenhouse designs, which include heating and lighting systems, are used for growing crops all year round.
A greenhouse with your own hands can be built from wood and brick in combination with metal elements, or have a frame structure, for example, made of lightweight metal-plastic pipes.
When implementing an idea, the first thing to determine is the location where the greenhouse will be installed. The size of the future structure directly depends on its area.
Next, you need to decide when this structure will be used - only in the spring or throughout the year. If you choose the “winter” option, then you need to know that construction will cost much more, since it will require more materials, and will also require lighting, heating, plumbing and ventilation.
Then, you need to select the material of manufacture and the type of greenhouse construction. To focus on one of them, several of the most commonly used options will be considered.
Types of greenhouses
The design of greenhouses, in principle, is not very complicated, so any owner of the site can build it independently. To do this, you just need to prepare the material and tools. Greenhouses can be divided into types, based on various criteria - the material of manufacture, the shape of the structure, whether it will be stationary or temporary.
Greenhouse covering material
Several different types of materials are used to cover greenhouses. They should be transparent and may have shades favorable for plant growth. For example, which became especially popular in Lately, sometimes not only a colorless transparent one is chosen, but also a yellowish or green tint.

The KINPLAST company offers high-quality cellular polycarbonate for greenhouses. The material has excellent technical and performance characteristics. KINPLAST is a leading manufacturer of polycarbonate in the domestic market. The line of cellular polycarbonate includes brands such as WOGGEL - a material created in collaboration with foreign colleagues; SKYGLASS – universal polycarbonate with excellent characteristics at an affordable price; as well as specially developed grades of polycarbonate for use in agriculture AgroTITAN.
Glass is often used to cover the walls and roof of a greenhouse. Due to its structural structure and transparency, it is excellent for this room, but to install glazing it is necessary to create a particularly reliable, durable frame structure, since this material has considerable weight. Capital winter greenhouses are sometimes built from metal-plastic frames and double-glazed windows, but such a structure will be extremely expensive.

Another option that is most often used for covering greenhouses is polyethylene film. It can be used for tensioning on a frame built from any material, since it has a very small mass. Recently, a special reinforced film has appeared on sale, which is more durable and easier to attach to the frame sheathing.

To decide on the choice of material, you need to carefully study its performance characteristics, which are presented in this table:
| Material Evaluation Options | Cellular polycarbonate | Glass | Film |
|---|---|---|---|
| Miniature |  |  |  |
| Mounting and weight | It is lightweight and in certain designs can be used without additional elements frame, as well as without a foundation. | Glass has the heaviest weight compared to other covering materials, and when choosing it, you will need to consider a reliable frame installed on the foundation. | Polyethylene has a very small mass, but requires special fastening. If the material is not reinforced, then it is fixed to the frame through special slats and additionally secured with thin stretched ropes. |
| Durability | Polycarbonate as a greenhouse covering can last 18–25 years, depending on its quality. This material is flexible and has sufficient rigidity to be an element of a self-supporting structure. Fixed to the frame, it does not deform and does not distort. | Glass can last for a long time, as it is not affected by ultraviolet rays and moisture. On the other hand, glass is a fragile and inflexible material, therefore it does not withstand mechanical stress, heavy loads and deformation of the frame structure. | Polyethylene has the shortest service life compared to other coating materials, as it is exposed to ultraviolet radiation, from which it gradually deteriorates. In addition, it cannot be called resistant to temperature changes. |
| Noise insulation | Cellular polycarbonate dampens the noise of wind and rain well, thanks to its structure. | If the installation of the material is done poorly, then during strong winds gusts of air can penetrate inside and the glass can make a ringing noise. | The film will not protect the greenhouse from noise, and if the wind is very strong, the material will rustle a lot in the wind. |
| Appearance | Polycarbonate gives the building an aesthetic appearance and can make an ordinary greenhouse a real decoration of the area. | Properly installed glass will give the greenhouse a neat appearance. | The film looks neat and remains transparent only during the first season of its use, and even then not always. Then, under the influence of the sun, temperature changes and wind, it becomes cloudy and loses its aesthetic appearance and light transmittance. |
| Safety | Polycarbonate has high strength, exceeding that of glass by approximately 200 times, and is also approximately 15 times lighter. When falling, the material does not break and cannot injure people inside or near the greenhouse with fragments. | Poorly installed glass is extremely dangerous for people working inside. In addition, if fragments fall into the soil of the greenhouse, you can be seriously injured during subsequent cultivation of the soil. Therefore, if you plan to install glass, then it is recommended to entrust its installation to professional craftsmen. | Completely safe for both people and greenhouse soil. |
| Care | This material is easy to care for - just wash it with water using a strong pressure in the hose. However, it should be noted that dust on the surface of polycarbonate is almost invisible, so the greenhouse does not have to be washed often enough. | Traces of rain drops remain on the glass, and dust is also retained well. To get rid of dirt on the surface, you need to make a lot of physical effort. It is especially uncomfortable and dangerous to carry out cleaning activities on the greenhouse roof. | Plastic film is not washed, because after wet cleaning, stains remain on it and it becomes cloudy, which makes it difficult for light to fully penetrate inside. The only way out in case of severe contamination is to completely replace the film. |
| Created microclimate | Polycarbonate is able to reliably thermally insulate a greenhouse and protect plants from the wind. Vapors settling on internal surfaces flow down them into the soil. In addition, the material not only transmits light perfectly, but also makes it softer and more diffused. The heat generated by the soil and plants is reliably stored indoors, which creates the greenhouse effect. | Glass is not capable of creating high thermal insulation, unless it is metal-plastic structures with double-glazed windows. The material perfectly transmits light, but does not scatter it, and sometimes even focuses it on a specific bed, which is extremely harmful for plant leaves. | Dense new polyethylene film is capable of creating high thermal insulation, but over the course of a season, under the influence of temperatures, sun and wind, it becomes thinner and loses its original qualities. Therefore, it is recommended to change the film coating every year. |
Having weighed all the “pros” and “cons” of materials, as well as taking into account the design of the planned structure, it will be possible to make a choice of the type of coating.
Greenhouse structures
Greenhouses have different designs - it can be a spacious room or just a large box covered with a glazed frame. Structures are also used that extend half their height into the ground. It will be possible to choose one of the varieties only after the owner understands the features of each.
- The simplest greenhouse design, which can be built from scrap materials, consists of an ordinary box, for example, 2000x1500 mm in size, assembled from boards and installed in a favorable area local area. For such a greenhouse, old ones are often used as a roof.

Such greenhouses are usually used for growing seedlings or herbs with early spring until late autumn.
- Another option for a simple and affordable greenhouse to build is a simple frame construction, made of metal-plastic or polypropylene pipes, fittings, and sometimes even thick steel wire, covered with plastic film.

If plastic pipes are chosen for the greenhouse, then even a woman’s hands can make a frame from them, since this material bends quite easily and holds its shape well.
This type of greenhouse can be used throughout the entire spring-summer season, from spring to late autumn. The convenience of the design is that by planting seeds, for example, tomatoes, under the film, after germination and strengthening, the seedlings do not need to be replanted. It is simply thinned out, and when a stable and comfortable temperature for plants is established outside, the film is removed from the structure, opening the free flow of air and sunlight. In very hot weather, a special mesh can be quickly thrown over the created frame, creating partial shade, but allowing light to penetrate to the plants as needed.
- A more complex structure, which is assembled from wooden beams and covered with film, can also be used throughout the spring-summer season. The size of such a greenhouse can be different - they vary from how many seedlings are planned to be planted, and taking into account the convenience of the gardener’s work.

In this design, it is necessary to provide a hinged lifting of the roof to provide access to the plants from sunlight and air. This is also a seasonal version of the structure, and it is advisable to use it only for growing seedlings, since in stable summer temperatures it is recommended to grow vegetables and herbs in open ground.
Video: homemade greenhouse on wooden frame with film coating
- If you need to grow a small amount of greenery or seedlings, you can make a greenhouse from a metal barrel, in which slots are made in the form of windows. This design uses a transparent polyethylene film as a roof - it can be removed at any time, opening access to air, and, if necessary, closed so that the coolness of the night in the off-season does not cause harm to the plants.

- A more complex greenhouse design, in which you can already install moderate heating and start using it yourself in early spring. It consists of a wooden or metal-plastic frame. This is already a full-fledged room, and in it not only the plants, but also the gardener will be protected from the wind and low temperatures. Such a greenhouse can be covered with very thick polyethylene film or cellular polycarbonate. When creating a structure from pipes, you need to remember that it will turn out to be quite light, and a strong wind can move it from its place, damaging the seedlings, so to tie it to the place, you need to drive metal corners or reinforcement into the ground.
 An interesting solution - the frame of the greenhouse is welded from very inexpensive polypropylene pipes and components for them.
 - The permanent structure of the greenhouse, equipped with heating and irrigation, can be used throughout the year. For such a greenhouse to work effectively, it is usually made of metal-plastic or aluminum structures and double-glazed windows that are installed on the foundation.
 This greenhouse is already a real capital building
 To more easily provide heating and water delivery to the greenhouse premises, quite often such structures are attached to the southern wall of the house. In this case, the building will serve as a kind of winter garden, which at any time of the year will delight the owners not only with fresh vegetables and herbs, but also with the color of ornamental plants.
 Sometimes greenhouses are attached to the south side of the house, and they become real “winter gardens”
 - Another option for a winter greenhouse, the design of which helps to save on heating costs, is a room that extends half its height into the ground. This structure, due to its high energy-saving qualities, is often called a “thermos greenhouse”. To achieve the desired effect, a pit is dug for this greenhouse, going 1600÷2000 mm deep into the ground. Additionally, walls 500÷700 mm high are erected above the ground surface, and then the entire structure is covered with a frame made of timber or a metal corner.

The work of constructing a building is quite labor-intensive and lengthy, but during its operation it will be possible to save enough on its heating system. One of important points The construction of a thermos greenhouse involves the arrangement of not only a heating system, but also effective ventilation.
Greenhouse roof shape
The next criterion by which greenhouses are divided is the shape of the roof. Insolation largely depends on this, that is, high-quality lighting of the room, and therefore the creation optimal conditions for growing plants.
- Gable roof
Greenhouses with gable roof can most often be found in suburban areas, since it is this form that contributes to effective lighting of the room from above. Provided the greenhouse is located correctly, the sun will “work” all day long from sunrise to sunset, promoting plant growth.
 “Classic” option - gable roof
 Therefore, this design is often used to create winter versions of greenhouses, since at this time of year plants experience a lack of sunlight.
- Arched design
Arched structures are made of metal-plastic pipes or metal elements. The first ones are usually covered with polyethylene film, while the second option most often has a polycarbonate coating. Metal structures can be purchased ready-made, and all you have to do is assemble them on site. Well, a frame made of metal-plastic pipes is quite easy to make yourself.

The convenience of such a greenhouse lies not only in its maximum illumination, but also in the fact that snow and water do not accumulate on the arched roof, which means that the coating will not be subject to deformation due to heavy load. Again, you will not need to climb to a height to remove snow from its surface.
- Shed roof
 One of the common options for a “serious” greenhouse is a strip foundation
 - Under it, according to the markings, a pit-trench is dug, having a depth and width of 300 mm.
- Since the walls of the greenhouse are not as heavy as those of residential buildings, a foundation depth of 300 mm is sufficient to withstand relatively light loads.
- Above the ground, the base can be raised to a height of 200 to 500 mm, depending on whether the foundation will serve as walls or whether they will be made of brick.
- A sand cushion 50÷70 mm thick is placed and compacted into the finished trench, and crushed stone is poured on top of it with a layer of the same thickness and distributed.
- A formwork made of boards and timber is fixed along the trench, into which roofing material is laid, which will become an excellent waterproofing for the foundation.
- The next step is to fill the formwork with concrete, spread it, and then pierce it with a bayonet shovel and gently tap the formwork to remove air from the solution.
- If the frame will be made of a metal corner or it will be needed to secure wooden blocks, then sometimes support posts or sections of the corner can be immediately embedded in the foundation.
Basis for greenhouse-thermos
For a thermos greenhouse, it is necessary to dig a fairly deep pit, and if you plan to build an agricultural structure of a large area, you will have to use specialized equipment, since such manual work will take a lot of time.

- After marking the site, it is recommended to remove it from it upper layer fertile soil. After removal, the soil is piled up, because it is perfect for laying the finished greenhouse in the beds.
- When digging a pit, among the layers you may come across clay, which also should not be mixed with the rest of the soil, as it can be useful for waterproofing walls or making adobe blocks for insulating a greenhouse.
- The pit is deepened so much that the gardener working in the greenhouse feels free, and there is quite a lot of free space above it. To ensure that the required temperature is maintained in the greenhouse and the soil does not freeze, it is recommended to deepen the pit by approximately 2000 mm.
If the pit is not deep enough, then you will have to raise the side walls, since it will be ideal when the total height of the pit corresponds to the height of the gardener.

- The width of the greenhouse is usually from two to five meters. If the room is made wider, it will quickly cool down, and lighting and heating will require a large amount of electricity. In addition, the design of a transparent dome would be too complex.
- When digging a pit, a ramp is installed on one side of it, where, along with the construction of the walls, a staircase of several steps and an entrance door to the greenhouse will be installed.
- To begin work on upgrading the walls, a base is made for them. To do this, a trench is dug around the perimeter inside the pit. After this, formwork is installed in it and the strip foundation is poured in the same way as in the case already considered.
- After the foundation is ready, you can proceed to lining the walls with bricks or foam blocks. When making masonry in the opposite direction front door One or two ventilation pipes are immediately installed on the wall, at a height of 400÷500 mm from the floor.

The ventilation pipe is brought outside and raised above the ground by 1000÷1500 mm.
- Separately, it is necessary to say about the laying, since in this case it is produced in a special way.
— To save on insulation, instead of bricks or foam blocks, which are not cheap, you can use clay extracted from a pit, which is mixed with chopped straw and adobe bricks are formed from this mixture.
— If you don’t want to waste time, and there is an opportunity to purchase foam blocks, which are called permanent formwork, then you can immediately get “bricks with insulation.” The blocks are hollow, and they are filled as they are installed on top of each other with concrete mortar. Having chosen the latter option, you will need to separate the foam wall from the ground surface of the pit with roofing felt or plastic film.
After the solution in the blocks has hardened, a film or roofing felt is hooked onto it, and the gap remaining between the waterproofing material and the soil wall of the pit is filled with clay or a mixture of clay and soil, and while filling, it is periodically compacted.
— If brick is chosen for wall decoration, then it is insulated from the outside using polystyrene foam, which is mounted between the brick and soil wall. Thermal insulation material must also be protected with roofing felt. The resulting gap, just as in the first case, is filled with soil.
- If the walls rise above the ground by 400÷600 mm, then they also need to be insulated and waterproofed. If desired, the wall protruding above the ground can be finished with a decorative coating - this can be clinker tiles or plastic lining for street use.
- If the walls are not high, then after waterproofing they can be sprinkled with a layer of expanded clay, which is covered on top with corrugated sheeting, which is fixed to the top of the wall. The corrugated sheeting will ensure the drainage of water that will drain from the greenhouse cover and keep the walls dry.
Wooden foundation
Another material for the foundation can be wood, or rather, a wooden beam with a cross-sectional size of 100×150 or 150×150 mm. This foundation is suitable for a greenhouse that is used seasonally - from spring to autumn.

In order for such a foundation to serve for a long time, the wood must be treated with antiseptic and water-repellent compounds and installed on a sandy, well-compacted cushion. Another option is to raise it above the ground using concrete slabs.

Construction of a thermos greenhouse
The installation of all greenhouses takes place differently, depending on the type of structure and the period of use of the structure, since “winter” options require a more careful approach and additional functions. It’s probably worth considering this, the most difficult option.

- After the walls are ready, you can proceed to installing the frame under the greenhouse cover.
- The frame is mounted from a metal profile or wooden beam.

- The first step is to attach a frame made of 100x150 mm timber to the walls of the greenhouse. Fixation is carried out with anchors or using embedded embedded elements.
- The rafter system must be assembled from timber of the same cross-section as the harness. For installation rafter legs Markings are carried out on the harness, since the rafter pairs must be distributed at the same distance from each other.
- The rafters are secured to the frame with metal corners, and in the upper part they are connected to each other using metal plates or using a ridge board.
- Wooden sheathing bars are fixed to the rafters, but with a fairly large step. There should be no more than two or three of them on each slope so that they do not block the sunlight.
- Polycarbonate sheets are laid on the sheathing, which are secured to it using special fasteners with bushings and rubber gaskets to prevent the possibility of leakage.

- Having completed the fastening of the covering material to the slopes, it is installed in the same way on the gable parts of the roof.
- After this, the door frame and the door itself are installed. It is advisable that door leaf It was also equipped with a transparent insert.
Creating optimal conditions for plants in the greenhouse
Greenhouse thermal insulation

In a greenhouse with a gable roof, one of its slopes must face the south side. It is recommended to finish the second side inside the greenhouse. Such a system will help not only retain heat, but even increase illumination inside the structure, since the sun, hitting the insulation foil, will be reflected into the room.

The insulation is fixed to the rafters with self-tapping screws, then it is bent onto the wall and glued to its surface using liquid nails. All the walls of the greenhouse are insulated in the same way, only the transparent southern slope is left uninsulated, and the western end transparent side of the structure can be left.
It should be noted that foil foamed polyethylene is an excellent vapor barrier membrane, and can not only enhance the lighting of the greenhouse, but also retain water vapor inside it and carbon dioxide, which are the main nutrient medium for photosynthesis, which determines the growth and development of plants.
In order to prevent heat from escaping from the greenhouse, it is necessary to create a reliable seal in the greenhouse space. To do this on ventilation holes You should definitely install doors or valves on which you can set the required gap as necessary or close them completely.
Greenhouse heating system
2. The infiltration coefficient depends on the difference between the external and internal temperatures in the greenhouse. You can use the following table:
3. Temperature inside the greenhouse (indicated in the formula t1), is usually taken equal to:
- For growing seedlings - + 25 ° C;
- For normal development of vegetable beds - + 18 °C.
If any exotic plants are grown, then the corresponding values are adopted.
4. External temperature ( t2) are accepted based on the results of meteorological observations in a particular region - the minimum during the coldest week during the planned season of use of the greenhouse.
5. Thermal conductivity indicators ( wtp), that is, the amount of thermal energy that is transferred outward by a covering area of 1 m² with a temperature difference of 1 ° C, depends on the type of material and its thickness. The table below shows the values for the most commonly used materials for covering stationary greenhouses:
| Material | Thermal conductivity (W/m²×°C) |
|---|---|
| Glass: | |
| - thickness 4 mm; | 5.82 |
| - thickness 6 mm; | 5.77 |
| - thickness 8 mm; | 5.71 |
| Monolithic polycarbonate sheet: | |
| - thickness 4 mm; | 5.33 |
| - thickness 6 mm; | 5.09 |
| - thickness 8 mm; | 4.84 |
| Polycarbonate sheet honeycomb: | |
| - thickness 4 mm; | 3.6 |
| - thickness 6 mm; | 3.5 |
| - thickness 8 mm; | 3.3 |
| - thickness 10 mm; | 3.0 |
| - thickness 16 mm; | 2.4 |
Having all the necessary data, it will not be difficult to calculate the required electrical heating power of the greenhouse. It’s even easier to use the online calculator below.
Greenhouses are the best structures for growing fruit and garden crops on protected ground. By design, it consists of a frame and a coating that transmits light (propylene, glass or film). In addition, the structure must have windows, doors and vents for maintenance and ventilation. Also, some walls can be sheathed with boards or covered with bricks for additional protection and insulation.
It’s easy to build greenhouses with your own hands from scrap materials, but at the same time such structures have fairly high functionality and allow you to grow vegetables, fruits and herbs all year round.
How to make a greenhouse at home
Many greenhouse owners are interested in the question of whether it is possible to use a conventional structure in the cold season. It is immediately worth noting that without special equipment for heating and ventilation conventional design will not be suitable for growing vegetables and fruits (Figure 1). Based on this, it is worth asking the question of how to build a greenhouse for winter growing fresh vegetables and herbs.
 Figure 1. Types of winter greenhouses
 In general, all greenhouses are built according to the same principle: first they build the foundation, then the frame, after which they begin cladding and installation necessary equipment. But when building winter types, there are certain features that we will describe below.
Conditions
A winter greenhouse can be made either single-sloped or double-sloped, and the structure can be either adjacent to the house or located at some distance from it. But it should be taken into account that wall structures are more suitable for small farms, since the wall of the house will protect the structure from the cold and reduce heating costs.
Before construction, you need to choose an area with maximum sun exposure. To do this, it is better to place the building from east to west: this way the plants in it will receive a sufficient amount of light, although lamps will still have to be used for additional lighting. In addition, if cold winds are often observed in your region, you need to provide wind protection: locate the room near another building or plant a hedge a few meters away from it.
Peculiarities
The technology for constructing a winter greenhouse is typical, but still has some features that help retain heat for normal crop growth.
If you are interested in how to make a heated greenhouse with your own hands, be sure to take into account the following rules:
- The foundation must be strong and high enough so that cold from the ground does not penetrate into the structure;
- Inside, it is advisable to arrange warm beds with a special soil mixture (sand, turf soil and humus);
- Heating and lighting devices must be installed to create an optimal microclimate inside. It is also necessary to install a ventilation system, and it is better to use stove or gas heating.
 Figure 2. Marking the foundation
 At the same time, it is necessary to equip all life support systems with automation so that growing crops indoors requires minimal human intervention.
DIY greenhouses from scrap materials
The construction of a greenhouse begins with marking the location for the foundation. To do this, take a cord and several stakes and mark one of the side walls. Stick the stake into the ground, measure the required length and pull the cord. After this, use a square to determine the location of the end wall, measure its length and insert another peg. The remaining stakes are placed using the same principle, and a cord is stretched between them. Next, we check the angles and measure the diagonals (they should be the same). Detailed instructions for marking and building the foundation are given in Figure 2.
Which covering material is better?
It is impossible to build a greenhouse without the correct selection of covering material. Many people prefer to use regular plastic film, but this material is far from the most successful of those presented on the modern market.
 Figure 3. Types of covering materials: film, glass and polycarbonate
 Let's try to figure out which material is best to use as a covering for the frame (Figure 3).
The use of glass is considered a fairly popular method of making cladding. For example, you can make a small greenhouse from old window frames, but if the greenhouse is large, you will have to order glass for it separately, and they are quite expensive. Despite the high cost, this design will last a very long time, and the glass itself is not afraid sharp changes temperatures, perfectly withstands heavy snow weight and helps maintain a stable temperature inside the structure.
Note: Film coating is considered a more economical option, but it is not durable enough. Regular film can last only one season, so for more durable buildings it is better to choose reinforced film, which does not need to be replaced for 6-8 years. In this case, it is advisable to fasten the film so that it is not damaged by sharp corners.
The most the best coverage considered polycarbonate. This is a lightweight and durable material that allows sufficient sunlight to pass through while retaining heat inside the structure. Since it is quite expensive, it is worth buying it only if the room will be used constantly.
Greenhouses: how to make soil for planting
The abundance of the harvest largely depends on the quality of the soil used for growing plants. It is impossible to pour ordinary soil from the garden onto the beds, as it may contain weed seeds and pathogens of dangerous diseases that will destroy the plants.
Note: If it is not possible to prepare a special soil mixture for the greenhouse, and ordinary garden soil will be used for the beds, it is advisable to disinfect it using special preparations (for example, Inta-Vir).
But, if you want to get a really rich harvest, you still have to spend a little time making a suitable soil mixture. The most fertile substrate is considered to be one that contains one part each of peat, humus, turf soil and sawdust. This soil is quite light and fertile, so additional fertilizer is required only at the stage of direct cultivation of crops. But, as in the case of ordinary garden soil, it is advisable to disinfect the mixture before laying it on the beds.
How to build a greenhouse with your own hands from wood
Depending on the design, greenhouses can be single-pitched, gable, hipped, arched, wall-mounted, pit-built, or be part of the house. In addition, they can be stationary (the structure cannot be disassembled) or portable.
Additionally, they are divided by type of coating (film and glazed) and heating method (heated by the sun or equipment).
When choosing a form, you should take into account the location of the building relative to parts of the world, other buildings on the territory, as well as the purpose and shading. The optimal location is one in which the southern part of the horizon is visible from the entrance. To do this, imagine that you are standing with your back to the entrance. If positioned correctly, the sun will pass from east to west in a clockwise direction. The transparent wall should be oriented to the south, since in this case the maximum amount of light will get inside.
Note: The location of the greenhouse on the cardinal points is important only if the walls (all or several) are made of opaque material. If it is completely covered with film or glass, these indicators do not play a decisive role.
If the building is shaded by trees or neighboring buildings (for example, on small area), its northern side is made of opaque material that will prevent hypothermia inside the building. To improve the reflection of heat and light, the roof is made transparent, and one of the walls is covered with white paint or a reflective screen.
Each type of greenhouse has certain characteristics, advantages and disadvantages(Figure 4):
- Single and double slope- one of the most popular. They are rectangular and can be placed in any part of the site, and inner space in this case it is used almost completely. If a structure of this type is built on a foundation and equipped with heating devices, crops can be grown all year round. The only drawback of single- and double-slope types is the rather complex construction and the need to purchase a large amount of materials.
- Arched They are easier to build, but they are not intended for long-term use due to the insufficiently strong frame. However, the streamlined shape makes it resistant to gusts of wind, and the condensation that collects inside drips onto the ground and not onto the plants. Besides, in arched greenhouse It is difficult to grow garden plants (special shelves are equipped for them). Additional costs will be incurred by ventilation equipment, since standard side ventilation is not suitable for this type.
- Wall-mounted Greenhouses and residential buildings are primarily used as winter gardens. They are more economically beneficial, since the heat in them is maintained by heating the house. The disadvantage is that to grow full-fledged plants, additional lighting equipment will be required.
- pit There are single and double slopes. Their main feature is that the side walls are made of brick and immersed in the ground. Thanks to this, heating costs are significantly saved.
 Figure 4. Main types of greenhouses: 1 - single-slope, 2 - gable, 3 - arched, 4 - wall
 If the greenhouse will be used not only for growing crops, but also as a decoration for a personal plot, it can be made polygonal. But in this case, construction costs increase significantly.
What is needed for this
Building a greenhouse with your own hands from wood is quite simple, because it requires a minimum of knowledge, tools and materials (Figure 5).
A frame is built from wood, which is then covered with glass or film. The main condition is to properly prepare and process the wood. The beams that will be used to build the frame are cleaned of dust and dirt and washed clean water and dry. After this, they need to be sanded and treated with an antiseptic solution to prevent early rotting.
 Figure 5. Construction of a greenhouse made of wood with your own hands
 The beams are fastened together with nails or self-tapping screws, and after the structure is completely ready, it needs to be painted, painting not only the wood, but also the metal parts.
Where is the best place to place it?
When planning the placement of a greenhouse on a site, you need to take into account the prevailing winds and the movement of the sun. In order for the plants inside the structure to be illuminated as much as possible by the sun, it is better to place it from east to west.
If your region often experiences strong winds, it is advisable to install the structure near other buildings or large trees. At the same time, too much shading of the structure should not be allowed.
Foundation
When marking the area for the foundation, use a level, since the ground must be absolutely level. Otherwise, it will be difficult to install the frame, and if its parts can be adjusted and mounted, the structure will be subject to overload and the frame may become deformed.
Note: According to the rules, the room must have a slight slope for water drainage, but even when constructing small structures this rule may not be followed.
After marking, you can begin building the foundation. It must be very durable, since it not only supports the weight of the greenhouse itself, but also protects the plants from cold air and pests. As a rule, ready-made collapsible structures include materials for building a foundation (beams or pipes). But they are not strong enough and do not protect against frost and rodents. Therefore, it is recommended to lay it out of concrete or brick. The width must be at least 10 cm, and it should be placed below the freezing level of the soil.
You can also use special blocks to build the foundation. They are hollow inside, so after installation inner part poured with concrete. They also use curb stone laid on a layer of concrete. Options for foundation construction are shown in Figure 6.
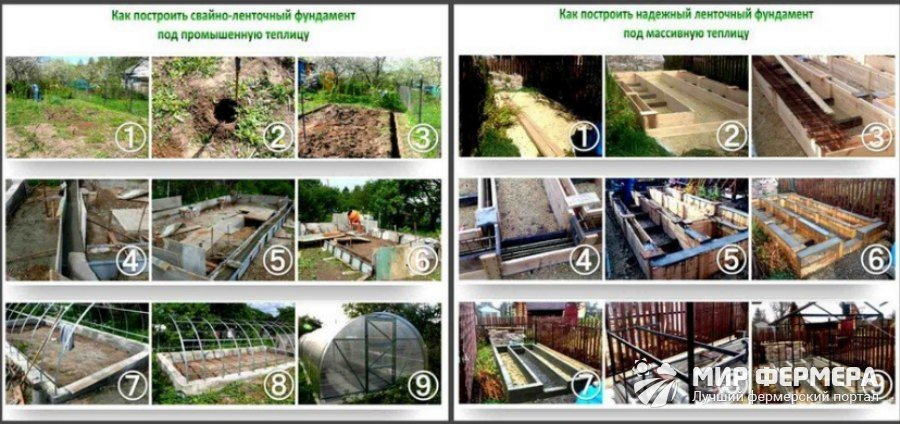 Figure 6. Options and order of foundation construction
 If the foundation is high (for example, located at a height of 30 cm from ground level), it will be inconvenient to bring or carry fertilizers and water inside. In this case, decking is installed at the entrance or the door is lowered to ground level, using the free space to equip shelves on which seedlings can later be grown.
Additionally, it is covered with waterproofing material to retain heat inside. During construction, care should also be taken to equip a container for draining excess water. It is better to bury such a container in the ground so that it does not take up internal space. The drain must be tightly closed to prevent condensation and water for irrigation from entering it. Practical recommendations on marking and building the foundation - in the video.
Construction stages
Several methods are used to build the basement:
- WITH inside lay sheets thermal insulation material, lay the binding wire and fill the surface with concrete;
- Cast blocks with gravel are placed on the base. This material retains heat well and has a high load-bearing capacity. But if the wall is expected to be high, it is additionally reinforced with reinforcement;
- Lay wood materials impregnated under pressure protective compounds. In the future, the tree is additionally insulated.
The choice of material and method for building a basement depends not only on your financial capabilities, but also on the type of soil and type of foundation. In addition, certain types of plinths require additional processing. For example, a concrete base does not need to be painted, but if it is built from concrete or sand blocks, the surface must be plastered and covered with moisture-resistant paint (Figure 7).
As a rule, the kit of finished products includes a frame that only needs to be mounted. But if you are building with your own hands, the frame is most often made of wood or metal.
 Figure 7. Base construction technology
 For this, planed lumber or metal profiles are used. When choosing materials for the frame, you should pay attention to several important details:
- Lumber intended for construction is treated with a special green compound, so the frame will have to be additionally painted. Such wood is quite expensive, but its service life is longer than regular wood. It is important that the impregnation composition is poisonous, so the roots or leaves of plants should not be allowed to come into contact with the tree.
- Pillars, ceilings and other vertical elements can be made from boards (50 x 100 or 50 x 125 mm). To install beams, timber is used, the size of which depends on the length of the building.
The construction of the frame begins with roofing felt or rubberized material being laid on the base. On lumber intended for horizontal fastening, mark and drill holes for bolts and place them around the perimeter of the plinth. After this, we outline the places for attaching the vertical beams. Detailed diagram frame installation is shown in Figure 8.
Having attached the horizontal elements to the base, check them at level, cut the vertical beams into pieces of the required size.
Note: It is not recommended to saw vertical beams in advance, since they may cause errors when installed on a plinth.
At the next step, attach vertical racks to the upper beams. Having marked the position of each board or beam, fix it with an obliquely driven nail. Optimal distance between the vertical posts is considered to be 30 or 60 cm, since in this case it is easy to glaze.
 Figure 8. Frame installation diagram for gable greenhouses
 At the final stage, the vertical posts are attached to the lower and upper beams with nails, and to strengthen the structure, it is recommended to tie the joints with steel staples, wire or tape with an anti-corrosion coating. After this, the cladding boards and gutters are attached. During the work, all cut points and holes for fastenings must be treated with an antiseptic. You will learn detailed recommendations for installing the frame from the video.
How to make a greenhouse from old window frames
Do-it-yourself greenhouses made from scrap materials are practically no different in functionality from expensive designs made of polycarbonate. Of course, they are not very suitable for winter growing crops, but they will successfully serve for several seasons under operating conditions in spring, summer and autumn.
One of the simplest structures is considered to be a greenhouse made from old window frames (Figure 9). For it, you need to make a concrete foundation, and if the building is located on clay or swampy soil, you need to additionally equip a gravel cushion.
 Figure 9. Construction of a greenhouse from old window frames
 But the most important step is the preparation of the raw materials themselves - old window frames. To do this, remove all handles, latches, hinges and other metal parts. The old paint is removed, the wood is treated with an antiseptic and repainted. In most cases, frames are fastened together with nails. Therefore, it is advisable to remove the glass in advance so as not to damage it during the installation process.
Frames are attached to a frame made of wooden beams. You can leave several vents for ventilation, and make the roof polycarbonate. The remaining windows that will not open during operation are carefully sealed with sealant.
How to make a foundation
The choice of material for building the foundation depends on the characteristics of the soil and the type of greenhouse itself. Let's look at the most popular options.
- Made from concrete
Suitable for homogeneous soil composition with average bearing capacity. In this case, a support is made directly at the construction site: wooden formwork is installed in a hole 30 cm deep, and the space is filled liquid concrete. The bottom of the pit should be level and covered with a layer of crushed stone or sand. If the site has rocky soil, dig a hole down to the rock and thoroughly clean its surface (Figure 10).
The formwork must be square (side length 30 cm). The boards must be tied together so that they do not deform when pouring. Reinforcement is placed inside the formwork and concrete is poured.
- From piles
More suitable for areas with soft soil pile foundation. Typically, piles are made of concrete and buried or driven into the ground. However, this method of construction is too expensive and requires the use of special equipment. Therefore, on a personal plot, you can use other methods of constructing a pile foundation:
- Drive old rails or other metal beams into the ground;
- Use sleepers impregnated with special compounds for longer service life.
 Figure 10. Procedure for constructing a strip concrete foundation
 Metal piles can be freely driven into the ground without fear of deformation. In this case, choose beams long enough so that their lower part reaches soil layers with high load-bearing capacity.
Note: Before driving piles, mark the area so that enough space is allocated for the foundation. This is necessary, since during the driving process the pile may encounter a stone or other hard rock, and its direction will have to be changed.
You need to drive piles while standing on a special stand. But even if you decide to build a small greenhouse on stilts, it is better to consult a specialist in advance.
- From concrete slabs
A foundation built from concrete slabs is quite expensive. But its cost is compensated by its high strength, reliability and load-bearing capacity even on soft soils.
It is based on a reinforced concrete slab 20 cm thick, which evenly distributes the load. However, concrete slabs cannot be laid on loose soil. If this is still necessary, the soil layer is removed and replaced with crushed stone or gravel. Styrox (10 cm thick) is laid on the crushed stone and the surface is filled with concrete. The technology for constructing a foundation from piles and concrete slabs is shown in Figure 11.
 Figure 11. Construction of a foundation based on piles and concrete slabs
 Selecting a foundation is especially difficult for clay areas or soil that changes its composition in depth. In this case, it is better to consult with a specialist so that the greenhouse does not deform after construction and has sufficient thermal insulation.
Construction stages
To make a greenhouse from old window frames correctly, you need to follow certain rules.
Step-by-step instructions for building a greenhouse include the following steps:
- Construction of the foundation: because the this design quite heavy, it is advisable to make the corner of the foundation from stone, and between them to make a structure of concrete on a bed of gravel and sand.
- Prepare construction material : remove all metal fittings from old frames, remove old paint, treat the wood with antiseptic and repaint.
- Make a floor: to do this, first compact the earth, and then work on it concrete screed, on which the beds will be located in the future
- Construction and framing of the frame: the base to which the frames will be attached is made of beams of the same thickness as the frames. The parts are fastened together with nails, and the roof can be made of film or polycarbonate.
After the greenhouse is completely ready, beds are arranged in it or shelving is installed. It is also advisable to provide a vestibule in which inventory and necessary equipment will be stored.
How to make a greenhouse yourself from a profile pipe
Profile pipes are widely used in construction, and since this material is light and durable, it can also be used to make a greenhouse.
Since it is difficult to bend a profile pipe at a right angle without the use of special equipment, it is best to build arched models with it.
Where is the best place to place it?
A greenhouse made from a profile pipe can be placed on almost any part of the site. Since this design is lightweight, it does not carry much load on the soil, and they can be built even in marshy and clayey areas.
 Figure 12. Recommendations for building a greenhouse from a profile pipe
 It is important to take into account that greenhouses made from profile pipes are subject to the same requirements as buildings made from other materials. To protect the structure from strong winds, it is advisable to build a greenhouse under the protection of other buildings or hedges. And to provide plants with optimal lighting, it is advisable to place the building from east to west.
Foundation
A profile pipe is much lighter than wood, so the foundation for a greenhouse made from it can be anything. However, if you plan to operate the building for a long time, it is better to make a permanent foundation of concrete.
If a greenhouse made from a profile pipe will be used only in the summer, you can bypass it without a foundation by installing the frame supports directly into the ground. But in this case, it is necessary to provide additional protection to the plants by installing wooden formwork around the perimeter.
Construction stages
The construction of a greenhouse from a profile pipe begins with site preparation (Figure 12). It is advisable to choose a flat area with sandy soil. If there is no such place, the soil is leveled manually, and drainage is installed on swampy soils.
Next, they begin to manufacture and install the frame. If you want to build a rectangular greenhouse, you will have to buy special equipment with which the pipe can be bent at the desired angle. To avoid additional costs, it is better to build arched structures. In this case, the pipe can simply be bent into an arc and dug into the ground on both sides.
At the final stage of construction, the frame is sheathed with film, glass or polycarbonate, the floor and beds are made, or shelving is installed.
Make a polycarbonate greenhouse with your own hands (drawings)
The most modern and functional option construction of a polycarbonate greenhouse is considered (Figure 13). This is a lightweight, durable and wear-resistant material that will last for many years. Its only drawback is the high price, so it is worth building such greenhouses only if it will be used for a long time.
You can make a polycarbonate greenhouse with your own hands according to the drawings, but many people prefer to buy ready-made structures and install them on site. We will tell you how to save money and build a protected ground structure with your own hands.
What is needed for this
First of all, you need to buy polycarbonate for construction. Another advantage is that the sheets have a standard length and width (12 and 2.10 meters, respectively). This allows you to build a greenhouse 3.5 meters wide and cover the roof with one whole sheet.
In addition to the polycarbonate itself, for construction you will need materials for the foundation, fittings for fastening sheets and a plastic U-shaped profile, which covers the edges of the polycarbonate to protect its honeycombs from dust.
Peculiarities
Apart from the high cost of polycarbonate, the material has no other significant disadvantages. Of course, its honeycombs can become clogged with dust, and the coating will lose transparency, but this problem can be easily solved with the help of a plastic profile that is attached to the edges of the sheet.
 Figure 13. Procedure for constructing a polycarbonate greenhouse
 Like other types of structures, polycarbonate greenhouses require a foundation, but its purpose is not to strengthen the building, but to protect the plants from the external environment.
Where is the best place to place it?
In addition, it is advisable to install the greenhouse so that the plants receive the maximum amount of sunlight. To do this, you need to position the structure from east to west.
Foundation
To build a foundation that will exactly fit the size of the greenhouse, you need to place the site by installing pegs and stringing rope between them. After this, you can begin installing the foundation.
Note: Since polycarbonate is lightweight material, the foundation can be built either strip (from concrete) or wooden - from beams and supports.
Asbestos-cement pipes can be used as supports, which are installed in the corners of the greenhouse. The soil around them is compacted, and the foundation is made of wooden beams. It is better to treat the wood with an antiseptic and paint it so that the structure does not rot.
Construction stages
The steps for constructing a polycarbonate greenhouse are the same as for other materials. First, the site is marked out and the foundation is built. After this, the installation of the frame begins. It can be made of wood, profile pipes or aluminum. The latter option is considered preferable, since aluminum is quite light, but at the same time durable.
At the final stages, the frame is sheathed with polycarbonate sheets, equipment for watering, heating and ventilation is installed inside the structure, and the beds are arranged.
How to make a heated greenhouse with your own hands
The design of a heated greenhouse is practically no different from conventional structures. But you need to take into account several important nuances. First, you need to carefully seal all the cracks so that heat does not escape from the greenhouse.
Secondly, you need to install heating equipment. You can make warm beds by arranging them according to the principle of a warm floor and laying pipes under the ground. But a more popular option is to install heating: a gas, electric or stove boiler.