Self-configuration of IP camera and PC. How to connect an IP camera? Connection methods and configuration.
In order to properly connect an IP camera, you must have basic knowledge of local area networks(LAN). One of the main criteria for a LAN is the protocol for transmitting the video signal. For each network equipment (from different companies) And software Various protocols are used. Therefore they may not match. Before purchasing or connecting the system, make sure that they are compatible (whether the camera is suitable for the DVR or router).
The most important part of setting up an IP CCTV system is address. If configured incorrectly, it may complicate access to the system.
Setting up an IP camera connection
To configure the IP address, you need to connect the camera using twisted pair ( LAN cable) and power to your computer or laptop. If you plan to create a video surveillance system using several video cameras or plan to use them through a home router, then it makes sense to connect them simultaneously. To do this, it is recommended to use a special switch ( router). Otherwise, each device will have to be configured separately.
After connecting the camera, you can proceed to setting the IP address on your computer. In order to do this as quickly as possible, you need to go to the manufacturer’s official website, download and install special software to configure it.
Depending on the manufacturer, the program interface for setting up an IP camera will differ, but the functionality will be approximately the same. We will look at connecting a camera using software as an example iVMS-4200 companies Hikvision. IP cameras from this manufacturer can be connected remotely using the service HiDDNS without using a static IP address.
Automatic connection
The IP address is configured in the following sequence:
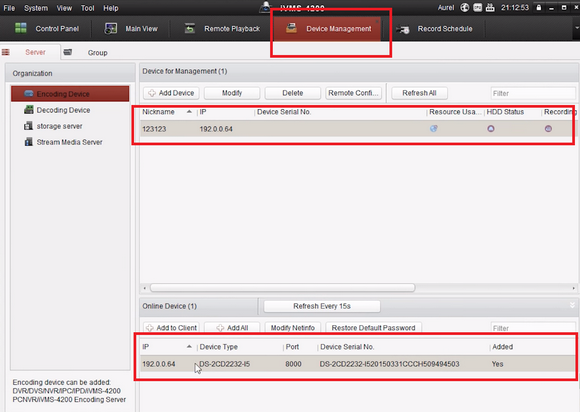
- Launch the program and select the menu item Tool->Device Management;
- Select the " Server»;
- Click on the menu item “ Encoding Device»;
- In chapter " Online Device"A list of equipment connected to the network will appear, from which you can select equipment to operate using the " Add to Client»;
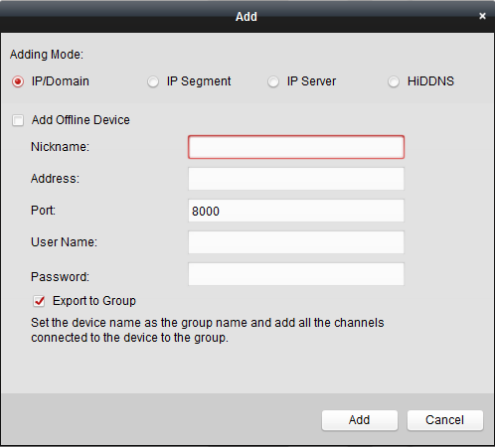
- If you know the device's IP, you can add the device manually by clicking " Add Device».
IP detection via client software
Manual connection
Remote connection via HiDDNS
It is often necessary to connect an IP camera remotely, that is, via the Internet. In this case, the IP address of the camera will constantly change, unless you specifically order a static IP address from your provider, for which an additional fee is always charged.
If you do not want to incur additional costs, you can use the free HiDDNS service.

Here you can also configure microphone parameters if you plan to record audio. This completes the IP camera setup. If you are using cameras from the same manufacturer, their addresses will be the same.
In order for the cameras to work correctly at the same time, each device needs to be assigned its own address.
How to change IP
By default, the penultimate digit of the IP address is one. This value must be changed to “0” for all cameras. And also change the penultimate digit in the gateway address (GateWay) to “0”. If the program does not have a line where it can be changed, then we change only the IP.
The last digits of the IP address must be different. Otherwise, the equipment will conflict and you will not be able to access them. We leave the first two values the same.
Change IP is possible not only using special software, but also through web interface. In this case, each will have to be configured separately. To get into it and change the camera address, necessary:


All data for logging into the web interface (login, password, IP) can be found in the device instructions (supplied, an additional copy of the documentation can be found on the manufacturer’s official website in the appropriate section).
Connecting to a DVR
The next stage of preparing the IP camera is setting up and connecting to a network video recorder or NVR(Network Video Recorder). The first thing to do is install to a video server for IP cameras HDD, if there is no built-in.
A regular one will do for this. SATA, which is connected to a laptop or computer (check the instructions for more detailed compatibility parameters). Procedure will be like this:
- Remove the back cover DVR;
- Find the connectors to connect hard drive, nutrition and others;
- Connect all the necessary wires, screw the HDD bolts to the bottom of the DVR;
- Replace the cover.

After installing the hard drive, you can start connecting IP cameras to the DVR. Depending on its features, the number and types of available connectors will vary. Usually this:
- Multiple video inputs (VIDEO IN) and one video output (VIDEO OUT);
- One audio input/output (AUDIO IN/OUT);
- Multiple USB ports;
- Internet cable connector;
- VGA port;
- Power cord.

If you plan to record not only the image, but also the sound, make sure that there is a built-in microphone or a connector for its connection on the camera, a corresponding port on the recorder.
Setting up the recorder
Connect all plugs to the recorder in series. Then connect the IP video cameras, external monitor and turn on the power supply. After this, you can begin further configuration. All your actions will be displayed on the monitor. For more comfortable navigation and interface control, connect a regular USB mouse from your computer to the recorder. Do the following actions in the web interface:

Other cameras are connected in the same way.
Attention! Never connect multiple cameras to the same channel.
Connecting a microphone
As a rule, the quality of the built-in microphone leaves much to be desired. It picks up the audio signal poorly, records extraneous noise and often breaks down. Therefore, even if the camera already has a built-in microphone, it is strongly recommended to connect an external one. But before that, make sure you have the appropriate connector.
Connecting a microphone to a video recorder- enough simple task. However, many users face some problems in the process. To avoid this, check out procedure:

This completes the microphone connection.
Connecting the camera to the router
In order to access the camera via the Internet or home router, you need to determine the type of your IP address and then start the web server. Connecting to your camera via the Internet will only be possible if you have a static or dynamic external rather than local IP address. To do this, you can use special online services to check your IP.
So your IP should not be in the following ranges:
10.0.0.0–10.255.255.255
172.16.0.0–172.31.255.255
192.168.0.0–192.168.255.255
Otherwise, you will not be able to access the camera via the Internet or router and will have to contact your ISP. If the IP does not match, then proceed to the next stage of setting up the router.
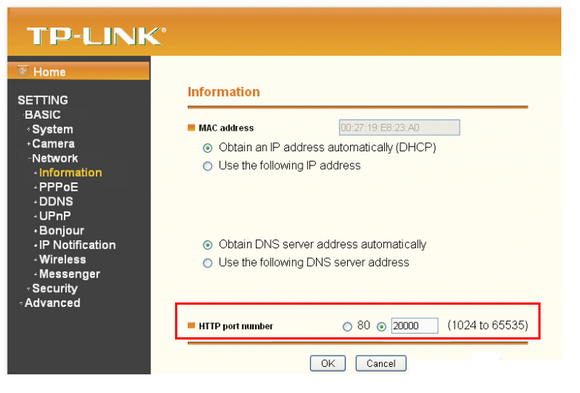
Let's look at the example program TP-LINK. First you need go to IP camera settings via the web interface and go to the menu " SETTING» - « BASIC» - « Network» - « Information" Here change the HTTP port number value to any other value other than 80.
Now connect to the router via the web interface (instructions on how to do this can be found on the Internet) and go to the menu “ Forwarding" (forwarding) - "" (virtual servers). In the address bar enter xx.xx.xx.xxx:20000, Where xx.xx.xx.xxx - your IP address, a:2000 - port value, which you specified (HTTP ports, service port) for the camera and entered into the “Virtual Servers” menu to connect to the router.

As soon as you change the parameter values, you can use a special program for viewing and recording images from a computer via a router. With its help you can get 24/7 camera access.
In order to configure the utility, you must:
- Go to main menu programs “Main console” - “Config” (configuration);
- Go to tab“IP camera and video server settings”;
- Fill in the fields in accordance with the data used above to connect to the router.

Conclusion
As you can see, connecting and setting up the camera correctly is quite simple. At the same time, some nuances must be strictly observed in the process. If you strictly follow the instructions, you will definitely get everything right the first time.
Video on the topic
Conventional surveillance techniques are a thing of the past. Nowadays IP cameras are popular on the market and there is a logical reason for this. Firstly, a device using the Internet protocol broadcasts ready-made digitized content without the slightest brakes or delays. Secondly, ease of use. The cameras are easy to install and use. Also, the equipment can easily connect to a ready-made local or wireless network. Thirdly – price. The price tag for IP cameras is still steep, but this is not a webcam to save on. On average, a modern video surveillance device costs the same money as an archaic analog device. A nice addition will be the fact that it is possible to monitor remotely.
And we will tell you how to set up an IP camera with your own hands in this article. For confident PC users, the adjustment process will not be difficult. For the rest, we have selected and described in detail the simplest method of adjusting the device.
IP and regular camera - is there a difference?
Before answering the logical question of how to set up an IP camera on a computer, let’s look at its differences from a webcam. The latter is an additional gadget connected to a PC. Such devices are used mainly for making calls.
An IP camera has a completely opposite purpose. Such devices are used to monitor an apartment, office or street. An important and, perhaps, the most important difference between such equipment is the fact that the IP camera is a full participant in the network. Accordingly, the device has its own unique address, not similar to others.
There are both wired and wireless cameras on the market. The only difference is the price. For wired devices, you will have to lay a cable, so you should install the gadget before repairing it. If you don’t want to stir up walls and baseboards, you should pay attention to the wireless option.
note
For continuous and correct functioning wireless camera You should place it close to the router.
There are devices on the market different types. IP cameras can be divided into rotating and non-rotating. Advantage PTZ camera the fact that you can remotely move the lens, change the viewing angle, etc. There are also devices used for installation outdoors. They are characterized by increased moisture resistance and can also withstand high temperature loads.
How to connect and configure an IP camera via a router
Modern devices work through a router. This is accomplished using an Ethernet cable. Consider purchasing a more powerful gadget with more inputs if you plan to use multiple cameras.
- Run a special program from the disk. Usually it is placed next to the device itself.
- Download software from the Internet.
- The address is also printed on the device itself or on the instructions supplied with it.
If you decide to check the functionality of the device by following the IP address using an Internet browser, you will not see anything. This is all due to the fact that the stationary unit and the IP camera use different subnets. To get the result, we need to set the address on the device local network.

Open the “Control Panel” and go to the network management tab. In the “Connections” section that appears, you will see the line “Ethernet”. It also sometimes says “Local Area Network Connections”. In the window that appears, select the section with information. In the tab that opens we will see our IP address. It is located in the “IPv4 Address” column. The address of our PC is 192.168.99.183, and the IP camera is 192.168.0.20. For further proper functioning of the device, we will have to replace the third digit in the camera address with the third digit from the address of our local network.
Simply put, from 192.168.0.20 we must make 192.168.99.20. The numbers will vary depending on your provider and the equipment you purchased, so don't be alarmed if you get different numbers.
Replacing the IP address
Exist different ways, how to change the address on a video surveillance device. We chose 2. The first one is the simplest. Suitable for novice users. You will have to dig around with the second one, and we advise using the second method only for people who are confident in their knowledge of a personal computer.
Replacement using the program
The first, and therefore the simplest, method is to convert the IP address of the surveillance camera using an application that you launched from the disk included in the box with the gadget, or downloaded from the Internet.
Each manufacturer has its own applications, but despite this, in any of them you will find an item with a change of address. Next, enter the address and voila, you're done. Taking into account our data, the video will be broadcast at 192.168.99.20. Your local network address will be different, so the output numbers will be different. Our camera now works on the same subnet as the computer. Therefore, you can check its functionality through the browser. Enter the address of your device in your Internet browser. After downloading, you will be able to observe what is happening in front of the lens of your device.
Replacement via software
The second method is that the local network address of your PC will change, not the purchased device. Let's say the address of a personal computer is 192.168.99.25, and the IP of the camera is 192.168.0.20. This means the local network address should change to 192.168.0.25.

To do this, open the “Control Panel” and select Network Management. Let’s follow the line “Ethernet” or “Local Area Network Connections”, but now open the “Properties” window.
In the tab that pops up, click on “Protocol fourth version” and go to properties. In the tab we change the IP to the one we selected, we do not touch the subnet mask, and use the camera address as the main gateway. Then don't forget to apply and save our chosen settings.
To check the functionality, open an Internet browser, go to the device program and enter the IP address of the surveillance camera in the browser. If you did not make any mistakes in the previous steps, a window will appear on your monitor for entering administrator data. You will find them on the device box or in the manual. Manufacturers often use simple combinations. The login is almost always “admin”, and the password is “admin”, “00000” or “12345”. But to be sure, we recommend that you familiarize yourself with the data suitable for your device.
If the data is entered correctly, a window will open in which you will see video from the camera and settings.
In the software of your device, you should compare the device address with that located in the local environment. You will be able to find the appropriate settings in the window called “Network”. Then mark the IP as fixed and enter the following data:
- Address: 192.168.99.20.
- Subnet mask: standard 255.255.255.0.
- Gateway (your router address): 192.168.99.25.
- DNS ip address: 192.168.99.25.
Please indicate your consent next to DCHP. If there is no such line, select the “Dynamic IP” line.
The next step is to assign your camera its own port. From the factory, the cameras have port 80 open. If your device does not have such a setting, we will use this value. If there is a setting, we assign each camera its own unique port. For the first 8081, for the second 8082 and so on.
After following these instructions, disconnect the cable from your computer and plug it into the Ethernet slot of your router. We reset the settings we entered earlier on the computer itself. In the network settings, put consent next to the “Obtain an IP address automatically” column. We repeat the same procedure with the address. DNS servers. We save the parameters and connect the router to a laptop or system unit using the built-in network card.
After following the instructions, you will receive a broadcast directly from the IP camera at the specified address. In our case it is 192.168.99.20. Then we adjust Wi-Fi to receive a picture from mobile phone or tablet. We perform a similar scheme with other gadgets, if available.
Don't forget to give the cameras their unique port (if available) and Internet Protocol address, for example, 192.168.99.20, the next one will be 192.168.99.25. Thus, organize a chain of the following cameras.
How to set up a camera: preparing the router for Internet broadcasting

To do this you need:
- First of all, let's connect the previously adjusted IP cameras to the router using LAN slots or via Wi-Fi.
- We connect the router directly to the PC via a cable.
- Next, go to the router’s software page and begin port forwarding.
The parameters required for adjustment are located in the “Port Forwarding”, “Routing”, “Wide Area Network” tabs or in the “Virtual Server” tab. The device has the following parameters depending on the manufacturer:
- We write the name of the service ourselves, for example, “Camera number one” or “Camera in the kitchen.”
- Port range – here you should specify the number of ports previously assigned by us.
- Local IP address – here you should specify the address of the surveillance device. In our case it is 192.168.99.20.
- Local port – 8081, 8082, etc. If the camera does not have such settings, write 80.
- Protocol – TCP – this is the type of protocol that modern IP cameras work with.
- In the “Protocol number” column, leave all fields empty, or write “1” everywhere.
Using the same example, we configure each device. Be careful, all surveillance devices must have their own address.
To provide access to the surveillance system from any device with Internet access, you need to have a permanent Internet Protocol address. You can buy it from your provider or purchase it from the DynDNS website. This site will be able to give your non-permanent IP address any static domain name, like http://unique_name.ddns.ru.
First, you should enable the permanent Internet Protocol address feature in your router settings. Typically these parameters are located in the “WAN” section in the “DDNS” line. The next step is to register your domain name on the website (ASUS brand routers have a website for operations of this kind, where this is done for free), and write it into the router parameters.
Checking the operation of the CCTV camera

After all the above operations have been completed, you should check the IP camera for functionality. In order to make sure that your surveillance device is active and working properly, open your Internet browser and go to the website http://unique_name.ddns.ru:8081, and if you use your home computer or within a local circle, just go to the Internet address your camera's protocol.
If all the instructions were followed correctly, then after going to the address you will see an image transmitted from your device. When you change the ports (for example, instead of 8081 put 8082) you will get a view from other connected equipment.
We have thoroughly discussed several methods on how to set up a CCTV camera on a computer via a router. Using the instructions proposed in the article, you will not have problems with installing and properly adjusting your gadget. If all points are followed, you will organize a video surveillance network both from home and from a portable device.
IP camera is digital video camera, which can transmit data via Internet protocols on a network. This is a convenient device, but in order to get full access to all its options, you will need to make some settings.
An IP camera (outdoor or indoor) can also be described as a camera and a computer combined in one unit. The main components of this device include a lens, an image sensor, one or more processors, and memory. The processors are used for image processing, video compression, and network function analysis. Memory is used to store firmware ( computer program) and for local video recording. Thus, it is not necessary to connect the IP camera to a computer to ensure its smooth operation.
Like a computer, a network camera has its own IP address, connects directly to the network, and can be placed anywhere there is an available connection. An IP camera, the price of which is slightly higher, independently provides the functions of a web server, FTP (File Transfer Protocol) and Email, and also includes many other network and other IP protocols. This is different from a webcam, which can only work when connected to a personal computer (PC) via USB or port. In this case, its software must be installed on the PC.

Wireless IP Camera modern model can be configured to transmit video over a network for live and/or recorded viewing, or continuously, scheduled, event-driven, or upon request from authorized users. Captured images can be transferred as Motion JPEG, MPEG-4 or H.264 video using various or downloaded as individual JPEG images using FTP, email or HTTP (Hypertext Transfer Protocol).
In addition to video recording, some network cameras provide event management and smart features such as video motion detection, audio detection, active tampering alerts, and auto tracking. Most devices also have I/O ports that allow you to connect to external devices, such as sensors and relays, and the recording from the IP camera can be broadcast extensively. Other features may include audio capabilities and built-in support for Power over Ethernet (PoE). Many gadgets also support advanced security and network management features. A modern outdoor IP camera allows you to capture high-definition images even in poor visibility conditions.

Connection features
Some IP cameras require additional device for recording, while others can record their videos directly to a NAS (network-attached storage device) or PC that is configured to function as a server. Some of them even have built-in Micro SD card slots, and can save content directly to this physical medium. They may even have servers built-in, so you can sometimes access the recording remotely. How to configure an IP camera correctly? How should synchronization with the Internet be performed?
Where to begin?
If you are creating your own server, there will be an IP camera program selected that you will need to install yourself. You can connect multiple imaging devices to get a more complete picture of what is happening in the area being monitored.

Is it possible to use alternative gadgets?
Instead of using a classic IP camera, you can use a simple "webcam" and connect it via USB to a computer running appropriate recording software. This device is generally cheaper than an IP camera (which costs an order of magnitude higher), although it may lack some important features (such as night vision capability for recording what's happening in complete darkness).
Another difference is that the webcam must be connected directly to the computer via USB, while the IP camera can be located in a completely different location and synchronized via Wi-Fi.
First of all, you need to choose some webcam surveillance software. Such applications are used to capture and record video captured by the lens. You should remember that IP camera software (which can also control regular web cameras) may cost a fee, but you can still achieve some savings.
If you make this setup, you will need to keep your computer running 24/7, at least if you want to record the entire day's events.

Smartphone as a recording device
If you have an old unused Android phone, you can turn it into a camera for In the end, any such gadget has a camera, Wi-Fi, and also built-in - all this should shoot, save and record video.
Network or IP cameras, in turn, are designed to work on a local network (LAN) and over the Internet. In a LAN they are managed within the computer network to which they are connected. With the additional configuration of this local network, you have the opportunity to allow cameras to be monitored not only locally, but also remotely, as well as via the Internet. How to configure an IP camera on a LAN?
Local access
Before you can configure your camera to work over the Internet, it is recommended that you enable all the necessary options for local access first. Review the technical documentation that came with your device for instructions on how to set it up for the first time. Once the camera is configured for local access, you are ready to begin configuration for remote access to her via the Internet.
![]()
Remote access
Before setting up an IP camera on your local network to allow filming from a remote location, it is recommended that you review the network administrator properties to ensure that you have the appropriate permissions. Otherwise, you cannot access the camera remotely.
In order to configure the camera to work over the Internet, you will need to configure the Port Forwarding service. It allows you to access the camera from a remote location by forwarding network ports used on the Internet. These ports are typically routed to your network's router to forward ports used by the camera.
Obtaining an IP Address
In order for an IP camera to transmit data via the Internet, you need to correctly configure the network protocols. To access your network's router to configure port forwarding, you will need the IP address of the router to which the camera is connected. You can obtain this information by asking the network administrator of your network or by opening the Command Prompt in Windows and entering the command To open the Command Prompt window, you will need to click on the Start button and then proceed to click Run.
After doing one of the above steps, you will get the router's IP address. You will need it in order to access your router to set up port forwarding. The network router's IP address will appear as the default gateway.

Accessing your network's router
Now you will need to navigate to an available router by entering its IP address in your web browser. Then you need to go to the configuration section where port forwarding is configured.
You must enter the camera's local IP address, as well as its unique name associated with the specific port that should be forwarded. As a rule, this is the default; however, it is advisable to request information from the manufacturer of your device for additional configuration details. For example, a wireless IP camera with advanced settings may require more data to enable all options.
Some devices require more than one port to be routed in order to get all the features offered by the gadget's functionality. You will also be given the option to select the protocol to be used. Common options are UDP or TCP. Your router may also have additional options. In most cases, you will need to select the Both Simultaneously protocol option. This will allow UDP and TCP to be associated with forwarding ports. Once you have completed entering all customizable options, click on the Apply button to save your selections.
Once the settings have been saved to the router configuration, you should be able to see this information displayed in the list. There may be other entries configured by default (will be present in the same list). The settings for your connected device will be at the bottom under the IP Network Camera heading.
Internet access
Now that you have configured port forwarding on your network router to allow the camera to be accessed over the Internet, you can begin setting up control access for it. It is recommended that you initially try to get it from a remote location rather than on your local network. This is desirable to confirm that port forwarding is configured correctly.
How to configure the IP camera finally?
While in a remote location, you will need to enter the public IP address provided by your Internet Service Provider (ISP) to be able to access the camera. If you don't know it, contact your ISP's technical support or online services that allow you to determine the details of your Internet connections. You will not be able to access the camera using a private IP address because it cannot be seen on the Internet (it is only visible within the local network where the device is connected). In addition to entering the public IP address, sometimes you need to enter the port in the address bar. In most cases, port 80 will be forwarded automatically, so this line can be left blank when trying to access the camera. However, there are times when the IP camera will not use port 80. If this happens, you will be required to enter the full IP address, followed by a colon and the port number used in the connection.
Modern ones are multifunctional devices that have significantly greater capabilities than their counterparts - devices analog type. Network video cameras allow you to analyze the video stream and send data over the Internet with specified resolution settings. These solutions can also be supplemented with modules for the ability to record license plates Vehicle, facial recognition and people counting.
Such cameras have many advantages, the main ones being:
- unlimited resolution;
- possibility of remote access to information;
- the ability to independently encode data;
- ease of display and storage of records;
- ease of archival search;
- providing multi-threading mode;
- Possibility of power supply from memory cards and Ethernet network.
The IP camera is autonomous system for video surveillance. Therefore, when purchasing a device, anyone can select the characteristics that most accurately meet individual requirements. And the above capabilities are only part of what it is capable of. IP video camera. Constant improvement of these devices opens up excellent prospects and ensures their relevance.
Connection features
On the back of the IP video camera there is a connector that is familiar to most users of personal computers. So, the simplest way to connect this device is connection to a laptop or computer, which is equipped with a network card, using a network cable with the appropriate connectors. When laying any, even the simplest local network, a “twisted pair” is used, equipped with connectors like RG-45.
The connector and cable are connected using a unique tool that looks like pliers. These devices can be easily found at specialized points of sale that sell computer components. But it will be easier to crimp the cable to the required length in a workshop for a low fee. After crimping, ready-to-use cables acquire a new name - “ patch cords", and can be used to connect an IP CCTV camera.
Network cable is divided into two main types:
- Straight-through or " straight", which can be used to connect switch or modem to computer. This involves connecting a specific pin on a specific connector to every specific pin on a different connector.

- Cross-over or " null-hub» allows you to connect two computer devices via network card. The connection diagram here is simple and does not require the use of any other equipment, for example, a switch, etc. A completely different method is used to connect the contacts.

You can buy ready-made cables, but you should explain to the seller for what purpose it will be used. The choice of cable type will depend on this.
If the cable is prepared, all that remains is connect ip camera through network adapter computer, and using the user manual set the required IP address. That's all for building a connection. As mentioned above, everything is extremely simple. Now you should study ready-made solutions obtaining information.
Receiving information from an IP camera
All modern network cameras have a built-in feature called “ web server" It includes ready-made software developments through which the user can configure the operation of a specific video camera. The software also provides the ability to view video in real time, manage security policies, and use mouse movements to rotate the video camera to provide the desired view.
To implement IP video surveillance, you need to contact a specific camera. To do this, in the Internet browser line you should enter the IP address of the video camera. For these purposes, you can use any modern browser; each of them (in the updated version) provides this feature. You will also have to go through user authentication - enter your login and password.

The Web server is equipped with almost the same menu as a regular Internet site. So users who have just begun to get acquainted with working on the Internet will be able to cope with the settings very easily. Everything here is extremely clear and accessible.
Viewing and saving video recordings can be done through special software that is installed on your computer. All necessary programs can be found on the disk that came with the IP video camera. However, there is a significant drawback here. When using a specific camera's software, the entire network may consist of only one surveillance device that is connected to a computer.
Connecting multiple CCTV cameras
Connection large quantity IP CCTV cameras are carried out using a switch. For example, to connect several surveillance devices, several computers and an NVR recorder, you can purchase 8-port switch. Suitable for connecting all these devices "straight" patch cord. Settings are made using the specific manufacturer's manual. The IP camera connection diagram is shown in the figure below.

To provide IP camera power supply CCTV can be used in two ways. In the first method, power is supplied to the device using laying a separate wire(as in the case analog video cameras). The second method uses ready-made PoE technology . They are supported by modern IP cameras and network switches. This technology provides power supply via network cable , so no additional wires are required. This is very convenient and at the same time more economical.
Internet access connection
One of the main features of IP CCTV cameras is the ability remote connection to view video recordings in real time via the global Internet. In this case, the network switching device is connected to the router, and it is connected via an Ethernet cable to the Internet provider or to the modem. If, after such a connection, the router is configured correctly, the remote user will be able to open the image from one or several video cameras of the IP video surveillance system simultaneously online. The figure shows a diagram of connection via the Internet.

When you connect to the Internet, your ISP provides a modem dynamic IP address. It is this that must be specified during a remote connection. However, over time, the IP address may change (and will definitely change), so in this case you need to take care of obtaining from the provider static address.
Remote connection can also be achieved through a dynamic IP address. To do this, you should use one of the free Dynamic DNS servers. These solutions provide the ability to monitor IP address changes. If a client installed on a PC transmits information to a public service, its IP address will be displayed there. Also, a large number of Modern IP video cameras and routers have a built-in DynDNS system. So they don't need a computer.
Features of installing an IP video camera
For IP video surveillance of the perimeter of the house, the video camera can be mounted at a height of 4–5 meters. However, the video camera needs to be protected, especially if it is located on the border of the streets. The device must be securely fastened and possess shockproof properties. When placing a video camera, you need to eliminate the possibility of icicles falling from roofs and protect it from strong gusts of wind. Also, the camera is sensitive to dust, water, dirt, which can damage it low temperatures. For all these situations, a special thermal casing is provided.
However, if we take into account that the temperature in our latitudes tends to drop to –30 o C, then the thermal casing must be equipped heater, which allows you to expand the operating temperature range to –50 o C.

Appearance of the heater for the video camera.
If you plan to organize hidden IP video surveillance, for example, indoors, you need to use your imagination. There are great opportunities here. Can be used for camouflage sensors fire alarm, ventilation grilles, chandeliers, holes in the walls or dropped ceilings . The main thing is to make the video camera look like ordinary piece of furniture and didn't attract attention.
As you can see, connecting IP video surveillance is not complicated. You can do this yourself. You just need to take into account all the features that are described in this article. Compact, simple video cameras can be used for integrated system video surveillance, remote monitoring of the work process at an enterprise or office, carrying out project work, recording video materials in order to prevent emergency incidents, as well as for recording tourist sites. But the main feature of this solution is that video surveillance can be carried out in real time, being at any point globe. It's simple and convenient.
Video on the topic
Being more high-tech devices compared to conventional “webcams”, IP cameras contain an Internet server, a network interface and can directly connect to the Internet. Connecting an IP camera via a router is possible via Wi-Fi or wired (over long distances), power is supplied via the ETHERNET connector.
IP cameras use the web protocol to transmit video signals. These devices are used mainly for surveillance and control systems for the protection of various premises, transmitting a video signal through the World Wide Web. The cameras have a digital zoom function and a motion sensor.
The video captured by the IP camera can be viewed from any computer connected to the network. The use of IP cameras is justified when there is a certain number of video surveillance devices.
Differences between an IP camera and a regular webcam and advantages:
- Autonomy (without mandatory connection to PC).
- Constant monitoring of the protected premises.
- For full functionality, a router and an IP address are required.
- To see the camera image from any PC on the network, you only need to enter the camera's IP address in the search bar of your browser.
- High quality video resolution with zoom capability.
Typically, the installation process occurs simultaneously with the planned renovation of the premises, which makes it possible to lay cables (at large distances between cameras), but if you are not upset by wires in a visible place, connecting and setting up an IP camera to a computer via a router is possible at any time, there is a choice After you.
It is possible to avoid laying wires altogether using a Wi-Fi router for IP cameras, but there will be limitations related to the distance from the router to the surveillance cameras, the presence of obstacles in the form of walls, furniture, because the quality and strength of the Wi-Fi signal is in direct dependence on these factors.
Remember that most routers do not distribute Wi-Fi network over fairly long distances, so to avoid problems with picture or sound quality Wi-Fi setup IP cameras via a router make sense in small rooms in the area of reliable signal reception by network devices. In all other cases, a wired connection method is required.
How to set up an IP camera via a router
So, we have got an idea about IP cameras, now let's figure out how to connect an IP camera to a router.
We choose the connection method: without using a wire or wired.
If we choose the second method, we will need a special UTP cable in order to connect the router to the camera. Next we go directly to the setup.
- We connect all the elements of the future surveillance system:
- We enter a special panel for controlling the camera.
- For this step, we will need the IP address assigned to our camera to set the same subnet to the configuration computer (in most cases, you will find the IP address on special sticker on the bottom of the device or in the product passport). Let's say the address value is 192.168.0.20.
- Open the Network and Sharing Center on your computer (Start > Control Panel > Network and Internet). In this menu, go to “Local Area Connection” and then to “Properties”. In the “Internet Protocol Version 4” window we make the following settings.
- So, we configured the subnet. The next step is to launch the browser.
- In the search bar, enter the address of the IP camera (192.168.0.20) and enter the necessary data for successful login (you will also find the data either on the device itself or in your passport).
With just one camera, you don't need anything else. If there are more cameras, we move on.
- We change the IP address depending on the spread of local network values.
Knowing the address of the router (we look for it in a similar way), we set it for our camera by changing the fourth value in it. Let's say: the router address is 192.168.1.2. For example, select the address for the camera 192.168.1.11 by checking the box next to “FIXED IP” and entering the appropriate values.
- Having saved all changes, disconnect the computer and the IP camera.
- We connect the camera and router via the LAN connector. We set up a local connection (if we use a wired connection between the computer and the router). In this step, we set up automatic acquisition of an IP address and DNS.
- We find in the WIRELESS menu to ensure the wireless network connection automatically. Here we need the SSID and password. After this, save the process and restart.
- We disconnect the first camera from the router and connect the others in order. Their characteristics will be identical, with the only difference being IP addresses and ports. Having completed this process, you can begin to configure the router itself.
How to connect an IP camera to a router
Different manufacturers have different setup menus, but the general procedure is approximately the same: we need the Forwarding menu item (or something similar). To do this, turn on the virtual server and enter data (see figure). If there is more than one camera, then such actions must be carried out for each individual camera.
If you are the owner of a static IP address, enter in the search bar of your browser: http://your address:8181. After this, you will be taken to a tab showing the view from the first camera.
Usually, by default, everyone has a dynamic address. In this case we do in the following way: enable the DNS client in the WAN menu. For example, ASUS provides its server and its use for free. In another case, we can use third-party services (NO-IP and others).
After saving all the set parameters, we can go to the address received during service registration. Congratulations: from now on you are aware of all the issues of connecting an IP camera to a router via Wi-Fi.
Why do you need a router: Video