Diagram of how to connect a rear view camera. So, here are detailed instructions on how to install a rear view camera. A fuse is a required element when connecting.
Publication date: January 22, 2016.
Once upon a time, not everyone could become the owner of a car, and even if open windows music was coming from the car, then its owner was considered a successful person earning crazy money. Today, a personal car is not a symbol of luxury, but a convenient means of transportation that almost every family has. Technological progress continues to simplify our lives and now a radio with a rear view camera, packtronics or a “smart” on-board computer does not surprise anyone. These tools help reduce the risk of a collision on the road or while parking to almost zero.
The rear CCTV camera is considered the best remedy for quick or difficult parking. It is usually installed above the license plate and connected to the screen in the car. The car monitor for the rear view camera can be integrated into the mirror or be independent. The last option is not very convenient for several reasons. Firstly, to connect the camera you will need a wireless module or a special adapter with an RCA connector. In this case, the signal will be triggered with a delay of 2 seconds. Secondly, having another gadget in the car is not pleasing to the eye. That's why now larger number drivers prefer to connect a video device to the car radio.
Connecting a rear view camera with your own hands in this case is not difficult, but if you doubt your skills, then contact a car service center, where this service will be inexpensive. If you still want to do everything yourself, you will first need to prepare.
Preparing to install a rear view camera
In order to connect the device to the car radio, you will first need to install the camera itself. Therefore, the first step is to disconnect the positive terminal on the car battery. This is done as a precaution to avoid short circuits and subsequent fires in the wiring. Or simply disconnect the entire battery.
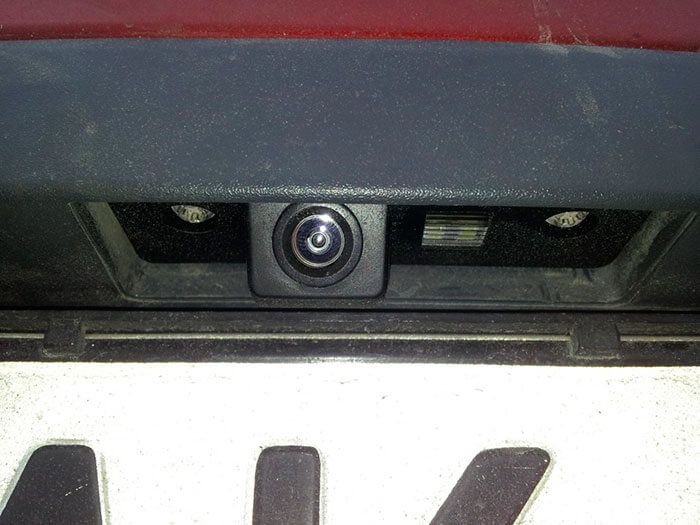
After that, look in the trunk and determine where the camera wiring will be located. Usually the wires are pulled along existing ones. The “eye” itself is most often mounted in the bumper or above the license plate in its backlight or in the license plate frame itself. In the front part of the cabin, several panels also need to be removed. For example, you will have to disassemble the dashboard and dashboard so that you have access to the electrical wiring.
Advice! It is not recommended to install a camera inside the passenger compartment on the rear window, as in this case the picture will be “blurry”.
Power to the camera comes from the reversing light, this necessary condition, so that the device turns on as soon as you start to back up. The fact is that rear view cameras, unlike DVR cameras, can operate for no more than 1 hour during continuous operation, after which they must turn off. This is quite logical, because the main objective These devices are designed to provide visibility while parking, and not during the entire driving process.
If you want to organize a tandem in which the radio will interact with the rear view camera, then it will not be superfluous to make sure that the audio device is equipped with the necessary LCD monitor.
When all preparatory work completed, you can proceed to installation.

Installing a rear view camera
Regardless of where the cameras are mounted, almost all of them are connected according to the same principle. To work you will need:
- screwdriver;
- fuse 0.5 A;
- perhaps a soldering iron might come in handy;
- screwdrivers and keys;
- sealant (can be replaced with glue);
- insulating tape (can be replaced with regular tape).
At the first stage of installation, the camera “eye” is installed. Some cars have seats for them. If there is such a hole, then you need to remove the plastic plug from it and simply install the video sensor there. If seat no, then a prepared drill or electric drill will come to your aid, with which you can make the necessary hole in the bumper. After the “eye” has taken its place, it must be fixed with glue or sealant.
Next, we pull the wires from the camera into the trunk and connect the negative wire (usually black) to the ground of the car. This can be done using any bolt. Power the positive wire (it's usually red) from power cable rear light. Also remember to connect one end of the yellow wire to the camera.
Important! When connecting to the tail light, a 0.5 A fuse must be used.
At this stage, we figured out how to install a rear view camera on a car, now it’s time to connect it to the radio using a video cable.
Connection to radio
Once you have connected the camera to the car's electrical outlet, run the video cable (yellow tulip plug) through the interior and secure it with electrical tape. It is important that the yellow wire is not pinched and does not fall into fastener. Typically, the length of the video cable is from 3 to 5 meters, this is enough to lay it in the most inconspicuous way, even in a large SUV.
Healthy! If you do not have enough cable length, you can extend it with another cable of the same type.
Next, connect the cable to the tape recorder. To do this, first read the instructions for the radio, although the principle is the same for most systems, some may still differ in their configuration. Also in the document you will find the specification of the ports, their markings and the location of the input connectors. Usually it is enough to connect the second end of the “tulip” to the corresponding “Video in” connector.
A typical camera connection diagram is presented above. On most car radios that have the function of connecting a video camera, in addition to the video input, there is an additional wire for activating the inclusion of the radio in the mode of displaying the video image coming from the video camera. This wire is designated “Reverse” or “BACK”. Activation is carried out by applying a “positive” (+12 V) voltage to this wire. For this purpose, video camera manufacturers equip their products with a special wire that, in addition to the cores transmitting the video signal, has another core (red, designated “P3” in the diagram). One end of this wire is connected, together with the + 12 V end of the “P2” connector, to the power wire of the reversing lights, and the other end to the additional wire of the radio.
If we're talking about O wireless camera, then the connection principle is the same as described above, with one difference - instead of a video cable yellow color You will need to connect the supplied transmitter to the “Video in” port. This completes the installation of the rear view camera, the video of which you can watch at the end of the article. But don’t rush to assemble the interior trim; first you need to check that you did everything correctly.
Checking and setting up the camera
In order to check how successfully the installation and integration of the camera into the radio was completed, connect the battery, start the car and put the car in reverse gear. If an image appears on the car radio, it means you did everything correctly. If the picture is missing or is poorly displayed, try the following:
- go to the radio menu in settings;
- find the “cameras” section;
- find the camera in the list;
- adjust the focus and other parameters of the “eye”.
Thus, the car radio with navigation and rear view camera are installed and you can enjoy all the conveniences of this gadget.
In custody
When installing any new equipment that involves connection to the on-board power supply system, use fuses. This way you can avoid the unpleasant consequences of incorrect installation. Fuses should be selected based on the power of the device you are installing. Take your time, carefully secure the wires and their connections with electrical tape, then your video system will work smoothly for a long time.
› The only working option for connecting a rear view camera in a car with lamp health monitoring
We use the camera with a CCD sensor, as it produces a high-quality image at any time of the day (you can clearly see that the image is noticeably better than CMOS), with IP 68 dust and moisture protection and operation in the dark. For example, this Swift HD CCD Luxur W-989: HD CCD Car Rearview Camera Waterproof night vision Wide Angle reversing with a combined female connector with a stub. This is a great camera with a Sony lens, tested personally! Everything is visible even at night (photo below). At the same time, it costs less than 1000 rubles!
The only downside is that she has very small angle review, no more than 100 degrees! Keep this in mind if this is important to you as a hedgehog04.
We also make sure that there is no flare from the license plate lighting if the camera is close!
The camera has an operating voltage of 5 to 30 V, a maximum current of 90 mA (~0.1 A), operates from 3.3 V - there is a stabilizer in the plastic boss on the wire in front of the camera wire connector. It can overheat if it works constantly, so we only power it when the radio monitor is turned on.
Removing noise from the camera image when the engine is running
Having a problem with the camera with the engine running Every car owner is faced with monitoring the serviceability of lamps. Always think over and draw a connection diagram before installation - this will help you immediately avoid many mistakes and problems!
First, try connecting the camera directly to the cigarette lighter to plus and minus and look at the engine running. Connect the minus correctly! Take the minus away from the reversing lights (RL), for example, from some bolt on the body, or even without the minus at all - the minus will be taken from the radio via the video transmission cable. They also often mistakenly take the plus from the interior lamp, and the excitation wire (to turn on the monitor) from the 3X lamps. Plus, you need to take the relay from the cigarette lighter, since the interior lighting also has control of the health of the lamps, and take the camera power wire and the excitation wire after the relay from the ZX! You can also take the plus from the ACC ignition switch.
Power supply interference is monitored by monitoring the performance of the lamps when the engine is running. And this pulse current goes to the reversing lamps (RR). Due to the inertia of the spiral, it seems that the 3X lamp is burning continuously, but in fact, voltage appears and disappears on it at a high frequency. At moments of “failure” the serviceability of the lamp is checked.
Important!
There is only one working option for connecting the camera's power supply out of four. :)
Only with connection option 4 will the camera work and give a clear picture. Why is written below.
1. If you connect the camera directly to the 3X lamps, then when the engine is running, the camera will not work at all due to the pulsed current monitoring the health of the lamps, or strong interference will be visible in the form of stripes in the image!
2. If you connect the camera to the 3X lamps simply through a relay with pure power, then the relay crackles like crazy, and the camera does not turn on because the relay does not provide power!
3. If you connect the camera to the 3X lamps, even through a diode with a smoothing capacitor, then when the engine is running, the camera still produces noticeable noise in the image due to power supply ripples!
Ripple after rectification by a diode and smoothing by a capacitor produces noise in the image
4. And only if you connect the camera to the 3X lamps through a relay with pure power from the cigarette lighter, while the positive wire from the 3X lamps is applied to the relay winding only after rectification with a diode and smoothing out the ripples with a capacitor, then the camera works perfectly and there is no interference.
Monitoring the health of the lamps does not apply to the cigarette lighter - so we take the pure positive from it, and the relay is needed to control this positive. A diode and a capacitor are needed so that the relay does not click from impulses to monitor the health of the reverse lamps, but closes normally. You can assemble a ready-made module like this.
If there is still interference even from clean power, then at the clean power input from the cigarette lighter in the relay you need to connect a capacitor with a plus to this input, and a minus to the minus of the relay winding, or install car filter- it won’t be superfluous. The capacitor capacity is at least 2200 µF, no amount of 470 µF will help! It will be simplest filter camera power supply. Or use a car power filter.
You can check the generator with the regulator, as well as the spark plugs with ignition coils and high-voltage wiring!
This is the safest power connection option for the camera and car!
You can, of course, connect the camera to the 3X lamps through a car power filter on the inductor in series and then the capacitors in parallel, but this still will not provide such clean power as from the cigarette lighter through a relay. It is advisable to install the filter already from the output of the relay from the pure positive from the cigarette lighter, facilitating the work of the camera stabilizer in the boss, since it sometimes fails (ketai).
An important point - the negative contact from the camera must be connected away from the minus of the 3X lamp to the bolt on the body, otherwise the camera picks up interference through the minus of the 3X lamp! . You can turn off minus altogether. The camera will then take the minus further away: from the screen (minus) of the video cable, and it, in turn, from the radio, which will ultimately take it from the same bolt on the body in the cigarette lighter area.
The cigarette lighter itself gets its brown negative wire from the same bolt on the body.
There are proven clean 12V (for example + from the cigarette lighter, rear wiper motor, etc.).
There are three wires going to the rear wiper motor: plus (which is there even when the ignition is off), ground, and a signal minus (which turns on the wiper).
By the way, you can quickly check the camera by feeding video from it to the TV through the yellow tulip input.
Due to the pulse current of the flashlight, the 3X relay quickly clicks back and forth (crackles) and does not turn on! Therefore, you need a diode for rectification and a capacitor to smooth out pulsations, and only after them is a plus applied to the winding so that the relay does not crackle, but closes normally!
What is pulsed current read here: Pulsating electric current
See how the relay cracks here: Relay crackling from pulse current
We read about the rectifier here: Low-power power supply, www.cqham.ru/pow2_15.htm
Diode in in this case It works not so much as a rectifier (since there is no negative half-wave here), but as a blocker that prevents the capacitor for the 3X lamps from quickly discharging, maintaining a constant voltage on the relay winding and preventing it from clicking.
Elimination of a blank screen and RCD radio error when exiting camera mode. We make a delay for turning off the camera.
When the camera is powered from the reversing lights, as well as turning on the camera mode on the display, then when you turn off the reverse gear, it often turns off before the display has time to process the status change and exit the camera mode (a delay of about 1-2 seconds) and on some radios noise is displayed disconnection and a blank screen of an already disabled camera. Also, when maneuvering on a narrow section of the road back and forth, when changing gears, the monitor often turns on/off, which is inconvenient.
Therefore, a simple delay is set to turn off the camera's power.
The best solution without a diode and a capacitor right out of the box is the VAZ-2111 rear window washer relay AVAR 454.3747 (or 526.3747-03) with a delay of 5 seconds.
This windshield washer timing relay turns on the washer pump for 5 seconds.
The delay can be either reduced or increased by replacing the 22 µF capacitor in this relay.
The second solution is a low-power, high-resistance relay and a capacitor with a diode. We feed the plus from the 3X lamp through the diode, and then the capacitor to the relay winding.
The capacitor smoothes out the lamp control ripple, allowing the relay coil to close the relay. A diode is absolutely necessary to get rid of the lights, otherwise the capacitor will quickly discharge through the reversing lamps. The relay is precisely a low-power one with a winding with a high resistance = ~ 1 kOhm, so that the capacitor does not quickly discharge and there is a delay of a couple of seconds.
A regular relay will not work, since its winding resistance is =~ 85 Ohms, and this is very small and there will be no delay! Installing a 1 kOhm resistor in series will prevent the relay from closing at all.
You can calculate the relay turn-off delay time in this circuit with a diode and capacitor.
The discharge time of the capacitor is equal to the product of the capacitance and the resistance; there is a direct relationship. You just need to take into account that the relay will turn off a little earlier than the condenser is completely discharged.
We bring all quantities to one dimension (farads, ohms, seconds) and calculate:
Delay time for RC circuit: T = C * R.
where T is time in seconds, C is the capacitance of the capacitor in farads, R is the circuit resistance in ohms
T = 2200 µF * 960 Ohm = 0.0022 * 960 = 2 sec. (quite enough)
For example, you need delay of at least 8 seconds. on a relay with a 960 Ohm winding:
Capacitor capacitance for 8 sec delay: C = T / R * 1000000 = capacitance in uF
C = 8 / 960 * 1000000 = 10000 µF(rounded towards the standard capacity).
Attention! For a standard head unit (GU) of the RCD 330 series, it is necessary for the camera to work for another 8 seconds after turning off the reverse speed. Otherwise, when disconnected, the message “Camera unavailable” will appear. If you have a standard PG, then it is best to use the VAZ-2111 rear window washer relay AVAR 4543747P, increasing the 22 μF capacitor in it to 47 μF 25V and the 470 Ω resistor to 3.3 kΩ, obtaining the required shutdown delay of 8 seconds. instead of 5 sec. default. In this case, the diode and capacitor from the ZX lamp are not needed for this relay!
You can use a RAGTIME3-12-(0-60) relay, which is also fed through a diode and a capacitor, but only the capacitor is no more than 10-50 µF, otherwise the shutdown delay will be too long!
For a high-impedance relay circuit, you need to increase the capacitor value to 10,000 µF.
You can also use ready-made
You will need
- 1. Camera and monitor
- 2. Ready-made wires with connectors
- 3. Fuses (2 pcs.) 0.5 A
- 4. Screwdriver
- 5. Set of keys
- 6. Knife
- 7. Pliers
Instructions
Before starting any work, remove the positive terminal of the battery.
Look carefully camera: Regardless of the model, the camera must have power and video wires (connectors) progress. Most often it is recommended to supply power to the camera from the rear light progress, as a result of which the camera will only work when driving in reverse. The rear view camera is designed for short-term use, and failure to do so may dramatically shorten its service life.
Connect the red wire of the camera to the positive terminal of the rear light progress. If there is no fuse on this camera wire, install one. The fuse should be 0.5 A and located as close to the connection point as possible.
Connect the black (negative) wire of the camera to the car body. For example, under a suitable and pre-cleaned bolt. No fuse is required for the black wire.
Most cameras are equipped with a five-meter yellow wire for connecting to the monitor, with a connector typical for audio-video equipment. If the cable is not long enough to route through the car interior, purchase an extension cord with a connector connector. Can be purchased suitable cable and solder the necessary connectors yourself.
Connect the cable to the monitor by plugging it into the video input. Please note that each monitor or radio may have several video inputs, one of which is specialized for connecting a rear view camera. You can find the required video input according to the instructions for the monitor (radio tape recorder). The simplest monitors have only 2 connectors: video output (most often white) and video input (most often yellow).
The monitor itself also needs to be powered. Proceed in the same way as when connecting the camera: red wire with a fuse to the power plus, black to ground (under the stripped bolt).
After a thorough check of the work done, the connectors are wrapped with electrical tape. Don't forget to turn on the positive terminal of the battery.
Tip 2: How to connect parking sensors
Parking sensors assist the driver in reversing maneuvers. When approaching any hidden object, the sensor begins to beep and show the distance to the obstacle. This way the driver can park in limited conditions
Isn't a camera a great way to make parking in tight spaces easier? Installing a rear view camera with your own hands will not take you much time. Let's consider the installation of a mirror with a built-in camera, as well as diagrams for connecting a remote device to a multimedia system monitor.
Installation options
There are several ways to retrofit a car with a rear view camera ():
- a separate camera that connects to a standard multimedia system or a self-installed screen;
- a camera kit with a rear-view mirror, on which an image will be displayed when moving backwards. This can be either a separate mirror or an overhead panel that will be mounted on top of the standard reflector.
Installation
You have to decide where exactly the camera will be mounted. Installation methods:

Optional equipment
One of the main problems is the lens getting covered in dirt and ice. Even few standard systems are equipped with such useful function, like washing the camera. If you install the accessory in the trunk lid of a car that has a rear window washer, then cleaning is very simple. You just need a tee, which will be implanted into the standard washer line in front of the rear window nozzle. As a sprayer, you can take a compact nozzle from any suitable car. Since the lens glass is small, there is no point in using a fan nozzle.
The second useful feature is the camera illumination, which in some models is built into the body. It is worth recognizing that in most cases the harm from this function is much greater than the benefits. The backlight illuminates the camera lens, and as a result, the image quality does not improve at night. A backlight problem may arise if the rear view camera is installed next to the license plate light. In this case, replacing incandescent lamps with LEDs can help. If this move does not solve the problem, you will have to make a protective screen.
Electronic component
Be careful when routing wires. The joints must be properly insulated. To prevent the wires from dangling or fraying, wrap them with rag tape, if possible, secure them with zip ties to the standard wiring harnesses, or secure them using the technical holes of the body elements. In the cabin, the wires can be pulled both below along the thresholds and behind the ceiling trim.
Installing a rear view camera with your own hands will not cause difficulties even for a novice car enthusiast, but you need to approach the connection much more thoroughly. It makes no sense to consider the rear view cameras that come with a special mirror. You just need to connect everything according to the instructions that are included with the device.
For normal functioning systems used:
- two-wire wire for powering the camera;
- two-wire video communication cable. To transmit video to the monitor, wires with RCA connectors (the well-known “tulips”) are used. The cores are not shielded, therefore, if necessary, they can be lengthened or cut for pulling in hard-to-reach places. In some versions, for correct operation of the system, an additional excitation wire will come out of the RCA connector.
The excitation wire activates the radio screen with a “positive” current, causing the system to automatically switch to the mode of broadcasting images from the camera. The excitation wire is not required for all multimedia systems; in some devices, automatic switching to the rear view camera is carried out via a video link. If such a function is not provided by the radio or the device is not connected correctly, then you will have to manually change the image on the screen by pressing a special button.
Connection methods
You can connect the rear view camera and the monitor in the cabin wirelessly. This will require a special module. The module's power is connected to the reversing lamp, and from the module it goes to the camera. The second wireless module is connected to the monitor's power supply. The disadvantage of this method is interference, which often interferes with normal image transmission. Also, this method is not suitable for radios that require an excitation wire.
Let's take a closer look classic version connections. The essence of the above circuit is to connect the camera's power to the reversing light, the voltage at the terminals of which appears only after reverse gear is engaged. The connector (“tulip”) is connected to the standard output on the radio or screen intended for video communication. The excitation wire must be connected to the output of the radio, usually marked as “Reverse”. You can find out whether an excitation wire is required for your multimedia system from the technical documentation for the radio. At this point, do-it-yourself installation and connection for most cars can be considered complete. 
Lamp fault monitoring system
What should you do if you have installed a rear view camera on your car, but it only works when the car is turned off? Many modern cars, usually of German origin, have a lamp monitoring system installed. The PWM controller sends power through the wires lighting fixtures rectangular positive pulses that help detect burnt-out rear lights. Since the lamps have inertia, current ripples do not affect their operation. But the reverse camera will not work correctly with such interference. 
To prevent this effect, the camera must be connected to the reversing light via a relay powered by the cigarette lighter (where the current will already be constant). In this case, “+” from the 3X lamps must be applied to the relay winding only after rectification with a diode and smoothing of ripples with a capacitor. The “minus” for powering the camera must be taken as far as possible after the “mass” of the 3X lights.
We invite you to watch the video from detailed description a way to eliminate interference so that you are guaranteed not to have problems with the picture on your car.