Connect remote access to your computer via the Internet. Remote viewing of video cameras via the Internet
To connect the digital video recorder to a local network or the Internet, you must perform the following steps:
- The DVR and computer must be connected with connecting cables to the same router.
- Connect the router to the Internet to be able to view the recording remotely.
- Browser must be installed IE 7, IE 8 and higher.
Setting the IP address in the DVR.
On the DVR, go to the Settings menu and select Network.
In the table that opens, check the “Enable DHCP” checkbox. Click "OK" to reboot the system. Enabling DHCP means automatically obtaining an IP address.
Repeat the previous step and write down the IP address, subnet mask, default gateway and DNS.
Please note that if your router does not support DHCP, you will need to contact your network administrator to assign you an IP address. If the DVR needs to specify PPPoE (DSL/ADSL) parameters, please contact your Internet service provider.
Setting up a computer to view video from the DVR.
All computers that need access to the DVR need to configure and run ActiveX controls remotely. The configuration is performed only once for each computer.
Add the DVR's IP address to the list of trusted sites in Explorer browsers.
Open the IE browser, click “Tools”, in the top menu > “Internet Options”, > “Security” tab > “Trusted Sites”, click the “Sites” button. Enter the DVR IP address in the format http://192.168.0.108 and click the "Add" button > click "Apply"
Change the Default settings for the Trusted Sites zone to Low. This will allow ActiveX controls to load and access the DVR.
Note: The IP address used in this example is for use on an internal network. If you need to access the DVR from a remote location, then the “external IP address” should also be added to the list of trusted manufacturers.
View videos through your computer.
After completing these steps, you can use IE browser. Enter the IP address of the DVR in the address bar, for example: http://192.168.1.19 press "ENTER".
If the computer and DVR are connected to the same router, you can use the internal IP address to watch the video. If the computer is located in a remote location, you need to enter the external IP address to access the DVR.
Specify “use IE browser” in the DVR settings.
Enter the "username" and "password" to login the DVR.
In the information bar that pops up below the address bar, click on the “yellow” information and select “install this add-on for all users on your computer”
Download ActiveX and then install it.
View video remotely from DVR via the Internet.
You have successfully accessed the DVR via LAN. Now you need to set up a router for the DVR to access the Internet.
For more information about port forwarding, visit http://www.portforward.com
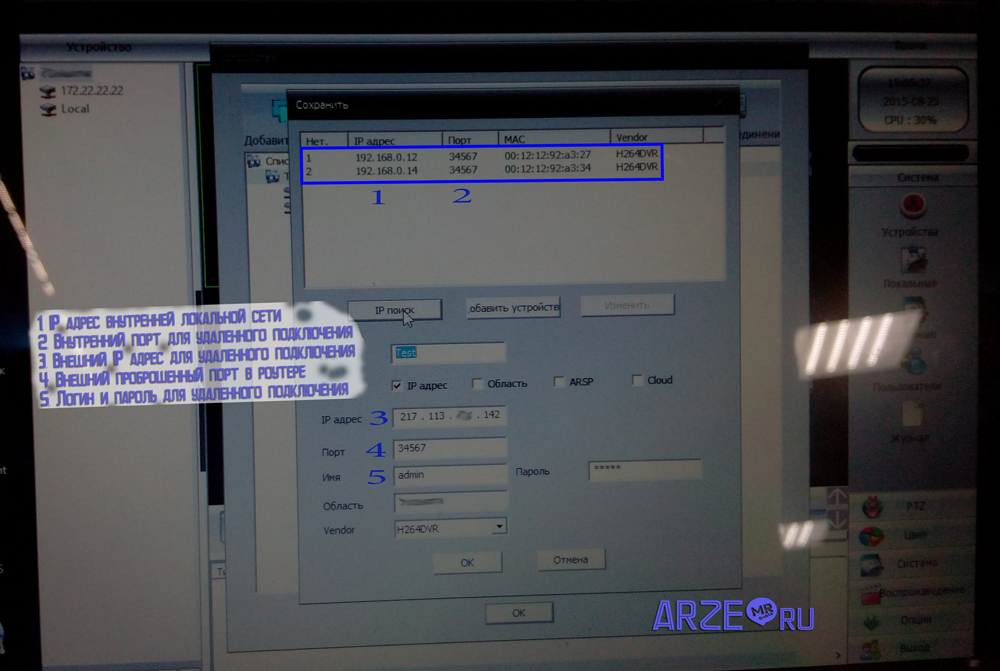
Login to your router through a browser, enter “username” and “password”, and then select “Port Forwarding”. The default HTTP port is 80 and TCP port 34567.
If you need remote viewing on a mobile phone, then you need to perform port forwarding. By default, port 80 and 34599 need to be forwarded to the local IP address of the DVR.
Before testing, you need to find your external IP address. You can do this via the link www.wahtsmyip.org.
Once you know your external IP address, enter it into your IE browser to access the DVR, for example: http://56.226.242.1. If you set a default port that is other than 80, then you need to add it to the end of the IP address, for example: http://56.226.242.1:82
If after you have completed the above operations and still cannot access the DVR, please resolve the following reasons:
1. Check your network connections and go through all the steps to make sure there is no configuration error.
2. Check the port forwarding setting. Check your router settings, or contact www.portforward.com for help.
3. In IE browser controls not installed ActiveX.
4. Your router is blocking your computer from using external IP -addresses for access to DVR
5. Port 80 is blocked by your IPS. Change TCP port 6000. Port forwarding must be done in the settings for the new port
6. If problems persist, contact your ISP for assistance in setting up your modem and router.
Setting up work digital video recorder via DDNS.
DDNS (Dynamic DNS)
Instead of using an IP address to access the DVR online, you can use DDNS to create a connection.
Remember the website name to access the DVR.
The following instructions are for DYNDNS.org.
Before performing the following operations, you must open an account with DYNDNS.org. This is done free of charge.
Configuration for DVR:
1. Login DVR system menu, select “System” > “Netservice”. Enter the password if required, select "DDNS" and press "ENTER", select "DDNS Type" from the drop-down menu, change "DDNS Setting" to "Enable".
2. Enter your account hostname DDNS .Example: vstardvr.dyndns.org.
3. Enter your account username and password DYNDNS.
4. Select "OK" to confirm.
Access DVR to watch video via hostname.
Enter the hostname in the IE browser, then in the login dialog that appears, enter the username and password, click the “Connect to video” button, select “OK”.
If you are using a different port (the default is port 80), then you need to add the port name at the end of the host URL.
Remote video surveillance an increasingly popular service. CEOs and directors of companies are increasingly conducting their business remotely or on the road. It is good when the staff is supervised by an experienced deputy or department head. What if your assistant is not so good at this? Or is there a risk that in your absence clients will be lost to others? Or will theft flourish?
The tasks solved by remote viewing are varied. To start viewing, you need to forward the ports on the router at the final stage of installing the cameras; sometimes this procedure is called port forwarding.
A little theory
Port forwarding is not related to the type of cameras. Whatever video surveillance system you have: IP or analogue, everything is connected to the router. The difference is that analog cameras do not have their own IP address.
Schematic diagram of remote connection to a DVR or IP cameras
Each analog camera is directly connected to the DVR using a cable. The DVR is connected to the network and port forwarding is done on it.
Each IP camera has its own IP address on the network, for example, one is 192.168.0.110, the second is 192.168.0.111. The DVR also has its own IP address, for example, 192.168.0.100. Unlike analog cameras, digital cameras can be connected to a switch (switch) anywhere local network. And when you combine switches into one network, you can connect to IP cameras directly and through a DVR.
Setting up the program on a PC for remote connection to video cameras
Each camera has not only its own IP address, but also a web interface, login and password for logging in.
Thus, in reality, you can connect remotely not only to the DVR, but also to the cameras directly. To do this, you need to forward ports on the router not only for the IP address of the DVR, but also for the IP address of each camera.
Types of routers
There are enough available on the market a large number of routers, each of them has its own interface. In my opinion, the most sophisticated one is the D-Link DIR-620. I’ll try to rank routers in order of prevalence (these are purely my observations):
- Tp-link.
- D-link.
- Asus.
- Zyxel.
- Huawei.
- Other
To avoid confusion, there are wi-fi routers and they are also called routers.
DVR settings
We have come to the most important point, I will try to guess the one for which you are reading this article. First we go into the DVR and set it up. If you have one camera, go to the camera via the web interface and configure the network settings of the video camera.
Network settings of an analog video recorder
To remotely connect to CCTV cameras in the router, you need to forward the ports specified in the DVR. For overly suspicious users who think about the security of access to cameras, the open ports can be changed, but then difficulties may arise in the settings.
Brief instructions for setting up the DVR
In order not to make a mistake about which ports we need to forward, go to the network settings of the IP DVR and open the ports in the router indicated in the TCP, HTTP, CDM, RTSP, etc. windows. Depending on the brand of the manufacturer and the chipset, they may be different. You can also set them manually yourself.
Setting up routers
There are routers with automatic opening ports, they have a function for this, and we also enable this function in the DVR. In most cases, business owners do not remember or do not know logins and passwords for routers. This feature can help save time during setup in some cases. The function does not always work, then there is nothing left to do but reset the factor to the router.
Before doing a factory reset, ask the customer about the availability of settings from the provider providing Internet access.
If you have access to the settings of your router and DVR, feel free to enable the UPnP function, which will help you quickly resolve the issue of port forwarding. It is especially useful when you manually set all the ports and there are a number of other devices on the local network that need remote access. Otherwise, you will spend a long time figuring out which devices conflict with each other.
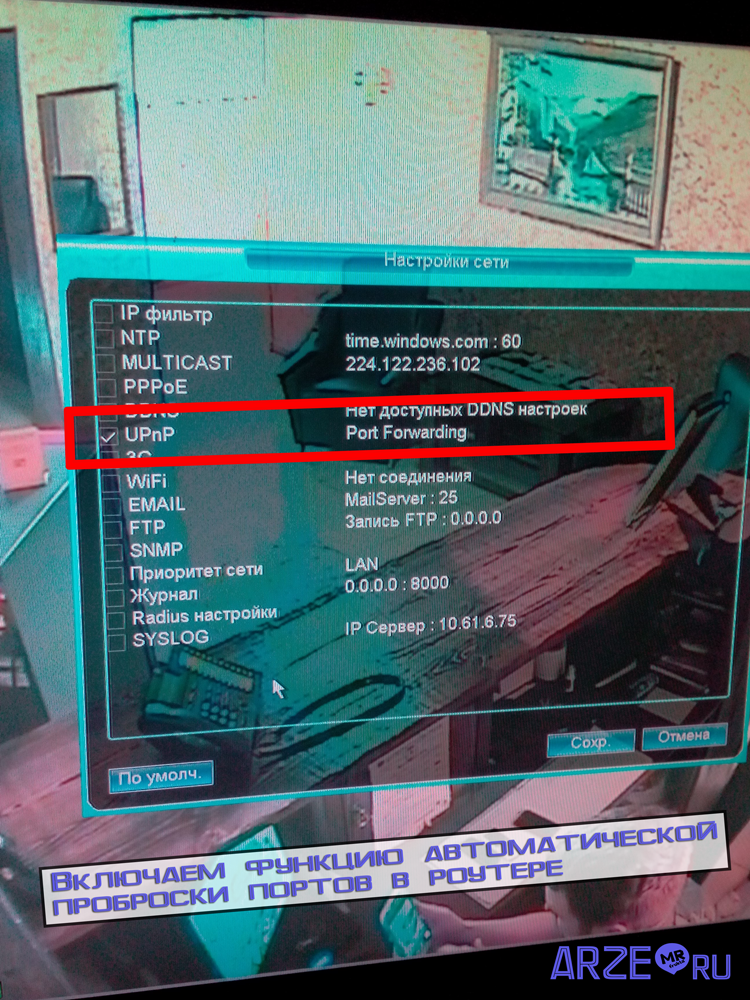
UPnP automatic port forwarding function. Must be enabled in both the router and the DVR
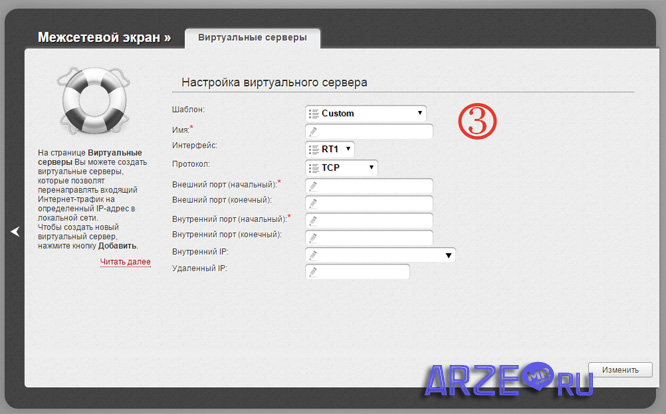
When you go to the settings of the router, find the “Virtual Servers” menu in it, this is where you need to set up port forwarding.
I will illustrate where this can be in the screenshots:
- D-Link DIR-300

- TP-LINK

- D-Link DIR-600
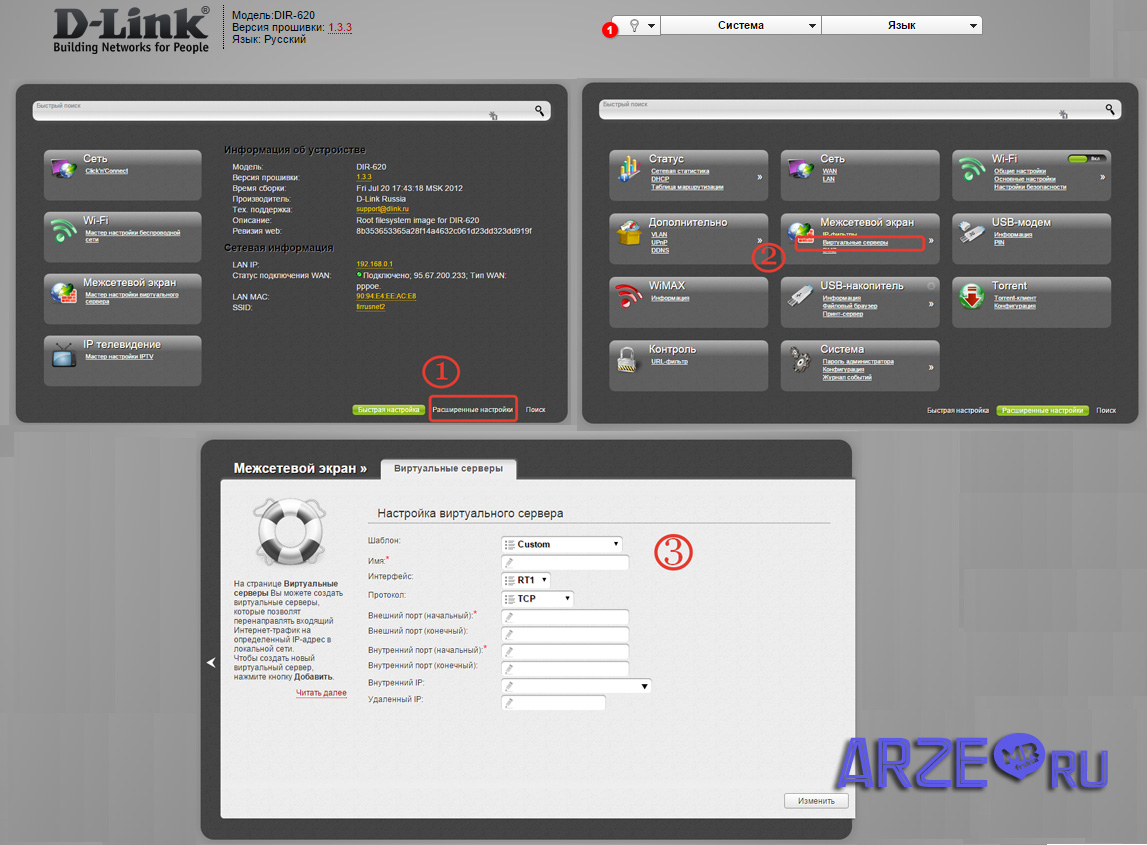
- ASUS RT-N65U

Nuances
A few more important points and here I will conclude the article. If you don't mention this, you may have difficulty setting up.
- The HTTP port of the DVR and router is port 80 by default. To avoid a conflict, change to 88 on the DVR; accordingly, forward port 88 in the router.
- The external start and internal start ports in the router settings can be set to the same, for example, 37777, or different. If you have specified an external one, then connect to the DVR (camera) through the port that you specified. The connection occurs through the CMS program included with the DVR.
- The external end port does not need to be specified.
- Set the internal IP address for the device you want to connect to remotely. This may not necessarily be a DVR, but also a printer, PC, or network drive.
- Ports 80 - for connecting via browser (HTTP), 37777, 37778 - for connecting via CMS program (TCP, UDP), 34567 - RTSP (sometimes called mobile) - for connecting via phone (in older DVRs this value can be 554, 654 and etc.)
I tried to cover this topic as widely as possible so that you don’t have any questions, but if you still have them, ask them in the comments.
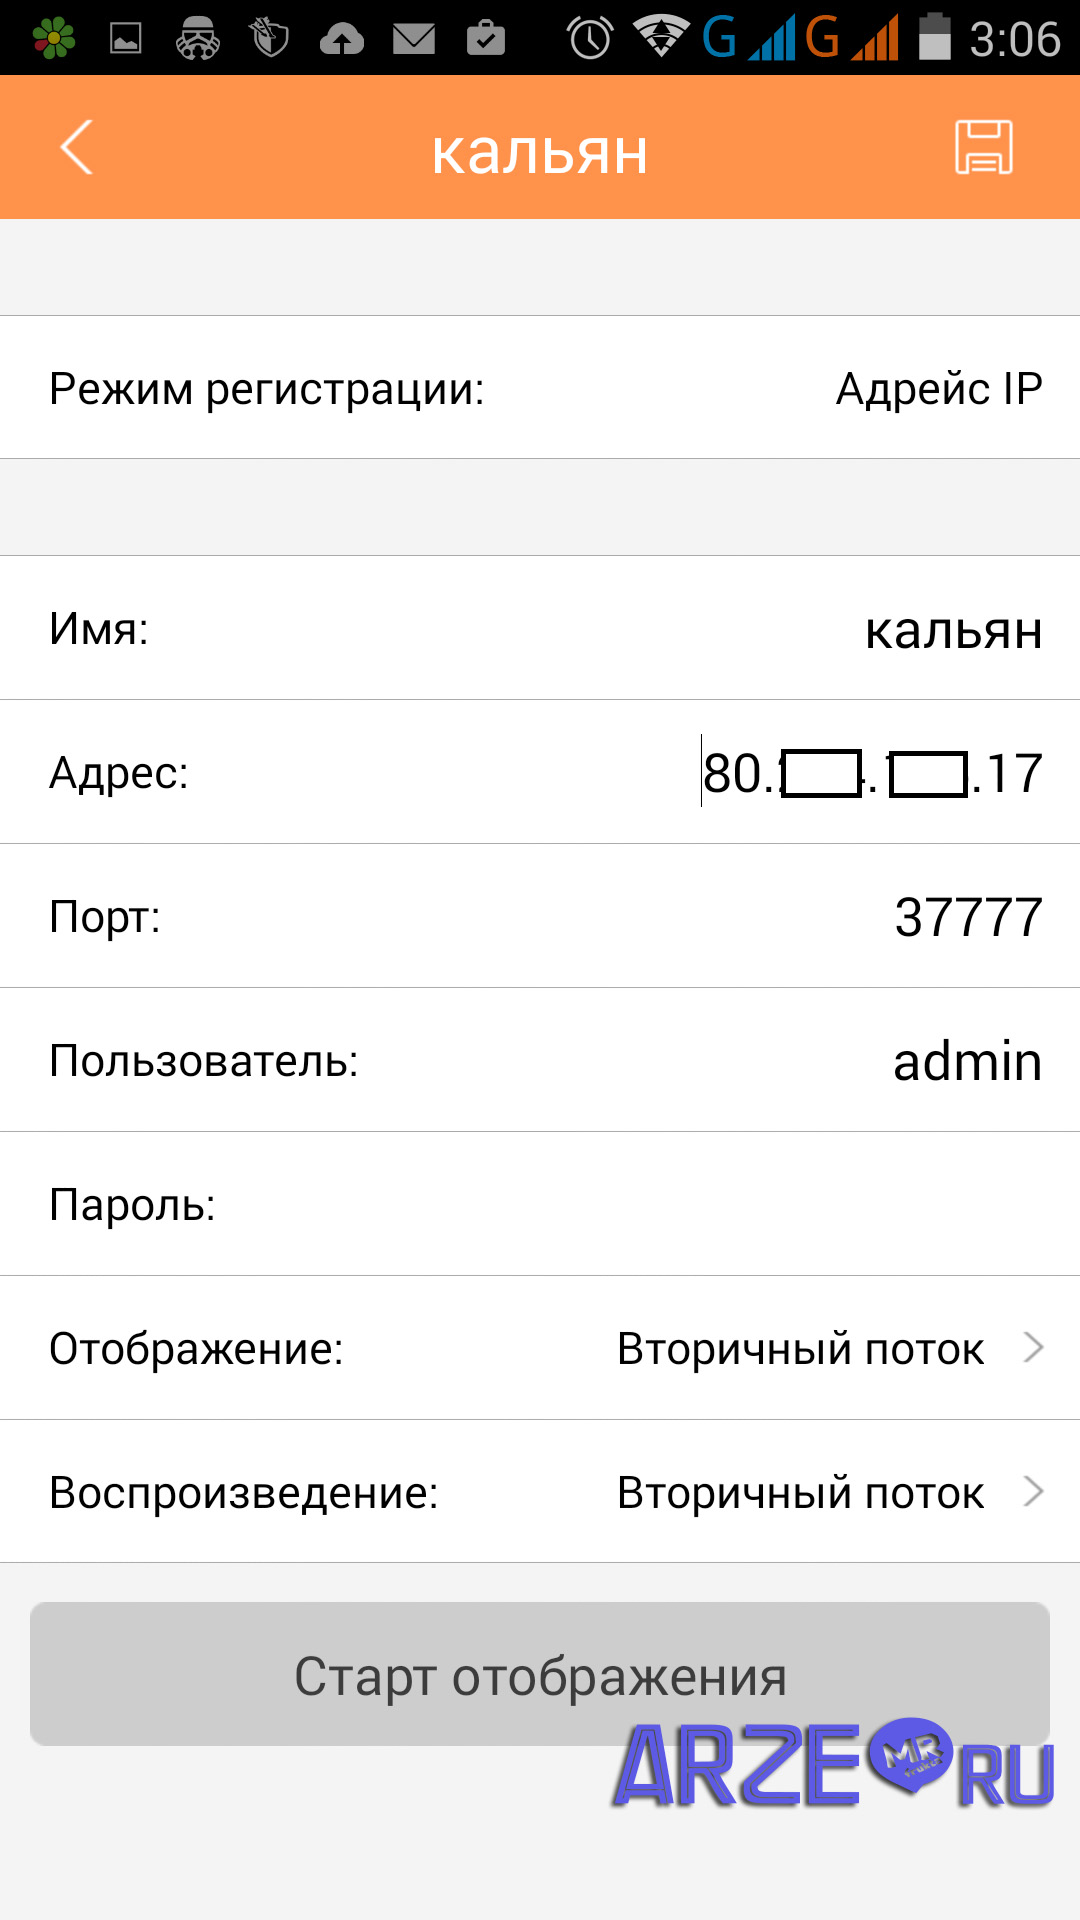
Example settings for connecting remote viewing of an IP camera from a phone
Watch the video where I spend comparative analysis video cameras, it shows how to configure and connect cameras to the DVR.
I completely forgot.
Examination
Before you rejoice at completing the hardware settings and start setting up the CMS or client phone, I recommend checking port forwarding using an online service. Using the service, you can determine the external IP address of your computer and check whether it is static or dynamic.
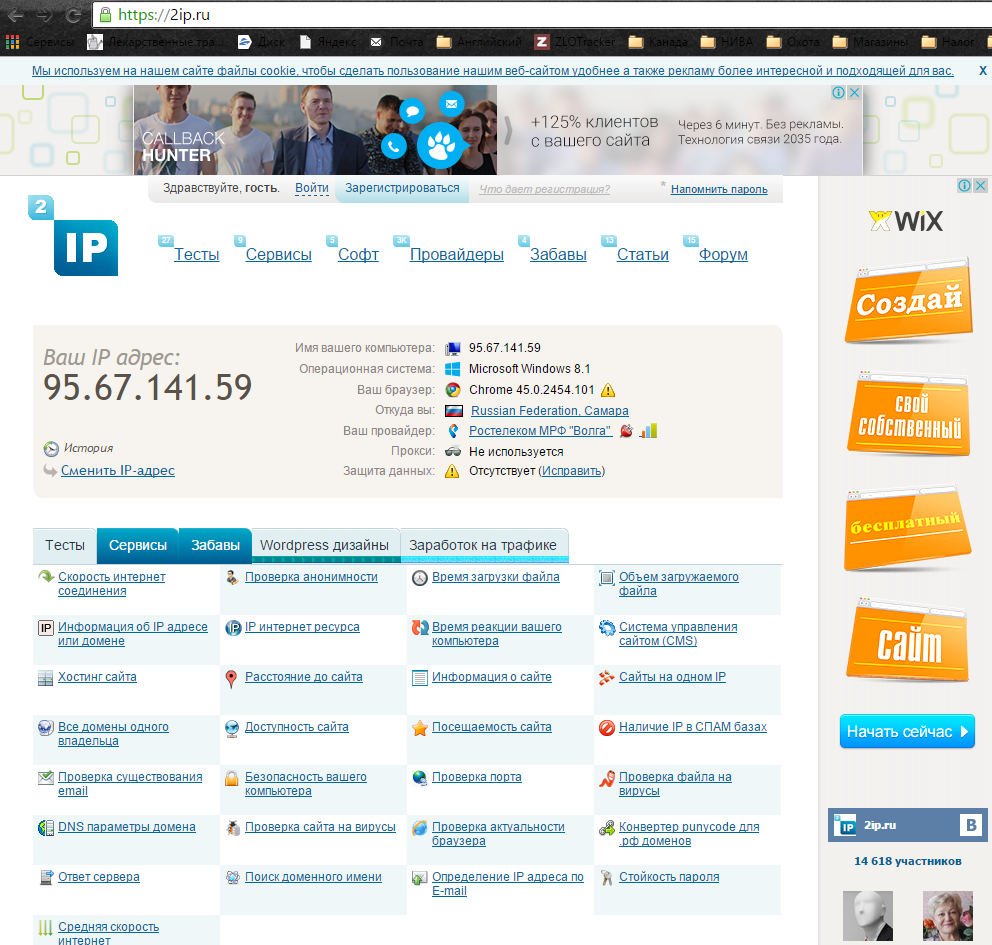
Port checking service
An external IP address is required to be entered into the CMS or phone when setting up a remote connection. In the 2ip service we check ports for openness or closedness. If they are closed, you will not be able to connect remotely. Let's check all the settings again. We fix errors.

Checking the ports
In conclusion, I would like to mention that you can connect to cameras remotely not only directly. There are cloud services that can help you bypass the procedure of port forwarding and purchasing a DVR. All you need is a constant Internet connection. They have their drawbacks, which are a story for the next one.
Creation date: 2013-03-11
To resolve the issue of choosing the best connection, it is necessary to take into account that any video surveillance system is a fairly broadband signal source
Any video surveillance system is a broadband signal source, this must be taken into account when choosing the best connection. If you want acceptable image quality, you will need to ensure a stable connection between the source and the client. IN in this case the source is a server or DVR. This material discusses in detail the issue of setting up remote access with an example. Follow the instructions and you won't have to resort to professional help.
Methods of organizing access
When preparing to set up remote access, you will need to contact your Internet service provider and find out what the upstream bandwidth of your connection is. If necessary, you will need to change the tariff. Practice shows that for stable operation of a DVR, it is enough to have a channel that provides a bandwidth of 1-2 Mbit/s for outgoing traffic. If you need high quality, so that you can make out the details, it is worth choosing a channel with a larger outgoing channel width. It also depends on the hardware and software used.
The second factor in choosing a channel is the ability to create access to the external address of the router. To organize access from clients from the global network, you can use three methods: with a static IP, with a dynamic address, or using a cloud service. Let's consider each option in detail.
Method No. 1: access to a DVR with a dynamic IP address
The provider cannot provide a permanent external address, in other words, a static IP. It's about about a connection where an address is issued to one computer for a certain period of time, usually one communication session. This is a dynamic IP address. As practice shows, most providers in the CIS countries issue dynamic addresses to users. But if you need to access the desired device at any time, the connection must have a permanent IP. This is where the Dynamic DNS (DDNS) service comes to the rescue.
Thanks to this service, you can access the DVR via the Internet at any time, regardless of whether a static or dynamic IP address is used for connection. The Dynamic DNS service allows external users to quickly connect to a video surveillance system using the domain name of a specific device. It’s quite easy to understand the service - go to the official website and register.
When creating an account, you will need to indicate your current address once and decide on the domain name with which you will control the equipment in the video surveillance system. You will be able to get information even if the address changes 3-4 times a day. For workDDNS server needs to change router settings. You need to make DDNS servers available - this is done by setting the appropriate mode.
Method No. 2: connect to the video surveillance system with a static address
Everything is simple here, since you don’t need to use additional services. It’s great if the provider provides a static address, which is also called white IP. Your DVR will be linked to it if the router operates in “bridge” mode or if there is a direct connection. In other cases, a static IP address will be assigned to your router.
Customers will be able to use the CCTV system using your address. There is also Alternative option: client application for more comfortable monitoring and management of systems. If necessary, access can be obtained from any device; the only requirement is an Internet connection.
Method No. 3: surveillance via cloud service
This method can only be used if the DVR supports cloud service technology, and a static address is not needed here. Through specially organized channels, the image from the DVR is transmitted to a remote client, due to which the user can always access the equipment. The cloud service is free, which is another significant advantage. If you are going to choose this method, it will be useful for you to know how this service works.
Important! Find out in advance from your provider whether packets from the external Internet are allowed to pass through the network interface of your video surveillance system. To do this, you will need to provide the port numbers that you plan to use; they are in the description of the DVR. IN modern models there is a function for changing the number - this is a significant advantage over registrars with specified ports, since you can choose ports that are not blocked by the provider.
To get started, the DVR must be connected to the Internet. There are a lot of cloud services, it’s worth choosing popular options. On the service website you need to find the tab “ ByDevice" or " Using the device" Here you will need to enter the equipment serial number, after which the cloud service will independently find the recorder and create a connection. Automatic setup is complete, now when you log into the site you will view all the cameras that are connected to the system. If you have chosen TM “Proto-X” devices, then you need to go to the website www.proto-x.org; for TM “Polyvision” recorders, the servers www.cloud.dean.ru or www.xmeye.net are used.
It's also worth checking your router in advance, as cheaper models may block port numbers that are used most often. As an example, you can take port number 80. Avoid them when setting up access to the DVR. The last thing you need to check with your Internet provider is the reliability of the channels. If it does not provide correct information, then it is worth contacting other clients of the provider and finding out how often the “channel” fails and how quickly specialists react to a failure.
1. Registrar-Internet connection
It is completely impractical to use a dedicated channel for a DVR, so most often users resort to using the second connection scheme (Recorder-Router-Internet).
2. Connection type Registrar-Router-Internet.
In this case, the router acts as a router. There are two methods for remotely accessing a video surveillance system via the Internet, provided that you use a static IP address. The first option is a client application to control the DVR, and the second is to use a standard browser in Windows. We have discussed how to work with the client program, since it has more functionality than IE.
The scheme is as follows:
- There is a remote computer on which the client application is installed, it goes to the router via an external address.
- The router redirects us to the local IP address, it performs this action on the specified external port.
- The local IP address in our case is the DVR or a specific port.
Before using the client program, you need to make sure that your ISP provides a static address. At the moment, most providers provide a dynamic IP, and a static IP can only be obtained as an additional service. You can check this in several ways: fix the external IP or simply call the support of your provider. The second option is quite simple, but the first requires additional consideration.
By external we mean the IP that is currently assigned to your router; some users confuse it with the computer’s IP. Type the phrase “My IP address” in the search bar of any browser. Write it down and then turn off the power to the router for 10-15 seconds. Turn it on and check what IP address you now have. If it hasn't changed, then your ISP provides a static address. The appearance of changes in numbers indicates that the address is dynamic. Contact your provider's support and find out if it is possible to switch to a static IP.
To understand setting up remote access, it is worth considering a simple example of connecting to a registrar with a static address. In short, for a successful result you need to complete three steps:
- Enter the local network parameters correctly.
- Forward ports on the router.
- Make the correct settings in the client application.
We use the client program
Using TM “Polyvision” as an example, we will consider connecting through the client application. First of all, you need to go to the main menu of the registrar. The interface differs slightly depending on the specific model, but the operating principle remains the same. We need to get to the section " LAN Settings" to start setting up. The process then proceeds as follows:
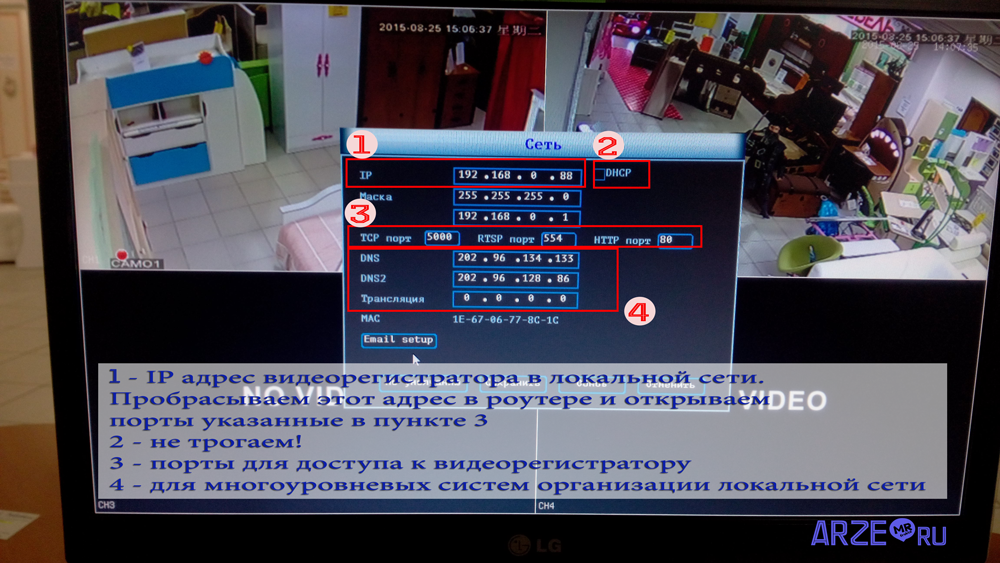
1. Register the Gateway (This is the local IP of your router) 192.168.0.1
2. set the local IP address of the registrar (in the same subnet as the router’s IP, the main thing is that it differs from the IP of other devices on the local network) 192.168.0.10
3.DNS server (same as the router’s IP) 192.168.0.1
4. Leave the subnet mask at 255.255.255.0
5. Port 1: Settings port. Default: 34567 - this is for the client program (you can leave it as default, you can set your own)
6. Port 2: Mobile port. Default: 34599
7. HTTP port - for access via IE browser (it is better to change) 80
Router setup:
In this review, I’m looking at port forwarding on the D-Link DIR 300 router. If you use a different model of router, its interface will most likely be different from mine, but the principle of the settings is again the same.
- Go to the admin panel of the router -> Select ADVANCED from the menu -> Port Forvarding
- We create a new rule here for the external port;
- what port to redirect to 34567 (Port for client program interface)
- 192.168.0.10 (IP of our reg);
- client-DVR;
- 34567-34567
- Let's specify one more rule for the Web interface of the Internet Explorer browser
- Specify the range of external ports 80-80 (from which ports to redirect);
- Name of the rule - let it be ie-DVR;
- Which local ip to redirect to? 192.168.0.10 (IP of our reg);
- what port to redirect to 80 (Port for Internet Explorer interface)
- Launch the client program -> select the settings menu
- Create a new device group
- Add a new device to this group
- Registrar name
- IP address (The IP address that was given to you by your provider) 46.0.209.182
- Port 34567
- number of cameras
- login
- password
- Save the settings.
If you want to log in remotely via a mobile device, then you must also forward the mobile port, for Polyvisoin – 34599.
The process is quite simple, although lengthy. You need to return to the main menu of the client application and connect to the created system. Surely you have already noticed that the client program offers ample opportunities to control the DVR, among which it is worth highlighting viewing archives, recording and viewing videos. You will have access to all DVR settings.
Important! If the computer from which the DVR will be controlled is located on the same local network as the device itself, then you will not be able to access the DVR. You can only get to the registrar at an external address using a remote connection. To gain access to a recorder that is located on the same local network as a computer, you should go to the localIP registrar. You will find this data in the technical description.
To make using the video surveillance system more convenient, it is recommended to set a static address on the recorder, even if the router is set to DHCP mode. In the DVR settings, check the box next to “ Dynamic IP».
Using Internet Explorer
You need to go to your browser and enter the IP address of your registrar into the address bar, and then add the port for the web interface through a colon: 60.191.94.100:8080. You will need to configure IE to be able to connect to the video surveillance system via a browser:
- Go to the menu " Service" and select the option " Internet Options».
- Next, switch to the section “ Safety" and click on the button " Another…».
- In chapter " Security level» we descend into bottom part screen and find the option “ ElementsActiveX and connection modules».
- Set all parameters to " Included" Don't forget to save your changes.
- We enter the IP address associated with your registrar into the address bar, Internet Explorer will offer to install the ActiveX plugin.
- We agree with the browser, after which you will have access to the DVR.
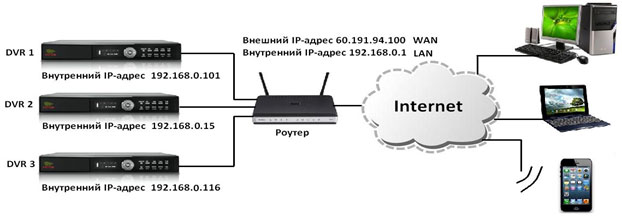
If several recorders are connected to one router, then the settings will be as follows: we register the ports in accordance with the devices, for DVR3 port 85 is used, for DVR 2 - 8, for DVR 1 - 80. In the address bar you must insert the address of the recorder you are using which you want to access.
Good day everyone.
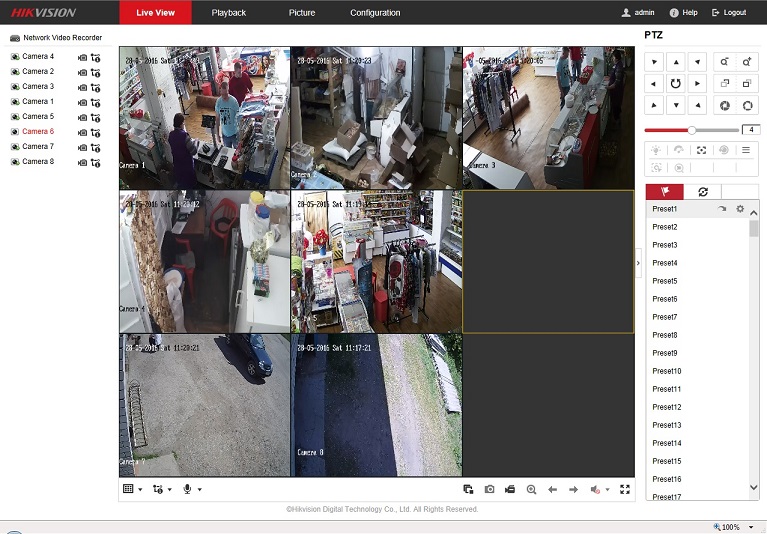
Today in simple language, “clean on the fingers,” - about organizing remote access to the DVR via the Internet. Here at the beginning of the page is a screenshot from the screen of my computer, viewing a video recorder installed at a remote site and connected to the Internet. The image is intentionally roughened to avoid recognition and reading of network parameters. In fact, its quality is not at all different from the real signal entering the DVR. Unless, of course, you specifically coarse the resolution to eliminate “brakes” when transmitting over the Network.
Modern customers are increasingly asking to organize viewing of their recorder via the Internet - this is convenient, you can control the situation at the site from anywhere in the world where there is Internet. You can view it from a mobile phone - this is more for prestige - he pulled out his iPhone and showed off the image of his yard, garage and garden with a swimming pool. Well, if you have something to pull out and boast about. Although, sometimes it can be useful - for example, the same GSM alarm sent you an alarm message, you open the view and discern some movement where there should not be any. It’s not about the size of the image - you need to call the police.
First, a little about network security. By organizing external access to the DVR, you dramatically increase the vulnerability of your entire local network. This is not just about outsiders viewing your video information. The DVR is a computer running Windows control(in the case of a PC video recorder) or various degrees of truncated Linux (in the case of the so-called non-PC platform or, more simply, a separate piece of hardware). Therefore, an attacker, having penetrated the DVR through open ports, can, in addition to full access to your video archives, upload malicious code into it and, in some cases, cause very serious losses:
- if the DVR is part of a local network (LAN) of an enterprise, it can begin an attack on other computers on the network, stealing codes bank cards, passwords, organizing access to accounting, etc.;
- the DVR and other hacked local network devices can be used by attackers as bots that send spam or participate in DOS attacks;
- completely different computing tasks can be launched on the DVR due to a decrease in its performance in terms of performing its main functions.
There are known cases when programs for cheating bitcoins were stuffed into DVRs. The recorder's processor is not at all suitable for such calculations; it chokes, slows down video surveillance, and gets hot. In general, it’s a complete mess.
Okay, let's assume that everyone was scared and impressed. Therefore, about methods of protection. In fact, there aren't that many of them. Ideally, it would be advisable not to include the DVR as part of the LAN, although, of course, this is unlikely. You can give it a static address and block access from this address to all other LAN devices. But the most important thing is change default passwords and logins if possible.
The standard factory set for DVRs is the admin login and passwords: “admin”, “12345”, “4321”, “123456”, or even an empty password. True, after many cases of hacking, finally one of the large manufacturers— Hikvision. Now, when you turn it on for the first time, the recorder requires you to set a complex password with large and small letters and numbers of at least 8 characters in length. Simple passwords like 1111111 are not allowed to be entered.
Your local network connects to the Internet through a network router called a router. There, too, by default there is another mess: continuous “login-password” pairs like “admin-admin” and “admin-empty”. If you want to manage the router from the Internet, change the admin password. Just please keep it safe. And save the router configuration on disk, and duplicate it so as not to reset the settings if something happens.
Here specific example network carelessness. Recently I was organizing access to a client DVR from the Internet, I made a mistake by 1 digit in entering the address and saw this menu:
Well, it’s clear, I entered there under “admin-empty”. Please admire - some small store, judging by the IP address, in the city of Slavgorod. I’ve blurred out the IP address here, but here’s the picture, maybe the owners will suddenly see it and close the gate to their garden for everyone they come across.
Okay, now to the main topic. First, you need to obtain a “white address” or, in official language, a “static IP address” from your Internet provider. You don't have to do anything special, they'll just tell you your address and write it down somewhere. Now any network user, typing this address in a browser window, will be taken to a router connecting your local network with the outside world. He can't get any further yet; the router won't let him in.
Update from 06/07/2017
There are ways to view a remote DVR or video camera over the Internet without using a static white address. About some of them - in the chapters about And .
Now let’s look at the settings using the example of a Hikvision recorder and a DSL-2650u router, working in a small shop in a village 120 km from Barnaul - the router has a very simple menu, everything is very clear. So we have:
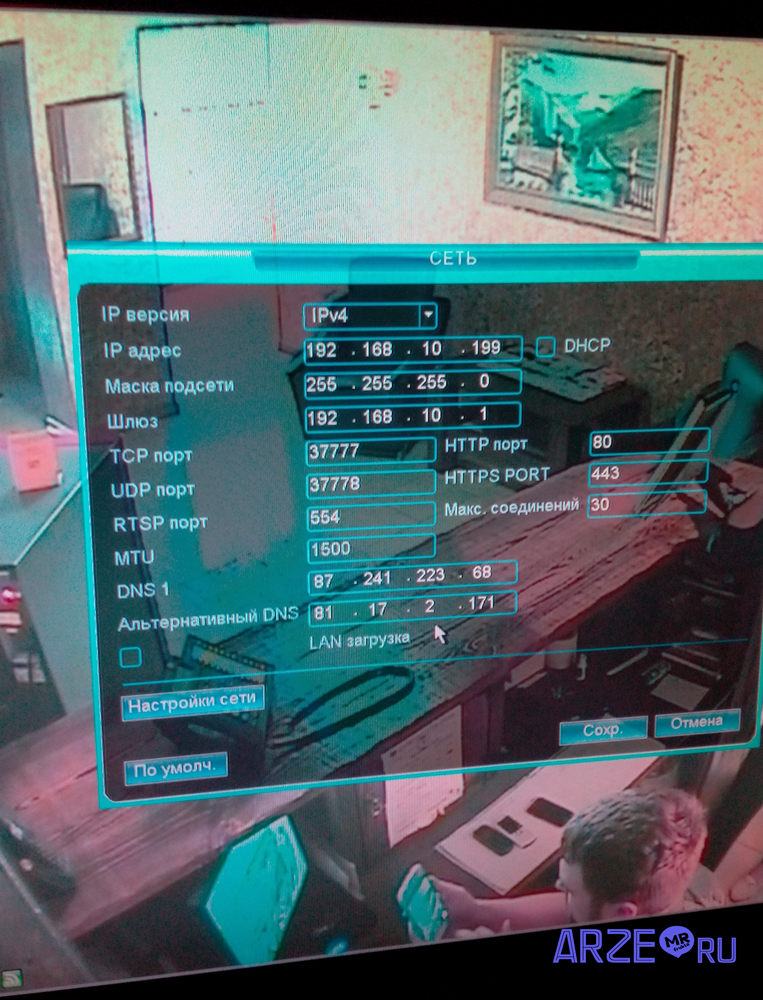
- A router connected to the Internet with an external IP address, say 22.33.144.155, to which our registrar is attached via the local network. Internal (local) IP address of the router: 192.168.1.1, default password admin, login admin. The router has DHCP mode enabled, i.e. it distributes addresses to devices on the local network (dynamic IP addresses).
- The DVR connected to the router has a static address of 192.168.1.169, we want to keep it static rather than getting it from the router.
Here is the DVR network settings menu (sub-item “TCP/IP”):
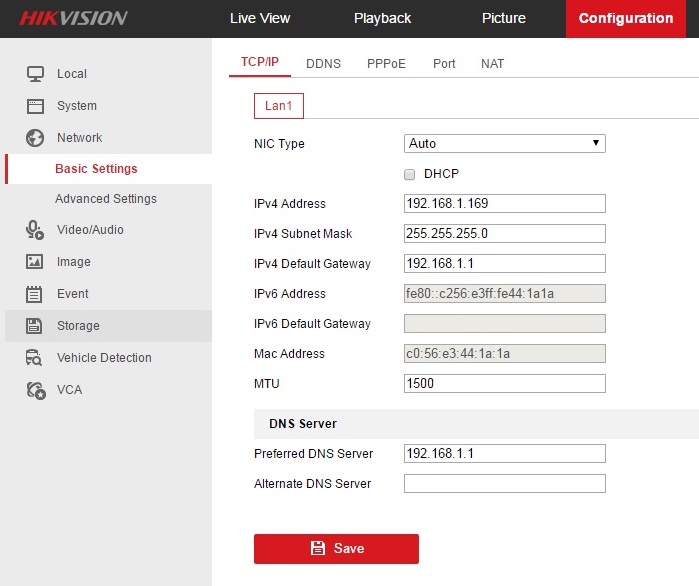
The DHCP checkbox on the registrar is disabled, i.e. it will not set itself the address offered by the router. IPv4 Address is our static address, the subnet mask suits us in this case - we don’t change it, Default Gatevay is an Internet gateway (in our case, the address of the router on the registrar’s side), Preferred DNS is also the address of the router (in some cases, DNS distributed by the provider, this needs to be clarified). We don't touch the rest. Now we go to the Ports sub-item there:
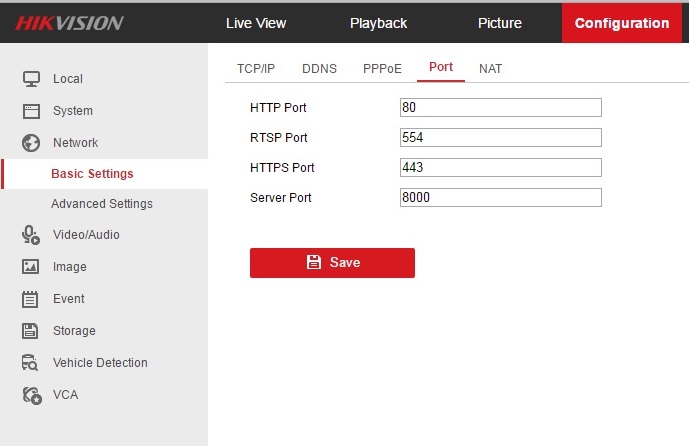
Here we are primarily interested in the server port: the default value is 8000, I did not change it, there are no other devices on the LAN, and it will not interfere with anyone. Can be changed to any value from 2000 to 8000.
That's it, now let's go configure the router.
We connect from a laptop or computer to the router by typing its local address 192.168.1.1 We enter the default password (admin-empty). Well, here's something like this:
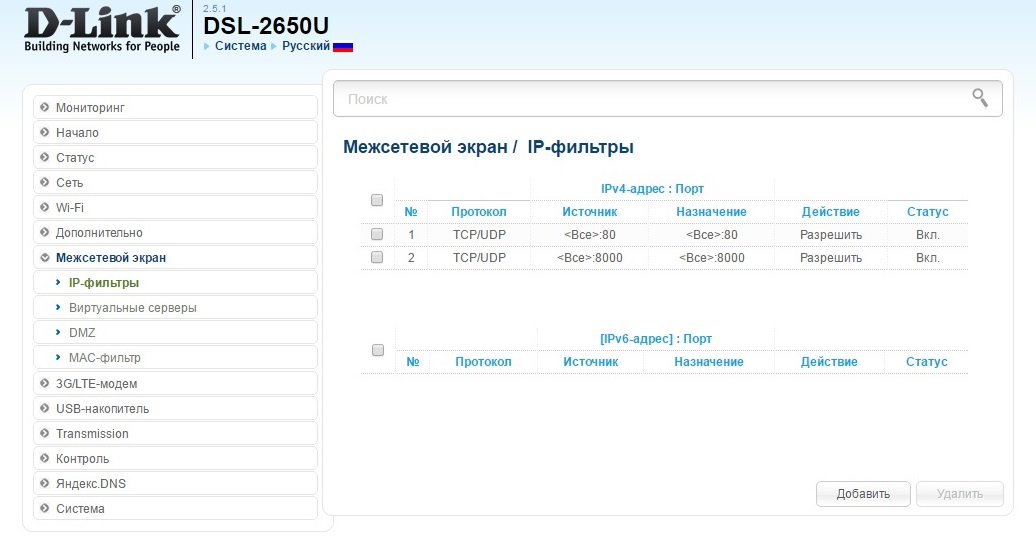
The router is already connected to the Internet, we do not get into the network part of its settings. Directly to the firewall. Sub-item “IP filters”. Our task is to teach the router to pass data between the local network where the DVR is located and the Internet.
Add filters with values:
Protocol: TCP/UDP,
ports: 8000 in both sources and destinations,
action: "allow"
status "on".
Those. we allowed data to be sent back and forth through the router using the TCP and UDP protocols. I also pushed port 80 here, this is for working through the web interface via HTTP.

Here we presented our DVR as 2 virtual servers, each with an address of 192.168.1.169, but different ports: 80 and 8000. Servers are added with the “add” button.
Now, when you access port 8000 of our router from the network, it will redirect you to the DVR (virtual server) with open port 8000 and address 192.168.1.169. And he will ask you to enter a password. This is why the DVR password must be strong.
Now additional network settings of the router:
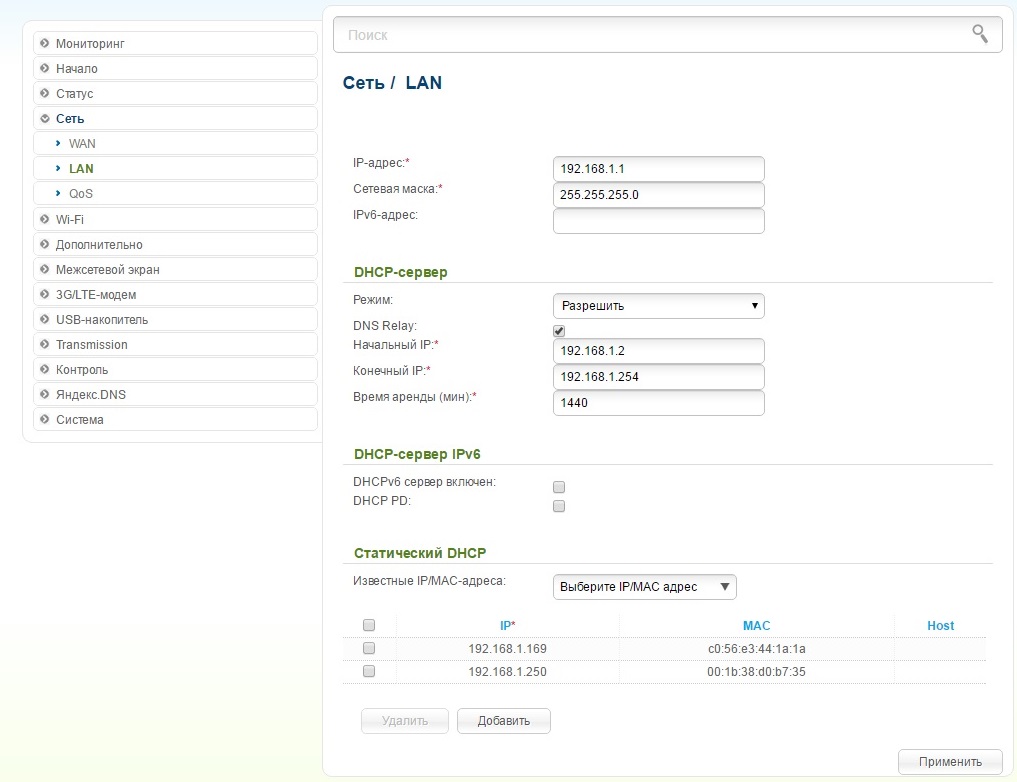
The IP address at the top is the default. Next are the DHCP settings. “Allow” mode, i.e. It will distribute addresses to everyone, DNS relay is enabled, since the local DNS address is registered in the router. The zone of IP addresses that DHCP distributes to neighbors on the LAN: 192.168.1.2 - 192.168.1.254. We do not touch the remaining settings.
Another interesting point - we left a static IP for the registrar - there is a static IP below. We click “select IP/MAC address”, select the devices we need and register them below with the “add” button. There he is at address 169, the registrar, and at address 250 is my laptop: I was too lazy to transfer it from the static address, I registered it that way. Now the router will not impose its DHCP services on these addresses, but will accept these devices with the specified addresses. Moreover, if we replace the devices with others with the same IP, the router will not play with them - the MAC address is different, and it is assigned at the factory. Just like that.
In general, from the point of view of the router, we allowed two virtual servers with the address 192.168.1.169 to transmit and receive information to/from the Internet via allowed ports 80 and 8000 using the TCP and UDP protocols.
Everything started right away. Previously, we agreed that the provider gave us a static address 22.33.144.155 (I checked - there are no stores at this address). If you log in via Internet Explorer (IE), then in the address bar you need to type: http://22.33.144.155:80/ This is the choice of a device with an open port 80, located on a local network, fenced off from the Internet by a router with an IP address of 22.33.144.155.
If you connect using the iVMS-4200 or iVMS-4500 program (version for mobile devices), then the port must be selected 8000. That, in fact, is all the wisdom.
Here it is, our store:
There is such Internet in the village - I couldn’t wait for one of the cameras to cut through, so I took a screenshot. Well, what to take from him if telephone line via an ADSL modem, but with rural lines. Well, okay, this is no longer for me. And I’m probably done for today.
Okay, write, comment, subscription form is at the bottom of the page.
Yes, by the way, I also organized remote access to the router itself via other ports. And all these screenshots were taken remotely from home. So once again, take network security very seriously. It's time to get used to the idea that the Network is a single cyberspace, and an attacker has absolutely no idea where to break you from - from next door, from Moscow or the Republic of Zimbabwe. But the result is the same: the minimum is a headache for the system’s performance, the maximum is financial damage proportional to your carelessness.
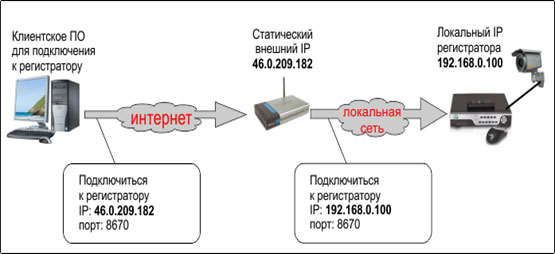
Let's look at an example settings for remote access to the DVR via the Internet using a router (router).
It all looks schematically in the following way: The client program on a remote computer reaches the router via an external IP address; The router, in turn, redirects us to a local IP address on a given external port, in our case to the DVR, to a specific port of the DVR.
To do this you need:
Local network settings on the DVR.
Go to the DVR interface -> Select "Local network settings" different models DVRs, of course, have a different interface, but the operating principles and settings are the same for all DVRs

- Register the Gateway (This is the local IP of your router) 192.168.0.1
- set the local IP address of the registrar (in the same subnet as the router’s IP, the main thing is that it differs from the IP of other devices on the local network) 192.168.0.100
- DNS server (same as router IP) 192.168.0.1
- Leave the subnet mask at 255.255.255.0
- Port1 is for the client program (you can leave it as default, you can set your own) 8670
- HTTP port - for access via IE browser (it is better to change) 8080
- Port 2 - for mobile applications
Forwarding ports on the router router
In this review, I’m looking at port forwarding on the D-Link DIR 300 router. If you use a different model of router, its interface will most likely be different from mine, but the principle of the settings is again the same. If difficulties arise, just quickly type “port forwarding on the router (YOUR ROUTER MODEL)” into the search engine.
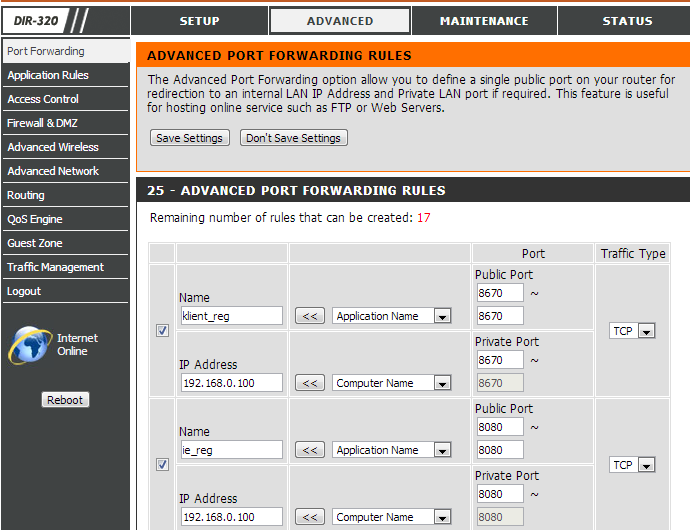
- Go to the admin panel of the router -> Select ADVANCED -> Port Forvarding from the menu
- We create a new rule here for the external port;
- 8670-8670
- Name of the rule - let it be client-reg;
- 192.168.0.10 (IP of our reg);
- what port to redirect to 8670 (Port for client program interface)
- Let's specify one more rule for the Web interface of the Internet Explorer browser
- Specify the range of external ports 8080-8080 (from which ports to redirect);
- Name of the rule - let it be ie-reg;
- Which local ip to redirect to? 192.168.0.10 (IP of our reg);
- what port to redirect to 8080 (Port for Internet Explorer interface)
Be sure to check the created rules and save the settings.
Setting up a "client program for remote access to the recorder".

- Launch the client program -> select the settings menu
- Creating a new group of devices
- Add a new device to this group
- Registrar name
- IP address (The IP address that was given to you by your provider) 46.0.209.182
- Port 8670
- number of cameras
- login
- password
- Save the settings.
This completes all settings. We return to the main window of the client program and connect to the newly created registrar.
AND Important point: If your computer from which you want to connect to the recorder is on the same local network as the DVR, that is, you are currently connected to the same router, then you will not be able to access the DVR using an external IP. Login to the DVR via external IP You can only do it remotely, but not by being connected to the same router at the same time. To connect to the registrar while being on the same local network, you need to go to the local ip of this registrar: 192.168.0.100.
Possibilities remote work with the DVR through the client program are quite extensive: viewing video, recording video, viewing the archive, as well as managing all settings on the DVR.
You can also connect to the DVR via Internet Explorer browser . In this case, in the address bar of the browser, enter the external IP address of the DVR and, through a colon, the port for the web interface: 46.0.209.182:8080 . To access the recorder through a browser, you need to configure Internet Explorer: In the “Tools” menu, select the “Internet Options” option. Go to the "Security" tab, click the "Other..." button (section "Security level for this zone"). Scroll down the scroll bar, find “ActiveX controls and connection modules” and set all parameters to the “Enabled” position (if the “Enabled” position additionally has the label “unsafe”, then the parameter must be checked “Suggest”). Apply new settings. After changing the settings and using the IP address of the registrar, the browser should prompt you to install the ActiveX plugin. We install. Now everything should work.
In this review, we used the interface of the LiteView LVDR-0404-0003 brand DVR and the client program that came with it.