Devices for cutting circles with a jigsaw. How and with what to cut out curves and circles
- Hand tool
- Jigsaw
- Preparing the stencil
- Sawing process technology
- Defects in work
Wood carving with a jigsaw is rapidly gaining popularity: many people want to purchase an interesting decorative item to decorate their home, furniture, and even clothes! Carved objects of various thicknesses fit organically into any interior style; people often purchase photo frames for photographs with ornaments, cut-out words and letters, or order intricate shelves and others interesting products. Few people know that artistic sawing using a plywood jigsaw is a task accessible to anyone, even the untrained and inexperienced. You just need to understand how to work with the tool.
What is a jigsaw: general description
A jigsaw is a tool designed for cutting various contours from plywood, including curved ones. It is equipped with a blade with fine teeth that can make an even cut of plywood without the formation of significant burrs.
Hand tool
The ancestor of this type of tool is a manual jigsaw. It consists of a metal arc in the shape of the letter “U”, between the ends of which a sawing blade is stretched and attached to clamps. They securely hold the file during operation and allow you to adjust its tension. On one side of the frame there is a handle.

The clamps on the tool can rotate, creating different planes for sawing, thereby providing the opportunity for wood carving of varying complexity.
When cutting from plywood with a hand jigsaw you have to be careful: its design is quite fragile; during intensive work, the blade often breaks from force and heat, so it has to be replaced. To do this, each master must have several dozen spare files.

When working with a jigsaw to carve internal contours, it is convenient to use such an auxiliary board as in the photo: it will help both protect the table and solve the problem of convenient placement of the workpiece.

Jigsaw
The tool operates from an electrical network. It is a housing in which the working mechanisms are located, and there is also a handle for control on it. The sawing organ is located in the lower front part. The blade is often protected by a foot, which allows you to cut the contour exactly along the line without deviation. Advanced and professional jigsaw models have various attachments that facilitate the cutting process and straighten the edges of plywood.

Blades can have different teeth in shape and size. It is necessary to select saw blades that are appropriate for the material being processed so that damage and damage to the plywood sheet does not occur during operation of the mechanism.
Classification of jigsaws by power and application:

The instructions on how to use a jigsaw, or the technical data sheet, should describe the main parameters of the tool that must be taken into account when using the mechanism.
Wood carving tools
Sawing with a jigsaw is a creative process, but it requires preparation and additional equipment. What you will need for work:

Preparing the stencil
Drawings for cutting with a jigsaw can be different sizes, depending on the scale of the product being manufactured. To create a diagram of a shelf, a piece of furniture or a composite three-dimensional toy, you can take a large sheet of whatman paper A1 or A0; wallpaper left over after renovation will also work; for small figures, use regular A4 paper or another suitable format.

Using a bright pencil or marker, draw the outline of the future product on the surface, following the dimensions. This could be an element for assembling furniture, a shelf or another large product.

There are such a wide variety of templates for cutting with a jigsaw that it can be difficult to choose the right one. It is much easier to come up with your own cutting patterns and transfer them to paper.

Transferring an image to the surface of plywood or boards
Before you start cutting with a jigsaw, you need to transfer the image from the stencil to a wooden or plywood blank. To do this, cut out a shape from a sheet, apply it to the surface of the plywood and carefully trace it. It is desirable that the line be smooth and accurate. We use a simple pencil so that, if necessary, we can correct the line by erasing it with an eraser.
We apply the outline from the back side so that finished product no remnants of the lines were visible. The internal area can be shaded so as not to cut off excess and to mark untouchable areas.
It is important to transfer the design in such a way as to minimize cutting along the grain with a jigsaw - it is so difficult to get an even line.
Sawing process technology
Many people have probably heard how to use a jigsaw. Working with the tool will not cause difficulties if you prepare for it correctly.

Plywood carving begins with the inner contours of the design. To do this, you need to make slots for inserting the tool blade:
- The plywood is often taken thin, and when cutting a large contour there will be no problems, but tension may arise in a small remainder. Sawing with a jigsaw inside can damage the product - chips, burrs, cuts;
- It’s easier to work this way: you always have something to hold the workpiece by. A large sheet is much easier to handle than trying to hold a small sawn piece while shaping its interior.
How to saw with a jigsaw:

Working with a jigsaw is much easier than using a hand tool; there is no need for physical effort and the process is underway faster.
How to saw with a jigsaw:

As you can see, there is nothing complicated in this process.
Defects in work
If you did not follow the technology or hold the tool incorrectly, the saw may simply move off the line. Why does a jigsaw cut crookedly:
- tilted the tool while working;
- the tension of the file has weakened;
- With an electric saw, the fastening of the saw may become loose.
To avoid such problems, before starting sawing, be sure to check the tension of the saw and the fastening of all working elements. If the blade is beveled and stuck, it is better to start over and make a line parallel to the defective one.

A little about safety
Safety precautions when working with a jigsaw for cutting plywood and wood are simple:
- Use protective equipment - glasses, gloves, gown. These things will protect you from dust and small chips.
- Sawing with a hand jigsaw should be done carefully so as not to damage your fingers with the file. Maintain a distance between your body and the tool.
- If you are a beginner, carefully read the instructions on how to use a jigsaw and the main characteristics of the tool. This information will help avoid accidental injury and unit breakdown.
Wood carving with a jigsaw requires care and attention. Both your health and the integrity of the finished product depend on these qualities.
What can be made from plywood: interesting ideas and drawings
Sawing wood with a jigsaw or hand tools is a creative process. You can create many decorative items different directions:

Drawings of plywood crafts do not have to be made in exact dimensions. Even taking an example from the Internet and changing its proportions, you will get a unique product that no one else has in this form.
DIY plywood crafts can be painted or left in a natural color; you can glue buttons, beads, ribbons and other decor onto them to liven up the product. To do this, it is worth involving children in the work; their imagination is a bottomless well of interesting ideas.

We offer you diagrams with photos for cutting out of plywood with a jigsaw.
You can think of yourself what can be cut using a hand or electric tool, make your own sketch and transfer it to paper, then to a piece of wood or plywood.
Carving plywood with a jigsaw requires certain knowledge and skills. If you don't have them, consider the following rules:

A jigsaw is a very useful power tool. Using the right file, a little experience and confidence, and most importantly - correct position body, you can do everything with it. You can do many things that cannot be done with other instruments. The machine is used for cutting straight lines, curves, profiles and circle trimming. Great for cutting wood, metal and plastic.
The master showed how to cut a perfect circle with a jigsaw. He made a device out of wood. Its design is simple, and the device itself is easy to manufacture. To get an idea of this, see this image.
Material used:
12 mm plywood sheet. Wooden strip. Nails.
How to do
First of all, measure the size of the jigsaw machine's base plate. The next step is to cut the plywood sheet into an L shape as shown in the image.

After cutting a sheet of plywood into exact size the next step is to cut a strip of wood to attach this sheet with nails. This strip is used to hold the jigsaw in its position.

Make sure that there should not be any type of opening between the strip and the base plate of the jigsaw.
The next step is to drill small holes on the sheet. The distance between these holes is, for example, 1° cm. These holes are used for cutting circles of different diameters.

After that I painted it so that it looked good. It is now ready to be used to cut a perfect clamp circle.

Advantages:
It's very easy to do.
Easy to use.
Less costs.
Used for cutting round discs various diameters.
For better understanding, watch the video below.
Plywood (and to a lesser extent other sheet materials such as chipboard or oriented strand board) has significant decorative potential. If there is enough simple tool and certain skills, you can cut almost anything out of plywood.
But in order for the parts obtained as a result of such carving to look quite presentable, the master should have a few tricks in stock. We will talk about them in our article. 
Getting started with sheet materials, many craftsmen only have an idea of how to cut in a straight line. Therefore, the question of how to cut an even circle from plywood can confuse many. And indeed, ordinary or circular saw can't cope with the task.
Figure sawing Most often done using the following tools: 
- The simplest device used for sawing. With the help of a jigsaw, even the most delicate work can be done with your own hands, but for thick material or long cuts it is practically not suitable.
- Jigsaws. There are two types of devices you can use here:
- regular, with a vertical file;
- artistic, in which the role of the cutting element is performed by a steel blade.
Regular jigsaws will come in handy when working with thick ones. But if you are looking for a way to cut letters from plywood or make other complex elements (for example, parts children's construction set), then it is best to use a model with a band saw.
Advice! Naturally, for each type of jigsaw there are several types of files and blades. Right choice cutting element is a necessary condition High Quality products.
- In addition to jigsaws, you can use a furniture router for curved cutting. Despite how difficult it is to operate, it is many times superior to most models of plywood saws in terms of the quality of the holes it makes. Using a router you can.
Also, do not forget about available devices, but we will talk about their use in the appropriate section.
Cutting from plywood has several nuances that the master needs to take into account:
- Firstly, you can only cut on dry material. High humidity leads to an increase in the resistance of plywood, therefore, with excessive force, either the veneer will begin to delaminate or the file will break.
- Change the saw or cutting blade it is necessary immediately after the first signs that the teeth have become dull appear.
- If we are cutting from plywood using a jigsaw, then to obtain cleaner edges, the main cutting lines should be placed along the grain of the veneer. But with hand files it is easier to work across the grain: there will be slightly more chips, but there is less risk of the file getting pinched or moving away from the intended line.

Advice! When transferring designs for cutting from plywood onto the workpiece, try to place the template in such a way that the elements to be removed fall on areas with defects: knots, chips, stains, etc.
Shape cutting technologies
Jigsaw
As we noted above, a jigsaw will come in handy if we are looking for how to cut a word out of plywood or make other parts of complex shapes:
- We transfer pre-printed drawings or templates onto the workpiece using carbon paper.

- If the structure has through sections, we make starting holes with a thin drill.
- Insert a file or jigsaw blade into the hole. Secure the free end of the file with a fastening screw or clamp.
- We make a cut along the intended line, pressing the workpiece to the workbench. The saw moves either automatically (for electric jigsaws) or manually.
After all the arc elements have been sawn, we remove unnecessary areas and process finished part file or sandpaper. 
Fraser
A furniture router is great for cutting out thick plywood. Of course, you can’t make a complex shape with it, but cutting an arc or circle is easy:
- We fix the standard ruler included in the router in the center of the circle using a self-tapping screw.
- If the length of the ruler is not enough, you can assemble a simple bracket from metal profile or wooden planks.
- By rotating the cutter along a fixed radius, we select a groove along the circumference, resulting in an almost perfect hole.

Note! When calculating the diameter of the circle, you should take into account the dimensions of the working cutter. The instructions for the device will tell you the exact numbers.
In this way, you can cut not only circles, but also individual arcs - for example, in order to make grooves for furniture brackets.
Using improvised means
For curly elements desirable to have special devices, but to do about round hole in a laminated veneer slab can be needed by any craftsman. Below we will tell you how to cut a circle from plywood when you have nothing at hand.
Well, almost nothing:
- Used for cutting plywood wooden plank with two nails.
- One nail is driven through the strip into the workpiece, exactly in the center of the hole being made.
- We drive the second nail into the bar so that the point protrudes on the wrong side by at least 5-10 mm. The distance from the first nail should be equal to the radius of the hole being made.
- Rotating the bar, use the tip to draw a groove on the plywood, deepening it with each turn.
- Instead of a stick, you can use a strong cord. The operating principle remains unchanged.

The sharper the nail used, the faster the hole will be made.
It should be noted that although the price of such a device is low, it is worth using it only when other methods are not available: the edges still turn out to be far from ideal.
Similar materials


Often, when repairing or installing various wooden products You need to drill a perfectly round hole. In this article we will try to highlight all the ways in which such a hole can be cut. Options with the use of special tools, as well as without them, will be considered.
How to cut plywood
A hacksaw with a very narrow blade, a jigsaw, a drill saw and a round file are those hand tools, which can be used to cut along a curve.
It is the narrow blade that provides maneuverability to the hacksaw, but for the same reason it is extremely difficult to operate. You must have a steady hand and an attentive eye to prevent deviations from the markings. However, do not try to work quickly. On the contrary, it is better to advance in small spurts. This will help you hold the saw handle more confidently and guide it exactly along the given line.
It is better to cut out small round or oval holes and “narrow” curves using special tools - a drill saw and a round file, which can also be used to clean out curves.
However, the most suitable tool for cutting rounded parts and holes is an electric hacksaw. Its advantage is not only that it saves energy and time. The included set of interchangeable blades with different teeth allows you to choose a blade for sawing almost any type of workpiece, be it wood, plywood or particle board. In other words, an electric hacksaw can rightfully be called a universal tool.
Round corners of furniture
You can even get injured by hitting a sharp corner of the table. Therefore, we recommend cutting corners where possible. U homemade furniture they need to be rounded off from the very beginning.
Cutting circles and curved lines is no more difficult than making an absolutely straight cut on a workpiece, but under one condition: in your hands the right tool and you are good at it.
Mark missing parts
It may happen that the holes that you drilled to insert a narrow blade of a hand or electric hacksaw will end up on useful areas To avoid such errors, you should mark all missing parts of the workpiece with shading.
What is suitable for the template
You can make a circle on a workpiece not only with a compass. Any object of a similar shape is suitable for this purpose. This could be a pan, plate, cup or bowl. However, when starting work related to the repair of furniture or some piece of furniture, calculate in advance the need for parts with rounded contours or with round holes. It may be enough to make only minor changes to the design.
Instead of a compass
A school compass can also be useful in a home workshop, but its range of action is small. What if you need to draw a circle of large diameter?
An easy way is to do this with string, a nail and a pencil. The nail is carefully driven into the workpiece, the rope is secured to it at one end, and a pin is secured to the other end. The length of the rope determines the radius of the circle being drawn. The only condition is that the rope must be taut along the entire path of the pencil. Then the distance from the center (nail) to the circle in all sections of the marking will be the same.
Strip of cardboard or slats
No less simple, but more reliable way- use a strip of cardboard or, even better, a wooden plank instead of a rope. Drill two holes in this bar (strip) - one, smaller, for a nail, the other, larger, for a pencil. The distance between their tips should correspond to the radius of the desired circle. All that remains is to install the nail in the right place and rotate the bar around its axis.

Two sharpened nails and a wooden strip or a strip of thick cardboard can replace a compass.
How to draw ellipses
An ellipse is a rather complex shape, but to draw it on paper, you only need two thumbtacks, a piece of string and a sharpened pencil.
Attach two buttons to the surface of the workpiece at some distance from each other. Take a piece of rope, tie both ends into a knot and hook the rope onto the button heads. Now use a pencil to draw a line that allows you to describe taut rope. You can change the shape of the ellipse at your discretion.

The distance between the two focal points of the ellipse is indicated by buttons. If you guide a pencil within the boundaries assigned to it by a rope, then the outline of an ellipse will appear on the paper.

The ellipse shape can be larger or smaller, thicker or narrower, depending on the distance between the buttons and the length of the rope.
Templates
Shot glasses, cups, plates, pots or baking dishes - in any household there are many round-shaped objects that can be used to mark a circle. If you are making something and decide to give your product a rounded shape, then first look to see if there is a suitable template among the household utensils. To be sure, select a few items and take them to the workshop. There you can immediately try them on the workpiece and determine what is most suitable. With some practice, you will be able to make rounded lines from several round objects with different radii. Arcs of a circle can be drawn sequentially, or bridges-transitions can be made between individual arcs.
Preliminary drawing
Before attempting to draw a curve on a piece, design it on a large piece of paper or piece corrugated cardboard. Only after the result is satisfactory in all respects can you cut out a template from paper and make markings on it on the workpiece.

You can draw circles and fragments of a circle using a cup or plate by simply tracing them with a pencil.
Inserting a sink according to a template
Washing is one of the essential elements kitchen equipment. If you decide to cut your sink into your kitchen worktop yourself, the first thing you need to do is prepare an exact template.
First on dense sheet paper, transfer the outer contour of the sink. Next, measure the width of its sides, which will rest on the tabletop. Usually this is 2-3 cm. Now step back from the outline drawn on the paper, inward to the width of the side and draw parallel line. This will be the cutting line.
When applying markings, make sure that the position of the template itself on the plate is correct. Of course, if all the corners of the sink are symmetrical, then nothing bad will happen if, according to the markings, it appears to be in a mirror image. But if the sink has the shape of a trapezoid and the roundings at the front corners differ from the roundings at the back, then under no circumstances confuse the front and back parts.
Using a similar pattern, make templates and cut out holes for the devices. wall lighting or for loudspeaker mounted on wooden panels.

The line drawn around the sink is auxiliary. The second, drawn parallel closer to the center, is the sawing line.
Electric hacksaw
If you need to cut a round-shaped part and saw a round hole in the workpiece, then an electric hacksaw is the most suitable tool. With its help, you will save effort and time, since such a saw has great advantages over a manual one. Thus, the blade of the electric hacksaw is narrower, which provides increased maneuverability. Further, it has replaceable blades with different teeth, which allows you to process workpieces of any type, that is, wood, plywood, chipboard (it is no coincidence that the tool is also called a jigsaw).
To cut a section inside the workpiece, a hole is first drilled for a hand saw. But if you have an electric hacksaw, then this is not necessary. The tool is brought to the workpiece with a slight tilt forward and turned on in this position. The saw will cut the hole itself. Just don’t put too much pressure on the body - this can lead to breakage of the saw blade.

Lead in a circle
This device, simple in design, makes cutting out round holes or arcs much easier. It is enough to mark the center of the circle on the workpiece, fasten the device along the mark and connect the rod coming from it with an electric hacksaw. The divisions on the rod help set the saw blade at the required distance from the center of the circle. As a result, without preliminary marking, you can cut a circle or saw an arc with a radius of 5 to 20 cm.
The device (more precisely, its “sole”) is attached to the surface of the workpiece with screws. They should be well tightened. If the fastening is not rigid and starts to wobble, then an even circle will not work.
Suitable for lefties too
Left-handers can also use the device, since the guide rod is attached to the movable unit both on the left and on the right. So cut at your own discretion - clockwise or counterclockwise.

Using such a device, you can cut a round hole with a diameter of 10 to 40 cm in the workpiece without preliminary marking.
Jigsaw
When cutting holes or curves in small workpieces, sometimes you can’t do without a jigsaw. Replaceable blades with teeth of different shapes and locations allow you to work with wood of different densities. However, it should be taken into account that the depth of the cut is limited by the arc of the jigsaw, that is, the saw blade will not be able to move further than 30 cm from the edge of the workpiece.
Very thin, narrow saw blades can be easily damaged if the jigsaw is used incorrectly. The saw must be operated with careful, methodical movements. The main thing is to prevent the canvas from skewing. Otherwise, small and light workpieces will begin to move with the saw, which may ultimately lead to the blade bursting.

The thinnest jigsaw blade will “master” the narrowest curve, but only in small workpieces, since the advancement of the blade is limited by the arc of the jigsaw.
Drill saw
Neither a hand saw nor an electric hacksaw will help if you need to cut a small hole in the workpiece - less than 10 cm in diameter. A jigsaw may also be useless if the workpiece is large. In this case, the most suitable tool is a drill saw. With its tip it bites into the wood like a drill and thus makes a “starting” hole for further cutting. Externally, the saw is similar to a round file with the difference that its shaft is surrounded by a spiral around the cutting edge.
Drill saws are available with interchangeable attachments of various diameters, designed for processing both soft and hard wood, as well as a variety of materials made from it.

The working body of a drill saw is a metal rod with a cutting tip, like a gimlet, and a cutting edge that goes around the rod in a spiral.

This is what the narrowest one looks like hand saws. Thanks to the fastening unit, the blades in the hacksaw can be changed depending on the nature of the material being processed.
Drill attachment
One of the most popular and convenient options The hole is cut using a special attachment on the drill. It is made in the form of a crown comb and has a rounded shape. With this attachment, cutting holes occurs quickly, and they turn out quite smooth.

drill bit for holes
There are nozzles different diameters, which allows you to cut a hole of the required diameter. If you have already prepared a hole, we can advise you to try your hand at options trading.
Drill
Cut big hole You can also use a drill. To do this, it is necessary to pre-mark the outline of the hole to be drilled. Next, use a small drill to drill along the contour prepared in advance, through holes. Next, using a jigsaw or a very sharp knife, we cut off the holes, thereby connecting the holes. After which you can smooth the circle using sandpaper of various grain sizes.
Chisel
You can also cut the required hole using a chisel. It is enough to remove the wood layer by layer along the contour. This option is the least suitable for interior decoration. The hole must be smooth, which cannot be achieved by using improvised and unsuitable materials for the job. The best option will be using a bit on a drill. The hole is even and has smooth edges.
Thus, to summarize, it becomes clear that you need to choose a tool for cutting a hole based on your goals. If you need a high-quality cut, then you cannot do without a special tool.
Let's look at what stencils for wood carving are, how they can be used and what they are. Today this ancient craft fascinates many, but it is a rather complex and painstaking task that requires not only talent, but also artistic skills. If everything necessary for this task has been acquired and you know how to work with each of the tools, then determine the drawing.
Stencil pattern for applying a design to wood
But it is not always possible to choose and draw the one you need. In this case, purchase stencils for wood carving, which help the novice craftsman do everything correctly.
Let's look at what a stencil is. This is a device that helps to apply a pattern or identical symbols to a surface. For example, they occupy a special place in this niche, since they are produced specifically so that the master can perform complex work intended for external walls.
Stencils for carving wood with a jigsaw exist for the following interior items:
- pilaster;
- towels;
- brackets;
- and etc.
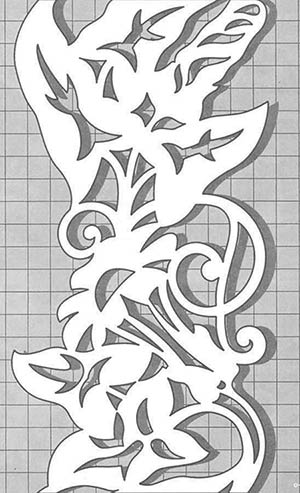 Stencil with complex pattern for carving
 These are specialized templates; it is from them that three-dimensional ornaments and patterns are created. They make the task of change much easier appearance interior After all, you don’t have to look for a stencil, but you can simply download it or order it through worldwide network. And then create your masterpiece.
How to choose and where to find a stencil
Exists a large number of various patterns for: from simple ornaments to an animal, bird, person or a whole picture. When making a choice, you must remember the following rules: 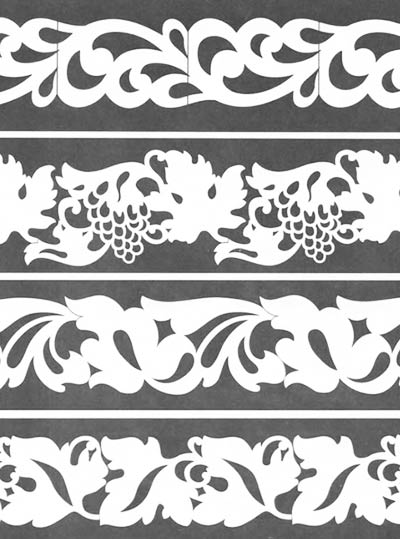
- if they are holding it in their hands for the first time, they do not purchase a template for an old painting or engraving, since it is quite difficult to work on it and the source material can be ruined;
- There are stencils for a certain type of carving;
- In order to complete the work accurately, all lines are transferred accurately to the source material.
 Stylish stencil ornament for carving
 And nowadays it is available through digital libraries, which publish complete editions. Therefore, you can look into these rare publications and “take inspiration” from there. An artist, decorator, designer or woodcarver will appreciate such a source of information, as it makes it possible to understand and feel not only the past era, but also the spirit of that time. After all, it was then that everything was produced by hand, and objects were decorated with fancy patterns.
Before choosing a design, compare the dimensions of the workpiece and the image. For a correct and good reading, you must remember the following points:
- if the product is large, then do not choose openwork or small ornaments;
- Large drawings are not suitable for small ones;
- proportions must be observed.
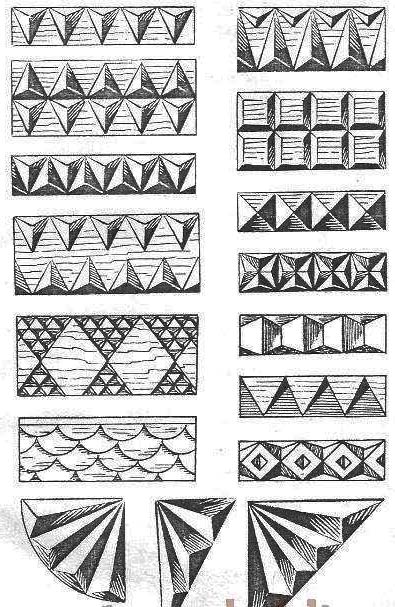 A selection of various geometric patterns for carving
 All this concerns not only the floral pattern, but also the image of an animal, bird and ethnic ornament.