Crafts from 1.5 liter bottles. We make it ourselves: crafts from plastic bottles for the garden and home (23 photos)
Many summer residents use a variety of available materials to decorate their plots, one of the most simple options is the production of various jewelry from plastic bottles. The use of this option has a lot of advantages: low cost and availability of the material, ease of operation and the ability to make a wide variety of crafts. You don't need to have any special skills or use a special tool, everything is very, very simple.
What do you need for work?
As you know, plastic bottles are often simply thrown away, however, the material can be given a second life, especially since very little is needed:
| Bottles | Products of a wide variety of colors and sizes are suitable for work - from small to large. In some cases, the color of the products matters, but if desired, you can use any materials |
| Scissors and sharp knife | Almost any work involves a lot of cutting; sometimes it is more convenient to use scissors, but sometimes a knife is better. It all depends primarily on what is more convenient for you to work with. |
| Rigid wire or metal rods | These materials are needed when creating products that are additionally reinforced with a frame to impart reliability and resistance to deformation. It is important to choose the optimal elasticity option so that it can ensure sufficient stability of the frame |
| Paint for plastic | Any composition that fits well on plastic will do. The choice of colors depends on what color scheme you have chosen for future designs. The most commonly used compositions are acrylic base, their price is low, but the quality is quite high |
Important!
Remember that all products will be located outdoors and will be exposed to many adverse influences: sun, high humidity, temperature changes and so on.
That is why it is necessary to use weather-resistant compounds that can maintain color and structure for at least several years.

Main Use Cases
As noted above, you can make the most various crafts from plastic bottles for the garden. It is important to choose an option that you like and that will organically fit into the decor of your site.
Palm trees
A very popular option due to the fairly simple workflow and excellent result ultimately. The most important thing is that, having learned how to make palm trees, you can easily make any other tree, since the principle of operation is exactly the same.
Let's consider the manufacturing technology step by step:
- To work you need a knife or scissors, wire or metal rod to make the frame and the bottles themselves. It is best to use green products for leaves, and brown for the body. As a last resort, the trunk can be painted, but it is still better to make the branches initially green.
- First, brown bottles are cut in half and teeth are cut along the top edge as shown in the photo. It is worth considering that for work you will need quite a large number of blanks, so take care of the necessary supply in advance so that the work does not stop halfway.

- Next, take a strong pin with a diameter of 5-8 mm, you can use reinforcement, or you can use any other metal element suitable for height. It is worth considering that part of the element will go into the ground, for reliable fixation, for large crafts It may even be necessary to concrete the base in order to provide the necessary stability.
- Next, the workpieces are strung on a pin, after which corner elements are bent to give the trunk even more naturalness and resemblance to a real tree. Of course, you don’t have to make folds, but with them similar crafts from plastic bottles for a summer residence they look much more interesting.

Important!
Be sure to remove labels from bottles in advance, as they can ruin the appearance of the finished product.
Sometimes they come off easily, but if they are difficult to remove, you can place the products in hot water for a few seconds - then the process will be much easier and faster.
- Next, green products are taken, first of all, the bottom is cut off, after which the petals of future branches are cut. They can have a wide variety of configurations - from straight to figuredly carved. Everything again depends on your desires and preferences; your imagination is not limited to anything.

- Next, the finished leaves are strung on pins, after which they can be bent to make them even more naturalistic.. Lastly, all the elements are connected to each other, the easiest way to do this is by welding, but if you don’t have the equipment, you can use special clamping clamps, which are sold in all construction fastener stores.

Flowerbeds
Compact flower bed:
- You can take any container as a base, the main thing is to choose optimal size, a barrel cut in half, a stack will do car tires or anything else.
- Next, the base is installed in the right place and a cement-sand mortar is prepared in a ratio of 1 part cement to 2 parts sand. Water is added until the consistency of thick sour cream is obtained.
- Next, take bottles, and you can use both plastic and glass products. The walls of the container are coated with a thick layer of solution, after which the necks of the bottles are stuck into it. The rows are arranged in a checkerboard pattern; you can use variations of different colors to create a pattern or ornament.

- After the solution hardens (after 1-2 days), the container can be filled, the bottom layer is gravel or crushed stone, it will serve as drainage, and the top layer fertile soil, in which flowers will be planted. The solution, which is visible from above, can be decorated with any available material.
Compositions from bottoms
The instructions for making such a composition are quite simple:
- Take half bottles, they can be of a wide variety of colors, this allows you to create the most unusual compositions.
- A hill of soil is poured, and the halves are stuck into it, depending on the shape of the slide and the color of the elements, you can create any flower beds.

Design of flower beds and beds
You don’t have to make full-fledged crafts from bottles for your garden, but use them as a decorative element, which, among other things, also has a practical function, which we will consider below:
- You can take products of the same color, or you can use any options, but later they will have to be painted to improve the appearance of the composition. The most important thing is that the size and shape of the bottles are approximately the same.
- Next, you need to cut off the necks approximately at the point where the narrowing begins, after which the resulting containers are filled with white sand or black soil– this will give them rigidity and simplify installation.
- Filled blanks are dug in around the perimeter of flower beds or beds; this design will help give the summer cottage originality. In addition, such improvised fences prevent soil from spilling onto the paths - they can be sprinkled with gravel to further improve the appearance of the garden.

Flowerpots
Another very attractive option is a flowerpot; such crafts from plastic bottles for the garden are very easy to work with, but the result is excellent.
There are several options:
- The simplest solution is to cut off the top of the bottle(then you will get a straight pot) or its bottom (then you will get a cone-shaped one). Naturally, it is best to use large containers; almost any plant can fit in them. Products can be decorated with paints, pebbles or shells - it all depends on your imagination.
- You can cut off the side of the bottles and make hanging planters, in this way you can decorate any wall. This option allows you to decorate nondescript surfaces.

- From large containers you can make flowerpots in the shape of various animals or birds, this option is somewhat more difficult to implement, but the result is much more interesting and attractive.

Other options
Do-it-yourself country crafts from plastic bottles do not always have big size, these can be very tiny decorative elements.
There are a huge number of options, and we will look at just a few of them:
- From the bottoms, which often remain during the work process, you can make various figurines of animals or fairy-tale characters. In this case, coloring is also required in order to achieve maximum similarity.

- Using a grid with large cells, you can create flower arrangement . You can do it even simpler: just create flowers, in which the middle will be the bottom of the bottle, and the petals will be the cut elements. The final result depends on how the plastic is cut.

- If necessary, you can even decorate a fence with bottles– such a fence will last for many years and will perfectly fulfill its intended purpose – protection from the penetration of animals. (See also article.)

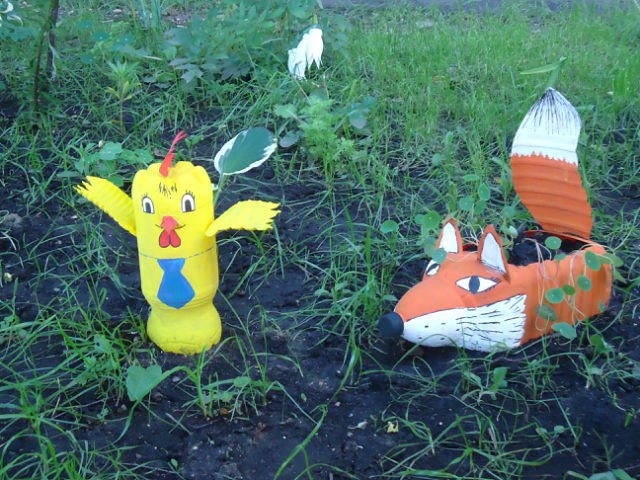
- You can do this: simply decorate the products in the form of fairy-tale characters and place them in the garden or vegetable garden. Children really like these figures, and in just a few hours you can create a whole fairy-tale world.

Using traffic jams
During the work process, very often a large number of caps remain, which can also be used to make quite interesting products and compositions:
- Corks are great for creating bright and elegant garden curtains. The process of their manufacture is extremely simple: each cap is punched using an awl or a screwdriver with a thin drill, after which all the elements are strung on a fishing line or cord.

- Another fun option is to create paintings from caps.. You can make any composition; the more elements are used, the more colorful the picture will be.

Conclusion
You shouldn’t throw away plastic containers, because with their help you can make your summer cottage unique almost free of charge. The video in this article will clearly show some of the manufacturing options being considered.


IN Everyday life There are many things that can become excellent materials for creativity. If you have a pile of unused plastic bottles, don’t rush to throw them away. With their help, you can create amazingly beautiful things that will become a wonderful element of home decor, decoration of a cottage or yard. DIY crafts made from plastic bottles will help you have a fun time; small children will especially enjoy this activity. See below for master classes with photos that will show you step by step the creation of such original things.
Step-by-step instructions for making crafts from plastic bottles
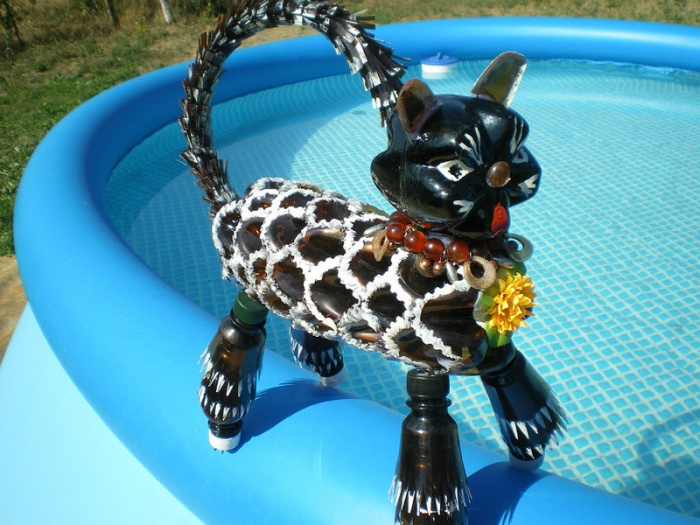
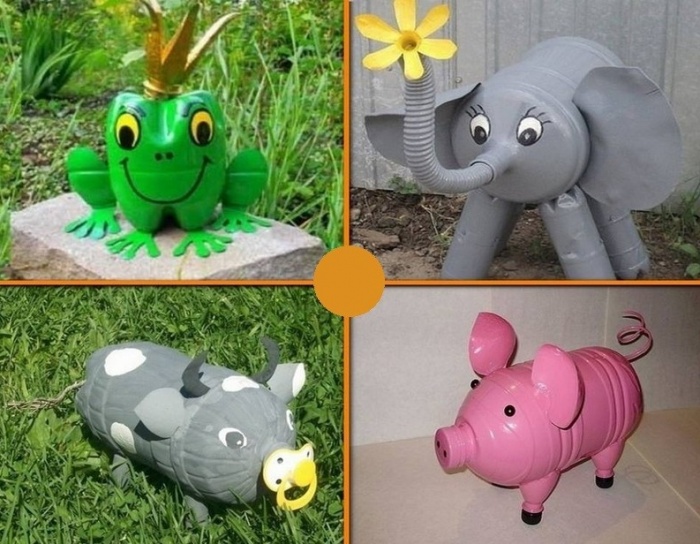
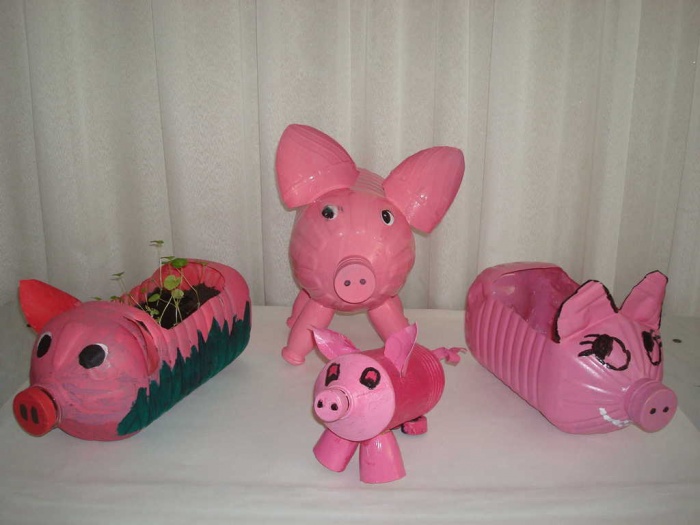
It's amazing how many products you can create using ordinary plastic bottles. Together with your child, you can make fairy-tale characters - Cheburashka, Crocodile Gena, Winnie the Pooh, Piglet, and the Frog Princess. The figurines of birds look original - storks, wood grouse, pigeons, swans. Crafts from domestic animals and wild animals, such as a cat, a dog, a parrot, a penguin, a donkey, a squirrel, and a pig, look great.
You can place these things in the kitchen or in the nursery, or decorate the yard outside. Not only decorative, but also functional crafts can be used to decorate your home. For example, a beautiful plastic vase will be useful for storing bouquets - dry or live, and you can plant them in an original pot houseplants. For your summer cottage, you can make figurines of animals and plants, cars, rockets, and a lake made of bottles will surprise guests at home and become a true work of art. Read on to learn how to make crafts from plastic bottles with your own hands.
Original palm tree for a summer residence
Plastic bottles are an unusual and a budget option, which will help summer residents decorate their plots. The original exterior will definitely be appreciated by loved ones who come to visit and neighbors. A stylish tall palm tree looks beautiful, for which you will need ordinary brown and green containers. What materials are needed to make a southern tree:
- bottles (brown, green);
- a metal sheet;
- cable (take high voltage, 12-14 mm);
- scissors;
- rods (at least 25 cm), tubes (2 cm in diameter) and bushings (metal).
How to do:
- Remove labels from bottles. Take the green ones and start making leaves: to do this, use scissors to divide them in half. Cut thin strips along the surface (to the point where the container narrows). String the finished leaves onto the cable. For one tree you will need seven such elements.
- For the trunk, take brown bottles and cut them lengthwise into six pieces to create wide stripes. Also string it onto the cable.
- How to make a base: weld rods under a sheet of metal different angles. Place tubes on them. Attach bushings to the end of the rod so that you can thread the green containers through them.
- Assemble the trunk on the rod: to do this, place the brown blanks on top of each other, lowering the neck down. Pull the cable through the grommets, securing the leaves on top.
- After assembly, bury the structure in the ground, but no more than half a meter.
How to make an original palm tree, watch the video:
Beautiful baby elephant made from plastic bottles for kindergarten
The child who goes to kindergarten, rejoices environment: beautiful places for games, new toys. Crafts made with plastic bottles can be a wonderful decoration for the interior of a kindergarten or street. If you want to surprise the kids, make a beautiful baby elephant. What materials will you need to create an interesting decoration:
- two bottles (six liter);
- two-liter containers (six pieces);
- half-meter corrugated pipe (small diameter);
- acrylic paints in gray (or blue), white, black, red shades;
- thick wire fifty-five cm;
- sand;
- glue for plastic;
- scissors.

How to do:
- Cut two-liter bottles in half, the bottom parts will be the elephant's legs.
- Make ears from six-liter material. In the second large capacity cut holes to secure them.
- Bend the wire - this will be the shape of a trunk. Place a pipe on it.
- Color all elements gray or blue. Connect, gluing the legs to the body (after pouring a little sand there), and the hose to the hole of the large bottle that serves as the elephant’s body. Insert your ears into the holes.
- Paint the eyes with black and white paint and the mouth with red acrylic.
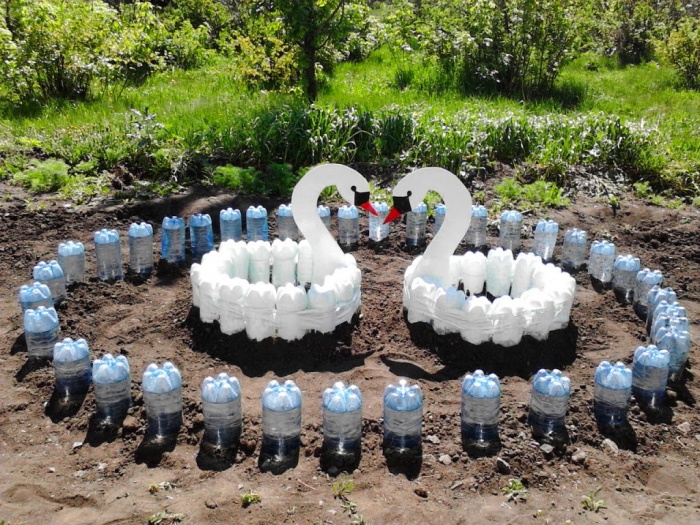
How to make a swan to decorate a playground
A beautiful swan will be a wonderful decoration for a children's playground or your own summer cottage. This bird, which is made using plastic bottles, looks beautiful and original. Children will definitely love this figurine, which serves decorative element. What materials will you need to create a beautiful white swan:
- one bottle per five liters;
- rigid wire hose;
- milk bottles;
- marker;
- candle;
- wire;
- scissors;
- dye.

How to do:
- Mark cut lines on the large bottle. Carefully remove the top, but leave the neck - this is the body of the bird.
- Insert a hose with a wire through the throat - this is the swan’s neck.
- Cut off the bottoms and necks of the milk plastic elements. Cut out feathers from them. Decorate their edges with fringe. Light it a little with a candle. Collect two feathers with wire. Glue to the body.
- Cut off the bottom of small bottles, put it on the hose, forming a neck. The swan's head will come from the top of the white container. Make holes in it and the hose on both sides, fasten with wire material. Close the lid.
- Take the cap from chemicals. Cut in half. Insert the cap into the lid. Glue it to your head.
- Color the beak, draw the eyes.
Master class on making a Christmas tree for the New Year
A New Year tree is a tree that is traditionally purchased before a major holiday. But if there are a lot of green plastic bottles left at home, there is nothing difficult in making a budget-friendly original version on one's own. In addition, such a tree does not fall off its needles and can stand for a long time. What materials will be needed to make wood:
- six bottles (two-liter);
- scissors;
- wooden base (half a meter);
- paint, brush;
- plasticine;
- pot.

How to make:
- Cut from bottles bottom part. Cut the top lengthwise into eight strips, using scissors to form their sharp corners. Do this carefully.
- Using scissors, run along the petal until it curls.
- Secure the base in a pot on plasticine. Place bottle blanks on it. Use scissors to trim off any excess plastic from the top petals to give the tree its shape.
- Paint the tree green.
Cat pot made from a plastic bottle for indoor plants

A beautiful cat vase will become great decoration room interior. You can use this element to store various small items or plant beautiful plants there. Cacti, ivy, and succulents look good in such a pot. Small children will love making this original cat. What tools are needed to create an interesting decoration:
- one and a half or half liter bottle;
- acrylic white paint;
- markers;
- scissors.

How to make:
- Cut off the bottom third of the container. Form ears, removing excess.
- Paint the outside and inside with acrylic paint.
- Draw the cat's eyes, ears, and mouth using the template.
- Plant it in a pot favorite plant. If you want, make the planter hanging by cutting symmetrical holes on four sides.
How to make a peacock with your own hands
The beautiful peacock is a bird that symbolizes happiness, fulfillment of desires and nobility. Such a figurine, placed on summer cottage, will bring good luck to its owner. A peacock requires painstaking and serious work, so it will take a lot of free time to make it. What materials are used when creating a wonderful bird:
- a lot of plastic bottles different color and size;
- stand;
- synthetic foam;
- glue gun;
- abrasive mesh;
- colored paper;
- scissors.

How to create a craft:
- Remove the necks and bottoms from the bottles. From the main part of the containers, cut out many feathers of different sizes - from small to huge. Trim the edges with fringe.
- Sort the pieces by size.
- Make a bird figurine using polystyrene foam. Attach to stand.
- Cut out the beak (use the red bottle).
- Decorate the bird's chest with small multi-colored plastic parts. Gradually cover the foam as you get closer to the tail, using feathers bigger size.
- Alternate colors to make the peacock look bright.
- For the tuft, make several plastic strips with a fringe at the end.
- To decorate the bird's head, take small oval, round pieces of plastic. Make eyes from a brown bottle.
- Cut the abrasive mesh into the shape of wings. Attach feathers to it - move from small to large.
- Make the tail also using a mesh.
- Complete the ends of the feathers with paper parts: cut out circles of different colors and sizes. First glue a large oval, a smaller one on it, and place a very small element inside.
- Connect all the parts with glue.
Watch the video for more details:
Children will absolutely love creating a beautiful craft - a butterfly. An easy master class will help even the little ones create an original figurine. The craft can serve as an element of interior design or as part of a painting. You can make many butterflies of different shapes to decorate your children's room. What materials will you need for this master class:
- paints;
- marker;
- plastic bottle;
- scissors.

How to make a craft:
- Cut a cylinder from the flat part of the bottle. Cut in half.
- Draw a butterfly on the resulting convex plate.
- Cut it out.
- Fold the wings so that they take on a natural shape.
- Color as desired.
For more details on how to create a craft, watch the video:
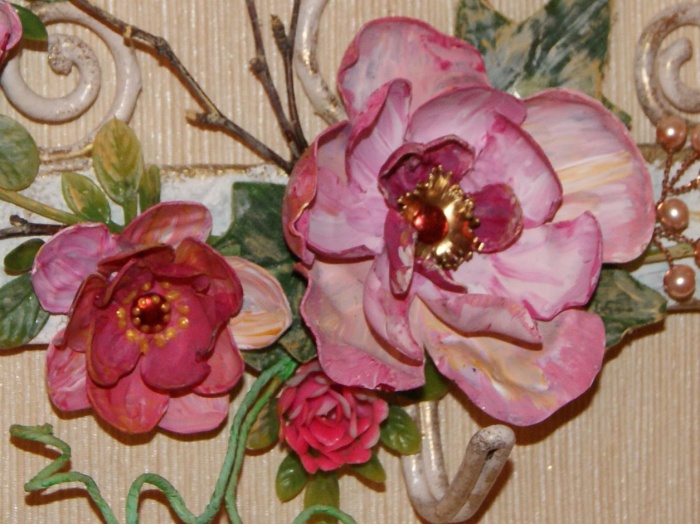
Decorative flowers
Decorative flowers will be a wonderful decoration for your home. You can create sunflowers, daisies, roses, and other plants. An easy master class with photographs will help you easily make original decoration. Decorate boxes, baskets, shelves with it or make an unusual picture. What elements will be needed to make an original craft:
- bottle;
- lighter;
- scissors;
- marker.

How to create a craft:
- Draw flowers on the surface of the plastic container with a marker. Cut it out.
- Bend the petals so that they look in one direction. Burn them to get a beautiful shape.
- Make several. Connect them by placing them on top of each other using glue, wire, or heat. Decorate the center with beads or a plastic flower.
Bright flower beds for the garden and vegetable garden
A flower bed using plastic containers is easy to create. This material will help you create a budget-friendly and beautiful design for garden plants, fencing them off from the lawn. The craft will not take much time, and the result will delight you with its originality and beauty. What materials will be needed to make a simple flower bed for garden plants:
- a lot of plastic containers(plain or colored);
- paint (if desired);
- sand/earth.

How to do:
- Clean the bottles.
- Fill them with sand or soil (full or half).
- Create a flowerbed fence by firmly digging containers into the ground with the neck down. It is important that they fit snugly against each other.
- If desired, paint the finished fence.
See the video for options for such flower beds:
Video tutorials on making crafts from plastic bottles for beginners
It can be difficult for beginning needlewomen to create original craft based on pictures alone. To do this, experienced professionals remove for free interesting videos, where they describe step by step the stages of creating a particular figurine. Illustrative examples will help you repeat all the actions of the presenter and make beautiful things using plastic bottles. In the following master classes you will learn how to make a hedgehog, a rag doll, daisy flowers, an autumn bird feeder, a crocodile, mushrooms, and how to decorate a dacha with corks. Watch interesting videos from detailed description all actions:
How to decorate your dacha with plastic bottle caps
Photo ideas for DIY crafts from plastic bottles
When creating crafts, it is important to get ideas that will help you make truly interesting and beautiful things. Many people make unusual products with plastic bottles, and then take pictures of them with a camera. A variety of decorations for your home, yard or cottage, made by craftsmen, will help you choose your own option or come up with something new. See many photos of crafts made from plastic bottles.
From seemingly unnecessary things you can sometimes create very interesting and useful items allowing you to decorate the world, and sometimes, in addition, it’s also a good idea to save money. Ordinary plastic bottles periodically appear in every home. Every housewife gets rid of them from time to time so as not to clutter the apartment. And in vain!
The life of plastic bottles doesn't have to end in the trash. We invite you to learn how to give them a second life, which will be much brighter and more diverse than the previous one! DIY crafts made from plastic bottles can not only please kids or decorate your home, but also save nature.
Plastic bottles - available material, the scope of which can be significantly expanded if desired. Not only adults, but also children can join in the exciting creative process. Unite all family members behind a common cause!
Many people are aware of the deplorable situation with the ecology of our planet. Treatment facilities and there is a catastrophic shortage of processing plants. But plastic products can decompose from 450 to 1000 years! However, only about 90% of them are not recycled at all.
Every self-respecting person is obliged to maintain cleanliness and not litter. And avid gardeners and handicraft housewives approach this issue competently. For them, plastic bottles are not trash at all, but very multifunctional item, which served as the basis for the hobby.

Craftsmen, by creating beautiful birds and exotic palm trees, thereby take care of the environment. In addition, the main advantages of plastic products are that they are strong and durable. To people who have never done anything like this, it may seem that it is impossible to create a true masterpiece from such waste material. Today we will prove that this is not so!
To make crafts from plastic bottles for beginners, you just need to collect as many colorful containers of different sizes as possible, and then it’s up to your imagination!
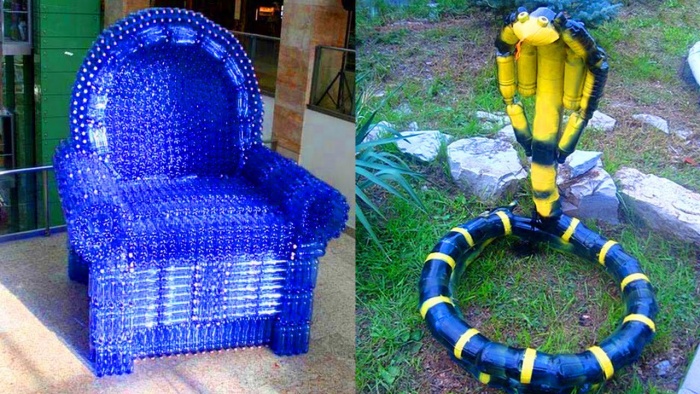
From such simple material I can do it unusual decor for an apartment, decoration for a playground, figurines of birds and insects, flowers, vases and even furniture! The creation process is easy and fun!
So where to start?
Plastic birds - decoration for home and garden
If you have the desire and some free time, you can try to make decorative birds from plastic bottles with your own hands. They look very impressive and harmonious on a well-groomed lawn, among flowers in a flower bed, or simply under a bush or tree near the house.
Snow white domestic swan
First, we want to tell you how to make a swan from plastic bottles. To create it you will need:
- plastic bottle 5 l;
- a lot of milk or kefir bottles of 300 ml;
- hose;
- hard wire;
- scissors;
- black marker;
- lighter;
- paints.
Stage 1. Torso.
- We mark lines on the largest bottle with a marker, as shown in the figure - along them you need to cut a hole, which will later play the role of a flowerpot.
- Stretch a stiff wire inside the hose and insert the hose into the bottle through the neck - this is the frame of the swan neck.

Stage 2. Plumage.
- From the bottle white cut off the bottom and neck.
- Cut the feathers - their shape and width can be arbitrary.
- Make small cuts on the edges of the feathers.
- From the outside, treat each feather with a lighter.
- Start stringing feathers onto the wire, 2 pieces at a time, remembering to secure them.

Stage 3. Final assembly.
- The same white bottles, only with the bottoms cut off, will serve as the bird’s neck. In our example, 16 of these were used.
- Swan head – top part containers with the neck cut off.
- In the part of the head where the hose ends and the beak begins, you need to make 2 holes in the bottle and in the hose on opposite sides and secure the structure with wire.
- Make a beak from a bottle cut and painted with red paint.
- Secure the feathers by moving from top to bottom in a circle.

All! The swan made from plastic bottles is ready! All that remains is to choose a suitable place for it and plant your favorite flowers inside.
Doves are the bearers of good news
The dove is considered a symbol of spiritual purity, and a pair of doves in the house, according to folk beliefs, promise love, prosperity and long life. We present to you a master class on making a couple of delicate white doves.
To work, prepare in advance:
- white plastic bottles;
- Styrofoam;
- scissors;
- wire;
- mesh;
- paints;
- glue;
- eyes.
The working process:
- We cut off the neck of the bottle, as shown in the picture - this is the body of the dove. We make the breast a la collar.
- We cut the plastic bottle according to the picture.
- We press the cut part inward, forming a body, and tighten it with wire.
- We cut out the bird's head from foam plastic.
- To create feathers, cut the middle part of a plastic bottle of various lengths into strips with rounded ends.
- We make two holes in each feather at the base.
- We fasten the feathers with wire to the mesh.
- We attach the finished pigeon tail to the body of the bird.
- We decorate the bird's head and glue on the eyes.

We made these cute doves from plastic bottles with our own hands!
Fabulously beautiful proud peacock
To make a firebird from plastic bottles with your own hands, you need to prepare:
- 1.5, 2 and 5 liter plastic containers;
- scissors;
- blue garbage bags;
- foil;
- scotch;
- stapler;
- fishing line;
- acrylic paints;
- brush.
Having collected all of the above around you, you can safely get down to business, guided by our instructions and your own imagination. We will proceed step by step:
Stage 1. Tail.
- Rinse thoroughly and dry all plastic container, not forgetting to remove the labels from it. Cut off the bottom and neck of the bottle, leaving only the middle part. It, in turn, should be cut into 3 oblong petals.
- We round one end of each petal like a bird's feather. We make many small cuts on both sides. Near the rounded edge we staple an oval made of blue polyethylene and a circle of foil. We do the rest of the feathers in the same way.
- From the middle part of a 5-liter bottle we cut out a semicircle, to which we attach feathers using a stapler.
- Lay out all the feathers as shown in the picture.

Stage 2. Torso and head.
- We cut off the neck of a 5-liter bottle, and the bottom of a 2-liter bottle. Using tape we fasten them together.
- We don’t throw away the cut elements - we will use them to make a peacock’s head. To do this, twist the neck of the bottle into an oblong funnel and attach it to the bottom of another bottle.
- We connect the head and body with tape.
- We cut out the bird's plumage from garbage bags, which we attach over the entire surface of the peacock's body in overlapping rows.

On a note! To increase the weight of the peacock, pour sand inside its body.
Stage 3. Final.
- The peacock's tail is attached to the body with a rope (to do this, a hole must first be made in the place of fastening).
- We attach a stick or two thick wires to the peacock’s belly so that it can then be installed at its destination.
- A peacock made from plastic bottles is ready! All that remains is to decorate his eyes and beak with paints. Make a crown for the Firebird using leftover plastic.

DIY cute plastic insects
Making crafts from plastic bottles is an easy way to make beautiful little things and decorations. This is an excellent leisure option for those who want to create something beautiful with their own hands together with their children. In addition, from waste material you can make wonderful toys or even durable teaching material for classes to familiarize yourself with the outside world.
Below are the simplest master classes using plastic bottles to create various insects.
Amazing plastic butterflies
Bright butterflies made from plastic bottles with your own hands can decorate... city apartment, and a gazebo in the country. The process of making them is very simple and exciting, and most importantly, you can connect your child to it!

The creativity kit is standard:
- plastic bottle (its color does not matter);
- scissors;
- sheet of cardboard;
- pencil;
- wire;
- acrylic paints;
- beads of different sizes.
Making a butterfly from plastic bottles step by step:
- Cut out the middle part of the bottle.
- On cardboard, draw a template for the future butterfly and cut it out.
- Trace the workpiece, placing it on the plastic, and carefully cut along the contour.
- Attach the wire to the bend line.
- Color the wings according to at will and decorate them with beads.
There are a huge variety of design options, here are some of the most interesting ones for your inspiration:

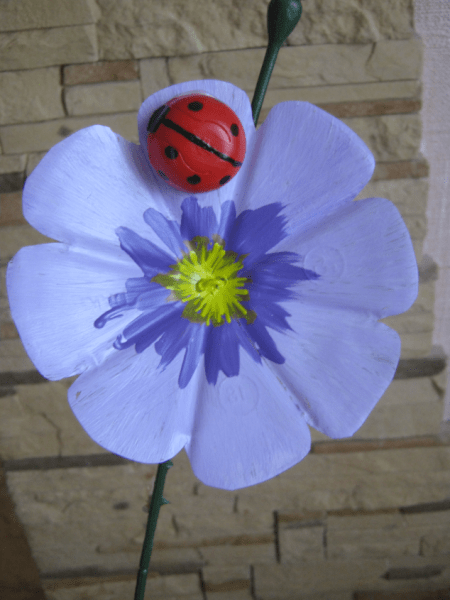
Such different ladybugs
You can create ladybugs from plastic different ways, as well as from different parts of the bottle itself. We offer you the most popular options.
Option No. 1 – Ladybug made from plastic bottles
You will need:
- 2 plastic bottles 0.5 l (black plastic) and 1 l (red plastic);
- glue or stapler;
- scissors;
- acrylic paints.
Progress:
- A liter bottle will act as the body.
- We cut out the red wings of a ladybug from a larger bottle.
- We paint black dots on the wings.
- We attach the wings to the body with plastic glue or a stapler.
- We decorate the eyes and antennae (you can also use plastic).

Option No. 2 – Ladybug made from plastic spoons
You will need:
- small plastic bottle;
- 2 plastic spoons;
- black and red acrylic paints;
- glue.
Progress:
- We paint the bottle black, and the two spoon handles red with black dots.
- Glue the cuttings to the neck of the bottle.
- We add eyes and a mouth.

Option #3 – God’s Cork Box
You will need:
- plastic bottle cap;
- paints.
Progress:
A tiny ladybug can be made from an ordinary lid, simply by decorating it accordingly. It can become both a toy for a baby and a refrigerator magnet. To do this, just attach a magnet or double-sided tape to it.

Now you know that you shouldn’t rush to throw away empty plastic bottles, because you can easily and quickly use them to make cute ladybugs with your baby.
Flowers from plastic bottles
DIY flowers made from plastic bottles not only look beautiful, but also bloom regardless of the time of year. And the ability to create beauty actually out of garbage is wonderful and noble in relation to nature. Plastic flowers will be a unique bright decoration for both your apartment and your cottage. Just imagine, the snow has just recently melted, buds are beginning to bloom on the trees, and amazing blooming daisies, lilies of the valley or roses are already adorning your flowerbed! Let's quickly master the intricacies of the process.
Delicate white daisies
To make chamomile from plastic bottles we will need:
- white, yellow and green bottles;
- scissors;
- candle;
- awl;
- heat gun;
- green hard wire.

The manufacturing process is as follows:
- From the middle part of a white bottle (for example, a kefir bottle) cut out a circle 8 cm in diameter.
- We make 3 cm cuts from the edges to the center, which visually divide the circle into 16 equal segments.
- We round each petal with scissors and process it over a candle flame.
- We pierce each corolla of the future color with an awl exactly in the center.
- To create the core of the daisy, we cut out two small circles from yellow plastic, along the edges of which we make many small cuts. They also need to be processed over a candle.
- Cut out a small triangular segment in one of these circles.
- We cut out a sepal from a green plastic bottle, which we also treat with hot air over a flame.
- We make a small hole in the center of the sepal.
- We cut the wire of the required length, which will serve as the stem of the chamomile, and put a sepal on one of its ends.
- Then we string two whisks and a yellow circle in the middle.
- We bend the end of the wire and disguise it under the middle with a cut out segment, which we glue with a heat gun.
- We cut out leaves from green plastic, the entire surface of which, with the exception of the stem, is processed over a candle.
- We attach the leaves with cuttings to the stem, twisting them around it over the flame.
This is how you can make beautiful and durable daisies quite easily!
Blooming lilies of the valley
The lilies of the valley made from plastic bottles presented in our master class are best suited for decoration. garden plot or dachas. If you don’t have white or blue containers on hand, you can always take the ones you have and paint them with acrylic paint. As for the sizes, the smaller you want to get bells from plastic bottles, the smaller the volume containers you need.

- To make the buds, we only need the top parts of the bottles with corks. From these we cut out petals of the desired shape.
- Then we bend and heat each petal over the flame to give it more volume and realism.
- To make the lily of the valley look just like the real thing, make small holes in the corks and pull them through the wire.
- To create a bush, wrap a wire around a thin spiral cut from a green plastic bottle and hold it over the fire until the plastic melts slightly.
- Hang the wire with bells on the branches of the bush.
- Cut large green lily of the valley leaves from green bottles.
Luxurious homemade roses
A bouquet of roses made with one's own hand can not only delight the eye every day standing on your desktop, but can also become a wonderful gift beloved mother or grandmother. In general, the peculiarity of making plastic flowers lies in understanding the main principle on the basis of which roses, lilies, cornflowers, and asters are created. Therefore, to consolidate the material covered on daisies and lilies of the valley, we offer you a master class on creating chic roses.

The source materials are the same, so let's move directly to the creative process:
- Using templates pre-drawn on cardboard, we cut out 7 plastic blanks (each next one is smaller than the previous one).
- In the middle of each workpiece we make a small hole with an awl.
- We melt all the petals one by one over a candle or lighter, slightly bending them upward.
- From a green plastic bottle, cut out the corolla of the sepals using a cardboard template. Similarly, we make a hole in it and melt it.
- The role of the stem will be played by a wire wrapped in a green plastic spiral cut from a bottle. The winding also needs to be slightly heated over a flame.
- We put sepals and corolla blanks on the wire, starting with the largest. We press them tightly together, and bend the end of the wire into a loop.
- Using a stencil, we cut out leaves from green plastic, which should also be slightly melted and fixed to the stem with cuttings.
All! The most beautiful rose ready! And this is what a small bouquet of roses might look like:

Plastic vases for fresh or artificial flowers
Vases made from plastic bottles - simple and beautiful crafts, in the manufacturing process of which you can even involve a child. The interior is made up of little things! By choosing a material that matches the color and texture, you can make a beautiful vase that will look appropriate in the kitchen, living room or nursery. So, if you try, you can save money, have fun and create a practical thing.

To create an incredibly beautiful vase, we only need a bottle, scissors and a little free time.
- Cut the top of the bottle approximately in the middle, leaving enough space for the fringe to weave.
- Make equal cuts from top to bottom.
- Carefully bend all the resulting strips outward.
- Turn the bottle upside down to make sure the cuts are even on all sides.
- Start folding the strips one by one, as shown in the picture.
- Continue until all the stripes are intertwined.
In addition to the vase, you can also make products from plastic bottles like flowerpots. Here are some ideas and examples of their design:


Useful plastic items for the garden
How many unique creations can be made from bottles that we throw in the trash every day.
Plastic bottles are an excellent material for creativity that cost almost nothing.
For creative self-expression at your summer cottage, you just need to collect more soda bottles, stock up on scissors, glue and paint. We tried to collect for you the most different ideas and options and master classes for creating crafts from plastic bottles step by step.
Comfortable and beautiful ottoman
To make a cool ottoman from plastic bottles with your own hands for the dacha, you will need only 16 (but more is possible) empty bottles from soda capped. Turn them upside down and secure them with tape, 2 pieces at a time. Then connect all the pairs with each other. Attach cardboard circles of the appropriate diameter with tape to the top and bottom.

Wrap an ottoman made from plastic bottles with foam to increase its comfort. Finally, sew a beautiful cover from old clothes. No one will even believe what your new piece of furniture is made of!

Broom for the hostess
Having several plastic bottles and scissors on hand, you can quickly and easily make a broom for an ownerless cutting that has been lying idle for a long time. To do this, you need to cut off the bottom of the bottle and cut the plastic into small strips, 4-5 cm short of the neck. The same should be done with two more bottles. Then cut them lengthwise, connect them and attach them to the cutting.

Such a broom made from plastic bottles, of course, is unlikely to cope with sweeping up litter on the carpet, but it can remove small debris in the yard!
Your own palm tree will be the envy of your neighbors!
Most plastic bottle trees are made using the same process. To work you will need:
- brown and green bottles;
- scissors;
- spray paint cans;
- wire.
So, how to make a palm tree from plastic bottles that will please the eye both in hot summers and snowy winters, while remaining evergreen:
- Cut off the bottoms of brown bottles with scissors.
- Harvesting a palm trunk occurs by inserting one bottle into another and so on until the required height is obtained. In this case, all the elements are strung on a wire that passes through the neck.
- The top of the tree is the neck of a green bottle without a bottom.
- Cut strips of green plastic into equal parts to imitate palm leaves.
- Don't forget to melt the cut areas if you have a curious baby who might cut himself on them.


A palm tree made from plastic bottles is not afraid of rain, snow or wind. By making at least a few of these exotic palm trees, you can greatly transform your flowerbed by introducing tropical notes into its design.
Before you start working on any product made from a PET bottle, we would like to finally give you some useful recommendations:
- To make the craft clean and neat, before starting work, thoroughly rinse the bottles under running water, dry them and remove the stickers from them.
- It is most convenient to cut out elegant details using a template. Draw a pattern onto the cardboard and place it on the plastic base, tracing it using the tip of an awl or a permanent black marker.
- The shape and volume of a plastic element can be given by holding it for some time over the flame of a candle or lighter.
- It is more convenient to paint the plastic before cutting, and at the end all that remains is to correct the nuances of painting.
- Acrylic paints are best suited for painting small crafts, and crafts intended for the garden or vegetable garden can be painted with aerosol or car paint from a spray can.
- To ensure that the finished craft from a plastic bottle retains its original appearance longer, cover it with a layer of colorless acrylic varnish.
Plastic bottles along with plastic bags have become the main source of pollution on the entire planet. To somehow combat this problem, people are developing various ideas. rational use empty container. Today, boats are made from PET bottles, greenhouses and houses are built, fences are erected and furniture is constructed.
A simpler and more accessible way for the average person to recycle plastic is to make various decorations from it. This idea is especially relevant in playgrounds or gardens, because multi-colored bottles make wonderful crafts: bright, interesting and useful.
This article will be devoted to garden decorations made from plastic bottles.
Features of plastic material
Before you start building something from plastic bottles, you need to get to know this material better and become familiar with its properties. So:

Advice! It is much easier to work with plastic bottles of the same color.
And if a large product is planned (for example, Street furniture), it is recommended to collect bottles of the same shape and size. For some small crafts, on the contrary, bottles of different shapes, colors and volumes are suitable.

What crafts can be made from plastic bottles for kindergarten?
Crafts for the garden from bottles can be very diverse: from fencing sandboxes to making fairy-tale characters, flowers or lanterns. Here, a lot depends on the imagination of the performer, as well as on the amount of collected plastic containers.
Important! In children's institutions, it is better not to use long-drying toxic dyes. Therefore, when painting plastic crafts, it is recommended to use acrylic paints on water based- they dry quickly, lay down in an even layer on the plastic, and have a bright palette of shades.
Bottle palm
You can build not only an exotic palm tree from plastic, but also any other tree - the principle of its manufacture will be almost the same. To work you will need plastic bottles, scissors and a knife, metal wire or a long wooden rod, acrylic paint(if you couldn’t find bottles of the desired shade).

The entire process of making a palm tree from plastic consists of several stages that are very easy to implement:
- Dark brown plastic bottles will be used to make a tree stem. To do this, you need to cut off the bottom of the bottles - it will not be needed in the work.
- A metal or wooden rod is inserted into the ground, imitating the frame of a palm tree trunk. The length of this frame should correspond to the desired height of the tree.
- Cut brown plastic bottles are strung onto a reinforced rod, neck up.
- When almost the entire rod is hidden behind the plastic, the last part is strung - it is better if the bottle is green and blends in with the crown of the palm tree.
- To roughen the trunk and make it even more similar to the original palm tree, you can use scissors to cut teeth on the free edges of the bottles and bend them outward a little.
- Now leaves are made from green plastic bottles. Here everyone can act at their own discretion: you can cut a plastic bottle lengthwise into four segments, leaving only the neck intact, and form carved edges of the leaves; someone uses a different method - cutting green plastic into long thin strips and collecting them into something like hanging palm leaves.
- All that remains is to fix the leaves on the trunk, and the plastic palm tree is ready. It is quite possible to supplement it with plastic coconuts or bananas.
- If transparent bottles were used for work, they must be painted with suitable paint.
Advice! Several palm trees will look more organic than a single tree. It is better to immediately make a small “oasis” of three or five palm trees of various sizes.
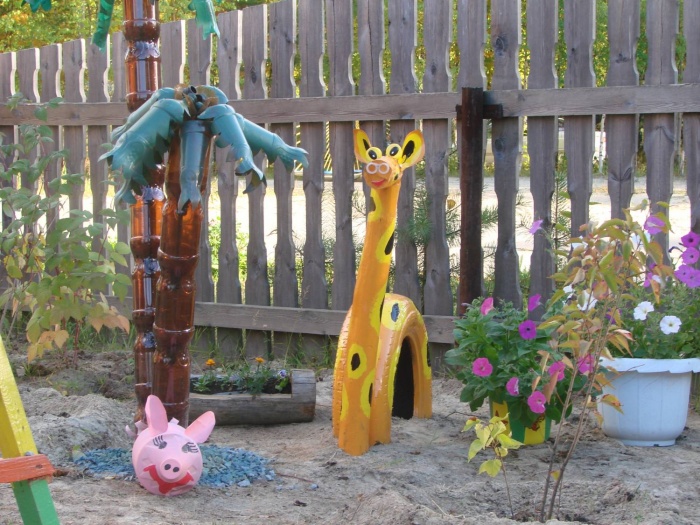
These plastic palm trees are not afraid of either rain or snow - they for a long time will decorate the playground and delight the kids (an excellent example of a palm tree is shown in the photo below).

To prevent children from getting hurt on the plastic cuts, it is recommended to melt them a little with a simple candle or match.
Plastic flower beds made from bottles
Many parents and kindergarten workers know how difficult it can be to break up beautiful flower bed. After all, children often trample on flowers, and it happens that there is simply no one to care for the plants.
But this is not a reason to leave the site without bright colors- fresh flowers can easily be replaced with artificial ones, and the easiest way to make them is from plastic bottles. To do this, it is not even necessary to cut out the petals of each flower; you can create a larger composition from plastic.
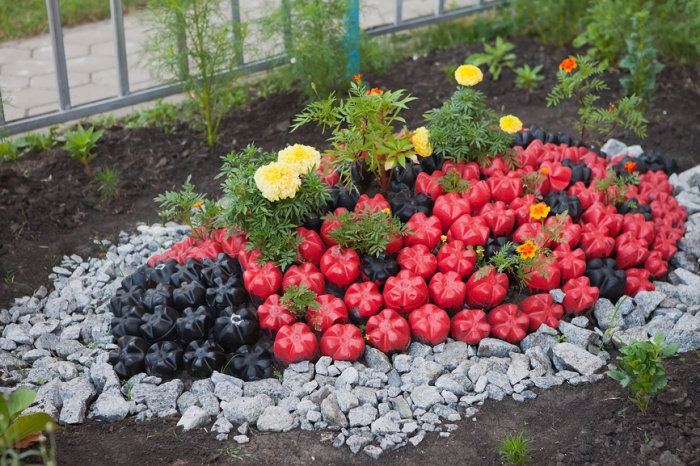
For such a flower bed you will need the bottoms of plastic bottles - they are cut off with a knife or scissors, cutting the bottle approximately in half. Now the prepared elements need to be painted in the desired color, using thick and uniform paint and a soft brush or spray paint.
When the paint dries, the halves of plastic bottles are inserted into the ground with their bottoms up - you get beautiful and bright flowers, collected in a certain composition.

Attention! To make the flowerbed organic, it is better to first draw its design on a sheet of paper. This will allow you to clearly see the result and correctly select the shades of “flowers”.
Using this simple technology, you can make plastic flower beds of unusual shapes and a variety of sizes (as in this photo).
For those who are able to do more delicate work, the method of creating elegant flowers, the details of which are cut from plastic bottles, is suitable. Such flowers can become a decoration not only on the street, they can be used to decorate a group or assembly hall.
To work you will need simple tools:
- plastic containers;
- dyes based on acrylic or latex (they are more uniform and non-toxic);
- sharp scissors;
- decor in the form of beads to create the core of the “flower”;
- strong wire for the stem and thinner wire for the stamens;
- glue gun or other reliable fast-curing glue;
- candle for melting edges and shaping plastic petals.
Petals are cut out of bottles the right size and shapes - for this it is convenient to use a cardboard template. Then they need to be heated over a candle and given to the edges and middle the required form. Now the petals are painted in the chosen color and allowed to dry thoroughly.
Collect petals from the inflorescence and secure plastic parts on a wire leg. The middle is made of wire, thick fishing line and multi-colored beads. Also, flower leaves are cut out of plastic and attached to the stem using a glue gun.
An excellent example of creating such a flower from a plastic bottle is shown in the photo below.

Bottle fencing
From plastic bottles you can create beautiful and strong fences for flower beds or sandboxes, for example. Those who have been working with plastic bottles for a long time recommend strengthening vertical structures by filling the container with ordinary sand, earth or pebbles. This way, if a child steps or falls on the fence, it will not break or become deformed.
Using the same paints, plastic bottles are given the desired shades and placed dropwise around the perimeter of a flower bed or sandbox. Fences made from several rows of painted bottles look even more beautiful - you can even create some kind of pattern inside the fence.
Mosaic of caps

The container can also be used for educational activities with the children themselves. One of these lessons could be a simple drawing made from multi-colored plastic stoppers. If the children in the group are very small, the leader can make blanks for such a mosaic by drawing circles on paper in the places where the lids should be located.
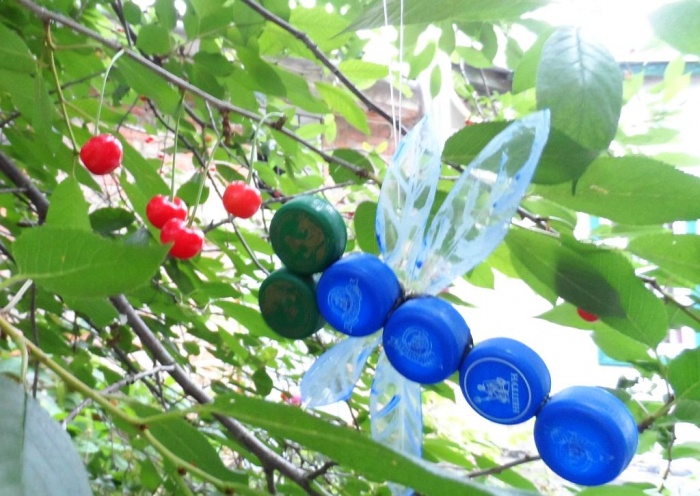
The child just has to choose the cork of the desired color and use glue to fix it on his panel.
This technique allows you to collect from plastic bottle caps and more complex patterns. Good craftsmen create from plastic caps different diameters and the shade of entire paintings on walls and fences (you can see them in the photo below).

Animal world and fairy-tale characters from a plastic bottle
Most of all, children love the heroes of fairy tales and cartoons - these characters can also be easily made from plastic bottles. You just have to be patient and put some skill into making such crafts.
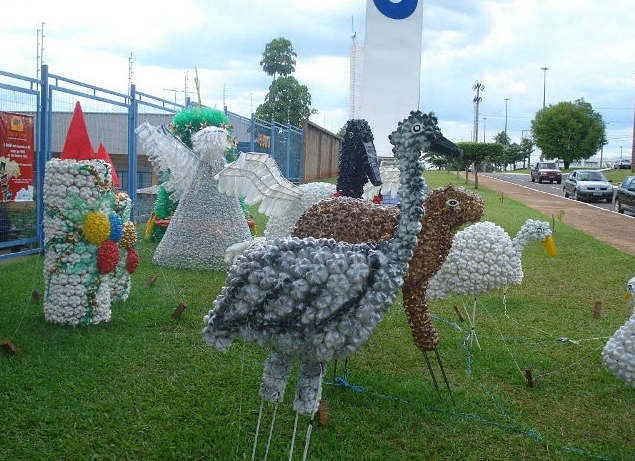
The size of the hero and its complexity depend entirely on the skill of the master. Talented performers make real masterpieces out of ordinary plastic waste. These are firebirds, flamingos, peacocks with huge tails, big wolves, foxes, owls and bunnies, small funny bugs and bright butterflies.
As a rule, in such crafts it is used metal carcass from a rod onto which plastic parts of the character’s torso, head and limbs are strung. The easiest way is to make a funny pig out of containers - you can also involve children in this process.

To create a plastic pig you will need:
- five-liter water bottle;
- five regular one and a half liter plastic bottles;
- knife or scissors;
- pink paint and brush;
- wire or something else for the pig's tail;
- beads for eyes;
- glue or a gun with silicone.
The piglet's body and head will be made from a single five-liter bottle. You need to cut off the necks of four small plastic bottles, making one side of the cut slightly lower than the other. These will be the legs of the pig, and such cuts will help to better attach them to the body.
Ears are cut out of the last plastic bottle. The easiest way is to cut them off near the neck, since in this place the plastic is already curved and has the desired shape. If you need larger ears, you can cut them out from the “body” of the bottle and shape them by heating the plastic with a match.
Now the entire structure is put together and all the plastic elements are fixed with glue. All that remains is to color the piglet in its characteristic color pink color and glue on the eyes and tail (the finished pig is shown in the photo below).
Gazebo made from plastic bottles
For those who are not afraid of difficulties and have a sufficient amount of plastic containers, the method of constructing a gazebo is suitable. This could be the most simple design of four supports and a roof or a more complex round-shaped gazebo with windows and a doorway - it all depends on the skills of the craftsman.
The main thing is that children will find it interesting and safe to play in such a house, so it is worth making it for the garden.
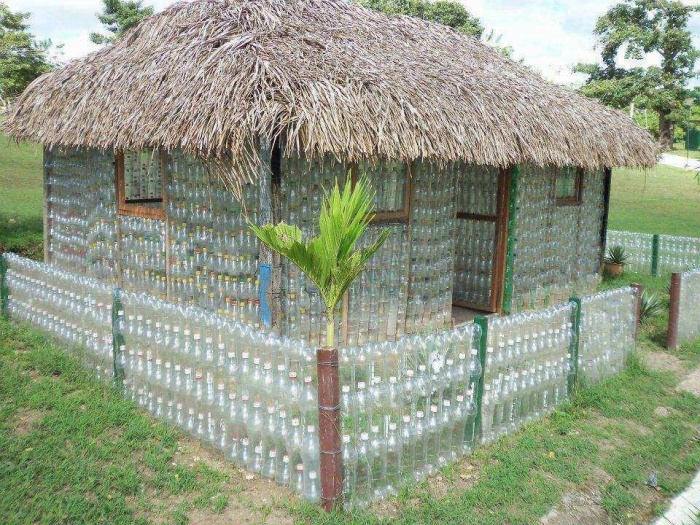
Construction made of plastic can be based on metal or wooden frame, or you can use plastic containers themselves as supports, only by first filling them with sand or earth.
The roof is covered with light material, such as ondulin or polycarbonate. Also for these purposes, you can use the bottles themselves, connected like a raft or flattened into flat petals and fixed with wire or screws.
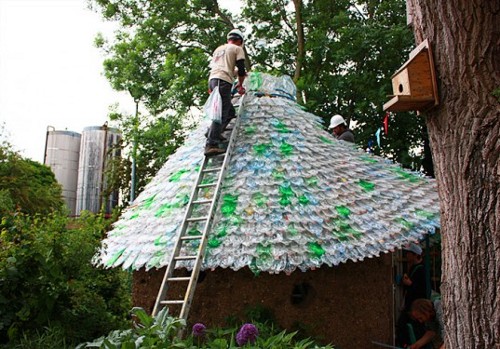
The walls are fastened with small self-tapping screws. To facilitate the process or when there is not enough “building material”, you can use waterproof fabric or bright film, the same polycarbonate, which is stretched and fixed between adjacent plastic supports.

The door and windows of the gazebo can be curtained with curtains made from corks from the same plastic bottles. You can assemble such curtains together with your children. To do this, make a small hole in each cap and string all the plugs on a thread with knots or on a long fishing line.
Very beautiful gazebos made from plastic bottles are shown in the photo in this article.
conclusions
Instead of littering the planet, you can use plastic bottles for good - decorate a playground or kindergarten group with them. Plastic is safe for babies, and it is also quite lightweight. If suddenly the structure made of this material is damaged, the children will not be harmed.

Another big advantage of this idea is that you can easily involve the students themselves in the work - collect simple crafts Even kids can make a garden out of plastic bottles.
Sometimes bottles of water or other liquid are not only a pile of useless garbage, but also interesting construction material. You just need to take a close look at it.
Masterpieces created from plastic truly impress with their diversity and originality. Most often, we throw away such things so that they do not create unnecessary trash in the room, but DIY crafts from plastic bottles are also a great way to save on expensive interior parts.
Learn to give plastic bottles a second chance and you will never regret it.
Advantages of using plastic bottles for decoration
- - Firstly, this material will cost you very little. You don’t have to buy it additionally, just take the used container.
- - Secondly, by making crafts from plastic bottles for your garden or home, you make our planet a little cleaner.
When we throw away plastic products to landfills, we often forget that such things take 1000 years to decompose! It is too long. Imagine how much garbage will accumulate over this millennium if humanity does not invent a more rational way to dispose of it.
Thirdly, products made from this material are very durable, so you don’t have to worry about the durability of your handmade masterpieces.
Decoration for the garden
If you have a little time, perseverance and patience, you can make many masterpieces that will decorate the area of your home. Below is a description of crafts made from plastic bottles. One option would be birds. This decorative element will be a wonderful addition to any flower bed or lawn.
In order to make, for example, a swan, you need to stock up on a large 5-liter plastic bottle; several dozen small white bottles of 200 ml. This could be containers for dairy products; wire, hose, scissors, paints and a lighter.
We cut out the body of our future swan from a large bottle, as shown in the photo. It will be much easier to do this if you outline the lines along which you will navigate. Now take a hose, thread a wire through it and form the neck of our bird.
In order to decorate the frame of the product, we will use small bottles. Each of them needs to be cut as follows:
- - cut off the top and bottom;
- - cut into oblong pieces that will play the role of plumage;
- - punch holes in each feather;
- - treat their edges with a lighter to smooth out any unevenness;
- - string them onto the wire, simultaneously fixing and securing them.
To make the swan's head, you need to cut off the bottom of one of the small bottles. Now it's time to connect our structure and paint it with paints. The swan is ready!
To please children, you can make beautiful and bright butterflies that will become wonderful decoration both in the yard and indoors. The manufacturing process itself is quite simple, so you can involve your baby in it too.
Let constructing children's crafts from plastic bottles become a little lesson in labor for him. In order to build this structure, you need to take one plastic bottle, cardboard, scissors, wire, paints and beads.
To make a butterfly, you need to draw a template on cardboard, and then cut out the contours from plastic. Now secure the wire in the center of the butterfly, where it will bend.
Attach antennae to the butterfly from the same wire, decorating them with beads. You can color the insect wings as your imagination tells you. The butterfly is ready.
Ladybugs made by yourself will also look original in the flowerbed. In order to make such beauty, take 2 bottles of 0.5 liters and one liter; scissors, paints, glue.
To create the ladybug itself, you need to take a liter bottle as a basis, paint it black, leaving two white areas on the lid that will symbolize the eyes of the insect.
Now cut out ladybug wings from two smaller bottles and paint them red with black dots. This structure must be secured with glue. You can decorate the insect by adding a smile and antennae made of the same plastic.
We hope that this information was useful and interesting for you! As a nice bonus, we have posted below many photos of crafts made from plastic bottles.