Paving tiles types of laying. Examples of paving slab patterns with diagrams
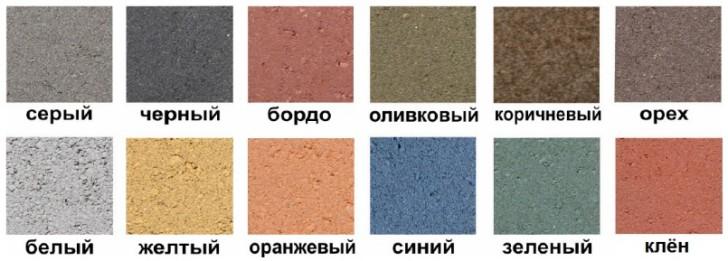
Paving slabs - practical finishing material, which opens up wide possibilities for creativity. There are many types of paving slabs various shapes and textures. This material comes in a wide range of colors, but two colors are usually enough to create an attractive pattern on your front yard or garden path. There are different options for laying paving slabs; what to choose depends on the location and its purpose.
Basic methods of laying paving slabs
There are three main ways:
- on a sand cushion;
- for cement-sand mixture;
- for cement-sand mortar.
Before laying tiles in any way, you need to prepare the base well - remove upper layer soil. If you are going to lay tiles on a soil layer overgrown with grass, in addition to sand you will also need crushed stone to level the surface. After this, a layer of sand (5-10 cm) is poured onto the base. The surface of the base can be compacted, or you can simply pour water from a hose with a nozzle, allowing the moisture to be absorbed.
In the first, simplest case, the tiles can be laid on wet sand. This good way laying for garden paths, water will practically not stagnate on them, it will be absorbed by the seams and go into the sand, and then into the ground. But this installation option cannot be called thorough.
The second method is not labor-intensive and more practical. To create the mixture, cement and sand are mixed (1/5 ratio), the mixture is evenly distributed over the site, after laying the tiles, its surface must be watered. Water will provide the mixture with good adhesion, penetrating between the seams.
Laying tiles with cement-sand mortar is the most reliable option, but also the most difficult. It is difficult to prepare the solution manually, so it is advisable to have a concrete mixer. The ratio of cement and sand is also 1/5, we spread the prepared solution on the base, and use a trowel to level it. The mortar layer is 3-4 cm. To lay the tiles, we use a rubber mallet. If installation is carried out without a slope, be sure to use gutters to drain water.
The methods of laying paving slabs described above will help in choosing suitable option, but that's only half the story. It is very important to lay the tiles with high quality so that the resulting coating is durable and practical, but considerable importance is attached to the design of laying paving slabs.
Using tiles of different colors, with interesting textured surface, laying out according to a certain pattern can create a coating that is truly interesting and aesthetically attractive, pleasing to the eye and enlivening the appearance of the yard and garden.
Paving slabs as a means of decorating the yard and garden
The scheme for laying paving slabs can be either very simple, when two colors are combined in a certain order, or complex, with the help of which you can create real designs.
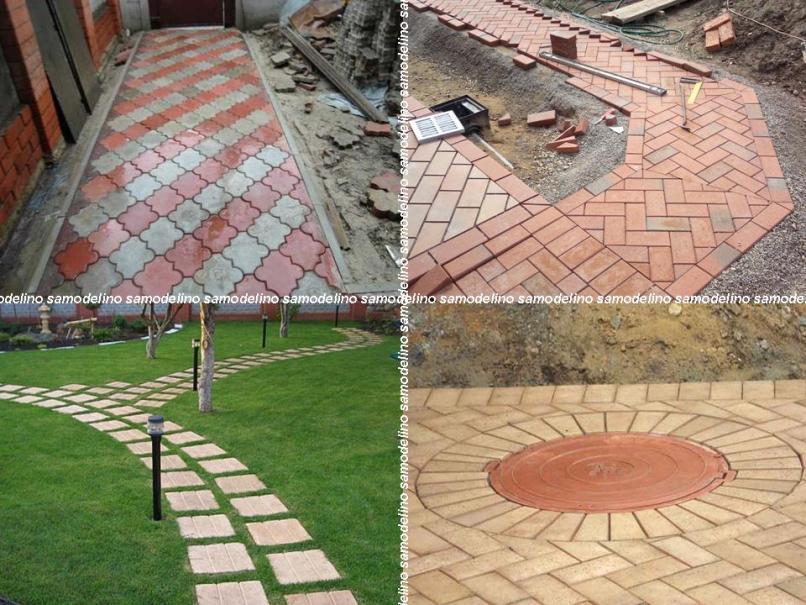
For paving your yard or garden path, you can choose classic rectangular tiles. Despite the fact that its shape is simple, rectangles of different colors can be successfully combined to form an interesting pattern. When choosing figured tiles the path will look even more original.
A cute path created using brick tiles gray and framing the sides of the path with red tiles. A matching staircase and a path made of decorative saw cuts in the shape of flowers add completeness to this part of the garden.

Various designs on paving slabs are created using color, shape and alternating tiles according to a specific pattern.

Textured tiles – a good option for the garden, allowing you to create original patterns and combinations. Its color can harmonize with the color of the soil and the greenery of lawns. IN in this case the pattern of leaves on the surface is appropriate in the garden
Herringbone and wicker
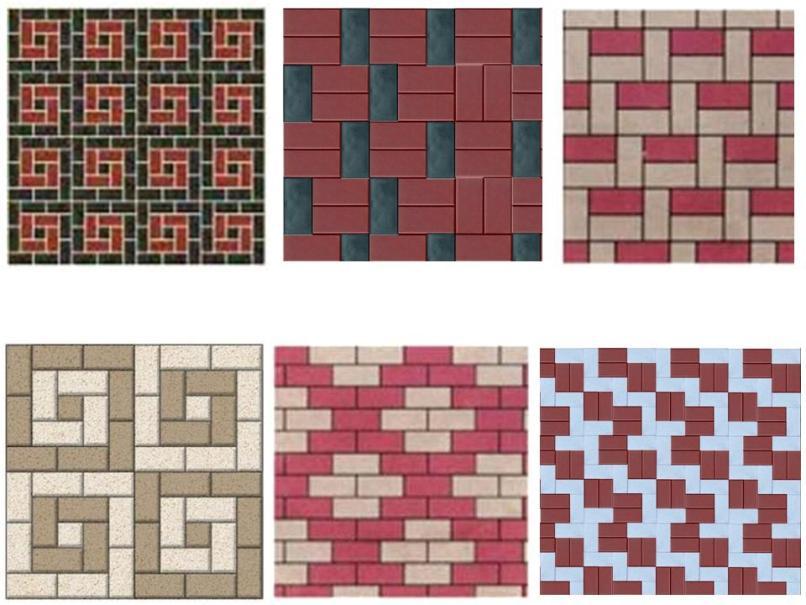
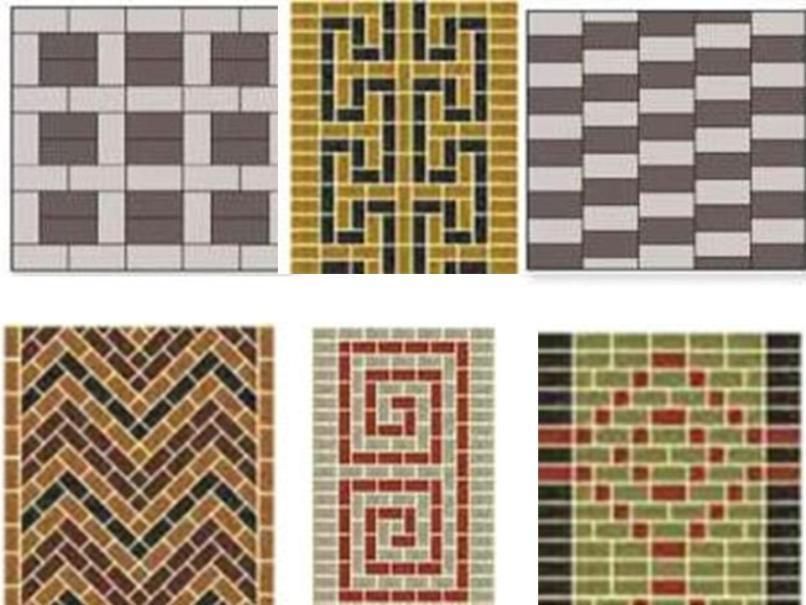
Popular patterns for laying paving slabs include herringbone and wicker. The herringbone pattern can be obtained by laying tiles at a certain angle - 90° or 45°. Braid is a version of herringbone, when the alternation of tiles resembles interlacing. The braid is created by alternating longitudinal and transverse laying.

Simple drawings for creating patterns on rectangular and paving slabs curly shape. To create a striking pattern, you can use only two colors. In the first row in the second illustration there is a herringbone, in the fourth row in the second illustration there is a wicker
Chaos or random mixture
A simple installation method that will look good on the path - chaos or a random mixture. To create a chaotic pattern, you can use tiles of different colors and sizes, laying them in random order. It's not difficult, and the result can be interesting.
Two-color tiles square shape, laid out in a checkerboard pattern, always looks impressive. Can be used to create cells of two rectangular tiles.

A path in a garden where rectangular tiles are laid out in twos in a checkerboard pattern, forming neat symmetrical squares. Plants match the color of the path
Among the examples of laying paving slabs, the circular pattern occupies a special place. The “circular pattern” pattern will allow you to create a beautiful area in front of the house, a place to relax in the garden. If you are working on creating a tile pattern creative person, you can deviate from the usual patterns, creating beautiful designs that look very impressive in a normal position or from a height.

An example of a combination of a circular pattern and a “random order” pattern; when creating a pattern, the tiles are laid out strictly according to color, forming circles different colors, the circles are framed by tiles of the same colors, laid out in random order

The drawing was created using the “leaf” template, the result was beautiful composition on the recreation area, even more impressive thanks to the sandstone frame on one side
Tiles and lawn (flower bed)
An interesting combination is formed by tiles and lawn, when part of the lawn is framed with tiles or a small flower bed is created in the center of the path or area. This is an element landscape design, using which you will make your site more aesthetically attractive.

Tiles and lawn - beautiful harmonious combination. The irregular shape of the tiles, wide joints look impressive against the background of the green lawn

In the center of the tiled path, small flower beds look original, becoming an interesting detail in the appearance of the garden and yard
There are quite a few types of laying paving slabs; the material is inexpensive and suitable for small garden you don’t need a lot of it, but in combination with other means decorative finishing it will help you make your yard and garden more comfortable and beautiful.
Paving slabs are one of the most reliable and beautiful road building materials. It is often used for paving sidewalks and car entrances in the courtyard of a private house. The cost of laying tiles is not low, but not everyone knows how to lay paving stones. To road product was of high quality it is necessary to follow the work technology. Laying paving stones with your own hands is carried out according to the instructions and based on recommendations.
It is important to know how to lay it correctly paving slabs so that she served for many years and had a beautiful appearance . A pavement made of paving stones will improve not only the yard of a private house, but also the adjacent area on the street.
Types and benefits

Types of paving slabs by material:
- Vibrocast.
- Clinker room.
- Granite.
In addition to differences in material, there is a huge variety in color, shape and decor. Also, it differs in the method of installation and technology of work.

Advantages of laying paving stones:
- High strength material.
- Long service life.
- Environmental friendliness of the material.
- High load-bearing capacity.
- Low temperature resistance.
- Beautiful appearance.
- Easy installation.
- Opportunity reuse material.

Flaws:
- Material cost quite high.
- Difficulty of processing.
- It is uncomfortable to walk on paving stones in heels.
- Opportunity washing out the base and then the masonry sags or individual elements fall out.
Calculation of material consumption

Before you begin laying paving stones, you must buy all required material and purchase a tool. It is important to accurately calculate the area of work in order to buy all the tiles in one batch. If sand or cement can always be purchased, then tiles will be difficult to find. If it is the same model and the same manufacturer, but a different batch, then it may not match the previous one in shade or size.
On a path paved with tiles from different batches, a displacement may occur and quite noticeable. For this reason, paving slabs must be purchased in full at once and even 10% more for stock.
Required material and tools:
- Paving slabs.
- Border.
- Geotextiles.
- Sand.
- Crushed stone.
- Cement.
- Shovel.
- Rake.
- Broom.
- Wheelbarrow.
- Vibrating plate (manual rammer).
- Grinder with a diamond blade for cutting concrete.
- Rubber mallet.
- Hammer.
- Metric tape measure.
- Level.
- Rule.
- Bucket.
- Trowel.
- Irrigation hose.
- Pegs and beacon cord.
- Individual protection means.
Paving stone laying technology

There are several ways of paving paving slabs, they depend on the purpose of the road and the type of paving stones. tiles can be laid on sand, cement-sand mixture (gartzovka) and even concrete, under high loads on it.
Despite the fact that there are generally established technologies for masonry, each master has his own characteristics in his work. Someone says: “I lay paving stones inexpensively,” while others charge a high fee, but give a long guarantee on the quality of the product. Therefore, in order not to think about how much it costs to lay paving slabs, you need to know yourself how to lay paving stones correctly.
As a result, you can save on the work of the master and make quality paving, but you need to work hard. To do all the work correctly with your own hands, step-by-step instruction will be simply necessary, especially for a person who has never encountered this type of work before.

Technology of work execution
Before laying paving slabs, certain preparation must be completed. Need to provide all the nuances to achieve the desired result. How to properly lay paving slabs is often indicated by the paving stone manufacturers themselves, but each master has already developed his own technology in practice.

- Preparation for paving paving stones. First of all, you need to determine - when should you start working. It is recommended to start work in the spring. The purpose of the road is determined. If this is a pedestrian path, then it will be enough to use tiles 40 mm thick. For a road that will be periodically used by cars, thicker paving stones will be needed. Besides, if the road surface is subject to heavy loads, then the paving stones lie on concrete screed . pedestrian path can be laid on sand or cement-sand dry mixture. But before you lay the paving stones on the sand, you need to build a reliable foundation.
- Marking the territory. Before laying paving stones with your own hands, you need to mark the area and excavation. The scope of work is determined based on paving parameters. At this stage it is important determine the correct width of the road so that you don't have to cut the whole tile. Also, you need to take into account the thickness of all seams.
To mark the corners of the future road, pegs are driven in and beacon cords are pulled. They show the level of the road surface, so the horizontal level must be checked with a water level. The road is constructed in such a way that rainwater is drained.
- Excavation. Under the paving area, soil up to a depth of 50 cm is removed. The plant layer can be used for landscaping. The bottom of the earthen structure is leveled and carefully compacted with a vibrating plate or manual tamper.
- Geotextile flooring. Geotextiles are spread on the bottom of the earthen structure and its walls. It increases the strength of the product and ensures its integrity. Masters of the old school often perform work without a tissue membrane, without taking into their arsenal modern materials. But such an innovation is significant improves quality road surface.
- Backfilling with crushed stone. Crushed stone in fractions of 20 x 40 mm is poured into the trench and thoroughly compacted with a tamper or vibrating plate. The backfill must be at least 100 mm thick. This thickness is permissible only for the pedestrian zone; for entrances, a crushed stone backfill thickness of more than 150 mm will be required.
- Installation of curbs. Curbs are installed according to pre-made markings. A cement-sand mortar is mixed and applied to the base along the curb structure. The blocks are installed in the design position on the mortar and adjusted to the level. The solution is prepared in a ratio of 1:3. After installing the curbs, it is necessary leave work for a day so that the solution gains strength.
- Sand backfill device. A sand cushion 150 mm thick is installed on the compacted crushed stone. Backfilling with sand is carried out in several stages in layers of 5–7 cm. Each layer is watered with water from a hose and compacted with a vibrating plate. It is better to take river sand without clay impurities. In this case, the water will flow into the ground and will not linger in the bedding.
- Backfilling with prance. Before laying paving slabs, you need to take care of the strength of its installation. To do this, a cement-sand dry mixture is poured onto the sand. It is evenly distributed with a rake over the entire area of the masonry. Gartsovka is prepared from sand with a cement content of approximately 1:8. When water gets on the paving stone, the cement hardens and firmly fixes the paving stones in place.
- Laying paving stones. Having decided on the sidewalk pattern, you can begin paving the paving stones. It is necessary to learn how to lay paving stones with your own hands in appropriate conditions and the specifics of performing the work.
The paving stones are placed in the corner, and their further laying is carried out from themselves, observing the given pattern. The tile is installed on the groove and compacted using a rubber mallet. The level is set by a beacon cord. If the surface of the paving stones is higher than the specified level, then you need to remove the laid material and slightly remove the bedding layer. If the surface level is below the lighthouse, then additional bedding can be made. Each tile fits tightly to one another.
If necessary, paving stones can be cut using a grinder with a diamond wheel for cutting stone. The laid paving stones are checked by level and rule. It should be designed in such a way that rainwater drains and puddles do not form.
- Filling seams. After the paving stones are laid, it is necessary to fill the joints of the masonry. To do this, a dry cement-sand mixture is poured onto the road surface and distributed evenly over the entire surface. The mixture fills the seams, and the excess is removed with a broom or broom. After which the masonry is watered with water from a hose. When the garnet comes into contact with water, it hardens and firmly fixes the masonry.
If you are paving a road that will be periodically used by a car, then it is necessary to install a reinforced concrete foundation. In this case, paving stones with a thickness of 60 mm or more are used and placed on a cement-sand mortar.


Paving the yard of a private house is not just a practical necessity. If you approach this task with a certain amount of imagination and skill, you can create real masterpieces from paving stones that will decorate the site and be the subject of admiration and envy of friends and acquaintances.
The main stages of paving with tiles
Paving slabs are a strong and durable material that has a wide range of colors and various forms. There are several dozen options for laying paving stones, each of which will be a worthy addition to the country landscape.
To work, the master will need the following tools:
- cord for marking and pegs;
- rake, broom, tamper;
- rubber hammer, wooden mallet;
- building level, channel;
- watering hose.
Materials for work:
- crushed stone or gravel mixture;
- sand;
- cement or dry plaster;
- geotextiles;
- paving slabs.
Stage 1: preparation
In the area chosen for laying paving stones, you need to remove the top layer of soil with grass and roots. If for some reason this is not possible, an embankment of crushed stone and sand is made on the soil. Curbs are installed along the edges of the embankment.

Advice! It is better to lay a geotextile fabric between the materials, otherwise the sand will spill through the crushed stone fractions.
The base for laying the tiles is filled with sand (a layer of at least 8-10 centimeters) and carefully compacted. Experts recommend pouring water over the sand from a hose with a sprayer. Such sand cushion will relieve paving stones from problems with stagnant water after rain.

Advice! For more reliable fastening paving slabs, you can add a fifth of cement or plaster to the sand. In this case, there is no need to water the pillow.
The prepared base is leveled with a rake. You can use a channel for leveling. Profiles or pipes are used as guides.
Stage 2: paving
Before laying the first element of paving stones, it is important to have a drawing of the future installation or diagram before your eyes.
During the work process, paving slabs are laid in the direction “away from you”, diagonally. Each element is tightly adjusted to the previous ones using a mallet.

Comment! It is enough to leave the seam between the styling elements within 1-2 millimeters.
After the paving is completed, the surface is leveled with a rubber hammer, and the result is checked with a building level. The finished paving stones are covered with a cement-sand mixture. The excess mixture is swept away.

After laying, the area is watered abundantly. Water will penetrate the seams between the paving elements and provide strong adhesion between the cement-sand mixture and the tile material.
Stage 3: care
Paving slabs - reliable and durable material, but it also requires care. Periodically you need to sweep away dust and debris and clean out clods of dirt. It is better to wash the colored coating of paving stones occasionally, so it will retain its brightness longer. Fallen and loose elements are laid out in a new way
Important! Cannot be used to clean tiles from ice and snow. metal objects(shovels, crowbar) and use salt or chemicals. It is better to use regular sand.
How to choose a paving pattern
The selection of a tile laying scheme depends on many factors:
- size and shape of the site and paths;
- landscape features of the site;
- purpose of the paved area;
- architectural features of buildings.
It is worth considering that the service life of paving slabs is very long (up to 40-50 years). Therefore, it is important to take a balanced approach to choosing a paving pattern.

Important! Areas covered with paving stones are used for recreation or parking. In the latter case, you need to choose a material that can withstand heavy loads.
Most often, classic rectangular paving slabs are used. Alternating two or more colors and laying paving elements in a certain sequence allows you to create original patterns.
Laying figured tiles is more difficult, but with its help you can achieve excellent results.

Paving options
Brick or spoon
The simplest installation pattern, allowing for economical use of material. Alternating tiles of different colors will give this coating original look. In the photo, a contrasting color border is used to decorate the paving stone path.

Braids and Christmas trees
This type of installation is one of the most common. Herringbone elements are placed at 45 degrees or at right angles. This type of paving is highly durable, which is why it is often used when laying driveways. Interestingly, the paving method at 45 degrees makes the site visually smaller, and 90 degrees makes it wider.

To imitate weaving, the transverse and longitudinal directions of paving alternate, as in this photo:

Random order
For this paving option, elements of different sizes and colors are used. Laying is carried out in any order, which allows you to achieve an interesting result.
The only thing that is required from the master is the presence of abstract thinking and an artistic view of the future landscape. This installation goes well with other paving options, as in the photo:

Chess
Tiles laid out in a checkerboard pattern look impressive and neat. Symmetrical square elements of paving stones fit organically into the design of platforms and strictly shaped paths.

Used for paving in the photo square tiles different colors with textured surface.
Diamonds
There are several dozen options for diamond paving. This installation perfectly combines different colors of tiles. The combination of gray, burgundy and white is considered classic. On a large area of diamonds you can make a star, as in this photo:

For such paving, it is important to prepare a schematic drawing and carefully mark the surface. In addition, with this styling you can achieve a 3D effect, as in this photo:

Circular patterns
Radial patterns using tiles of different colors and shapes look great from above on areas of any size. In this installation option, the author can give free rein to his imagination and achieve very unusual results, as in these photos:


Curly templates
Laying paving slabs according to a shaped pattern is not easy - in this case it is important to follow the specifics color range and the direction of each element. Such paved areas will add zest to any landscape. The shape can be very diverse: stars, leaves and flowers, images of animals and even people. For inspiration, you can use children's drawings or works of artists. For special effects when laying, textured paving slabs are used. Such work will require careful preparation, creating a sketch and detailed markings. Modern designers use special computer programs to create such platforms. The photo shows options for similar drawings:

Natural stone paving
Textured paving slabs imitating stone will look organic and natural on garden paths and lawns. Its installation occurs in random order. In paving, you can combine these elements with pebbles or wood. This simple technique will help you achieve excellent results without special effort. Imitation of stone is especially appropriate if the facade of the house is decorated with a similar material, as in this photo.
Owners summer cottages And country houses in their possessions they want to create an atmosphere that will both please the eye and promote active recreation. Gone are the days when a piece of land was perceived solely for growing agricultural products. The garden beds have made room a little and given way to gazebos, green lawns where children can frolic, as well as beautiful garden paths that are both pleasant and convenient to walk on.
Paving stone paths undoubtedly look the best and are the most functional, but when site owners begin to consider the prices for paving services, all interest often disappears. But in vain. In this article we will try to prove that there is nothing impossible in such a process as laying paving stones with your own hands. Step-by-step instructions will help readers of our portal bring this process to life.
What are paving stones? What is it like?
Paving stones comes from the word whetstone. Granite, basalt or other hard rock was previously split into fragments (bars) of approximately equal size and shape, then a covering was assembled from them - paving stones, which is why it is called chipped stones. Such technologies are still used today. Such coatings look very interesting, although the surface can hardly be called perfectly smooth and installation requires a highly qualified craftsman. Over time, due to the passage of a large number of people and passing vehicles, the surface wears out, grinds naturally and becomes smoother. It is precisely these paving stones that are loved by tens of millions of tourists visiting the old cities of Europe, paved hundreds of years ago.

The next step in the development of paving stones was the use of sawn stone, when all the bars have the same geometric dimensions. Such paving stones are also called full-sawn paving stones, since all edges were processed. It became easier to lay such stones, roads and sidewalks became smoother, and it became easier to walk on them. And now sawn paving stones made from natural stone are most widely used, even despite their considerable cost.

Another variety of paving stones is split-sawn paving stones, when a stone blank is first sawn into blanks of equal thickness, and then split into pieces the right size. Sidewalks and paths look very advantageous, where full-sawn and split-sawn paving stones are successfully combined.

Also in the 19th century, clinker paving stones began to be produced in Germany, obtained from natural slate clay, from which they were molded into bars of the desired size and shape, and then fired in a kiln at high temperature. This technology is still simpler than cutting or splitting natural stone, so clinker paving stones began to be produced in large volumes. It is still being produced, as it has proven its worth. Some clinker sidewalks have been successfully used for more than 150 years and are not at all about to “retire.”
Prices for paving stones
paving stones

IN modern world, with development construction technologies, produced good replacement natural materials– concrete paving stones. With a very large interference, it can be called pure concrete, since in addition to high-quality cement and mineral fillers, it contains a lot of polymer additives that increase strength, wear resistance, frost resistance and also allow the paving stones to be painted in any color. This gives unlimited scope for the implementation of any idea for decorating your site. Concrete paving stones can be made into any shape, so all path curves, transitions and various other curved elements can be laid without labor-intensive trimming.

Concrete paving stones can be vibrocast or vibropressed. The second is preferable, since it operational properties much higher. Manufacturers' statements that concrete paving stones are in no way inferior to natural granite or clinker stones are only partly correct, if only because artificial paving stones have not yet passed the test of time. The authors of the article do not wish to offend any manufacturer or seller of concrete paving stones. If in a ridiculous 150 years we are shown a sidewalk in good condition from artificial stone, which is due today, we will sincerely apologize for our words.
What are the advantages and disadvantages of paving stones?
Residents of cities built not in the 20th century, but much earlier - in the 18th and 19th centuries, seen at least once, as if from under the “shabby” asphalt pavement old paving stones peek through. A reasonable question arises: why does the “younger” asphalt “live” much less than the road surface that our great-grandfathers and great-great-grandfathers made? And this fact is far from uncommon. It turns out that well-laid paving stones can serve as a load-bearing base for other coatings.

If you believe historical sources, then even in ancient times not all cities could afford paving stones, but only with a substantial budget, since this coating was very expensive even then. It is still very expensive. But it’s still too early to write off paving stones. Despite the fact that such covering of roads and sidewalks is very expensive, fortunately, it will delight our eyes for a long time. Why does humanity stubbornly continue to use paving stones, what are its advantages?
- Paving stones are very durable, wear-resistant and frost-resistant.
- Due to the fact that the paving stones are always laid on a drainage pad, water will never accumulate on the paths.
- Paving stones are always easy to repair, because you can partially disassemble them and then reassemble them. You can also change individual elements.

- When the soil moves, no cracks form on paving stones.
- Paving stones do not melt in the heat like asphalt and do not emit vapors of various petroleum products.
- Paving stones look very beautiful. They indicate good taste and the wealth of the owners.
- Laying paving stones does not require the use of special heavy road equipment, that is, all work can be done independently.
If paving stones are such a wonderful covering, then why not pave all roads and sidewalks with it, and then live and rejoice in the fact that there is enough for our lives, and possible problems let the grandchildren or great-grandchildren decide. Paving stones still have disadvantages.
- Paving stones are a very expensive material. Covering roads and sidewalks with asphalt or concrete is much cheaper.
- Work on laying paving stones is also one of the most expensive, as it requires serious preparation of the base and qualified work force. It takes much more time to build a road made from paving stones than from other materials.
- Paving stones require good construction measures, since excess water will simply wash away the base.

- Paving stones have a large mass, so they are prone to subsidence, especially if the laying was carried out in violation of technology.
- Driving a modern car on cobblestones is a dubious pleasure, and in wet or frosty weather the surface can be very slippery.
- For reasons “unknown” to science, for some reason women who wear heels do not like crushed paving stones.

Nevertheless, owners of country houses and summer cottages should very seriously consider the use of paving stones for paving yards or arranging paths in the garden. And if you do it yourself, the money saved will more than cover the cost of purchasing the material. However, you can even make paving stones yourself, which you can read about on our portal.
What is the difference between paving stones and paving slabs?
If you consider various sources, then this issue can become very confusing. When some say that paving stones are only a natural stone, others argue that it’s not this, but the size - the paving stones are much thicker. We propose to clarify this issue; to do this, we suggest considering the following table.
Prices for paving slabs
paving slabs
 Paving slabs are paving stones that regularly visit a nutritionist
 The horizontal line shows typical thicknesses of paving slabs or paving stones, and the vertical line shows greatest length, because tiles or paving stones can be not only square, but also rectangular. If the ratio maximum length to the width will be less than or equal to four, then we can say that this is a paving stone. In the table, such ratios are indicated in red-brown color. If the indicated ratio is greater than four, then such products can be classified as paving slabs; these ratios are highlighted in blue cells.
Paving stones are superior to paving slabs in their load-bearing capacity. Obviously, if you put a 160*100*62 mm paving stone on the sand and run over it with a KAMAZ wheel, then nothing will happen to it - it will simply be pressed deeper into the sand. And if you take a 420*420*62 mm tile and place it in the same conditions, then most likely it will crack. It turns out that with equal thickness, the fracture strength will be higher for paving stones.
Paving slabs and paving stones provide ample opportunities to obtain reliable, convenient and beautiful coating for the garden path. In such a situation, it is very important to choose the right paving slab design option and select best option its placement. To do this, let's get acquainted with the circumstances of paving, types of tiles and options for patterns of laying them.
We coordinate the features of the tiles and paving area
Of course, when choosing a covering for a path, we dream of getting a colorful and unusual design. However, not every tile is suitable in specific conditions, and not every pattern is consistent with the existing landscape. The industry offers a number of collections of paving slabs, each of which has its own characteristics and its own name.
Paving stone size options
 Among other characteristics, the thickness of the tile is decisive. So, for garden paths, a size of 30 mm is suitable; on frequently used paths in the yard, paving stones 40 mm thick will not break; for a reliable platform for a car, a covering with a height of 60 mm is required.
To meet any need, manufacturers offer paving elements of various thicknesses for each of the shapes. Coverings with a thickness of 30 mm or less are called tiles; samples of greater height are considered to be paving stones.

When choosing paving elements, you should strive for a minimum amount of trimming, as this significantly increases the cost of the material and the time spent on constructing the path.
It is obvious that smaller paving elements provide greater opportunities for organizing a covering of the required width without trimming.
Choosing a tile configuration
Undoubtedly, tiles of the correct geometric shape (rectangle, square, diamond) are much easier to lay. Note that the amount of trimming is noticeably larger when using complex elements that will have to be cut near the curb. At the same time, the decorative value of free-form paving elements is much higher.
Some manufacturers offer halves of tiles (for example, “Clover”), which partially compensate for the indicated disadvantage. Sometimes paving stone collections consist of elements different sizes, folding into complete figures.
Colored and gray paving stones - decorative value and material value
The decorative qualities and unusualness of the sidewalk are most easily achieved by using a multi-colored coating. In this case, the design can be chaotic, have a geometric shape or consist of stripes directed in relation to the path under different angles. Note that colored paving elements are noticeably more expensive.
When referring to multi-colored decorations on the path, you should have a layout diagram, without which it is impossible to calculate required amount elements of each color. You must understand that the brightness and richness of the color of the real coating will be much inferior to the image on paper.
Laying paving stones and the shape of the paving area

Curvilinear sections of paths are the most difficult to paving. In this situation you have to do a large number of cutting paving stones. Thus, you should choose curvilinear, broken, radial shapes of paths and intersections with an acute angle in the country in the following cases:
- complex geometry is dictated by landscape features;
- for the purpose of correcting the contours of the site;
- complex paving enhances landscape design.
That is, as in the case of choosing colored or gray tiles, when planning the shape of the paths, the decorative qualities of the coating conflict with their cost. It should be taken into account that the larger the paving area, the less noticeable are the cut parts of the paving stones installed between the intact elements and the curb. At the same time, from the laying technology it follows that the perimeter of the path at the dacha is framed by curb stones that have the correct geometric shape.

To organize fencing in areas of complex contours, it is possible to use a vertically installed cylindrical border, which will somewhat reduce the amount of pruning. However, such a fence costs more than usual and is more difficult to install.
Techniques for laying popular tiles
For each tile collection there is a classic installation, which we will familiarize ourselves with.
In any case, it is very convenient and efficient to plan the layout of the tiles on the computer screen, which can be done independently even in a publicly available text editor.
This will allow you to quickly select required type coating design and easily calculate the required quantity of all its components. First, let's get acquainted with the general factors that determine the choice of layout of paving elements in the country.

The easiest way is to lay rectangular tiles in straight areas and along curbs. Laying rectangular elements diagonally will require trimming each paving slab at the curb. Paving stones can be laid out with offset or coincident transverse seams, in pairs or at right angles. Tiles of the same size can be laid out in a pattern or in disarray.
If the tiles have non-linear shapes, displacement of the seams and various schemes patterns. When paving paths with curves, longitudinal joints for tiles with long and short sides can be conveniently oriented in different directions.
Combining paving stones with lawn grass allows you to harmoniously link paving slabs of any shape with the paving area. To ensure that the elements of the drainage system (rain inlets, hatches, trays) do not spoil the planned pattern, you should start laying the coating from them. 
Large patterns are appropriate for large areas of coverage.

Colored paving elements with an axis of central or radial symmetry will help highlight the direction of movement on the path.

One of the options for laying paving slabs on curved areas is to make wedge-shaped joints. In this case, the violation of the pattern is practically imperceptible.

The winding path laid out in a herringbone pattern looks harmonious and natural.
Schemes for laying out paving stones "Brick"

“Brick” paving stones usually have dimensions of 10x200mm and vary in thickness. Here are several examples of laying paving stones in a herringbone pattern. In this case, the paving elements are located at right angles to each other, and the pattern is often oriented along the direction of movement.

This type of covering can be laid with a bandage, that is, with the seams offset by 10mm. If the masonry pattern consists of half a tile in the center, and there are 4 whole bricks around it, you will get a “well” layout. Elements of two colors laid in pairs form a masonry " Chess board" Paired placement of paving stones at right angles to each other is called blocks.
Several more types of “Brick” paving stone layouts allow you to appreciate the wide possibilities for creativity and create your own ornament.
Paving stones "Brick" are very convenient at intersections, in corners and on steps. On garden paths with a thickness of 8 cm and laid on a mortar, such an element can serve as a border.
Laying "Rhombus"
Standard “Rhombus” paving stones have a diagonal size of 32x19cm. The special form of the paving element provides only one layout scheme. However, the use of coatings of different colors provides several decorative varieties.

Laying a “diamond” with a hexagon involves the contact of three tiles at an obtuse angle at a common point. Laying “ornament” involves decorating the figures in one color. When six tiles meet at a sharp angle at one point, it is called a star. To organize a 3D pattern, you need three tiles of different colors, two of them must be a shade of the same color.
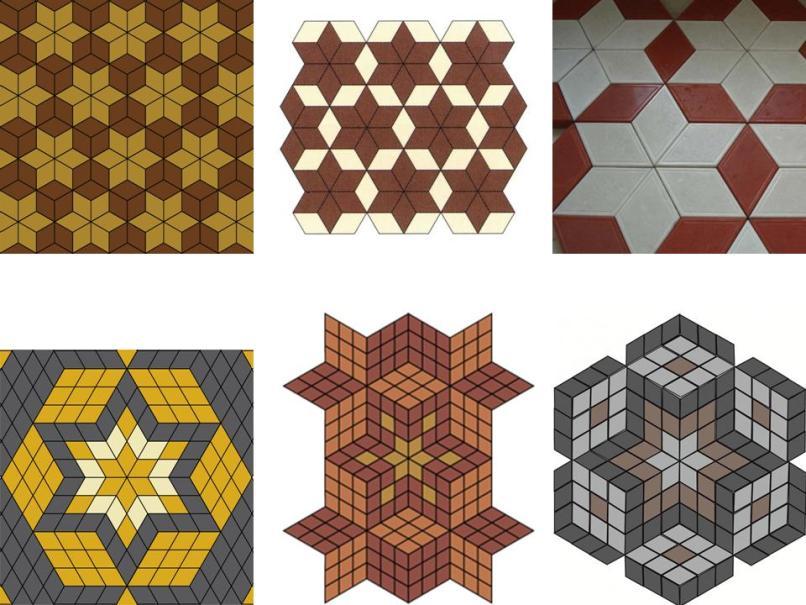
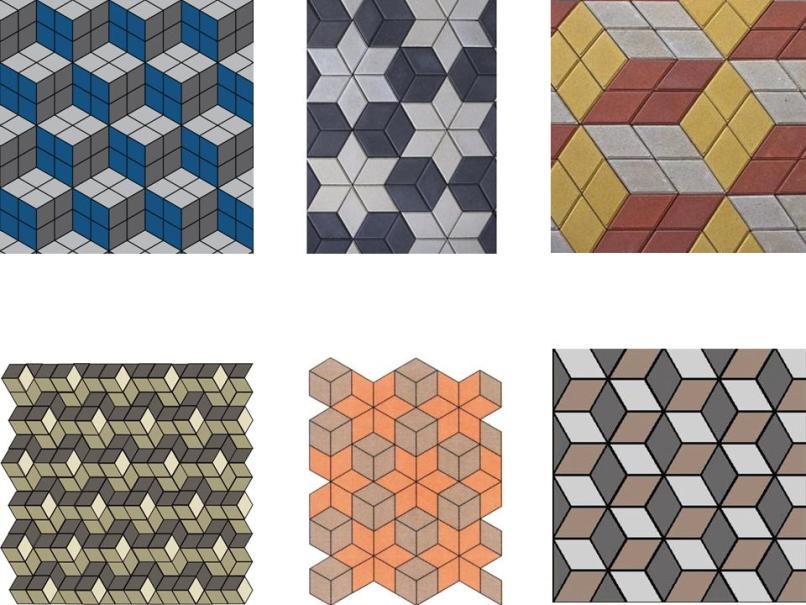
Good news: some manufacturers offer diamond halves in long and short diagonals for installation near curbs and walls. Several examples of diamond layout using different colors will help you choose suitable way laying paving stones.
Application options for the “Old Town” collection
Collection " Old city» offers 4 paving options depending on the length: 60, 90, 120 and 180mm with a width of 120mm. In addition, there are two elements in the form of trapezoids with different inclinations of the sides. This makes it convenient to paving curved and complex surfaces and organizing a variety of patterns and ornaments.

Longitudinal version of laying paving stones “Old Town”.

The transverse layout involves placing the seams perpendicular to the direction of the track.

The multi-colored layout option assumes any method of laying relative to the seams.
Elements built into the coating LED lighting significantly enhance the aesthetics of paving at night.

The chaotic layout allows you to lay tiles of different colors in any order. Obviously, in this case there is a wide field for fantasy and self-realization.


Several types of coating design using the “Old Town” collection will help you decide on the right option.

Features of the organization of the geometric pattern of the “Old Town” set.
 Wide range of possibilities"Old Town" in a new city.
How Clover blooms

Currently, the most common modification is “clover”, consisting of one tile measuring 218x267mm. Some manufacturers offer parts of collection elements, which eliminates trimming at the curb. There are not too many clover layout schemes.

Several examples of this type of layout will help you decide on the choice of paving stones.
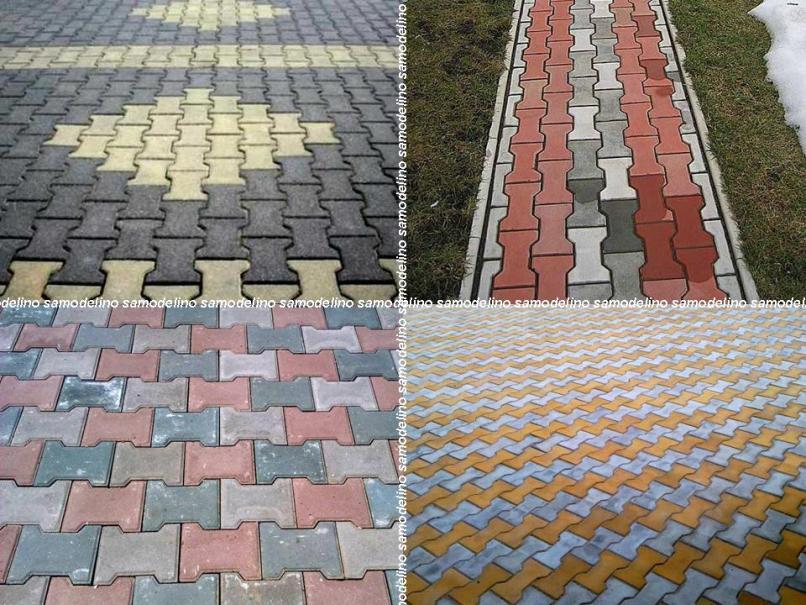
“Wave” layout schemes

The Wave paving stones have dimensions of 11x22cm. Elements of this type can be laid offset relative to each other and at right angles. The slight unevenness of the sidewall of the tile does not interfere with its installation along the curb without trimming.

Various examples of wave laying methods allow you to evaluate its advantages.
“Coil” layout schemes
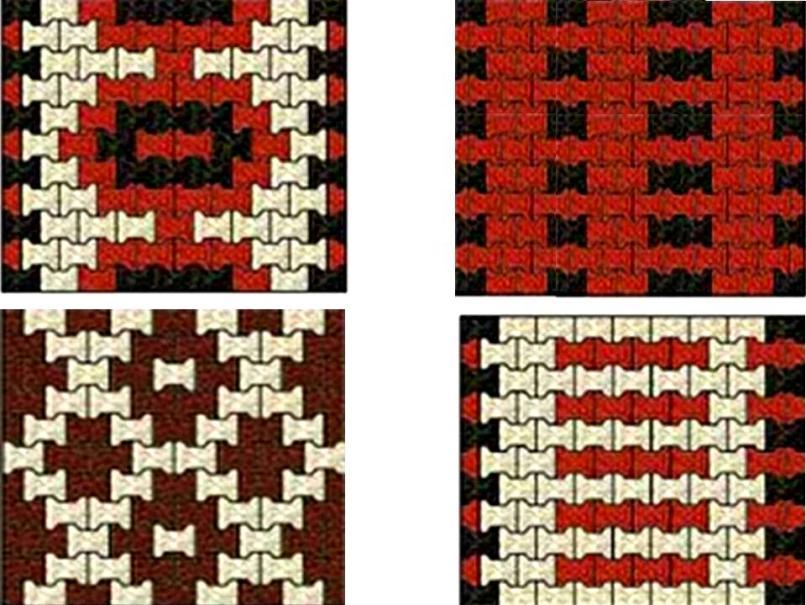
The Coil paving stones have dimensions of 17x20cm. “Coil” involves laying offset relative to each other, along the track and across.
Several photos of the coil layout explain the features of its use. If you cannot purchase ready-made halves of the elements, then when laying longitudinally you will have to cut each tile, and when laying transversely - every other tile.
Layout examples for less popular collections
