DIY tabletop fountain at home. Making a decorative fountain for your home with your own hands
To humidify the air in an apartment, a bowl of water is enough, but many owners prefer to have an unusual thing which will decorate your home. Such products include a home fountain. Fountains for every taste are presented in stores, and you can also hire builders to make them to your liking. However, economical and original version- make it yourself from available items.
Decide on the purpose of the device. A small structure is used primarily to humidify the air, while a large fountain will create a certain microclimate in the apartment. A small fountain will get lost in a spacious room, but looks good on the table. For large rooms, a device of at least 1 m in diameter is suitable. The design may be different, but the principle of operation is the same - water must move in a circle. The container for the fountain will suit any shape and size to suit your taste. You can use a flowerpot or a plastic bottle large diameter . The main requirement is that the dishes should not allow water to pass through. In our case, the fountain will be in the form of a waterfall, so prepare two containers. The base of the structure on which everything will be placed is a hard surface, for example, a tray measuring about 30x30 cm. The device will require a low-power liquid pump that lifts water from the lower reservoir to the upper one. A pump pump will do. If the device is not available in stores, use a pump from an old household appliances , for example, from an electric samovar. Let's make


For Feng Shui lovers, a small fountain installed in the northwestern part of the room will provide residents with prosperity.
By making an indoor fountain with your own hands at home, you can not only save a lot a large sum money, but also to buy useful decoration interior According to the Chinese teachings of Feng Shui, the symbol of Water, placed in the northwestern part of the home, ensures prosperity in the family. An excellent embodiment of the moving element in the house can be a babbling brook, a cascade of waterfalls or another form of fountain.
Small decorative cascades for interior decoration should be made taking into account the fact that there is nowhere to drain the constantly rising water at home. This means that the amount of liquid in the system must be constant. To comply with this requirement, the fountain installed in the room must be made to operate in a closed cycle. In this case, the water will collect in the storage tank. The pump installed in the system must lift it to the top point of the structure, from where the liquid will flow out, again falling into the tank.
In order for a thin stream to beautifully flow, drip or shoot up, decorative obstacles should be made of shells, stones, shards or other objects in its path. IN Ancient China and Japan, specially trained craftsmen built a channel for a stream so that it would babble beautifully. Tuners of the “music of water” created real masterpieces from ordinary pebbles, laying them so as to form cascades with depressions into which drops and streams fell, producing the noise characteristic of a stream or waterfall.
What to prepare for work?
To create a mini fountain, you need to choose a suitable pump. Its power depends on the height to which the liquid needs to be raised. This value is dictated by the dimensions of the structure and is determined individually. If you want to make a fountain with your own hands so that the stream of water shoots upward, it is better to buy a pump with more power and a regulator. To assemble a small tabletop cascade, an aquarium pump for filtering water is sufficient.
Before you make a fountain with your own hands, you need to prepare:
- a reservoir into which water will flow;
- silicone tubes;
- waterproof glue;
- materials for decorating the product.

The reservoir bowl should be spacious. In addition to its direct function - collecting liquid circulating in the system - it will also serve as the basis for a composition made of stone or other materials. Some of them can be placed directly in the container.
What to do if there is no pump?
A low-power pump that can raise water to a height of about 20 cm can be made independently. For this you need:
- a motor from a children's toy, camera or other, protected from water;
- batteries (phone or finger batteries);
- charging connector if using a mobile phone battery;
- LEDs - optional;
- switch of any type;
- electrical wires;
- plastic gear;
- a small round container (aerosol cap, plastic bottle);
- waterproof glue.
Make an impeller for supplying water from a gear from an unnecessary mechanism: adjust the wheel to the diameter of a round container, glue 4 pieces of plastic crosswise onto the shaft: fig. eleven). Drill a hole in the bottom of the container for the motor shaft, and in the side for water. Place the motor shaft inside the container, glue the motor housing to the bottom of the pump reservoir from the outside, and secure the impeller to the shaft inside (2). Cut a piece of plastic, make a small hole in it, and seal the open part of the pump body. Attach a tube to the hole in the side and seal the connection (3). Connect the wires to the motor and carefully insulate the connection, protecting it from water. Any sealant will do for this.
To connect the motor to the power source, use diagram (4). It is important to remember that batteries should not be exposed to moisture. You can attach them to outside pool, glue the switch here too.
You can include a resistor in the circuit to adjust the speed of rotation of the motor or LEDs for decorative lighting.

Assembly method
A homemade or purchased pump must be attached to the bottom of the tank (storage container). Its depth should be such that the pump is completely immersed in water. You can hide the pump in different ways: place a mesh cover on top of it, on which pebbles or shells will be laid, representing the bottom of a reservoir, or hide it inside large element decor. One of the design options - a dry fountain - provides for a completely hidden water surface in the storage tank. To do this, you need to lay a grate on top of it and secure the stones. The water will pass through the stones into the container without forming a visible pool. Rice. 2.
A short master class will tell you how to make a mini fountain in an apartment with your own hands from ceramic pots (Fig. 3):
- 1 Prepare 2 ceramic pots and 5 trays (2 large and 3 small). Cover them with waterproof varnish, drill a hole for the tube in the center of 1 larger and 1 smaller tray. Make cuts on the edges of the pallets to drain water.
- 2 Install the pump at the bottom of the tank, following the diagram in the figure. Cover it with a large pot, and lead the tube through its drainage hole and drilled holes in the trays to the very top of the structure.
- 3 Place a smaller pot next to it and secure the tray to it. The next tier consists of 2 small pallets (one is upside down and serves as a base for the bowl from the other). The pallets must be placed so that the holes cut into their sides allow water to flow from one to another, forming a cascade.
- 4 Decorate a fountain, assembled with your own hands from the most simple materials, beautiful pebbles, plants and shells, figurines of aquatic animals or birds.

Such a miniature pond can be placed on a table or given a special corner among indoor plants. Iridescent water will not only enliven and decorate the composition, but will also slightly humidify the air.
Waterfalls in the room
Stylish and fashion decoration interior - vertical waterfall (Fig. 4). Making this type of indoor fountain with your own hands is not much more difficult than a mini tabletop fountain. The only difference is the pump power for such a large structure. When looking for a pump, you need to pay attention to the fact that the height of the water column is at least 1.8-2 m. This will make it possible to build a water wall or stream originating from the ceiling of the room.
Before making a home waterfall, you need to waterproof the floor in case the tank leaks. For this it can be used polyethylene film. It is advisable to cover with it a section of the floor 15-20 cm larger than the perimeter of the future structure.

For the panel on which water will flow, you will need:
- thick glass or mirror;
- 5x5 cm bars for support posts;
- boards for the base of the top cover;
- pipe plastic diameter 2 cm to distribute water over the glass;
- a block or thick board for the clamp step.
The structure of the fountain supply system is the same as discussed above.
On top of the fountain tray, you need to install and secure a board with a stop to fix the glass in a vertical position. Knock down the frame from the support bars and crossbars on top. The role of the crossbar can be played by the horizontal bar of the top cover.
Drill a piece of plastic water pipe, the length of which is equal to the width of the glass panel, in one line along the axis. The holes should not be located too far from each other so as to avoid the impression of separate streams. Plug one end of the sprinkler tube and secure it to the top cover strip. Install backlighting if necessary.
Place the glass panel vertically, resting the lower edge against the step of the latch. Attach the side parts to the support bars using liquid nails. To prevent water from spreading beyond the panel, sides made of strips of glass, wood, and plastic must be glued to its edges.
Install the pump into the pan and run the water supply tube up to the open end of the distribution pipe. Connect and seal the connection. Hang the front part of the top cover. Perform decorative finishing home fountain with your own hands according to your own taste. Through many holes in the sprinkler pipe, streams of water will fall on the glass and flow down it into the pan, creating the illusion of a falling stream.
Materials for decorative finishing indoor fountains, made with your own hands in a tabletop or floor-standing options, can be found in pet stores (colored soil, castles, shells, ships in the aquarium department). Flower shops sell bamboo plant supports and beautiful containers. In the souvenir departments you can find artificial bonsai, figurines of birds and animals.
There is nothing more pleasant than to relax after working day under the quiet splash of water in a man-made stream. Decorative functions fountains are perfectly combined with its main purpose - to humidify the air in the room. You can add live indoor plants to the streams of flowing water.
Decoration of the site - favorite hobby summer residents and homeowners. Beautiful flower beds, flower beds and even beds are a true decoration. However, nothing pleases the eye more than ponds and ponds surrounded by beautiful vegetation. And if a stream of water still comes out of it, then the corner turns into the best resting place. If you still manage to make not only a fountain with your own hands, but also beautiful lighting, put a swing or bench nearby, in the evenings all the inhabitants will gather on this patch.
This fountain is DIY and so is the lighting: a waterproof LED light with remote control for changing colors
Fountain device
To make a fountain in your dacha you don’t need to spend a lot of money. Of course, it all depends on the size of the reservoir and how you imagine it. According to the method of construction, fountains are either closed or open type. It's about about the cyclical use of water. The closed type uses the same volume of water, driving it in a circle. Open - new all the time. Garden and country fountains are mainly made of a closed type: their design is simpler and more economical. Of course, water has to be added and changed periodically - it evaporates and becomes dirty, but still, the costs are not very high.
When installing an open type system, you will have to think through the water supply system, control of its level, drainage and disposal. You can, of course, use the fountain’s reservoir as a container for heating water before watering, and use the bowl to distribute it throughout the garden, but watering is not needed around the clock, and the fountain can operate in this mode.

In the very simple version To make a small-sized fountain, you need some kind of sealed container and submersible pump. Any container can be adapted - a special plastic one for a pond, a barrel, old bath, basin, trimmed tire covered with film, etc. With pumps it’s a little more complicated.
Fountain pumps
Fountain pumps are sold specially, with built-in filters. To make it easier to make a fountain with your own hands, you can buy such models. It’s very easy to work with them: put them in a container, secure it so that it doesn’t move, fill it with water, carry out the starting manipulations (described in the instructions) and turn it on.
Fountain pumps come in different capacities; they raise the stream by different heights. Often the kit comes with replaceable nozzles that change the nature of the jet. They are powered from a 220 V network, there are models that operate from solar panels. They are made hermetically, so there will be no problems when connecting, no step-down transformers are needed. The only thing that won’t hurt is an automatic machine and an RCD on the line to which the pump will be connected. This is just in case, to increase security. The price of the smallest and lowest-power fountain pump is $25-30. Productive models cost several hundred or more.
You can use any submersible pump for the fountain. But you need to buy or make (you can make a sand one) a step-down transformer for it. A security group from a machine gun and an RCD on the line will not be out of place here either. This circuit is worth tinkering with if you have an old pump that is not currently being used.
How to do it without a pump
Is it possible to make a fountain without a pump? It is possible, but it is open type. For example, bring a water supply pipe into the pond - central or. The water coming out under pressure will produce a jet of some height. By installing a tip on the pipe, we can change its shape. But with such a construction, it is necessary to figure out where to divert the water. You can go back to the well or to the river, to the irrigation area, etc. Although with such an organization there is a pump, it pumps water into the house, and the fountain is only one of the flow points.
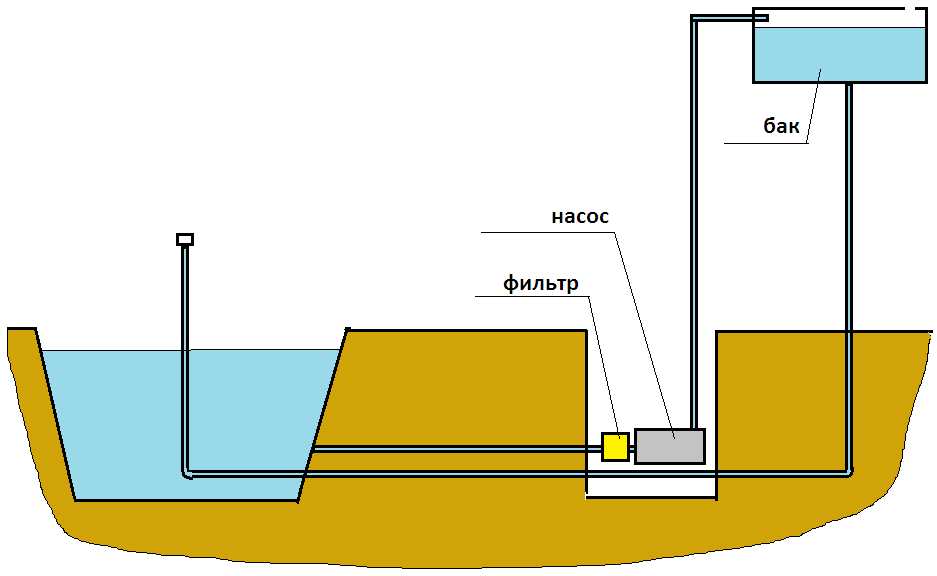
The second option is to place some kind of container at a height, supply water to it, and from there it is supplied through pipes to the fountain located below. To create a more or less decent jet height, the container must be raised 3 meters or higher. But the question remains: how to supply water there. Again using a pump, but no longer submersible. They are cheaper, but require a filter. You will also need a pit in which the equipment is installed. A system of pipes connects it to the bowl of the fountain.
In this area, everything has become easier with the advent of LEDs. They are powered by 12V or 24V, which is much safer than regular mains power. There are even lamps that run on solar-powered batteries.

Illumination can be done using waterproof or similar spotlights and lamps. To power them, you need an adapter that converts 220 V into 12 or 24 V, but they are usually sold in the same place where LEDs are sold, so there shouldn’t be any problems. Installation is simple: the spotlights have mounting brackets, the tape can be “shot” with a stapler, you just need to find the brackets more sizes tape: there is no need to punch it, so as not to break the tightness.

There are LEDs that change color. Shades from 8 to several thousand
Schemes of fountains of different configurations and photos of their design
Surely you know that the main component of a fountain is its bowl. Essentially this is the same pond, but with optional equipment- pump. A pond can be made with at least a dozen different ways and some of them are described in a separate section, because we won’t describe how to make a bowl for a pool. We will pay maximum attention to the organization of fountains and their decor.
Small fountain
The device requires a container and a pump. Decoration is put on the tube that comes from the pump. These can be slabs of stone in which it is necessary to drill a hole, with a diameter slightly larger than the diameter of the pipe. These slabs are strung on top of each other like a children's pyramid.

Organization diagram decorative fountain for the dacha
To avoid water overflow, it is necessary to provide a drainage system - just below the maximum level, cut a pipe into the container, the second edge of which is led into the sewer, drainage system or to the garden. You can do it another way: arrange a water collector around the bowl - make a concrete groove or dig in a plastic one. The collected water should also be taken somewhere. Usually in closed systems The problem is not the overflow, but the lack of water - it evaporates, but you can play it safe.
DIY fountain: photo report 1
And now a photo report of how a mini-fountain was made with your own hands according to this scheme. It turned out interesting.

To make this fountain you needed:
- square plastic flowerpot without holes;
- small fountain pump;
- a plastic pipe 0.7 m long, the diameter is such that it fits over the pump outlet;
- a bag of decorative pebbles;
- three bricks;
- red granite sawn into slabs.
From the tool - drilling machine to drill holes in granite with a diameter slightly larger than the diameter of the pipe.
We install a bowl in the prepared hole, and place bricks in it, closer to the edges. They are needed for the stability of the structure and to reduce the amount of pebbles. They also serve as support for the stone structure. Between the installed bricks we place a pump with a tube on, pour in water and check how it works.
Holes were pre-drilled in the slabs in the workshop. They should be located approximately in the center so that the weight of the stones does not overturn the structure.

The first slab rests on lying bricks, the rest are strung so that the center of gravity does not shift. Having laid the first one, we fill the remaining space with pebbles. After the last piece is laid, a mark is made on the pipe. The very last stone is removed, the pipe is cut down just below the mark, then the last fragment is returned to its place. When the water is turned on, it seems to come straight out of the stone. Very unusual and uncomplicated.
Photo report 2
The next version of a small fountain is made according to the same principle, only a flexible hose is used instead of a pipe, and driftwood is used instead of a stone. The effect was simply wonderful.

Everything is so clear that there is no need for comments. It differs from the previous design only in the presence of a mesh. This is to increase the volume of water: the tray is small in size.

Until you see it, it’s hard to imagine how easy it is to make amazingly beautiful things. As for pipes, it is better to use polyethylene pipes - they bend well and are not afraid of ultraviolet radiation.
How to make a fountain from a tire, see the video report.
Room or tabletop
Mini-fountains are made according to the same principle, only they use very low-power pumps. Suitable even for aquariums, but without aeration. They even work almost silently. We will make a fountain in Japanese style. In addition to the pump, you will need a small ceramic container for this. In our case, oval made of baked clay. A piece of bamboo - about 70 cm long (bought in flower shop, sold as a support for climbing plants), a bunch of living growing bamboo and a quantity of small pebbles. From all this comes such beauty.

First of all, cut a piece of bamboo into pieces of different lengths. It is hollow inside - these are natural pipes, which are also for a long time don't rot. One of the sides should have an oblique cut, the other should have an even cut. Saw so that the longest piece near the evenly cut end has a “joint”. The lower incision goes approximately 5 mm below this thickening. There is simply a partition inside, with its help it will be easy to attach this segment to the pump outlet. It is difficult to cut, but I managed to saw through the thin trunk with a metal blade.

We put a small pump in the vessel, put the longest piece of bamboo on it - its length is about 35 cm. On the other side we put a bunch of living bamboo, filling the space between them with pebbles.

We tie the two remaining pieces of dry bamboo to our “pipe”. You can use hemp rope. That's all, we made a mini fountain with our own hands. All that remains is to fill in the water and turn on the pump.
Other models can be made using the same principle. Now you understand how and it will be easy to change the design. A few photos for inspiration.


Another type, more traditional and familiar to us, uses almost the same idea and the same tools. The difference is in the design. You can take a large ceramic one or even plastic pot. It is only important that it has no holes for drainage. Next is a matter of technique: to divide it plastic partition into two or three zones, pour into one more soil and plant one of the moisture-loving plants.

The second part will be the reservoir. Only when organizing circulation is multi-stage filtration necessary: the water becomes very polluted. Therefore, glasses made of filter materials with different meshes are inserted one after another - first - a wire or plastic mesh, then - fabric with different meshes, and inside this structure - a small pump.

You can make with your own hands not only the composition of such a tabletop fountain, but also a pump. How? Watch the video.
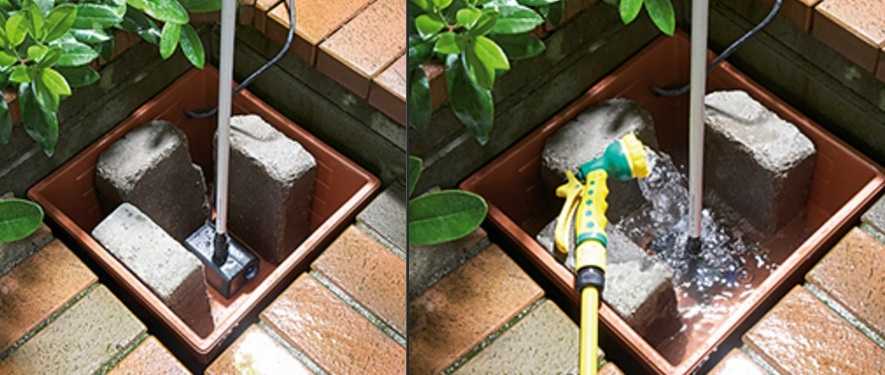
Pebble fountain
Very interesting design at the fountains with pebbles. Their bowl is disguised, so it looks like a dry fountain, without a bowl. In fact, there is a bowl, but it is decorated with pebbles, which are laid on a mesh covering the tank.

Dry pebble fountain - device diagram
A container is installed in the dug pit. Its volume and size should be quite decent: to collect all the splashes, or at least most of them. Place the pump in the container, cover the top with metal or plastic mesh with a small cell. It serves to protect against large contaminants getting into the water, and a thick wire mesh can be laid on top of this fine mesh. This is if you use pebbles. If you are laying stone slabs, you can use boards or bars.

How to make a “dry” fountain with your own hands
With pebbles, it’s probably better to do the opposite: first lay a mesh with a large cell as a base, and on top of it with a small cell. This way you won’t have to worry about choosing large pebbles, and debris won’t get into the water.

Rockery with a source - this is what this fountain might look like

If you use your imagination, you can come up with very interesting compositions. For example, one of the options with garden watering can. If your in classic style, a fountain made from a watering can will hardly fit well, but it will fit very well into the country style.

As you can see, water is collected in the same vessel, hidden under pebbles, and from there it is pumped into a watering can with a small pump.
Near the wall
This classic version- a small or large stream of water runs from the wall, flowing into the bowl. As you may have guessed, there is a pump in the bowl that supplies water through a pipe to the water outlet point. It's simple if you know how. It's just a matter of implementation and decoration.

To prevent the pump from floating, it is screwed to some kind of heavy plate. At least for the sidewalk, as long as the size fits. The case usually has corresponding holes for mounting, but when choosing, you should pay attention to this.

If you plan to do something similar near the wall of a house or fence, take care of its waterproofing. Even if the water does not flow down the wall, splashes will fall on it and the humidity will be increased. At a minimum, it is necessary to lubricate several times hydrophobic composition. Try to find one that doesn't change the color of the surface too much.

The design style may be different. A flat surface is made at the top bowl, from which water flows down like a wall. The effect is very interesting. It is important that the surface from which the water falls is mirror-smooth and absolutely horizontal.

Fountain-cascade
The iridescent jets look very interesting. Fountains of this type are called cascades or cascading. With this organization, water is poured from one bowl to another. In the case of a country or garden fountain, you can come up with interesting shapes. For example, a fountain made from buckets, watering cans, teapots and even old garden carts.

The principle of organizing such a cascade is simple: several vessels or bowls mounted above each other so that a stream of water flows from one to the other. At the bottom is the largest tank, where the pump is located. He delivers water through a hose to the highest of the vessels.

How to make a fountain bowl
If you need a classic shape - a round, square or oval bowl from which a stream of water flows, the easiest way to find a suitable plastic tank. They are different shapes and volume - from tens of liters to several tons. In color they are mainly black and blue. Although it seems that for our purposes it is better to take blue color, please note that against such a background, pollution is more visible. To prevent your fountain from looking like a swamp, you will have to clean this bowl often. From this point of view, it is more practical to take black - the water looks the same, but you need to wash it less often.

The selected tank can either be buried flush with the ground level, or leave a side. Most often, the sides are decorated with stone or pebbles. Depending on this, choose the depth of the pit. It is dug out and is slightly larger than a bowl.
When the required depth is reached, all the stones, roots, snags are removed, the bottom is leveled, compacted, sand is added in a layer of about 10 cm. It is well leveled and spilled so that it becomes compacted. Place the bowl on the prepared base and fill it with water. Sand or soil is poured into the gap between the walls of the bowl and the pit. Sand - if the soil is clayey, and soil - if it drains normally. Having filled in a small layer, it is compacted - carefully, using a pole or deck to get into the gap to be filled. But no matter how well you compact, be prepared for the fact that in a couple of weeks you will have to add more: the soil will shrink by several centimeters.

You can do without a plastic bowl. There are two other options: make a tank from monolithic concrete. In this case, you can make a fountain with sides. The process is long and expensive, and you also need to worry about waterproofing.
Most cheap option— dig a pit and line it with film. In principle, any high-density polyethylene will do, but it will last a year, maybe two. Then it begins to let water through. Special films for swimming pools are more reliable in this regard, but they cost a lot of money, but can be used for years. The technology for making such a fountain bowl is captured in the photo.

The first stage is digging a pit and leveling the walls. After the required shape and dimensions are achieved, the horizontal areas are leveled and covered with a layer of sand. It will protect the film from possible damage.
We lay the film in the finished pit. It should lie inside without tension, freely. Its edges are covered with soil and pressed down with boulders. To prevent plant roots from growing through the film, it is not advisable to spread it under. This is a non-woven fabric that is very tear resistant. It is used when laying roads to prevent the soil from being crushed and trees from sprouting. So she can protect the fountain without difficulty.

Boulders are laid out on the laid film. If the pit is stepped, boulders should lie on each step. When the design of the bowl is almost complete, a pump is installed. The bowl is filled with water and the bowl is tested for leaks and pump performance.
For those who want to update their exterior, make it special and memorable, we suggest using a small homemade fountain. Step-by-step instruction Making a fountain with your own hands is quite simple and anyone who has a certain set of tools and materials can create this beauty in their yard.
Installing a fountain at the dacha
The first point of the fountain installation plan is planning its size and type. Consider the size of the yard; do not make the fountain too large or small - this will not give a positive visual effect. Remember, the power of pumping equipment is directly proportional to the size of the structure.
Now you should select the right piece of land for installation. Firstly, the fountain should be located where it can be clearly seen. Secondly, it should be close to the vacation spot. The sound of running water and cool freshness in summer heat- important components of a pleasant and peaceful holiday on fresh air. Try not to install the fountain in direct sunlight. The water will have to be changed frequently due to blooms. There is also no place for structures near trees; the roots can damage the thicket and for repairs you will have to dismantle the entire decorative element.
To install a fountain with your own hands on the site correctly, do not choose places near the walls. In this case, the structure will not avoid exposure to mold and mildew. And this, in turn, will not only spoil appearance, but will also cause an unpleasant musty smell.
Plan future buildings on the site in advance. You should not install a fountain on the road to them.
Step-by-step guide for installing a fountain in your country house with your own hands
Let's talk about how to make a fountain with your own hands using the example of a very simple design - fountain-fontanelle. A structure of this type has a number of advantages:
- Spectacular appearance;
- Easy care;
- Easy access to parts for repair purposes;
- Possibility of dismantling for winter.
Having selected a place for installation, we dig foundation pit slightly larger than a fountain bowl. Additionally, a shallow hole should be dug around it. gutter(about 10 cm).
DIY fountain. Instructions in photo
At the bottom of the pit there should be sand cushion 15 cm thick. This will protect the underground part of the structure from plant roots. Level the surface and install it on it plastic bowl. We level the font, pour in and compact sand. The container should be installed in such a way that its edges protrude by 5-8 cm.
The next stage is filling plastic container under a bowl of water. There is no need to pour “heaping”; leave 4-6 cm to the edge.

Now it is necessary install a fountain and check the operation of pumping equipment. If power pumps can be adjusted, then we adjust it so that the water falls back into the bowl. The choice of equipment should be approached very carefully. Ideally, when purchasing, explain to the seller what bowl size and bowl volume is expected. Then he will help you choose equipment of the required power.

DIY fountain. Instructions in photo
After installing the bowl and pump, you need to do waterproofing fabric. We cut out a canvas with a diameter the size of a fountain pit. Starting from its center, cut strips. This must be done so that the diameter of the resulting inner circle is equal to diameter bowls of the structure. We bend the resulting strips of material and lower them into the container. They can be secured using sealant. Do-it-yourself fountains always require a lot of patience and accuracy in work, especially this stage of construction.

To ensure that the base of the structure does not lose its shape and is stable, we place a couple of rods on a sealed fabric fittings, and on top of them - galvanized fine mesh. The mesh size will influence the size of the stones or crushed stones used used in the decor of the fountain.

DIY fountain. Instructions in photo
The final stage of construction - decoration designs. The border of the fountain can be laid out with larger stones, but you should not make it too clear. Small stones such as sea pebbles or crushed stone are laid out on the mesh. If it is necessary to add naturalness to the fountain, then its boundaries should not be too clear. Various plants will look good along the edges of the structure.  Thematic japanese fountainfor lovers of oriental exoticism it is installed in a similar way. Step-by-step instructions for making a fountain with your own hands for a Japanese-style garden consists of the same points. You will find a diagram of the structure below.

DIY waterfall fountain
We will not build anything grandiose, but small, about 1 m high, cascading waterfall We are quite capable. It has already been described in detail above how to prepare a pit for a pond bowl. But this time we are building a waterfall. And if there is no natural elevation for him, he will have to create it himself.
Do embankment convenient in the process of digging a pit. We simply throw the earth where the slide should be and carefully compact it. For the hose supplying water to the point where the water falls, make a small groove There are holes and embankments in the wall.

DIY waterfall fountain. Instructions in photo
After the foundation pit and embankment for the waterfall are ready, we begin to cover the bottom and walls of the mini-pond waterproofing material (for example, PVC film). The fabric must be laid in such a way that it not only completely covers the bottom and walls of the pit, but also protrudes about half a meter on the sides of the pit.

Be sure to lay a pipe for supplying water to the top of the waterfall in a previously prepared channel-ditch. Bend one edge 30-40 cm up.

This time we are making a permanent structure, and therefore it is best concrete a bowl of a pond. To begin, carefully lay out metal mesh at the bottom of the pit. The waterproofing must not be allowed to become damaged. Next, pour a layer of concrete about 12-15 cm thick.

How to make a fountain at your dacha with your own hands. Photo
Now you need to prepare bowl walls. We lay out the mesh, strengthening it in the solution that has not yet hardened. You can continue installing a fountain with a pump with your own hands, which will look like a cascading waterfall, within a day. We fill the walls of the pond bowl and complete the most difficult stage of construction.
The next part of the construction is decoration the resulting structure. We build steps on a pre-compacted hill. The step should be about 30 cm and three ledges will be enough.

On the resulting flat surfaces we lay out flat sandstone, pebbles or any other material to your taste. We decorate the rest of the fountain, including the film around the perimeter, with stones, crushed stone, marble or other pre-prepared materials.

All that remains is to turn on the pump and fill the font of the structure with water. We watch the stream flow steadily down the steps of the waterfall and enjoy the originality of our suburban area. 
DIY stone fountain
How to build stone fountain? We'll talk about this right now. First you need to make sure you have everyone necessary devices and materials. We will need:
- Water pump (underwater with medium power is suitable);
- Plastic container for the bowl;
- A metal or PVC tube for carrying an electrical cable;
- coupling;
- Flat stones and gravel;
- Wooden bars;
- Water flow power regulator;
- Copper tube with a diameter of 15 mm.

Pit for the fountain bowl there should be a slightly larger container prepared for these purposes. By filling the space between it and the walls of the pit with soil, we will significantly strengthen the position of the bowl. As in previous cases, do not forget to create a pit at the bottom sand cushion. On top you need to lay a layer of pebbles.

Water pump fits freely in the water tank. This will make it easier to repair it if the need arises. You can protect your water tank from debris by simply fine mesh. To give strength to the structure on top metal mesh are placed wooden blocks (if desired, they can be replaced with metal fittings).


The base of the fountain will be metal pipe, which is attached vertically to the pump.
The next stage is preparation flat stones. To do this, using special tools, we make holes with a diameter slightly larger than the diameter metal pipe- foundations of the structure.


Next, using the principle of a children’s pyramid, we “place” the stones on the pipe. All that remains is to add decorative elements to the fountain and connect the pump. Very simple but effective and beautiful fountain at the dacha with your own hands, ready for use.


A variety of do-it-yourself fountains in personal plots
Submersible fountains
If there is already a pond in the yard, then it can be used as a basis submersible fountain. The principle of its operation is simple. Water is supplied via a pump directly from the pond. In this case, to install a submersible fountain you will need:
- Pump;
- Water supply pipe;
- An appropriate nozzle for forming a water jet and giving it the correct direction.
The attachments come in a variety of different types. Eg, bell attachment is a two-disk design. The flow of water passes between them and changes when the gap is adjusted. Nozzle " geyser"—a tube narrowed toward the top—quite effectively copies the corresponding natural phenomenon.

Such structures have quite a lot of possibilities. For example, you can create the effect of a key gushing out of the ground. To do this, install the fountain yourself so that the end of the pipe does not protrude above the surface of the reservoir.
Using more complex attachments, you can significantly expand your decor options. The effect of spraying water, the simultaneous combination of several nozzles and many other variations for the choice of those who construct a fountain in their dacha.
Stationary fountains
A fountain of this type is a real find for amateurs and professionals of design art. Structures can take the form of natural stone fonts, antique structures; they are executed from clay pots, plastic bottles and any material that is at hand. Particularly popular in Lately fountains for Japanese gardens.
Any frost-resistant material will do: marble, fake diamond, sea pebbles And so on. To decorate such fountains, they often resort to painting. There are two ways to do it:
- Coloring the material before manufacturing the structure;
- Painting the finished figure.

The first option costs much more, but it is also much more reliable. To protect against moss, fungus and mold, it is useful to treat the fountain structure with special products.
Small stationary fountain It will look good in family recreation areas or near children's playgrounds. Our master class “Do-it-yourself fountain in the country” will help novice designers correctly build, perhaps, one of the main decorative elements in the garden. suburban area. And it doesn’t matter whether it’s a small geyser fountain or a large cascading waterfall 2 meters high. The main thing is that it pleases the owners and does not cause problems.
Video instructions for making a fountain at the dacha
Today you can start building a small fountain on summer cottage. We will show you how to do this simply, beautifully and inexpensively.

Types of fountains
A fountain is a decorative hydraulic structure in which water can be supplied under pressure upwards and to the sides, or simply flow down the walls of the structure. The water in the fountain circulates due to the operation of the pump (this principle is also used in artificial and). Depending on the nature of the movement of the water flow, cascade, geyser and “bell” fountains are distinguished.

- Geyser. The most common type of fountain is when water under pressure is thrown out vertically or at an angle. The height to which the liquid is supplied can vary widely. By changing this indicator, you can create both a cozy low fountain and an impressive noisy stream of water reaching a height of several meters.
- Bell. Another simple solution that fits perfectly into the landscape. The water in such a fountain is supplied to a small height, from where the nozzle is evenly distributed around the perimeter, forming a continuous water film in the shape of a hemisphere.
- Cascade. The implementation of cascades is varied and most impressive: water slowly flows from one container to another, creating the illusion of stepped waterfalls.
- Hybrid solutions. Usually they combine geyser and cascade types of fountains. Pressurized water is supplied to top part cascade design, where due to overpressure one or more geysers are formed. Further, the path of water runs along the cascade.

Construction of a stone fountain
We invite you to familiarize yourself with the technology of making a simple cascade fountain from scrap materials. The techniques underlying its construction will allow you to build any decorative fountain with your own hands.
Before you start work, sketch out a diagram of your future creation on a piece of paper. This will allow you to evaluate the pros and cons of the planned design and at this stage select best option pump

Improve your garden area in just 10 simple steps:
- Select appropriate place . Try to find a site on the leeward side of the house, otherwise its walls may suffer from moisture. Decide on the height of the garden fountain X ( see fig. higher). The distance between the house and the fountain should not be less than three times the height to which the water is supplied.
- Decide on the size. Use a ready-made container (plastic, ceramic, metal, etc.) or dig a small ditch and cover it with waterproofing material or fill the bottom and walls with concrete.
- Dig a pit and trench. Make the dimensions of the pit 10-20 cm larger than the dimensions of the container. This is required for the device sand cushion. If after installing the plastic container there are voids on the sides, fill them with soil and crushed stone. Dig a trench 30 cm deep from the pit to the house - it is necessary for laying the cable feeding the pump. For protection, place it in plastic pipe or a suitable size hose. Route the cable into the house.
- Install a submersible pump. To avoid having to frequently clean the filter of pumping equipment, install it on a brick pedestal.
- Connect the pump to stainless pipe . The tube will serve as a frame for the structure made of stones, and water will be supplied through it. Determine the size of the tube taking into account the depth of the container and the height of the fountain X.
- Cover the container with a wire rack and bars. To avoid contamination of the water with large debris, cover the container with a plastic or stainless mesh with a mesh no larger than 1x1 cm. Place several bars across the container that can support the weight of the stone structure.
- Prepare the stones for installation. Give preference flat stones interesting colors and shapes. Wash and dry them thoroughly. Consider their location and drill a hole for the tube (see point 5).
- Collect decorative design made of stones. Carefully place the stones onto the tube, trying to place the center of mass in the bottom 1/3 of the height of the structure. This means that the larger stones should be at the bottom.
- Fill the container with water and check the fountain operation. The water should evenly cover most of the stones. Adjust the pressure and swap stones if necessary.
- Finishing touch. Mask the cracks with small stones and decorate the top of the fountain to your own taste.
Don't quite understand how to make a fountain? The process of constructing such a structure is presented in some detail in the following video.
You can use the most unexpected objects as nozzles. The next video shows a garden fountain made from bottles – it looks unusual.
Choosing a fountain pump
The range of pumps is extremely large, so don’t rush to buy the first model you come across. Your task is to select the device that has the optimal characteristics and is suitable for use in specific conditions. And the first thing you need to decide on is to buy a submersible or surface pump?

Features of surface and submersible pumps
|
Characteristics |
Submersible pumps |
Surface pumps |
|
The device, hidden under the water column or individual structures, remains invisible to prying eyes |
Placing pumping equipment in an open area involves the construction of additional masking structures ( decorative rock, bushes, box). High risk of theft |
|
|
Reduces to installing the pump on a pedestal at the bottom of the reservoir, connecting pipes and power supply to it |
The work is carried out near the reservoir, water is discharged to any part of the fountain |
|
|
Service |
The device is underwater, which complicates routine maintenance. Most models must be dismantled for the winter to avoid damage |
The pump is located in a dry place and has easy access. Easily tolerates wintering on the work site |
|
Hidden underwater pump equipment almost inaudible |
Even when the pump is disguised decorative elements, his work is noticeable by the characteristic sound |
|
|
The best choice |
For small fountains |
For structurally complex fountains when implemented on large bodies of water |
|
As a rule, with equal characteristics, submersible models are cheaper than surface ones |
||
For each specific case, select a pump with the appropriate characteristics. First of all, you should be interested in the following indicators:
- maximum head. Usually denoted Hmax, measured in meters. Characterizes maximum height rising water;
- maximum performance. Designated Q max, measured in m 3 / h or l / h. Determines the volume of liquid that can be pumped through the pump within an hour.
To make it more convenient for you to select equipment, we suggest that you familiarize yourself with the data in the table below. With their help, you can determine the approximate characteristics of the pump.

Indicative data for choosing a fountain pump
|
Fountain type/Characteristics |
H max, m (maximum pressure) |
Q max, m 3 / h (maximum productivity) |
|
Geyserny |
||
|
Cascade |
||
A fountain without a pump - is it real?
There are two approaches to making a fountain without installing a pump:
- pressure due to the pressure of the liquid column. To build such a structure, you will need a sealed container, pipe or hose installed at the location of the fountain nozzle. Secure the container above the level at which the nozzle is located (the pressure depends on the height), connect it with a hose or pipe to the nozzle. Fill the reservoir with water - you will get a periodic design: the fountain will work until the water container is empty;
- pressure due to pressure in water pipe . Take advantage of the pressure potential created in a centralized plumbing system your his gardening partnership. Simply connect the fountain to the pipe and you can adjust its operation as you wish. Only in this case, do not forget to provide options for using the resulting volume of water!

Regardless of what kind of fountain you decide to build on garden plot, be sure to check out the most. Someone else's negative experience is worth a lot! And you can always buy a fountain - a ready-made factory solution that does not require complex work.