Make your own tornado cultivator. How to make a cultivator with your own hands: several simple manufacturing options
In order to get a good harvest, the land not only needs to be plowed and sown. In the process of growing different cultures the soil also needs to be loosened and cultivated. It is necessary to pull out all the weeds and it is especially important to hill up the soil. A cultivator is perfect for these purposes. You can make such a device at home with your own hands, you just need to have a great desire.
Options for homemade hand cultivators
This important function can be performed with a shovel.. But hard work doesn't pay off. Labor efficiency itself increases several times if you use mechanized soil tillage. Hand plow Any owner can do it with his own hands small area land. Special tools may require a welding machine.

It should be noted that soil cultivation began a very long time ago. Several decades ago, at the peak of the garden and country lifestyle, such a tool was very popular. It was either bought from factories or made independently.
The most popular types of tools are:

The scope of application of the devices is the widest. Cultivators can perform the following tasks:
- loosen the soil, thereby saturating it with oxygen;
- cut rows for sowing crops and sprinkle them;
- rid plants from the influence of weeds, etc.;
- used together with a walk-behind tractor;
- break up lumps of soil and level the ground.
Required materials and tools
 In order to always be able to make some necessary products at the dacha, it is necessary to prepare the most popular materials in advance.
First you need to stock up on a lot of steel. It should be in every workshop. The number of different strips, profiles and pipes determines how many necessary tools you can make with your own hands.
Welding will be an indispensable tool in every household. With its help you can quickly and reliably connect all parts various designs. Bolts and nuts are used as an alternative to welding, but the reliability will not be comparable.
Many people do not know where to start when assembling a hand cultivator with their own hands. Drawings are the first thing a novice owner should stock up on . You also need to have the following set of tools and materials:

Cultivator "Tornado"
 Making such a cultivator is not difficult. Its base can be made of a metal pipe. It is necessary to weld steel rods to the end of the lower part of the pipe, thereby forming a square shape. After this, the rods are bent in a spiral direction, and the ends are sharpened.
As an alternative, you can use a bicycle handlebar as a lever, and instead of a metal handle, install a shovel shaft. This will save you a lot of money own strength while working.
Such a device is designed for digging out various roots at great depths, for preparing holes for planting trees, etc. It can be used as an electrophoresis for cultivating the soil with your own hands.
How to make a flat cutter
 Many people are looking for a cultivator for weeding. You can make such a weeding machine yourself. Used as a basis for the frame profile pipe made of metal or steel. This base must be made of 2 parts. You need to weld at an angle of 30 degrees. A wheel fork made of steel pipe or plates 3 millimeters thick. The wheel itself can either be made independently or purchased. The steering wheel must be made of 2 steel pipes fixed to the frame.
The horizontal part of the frame is an adapter for the cutting attachment. Then you need to install a knife, which is made of steel tape 2-3 millimeters thick. Then the knives are sharpened. The sharpening angle can be changed or adjustable knives can be installed. If the farm has old bike, then all spare parts can be taken from him. Because of large diameter The bicycle wheels move very easily when working. The knife is made in the form of an inverted letter “P”, or T-shape. It should be noted that a T-shaped knife must be used very carefully between rows, as there is a possibility of spoiling the harvest.
 A special subtype of the flat cutter is the design with forks. This device has several knives that are attached to a fork. It is made of steel rods, and they, in turn, are curved in a special way.
For such a device you also need to make knives self made with your own hands. Drawings of these devices can be found in various thematic forums and blogs.
The design has a fairly easy movement. A similar device can be used by both a fragile girl and Small child. Loosening occurs on top level, but the roots of the weeds are practically not cut off. To do this, you need to choose what is more important: high-quality loosening or removing pests from the soil.
 Although such a device is called a plow, its intended purpose is contradicted. It does not have the classic properties of a plow. Even two people are not enough to work with such a tool. He is more of a classic cultivator. The device resembles a flat cutter, but a traction handle is additionally installed.
Such a structure is handled by one person from the front, who acts as a traction force. And the second, the operator, controls the process of cultivating the land. It is impossible to use such a device without a co-pilot.
It is important to note that such a tool is not suitable for plowing soil for two reasons. The first is that a normal plow turns over layers of soil, but the device only loosens it. In addition, human power alone is not enough for normal plowing of the land.
Rotary or star
 Making such a device is not a difficult task. To make the structure, you need 5-7 stars, which will serve as knives, strung onto the axle. These knives can be either straight or curved to the sides. After cultivating the soil with such a tool, it is recommended to walk between the rows and a flat cutter. A combination of two models is also possible, when the stars are first used in the design, and then a flat cutter is used for the final stage. This can significantly save the worker’s strength and energy. Since the stars perform the function of wheels in the design, an additional axle is not needed.
Working with such a tool is quite difficult, so only a physically trained person can handle it. In a similar garden design You can install wheels of the same diameter instead of sprockets. In this case, you will get a good weeding hiller.
Cultivator "Hedgehogs"
For the base you need to prepare a powerful fork made of steel strip. In front of the tool there is a working axis with attachments. They need to be made from pieces of pipe onto which steel rods with pointed tips are welded. Actually, that's where the name comes from.

Loosening is carried out by lightly shaking the soil and piercing it, but the weeds remain in place, especially their roots. The main advantage of this subtype is the easy movement of the tool. Inter-row passage is carried out almost effortlessly.
Just like in the star model, in the “hedgehog” design you can additionally install a flat cutter for last stage cultivation of the land, with the help of which all weeds are removed. For the handle, you can use either a shovel stick or a bicycle handlebar. This steering wheel can be used in front of you or behind you.
For the first option, you need to drive the hedgehog attachment itself into the ground own weight. This process is quite labor intensive. For the second case, you need to make the working part heavier. Nevertheless, it is much easier for them to work, despite excess weight. In such work, you can listen to the advice of your parents. They are familiar with such tools personally. In past manual designs were used very often, since there were no mechanized means at all.
Important nuances when working
 When performing any work in the workshop, it is necessary to comply with all safety measures. It is very important to protect your eyes when welding, regardless of the type of welding.
When using arc welding, the danger can come not only from the light from the arc, but also from the breaking off steel at the site of the newly formed seam. Moreover, the seam can break off on its own and be thrown out over a long distance.
Tapping a hot seam is also a bad idea because hardened steel It can get not only into your eyes, but also into your collar or hair. Therefore, these places need to be closed first.
When working with electric welding, you must have gloves and a protective helmet, since the work takes place at high temperatures. You should also avoid combining oxygen and oil, since this is an explosive mixture and a spark is not needed for detonation.
Making a manual soil cultivator with your own hands will cost much less than its factory-made counterparts. The cost will be higher when the design includes mechanized and additional means and “gadgets.”
By making an inter-row homemade product, you can not only save money, but also get the opportunity to design it for your personal needs. This will allow you to achieve maximum convenience when working with such a tool.
Therefore, even such simple products as a “hedgehog” or a cultivator made from a bicycle can significantly reduce labor costs during work. This process will be unique and very convenient.
Land owners know firsthand the labor-intensive process of cultivating land. Using a shovel, hoe, or rake certainly makes work easier, but it is not very suitable for processing large areas and requires considerable physical effort.
But progress does not stand still - they invented it to facilitate human labor. This is a useful find for women gardeners.
This technique is used in vegetable gardens, plots, vineyards and orchards. One machine can replace many accessories and takes up little space.
The options for using a hand cultivator are as follows:
- processes land before planting or sowing;
- loosens the soil to saturate it with oxygen;
- copes with splitting large lumps of earth;
- pulls out weeds;
- helps in caring for flower beds;
- used for weeding the area;
- spuds the earth.
In the article we will talk about what types of cultivators there are, what they are intended for and how to make them yourself. We will also look at several specific homemade hand cultivators.
Capabilities of hand cultivators
For hard-to-reach areas or where a more gentle approach is required, a hand-held rotary cultivator is a good choice. It is brought into operation through human effort.
Due to the “hedgehogs” it copes with heaving and loosening of the soil. It also turns up soil layers, which helps control weeds.
There are also star cultivators that remove roots. They are usually easy to use, replace a shovel, and make digging much easier.

The manual cultivator is intended for:
- loosening the soil;
- digging for further planting;
- removal of weeds by the roots;
- processing areas under trees and bushes;
- enriching the soil with oxygen.
Mini-cultivators are well suited for small plots, they do not take up much space, they are easy to move due to their low weight. Suitable for loosening the soil under trees, bushes and in hard-to-reach places. Facilitation of earthworks occurs due to the correct distribution of the load on the muscles and the position of the person during work. 
Types of cultivators
This equipment is available in different models:
- disk
- paws
- rotary
- milling
Almost all cultivators work on the same principle: the mechanical part is started, which sets the device in motion, loosening the soil.
Its classification depends on the purpose of the equipment: differences in size, engine power, operation, scope of work. Considering these criteria, they are:
- light
- moderate severity
- heavy.
For relatively small areas with soft soil, light equipment is suitable, usually flower beds and greenhouses. Medium-weight equipment is designed for clay soil. Heavy equipment is universal, it is suitable for any type of soil.

Cultivators differ in the way they function:
- hand cultivators;
- with electric drive;
- on gasoline.
We will focus on manual cultivators, which you can make yourself to save money.
A number of advantages of manual designs:
- They are economical and do not require refueling.
- Several devices are replaced: a shovel, a hoe, a rake.
- They take up little space.
- Help distribute the load across all muscles.
Manufacturing technology
From forks of the “Tornado” type
 It has the simplest design, somewhat reminiscent of a corkscrew. Consists of a vertical stand and a horizontal handle. You can safely make such a cultivator yourself using a regular pitchfork.
To do this, you will need a plastic attachment, which is usually used for forks, shovels, in the shape of a handle. We slightly modify the nozzle so that the handle looks like a horizontal pipe. Take a part as it plastic pipe size 0.5 m.
Note: In order for everything to fit together, the diameter of the pipe should be slightly larger than the diameter of the nozzle.
- A cut is made along the pipe so that when turned out, it fits onto the handle.
- For reliability of the coupling and further practical use, secure everything with electrical tape.
- All that remains is to twist the forks into a corkscrew shape. To do this, bend the teeth in the desired direction with a hammer.
Bicycle based
In order to make homemade cultivator from improvised means, it will be useful to you old frame from the bike and  one wheel.
Assembly method:
- The cultivator head is attached to the frame, which is either ready-made spare parts from an old machine, or made independently from steel rods. A small plow is suitable for the frame. And for ease of control, the handle is made of steel pipe.
- The crossbar is made from a pipe with a diameter of 2-3 cm.
- The entire structure is secured with bolts; nothing should be loose.
- For convenience, take a medium-sized wheel and secure it with locknuts.
- This type of cultivator is designed for weeding the soil between the beds.
Disc rotary
This type is designed for breaking up hard pieces and leveling the soil. The main working element is a disk in the shape of a sphere. The whole difficulty lies in their manufacture.
The work order is as follows:
- Spherical plates 4 mm thick are made from metal. The bowls are knocked out with a hammer in the center of the plate itself.
- Discs are welded to the bushings, replacing them on the axles.
- The edge of the axle is secured with special cotter pins in brackets.
- The ledge is made in a bracket that is larger in size; a pipe and a handle are passed through it.
- In a smaller bracket, a rod with a diameter of 25 mm and a length of 26 cm is made. A rod 15 mm thick is also screwed into it.
- The convex corners of the cultivator are fixed using wing nuts.
- Due to the rotation of the convex angles, the large bracket bends, the rod rises, and the angle of the elements changes.
Chainsaw cultivator
 It is made on the basis of a chainsaw engine. It’s good if you have all the components; if not, you need to buy more.
Materials you will need:
- metal corner;
- fuel tank;
- a tube;
- rubber wheels;
- sprocket for the intermediate shaft (41 teeth);
- moped sprocket.
First you need to weld a cube frame using metal corners for a walk-behind tractor. The frame size is 32 by 32 cm, the engine is mounted on top of the transverse corners, and the fuel tank is installed on the bottom on brackets. Then the intermediate shaft is mounted on the corner vertical stands. For the running shaft, bearings are attached to longitudinal angles. From all this comes a walk-behind tractor resting on the surface of the wheel.
For handles, pipes with a diameter of approximately 30 mm are used. Good wheels will come out of rubberized ones. Here you will need a sprocket for the intermediate shaft with 41 teeth and a main sprocket (a moped sprocket will do). All that remains is to assemble all the parts into one mechanism, and you will get a garden cultivator from a chainsaw (by the way, you can read how to choose a chainsaw).
This can be done even without drawings. In addition, the cultivator is not very demanding on materials for refilling, unlike purchased models.
Cultivators make it much easier earthworks, help to properly cultivate the land before planting, fight weeds and are simply irreplaceable for large areas. And if you don’t have the funds to buy these expensive machines, then you can easily make them yourself.
How to make a manual cultivator from a bicycle is described in detail video:
Cultivator – garden tools of varying degrees of complexity, designed for cultivating and loosening the soil. With its help, you can significantly simplify pre-sowing work and reduce the time you spend in the garden several times. However, even the simplest hand cultivators, despite their primitive design, are not cheap and, lacking extra funds, many summer residents continue to make do with a shovel, turning loosening the soil into slave labor. But it’s quite easy to find a way out of this situation - you need to make a cultivator with your own hands. We will offer at your discretion several ways to manufacture this garden unit, starting with the simplest manual model and ending with a tool with electric motor.
A homemade cultivator can have quite complex design- model based on a chainsaw
There is often a product on the market that is very simple in design - the Tornado cultivator, which is a kind of corkscrew on vertical rack with horizontal handle.

"Tornado" - a manual cultivator for easy loosening of soil
Making such a manual cultivator with your own hands is as easy as shelling pears using ordinary pitchforks. To do this, purchase a plastic handle-shaped attachment from a hardware store - they are used for both forks and shovels to make working with the tool easier. Since the handle in the original “Tornado” is made in the form of a long horizontal tube, our nozzle will also have to be improved. To do this, take a piece of plastic pipe about 0.5 m long.
Its diameter should be slightly larger than the thickness of the horizontal handle we purchased plastic handle. Carefully cut the pipe lengthwise so that you can turn it out and put it on the handle handle. It is advisable to secure the tube so that it does not slip during operation and does not jump out of its designated place. The easiest way is to tape it with electrical tape. At the end of the work, we will receive a handle, the edges of which will protrude on both sides of the handle by about 25 cm.

Now it's time to get to the fun part and give the forks teeth the required form corkscrew To do this, use a regular hammer, with the help of which the metal will bend in any direction. It is advisable to have a photograph of the original Tornado cultivator on hand and try to repeat all the bends that exist on it.
Bicycle-based cultivator option
The next manual cultivator, which we will present to your attention, is more complex in design and to some extent mechanized. To make it you will need an old bicycle frame, as well as a bicycle wheel.

A cultivator head is attached to the bicycle frame - this can be ready product from an old cultivator or made independently from sharp steel rods. If desired, a small plow can also be used in this capacity. The handle for convenient control of the tool is made of steel or aluminum pipes. For the crossbar, take a small piece of pipe with a diameter of 2-2.5 cm. All components are secured with bolts, but so that the connections do not dangle - the entire structure must be rigid.

It is better to take a wheel that is neither small nor large, but of medium diameter. It is secured to the frame with special wing nuts or regular locknuts.
Despite the fact that this cultivator is homemade, it can be used to easily remove weeds and weed the space between the beds.
Toothed manual plower
The next model of a homemade cultivator consists of five steel discs-pancakes, which rotate on an axis 320 mm long and 16 mm in diameter. Three discs contain sharp curved teeth, which will be used as a working tool for loosening the soil. At the ends of the axle there are trunnions with bearings, on which steel brackets are fixed, converging on a wooden handle.

Diagram of a gear cultivator: 1 - disks, 2 - teeth made of rods, 3 - axle, 4 - axle, 5 - bracket, 6 - wooden handle
Steel disks and axles are machined independently or ordered from local craftsmen who are skilled at working at lathe. Five holes are drilled on the side surfaces of the three disks, into which teeth made from a steel rod with a diameter of 10 mm are inserted. The resulting disks with teeth are hung on the axle, then axles with bearings and washers are installed.
When such a cultivator operates, the teeth on the discs stick into the ground and turn over surface layer. Sharp “claws” cut off the roots of weeds, loosen the soil and help saturate it with air.
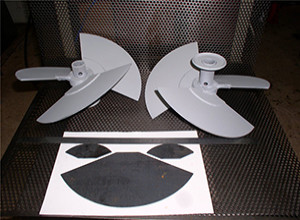
Disc rotary cultivator
You can also make a rotary cultivator with your own hands, which can be used to harrow, break up large clods of earth and level the surface of the garden. The diagram of this model is shown in the figure and it is called a disc cultivator.

Disc cultivator homemade: 1 - disk, 2 - axle. 3 - sleeve, 4 - large bracket, 5 - small bracket, 6 - rod, 7 - pipe, 8 - handle
The working body of the cultivator is spherical convex disks. They are welded to bushings, which, in turn, are put on the axles. The axial ends are secured in brackets using cotter pins.
A pipe with handles at the end and a crossbar passes through a special ledge made in a large bracket. A rod 250mm long and 24x2mm in diameter is welded to the small bracket. A 16mm thick rod is screwed into it, part of which protrudes above the crossbar.
Manufacturing steel disks can be a little difficult. They should be spherical, and give this shape to ordinary metal plates 4mm thick is quite difficult. It is necessary to wield a hammer, with strong blows“knocking out” the bowl in the center of the workpiece.
Wing nuts on the crossbar allow you to adjust the installation angle of the spherical discs in relation to the direction of movement of the cultivator. When the nut is rotated clockwise, the rod rises up. At the same time, the large bracket will bend and the angle of the disks will change.
Electric version based on a meat grinder
At home, you can make not only hand tools, but also an electric cultivator with your own hands.

The photo shows a cultivator made on the basis of a production meat grinder. This design is quite simple to make. Two corners are screwed to the gearbox housing, to which two pipes are welded, the ends of which are bent to obtain comfortable handles. Another piece of pipe is placed between them for strength. Wheel axles are also welded to the corners. It is advisable to use medium-sized wheels, since too large ones will be inconvenient, and small ones will sink into the soil when moving.
The shaft of the structure is machined from ordinary scrap. The attachment of a production meat grinder is chipped off with a sledgehammer and a cast iron bushing remains. A workpiece machined from scrap is placed in it and a grouser screw is welded. The engine switch is located, for user convenience, on the handle.
When moving quickly with such a cultivator, the screw breaks the earth into large clods - the result is rough plowing. If you move slowly, the loosening is more accurate - the soil turns into dust.
Here's another interesting video, which tells you how to make an electric cultivator with your own hands, using a frame, chain and sprocket from a bicycle, and an engine from washing machine.
There are many more ways to make units for plowing land at home, for example, you can make a homemade cultivator from a chainsaw. All you need is the ability to understand technology and a little imagination.
To provide good harvest in your garden beds, it’s not enough to plow the ground and sow it. During the growth, and especially the ripening of crops, the land must be constantly cultivated. Hilling is carried out, weeds are removed, and the hardened surface is loosened between the rows.
All this can be done with a hoe or shovel. However, labor efficiency increases by an order of magnitude if the soil cultivator is mechanized.
Any owner can make such a device with his own hands. You don't need any special tools, except a welding machine.
I must say that this idea is not new. Many decades ago, when the population of one sixth of the Earth was experiencing a gardening boom, such tools were popular. They were bought at hardware stores and, if possible, made independently.
Let's consider options on how to make a homemade manual cultivator
Main types of tools:
Flat cutter. It is a mechanized version of a regular hoe.
Rotary star. The principle of operation is to alternately cut the soil with flat knife-shaped elements.
Hand cultivator hedgehogs. The design is similar to a star, but the ground is pierced not by knives, but by sharp steel rods, similar to porcupine quills.
Tornado. It is a pitchfork with teeth twisted into a small spiral. It cannot be mechanized; it simply needs to be stuck into the ground.
How to make a hand-held cultivator for a summer cottage from scrap materials?
Materials and tools used:
- Steel strips, pieces of reinforcement, or other metal blanks, depending on the selected model;
- A wheel with a mount, or a finished frame (for example, from a bicycle);
- Pen. Can be used metal pipe or a shovel shaft;
- Welding machine(preferably);
- Drill, grinder.
Cultivator "Tornado"

It's very easy to make. The base is made of steel pipe. We weld steel rods to the end to form a square.
Then the rods are bent in a screw manner, and the ends are sharpened. You can use a shovel shaft as a handle, or use a bicycle handlebar as a lever. Then it will be easier to perform turning movements.
This cultivator is used to loosen the soil to a great depth, dig up the roots of shrubs and prepare holes for planting trees.
Cultivator flat cutter
The frame is made of square section corrugated pipe. One welding point at an angle of 30°. We weld a fork for the wheel from a steel strip 3 mm thick to the frame. The type of wheel does not matter; it can be ready-made or homemade iron.
What is a hand cultivator? This is a device for cultivating the land using mechanical devices and hand strength. Just as the work of caring for beds and flower beds is varied, there are also many hand tools, made by hand and industrially. It is generally considered to be cultivators for manual application soil rippers, with a grip no more than 20 cm, on a long or short handle.
Why are cultivators needed?
 Even the most technology-rich area will not be well-groomed if a person’s hand with a narrow tool does not pass through it, loosening the soil next to plants and flowers, breaking the soil crust and exposing and tearing the roots of weeds. This tool is called a hand cultivator and its purpose is:
- loosen the soil, ridding it of crust and saturating it with air oxygen;
- cut furrows for sowing plants, and then sprinkle with new seedlings;
- rid cultivated plants from the proximity of weeds;
- smooth the surface, breaking up lumps - harrow.
These are not all the functions of cultivators. A tool with a comfortable grip, sometimes with handles and a wheel, is used for cultivating the land on a par with electric or gasoline-powered cultivators.
Types of working bodies of cultivators
A manual cultivator for the garden, such as the one in the photo, is always in use. 
Among the many shapes and sizes of tools, they are classified into several types according to the shape and function of the working part. Thus, pitchforks with curved horns, wrapping the roots of the ubiquitous wheatgrass around themselves, were invented relatively recently, and were named for their effect in combating malicious perennial plants.
 Among the new tools, one can note the flat cutters of engineer Fokin, with three-sided sharpening of a narrow strip of tool steel. They have a rectangular handle, adjustable angle for working, and can extract any weed from a narrow crack. These weeding rippers are loop-shaped and cut roots at depth and do not turn them over upper layer soil, keeping mulch on the surface. Toothed hand cultivators, on the contrary, are needed to loosen the top layer.
 Rotary cultivators are used for loosening and weeding. They are efficient and require little effort to set the stargazer in motion. Miniature arrowheads on curved rods make excellent rippers and are often mounted on homemade tools with wheels on manual traction.
So, cultivators are divided according to the shape of the working body;
- flat cutters and hinges;
- serrated, with a flat, sharp and arrow-shaped end, from one to 7 links;
- rotary, with a set of rotating sprockets;
- straight vertical rods – rake tools.
Some models combine two functions, for example a manual rotary cultivator with a loop weeder.
The well-known manufacturer of the drug EM-1 Baikal for improving soil health has created a tool for cultivating the soil. Plate flat cutters of various widths, assembled in a set. Their difference is that the strip is sharpened on both sides and the work efficiency doubles. Handles for these flat cutters are selected separately. The goal is to cut the roots of weeds, which will then destroy effective microorganisms.
Any summer resident dreams of always having at his fingertips the right tool. Therefore, they buy them and create their own designs based on known shapes, but changing the dimensions, handle height, grip width.
How to make a hand cultivator with your own hands
 Anyone can attach the attachment to the handle. We propose to build a hand-held cultivator with your own hands from a discarded bicycle and improvised means. It is better to take a wheel from a teenage touring bike with a wide rim. Only the front wheel with fork is used. The working part on the frame can be made in any way - with teeth in 2 rows, stars or a flat loop. The main thing is that in a manual cultivator the frame must be strong with bolted stiffening ribs connected to handles made of simple or laminated wood. Instead of wood, you can use light tubes made of non-ferrous metal. A convenient and lightweight ripper is indispensable for processing wide row spacings, tree trunk circles trees.
Others no less effective hand tools will become a manual rotary cultivator. Main components in the drawing:
- working elements sprockets or discs – 1;
- axles for fastening working sprockets – 2;
- bushings for assembling the unit - 3;
- connecting brackets, large and small – 5, 4;
- frame rod passing into a pipe and connected to a transverse handle - 6,7, 8.
Discs are spherical and are created by shaping. But with the same success you can use manual “hedgehogs” and with their help assemble the working part. Detailed drawing DIY hand cultivator to help you. 
Among the homemade designs there are full-fledged walk-behind tractors created on the basis of chainsaws and other motor equipment. The value of these homemade devices for the owner is that he used available means and created a tool to suit his needs. On the other hand, the cost of factory models does not always allow you to buy a cultivator from a well-known reliable manufacturer. How else can you assemble a manual cultivator with your own hands, watch the video:
Let's get acquainted with factory-made cultivators
 If a farmer does not have the opportunity to create an inexpensive, effective assistant, Ukrainian engineers have done this. Without engine, with one wheel and handles, simple design facilitates work on site. One of 6 working units is attached to the socket. That’s why the device is called the 6-in-1 universal manual cultivator.
The device weighs 9.5 kg, the handling is good, and the cultivator can be easily handled by women’s hands. The parts shown in the photo represent working tools:
- Hiller, which is the main working tool. Cutting furrows and raking potatoes is done using a hiller. But it is replaced in the kit by a disk ripper, which performs the same function as the hiller.
- A flat cutter with mounted razor knives that cut the roots of weeds is adjustable to the width of the rows of plants.
- The inter-row cultivator is used for loosening and cutting the grass. This tool has adjustable axial tilt and depth of descent into the ground.
- There is a plow; it is used to cut furrows when sowing seeds in the ground.
- Loosen the ground when a crust forms using the stars that are included in the kit.
- The set includes a furrow former and a marker along with it. The unit is used during sowing.
The factory design does not withstand work in heavy, damp areas. Therefore, in the reviews of the masters there is advice to strengthen the wheel mounting frame and strengthen the handles with two rigid jumpers. The handles need to be lengthened somewhat and made more comfortable.
 It is worth paying attention to the design of Vinnitsa craftsmen. It was called without any frills - the “Universal 5 in 1 Digger” manual cultivator. The product costs 450 hryvnia, translated into Russian money 3000 rubles.
The following tools can be mounted in turn on the supporting frame:
- interrow;
- plow with marker;
- razor;
- cultivator.
The result is a frame measuring 64x30x30 cm with a mounting device. The nimble instrument will become an indispensable assistant when planting and hilling, weeding and loosening the garden.
We are used to getting a harvest through hard work. The principles of smart farming suggest otherwise. Do not dig the soil unless necessary, this will destroy its structure. Do not loosen the top layer deeper than 5 cm for the same reason. Do not weed the beds until the last weed. Mulch the soil more often and breed beneficial microorganisms in it. Labor will become easier and the harvest will be greater.
It will clear the top layer of vegetation, trim the roots and shoot furrows with an arrow. To raise the soil and saturate it with air, there is a ripper and a cultivator. They will destroy the crust after watering or rain. The included markers will help you adjust the width of the attachments. The plow and furrow holder are indispensable spring tools.
The manual cultivator contains parts made of high-quality steel. The durable keel coulter determines the depth of tillage. The handles are easy to control and durable. The set of tools is optimal, and the dimensions are such that the cultivator will fit into any nook and cranny.