The design of a gable mansard roof: how not to make mistakes during construction? How to build a mansard roof with your own hands and not make mistakes. Mansard roof plan.
More and more people are resorting to self-construction Houses.
There are many reasons for this, and everyone is guided by their own motives.
But the main thing is savings, of course, subject to knowledge of the matter.
Building your own home should be a mandatory attribute of success for every man.
Investing your savings in real estate is the best thing to do. The house will last for decades and its value will only increase over time.
Of course, a lot depends on the design of both the internal and external parts of a residential building.
For high-quality construction, you will need to study the technology of constructing a mansard roof. Another important skill is knowledge of carpentry. Or you can study the instructions yourself, which describe in detail the entire project of work. You should also pay attention to the fact that there are different.
When starting construction, you need to ask yourself the following questions::
- What are the best materials to use when building a mansard roof?
- How many stages of work remain to be completed?
- How many people will be needed to help with the construction?
- What kind of attic do you want to build?
It is best to plan the construction of an attic, installing a gable roof with a broken line, so you can get the largest area of the future room.
Before starting any construction, it should be developed. When working through it, take the numbers indicated in the calculations seriously; even the slightest mistake can lead to future damage to both the roof itself and the walls of the house.
So how to make a mansard roof? This article will help you answer this question.
- For soft roofs, solid;
- Discharged for slate.
Naturally There are certain rules for installing a soft roof, here they are:
- If the pitched angle of the roof is located in the range from 5 to 10°, then the roof has the appearance of a continuous flooring, special waterproof plywood or boards are used;
- When the inclined roof angle is between 10 and 15°, in this case the roof is made of timber with dimensions of 45×50 millimeters and with a pitch of 45 cm;
- If the inclined angle is greater than 15° for the sheathing timber 45×50 mm is used, but in increments of 600 mm;
- For the skate attachment area install additional beam.

Lathing under soft roof
Installation of the Mauerlat and rafter system
 The Mauerlat is laid after work has been done to level the attic and place the flooring.
Thanks to the placement of the Mauerlat around the perimeter of the attic all oblique angles can be corrected.
The material used is timber. The thickness is selected according to the edge of the walls.
When you lay the mauerlat under the side of the cornice, you should be especially careful.
Make sure the structure is non-thrust, because it is impossible to add additional elements. You will have to dismantle part of the outer masonry of the wall and raise the inner part of the wall.

Mauerlat installation
Installation of insulation
Insulate attic space necessary if you are going to settle it. First of all, it is worth deciding on the material used as a material. The best solution there will be special basalt slabs.
The insulation density is needed at least 30-40 km per cubic meter, otherwise its subsidence in the future is inevitable. And the thickness is 150 mm. A special film is also installed in the roof to protect it from getting wet.

Step-by-step installation of insulation
Installation of lathing and counter-lattice
After the base has been installed, it is necessary to install to strengthen the structure. This is necessary if the inclined angle is large.
The counter-lattice is installed from small beams, which are placed on top of the main sheathing, already laid on the waterproofing layer. When installing a counter-lattice, a ventilation space is created between the roof and the base, which increases the service life.

Installation of sheathing
Installation of waterproofing and vapor barrier
A do-it-yourself broken roof requires installation of waterproofing. To protect the roof from moisture penetration between the roof and the base a special layer of roofing material or film is laid. The counter-grid helps better ventilation to get rid of the vaporization effect.
The most common evaporation protection system is a three-layer structure - a hydrobarrier.
- Reinforced grating. It is woven from polyethylene fibers.
- Anti-condensation or porosity barrier.
Waterproofing is installed on rafters or sheathing.

Installation of waterproofing
Types of roofing materials and their installation
The market offers big choice roofing materials for every taste. Each of them has its own advantages and disadvantages. Any builder first of all looks at the cost of the roof, then at its quality and service life.
Roofing material
Conclusion
The construction of an attic roof requires special diligence and painstaking work if you want to get a high-quality and final result. You will have to invest a lot of effort, not only physical, but also moral.
It will take a smart approach to the work so that it is completed without problems. Encountering a number of obstacles, most owners turn to hired workers for help. But on the other hand, what can bring more pleasure than not doing quality work with your own hands?
Useful video
In this video you will learn how to assemble a mansard roof:
In contact with
- This is not a very ordinary design.
Such a structure must not only complete the entire structure of the building and perform protection functions.
But also to have comfortable life in the room located underneath it.
In order for the living space to be suitable for use, it is necessary to understand the essence of the design of such a structure and the nuances of its installation processes.
Such a design has a number of elements that make up a complete roof system.
The structure of the attic roof looks like this:
- Roof. Roofing is necessary for providing reliable protection from the influence of atmospheric conditions both the entire house and the entire roof system.
- . The supporting part of the attachment system is most often constructed from wooden boards.
- Ridge run. The very top of the entire system.
- Rafters. Supporting ribs that create rigidity for the structure. They have two varieties - hanging and layered.
- Mauerlat. The element is represented by beams that used for fastening the rafter system. The element repeats the location of the perimeter of the house and is fastened to each wall using fasteners.
- Diagonal piles. For that, that the roof structure system has high level reliability, the rafters are connected to each other by beams located longitudinally and by vertical posts, which are connected together by diagonal braces or bevels.
- Internal supports. An element that is located under each rafter leg and provides it with stability.
- Insulation layer. This layer unites the entire roof system into a single whole, while creating reliable sealing, vapor and sound insulation. This layer has its own structure and is multi-layered. All materials that are used to equip this layer are necessary to provide all kinds of properties that ensure comfortable living in the attic.
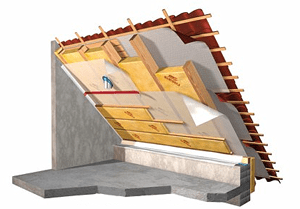
What components and parts does the attic roof consist of, you will see in this drawing:
Drawing of a mansard roof structure
Roofing pie
 Each type of roof has its own individual structure.
It is represented by several layers of different materials, which necessary to protect the attic space from cold air masses and high humidity levels.
The roofing pie of the attic roof includes:
- Lathing;
- Vapor barrier layer;
- Counter grille;
- Thermal insulation layer;
- Waterproofing;
- Ventilation systems;
- Roofing material.
Each layer is designed to perform specific functions that are necessary for normal operation the entire roof system.
If you make mistakes during installation or neglect any of the layers, then this may lead to the need to redo the entire structure.
- . The simplest type of roof over an attic, but not very popular. Represents one inclined plane, which is supported on load-bearing walls of various heights.
- . This kind represented by two slopes, which are located opposite each other.
- Broken. This type of roof has other names - half-hip. This type of design allows you to make the attic space optimal. This design has four ramps. It is quite convenient to live in an attic with this type of roof.
- Conical. The most complex type of design, represented by a cone. Suitable for buildings which have round or polygonal outlines.

Types of roofs
If we talk about the types of rafter systems, they come in 3 types:
- The hanging type of rafters ensures the transfer of load in a horizontal position to load-bearing walls. Such rafters are the basis of the entire system. There is no need for intermediate supports; wooden or metal ties are used to connect the beams.
- The layered variety of rafters is used if the load-bearing wall is located in the center of the building or if there are intermediate supports. This type of rafters is installed on external walls, while their middle part is supported by interior walls. Such a structure can only be built if the distance from the load-bearing wall to another is up to 6.5 m.
- The hanging and layered version of the rafter system is represented by triangles having a right angle. Additionally, this design is equipped with contractions at the bottom and top of the system. To suspend the ceiling, use the tightening of hanging rafters.

Mansard roof: gable structure of a wooden house
Tilt angle
 Very important parameter in the construction of a roof is to determine the angle of inclination of the roof. This value is determined not only by the design of the building, the features of the facade, but also by the selected roofing material and local climatic conditions.
If the precipitation falling in the area where the house is located has great importance, That The roof angle ranges from 45 to 60 degrees.
This value of the slope will ensure better snow removal from the surface, and, accordingly, a decrease in the load level. In addition to precipitation, this angle parameter protects the roof from icing.
If the house is located in an area in which a frequent occurrence is strong winds, That the value of the slope angle should be minimal. Otherwise, the structure may be destroyed due to weather conditions. Under such conditions, variations in this parameter range from 9 to 20 degrees.
However, the most common and optimal roof angle is 20-35 degrees.. This value is suitable for arranging a roof with almost any type of material.
CAREFULLY!
The angle of inclination largely determines the durability and reliability of the structure.

Tilt angle
Installation process
In order to install an attic roof, you must follow a certain sequence of actions:
- Initially, the upper beam is attached, which has section parameters of 10x10 or 15x15 cm. Fastening is carried out using nails, metal staples or self-tapping screws. At the same time, the first beam provides the function of a rafter frame.
- The following is installation of the Mauerlat, which is necessary to take most of the load. To install it, you will need a board with a thickness of at least 5 cm and a beam with cross-section parameters of 5x10 cm. Before laying the board, lay a layer that is necessary to retain moisture and not destroy structural elements. The Mauerlat is attached with nails or staples and additionally tied to the walls using metal wire. The wire is installed at the stage of wall construction.
- Next, install the rafters, choosing for this step from 0.6 to 2 m.
- The gable rafters are installed first., after which they tighten the level and begin to mount the remaining elements.
- After rafter legs all installed provide additional structural reinforcement, connecting the rafters to each other in their upper part.
- If the roof length exceeds 7 m, then installing ridge beams. Otherwise, equipping the rafter system with a similar element is not necessary.
- Once installed move on to equipping the layers of the roofing pie, having previously installed the sheathing.
- The last stage in roof construction is styling roofing .

Installation of sheathing

Installation of rafters
In an effort to effectively use all available space country house Many owners equip the attic. When doing this, you need to be prepared to arrange the roof in a certain way. At its core, an attic is a converted attic and requires certain design solutions and some alterations in thermal insulation and roofing. In general, the construction of an attic roof for a country house is not much different from the construction of other types of roofs. But due to operational features Attic roofs and the requirements for them must have knowledge and understanding of the specifics of the arrangement of this type of roof.
Types of mansard roofs
Like any construction works, the construction of an attic roof begins with the design stage and selection of the most suitable attic roof for the structure, its type and type. For the attic, shed roofs or regular and sloping gable roofs are used. On top of everything else, on appearance roofs are influenced by the materials used and the design features of the roof itself.
Depending on the structural features of the building itself, several standard roof solutions are used during the construction of the attic. Mansard roofs: photos and description
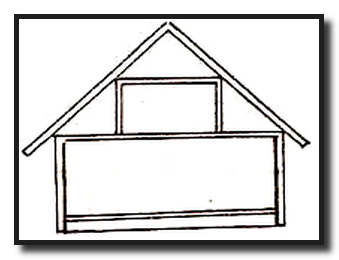
- Gable roof for a single-level attic. This option is a regular gable roof, under which an attic is located. During design and construction, no major difficulties arise due to the simplicity of calculations and ease of construction work truss structure. The main disadvantage of this roof design is the small interior of the attic with rather low ceilings.
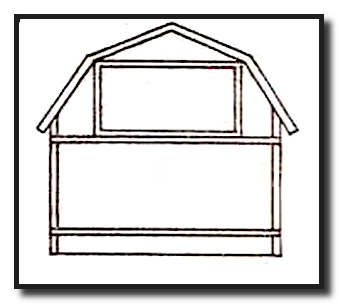
- Broken gable roof for a one-level attic. Unlike the usual gable roof for the attic, in a broken design, 4 pitched planes are used, located under different angles. This type of roof structure is somewhat more complex to design and construct, but its undeniable advantage is the full-size interior space.

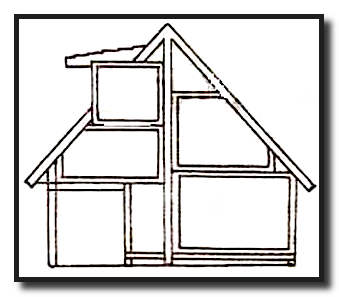
- Single-level mansard roof with remote consoles. The design of this type of roof is more complex compared to the previous ones. But a spacious room and full vertical windows compensate for shortcomings in the complexity of design and construction. The design feature of an attic with such a roof is its displacement and extension beyond one of the sides of the house, and the roof is more like a pitched one.
- Two-level mansard roof with mixed type support. Roofs of this type are the most difficult to design and construct. Such roofs are designed in conjunction with the house, as one whole, due to the multi-level placement of rooms.
Various designs of mansard roofs are not much different in design from conventional ones pitched roofs. Of course, there are certain design features, but in general they are the same as gable or single-pitch, and consist of the following main elements:

. Roof. The outer part of the roof, which serves as protection against various atmospheric phenomena.
. Lathing. More often wooden boards, to which the roof is attached, as well as insulating materials.
. Ridge run. Top part the entire truss structure.
. Rafters. These are the stiffening ribs of the entire roof structure; they can be layered or hanging. Layered rafters are used for the attic roof.
. Mauerlat. This structural element consists of beams laid around the perimeter external walls and connected to the walls using special fasteners. The entire rafter structure is attached to the Mauerlat.
.Diagonal connections. To ensure the reliability and strength of the entire rafter structure, the rafters are connected to longitudinal beams and vertical posts using diagonal connections or bevels.
. Internal supports. To give the roof stability, the rafters and/or ridge girder are supported by vertical beams.
. Insulation layer. Due to the fact that the attic roof and the interior premises are practically one whole, to maintain temperature and humidity conditions, a multi-layer insulation cake is laid between the roof and the walls of the room. The insulation consists of hydro- and vapor barriers, sound and noise insulation, as well as a thick layer of thermal insulation. In addition, proper insulation of the attic roof is important for the safety of the roof itself.
Mansard roof construction technology
When designing and constructing an attic roof, many builders and designers, either out of ignorance or, performing their work somehow, allow serious mistakes in insulation, ventilation and rafter structure. The result is an attic roof, which literally after a couple of seasons becomes unusable, fungus and mold appear, and the roof begins to leak or completely collapse. This happens due to a violation of the mansard roof construction technology.
Due to the fact that the attic roof is maximally drawn to the walls of the interior, and in this case it is quite difficult to obtain excellent heat transfer performance, the entire attic roof structure must have excellent thermal insulation, ventilation and a properly constructed rafter structure using wood treated with fire-bioprotectants.

To make your attic roof reliable and durable, you need to know the following:
- The thickness of the rafters must be more than 250 mm. For such rafters you can use laminated veneer lumber;
- Use materials as thermal insulation that will not lose their properties in the event of increased humidity. For example, extruded polystyrene foam or foam glass;
- between the roof and the thermal insulation layer we make full ventilation with vents and hoods, through which air will circulate under the entire surface of the roof;
- With inside It is necessary to install a vapor barrier layer over the entire surface of the thermal insulation;
- On the outside of the rafters, a layer of waterproofing and, if necessary, a layer of sound insulation are laid under the roof.
Such requirements are determined by certain natural and physical phenomena. But first things first:
A large thickness of the rafters is required to be able to lay a 20 cm thick layer of thermal insulation between them, and this in turn entails an increase in the mass of the entire roof structure, which is supported by the rafters.
The wood for the entire structure is processed by special means for protection against fire and microorganisms, which is a strict requirement of SNiP. This will protect it from damage by fungi and increase its service life.
If you use the following for thermal insulation popular materials, like mineral and glass wool, you can only gain in ease of installation and lightweighting of the entire structure as a whole. But cotton wool, no matter what it is, is cotton wool that absorbs water like a sponge, cakes and loses its insulating qualities. If you choose a material other than polystyrene and foam glass, you should focus on complete resistance to moisture, low heat transfer coefficient and relatively low weight.
A thermal insulation thickness of 20 cm is necessary because in our latitudes it is very cold in winter and very hot in summer. A feature of the attic design is large heat losses in winter and rapid heating of the room in summer. A large layer of thermal insulation will prevent heat loss and penetration inside. But this is only one of the reasons, the second is the safety of the roof. The fact is that the heat that escapes from their premises in winter warms up the roof, on which there is a layer of snow and partially causes it to thaw, and snow is a natural insulation. Melted snow at sub-zero temperatures turns into ice, which has no thermal insulation properties, it weighs down the roof and ultimately destroys the roof itself. And since up to 100 cycles of thawing and freezing can occur in one day, roofing material will fail in literally one season. In summer, the room becomes incredibly hot and stuffy, and you need to install an air conditioner, or even two. But these inconveniences can be avoided by installing a thick layer of proper thermal insulation.

Equally important is proper roof ventilation. It will help cool the roof, both in summer and winter, and also remove excess moisture from under the roof. All this will be provided comfortable accommodation in the attic, it will protect against the appearance of mold, fungi and rot, and in addition, it will protect the roof from destruction in winter.
Regarding steam, hydro and sound insulation, everything is simple. Vapor barrier allows excess moisture from the premises to pass through and prevents its penetration from the outside; waterproofing protects thermal insulation materials and the room from accidental moisture ingress. And sound insulation reduces the noise level from impacts of rain, hail and wind on the roof surface.
Phased construction of an attic roof
Carrying out all the work to create a roof for the attic requires builders certain experience in this domain. Unlike ordinary pitched roofs, building an attic roof with your own hands is somewhat more difficult due to the installation of angled windows in the roof itself and the broken structure of the slopes. To build an attic roof with your own hands, you must adhere to the following stages of work:
Design

The first thing you have to do is develop a roof project. To do this, you can turn to specialists or, if you are good with a computer, do everything yourself in an architectural program. Also at this stage all necessary calculations loads, angle of inclination of roof slopes, etc. To do everything correctly, you should turn to a document such as SNiP “Loads and Impacts” for the necessary information.
Construction of the rafter frame
This stage of work is the most labor-intensive, and in order for a do-it-yourself attic roof to be made with high quality, the combined efforts of 3 - 4 people will be required. We begin the construction of the attic roof by laying and securing the mauerlats along the entire perimeter of the house, using timber with a section of 100x100 mm.
Construction of an attic roof photo:

After this, we install a frame for the attic space, the racks of which will also serve as supports for the rafter structure. To do this, we use a beam with a cross-section no smaller than the cross-section of the longitudinal beams on which the racks will rest. First of all we install vertical racks at the beginning and at the end of the building. We fix them to the longitudinal beams using special stamped metal corners and self-tapping screws. To facilitate all fastening work, we use a screwdriver. Now we lay the jumper over the racks and secure it.

We stretch the cord between the two resulting arches, and if everything was done correctly, it will be strictly horizontal, if not, you will have to disassemble one of the arches, trim it a little and reinstall it. Now, using a stretched cord, we install similar arches with the step provided for the rafters. We connect the resulting arches with jumpers, which we secure with stamped corners or nail plates.

Having assembled the frame of the future interior space, we proceed to install the rafters. We start with those that have the greatest angle of inclination and are on the same level with the frame of the attic room. There are no particular difficulties here. The beam for the rafters is cut to the required design length, a groove is cut at the base of the beam for installation on the Mauerlat, and the top is cut at a certain angle. After which each rafter is installed in place and fixed to the main structure.

The next step is a little more difficult, since you will have to install the upper rafters. The difficulty lies in maintaining a certain angle and centering of the entire structure. To make the task easier, you can first of two long boards make a template that will exactly repeat the future connected rafters. Using this template, we cut the rafters on the ground and then install them in place. The rafter installation algorithm is the same as for the interior frame arches.

To complete the installation of the rafter structure, we nail the sheathing. For lathing can be used as regular boards, and sheets of plywood or chipboards. This will depend on the type of roofing materials.
Creating an Insulation Pie
Having installed the rafters and sheathing, we begin to create the insulating layer. To do this, first of all, we lay a vapor barrier on the inside of the rafters and fix it to the rafters with brackets. Next, we lay the thermal insulation material and carefully ensure that it fits closely to the rafters and does not leave any gaps. On top of the thermal insulation, in increments of 50 cm, we fill the lathing, which will hold all the thermal insulation.

On the outside of the rafters we lay a layer of waterproofing, which will protect against accidental penetration of moisture. Finally, we lay the roof on top of the waterproofing.
Construction of an attic roof: video tutorial
Diversity finished projects The attic roofs are very extensive. They can be with or without windows, rounded or strictly straight, with one slope or several. But no matter what the attic roof is, its construction will require the knowledge and skills of a construction master.
When people start building a house, they rarely think about the fact that the composition of the family may soon change. What to do if you need additional living space, but expanding your home with extensions is impossible due to the small area land plot? The design of the mansard roof solves the problem of lack of space; it can be installed on a house that is just being rebuilt or can be used to reconstruct an existing roof.

Gable attic

Broken roof with attic
Types of mansard roofs
The group of mansard roofs includes all types of roofing, under the slopes of which you can arrange a living space. By building regulations An attic is distinguished from an attic by a ceiling height suitable for human habitation and the presence of natural light. The following are suitable for attic installation:


Houses with any type of roof can be equipped with an attic, however, working with a hipped, pitched and asymmetrical roof is more difficult and expensive; it is better to abandon these options in favor of more rational ones - a gable or broken roof.
Types of attic spaces
A heated attic space is a real alternative to a second residential floor made of wood or brick house. The fact is that increasing the number of floors of a building is associated with significant costs for the capital foundation and the construction of stairs. Different attic configurations are used depending on the available space and the needs of the homeowner:

- Single-level. Under the broken or straight slopes of the gable roof there is only one living space. The construction of an attic of this type does not involve an increase in the weight of the roof, so it is suitable for buildings under construction and reconstruction. Even a master without experience can perform calculations and build a drawing of a one-level attic. According to building codes, the ceiling height in a residential area must be 2.5 m or more.
- Single-level with remote console. A cantilever-type mansard roof device is placed under an asymmetrical roof. To increase the area of the living space, part of it is moved outside the perimeter of the structure. The protruding part of the attic, supported by pillars, is adapted for a shed or garage. The roof of the house with consoles is asymmetrical; the main part of the house is covered by a gable roof, and the console is covered by a single-pitched “patch”. A cantilevered attic is built to install vertical windows for natural light. However, professional architects can create a project and drawings of such complexity, and the complex diagram of the rafter system is not suitable for self-installation.
- Two-level. If the roof height exceeds 5 m, then in the attic room you can arrange two rooms located on different levels and connected by stairs. This type of attic is not built on an already existing existing houses. Two-level premises planned at the design stage, taken into account when creating foundation drawings. The relative arrangement of the rafter system is specially developed for the complex, asymmetrical geometry of the roof slopes. The second level of the attic rests on columns, so the reliability of the structure directly depends on the correctness of the calculations and the professionalism of the architect.

Designers can create real masterpieces from cantilever and two-level attics, using the advantages of panoramic lighting, equip a greenhouse, a nursery or a bedroom filled with fresh air and light, however, a simple single-level design is more suitable for self-installation.
Advantages of the attic
Homeowners try to use every opportunity to rationalize construction costs, so they do not miss the opportunity to use the space under the roof of the house. This option for increasing the usable area of the house has the following advantages:

- Minimum price 1 sq. m of living space. Due to the fact that the equipment of the attic is not associated with an increase in the cost of constructing the foundation, the cost of each meter in the house is cheaper than when constructing two-story structures.
- Rationalization of heating costs. An air pocket between the floor and ceiling of the attic prevents the heat generated heating devices, exit through the roof. Air does not transfer heat well, so the ground floor of the building will be warmer, which leads to energy savings.
- The finished look. The equipment of the attic makes the appearance of the house complete and harmonious, allowing you to equip a balcony, canopy or garage.
- Speed of construction. During the construction of an attic in a residential building, it is imperative to stop using the first floor. The speed of installation allows us to complete the work on equipping the attic within a week.
- Minimum costs. Experienced builders They claim that there is no cheaper way to get a few square meters.
To equip an attic room, the length of the end wall of the building must exceed 4.5 m, and the area of the house must be more than 7 square meters. m, the recommended proportion of height to area is ½.
Natural lighting in the attic
The presence of natural light is a prerequisite that must be met in order for an attic space to be considered residential according to building codes. There are two ways to organize it.

When choosing windows for the attic, keep in mind that it should be in harmony with the roofing material, the total area of the windows cannot exceed a third of the surface of the slopes, and the size of the translucent structure directly depends on the angle of inclination.
Ventilation equipment
If you are going to insulate and heat the attic, it must be equipped with a forced ventilation system. The cold under-roof space is ventilated independently using dormer windows. In a well-insulated attic, natural air circulation is hampered, making it stuffy, damp and uncomfortable. To avoid such problems, installation is necessary:


Arrangement of forced elements ventilation system on a soft roof
A working forced ventilation system makes air circulate using convection - properties warm air go upstairs, making room for cool air taken from the street. This will increase the service life of the rafter system, roofing material, protect against mold and dampness, and also create pleasant microclimate in the attic.

There are ready-made drawings of attic roofs standard size available for installation with your own hands, if you are an inexperienced builder, then it will be most reliable to focus on these options.
Video instruction
A house with an attic is not just additional living space, but also a presentable appearance of the entire structure. Even if the room under the roof is not heated and is used only in the summer, it still has a powerful “air cushion” that helps retain heat inside the entire building.
Making an attic on your own will be difficult, especially if you do not have the relevant experience, because it is a fairly massive and complex structure.
The attic space can be installed under various types roofs, but the most popular is a broken or gable design. According to their structure, they are slightly different from each other.
In order to decide which design will be more suitable for your home and will be easier to install, you need to consider both options in more detail. In addition, the master who will be involved in the construction of the attic roof must figure out which of the two types of rafter system structures to choose.
Any roof belongs to one of the existing two types of rafter systems, it is layered and hanging design. Each of them has a different feature, and which one to choose depends on how the load-bearing walls of the structure are located.
Hanging structure
A hanging structure is a rafter system that rests only on the outer main walls. This happens when in the house itself, except for the external walls, there are no major partitions.
This design can only be used if the distance between two main walls is no more than 8 m, since this system puts a high load on the foundation. To reduce it, various elements are used in the hanging system, such as tie rods and headstocks, struts and crossbars. For example, the headstock hangs the tie to the ridge connection, and the struts pull the beams to the rafters.
For floor beams in a hanging system, hewn logs or fairly thick bars installed on an edge are used. Their cross-section must be at least 100x200 mm. The floor in the attic should be as reliable as possible, and in order not to make mistakes in the parameters, it is better to entrust the calculations to a specialist.
Layered system
The layered system, unlike the hanging one, is supported not just by two external load-bearing walls, but also by permanent partitions installed on the foundation. Therefore, when planning the construction of an attic, you need to think in advance what the structure will be like. strip foundation, on which permanent partitions will be installed. The layered system is perfect for installing an attic because it can withstand high loads compared to the hanging version. It provides good foundation for floor beams and, accordingly, for the attic floor.If you make a broken version of the attic roof, then it makes sense to use a combined roofing system, that is, the side rafters are installed in a layered manner, and the ridge rafters are installed in the form of a hanging system.
Do-it-yourself mansard roof: video, photo
When building a house from blocks or bricks with an attic, its front side is often built from the same material. This is convenient because you don’t have to calculate the parameters of these roof elements and assemble them from bars to lift onto the wall. But it is important to understand that the walls of the building must stand on solid foundation and have good thickness, since such a pediment puts a significant load on the main building.
If the attic serves as another floor year-round, then a gable wall made of foam blocks or bricks is an excellent option for creating a living space under the roof.
In order for attic rooms with a gable roof to be spacious and have a normal height, the angle of the roof slopes should be approximately 45-50°, depending on the width of the end part of the structure. If you take a smaller angle, the volume of the room will significantly decrease. Increasing the steepness of the slopes will make the roof unreasonably high, it will become heavier, will have greater windage under wind loads, and the cost of materials will be inappropriate.
Of course, the installation of a gable roof is simpler compared to a broken structure, since straight rafters are used without additional connections or any kinks. But the broken design allows you to make the room in this part more spacious, and the ceilings correspondingly higher.
The broken system is much more complex in design, calculations, and roofing, but it not only creates a more spacious space under the roof, but also gives solidity to the entire structure. Its main difficulty lies in large quantities complex connecting elements. All connections must be made in accordance with the technology, otherwise the roof will turn out to be unstable.If the walls are built of brick or stone, then it is better to lay out the front parts in advance during the general laying. In this case, in order to create a unique rafter system, aligned with the finished gables, you can install intermediate rafters and special supporting fastenings to them.
Before purchasing and preparing material for a particular system, you need to draw up a design project with the appropriate dimensions - it will become the main guide for preparing and assembling elements during installation.
Video: rafter system for a sloping attic roof
Attic projectWhen developing a scheme for building an attic, it is better to do this in different projections in order to clearly understand how the elements of the rafter system will be placed. It is important to correctly calculate what the height of the roof ridge should be, since the size of the area depends on it.
When preparing a design diagram for constructing a roof for an attic, it is necessary to calculate the height of the ceiling, ridge and total area of the room.
The minimum height from the floor to the ridge is 2.5-2.7 m, but if this distance is smaller, then the room cannot be called an attic; the name attic is more suitable for it. This indicator is established by SNIP standards.
In order for all elements to be accurately drawn and have correct location in the general system, it is necessary to start from a figure with right angles, namely from a square or rectangle - the cross-section of the created attic room. Based on the width and height of the future room, you will never be mistaken with the angles at which the roof slopes are located, with the location of the rafters, ridge and other supporting elements. Having found out these parameters, they must be immediately entered into the drawing.
First of all, you need to calculate the middle of the width of the front wall. Further from this point, the height of the ridge, the attic ceiling, the location of the walls (racks) and the size of the eaves overhang are determined.
Due to the fact that each of these structures has a certain number of connecting nodes with different configurations, it would be nice to draw each of these connections separately in order to understand in detail the features of the pairing of all the elements that are connected at this point.
All rafter systems include basic and additional elements, which may not be found in every structure. The main components of the attic roof include:
- floor beams (the basis for the remaining elements of the system). They are laid on main walls.
- A rafter leg consisting of two sections (in the case of a broken pattern) or straight in gable system. The top rafter in this case is called the ridge rafter, since it forms the highest point of the roof - the ridge, and the rafters that form the walls of the attic are called side rafters.
- Mauerlat is a powerful beam that is attached to the main side walls. It is necessary to install rafter legs on this element.
- A ridge board or beam is an integral element for gable roof, but is not always used when installing a broken roof.
- Construction sites – supporting elements, which are required to strengthen the broken and gable structures. In the first case, the side and ridge rafters are attached to it, and in the latter, the stand acts as a good support for a long rafter. Moreover, the racks are the frame for covering and insulating the attic walls.
- Diagonal connecting elements additionally fasten the longitudinal beams or posts and rafters, thereby making the structure even more durable.
- Inter-rafter purlins are installed in the case of a broken roof for structural rigidity.
- Beams attic floor are used in both versions of the system - they connect the racks, and they act as a frame for the ceiling.
In order to be sure that the project is developed without errors, it would be a good idea to show it to a specialist. It will determine how correctly you selected the attic parameters to the length and width of the walls of the building.
Video: calculating a mansard roof using software
Material parameters for the construction of an attic roof
When the graphic element is ready, then, based on the dimensions set on it, you will be able to calculate the amount of materials that will be needed for the construction of the attic roof. It is necessary to select materials according to their characteristics, which must meet environmental and fire safety requirements.
For wood, it is necessary to provide an antiseptic treatment, which will significantly reduce the flammability of the materials. For construction you will need:
- boards for rafter legs, the cross-section of which is selected based on the results of calculations, which you will learn about a little below.
- Beam 150x200 or 100x150 mm - for floor beams, depending on the width between load-bearing walls, rafter system, as well as for purlins, valleys or diagonal legs - if, of course, they are provided for by the design.
- Beam from 100x150 or 150x150 mm, intended for laying the Mauerlat.
- Typically, timber 150x150 or 100x100 mm is used for racks.
- Unedged board for the subfloor, as well as some fasteners.
- Annealed steel wire with a diameter of 3-4 mm - for fastening some parts.
- Bolts, nails, staples of various sizes, angles of various configurations and other fasteners.
- Lumber for counter battens and sheathing for roofing material - depending on the type of roof.
- Vapor barrier and waterproofing membranes.
- Insulation materials intended for roof thermal insulation.
- Roofing material and special fasteners.
Rafter section
Rafters provide a roofing element that absorbs the main external loads, which means special requirements are placed on their cross-section.
The size of the required lumber depends on many parameters - from the step between the rafter legs, the length of these legs between the support points and ending with the wind and snow load that falls on them.
The geometric parameters of the rafter system are easily determined in the drawing. But to understand other parameters, you will have to turn to reference materials and do some calculations.
It's no secret that snow load differs in different regions of our country. Below in the figure you will see a map on which all of Russia is divided into zones demonstrating the snow load.
In total, 8 zones are distinguished (the last one is considered extreme and can not be considered for the construction of an attic roof).
Sg is an indicator in the table (carefully study the map and the table attached to it).
μ is a correction factor that depends on the steepness of the roof slope.
For example, if the roof slope angle is less than 25°, then - μ=1.0; if from 25 to 60°, then μ=0.7; if it is more than 60°, then the snow will not linger on the roof, and the snow load is not taken into account.
If the attic roof is of a broken structure, then for its different sections the load may have different values.
The angle of inclination of the roof can be determined by a simple ratio of the height and base of the triangle (usually half the width of the span) or using a protractor according to the drawing.

This indicator also largely depends on the region where the structure was built, on the height of its roof and on the characteristics of the environment.
And again, for the calculation you will need to determine the initial data from the map and the table attached to it.

The calculation for this task will be carried out using the following formula:
Wp = W × k × c
W – value in the table, depending on the specific region.
k – coefficient taking into account the location and height of the building (see table).

The letters in the table indicate the following zones:
- A - open areas, forest-steppes, steppes, tundra, deserts, forest-tundra, sea coasts, reservoirs and large lakes.
- B – urban areas, areas with frequent wind obstacles, artificial or relief, at least 10 m high, wooded areas.
- B – dense urban development, building heights from 25 m.
With– a coefficient that depends on the prevailing wind direction (wind rose of the region), as well as on the angle of inclination of the roof.
With this coefficient, the matter is much more complicated, since the wind can have a dual effect on roofs. So, it has an overturning, direct effect on the roof slopes. However, at small angles, the aerodynamic effect of the wind is of particular importance - it raises the slope plane due to the resulting lift forces.
As you have already noticed, the diagrams that accompany the tables indicate the areas of the roof that are subject to maximum wind loads, and also indicate the corresponding coefficients used for the calculation.
It is worth noting that at slope angles up to 30° (in the area of ridge rafters), the coefficients are indicated both negative (directed upward) and with a plus sign. They somewhat dampen the wind load, and in order to reduce the impact of lifting forces, you need to carefully secure the roofing material and rafter system in this area, using additional connections (for example, annealed steel wire).
Once the snow and wind loads have been calculated, they can be summed and taken into account design features system, identify the cross-section of the rafter boards.Please note that these data are indicated for the most commonly used coniferous materials (spruce, pine, larch or cedar). In the table you can see maximum length rafters between the supports, the section of the board depending on the pitch between the rafters and the grade of the material.
The total load value is indicated in Kilopascals (kPa). Converting this value into the usual kilograms per m2 will not be difficult. 1 kPa ≈ 100 kg/m².
As for the dimensions of the board along its cross-section, it is rounded to big side standard sizes lumber.


What tools will you need to install an attic roof with your own hands?
Of course, during work you cannot do without a set of tools, the list of which includes:
- screwdriver, electric drill;
- building level, tape measure, plumb line and square;
- chisel, axe, hammer, chisel;
- jigsaw, a circular saw, hacksaw;
- carpenter's knife
If the work takes place surrounded by competent mentors, step by step and carefully, and the tools are of high quality, the process will be much faster.
Do-it-yourself mansard roof: main steps + video
It is important to strictly follow the sequence of work, because this is the only way the structure will be strong and reliable.
- Mauerlat fastening.
The installation of any rafter system should begin with attaching a powerful support beam - Mauerlat - to the end of the side walls of the buildings. It is convenient to install rafter legs on it. It is made from high-quality timber 100x150 mm. The Mauerlat is laid on roofing felt waterproofing laid along the upper end of the wall (regardless of the material).
Thanks to the Mauerlat, the load is evenly distributed over the walls and transferred to the foundation. It is fixed to the wall using metal pins, which are previously embedded in a crown or concrete belt running along the upper edge of the wall of the structure or anchor bolts 12 mm. They must go into the wall at least 150-170 mm. If the Mauerlat is installed on a wooden wall, then the beams are attached to it using wooden dowels.- Installation of the rafter system.
Installation of the rafter structure begins with the installation of floor beams, which can be mounted on top of the mauerlat (if you plan to move the beams outside the room, increasing its area). In this design, the rafter legs are fixed directly to the floor beams.
Otherwise, they can be laid on waterproofed walls and secured with brackets or corners to the inner edge of the Mauerlat. This option is used if the rafter legs need to be fixed directly to the mauerlat.
The posts should be at the same distance from the middle of the floor beam. In the future, they will determine the location of the walls of the room, namely its width.
The bars for the racks must have a cross-section corresponding to the size of the floor beams. The racks are attached to the beams using wooden plates and special corners. But first, they are fastened with nails, after which they are leveled using a plumb line and a building level, and only then are they thoroughly secured with the expectation of upcoming loads.
As soon as the first pair of racks is installed, they are fastened on top with a block (tightening). It, in turn, is connected using metal corners to the racks.
When the tie is secured, you will have a U-shaped structure. On the sides, layered rafters are installed on it, which are laid on the mauerlat or attached to the floor beam with the second end.
A groove (special notch) is cut into the installed supports for the timber or in the rafters. With its use, the rafters are installed on the mauerlat beam and secured with metal brackets.
To ensure structural rigidity, struts can be installed from the base of the rack to the middle of the side rafters. If this turns out to be not enough, and you don’t mind the material, then it would be nice to strengthen general design contractions and additional stands.
Then the middle is calculated on the puff. A beam will be attached to this place, which will support the ridge connection of the upper hanging rafter subsystem.
The next stage is the installation of ridge rafters. They can be fastened with various connections - these can be powerful bolts with metal washers or plates, or a metal plate.
After installing them, the headstock is attached to the middle of the tightening and the ridge.
Upon completion of work on one part of the truss structure, it is necessary to do the rest according to the same principle. The distance between adjacent rafters in such a system should be no more than 900-950 mm, but the best option there will be an interval of 600 mm, which will give the structure the necessary stability and rigidity and will be convenient for insulation using standard mats mineral wool. But this significantly makes the structure heavier and increases the cost of materials.
First, the side parts of the system assembly are installed, then the intermediate parts. They are connected to each other by purlins, which are installed between the upper ends of the racks and work like spacers. So, we get a rigid structure of the attic rafters, where there will already be a ready-made frame for finishing the walls.
Waterproofing attic roof
As soon as you have built the rafter system, you can begin finishing it with insulation and other related materials.
It is worth noting that the first coating on top of the rafters should be a waterproofing and windproof film. It is attached to the rafters using a stapler and staples, starting from the cornice. The canvases are laid with an overlap (200 mm), and then the joints are glued together with waterproof tape.
A counter-lattice is placed on top of the waterproofing, which will better fix the film on the surface and create a ventilation distance between the roofing and windproof material. Typically, the counter-lattice is made of boards 50-70 mm thick and 100-150 mm wide.
A sheathing is fixed perpendicular to it, on which the roofing material is laid. As for the pitch between the slats, it is calculated depending on the size and type of sheet roofing material, taking into account the overlap required for it.
If you are using a soft roof, then plywood sheets are usually attached to the counter-lattice.
How the roof covering is installed
The roofing material is fixed to the prepared plywood or sheathing. Typically, its installation begins from the roof eaves and then, one by one, from one of the edges - depending on the type of roof. The roofing sheets themselves are installed with an overlap. If metal tiles or metallic profile, then this material is secured using special self-tapping screws with elastic gaskets. Typically, fasteners are matched to the color of the material.
The most difficult stage in coating sloping roof– transition from layered side rafters to ridge rafters. Some difficulties may also arise if the roof has projections for arranging the roof above windows or balconies.Moreover, if a chimney pipe goes onto the roof, it requires a separate design of the hole in the insulating layer and rafter system, and on the roof - a device around reliable waterproofing. It is worth noting that the work of constructing any roof, including such a complex one as an attic roof, is very important and dangerous, and therefore requires increased safety measures. If you do not have experience in such construction processes, then it is better to entrust their implementation to specialists or invite experienced craftsman, under whose supervision perform all actions carefully and carefully.