Do-it-yourself foam ceiling is something anyone can do. Foam ceiling - inexpensive and effective insulation of any room How to make a two-level foam ceiling
Foam plastic is a popular and inexpensive building material, widely used in insulation and insulation. various surfaces. You can build a figured ceiling from foam plastic, which will not be inferior to tension and plasterboard structures.
Material advantages
A foam ceiling is in many ways no worse than plasterboard structures, this is due to the positive properties of the material:
The disadvantages of the material include the fact that it does not tolerate acetone and benzene and is not suitable for finishing expensive interior, and also emits acrid smoke when burning.
Jpg" alt=" DIY foam ceiling" width="680" height="534" srcset="" data-srcset="https://remontcap.ru/wp-content/uploads/2017/06/1_525505b5e4c8a525505b5e4cc7..jpg 300w" sizes="(max-width: 680px) 100vw, 680px">!} 
Creating a figured ceiling from foam plastic
What tools and materials will be needed
What you need if you decide to build a figured foam ceiling:
- Materials
- polystyrene foam - the right amount
- glue for mounting material
- surface treatment primer
- putty
- water-based paint
- Tool
- stationery or construction knife
- jigsaw
- glue gun
- spatula
- roulette
Creating a Project
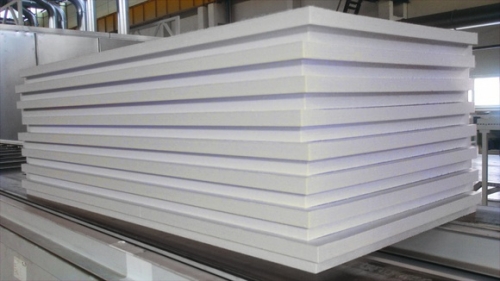
For your venture to be successful, you need to create a ceiling design project. Draw a diagram on paper to accurately represent what you want to see on the plane - will it be curved shapes, clouds in the sky or volumetric flower with backlight.
The material is produced in the form of small layers, so you can simply lay them out on the floor of the room in which you intend to make multi-level design, and transfer the drawing to them.
Then the foam is cut using a stationery knife, if it is not thick, or with a jigsaw, if the thickness is more than 5 cm, along the marked lines.
As soon as curly elements ready, you can start preparing the surface.
Jpg" alt=" DIY foam ceiling" width="650" height="388" srcset="" data-srcset="https://remontcap.ru/wp-content/uploads/2017/06/69ce0e12c7ae9fd51494cb7f4b23c1f8..jpg 300w" sizes="(max-width: 650px) 100vw, 650px">!} 
Preparation
The plane must be cleaned of dust and dirt, and the layer of plaque must be removed. If there are visible defects, they need to be plastered, after covering the surface with primer.
As soon as the plastered areas have dried, the surface is well primed in two layers. After the primer has dried, the surface is ready for installation.
Installation of foam plastic
Since the material is very light, there is no need to install a special frame under it.
Jpg" alt="curly foam ceiling" width="650" height="388" srcset="" data-srcset="https://remontcap.ru/wp-content/uploads/2017/06/d87fc4536a9f5ef7fbd25ed4f8065b7f..jpg 300w" sizes="(max-width: 650px) 100vw, 650px">!}
Polystyrene foam is a material that crumbles heavily when cut, so to create curved structures on the ceiling, you can use an analogue of polystyrene foam - polystyrene foam.
Jpg" alt="curly foam ceiling" width="650" height="388" srcset="" data-srcset="https://remontcap.ru/wp-content/uploads/2017/06/d4a0ccc9e9c32a5c3d2e5a79be7196c1..jpg 300w" sizes="(max-width: 650px) 100vw, 650px">!} 
Jpg" alt="curly foam ceiling" width="650" height="388" srcset="" data-srcset="https://remontcap.ru/wp-content/uploads/2017/06/c1d48f5ce33ca0e1f5fb720dead43bc9..jpg 300w" sizes="(max-width: 650px) 100vw, 650px">!} 
Jpg" alt="curly foam ceiling" width="650" height="388" srcset="" data-srcset="https://remontcap.ru/wp-content/uploads/2017/06/b4e3f3f3f6f25a22593ee333c3475c7d..jpg 300w" sizes="(max-width: 650px) 100vw, 650px">!} 
Foam ceiling tiles
If you don’t want to bother with cutting individual foam elements, you can stick shaped tiles to the ceiling.
There are two types of ceiling tiles:
- Pressed plate
Produced by pressing polystyrene strips, ready product has a thickness of up to 8 mm
- Extruded plate
Shiny and smooth. It is made by pressing to create a different structure on the front side. Distinctive feature of this material– possibility of wet cleaning.
- Injection plate
It has a thickness of up to 14 mm, is made by sintering, due to which a pronounced three-dimensional pattern appears on the surface of the slabs.
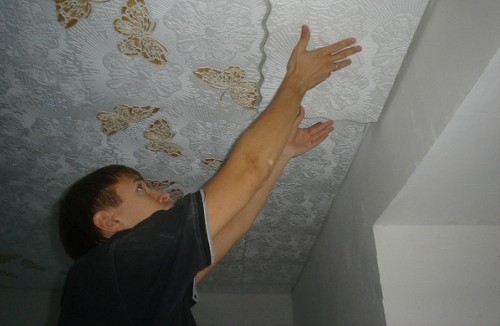
The material is mounted using mounting adhesive onto a previously prepared ceiling surface. The direction of the drawing can be parallel or diagonal, it all depends on your preferences and skill. The work is simple and can be easily completed by one person.
Home renovation is always a labor-intensive and time-consuming task. In order to somehow reduce the time spent not renovating your home, you need to use the most practical materials. However, it is necessary to select not only those that are easy to install, but also those that will last the longest possible amount of time. This is where success comes from. suspended ceilings and foam tiles. The latter is used more and more often, since it can be installed with your own hands with a minimum of time spent and, importantly, effort. In addition, finishing the ceiling with foam plastic is one of the most affordable price solutions.
What is a foam ceiling
How are foam tiles made?
One of the main positive qualities of this installation resource is its complete environmental friendliness. This ceiling is safe for allergy sufferers, which is undoubtedly important in the current environmental situation. In addition, a foam ceiling will retain more heat, as it insulates the space well.
This ceiling is perfect for any room where low humidity, be it a corridor, a bedroom, or a living room. It is usually manufactured using three standard technologies called injection, stamping and extrusion.

Advantages of foam tiles

Problem of choice
There are several tips to help you choose the best tiles for residential premises:

Attaching foam to the ceiling
There is nothing secret or inaccessible about installing foam tiles to the ceiling. Polystyrene foam is an unpretentious material and also cheap, so if there are any problems, you can always buy a couple of tiles. Also, it easily attaches to any surface.
The main thing is to follow the algorithm given below:
Step one. Preparation

Step two. Gluing panels to the ceiling
This is the most important stage of all the work, since the future of the ceiling depends on it: will it be neat and even, or a little in the style of surrealism. The size of the tiles is reduced, as necessary, with scissors or a knife.
For better results, you can follow the following tips:

Step three. Ceiling care
- Foam plastic does not like direct sunlight, so it is necessary to protect it from it.
- Can be coated with special water-based paint. This will greatly increase the service life of the tiles.
- If the tile is initially moisture-resistant, then you can wipe it, otherwise, clean it with a vacuum cleaner.
How to glue tiles to the ceiling, watch the video:
How to decorate a foam ceiling
Thanks to a large number various forms and colors of foam tiles, creating a small masterpiece on the ceiling will not be a lot of work. You can look at the photo beautiful ceilings in a search engine, but you can bring a similar ceiling to life right in your apartment!

Simple option
Whitewashing the ceiling followed by painting is what is meant by the easiest finishing option. Initially, the surface will need to be cleaned and primed. Then you can safely choose suitable paint. The main thing is not to overdo it with mixing colors, because the result may turn out to be far from expected.
To better understand how the color will lie, you need to paint first small area and wait a little. If you are satisfied with the result obtained, then you can safely continue, since the ceiling should withstand several paintings (read: "
In addition, you can paint the ceiling in the color you like. There is a little trick here: than less space in the room, the lighter the color should be. Also, this rule applies in reverse side. In addition, it is better to make the colors of the walls and ceiling slightly different, at least by 2-3 tones.
Do-it-yourself foam ceilings are not a myth, but a reality. With the right attitude, anyone can create the ceiling of their dreams in their home using matching colors and tile pattern. In addition, you can always redo the ceiling without much effort. The main thing is proper planning. Then the rest will definitely work out!
In the process of carrying out repairs and construction work developers cannot do without using reliable and practical materials, which guarantee the durability of a residential or commercial building. As for finishing the ceiling plane, there are quite a lot of methods and options. Tension and suspension systems, wooden structures and other materials. Foam tiles are most often used to decorate the ceiling, as they have such advantages as low price ceilings made of foam plastic, simple installation and maintenance, waterproofness, thermal insulation, as well as environmental friendliness of the material.
Foam ceiling concept
The cheapest and simplest ceiling covering, which can be installed without the help of installers, is foam boards. Such tiles can be of any color, simply white or laminated with a transparent film.
Foam boards can be standard size 50x50, as well as 100x16.5. If you want to install such a ceiling in the kitchen, it must be laminated with film. Using this technology, it is possible to hide various defects and unevenness of your ceiling.

The slabs are glued to any treated surface. While creating decorative ceilings made of polystyrene foam, it would be correct to use special glue so that, if necessary, the tiles can be easily peeled off. The disadvantages of such ceilings are poor moisture tolerance, they are short-lived and can turn yellow.
Making foam tiles
Polystyrene foam is an environmentally friendly product that does not emit toxic substances. That is why it is used in homes to build ceilings. Also this thermal insulation material which will reduce your space heating costs.
The foam ceiling is suitable for the corridor, living room and bedroom. The size of the tiles from all manufacturers is standard 50 by 50 centimeters. Tiles are made in three ways: extrusion, stamping and injection. To find out more, watch the video about foam ceilings.
Extrusion
The material for production is pre-melted polystyrene foam. Using the method of vacuum-thermal molding, tiles are formed from the molten substance. They are resistant to mechanical stress and durable.
To make the product work a certain color During manufacturing, various dyes are added to provide clear, high-quality color. This method requires high precision, to obtain the correct geometric characteristics. Therefore, in the end you get a very expensive foam ceiling with a smooth surface.
Punching
Of all types of tiles, the material produced by stamping is the cheapest. Manufacturing is carried out using special stamps, the starting material is polystyrene foam.

The resulting materials have a high grain size and are produced white. But such tiles can be laminated and covered various substances which give a luxurious look. Provides easy installation and can be painted. Fragile, moisture-resistant tiles practically do not absorb sound.
Injection
The finished tiles are white, but can easily withstand painting with water-based paints. It is also called tile without seams. This is an innovation in the construction market. Used in public and home spaces.

Despite its name, seams are still present, although less than 1 millimeter thick. Therefore, after installing a foam ceiling with your own hands, it is recommended to seal the seams. To do this, you need to choose a high-quality putty or grout or sealant. Never use silicone; a suitable option is acrylic. Silicone sealant It turns yellow over time, no one needs it.
Advantages of foam tiles
Foam boards, which are used to cover ceilings, have the following advantages:
- Waterproof, not moldy;
- Absolutely different designs, cheap, wear-resistant, not bad heat and sound insulation;
- Practical, easy to clean with detergents;
- The surface is waterproof, with waterproofing;
- Resistant to temperature changes;
- In case of any type of damage, they are easily replaced without the need to do complete dismantling ceiling;
- They will go well with drywall, and various coatings and patterns on the foam ceiling will give it an expensive look;
- With the help of such tiles, the appearance of a seamless structure is created.

Choosing ceiling tiles
Before purchasing this product, you need to know what it is. Tiles are divided into three types: extruded, injection, pressed. All types are made of polystyrene foam, but in different ways.
Regardless of the type, before you attach foam to the ceiling, you should look at the corners of the material. They, like the edges, should be smooth, and the angle should be 90 degrees. Avoid any dents or rounding. To check the edges match, stack the tiles in a column.
To check the quality and strength of the material, take the tile by the edge and shake it: good material should not break under own weight. When choosing tiles, buy with a margin of about 15-20%, depending on the area of the ceiling.

We have dealt with the criteria for choosing foam tiles, now let's look at the qualities of each type. Remember that extruded material is used in any room. This is the most expensive of the polystyrene foam tiles, however, despite this, it has many disadvantages: the presence in its composition of freon, which is dangerous for the ozone layer, the lack of clear geometric shapes, and the uneven surface of the reverse side.
The injection surface allows you to create the appearance of a seamless ceiling covering. It has good waterproofing and excellent sound insulation, is resistant to temperature changes, is easy to clean, does not burn and has increased strength. Available exclusively in white, but can withstand painting with a water-based composition.
The large thickness and porosity of stamped tiles provide low noise and heat insulation properties. Disadvantages also include its instability to water, high fragility and inaccuracy of its geometric shape.
Foam installation technology
So, you are interested in how to attach foam to the ceiling. Remember - you can make the ceiling in the room with your own hands. Polystyrene foam is an inexpensive and very practical material. Polystyrene tiles can be laid on plasterboard, wood, concrete, in general, on any ceilings. The work is being carried out in stages.
Preparatory work
Preparatory work includes quite a lot of operations. The first thing you need to do is stock up the right tool and materials. For independent work you will need a minimum set of tools: a knife, scissors, a spatula, a level, a tape measure and a brush. To purchase materials, we measure the area of the ceiling and purchase them with a reserve; you will also need glue and a framing frieze.
Before laying tiles, you should carefully prepare the surface. It is necessary to clean the whitewash from the ceiling, level and prime the uneven areas. If there is fungus on the ceiling, then the area should be cleaned and treated with an antiseptic. To attach foam plastic to the ceiling, “Creative”, “Akrol”, PVA and many other special adhesives are used.

Before pasting, the tiles must be kept in a dry room for 3 days to allow moisture to evaporate. After checking the accuracy of the angles and perimeter, mark the ceiling from the center to the edges. To do this, it is convenient to use a beating cord with any dye.
When marking, take into account the type of arrangement of tiles on the ceiling (diagonal or longitudinal rows). With the help of diagonal rows you will visually increase the ceiling plane, but this is a more labor-intensive process. It is recommended to place the panels away from the center of the room.
Ceiling paneling
The result of all your work depends on how the foam is glued to the ceiling and the quality of the pasting. To begin with, the tiles are cut with a knife or scissors according to required size. Then, using adhesives, the material is installed. Please follow a few guidelines:
- Disconnect electrical wiring before work;
- Wear gloves to avoid staining the tiles;
- The glue is applied in dots along the diagonal and perimeter of the tile (20-30 dots);
- Allow the glue to harden for five minutes;
- When gluing, press the material firmly;
- Use a damp cloth to remove excess glue.
To ensure that the tiles are fixed to the ceiling, use double-sided tape while the glue dries. At the end of the work, it is necessary to remove the gaps between the ceiling and walls. Expanded polystyrene plinth for the ceiling is perfect. Special corner elements decorate the room. In addition, there is an insert for the chandelier where the wires will be hidden. It is desirable that all this be decorated in the same style.
Caring for polystyrene foam tiles
Any white tile turns yellow over time, to avoid this, it is necessary to avoid exposure to sunlight, ultraviolet rays. But there is another option. After the ceiling has been made from foam plastic, to increase its service life and give it a certain beauty, the tiles must be coated with water-based paint. If the tile is moisture-resistant, you can wipe it with a wet cloth or sponge; if not, then clean it from dust with a vacuum cleaner.
Foam ceiling decoration
Every developer wants to make his home more comfortable and chooses the interior to his liking. This also applies to finishing, in particular ceiling decor. Many options are used for decoration - stained glass, plaster, mosaic, painting, etc. Just look at the photos of decorative foam ceilings! After all, on the construction market you can now find everything you want for a unique and luxurious decor for your ceiling.

There are two options for “decorating” the ceiling with your own hands. IN simple version a standard surface is used; in a complex one, a surface with additional structures is used. In addition, there are two design methods: “simple” and “complex” materials with different and multi-level structures.
Simple decor
The easiest way to finish it by hand is to whitewash the ceiling and paint it. It is clear that the surface is pre-prepared - cleaned and primed. After that, just paint it on. Paints can be selected and mixed according to your choice. Do not buy a lot of paints at once, because the color in the photo of foam ceilings may differ significantly from what you purchased, and the shade after mixing may disappoint you.
Therefore, first try painting a small area of the ceiling, if everything suits you, then continue working in the same spirit. This finish can be repainted many times and painted in any form. Be sure to complement adhesive ceilings with various baseboards or moldings. This will add even more beauty.
Complex decor
Performed using plaster various designs, tension systems. It is quite possible to do such finishing methods yourself. The advantage of this finish is that it will hide all your ceiling surface defects.
Additionally, for decoration, you can use caissons of any shape, unique recesses in the ceiling of various geometric shapes. A ceiling decorated with such elements is called coffered. The disadvantage of decorating such a ceiling is that with such decor the height of the room is reduced.

The smaller your room, the choose lighter tone paints for finishing the ceiling. And vice versa. This unwritten rule is intended for rooms that require a visual increase or decrease in space. The color of the ceiling should differ from the wall decoration by at least two shades. In low and small rooms ceiling plinths and cornices should not be more than 100 millimeters wide. A prerequisite for decor is thoughtful lighting.
Now you know how to glue foam to the ceiling, and are familiar with the main types ceiling tiles. Choose the appropriate type depending on the qualities of the ceiling that you plan to achieve after the renovation. The ceiling covered with foam plastic tiles in your home will give your room elegance and unusualness. Do-it-yourself work and cost savings will give the worker real pleasure!
One of inexpensive options thermal insulation and decorative design The ceiling can be called foam finishing. Today this finishing material is very popular. Thanks to wide range products made from foam plastic, the consumer has the opportunity to realize any ideas.
The main advantage of a foam ceiling is the ability self-execution installation work, without the involvement of experienced craftsmen. Therefore, you should tell us in more detail how to make a foam ceiling with your own hands.
Characteristics of foam plastic
Foam tiles are a unique material with which to achieve high level thermal insulation of surfaces. When using polystyrene foam to insulate cottages, cellars, bathhouses and other premises, heat loss through the roof can be reduced by about a quarter.
Polystyrene foam is an environmentally friendly material; during its operation it does not emit harmful substances. Therefore, polystyrene foam does not pose a danger to human health. At one of the stages of production, the raw materials are subjected to heat treatment, due to which the material becomes more dense, and its quality characteristics are improving significantly. Adding dyes to the product allows you to obtain products with a bright, saturated color.

Among the advantages of finishing the ceiling with foam plastic are the following:
- Affordable price. Using inexpensive finishing material provides cost savings and the ability to create original decor rooms.
- Light weight. Thanks to this quality, foam plastic does not weigh down the ceiling and walls, so it can be used in new buildings and long-built houses.
- Resistant to high humidity and temperature changes. The material is suitable for decorating baths, saunas and bathrooms, but in some cases additional protection of surfaces from moisture is required. The ability to withstand large temperature changes allows the use of polystyrene foam in harsh winters and hot summers.
- Possibility of creating patterns on foam ceilings.

Polystyrene foam also has disadvantages, among them the following attracts special attention:
- Light fire. For use near geysers or slabs there is a need for additional protection. If polystyrene foam is used to insulate the roof, then surface treatment with fire retardants is mandatory.
- Low strength characteristics. Even with minor mechanical impact the foam begins to crumble. Particular care should be taken when creating patterns on foam ceilings.
- Poor resistance to aggressive environments. Under the influence of nitro paints or varnishes, the foam may melt, so it is recommended to use water-based dyes.
- Poor permeability. Polystyrene foam does not allow air to pass through, which leads to the formation of fungi and mold in unventilated gaps.
Rules for choosing polystyrene foam
For the right choice products made of foam plastic, you need to listen to the advice of professional craftsmen:
- Angles square tiles must be strictly straight. Otherwise, during the installation process, uneven seams are exposed, and the appearance of the surface is significantly deteriorated. This problem is especially relevant when using seamless tiles.
- The edges of the foam tiles must also be smooth; fraying of the edges is unacceptable. In addition, you should pay attention to the clarity of the drawing; in this case, imperfections will be noticeable on the ceiling.
- You can check the quality of the product in the following way: The tile is taken by one corner and shaken. Quality product made of foam will not break during such actions.
Rules for laying foam tiles on the ceiling
When insulating the ceiling with foam plastic tiles, it is important to observe certain rules. Only in this case completed renovation work will not cause any unpleasant troubles. In particular, the following will help to avoid problems during operation:
- Installation work should be carried out with great care, defects on fragile tiles impossible to fix.
- In the process of laying foam elements, joints always form. Improve aesthetic characteristics finished surface You can use white putty and carefully perform all actions.

- To make corner joints easier, it is recommended to use ready-made corners, the width of which is selected in accordance with the width of the ceiling plinth.
- The mounting location of a chandelier or lamp should be masked using sockets.
- In the process of gluing tiles to the ceiling, you must first draw up a drawing or pattern. Glued tiles are quite difficult to remove or move.
- To avoid dangerous situations It is not recommended to stick foam tiles over the slab.
- When repairing the ceiling in rooms with increased level humidity requires additional surface protection with water-repellent compounds.
Foam Tile Adhesive
To properly glue foam tiles to the ceiling, you can use a universal adhesive composition, which is suitable for all types of foam. However, there is perfect option for this type of work, in particular we're talking about about one-component polyurethane glue. The composition sets quickly enough, which allows you to reduce the time you hold the tiles with your hands raised up. However, it follows that different brands of such glue are characterized by different costs. Therefore, if there is a budget shortfall for repairs, you can choose more affordable options.
To glue tiles to a perfectly flat surface, you can use PVA glue; to improve its characteristics, add a white “Moment-montage” product.

Work on surfaces with minor errors can be done using regular putty. This material simultaneously levels the ceiling and seals small cracks. Preliminary preparation ceiling and treatment with a primer makes it possible to glue foam tiles quite firmly.
Using a mixture of dry gypsum putty and PVA glue as glue has a very important advantage: the composition additionally fills the joints between the elements.
If the renovation is carried out in an old residential building, then additional fastening of the tiles with dowels with white plastic umbrellas is recommended. They are subsequently masked with white putty.
Painting a foam ceiling
Using dyes with aggressive components to paint ceilings made of foam plastic boards with your own hands can cause damage to the products. In particular, compositions with the addition of acetone and alkyd additives can corrode the material. The most suitable option in this case, neutral paint is considered water based. Water-based paint is available in construction stores in a fairly wide range.

Thanks to the wide variety of colors, it becomes possible to choose any color solutions for decorating the ceiling space. Quite often you can find surfaces decorated in silver or bronze. Applying paint using soft fabric allows you to imitate aged gypsum stucco. Also, the decor for the ceiling made of foam plastic can be bright or have a contrasting pattern.
Rules for gluing foam plastic to the ceiling
The strength and reliability of ceilings made of polystyrene foam squares depends on the correct gluing of the products. For this purpose, you must adhere to the following recommendations:
- The old coating is removed from the ceiling.
- Wipe the surface with a slightly damp sponge.

- Mark the base.
- Apply one or more layers of deep penetration primer.
- The corners of the tiles that will be located around the socket of a chandelier or lamp are trimmed.
- Starting from the center of the ceiling and moving towards the corners, glue the tiles.

- The glue is applied to the reverse side of the product, dried a little and pressed the tile to the ceiling.
- Exposed glue must be removed immediately with a clean rag, since once it dries it is almost impossible to remove.
- The joints between individual elements should be carefully sealed.
Installation of skirting boards
Gluing the baseboard is the final stage of creating foam ceilings with your own hands, but the process is quite complex and requires care. To facilitate the process, it is recommended to purchase lightweight elements and high quality glue.

To ensure strong adhesion of the plinth to the working surface, you need to apply an adhesive composition to the base and plinth. This option requires high flow rate glue, so most often experienced craftsmen use a different method. The adhesive composition is applied to the baseboard, the product is applied to work surface, lightly dry the glue, and then press it more tightly and hold it in this position for some time.

Decor corner joints requires certain skills. It is very important to correctly trim the edges of the skirting boards and fit the products to each other. When making a foam ceiling with your own hands, you need to pay attention to the design of the area where the chandelier or lamp is attached. The socket should mask the wires and the mounting location itself.
Thermal insulation of surfaces with foam plastic
Application of foam plastic products for thermal insulation wooden buildings has several features that every home craftsman needs to know about:
- The material should not be used in saunas as the material may melt and even catch fire.
- Finishing cellars using foam sheets requires additional ventilation.
- Rodents can pass through large gaps in foam ceilings and pose a serious threat to the material.
- It is not recommended to use foam plastic inside baths, since the material does not allow air to pass through. As a result, mold and mildew form on the walls.

All of the above rules allow us to conclude that foam plastic products can only be used externally as insulation. It is better to use this material indoors for decoration, making suspended ceiling made of polystyrene foam.
Economical and quick option ceiling finishing - installation of foam boards. There are many types of this material, which makes it possible to show your imagination. You can make shaped elements and even a multi-tiered ceiling from polystyrene foam. It’s easy to do all this with your own hands, without resorting to the help of specialists.
Pros and cons of the material
Styrofoam has a lot positive characteristics, which are identified during installation:
- it weighs little;
- processed without problems;
- helps improve sound insulation in the room;
- has heat-saving properties;
- is inexpensive;
- lends itself well to further processing: painting, etc.
Polystyrene foam has few disadvantages; it is noted that the material turns yellow with prolonged exposure to sunlight. it is fragile and breaks if handled carelessly.
Slab finishing
There are no serious problems during the installation of polystyrene foam. The main thing is to properly prepare the ceiling surface and choose the glue. For installation of slabs, compositions that contain active chemicals are used.
During the process of gluing the board, the glue may protrude along the edges. It can be used to seal joints between slabs. Decorative plinth is an indispensable element of ceiling design; it is mounted using finishing putty.

Surface preparation
This process consists of cleaning the ceiling from dirt, accumulated dust, and remnants of old coatings. For best results, carefully remove all interference. Then prime the surface with a special liquid and leave until dry. If the ceiling is suspended from plasterboard, then it is smooth and the tiles will stick without problems.
The foam is attached according to a pre-designed pattern: diagonally, symmetrically or staggered, combining a number of adjacent plates by half the length.

Installation procedure
If the slab is installed diagonally, work begins from the center of the room or from the window. The plates are glued one by one, at this moment it is important to look carefully so that no gaps form between them, and in general the foam has a correct, symmetrical pattern without deviation in a straight line.

Volumetric compositions are made using slabs of large thickness and size. They are not inferior in appearance to multi-tiered structures on a frame, but are performed faster and easier. To do this, shaped elements are cut out of foam plastic and glued to the ceiling. Such work differs from the version with tiles not only in design, but also in the adhesive composition used. It should be stronger. Liquid nails that firmly connect various materials are suitable.
Before gluing the cut parts, they are treated with a deep penetration primer. The slabs then require further processing. A plaster mesh is glued to their surface to prevent cracks from appearing later. After this, it is covered with starting putty, and after drying, it is sanded to form a smooth surface.
Even and smooth foam plastic is treated with a thin layer of finishing putty, sanded again using a special tool, primed, allowed to dry and painted. This is how three-dimensional figures are created on the ceiling without special effort. There is no need to make a frame, purchase and use it plasterboard sheets you won't have to either.

Various types tiles
This building material differs in its production methods. The plate is pressed, made by stamping from polystyrene strips. The finished product has a thickness of 6-8 mm.
Extruded slabs are made by pressing from polystyrene strip. The thickness of the elements is 2.5-3 mm. The surface is smooth and shiny. The plates are given a different structure: similar to marble, wood in section and others natural materials. This is clearly visible in the photo.

The injection plate is manufactured by a method through which the starting material is sintered. The product is of the correct shape, with a deep pattern, 9-14 mm thick.
Tile selection
At the time of purchase building material pay attention to geometric parameters products. If these are squares, then the angles must be the same and equal 90°. If there are deviations in this regard, the seams will be uneven.
The edges of a good slab are dense, not crumbling, and the grains are uniform in size. High quality foam– with small grains. It does not crumble under its own weight if the slab is held suspended by one of the corners. The drawing on it is clear, bright and without flaws. The slightest dent will be immediately noticeable.
Attention! Quality is easy to check. Take the tile by the edge and shake it. If the material is of poor quality, it will break.
Calculation of the amount of tiles and glue
After selecting the type of slab based on physical parameters and appearance, determine the amount of material required for finishing. If corners are rejected or accidentally broken, purchase 15% more. To find out the surface area, multiply the length by the width.
Foam plastic goes on sale with side line dimensions of 50 x 50 cm. If there are errors, then during finishing, gaps will form at the seams. This nuance is important to take into account.
Liquid nails allow you to properly glue tiles. If you want to save money, it is better to purchase rubber-based glue. Its consumption is lower than that of liquid nails. But in order for the slab to be firmly fixed, you need to give a little time after applying the glue to dry it.
Adhesives such as “Moment” and “Titan” adhere well and connect the slab to any surface, and after drying they hold tightly. After connecting to the ceiling, the element is pressed and held for some time.
Fastening methods
To install the slabs yourself, first make markings. From diagonally located corners, mark two lines through the center using a stretched thread. The place where they intersect is the starting point of installation. If there is a chandelier hanging on the ceiling, then it serves as a starting point to begin work. The joint near the wire is trimmed; anyway, in the end this place will be covered with a special glass. This is clearly visible in the photo.

You can start installation from one side of the wall and gradually, row by row, lay the slab. This is a quick and easy method. But there are also subtleties. It is better to start the first row from the side of the wall that is located near the door, and not the window. In this case, the gaps between the plates are noticeable less. Maintain the symmetry of the ornament, which is located on the edge of the slab. After all, if the patterns do not match, the integrity and beauty of the finish will deteriorate.
Location options
There are many options for the arrangement of elements. Diagonal or parallel are often used. To achieve interesting effects, styling methods and color solutions are combined. The elements are arranged in a checkerboard or snake pattern using different colors. After installation is completed, decorative skirting boards are laid around the perimeter. They are fastened liquid nails or special glue.

If the ceiling is whitewashed, it is more difficult to lay foam on such a surface. In this case, the surface is first coated with primer 2-3 times and allowed to dry. Only then do they start working.
The second option is to partially scrape off the whitewash, this is done with a metal spatula. Then a layer of glue is applied to the underside of the foam board and pressed against the ceiling. It is worth holding it to fix it well. Through a thin layer of whitewash, the glue will be absorbed and adhere to the coating.
If you are planning a budget renovation, purchase pressed slabs, their price is lower than that of other products. If desired, such slabs are coated with water-based paint. But they cannot be used in the bathroom, where high humidity, the material is made to absorb water.
To achieve a seamless finish, use an injection board with a deep pattern that can be inked with dye. The main disadvantage is the high price.

To make a ceiling with your own hands in the kitchen or bathroom, purchase extruded material. After all, it washes well if you add warm water mild cleanser.
Tool
To install foam plastic on the ceiling yourself, you will need the following tools.
- Stationery sharp knife;
- Corner:
- Painting cord for marking;
- Ladder;
- Roulette;
- Metal spatula.
The technology for gluing foam plastic to the ceiling is not complicated. With the right approach, anyone can do it. But some subtleties, if you know them, will help you avoid inaccuracies and mistakes.
- Before installation, leave the material for some time in the room where it is intended to be used.
- Color combinations can be arranged in a diamond pattern.
- Do not interrupt the process in the middle of the row so that nicks do not form and the seam does not get lost.
- It is possible to fill the gaps only after the glue has dried. For this, a special putty or sealant is used.
- Remove glue from the stove immediately before it dries.
- Press the slab against the ceiling not with your hands, but with an even block of wood to distribute the load evenly.
- High power lighting install at a distance of at least 20 centimeters from the coating so that the foam does not melt.
- To ensure that each individual piece faces the same direction, draw a small arrow on the wrong side so as not to go astray.
- Align the parts relative to the ceiling using a two-meter level or rule.
To learn more about how to glue a single-color or multi-colored board, look detailed instructions on video: