Options for modern toilet finishing. Finishing a toilet: types and design ideas How to decorate a toilet in an apartment
Modern market finishing materials offers many practical solutions for finishing bathrooms. Until recently, those who were planning to renovate their toilet had only two options - painting the walls or tiling them. Now you can choose from several available options, each of which has its own advantages and disadvantages.


In today's article we would like to tell you about one of the easiest and most convenient ways to finish walls and ceilings in a bathroom - plastic panels. You will learn about the features of this finishing material, the basic principles of working with it, as well as how to choose the right plastic panels for the toilet.

pros
First, let's look at positive sides using plastic panels as finishing material for the bathroom. The list of advantages of these products is quite impressive:
- Low price. This method of surface finishing is one of the most cost-effective. It would be cheaper to paint with water-based emulsion.
- Easy to install. Plastic panels do not require special repair skills. Even those who have undertaken repairs for the first time can cope with their installation.
- Fast installation. Installation of one PVC panel takes just a few minutes. Since bathrooms usually have very small area, all the work will take you very little time.
- No need for surface preparation. There is no need to level or plaster the walls for plastic panels.
- Low maintenance requirements. PVC is a waterproof material that perfectly withstands wet cleaning and contact with various detergents. Therefore, keeping the walls in the toilet clean will not be difficult.
- Wear resistance. Despite the fact that plastic is a fragile material, if you do not subject it to strong mechanical stress, PVC panels will last you quite a long time.
Minuses
However, plastic panels have not only positive aspects. Negative qualities This finishing material does not have many, but they are still present, so one cannot remain silent about them. So, the disadvantages of PVC panels are:
- Instability to heat and fire. Plastic panels are deformed under the influence high temperature, therefore you should not place heaters and heated towel rails close to them. In addition, plastic is not a fire-resistant material: it can catch fire if it comes into contact with fire. Therefore, you need to be careful when smoking in the toilet.
- Large dimensions. At first glance, it seems that the plastic panels are absolutely flat, but in fact they can be up to 2 cm thick. In addition, a few more centimeters of space are often “eaten up” if the walls in the room are uneven. For large bathrooms this is not critical, but in small toilets this can become a real problem, as it will not allow the tiny area to be used to the maximum.


Types of panels
Plastic panels intended for finishing walls and ceilings in the bathroom come in several varieties.

Leafy
The most popular type is sheet panels, which are rectangles from one to one and a half meters long. The thickness of such panels is 0.3-0.6 cm. They can be plain, with ornaments or imitation of natural structures - wood or stone. To Work with sheet panels most convenient due to their large dimensions.


Rack and pinion
Slatted panels for finishing bathrooms are used much less frequently. They are most often used for outdoor work or large premises. This type of plastic panels looks like long narrow strips. The length of such panels is from 4.4 to 3.7 meters, and the width is from 12 to 30 cm. Slat panels imitating wooden beams look especially impressive.


Stacked tiles
The least common type of plastic panels are type-setting tiles. They are squares different sizes, which allows you to lay out various patterns on the walls and ceiling, like a mosaic. The elements are connected through grooves in the panels, and everything is held together with special glue or clamps.


- If you want to purchase a product with maximum strength, choose plastic panels with a thickness of at least 0.8 cm. In addition, pay attention to the number of “ribs” on inside– they give additional rigidity.
- The quality of plastic panels can be determined by its appearance. Take a close look at the front of the product: the paint should be applied evenly, and the design, if there is one, should be clearly printed.
- As with wallpaper, the color of the same wall panels and different batches may vary by several shades. Therefore, buy products only from one batch.


The high cost of wall panels does not always indicate the same high quality, so price should not be the determining factor when choosing. However, material that costs significantly less than its counterparts from other manufacturers is usually not made in good faith.
Preparation and stages of repair
Before you begin finishing the toilet with plastic panels, you should carry out some preliminary work. By this stage of the repair, you already need to install the toilet, level the floor, lay it out ceramic tiles or cover with linoleum.

Experts advise preparing plastic panels for installation and further use by treating them with an antiseptic. This will protect the material from exposure to heat and moisture, so there is no need to worry about the appearance of fungus and mold.

- Stage 1. Installation of the side posts, which will serve as the basis for the frame.
- Stage 2. Lathing the structure with slats and cross members.
- Stage 3. Attaching plastic fittings.
- Stage 4. Cutting and installing plastic panels.

Basic principles and installation
Let's consider each of the above stages of work in more detail.
- One rack should be placed in each corner of the room. At the same time, they should not be in contact with the floor and ceiling, so we place some material between the racks and surfaces. After the structure is fixed with screws, the temporary support will need to be removed. The side posts must be placed plumb so that they are strictly parallel. We maintain a step of 0.3-0.4 meters between fasteners (we use screws as fasteners).
- The sheathing of the side posts is done with wooden blocks along the perimeter of the structure at the top and bottom. The fasteners should be screwed in at an angle of 45 degrees - this way we can securely fix two slats at once. Next, the slats need to be secured to the walls using self-tapping screws. This is the main frame, which, if necessary, can be supplemented with side posts or cross bars. The step between frame elements should be about 0.5 meters.
- We nail the plastic fittings to the frame using nails and a hammer. The fittings need to be cut at an angle of 45 degrees - this way it will fit more tightly. Since PVC panels are quite flexible, we install fittings, including in the corners. If there is a gap between the slats and the wall, fill it with scraps of plastic, then hammer in a nail. Nails for installation should be selected with large flat heads. In order not to damage the plastic elements when driving nails, the final blows are performed not on the head, but on the protective attachment (for example, you can use a nail).
- The final stage, when correct installation frame and fittings, takes very little time. We cut plastic panels using a hacksaw. At the same time, the size of each sheet should be a centimeter and a half less than the space prepared for it, since the missing length is compensated by plastic fittings. We insert the cut sheet into the grooves and attach it to the slats. We insert the next sheet into the previous one, then also nail it to the crossbars.
Do-it-yourself apartment renovations are always a source of pride for anyone. home handyman. But what if you have absolutely no experience in construction and finishing?
In this case, it is better not to touch complex rooms, such as the living room or kitchen, but you can practice on finishing the toilet. First of all, this is the most small room There is not a wide variety of finishing materials in the apartment either. In addition, if in the end nothing works out, you can turn to specialists, and they will redo everything without significant damage to your wallet.
The most common material for finishing a toilet is plastic panels, and it’s not just the ease of installation, there are a number of advantages that speak in favor of this option:
- A wide variety of colors and patterns that are great for decorating a toilet.
- Easy aftercare. Plastic panels are not at all afraid of water and detergents.
- Minimal financial costs for finishing work, even taking into account all the necessary components.
- There is no need for a huge number of tools. Any home craftsman will have everything you need to decorate a toilet with plastic panels.
Selection of plastic panels for finishing the toilet

As often happens, due to the high demand for plastic panels, many unscrupulous manufacturers have appeared on the market. It is very difficult to determine the quality of plastic by eye, and to the average buyer they all seem the same. But this is not so, and in order not to become a victim of scammers who skimp on the quality of their products, you need to follow a few simple tips:

The correct choice of panels for the toilet is already 50 percent the key to a successful renovation. It's much easier to spend an extra hour in the store than to redo all the trim for next year, or even earlier.
Important ! When buying plastic panels for finishing a toilet, you should always take two or three segments in reserve.
If at the end of the repair it turns out that the initial calculations were incorrect, the same panels may no longer be available in the store.
Preparation for installation of plastic panels

A good master begins any repair with preparatory work and making lists of everything needed. If this is not done, you may have to run to the hardware store more than once to get the missing materials or tools. Often, this takes much more time than the entire renovation, especially when it comes to such a small room as a toilet.
List of necessary materials for finishing the toilet

- Plastic panels with a small margin.
- Decorative elements: corners, baseboards. You also need to take it with a reserve.
- A wooden beam no more than 2 cm thick. The quantity is determined based on the installation horizontally, with a distance of approximately 30-50 cm.
- Impregnation for wood that prevents rotting, and a brush for applying it.
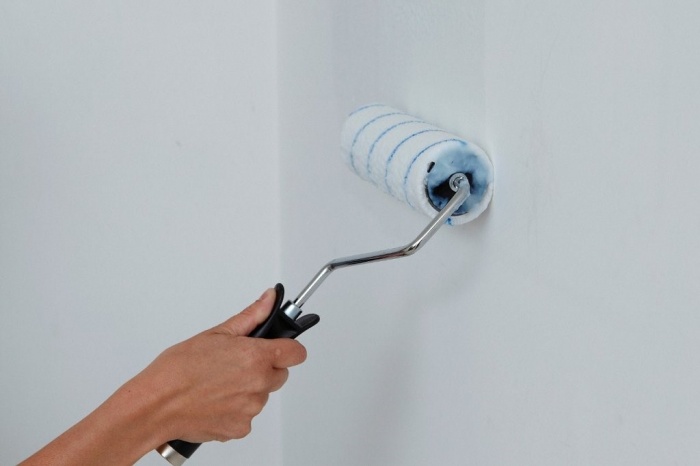
- Primer for walls with an antibacterial effect and a roller for its application.
- Dowels with a diameter of 6 mm and a length of 60-80 mm.
- Staples for a construction stapler.
- Glue for plastic. Will be needed to install external decorative corners.
- Self-tapping screws for wood. Will be needed to finish the riser in the toilet with plastic panels.
- Plastic film or thick fabric to protect the plumbing in the toilet.
Advice ! There is no need to skimp on consumables such as screws or staples. Fasteners are never superfluous in the household, and in finishing works, its deficiency may affect the service life of the entire repair.
List of necessary tools for finishing a toilet

- A hammer drill or hammer drill with impact mode, as well as a drill for it corresponding to the selected dowels.
- Hammer.
- Pencil, tape measure.
- Hacksaws for wood and plastic, or a jigsaw.
- Sharp construction knife.
- Metal spatula. Needed to remove old paint from the walls, if there is one.
- Construction stapler.
- Level with horizontal and vertical indicators.
Warning ! You should not cut timber and plastic panels with a grinder. As a result, a lot of acrid smoke is formed, which neighbors may mistake for a fire, and then you will have to explain it to them for a long time.
When both lists are collected and everything you need to finish the toilet is at hand, you can get to work.
Preparing the base for plastic panels
The quality and durability of any finish largely depends on the preparation of the base. Unlike more complex rooms in an apartment, finishing a toilet does not take much time and effort, so each stage needs to be given special attention. It’s better to spend two extra hours today than to redo everything later.
First of all, you need to completely clean the walls and ceiling of the toilet from old finishes or paint. This is done using a spatula and a light hammer, which is used to tap the surface. A coating that has become unusable will immediately disappear.

Next, the bars are prepared. They must be cut to the required length based on the horizontal attachment to the wall. When all wooden elements When ready, they are treated with impregnations and taken out to dry on the balcony or staircase.

Important ! The size of the bars should be a few centimeters smaller than the toilet room. This is necessary so that the tree has the opportunity to expand.
In the meantime, while the bars are drying, there is time to continue preparing the walls in the toilet for finishing. They need to be treated generously with an antiseptic primer; it prevents the formation of mold and harmful fungi. Impregnation is done using a foam roller. To dry completely, when room temperature, it takes about an hour, which means you can take a short break and catch your breath.
Installation of wooden sheathing under plastic panels
When the walls in the toilet and the wood are completely dry, you can begin fastening. First of all, fix the block a couple of centimeters above the floor, along the entire perimeter of the toilet room. The timber is passed under the ceiling in the same way.

If the ceiling in the toilet will also be finished with plastic panels, then lathing is also needed on it; the fastening technology is no different from the wall one:
- The block is applied to the surface, and using a hammer drill, a hole is drilled through the tree into the hay. The first fastening should be approximately five cm from the edge. A dowel is driven into the hole. The second edge is attached in the same way. Now that the block is fixed, it is further strengthened, with a step of 30-50 cm between dowels.
- When the bars around the perimeter of the toilet room are installed, use a tape measure to measure the distance between the lower and upper bars. It is divided into two, and another beam is attached exactly in the middle of the wall.
- The resulting two sections are once again divided in half, and the beam is placed again. This is done until the distance between the guides is approximately 50 cm.
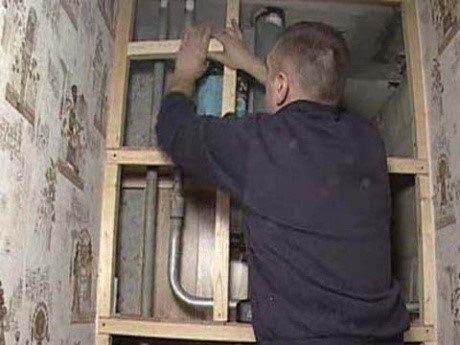
- Certain difficulties may arise with communications, which also need to be finished with plastic panels. To do this, boxes are made from the same block as the sheathing, which are attached to the wall and floor of the toilet. You can connect the bars together with wood screws.
Advice ! if spotlights are planned as ceiling lighting in the toilet, the block must be mounted below the ceiling, at least 15 cm. This is done using profile fasteners.
You can watch the video in more detail on how this is done.
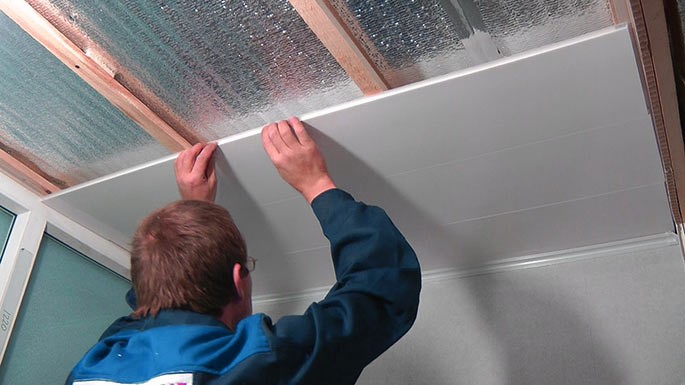
Installation of plastic panels in the toilet
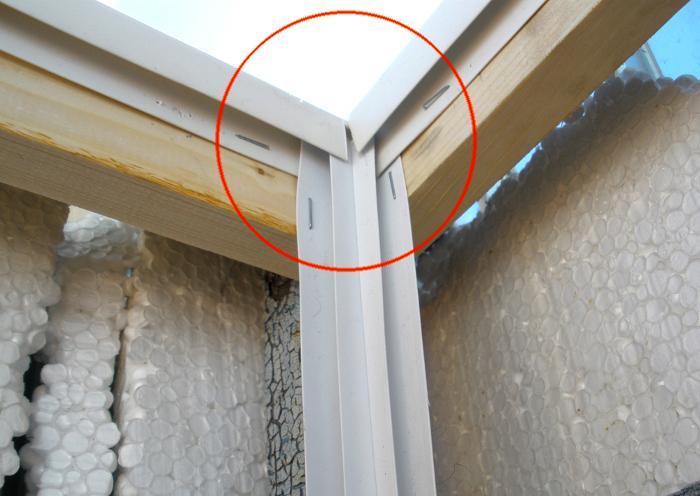
Before installing plastic panels, it is necessary to attach guide moldings to the corners of the toilet and to the ceiling.
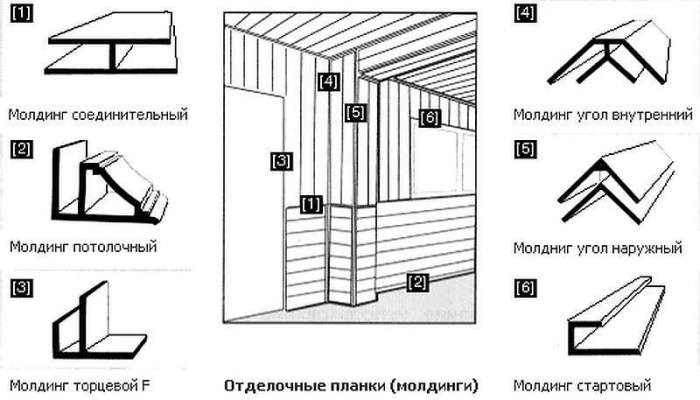
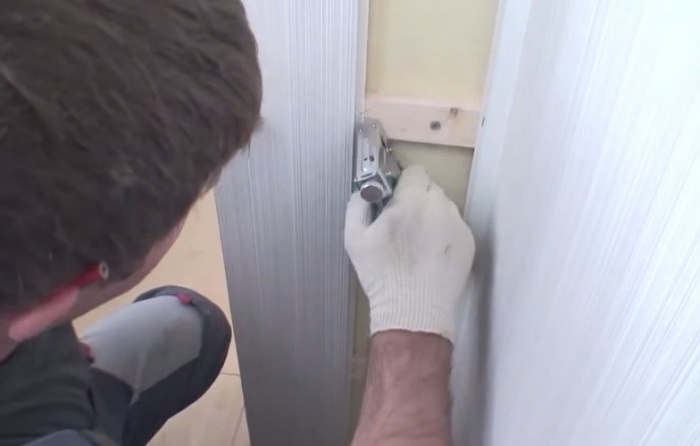
All finishing strips are fastened with staplers to the bars
When installing plastic panels in a toilet with your own hands, always start from the left edge and the ridge to the corner. Using a construction stapler, fastening brackets are driven into the corner groove and ridge on the other side of the panel.
Important ! The first panel must be installed strictly in level. All other finishing elements will be oriented towards it.
The second plastic panel is inserted into the groove of the first and its ridge is also fixed with brackets along each wooden guide. All stages of installation are clearly shown in the video
After the walls of the toilet are completely covered with panels, the boxes covering the communications are finished. Here, perhaps, each panel will have to be cut to length; subsequently, these places will be covered with decorative corners.
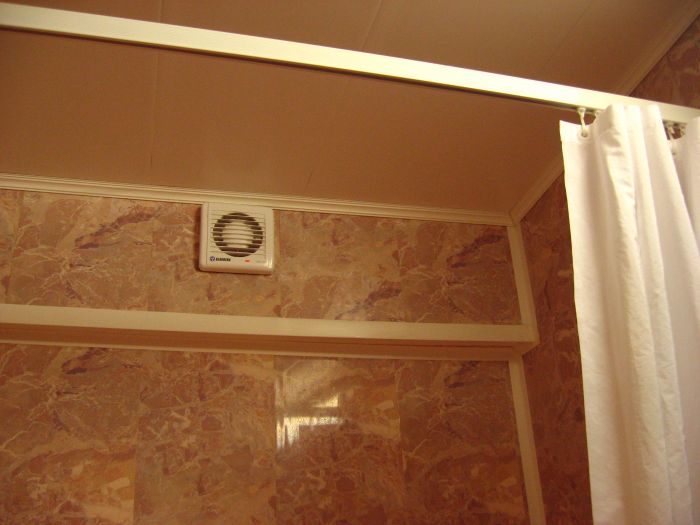
In the same way, plastic panels are installed on the toilet ceiling. But here it is important to immediately make holes in the places of the lamps and bring the electrical wires out.
Installation of decorative elements on plastic panels
The easiest way is to use external corners in finishing the toilet; they are much more convenient to install and are not inferior in quality to those into which plastic panels must be inserted.
Plastic glue is applied to the corner and applied to the junction of the panels. Good glue It sets in a few seconds, so it is important to have time to glue the corner before it dries.
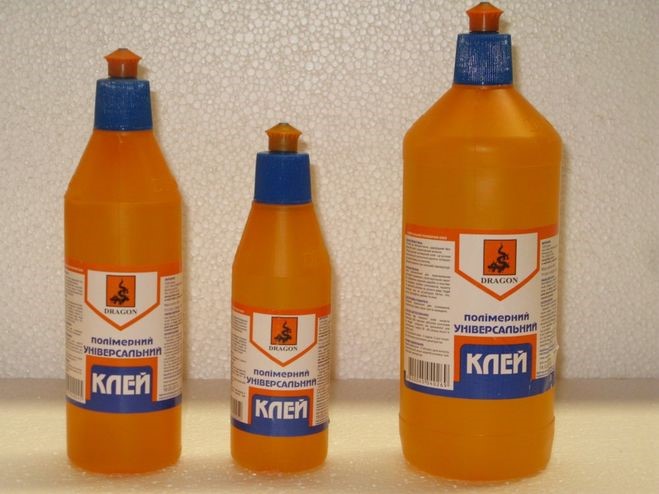
Using the same glue, floor and ceiling skirting boards are fixed. Any excess glue can be removed with a soft cloth, and at this point finishing the toilet with plastic panels with your own hands can be considered complete.
It's all up to the installation necessary accessories and lamps, but this is a topic for another conversation.
Conclusion
As you can see, there is nothing complicated about decorating a toilet with panels yourself. All stages of repair will take a maximum of two days. Even if it's the first do-it-yourself repair in an apartment, it will allow you to gain invaluable experience, and perhaps the next step will be more complex premises, which also require repairs and finishing.

And in order to avoid the most common mistakes when renovating a bathroom, you can watch the video
Despite the fact that the toilet is one of the most important rooms in the house, owners try to leave its renovation until the very last moment. Basically, finishing PVC panels toilet can be carried out independently.
To do this, you only need to know what tools and materials will be needed, as well as the sequence of repair work and some features.
The fact is that this room in many apartments is considered the smallest, so it is quite difficult to carry out repair work in it with your own hands. When involving professionals, the cost of renovation can be even higher than in a bathroom.
At the same time, the toilet room also requires Beautiful design and quality finishing.
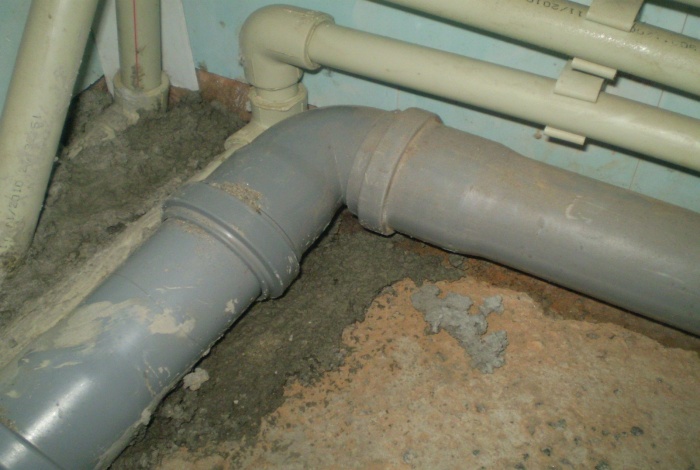
Advice. Before deciding on the choice of new finishing materials for the walls and ceiling in the toilet, you need to replace old, outdated sewer and water pipes new, more modern and reliable. Timely replacement of communications will avoid new repairs in the future.
As soon as these works are completed, you can move on to the main work.
Taking into account the fact that the air in the toilet is less humid than in the bathroom, the choice of materials for cladding the ceiling and walls increases. Finishing materials should be selected in such a way that the walls and ceiling are easy to clean and do not absorb odors.
Therefore, the most ideal materials for the toilet are:
- washable wallpaper,
- ceramic tile,
- PVC panels.
The last option, as practice shows, is considered the most convenient and economical option when decorating a toilet with your own hands.
Advantages of PVC panels

The advantages of PVC panels are that the range of these finishing materials is large; the buyer can choose for this room a plain material, panels with imitation wood, marble, malachite, etc. You can create a brighter design in the toilet using PVC panels with abstract drawings and patterns.
In addition, the cost of panels per square meter, as a rule, does not exceed eight dollars.
So:
- The length of one plastic panel ranges from 2.5 to 3 meters. This makes it possible to use one sheet along the entire length of the wall.
- Another advantage of this material is that it can be used to decorate not only walls, but also ceilings. True, for such surfaces it is better to use narrower plastic panels.
In this case ceiling covering will look more neat and harmonious. - In addition to all this, finishing the walls with PVC panels for the toilet is much faster and easier. To cover walls with this material, rough work on leveling and priming the wall surfaces will not be required.
Positive point Another advantage is that all communications can be easily hidden behind the panels. - Installation of the panels can be carried out without preliminary heavy leveling of the walls with plaster. You can quickly level even the most uneven and crooked walls using a special lathing that can be attached to the surface without removing some old coatings (wallpaper, whitewash, tiles and putty).
In addition, when creating the lathing, no special skills or any special knowledge is required.
Finishing a toilet with PVC panels, video instructions can be viewed right now.
PVC is considered the most attractive material due to its moisture resistance. The same coating allows for quick and very easy cleaning of the room.
Advice. To clean the surfaces of walls and ceilings from limescale, dust and stains, all you need to do is wet cleaning with a soft sponge or rag soaked in detergent.
Instructions for finishing a toilet with PVC panels

All cladding repair work comes down to three main stages. First you need to prepare the surfaces, then create the sheathing, and finally you can install the panels themselves.
So:
- The repair begins with measuring the toilet. You need to measure the length, width and height of the room, and when taking measurements you should take into account all areas and protrusions around the perimeter of the door. Don’t forget that you will have to create decorative box, with the help of which it will be possible to hide communications, i.e., it will also have to be measured.
- Now you need to properly prepare for repair work room. If the toilet room is finished with PVC panels only on the surface of the walls, then it will be necessary to remove all the old coatings and clean the walls.
If the finishing is carried out on the ceiling, then its surface will also need to be thoroughly cleaned of old coatings and dust. - After removing old coatings from the surfaces of walls and ceilings, you should remove construction debris and clean the room, since repairs are easier to do in a clean room. If the walls in the toilet were covered with wallpaper, then finishing with plastic panels can be done without removing this old coating.
But wallpaper can only be left if the room is dry enough and condensation does not accumulate on the surfaces. Otherwise, fungus will collect on the damp wallpaper under the new coating. - Next, you will need to create a sheathing of timber measuring 20x40 mm. At the same time, it is worth remembering that wooden beams may be susceptible to rotting, so in a toilet with increased level humidity, it is advisable to make a metal frame.
Between the elements of the sheathing it is necessary to maintain a distance of no more than 500 mm.
Advice. Suitable for creating sheathing wooden slats 10x50 mm, with their help you can also level the surfaces of the walls. In addition, all wooden parts of the sheathing should be treated with a special composition to protect against fungus and microorganisms.
- Next, all that remains is to install the PVC panels. Before starting work you should look step by step photo installation.
First, it is recommended to decide where exactly the plastic strips will be installed from. You can attach this finishing material to the sheathing using construction staples, or furniture stapler or small self-tapping screws with a press washer.

- Each subsequent plastic strip should be installed in the previous one. As a result, you can get a uniform glossy finish.
The same applies to those strips on which any patterns or designs are depicted. During the work, there is no need to adjust the design or pattern of one plank to another. - When installing PVC panels, it is advisable to use a level, and the panels will need to be cut to required size, then insert it all the way into the profile. Using small screws or a stapler, one panel is secured, and the rest are installed in the same way.
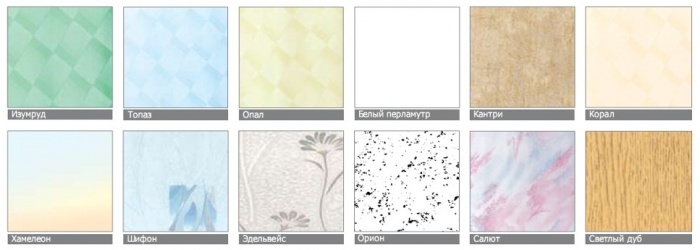
In order for a small toilet room to look attractive, well-groomed and visually larger, it is advisable to use panels in light colors, for example, pale blue, light pink, beige, pistachio, sand. At the same time, plain panels can be combined with themes that depict an interesting pattern or design.
Finishing the ceiling in the toilet with PVC panels
After covering the walls with plastic panels, you can begin finishing the ceiling with the same material, if the need arises. Installing this finishing material on the ceiling surface differs from installing panels on walls only by creating a frame.
Lightweight bars with a small cross-section or ceiling profiles are installed on the ceiling surface using direct hangers.
So, you can easily adjust the ceiling height and make installation easier lighting fixtures. Holes for the lamps are cut using a thin and very sharp knife.
It is also necessary to leave small gaps along the edges of the ceiling for future installation ceiling skirting boards. After installing the frame, you can install PVC panels in exactly the same way as on the walls.
Finishing the toilet in the areas where communications are located
Apartment owners who have decided to renovate their premises themselves are also interested in the question of how to close communications in the toilet in such a way that it looks attractive.
Naturally, you should first install the box from metal profile at pipe locations. Next you need to cut off all unnecessary pieces of the profile.
Those parts that have been cut are connected using self-tapping screws, and the structure itself must be secured to the wall using dowels and screws. After this, all that remains is to cover the created box with PVC panels.
Do not forget that plumbers must have constant access to communications, so the box must also have doors with fittings with a mechanical lock or latch. What the cost of repairs will be is up to you to decide.
Specialization: Capital construction works(laying a foundation, erecting walls, constructing a roof, etc.). Internal construction work (laying internal communications, rough and fine finishing). Hobbies: mobile communications, high technology, computer equipment, programming.
Recently, my eldest son and I had an argument about how to decorate the walls in the toilet. He also followed in my footsteps and is now receiving a higher architectural education. So our debates sometimes arise in earnest.
We discussed for a long time what to use on the walls in the restroom, whether it was possible to make a shower out of plastic panels, and what to do if the wall between the toilet and the bathtub was broken. Many copies were broken and we never came to a common denominator.
Therefore, I decided to tell you about the most popular, from my point of view, methods decorative finishing just a restroom and, if the wall between the toilet and the bathroom was demolished, the entire plumbing room.
This is not a finishing instruction, but an overview of existing possibilities. After familiarizing yourself with them, you can choose for yourself suitable option. After all, most likely, your significant other is already planning renovations for the near future.
Popular options for wall decoration in the restroom
Let me make a reservation right away: I will offer both my favorite finishing methods and those that my son prefers. Therefore, to make it easier for you to choose how to decorate the toilet, I will give both the pros and cons of each option.

For the vast majority of our compatriots, the bathroom and toilet are the smallest rooms in their home. This is why, by the way, many people ask how to tear down the partition between the toilet and the bathroom in order to make one, more spacious room.
However, due to the specific use and internal microclimate, characterized by high humidity and significant temperature fluctuations, to repair a toilet it is necessary to use finishing materials that can not only decorate the walls, but also protect them from adverse external factors.
Option 1 – Wallpaper on the walls
This method of decorating a room is the first one that comes to mind. In principle, I have often seen toilets covered with wallpaper. However, the specificity of this particular finishing method is that you need to choose wallpaper that is not expensive and beautiful, but one that can withstand use in the toilet.

There are several types of wallpaper, which are distinguished from each other not by price and appearance, A specifications. Short review I have listed the commercially available varieties in the table below.
| Wallpaper type | Characteristic |
| Paper | For the toilet you need to buy wallpaper and a coating with a hydrophobic layer. In this case, the wall decoration will better resist getting wet. In addition, this is the only way you can somehow clean the walls. |
| Vinyl | The material is absolutely safe, quite durable and does not collapse when wet. To give your restroom a beautiful and stylish look, I recommend using smooth or foam trellises. It is better to avoid embossing, since this relief on vinyl is very difficult to wash. I would like to say a few words about vinyl film. Yes, it is easy to glue and washes well. But believe me, you are unlikely to be satisfied with the appearance of the restroom after such finishing. |
| Fiberglass | Wallpapers with specific operational properties. Excellent resistance to moisture and open fire. They are not destroyed by household detergents. They have an attractive appearance. |
Even if you buy especially durable moisture-resistant wallpaper, I recommend finishing some sections of the walls with other materials (tiles, plastic). Especially in places where frequent contact with water is expected. After all, neither vinyl, nor paper, nor fiberglass will simply withstand such treatment.
Personally, I can say this. If you decide to decorate your toilet with wallpaper, then buy fiberglass-based products. This is the only way to achieve the optimal balance between technical characteristics and appearance. But the cost of such a solution will be quite high, so you can choose other materials.

The only thing you need to take care of is to level the walls and buy special glue. It's better to hire someone for this job experienced craftsman. After all, it will be very disappointing if dear construction material will be spoiled.
Option 2 – Liquid wallpaper
I have highlighted this finishing option in a special section, since liquid wallpaper, although called wallpaper, has nothing in common with strips of paper that are glued to the wall. But they are great for finishing toilets - they tolerate moisture well and look just great.

Another advantage that captivates me is the simplicity of the finishing process. They can be applied to any surface:
- brick;
- plaster;
- plasterboard sheets;
- ceramic tiles;
- glass.
Liquid wallpaper is sold in the form of... dry powder, from which a special solution is made before use according to the manufacturer's recommendations. The material immediately acts as plaster, filling all the cracks and irregularities, so there is no need to pre-level anything.
I recommend using liquid wallpaper in new homes (which have not yet undergone structural shrinkage). As the geometry of the walls changes, the finish will not crack or peel. The decor is also not afraid of significant temperature fluctuations, so several times I decorated the toilet with them. country dacha, where the heating was not supposed to be turned on in winter.
The advantage of this wallpaper is the wide variety of colors and textures. Cellulose fibers, cotton, wool, and so on are often added to wallpaper. I have also seen options with the addition of mica.
If you use the presented opportunities wisely, you can create a truly amazing interiors toilet. No amount of paint or tile can compare.

I consider the unique ability of wallpaper to be its ability to absorb water vapor, creating a healthier indoor microclimate. Wherein unpleasant odors do not accumulate in the walls. Therefore, if you wash your walls regularly, they will always remain clean and the air will always remain fresh.
This wallpaper is not glued, but applied to the wall with a spatula. Then they level it out and, voila, the toilet is ready (if only it were that simple).
Option 3 – Tile
This method is considered a classic. Ceramic tiles for finishing walls in the toilet withstand mechanical loads and high humidity(including direct contact with water). I would say another advantage is the wide variety of sizes, colors and textures. And if you add friezes to this, then even I can think of many design options.

Well, of course, I won’t surprise anyone if I say that tiles in the toilet will last much longer than all other types of finishes.
The only disadvantage of tiles is the complexity of the wall cladding work. Firstly, this requires considerable experience, secondly, the process itself is not very clean, and thirdly, you need to know how to level the surface of the walls for tiles and prepare them for cladding.
That is, you need to act according to the following scheme:
- Level the walls in the room. First, plaster is used for this, then putty, and then primer. And only after everything is finished can you start laying the tiles.
- Disguise engineering Communication. This must be done before you begin tiling. Often plasterboard sheets on sheathing are used to hide water and drain pipes. And tiles are already laid on them.
A built-in toilet in the wall can reduce the labor intensity of working with pipes. In this case, it comes with a special installation, so you don’t have to think about connecting pipes to the tank and attaching the cuff to the toilet.
- Lay the tiles. Here you need special skill to lay the tiles evenly and with the same distance between the parts.
- Rub the seams. A special grout is used for this. By the way, by choosing a fugue (grout) of a specific color, you can pleasantly diversify the design tiled walls in the toilet.
Laying tiles in a toilet is not an easy process.
I would also classify mosaic as a finishing method. Essentially the same ceramic tiles, but very small in size. I often had to use it to finish curved surfaces of complex shapes.
The material itself has a long service life, and by alternating elements of different colors and shades you can create real works of art on the walls of the toilet.
By the way, if you didn’t know, mosaics come in different geometric shapes:
- classic square;
- round;
- triangular.
In the store I came across different varieties that differ in color and size.

Laying mosaics is quite difficult. Although it is not sold as individual tiles, but in the form of rolls, where each individual small piece is attached to a mesh. Naturally, preparatory work will need to be carried out in full.
If during use one or more mosaic elements have fallen off, they can be easily attached to the wall using “liquid nails”.
I would like to add a few proprietary tips from myself. You will undoubtedly appreciate them if you decide to use ceramic tiles to decorate your own toilet:
- Do not use for wall cladding floor tiles. Floor ceramics are too heavy and often contain additional heavy decorative elements. The glue used to install the tiles will not hold such elements, and they will fall off (well, if not for a new toilet or your mother-in-law’s beloved cat).
- Wall tiles, on the contrary, are not suitable for floors. She is too thin and fragile. It is dangerous to place it on the floor as it does not have an anti-slip coating. The slightest moisture and there will be a big “boom” in the toilet, when someone crashes to the floor.
- Optional for decoration home toilet buy expensive tiles that are intended for intensive use (for example, for public toilets). Considering that many more people will use your restroom (even if relatives come from Riga), the strength of ordinary tiles will be quite sufficient.
- Before purchasing tiles, I would advise making a floor plan with dimensions, and then going to the store. Most shops will help you plan your tile layout on the computer. This service is often free.

Option 4 – Plastic panels
I can recommend using plastic wall panels for the bathroom and toilet for those who do not want to spend a lot of money on renovations. However, this does not mean that the restroom will be ugly and unhygienic. Polymer panels do not deteriorate from water, are easy to clean and have an attractive appearance.

In the store I bought both plain and multi-colored panels Several times I decorated the toilet with details with three-dimensional images. It turned out very well. However, you won’t find this in a regular supermarket; you’ll have to order it individually.
The advantages of using plastic panels for finishing restrooms are obvious:
- The material has a long service life. At the same time, all its technical characteristics remain unchanged, regardless of the humidity and temperature in the toilet.
- The panels retain their color without changes.
- Thanks to the smooth surface, the products are easy to clean and wash with ordinary household detergents.
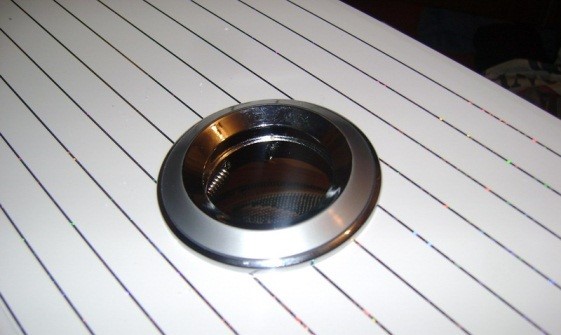
- Using panels with glossy surfaces that reflect light, you can visually expand the boundaries of the toilet.
- If desired, you can select panels of large width and make the walls of the toilet seamless (only with corners in the corners of the room).

All polymer panel options on the market are excellent for toilet renovation. I can only give a few pieces of advice that are important to me personally:
- I prefer to buy 8 mm thick products for finishing toilets. They are strong enough to maintain integrity under strong mechanical impact(for example, if someone leans against the wall in the restroom).
- Installing panels is much easier than tiling walls or gluing wallpaper. They do not need to be pre-aligned, since the parts will be attached to the sheathing.
- PVC panels have antiseptic properties. That is, inside the sheathing, contrary to popular belief, mold will not begin to grow and fungi will develop, which can cause allergies or a more serious illness.
- The panels can be used not only for walls, but also for ceilings.
- Under walls with such finishing you can easily and without additional costs hide any utility lines.
If the walls of the toilet have already been leveled, then you don’t have to bother with installing the sheathing at all. You can simply stick the panels onto a previously cleaned surface using mounting adhesive.
Despite its strength, the plastic breaks upon impact. Therefore, I do not recommend training boxing punches in the toilet.
Option 5 – Paint
This method is one of the fastest and easiest. There is hardly a person who does not know how to paint this or that surface with their own hands. Again, the paint design is also limited only by your imagination. Can be used various options and textures, stencils and patterns and so on.

Often in my practice, I have encountered cases where the paint on the walls in the toilet room peeled off and peeled off. To prevent this from happening, in addition to knowing what to paint the walls with, you need to know how to properly prepare them.
I always prepare walls in the following sequence:
- I plaster uneven walls by lighthouses;
- I apply a layer of starting putty, which evens out significant defects;
- I cover the wall with finishing putty;
- I clean the surfaces with a special mesh;
- I'm painting.
In principle, in terms of labor intensity, everything is not so simple, but here you can save money, since paint is cheaper than, for example, tiles or liquid wallpaper.
Option 6 – Designer finishing
Well, the last finishing option - designer renovation toilet. The name speaks for itself. Only people who are not strapped for cash can afford this type of design for sanitary facilities.

The work on drawing up the sketch is carried out by a specialist in the design of premises. In his work he can use any materials available. I helped renovate toilets that were decorated with:
- granite;
- marble;
- malachite;
- onyx and so on.
Naturally, we are not talking about cramped spaces in standard city apartments. Designers refinish toilets that are part of spacious country cottages. As a result, their imagination is not limited by area and other similar factors.
Designer finishes are characterized by the use of various accessories. I saw curtains, lanterns, and other products in the toilets.
And a few more points that I have no right not to mention. They will be useful to you during repairs, regardless of which wall finishing option you choose:
- Even if you are not going to change the toilet, you need to dismantle it before starting work. This will make it more convenient for you to work, and the earthenware product will remain intact.
- Before installing any type of finishing, I recommend soaking the walls with special antiseptics..
- Buy skirting boards for decorating the joint between walls and floors with hidden fastenings. It looks more aesthetically pleasing when combined with any type of decoration.
- Do not combine more than two finishing materials in one toilet. It will turn out clumsy and ugly.
- To carry out repairs you will need power tools. If you are not a builder, there is no need to buy them. It's easier to rent. Now many stores provide this service. And quite inexpensive.

- If your toilet is small, I recommend giving preference to solid colors without patterns..
Well, one last thing. Don’t be lazy and spare the money and replace the sewer and water pipes with polymer ones (if you haven’t done this before). After all, it will be very disappointing to destroy the beauty you created in the event of a sewer break.
Conclusion
These are the options for decorating the walls in the toilet that my son and I discussed. We did not come to a definite conclusion, since each option has both advantages and disadvantages. If you have already completed or are just planning renovations in the restroom, write in the comments what you decided to use on the walls. This will be interesting to many readers, perhaps I missed something interesting.
And if you don’t want to write, watch the video in this article. There you can find many interesting points regarding repairs.
Traditionally for interior decoration bathrooms and toilets are used tile. However, with all its many advantages, tile is not a cheap and easy-to-install material. If the bathroom renovation is planned to be done with your own hands and with minimal costs, it is worth considering such an option as finishing the toilet with PVC panels. Such finishing material as polyvinyl chloride panels becomes indispensable if repairs need to be completed as quickly as possible.
Do-it-yourself toilet finishing with plastic panels
The main advantages of polyvinyl chloride panels
The positive aspects when decorating a bathroom or toilet with polyvinyl chloride slats can be expressed as follows:
- Easy installation. It is quite possible for a high school student to carry out renovations in a toilet using PVC panels. Plastic panels are not particularly heavy.
- Price category. After spending comparative analysis, you can find out that prices for such material as tiles exceed the price of panels at least three times. This does not take into account the remuneration of the tiler-finisher, but laying the tiles with your own hands is beautiful and neat without preliminary preparation quite problematic.
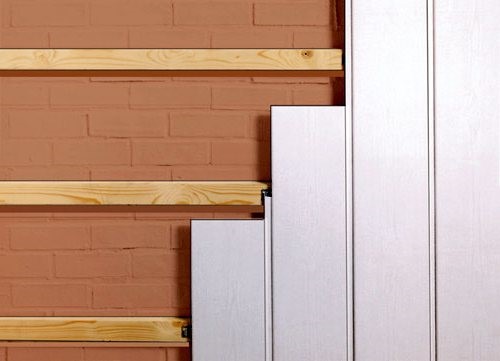
- The walls of the room do not have to be prepared for finishing them with plastic. PVC panels are usually fixed to a frame or sheathing, which means that possible defects can be leveled with their help.

PVC panels are fixed to the frame
- A material such as polyvinyl chloride is absolutely indifferent to the effects of a humid atmosphere. However, it is not moisture resistant, in other words, plastic panels are not able to withstand the appearance of dampness in the toilet. Waterproofing should still be taken care of preparatory stage, preferably before installing the sheathing.
- Easy to use. In order to care for such a finish and maintain its decent appearance, you do not need any expensive imported products. On the contrary, cleaning the toilet will not take more than 10 minutes, and all you need is a damp cloth.
- Long service life. The attractive appearance of plastic lamellas, inherent to them initially, is difficult to spoil, even intentionally. Polyvinyl chloride is able to withstand the effects of most household chemicals and solutions.
Disadvantages of polyvinyl chloride panels
In addition to numerous advantages, finishing materials such as plastic panels also have certain disadvantages. Otherwise, only plastic panels would be presented on the windows of finishing materials stores.

Plastic panels in the bathroom interior
The main disadvantages of plastic slats are:
- Flammability and formation of combustion products. Unfortunately, any plastic cannot withstand exposure to open fire. During a fire, one material begins to burn, the other melts, but in both cases the process will be accompanied by the release of toxic gas.
- Fixing the panels to the wall is enough simple work, but to ensure its efficiency and continuity, you will have to think about it when planning repairs.
- Decorating a bathroom or toilet with plastic will affect the overall volume of the room. When fixing the panels to the frame, it is possible to narrow the toilet by about 5 centimeters, but this is only if the surfaces do not require correction using lathing. If when decorating the ceiling with plastic this does not matter much, then when decorating the walls you should be extremely careful. Otherwise, there may be difficulties with closing or opening room doors or connecting plumbing and electrical equipment.
It is no coincidence that finishing a ceiling with plastic is much more common than completely decorating a toilet with PVC panels.

Plastic ceiling trim - a spectacular and practical look
You can often find combined solutions, when panels and tiles (or other material) complement and complement each other. However, most often such combinations are found when decorating bathrooms.
What to consider when choosing PVC panels
When purchasing plastic panels, some homeowners focus on parameters such as price and beauty. Of course, in some cases this approach is justified, but when decorating a toilet in an apartment with your own hands, it is fundamentally wrong. The main characteristics that you should pay attention to when buying plastic panels should be reliability and durability. This is due to the fact that exactly on Wall panels Various shelves and fittings will be hung from plastic. In other words, when choosing panels, focus not on their appearance, but on quality and rigidity. A high value of this parameter will ensure long-term operation of plastic panels. In addition, a more rigid plastic panel is much preferable for direct installation. The chance of vibration resulting from accidental movement is very small. In addition, in the sheathing you can increase the distance between its vertical bars.
Having chosen a certain type of panels, whose rigidity seemed acceptable to you, evaluate the dimensions and design features material. The dimensions of decorative panels made of polyvinyl chloride are, as a rule, three meters in length, but their width can vary from 120 to 250 millimeters. Keep in mind that the width of the products directly affects the requirements for the frame. That is, the wider the PVC lamella, the better and smoother the lathing should be. For those who decorate a toilet or bathroom with their own hands, the best option are panels whose width does not exceed 15 centimeters.
Having decided on the parameters that play the main role when installing the panels, you can begin choosing their design. Before leaving the store or finishing materials salon, do not forget to make sure there is a sufficient amount of consumables (corners, plastic ends). Such elements should be combined with the main background created by decorative panels.

A wide range of plastic panels
Buy Consumables it costs with some margin because in the first stages, especially when installing the toilet design with your own hands, breakdowns and errors are possible. Naturally, you don’t want to go to the store for the missing pair of corners.
For the frame or sheathing, slats with a cross section of 2 * 2.5 centimeters are used. To create a reliable and durable frame, you should use square or rectangular slats. You need to evaluate the quality of each slats, and to do this you will have to unpack a stack of bars prepared for the frame.
It is impossible to build a high-quality sheathing from the material poor quality. The frame is assembled using such necessary elements as self-tapping screws and mounting nails for fastening plastic products. No need to use small ones construction nails, they can be easily replaced with analog tar nails with a small head. If the toilet is often exposed to “man-made” floods from neighbors, then it is better to use an antiseptic for high-quality wood processing.
DIY frame installation
Before installing the plastic frame, it is necessary to lay the floor tiles and install the toilet, since work will require a flat floor surface.

DIY frame installation
Proper frame assembly
- At the first stage, it is necessary to treat the elements of the wooden sheathing or frame with an antiseptic. If you carefully lubricate the installed material with an antifungal solution, then such a structure will last for decades. It is worth noting that most of these solutions are toxic, so this procedure is best carried out outside a confined space. The antiseptic is applied to the entire surface of the sheathing.
- Setting up side bars. The recommended number of slats for installation coincides with the number of corners in the room, i.e. there should be four of them. The basic rule is that the slats should never come into contact with the surface of the ceiling and floor. In this regard, small pieces of plastic can be placed under the slats, but after precise installation they are removed.

The accuracy of fixing the side posts is extremely important for the further installation of the panels, so a plumb line is used when fastening them. Then check the parallelism of all faces using a long ruler. It is on these four elements that the quality of the frame will depend in the future. Mounts have step by step execution with an accuracy of approximately 30-40 centimeters and are mounted using self-tapping screws.
- Sheathing of side posts. After installing the main vertical slats, it is necessary to secure the bars along the upper and lower contours of the room. Mounting screws in in this case mounted at an angle of 45 degrees. This is necessary to secure the bars more tightly. After this, the material must be supplemented by attaching slats to the walls using long screws. When the base of the sheathing has already been assembled, it is necessary to install additional racks. It is recommended to keep the step between these posts approximately 50 centimeters apart. In this case, the frame connection can be considered quite safe and strong.
We work with accessories with our own hands

Plastic accompanying elements are fixed to the main posts and rails. Their corners must be cut at 45 degrees. Since the plastic panel is very elastic, the fittings are attached in all turns and corners. There is a distance of approximately 30-35 centimeters between the nails. If the lath begins to lag behind the wall, it is recommended to place a piece of plastic under it, and only then hammer in a nail. U assembly nails there should be flat and wide caps. If you cannot find such nails, then it is recommended to use any nails, the length of which is 20-25 centimeters, and you need to cut small gaskets of 1 x 1 centimeter from PET bottles, which will allow you to pull the plastic to the tree without damaging it. Use a hammer carefully so as not to damage the surface of the panel.
Installation of PVC panels on a finished frame
When the frame is completely ready, installation of the panels is quite simple and quick. Each part is sawed off separately with a fine-toothed hacksaw. At the same time it becomes smaller seat by 1-1.5 centimeters, which is easily compensated by shelves of fittings.

Installation of PVC panels indoors
All other plastic elements are moved closely to the previous one and fastened in the same way as the first one, with nails that have a plastic washer. This allows you to save the surface from being hit with a hammer.
The final PVC is cut to length. Such work must be carried out with extreme precision. The cut panel is inserted all the way into the lock of the previous one using a screwdriver. It is worth noting that the size of the locks is relatively smaller than the seat, and therefore the final panel must have contact with the surface of the previous ones. It must be secured with nails in a place where movement is not possible.
So, the renovation of the toilet room with PVC plastic panels is completed. But don't forget to leave it on ready-made panels small notes for shelves that will later be attached to finished surface. Plastic panels are one of the ways to decorate a toilet beautifully and inexpensively. They will look good both in temporary and permanent finishes.