Installation of metal fence posts. Drilling holes for fence posts Install metal fence posts
Creating holes for fence supports is considered the most labor-intensive and critical stage of construction, on which its result, appearance, strength and durability of the fence largely depend. Knowledge regarding the parameters of the holes for supports and the tools used for this type of work will help you avoid gross mistakes.
Hole parameters
When starting work, the master will have to perform some calculations and determine:
Number of pillars
To avoid mistakes at this stage, it is recommended to first calculate the width of the section. The value of this parameter should be a multiple of the length of the sides of the future fence and range from 2.5 to 3 meters. With smaller section sizes, the complexity and cost of work unjustifiably increases; with larger sections, the fence will not be strong enough. Keep in mind that the higher the fence, the more often the posts are located.
For example:
- if the fence has the shape of a regular rectangle with sides 50x25m, and its height does not exceed 2 m, then it is advisable to make sections 2.5 m wide, then a total of 60 supports are needed (4 corner + 19 on each of the long sides + 9 on each of short sides);
- if one of the sections is allocated for the gate, and the gate is part of the door leaf, then no additional supports will be required. If the gate stands separately (the most common option), then it needs one more support, and there will be 61 pillars in total.
Diameter of hole for fence
It is always made wider than the support, the only exception being when the post is driven into the ground. Typically, the hole dimensions are 2-2.5 times larger than the dimensions of the pillar.
With a wider well, it will be difficult to fix the support strictly perpendicularly for subsequent pouring, but the distortion will definitely make itself felt in the future. In addition, you will need too much concrete mixture. If the hole is too narrow, it will be completely impossible to perform concreting efficiently.
Hole depth
The value of this parameter depends on the characteristics of the soil on the site and on the dimensions and weight of the fence itself.
Taken into account:
- soil freezing depth: the bottom of the hole should be 10 cm deeper than this mark;
- level groundwater: you need to dig a hole below this value;
- climate features, wind loads, possible weight of snow cover;
Fence weight and height
For light fences, the posts are dug in a third of the length (that is, for a fence 2 m high, the post must be buried a meter deep), for heavy stone and brick fences another 20-30 cm is added. It must also be taken into account that a crushed stone cushion 10 cm thick should be created at the bottom of each well.
Tools used
To create holes, you need a tool that can ensure the verticality of the hole, because the slightest deviation can subsequently lead to skew of the section. In addition, it is necessary to maintain the required diameter of the hole and take care to optimize the expenditure of effort and finances.
Regular shovel
Among the advantages is the low cost of the tool. There are many more disadvantages: it is impossible to dig a narrow hole with a shovel, much less comply with the requirement of verticality. The high labor intensity of the work should also be taken into account. For these reasons, a shovel is used only when digging a frame under a wide square support (for example, under a concrete pillar, which will be made by monolithic casting).

Motor drill
Using this device, powered by gasoline or electricity, create a hole required diameter and absolutely correct geometry is possible in just a few minutes. The rules for working with a motor drill are extremely simple: first, use a shovel to make a hole half a bayonet deep in order to remove a layer of turf and mark the drilling site.
Then the engine turns on and the drill is put into action. It is required to hold it strictly vertically, pressing it into the soil. The soil is fed upward by an auger and accumulates around the hole.

Difficulties may arise when drilling on rocky soil. In order not to damage the tool, it is necessary to work at low speeds, try to catch and lift large stones, remove the drill from the hole more often and clean it.
The only, but significant, disadvantage of a motor drill is its high cost: when we're talking about about the construction of a single fence, buying a tool whose price is in five figures is hardly profitable.
Garden auger
Can be disk or screw. A disk tool is a simple device consisting of a drill itself, which is a disk curved as shown in the figure, an extension rod and a T-shaped handle. The auger drill has a more complex design.

Due to low cost, low weight, simplicity of design and the ability to drill holes of a geometrically correct shape and the required diameter, up to 2 meters deep, garden auger is the most popular tool for this type of work, so let’s look at it in more detail.
Rules for working with a garden auger
Unfortunately, a builder who decides to use this device for the first time may encounter difficulties in his work, for example, the fact that the drill does not want to fulfill his direct duties.
There may be several reasons for this:
- The soil is too dense. Can make it softer plain water. It is recommended that after drilling a hole to a shallow depth, pour a bucket of water into it and wait a little until it is absorbed into the soil - the work will become much easier. You can also try to soften the soil by hitting it with a crowbar.
- Inexperience of the master. When working, the drill should be held strictly vertically, removed after completing 2-3 turns to remove the selected soil and, if necessary, clean the cutting edge. When rotating the handle, do not put too much pressure on it, trying to speed up the drilling.
- Insufficient sharpening of the drill. Sometimes factory products are sold without sharpening, and such a tool, of course, is not able to cut off a layer of earth. Do the sharpening yourself, using a grinder or file. Please note that the chamfer is removed from the top.
- Incorrect drill shape. This disadvantage is inherent in homemade disk tools, in which the drill consists of two semicircles welded to an extension at an angle to each other. Be sure to check its geometry: the angle between the semicircles is 30-40 degrees.
And finally, sometimes a master simply overestimates his physical capabilities: in construction stores you can buy a drill with a diameter of 10 to 30 cm, but the higher this parameter, the more effort you will have to expend on rotating the handle.
In addition, on very dense, clay soils it will be even more difficult to work. For this reason, experienced builders advise using a garden drill only on light, sandy soils, provided that not too many holes are needed. Otherwise, it is better to rent a motor drill.
And one more tip: it is advisable to choose an auger drill or a disk drill model with an auger that is located below the cutting planes. It will simplify the removal of selected soil from the drilling area and make the work easier.
How to fix a pole
Before installation, it is necessary to protect the underground part of the support from dampness: wooden poles are burned blowtorch and are treated with resin, metal ones are painted. Next, the prepared support is installed strictly vertically in the center of the hole on a sand or crushed stone cushion and fixed with spacers.
Concreting a support can be done in two ways:
- The traditional, “wet” method involves filling the space around the pillar with a concrete mixture and then vibrating it.
The method is used on sandy soils that are unable to accumulate a large number of water. - If the soil on your site is clayey, absorbing moisture like a sponge, the force of frost heaving will push out the pillar along with the concrete sleeve. In this case, butting is performed (“dry” concreting): that is, the space around the pillar is simply covered layer by layer with crushed stone. Each layer is carefully compacted.
Individual particles of crushed stone remain mobile relative to the support and each other, therefore, when the surrounding soil swells, they simply shift, and the pillar remains motionless. In addition, the crushed stone layer, working as drainage, removes moisture from the pillar.
The disadvantage of this method is that even with careful compaction, over time the crushed stone sags and the pillar becomes loose, so after a few months it is necessary to add crushed stone, and until then further arrangement of the foundation is impossible.
While creating light fence on soft soil that is not prone to heaving, it is possible to install pillars without concreting, by driving them into the ground: in this case, a small hole is made along the diameter of the support, the pillar is installed in it and driven in with a sledgehammer. The method requires great physical strength and experience.
If you are going to soften the soil with water to make drilling easier, drill several holes at the same time: this will help avoid downtime. Do not try to jerk the garden auger out of the hole, as this may damage your back. It’s better to swing it slightly, after which you can get the tool out without any tension.
You should sharpen not only the end parts of the auger, but also the edges of the round plates: they are not directly involved in drilling, but by cutting off plant roots, they will help complete the job faster.
Last tip: if this is your first time getting started, try your hand at a post hole located in the most inconspicuous place, and no one will notice your mistakes. And only then, having gained experience, you can start drilling the remaining wells and do the job flawlessly.
In order for the fence to serve for a long time and reliably, you need to put a lot of effort into installing it according to all the rules. This labor-intensive work begins with marking the perimeter of the fence and drilling holes. Everyone does this in one of the known ways, choosing the most convenient and affordable one.
The process of drilling a hole to install a fence post
Available hole drilling methods
Drilling holes is a monotonous, lengthy process that requires the use of physical force. After all, all pillars must be the same size with strict adherence to the distance between each of them. The quality and cost of the fence depend on the chosen installation method.
Pros and cons of using a shovel

Hollowing out a hole with a special tool
It is hardly possible to find a person who is unfamiliar with this simple tool. This is the simplest and most affordable drilling method. You can do it with a shovel square holes for a massive fence. But making round holes of the required diameter in the ground is almost impossible.
The column must stand securely in the ground, and with this method it will turn out too big hole, which will have to be filled with additional concrete. And these are additional expenses. In addition, it is unlikely that it will be possible to dig a narrow hole with a shovel to a depth of 100–120 cm without affecting the surrounding soil. Therefore, we can safely conclude: although this method is captivating with its accessibility, it is not always practical. It can also be described as the most labor-intensive and time-consuming.
Using a garden auger
Using a drill under pillars is much more efficient and convenient. This tool can be purchased at any hardware store.

Garden augers in various sizes
Its cost is much higher than the cost of a shovel, but it pays off due to time savings and good quality holes. The auger is an auger with helical blades that, burrowing into the soil, throw it to the surface. Using this method, you can make holes to a depth of up to 200 cm. In this case, it is much easier to control the depth of the holes so that they all have the same dimensions. Therefore, the conclusion suggests itself that drilling holes to install a fence in this way is much more effective and not too expensive.
It is important to ensure that the auger of the garden auger is well sharpened, otherwise you will have to exert much more physical effort.
Sometimes you have to sharpen them immediately after purchase. This can be done with an ordinary file or with a grinder. But it is worth carefully studying the reviews of people who have encountered this problem. Due to the characteristics of the soil in an area where deep holes are required, it is not so easy to make them yourself using a garden auger.

TISE drill devices for drilling deep holes
This will require a lot of effort and outside help. This is especially true for heavy soils.
Mechanical drilling method
There is another method of carrying out excavation work with. This is to use a hole drill with gasoline or electric drive. Such a tool is quite expensive, so drilling can be called the easiest, but at the same time the most expensive.
The principle of operation of a hole drill is similar to a garden auger, only the auger of this mechanism rotates using a drive. It can run on electricity or gasoline. Productivity depends on engine power. The motor drill can be used on a site with any soil. The only significant disadvantage of this method of drilling holes for fence posts is its cost.

Making a pit with a motorized drill
Of course, you don’t have to buy an expensive motor drill, but rent it. But still, the cost of the tool itself and its power costs much more than a hand tool.
In addition, a motor drill creates a certain noise during operation and also requires close proximity electrical outlet or availability of gasoline. But this is the most quick way, a hole can be made in just a few minutes without significant physical effort. Drilling holes for columns along the entire perimeter of the fence will take much less time and effort than manually.
As an alternative, there is another way - to use the services of a car drill. Its choice depends on the size of the site and conditions, for example, free access and movement of the car.
Making the right calculations
Each drilling method has its own positive sides and some nuances. Before the beginning construction work to install the fence you need to make necessary calculations. The columns must withstand the entire load from the weight of the fence. Therefore, they must be reliably and stably buried in the ground.
As practice shows, the simplest calculation of the hole depth for good stability of a fence column is 1/3 of the height of the fence.
For example, if a fence two meters high is provided, then the column must be immersed in the soil by at least 70 cm. If the site has high groundwater, then the columns must be buried at least 100–120 centimeters. In addition, it is necessary to take into account the type of fence chosen. Its weight, and, consequently, the load on the pillars depends on these indicators. Holes in sandy soil should be deeper, and in stable rocky soil it is enough to drill 80 centimeters.

Diagram of a pit for installing a column
The hole size should be slightly larger than the diameter of the post. If the difference is large, then for stability and, therefore, this extra expenses. Placing the post too tightly in the hole will result in an insufficient amount of concrete mixture. The diameter of the holes can be from 15 to 30 centimeters.
In order to find out the exact number of posts in the fence, you need to divide its entire length by the width of one run, and then add two more posts for entrance gate. The distance between the posts is approximately 250 cm. But this number depends on the height and type of fence. If the load is too large, then the spans should be reduced in size. The size of the spans can be from 150 to 300 cm. The reliability and durability of the fence depends on the correctness of the calculations.

Scheme for installing fence posts
If you study all the available drilling methods, you can conclude that the garden auger is of high quality and inexpensive means. Before the beginning earthworks The perimeter of the fence is marked using a tape measure, measuring equal intervals and driving pegs in these places. If the fence delimits two adjacent areas, you should step back a few centimeters from the edge. This will avoid conflict situations with the owner of the neighboring plot.
The relief area is first marked in the corners, and only after that the locations for the holes along the entire side of the fence are marked. Now that all the places for future pillars have been marked, you can begin the actual work.
Fencing the site serves not only as protection from strangers, but also as an important decorative element making the first impression about the owner of the site. It is along the fence that passers-by and guests remember the house. Regardless of the cost of the material, installing a fence takes a lot of time and effort, so you want to ensure its maximum service life. The pillars perform a function load-bearing structure, and the durability of the entire fence depends on their quality and correct installation. This article will discuss how to properly install fence posts with your own hands.
What types of fence posts are there?
- The traditional material for making pillars is wood. Today, wooden poles of proper quality are a rather expensive solution. They are made from solid hardwood logs. The greatest resistance to adverse factors environment(temperature changes, humidity, mold fungi) differ from pine, larch, ash, oak, acacia and mulberry. In second place is a group of spruce and fir. Species such as birch, maple, linden, aspen, alder and beech are unsuitable for making poles. To increase service life wooden poles additional treatments with antiseptic preparations and firing until charring are required. The choice of this type is often related to style landscape design. Usually, wooden support used for fences from the same material.

- A universal and common solution is metal poles. They pair equally well with wooden picket fence, chain-link mesh and metal profile. In addition, such a support can withstand significant loads. Metal is more durable than wood, but requires pre-treatment to prevent rust. To extend service life, the paint layer is updated annually. Two options are possible: hollow welded pipes of a certain diameter and from metal profile with a square section. There are strict requirements for the diameter of the pillars and the thickness of the metal, ensuring practicality and reliability of operation. The optimal diameter is 6 cm with a wall thickness of 2 mm. Attaching logs and other fence elements to a metal support is simple and quick.
- Asbestos cement and concrete pillars They are characterized by a high level of durability, but they also have a number of disadvantages, in addition to the high price. Asbestos-cement pipes are inconvenient when installing a fence, are not compatible with all materials, and are prone to rupture under the influence of freezing water that enters the hollow space through the open top. Concrete pillars are rarely used and are mainly used for powerful and colorful fences.
- Brick pillars characterized by complexity of installation and high decorativeness. Specialists with professional skills take part in the construction of such pillars, which greatly increases the cost of the support. Before installation, foundation equipment is required, onto which the entire load of heavy pillars will be transferred. Durability is largely determined by correct installation, otherwise the pillars will warp and the fence will need reconstruction.

When choosing material for poles, they are guided by financial capabilities, characteristics, installation features and requirements architectural style. Forged fence structures look impressive with brick pillars.
Installation of wooden fence posts
- To mark the perimeter of the site, it is better to use posts with a diameter of about 15 cm; for intermediate posts, a diameter of about 10 cm is allowed. The tree needs to be dried and pre-treated with a solution copper sulfate or a modern antiseptic drug to destroy microorganisms. The lower ends are tarred and wrapped in roofing felt.
- For better protection moisture stains the pillars oil paint. When installing, they are oriented so that the top of the once-growing tree is at the bottom. This trick will prevent water from rising through the microcapillaries and moisture accumulation inside the column.

- The wooden support is installed mainly for lightweight structures, so its fastening can be quite simple. Using a drill, a hole is made about half a meter deep with a height of the above-ground part of the pillar up to 1.5 m. As the height of the fence increases, the embedment depth also increases, observing the rule that the buried part should be 1/3 of the entire length of the post.
- The diameter of the hole is twice the diameter of the pillar. The drill must be held strictly vertical to obtain a straight, even hole. Next, a layer of crushed stone or construction expanded clay is laid at the bottom of the recess to drain rainwater. The pillar is installed strictly vertically (its position is checked by a level), after which the sides are covered with crushed stone or broken brick. As the material falls asleep, it is periodically compacted using a crowbar. After each compaction, the position of the pillar is checked.
- For durability of fences, wooden posts can be installed in metal sleeves, which serve as a casing for the entire buried part. In this case, the sleeve must pass closely to the tree, eliminating the possibility of water penetrating inside. For this purpose, metal cylinders with a slightly smaller diameter than the pillar are used.
How to Install Metal Fence Posts
- Strength metal poles allows you to withstand even heavy structures and significant wind loads (fence made of corrugated sheets), so they must be firmly fixed. To install metal supports, concreting and driving into the ground are used.
- There are two methods of concreting. In the first method, a hole is made with a slightly larger diameter than that of the post. And then the space between the vertically installed pillar and the ground is filled with concrete. The second method is to fill the hole with concrete and then install the post. In this case, a stronger fixation is ensured.
- Concreting is used on sandy soils with good water permeability and not prone to bulging.
- Driving in pillars with a sledgehammer is the simplest and most reliable method, but it requires physical effort and skill. The post is driven into a hole of smaller diameter for a tight fit to the ground. This method Suitable for fences of light structures and used on heavy soils with dense soil. A positive point is the ease of reconstruction of the fence in case of distortion - the pillars are leveled using the same sledgehammer.
You can purchase metal poles with a spiral at the end. Screw piles are screwed into the soil, ensuring its sufficient compaction.
Installation of asbestos cement fence posts
- The most common pillars are about 12 cm in diameter. Asbestos-cement support is not considered strong, so it is only suitable for lightweight structures. At correct installation service life exceeds 50 years.
- The holes are drilled to a depth of about 80 cm (with a column height of more than 2 m), making an expansion at the bottom. The expansion is filled with concrete, and the walls are reinforced with a roofing felt tube, which should protrude by 15 cm. Wooden formwork is made around the protruding part of the roofing felt. The pit is filled with concrete, but not completely. While the solution has not hardened, insert an iron rod or pin slightly shorter than the pole itself.

- Next, after the rod is secured with mortar, the post is put on and the remaining space is filled with concrete up to the edge of the formwork. In this case, the structure does not come into contact with the ground at all and is securely fixed. To protect against rupture under the influence of freezing water, the cavity of the pillars is filled with concrete to the very top, forming a convex cap to prevent the accumulation of water.
- A less labor-intensive method is also possible, similar to installing metal pipes, in which the pillars are buried in the ground and filled with concrete. But its use is allowed only on sandy soils.
Installation of brick fence posts
- Installation of poles from brickwork starts with preparation strip foundation. To do this, broken bricks are placed in a dug trench and concreted. At the site of the future pillar, strong reinforcement with several metal rods is installed, which will serve as a frame. Wide pipes can be used.

- The top of the foundation is closed waterproofing material. Before starting masonry, check the correctness of the markings. The first row is checked for evenness using a level. Bricks are laid around the frame, and the resulting cavity is filled with concrete.
Installing brick pillars requires skill and is rarely done independently without the involvement of specialists.
Method of installing pillars on heaving soils and with close groundwater
- Heaving soils are dangerous because they can push pillars along with poured concrete to the surface. After just 2-3 years, the promised durability of the fence may be eroded. Close proximity to groundwater increases corrosion and decay, and also causes changes in the upper layer.
- In such cases, it is necessary to use more labor-intensive, but also more reliable methods of installing poles. Many practitioners advise increasing the depth of the holes below the groundwater level. This method entails excessive consumption of the solution and does not always pay off.
- The following method is considered more effective. Crushed stone or expanded clay is laid out at the bottom of the prepared hole in a layer of 20 cm. After installing the post, the space is also filled with crushed stone to a depth of 15 cm to the ground level. This remaining 15 cm is filled with concrete. The crushed stone layer provides good drainage and does not pose an obstacle to the flow of water. The concrete top guarantees a strong fixation of the post. Although many builders in such cases refuse concrete altogether.

General steps for installing fence posts
- After choosing the material for the posts and the best way installations begin to prepare all necessary tools. You will definitely need a garden auger, a shovel, a crowbar, a cord, a building level, drainage material. Depending on the chosen method, you may need a sledgehammer, roofing felt, a container for preparing the solution and cement.
- The critical stage is planning and laying out the site. Along the perimeter, in place of the future pillars, pegs are driven in, along which the twine is stretched. In this case, each peg must stand strictly opposite the neighboring one. They plan to install pillars of larger diameter in the corners for high loads. The recommended length of one section - the distance between two posts - is no more than 3 m. If the fence structure is heavy, then the distance is reduced to 2.5 m to avoid sagging.
- After installing the first corner post, proceed to the second corner post, leveling its height relative to the first using a hydraulic level. Between the two pillars, two cords are stretched at the bottom and top, which will serve as markers when installing intermediate ones.
- If there is a significant difference in height (more than 25 cm), it is planned to install additional poles and install a stepped fence. Auxiliary supports with greater strength are installed in the locations of gates and car gates.

- When fixing a pillar, its position is checked with a vertical level. It is important that all the pillars are not only the same height, but also stand level. When using concreting, work on fixing the fence begins no earlier than 3-5 days to allow the solution to completely set and harden.
Fence posts video
To install a fence at your summer cottage, you can do it yourself if you choose the most versatile method and material. At the same time, the fence will last for quite a long time and without the hassle of annual repairs. Most popular in Lately metal posts with chain-link mesh are used; profile fences are often found. Wooden fences It is impractical to build on a budget from low-grade wood. For more complex structures using asbestos-cement and brick supports will require the help of specialists.
The construction of any fence begins with the installation of the supporting part - the pillars. The more securely they are installed, the longer the fence will last under the influence of winds and bad weather. Therefore, this stage of work is the most critical and must be carried out according to technology. After familiarizing yourself with it, you can confidently place poles and build a fence with your own hands without the involvement of hired workers and equipment.
Methods of mounting supports - which one to choose?
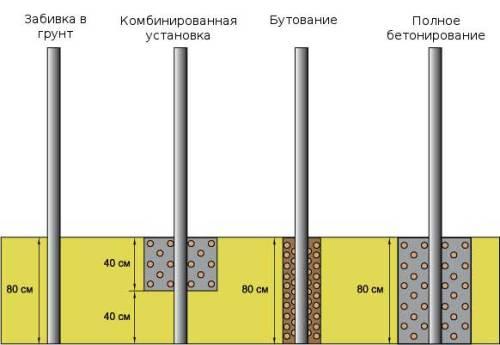
When erecting fences, 3 methods of installing supporting structures are practiced:
- direct driving into the ground;
- partial concreting;
- complete pouring of concrete into the underground part of the rack, including the installation of a strip foundation.
Note. In turn, partial concreting is carried out in two ways - pouring the so-called concrete collar or filling the well below the soil freezing line.
Pole installation options
Each of the listed methods used in certain conditions, depending on the quality of the soil, its saturation with moisture and the degree of freezing. In addition, the choice of technique is influenced by vertical and lateral loads created by the weight of the structure and its windage. An important rule applies to solid fences: they must be able to withstand wind loads, which sometimes exceed the weight of the fence.
Load on a solid fence made of corrugated sheets
Simply driving posts into the ground allows you to speed up construction and significantly reduce its cost. In contrast to these advantages, the method has numerous disadvantages:
- A stand driven into soft or loose soil (chernozem, clay, sand) will quickly become loose in the wind and tilt when solid solids are attached to it. fence sections with a large windage. The latter includes corrugated sheets, polycarbonate and various wooden boards.
- If the height of the fence exceeds 2 m, then the wind will turn out the clogged post in any case, even with a transparent one air flow mesh - chain-link.
- In areas with clayey, moist soil that swells at subzero temperatures, such supports will come out of the ground by 5-10 cm in the first winter. After which they will finally be tilted by the wind.
- After driving, the post is not able to bear a large load in terms of mass. Metal structures or artistic forging elements cannot be attached to it.
Heavy fence made of forged elements
From the above it follows that driving in racks can be used under the following conditions:
- when your site has hard or rocky soils;
- driving into soft soil is possible if the height of the fence does not exceed 1.5 m, and the spans are made of mesh - chain-link or other wind-transparent material;
- if it is necessary to quickly erect temporary fencing;
- during the construction of wattle fences or low decorative hedges near flower beds and front gardens.
To fence the front garden, posts can be driven into the soil
Concreting will require a lot of labor, time and money. Just hardening the concrete will take you 3 weeks, not to mention buying the ingredients to prepare the mixture and finding a concrete mixer. In return you receive the following bonuses:
- durability (the fence will easily stand for 30-50 years, depending on the material);
- proper concreting is used on all types of soil;
- reinforcement with concrete mixture is suitable for all types of fences, including heavy ones (stone, brick, metal structures, forging).
Fence with brick pillars
Note. Racks cannot be concreted in swampy, oversaturated soil. But in such situations, driving will not help; you need to build a pile-screw foundation.
It turns out that the choice of installation method for racks depends on the conditions in each specific case. Hammering saves time and money, but is not always applicable. Concrete is used everywhere and provides reliability and durability for any structure, although it is more expensive. On stable, dry soils, construction costs are reduced by partially concreting the supports.
Materials for pillars
For installation of a fence erected around land plot, the following types of pillars are used:
- from wooden beam and logs;
- from various rolled metal products - profile and round pipes, channels and angles;
- made of brick and concrete.
Wooden fence
Reference. Channels and angles are used either singly or double, welded into a “box”.
As a rule, wooden posts are installed when constructing a fence made of slabs, boards or thin logs (picket fence). They are also convenient to use together with plasticized mesh or chain-link mesh. The advantages of wooden poles are:
- low price;
- ease of processing and fastening of fence sections;
- fracture strength of the material, lack of flexibility, like metal;
- The supports can be given a wonderful appearance using wood carving, varnishing or painting.
Palisade with wooden supports
The use of wood as fence posts has one significant disadvantage - the material quickly deteriorates from exposure to weather conditions. To prevent a wooden stand from rotting in 10-15 years, it will have to be treated with an antiseptic and periodically painted. There is also a danger of the fence catching fire from an accidentally thrown cigarette butt.
Rolled metal - universal solution for the construction of various fences, but also more expensive. Although steel pipes also need to be protected from corrosion, they will last much longer than wooden racks. Sections made of various materials, from wood to forging elements, can be attached to metal. Steel posts are also used in the construction of permanent fences - they serve as the core of a brick pillar, to which wickets and gates are subsequently welded.
Steel pipe serves as a frame for brick supports
Reference. For quick assembly of fences made of corrugated sheets and polycarbonate, ready-made metal kits are available for sale. profile pipes And fastening elements to them.
Euro fence with concrete pillars
Concrete pillars are installed complete with a so-called Eurofence, consisting of individual slabs decorated with a relief pattern. In other cases, using concrete supports is impractical due to the high price and complexity of installation (the racks are quite heavy). But they also “live” for a long time - up to 50 years, and are not afraid of winds, precipitation and temperature changes.
Selection of columns by section
- timber with a section of 10 x 10 cm, minimum - 8 x 10 cm;
- log with a diameter from 100 to 150 mm;
- for a stockade it is better to take round timber maximum size- 15 cm.
For pillars, it is advisable to select logs of the same diameter
When selecting wooden supports, you should pay attention not only to the cross-section, but also to find out the type of wood. Birch and poplar are of little use for outdoor structures because they rot quickly. The best choice in terms of price/quality ratio - these are materials from coniferous species. They contain a significant amount of natural resins that help resist environmental influences.
Profile pipes for fence
When selecting metal poles, consider the following recommendations:
- with a fence height of 2-2.5 m, take a profile pipe cross-section of 60 x 40 mm; for a one and a half meter fence, products measuring 40 x 40 mm will be used;
- optimal diameter round pipe- 57 mm;
- take the maximum size of corners and channels installed individually to be 90 and 160 mm, respectively.
Diagram showing pipe cross-sections
Advice. To ensure that steel supports last at least 20 years, choose rolled metal with a wall thickness of at least 3 mm.
The pillars to which the gate leaves and wicket are attached carry an increased load, so their cross-section must be larger. As a rule, a profile pipe size of 100 x 120 mm or a round pipe diameter of 109 mm is sufficient. The cross-section of the channels and angles remains unchanged, but for gates they are combined in pairs by welding into a “box”.
Calculation of basic parameters for do-it-yourself installation
- Measure total length fencing using a tape measure. Determine the height of the fence for safety reasons and based on personal wishes. As practice shows, building a continuous fence more than 2.5 m high is not economically feasible. Optimal height, allowing you to save materials - 2 m (a six-meter pipe is divided into 3 parts).
- Determine the height of the pillars. The principle is this: to create a reliable support lever in the ground, the stand must be immersed in the ground at least 1/3. If you plan to build a 2-meter fence, then at least 1 m of the support must be in the ground, then its total length will be 3 m.
- Count the number of columns depending on the interval of their installation.
Fences with a height of more than 2.5 m are best made of mesh
Advice. On preparatory stage It is worth coordinating the construction with the neighbors so that later there are no disputes regarding the delimitation of plots.
It is important to choose the correct step for installing the supports, depending on the area and windage of the fence. The distance between the posts should be between 2 and 3 m. A smaller interval is not advisable from the point of view of economy, and a larger one sharply reduces the reliability of the structure. The exact selection is made on an individual basis.
Solid fence with an optimal distance between posts of 2.5 m
Calculation example for a fenced area length of 13.4 m with a fence height of 1.5 m:
- If you divide this distance into 4 sections, then the pitch of the pillars will be 3.23 m. With such a span length, the fence can be built from brick or chain-link mesh on metal posts. It is extremely undesirable to install corrugated sheets or other solid material; the racks will be shaken by the wind.
- Dividing into 5 sections will give the optimal interval - 2.56 m. This suitable option for most fences, both wooden and metal.
- If you divide the distance into 6 spans, then the length of each span will be 2.12 m. The reliability of such a fence will be excellent, although the cost of construction will increase. But here you can save on the cross-section of the pillars and take a smaller standard size according to the assortment.
An example of a breakdown into 4 spans
Advice. The optimal distance between the posts of a solid fence 2 m high is 2.5 m. This the best option in terms of price/reliability ratio when it comes to the most popular fencing made of corrugated sheets on metal supports.
An example of a breakdown into 5 spans
If you choose the optimal pitch of 2.5 m, then the construction of the fence will require 6 supports protruding 1.5 m above ground level. According to calculations, the total length of the post together with the underground part is 1.5 / 2 x 3 = 2.25 m, with a margin of 2.5 m. In total, 2.5 x 6 = 15 m of pipe or channel will be required.
Breakdown into 6 spans
Reference. Concrete Euro fences have a fixed span length of 2 m, so calculating the number of posts is not difficult.
How to install fence posts by driving
To carry out construction work you will need various instruments and accessories:
- measuring instruments - tape measure, liquid level;
- long twine and pegs for marking;
- manual or mechanized drill;
- sledgehammer or portable hydraulic hammer;
- bayonet shovel;
- tamper
If you plan to install wooden posts, they must be treated so that they do not rot in the ground. First, cover the entire support with an antiseptic composition such as Novotex or Biosept, and then tar the underground part with molten bitumen.
Advice. The bitumen coating must adhere firmly to the surface, otherwise it will peel off when driving the post. For this reason, it is not recommended to use cold bitumen compounds and primers to protect racks.
Painted metal supports
Before installation, the underground part of the metal poles must be cleaned of rust, coated with a primer and also applied with hot resin. The operation will not take much of your time, since the bitumen hardens quite quickly.
Work order
The first stage of installation of the supporting part of the fence is marking. Stretch a string on stakes between the extreme points, and then measure along it the calculated intervals between the posts, marking their installation points. The installation technology is as follows:
- At the designated points, drill wells of the calculated depth. The diameter of the drill should be 2-4 cm smaller than the cross-section of the post. When drilling, try to hold the tool vertically and not swing, so as not to break the walls of the hole, which will cause the post to fall in there without any driving.
- It is advisable to trim the ends of the wooden posts, this makes it easier to insert them into the hole.
- Compact the bottom of the well with a tamper and add some sand or small crushed stone.
- Hammer the first post to the required height with a sledgehammer. Here you will need the services of an assistant who will support the end of the support and prevent it from vibrating from impacts.
- Repeat the previous operation with the last post and pull a rope between them to break off the top level.
- Drive in the remaining posts, focusing on the level of the string. Cover them with earth on all sides and compact it.
Marking the fence on the site
Important! In order to maintain a clear vertical when installing pillars, it must be controlled during the drilling process. It is impossible to align the support when driving if the hole is drilled crookedly. But if this happens, then you can correct the matter in the manner described below.
Photo instructions for driving in racks
 When driving the column, an assistant must support it.
  Drilling a hole with a motor drill
  This is what a finished well looks like for driving
  Using hammering, the frame is installed in 1 day
Installation of backfilled pillars
To implement this method, you will need medium-sized stones, broken bricks and tiles or large crushed stone. The installation procedure is as follows:
- Drill or dig a hole to the required depth. It should be 10-15 cm wider than the cross-section of the support.
- Compact the bottom of the hole and fill it with crushed stone. Have a helper place the post and hold it upright using a building level.
- Fill the space between the soil and the stand with stones or crushed stone, compacting it periodically.
- Sprinkle the installed column with soil on top and compact it.
Scheme of backfilling supports
Reference. There is an old-fashioned way to secure the support tightly using backfill. You need to make a liquid solution of clay and water and pour it between the stones into each hole. The clay will fill all the pores and, after hardening, will hold up no worse than concrete.
Video on driving posts
Instructions for concreting supports
This technology involves full or partial filling of columns with a concrete mixture of grade M100 in dry soil and M150 when the ground is wet. To calculate the amount of materials required for concreting, use the data from the table, which shows their volumes for preparing different grades of mortar.
Calculation table for concrete, cement and other ingredients of concrete mixture
Knowing the number of holes for supports and their depth, it is easy to calculate the total consumption of building materials. When fully concreting, no more than 4 standard buckets of concrete are placed in a hole 1 m deep. Additionally, prepare the following materials:
- roofing felt or plastic film to separate the concrete mixture from the ground;
- sand for adding to the bottom of the well;
- pieces of reinforcement or corners for anchoring.
Building materials for concreting pillars
The set of tools used is the same as for driving, only instead of a sledgehammer you will need a concrete mixer. As a last resort, you can do without it and prepare the mixture on a sheet of metal using a shovel. To fix and anchor metal posts, you need to prepare a welding machine.
How to concrete: pouring technology step by step
The first stage of work, consisting of marking and digging holes, is carried out using the technology described above. Complete concreting of pillars is carried out in the following sequence:
- Compact the bottom of the hole, add sand and compact it again.
- Install the support and level it vertically in two planes, using a building level.
- Fix the pipe in the design position by welding the cutting corners to it so that their ends rest against the soil. If the posts are wooden, then nail strips to them or simply wedge them with large stones.
- Cover the bottom of the well and earthen walls with roofing material or film. The goal is to prevent the milk from leaking out of the concrete, which reduces the strength of the latter.
- Prepare a concrete mixture and place it in a hole with a stand. During the pouring process, make sure that it does not deviate from the vertical and is level.
Full concreting of the rack
Advice. In the first 20 min. after pouring, when the concrete gives away excess water, the position of the pillar can be adjusted in order to align the vertical.
Vertical adjustment after concreting
Complete hardening of the concrete mixture occurs after 3 weeks. Until then, it is not allowed to carry out work that could load the columns. The most you can do is clean them and paint them.
How to install and concrete columns: photo
 Filling the hole with concrete
  The pit is filled to the top with concrete
  It is better to cover the edges of the well with roofing material
  Fixing the stand with supports
  Using a rope is more convenient to determine the installation point of the pole
  Preparation of concrete mixture
About partial concreting: what depth to bury and what is the distance between the columns
If the soil on your site is dry and not free-flowing, then it is pointless to spend materials on a full fill. It is enough to make a concrete collar for each column using the following technology:
- Dig a hole half the calculated depth, but make it 20-25 cm wider than the section of the rack.
- Take ready-made support and drive it in the middle of the bottom of the hole to the required depth. Compact the soil around the pipe and add sand.
- Perform anchoring and roofing felt formwork as described in the previous section.
- Fill the hole with concrete mixture.
This is how frost heaving forces act on fence posts
The method is convenient in that it is easier to align a post halfway into the ground vertically and fix it in this position. But this technology, like complete concreting, is not applicable in heaving soils. In severe frosts, the soil will push the entire structure out. To prevent this from happening, use the following instructions:
- Find out exactly what the freezing depth of the ground is in your area. Calculate the total height of the supports using the following formula: above-ground part + freezing depth + 0.5 m.
- Prepare a mixture of crushed stone and sand to replace the heaving soil around the post.
- Drill a hole so that the drill goes 0.6-0.7 m below the border of the frozen soil. Make a 10 cm layer of sand and compact it.
- Install the support and secure it in a vertical position.
- Fill the hole with concrete to a height of 0.5 m.
- After the monolith has set, fill the well to the top with a mixture of sand and crushed stone.
Concrete is poured no higher than the frost line, and then crushed stone is poured
Note. Considering that in some regions of the Russian Federation the soil freezes to 2-2.5 m, the fence posts will be very long and the well will be deep. Therefore, the choice of material for pillars is small; only steel pipe is suitable.
When the moisture-saturated soil is replaced with crushed stone, and the concrete monolith is located below the freezing line, the forces of frost heaving will not be able to push your support out of the ground.
How to properly concrete pillars - video
As you can see, the technology for installing fence posts does not contain any particular difficulties. Also not required special equipment to carry out the work, but if you have a concrete mixer or hydraulic hammer, things will go much faster. It is better to build a fence with an assistant, since most operations are inconvenient to perform alone.