Installing a wooden window: all options. Features of installing plastic windows in a wooden house Large window in a wooden house
Plastic double glazed windows have gained popularity due to their performance qualities. But can they be used in the construction and repair of wooden buildings? Of course, it is possible and necessary.
Installation of plastic windows in wooden house has a lot of differences and features. The process includes a number of preparatory manipulations, primarily related to the fact that the structure tends to sag over time.
We install a PVC window in a private house
Features of the technology for installing PVC windows in a new or new wooden house old building are not very different. In any case, experts recommend technology using casing - time-tested, this technology allows you to avoid deformation, regardless of the material from which it is made.
Installing a plastic window in a wooden house or cottage with your own hands will require the performer to have some knowledge and skills. Of course, if there are none, then it is more advisable to turn to specialists. Complexity self-installation PVC systems in a wooden house is that the frame is fastened using a tongue-and-groove mechanism. This design makes it possible to create operating conditions in which the deformation and subsidence of wood does not directly affect the glass unit.
The system allows you to install a plastic window yourself, so that the window is fixed independently of the main structure of the wall and has a floating character. The window system is secured using grooves on the side, which are placed on tenons protruding from the end of the logs and beams.
To fix and seal the casing, only tow, flax batting or fiber insulation are used. Never use polyurethane foam.
Attention! A gap is left at the top based on the wood's settlement.
Thus, wall shrinkage wooden structure does not affect the window in any way, much less damage it. Depending on the fastenings, casings can be classified into the following types:
- into a thorn This design is characterized by the presence of a tenon, which is mounted on the side parts of the casing, and a groove, which is located in the logs of the opening;
- in the embedded beam. The basis of the fastening is considered to be a block, which is placed in a groove at the ends of the opening and passes through the casing posts;
- into the deck. The tenon is located at the ends of the window opening logs, but the groove is in the casing posts.
The box is a floating mechanism, which prevents deformation of the plastic window during operation, regardless of the type of installation of the casing.
Calculations should be made with high accuracy, since even a minor error can lead to deformation of the window frame or leakage of the structure. Besides, correct installation- this is the key to the quality of the plastic window itself.
How to make a pigtail (casing)
The design can be of two types: complex and simple. A simple window frame is the system described above, with bars and grooves. The complex design is performed somewhat differently: a ridge is cut out in the window opening, onto which a carriage with grooves is placed. This option is more reliable. When the walls shrink, the ridge can slide and does not allow vertical deviations, eliminating pressure on the window frame.
The casing is usually made of timber. Using a wood chisel, a 0.5 cm groove is knocked out in the center of the beam, and a tenon (0.5x0.5x.25 cm) is cut out from one end. A ridge with 0.5x0.5 cm spikes is cut out from the end of the opening logs. You can use a saw or chisel for this.
Important! Ridge markings - important point. The quality and reliability of the design depends on the accuracy of the markings.

After the ridge is ready, we proceed to install the risers and form the structure of the opening between them. The beams are installed level, taking into account the gaps for wall shrinkage (1 cm on the sides and 0.5 cm on top). The frame made of beams is strengthened with the help of grooves with the main fabric of the walls and dowels between them. The gaps left are sealed with tow or other fiber. That's all, now you can start installation directly plastic frame. You can watch the process in more detail in this video:
Stage No. 3. Installation in the prepared opening
After carrying out the necessary preparatory work and installation of the frame, you can begin installing the window.
Attention! Installing plastic windows in a wooden house without casing is the wrong option.
To begin with, we check the dimensions and location of parallels, the gaps between the casing structure and the frame. The margin for foaming should be: 4-5 cm at the top, 2-3 cm in width and height, 3-4 cm in the window sill area. Having made sure that the stock corresponds to these indicators, we proceed directly to installing the plastic frame.
The window is secured using special fasteners, which are sold at any hardware store. They represent metal plates with holes.
Installation of a plastic window should be done level. If you neglect this factor, then you risk getting a structure with a slope, which significantly reduces the operational and aesthetic objectives of the window.
Advice! Before installing windows, the sashes are removed. This simplifies the design and makes it much more convenient to install it in the opening.
After the window is fixed in the opening, it is necessary to fill the gap polyurethane foam. To avoid displacement of the structure during foaming, blocks are placed that will maintain the position of the frame without deviation. After drying, do not forget to remove it.
Fastening the window to the casing is done with care. In this case, you must select correct location tightening screws. Under no circumstances should a window be secured in the ridge area!
That's all, we finish the process by completely foaming the opening. We put the sashes on and let the foam dry.
We presented The right way installation of a plastic window in a wooden house. This process can be difficult, so if you are unsure of your abilities, it is better to turn to professionals.
However, installing a plastic window yourself is a significant cost savings. We invite you to watch a video tutorial on how to install a window yourself:
Reading time ≈ 6 minutes
Every builder knows how to install wooden windows in a wooden house, but ordinary residents of private houses cannot do this with their own hands. The reason is a lack of knowledge, although ordering such a procedure from experts “will cost a pretty penny.” Read the information below to make your home as comfortable and warm as possible.
Grandparents know very well what a wooden frame is. After all, previously there were such windows on every corner. The process of installing a wooden window requires special skills and abilities from the master in order to get the right result. The quality of installation, compliance with tightness, service life, and overall appearance directly depend on the experience and skill of the craftsman. And to avoid drafts and unnecessary distortions, let's look at it step by step correct instructions for installation of wooden windows. When installing a wooden window, you cannot do without skill and certain skills, but then you can make an excellent glazed window.
Features of installation and dismantling of old wooden windows
Before installing wooden windows in a wooden house, you should listen to the recommendations experienced craftsmen to effectively carry out the operation yourself. Especially if you have never encountered this kind of work before. It is best to transfer such a process into the hands of a master who knows all the secrets of the installation first-hand. After all, the lack of necessary skills can lead to the frame being damaged. And their cost is quite high, so spending additional money on repairs is expensive. In addition, repair is not always possible. However, it is often necessary to install products, for example, in.
Woodworking enthusiasts can delve into the installation features in more detail and try their hand at this craft. If you follow the recommendations, you will not only be able to install a wooden window with high quality, but also save a lot.
Advice: if you order a new wooden window, you should leave the installation in the hands of the manufacturer. The fact is that in this way all guarantees for this design will be saved. And if you install it yourself, then all your mistakes will remain on your conscience.

In any case, before installing new window frames, it is worth removing the old structures. This paragraph does not apply to houses that are under construction. Observing correct sequence actions, you will make your task much easier:
- Before work you need to prepare the room. If possible, it is better to move small interior details, clothes and furniture to another room. This way, your things will be safe and sound.
- The furniture that remains in the room and the flooring should be protected. To do this, just cover them with film.
- Floor coverings also need to be removed. This includes a rug, carpet, runner, etc.
After such preparations, you can begin to dismantle the old window itself. To do this, carefully, but applying force, you need to disassemble the wooden frame. In this case, the slopes are knocked out along with the plaster. This operation will help you determine the presence of a lintel. Without this element, the structure is dangerous. In older buildings, such “hackwork” is common. If you are also one of the “lucky” ones, then further actions are impossible without resolving such an issue with professional builders, and there is no need to go there on your own. But experience will help you further develop in the direction, and then completely.
Then beat off the slopes in all places. Carefully inspect whether there are embedded beams in each wall on which the window frame is fixed. It is worth immediately determining their condition.

Embedded beams in the wall
Tip: in order to find out whether these beams need to be replaced or not, use a regular awl. It's worth sticking it into the block. If it fits tightly and is difficult to pull out, then everything is in order. Their presence is not necessary to install a new window.
The importance of correct measurements
Replacing any window requires correct measurement of parameters. This will determine how perfectly the window fits into the window opening. If you have a wooden house, then cleaning should occur to the level of the casing. Now you can start taking measurements. It is important to take measurements clearly and in the right places. Even a small error can ruin everything.
Even if you have saved previous measurements, it is not a fact that they will fit now. After all, over time, any building can be influenced external factors. It is important to create a wooden window slightly smaller than the opening itself. This way you can correctly align the frame in relation to the horizon using correction. To do this, subtract 15–25 mm from the height, and as much as 4–6 cm from the width.
All parameters are taken from ideal lines (horizontal and vertical). To create them, use a building level. Modern devices, for example, a tape measure with a laser, will greatly simplify all measurements. After all, it will give a real indicator for each parameter. It is also important to know how if they are located on the upper floors.

Step-by-step installation of a wooden window
Before installing a wooden frame, you need to prepare necessary tools. To work you will need:
- drill and hammer drill;
- hammer pliers;
- screwdrivers;
- perhaps a saw and a plane with an axe.
It would not be superfluous to purchase silicone sealant, polyurethane foam, roofing felt (polyurethane). These materials are useful for sealing the opening.
If a wooden window is installed in a wooden house, then the technology involves the use of support blocks.
Initially, installing wooden windows in a wooden house with your own hands begins with protecting the window from moisture that a wooden wall can provide. After all, such moisture provokes the occurrence of mold and various fungal growths. And all this very quickly spoils the wood. Therefore, it is necessary to glue parts of the roofing material into the opening. It adheres well to silicone. Here's what you should do:
- Blocks (length 12 - 15 cm) made of wood. One end should already be under the frame. The widest point should correspond to the distance between the frame and the wall. You need at least 4 pieces.
- 2 pieces are installed at the bottom of the opening. There should be about 80 cm between them (depending on the size of the wooden window).
- Remove the sashes from your frame and place it in the opening itself on supports. Maintain the required slope - at least 10 cm.

- The remaining pads are set according to this scheme, as in the photo. They should not fit tightly, so if necessary, tighten them up a little with a plane. Always adhere to the vertical (plumb check) and horizontal (level check) so that there are no even small distortions.
- When everything is aligned perfectly, you can pull out the block one at a time, fill the area with sealant and insert it back.
- The hardest part is behind us. Now it's up to the polyurethane foam. With its help, all cracks around the perimeter are sealed. You need to work with it carefully, and after drying, simply cut off the excess parts with a knife.

You can learn more about window installation from the video. Now you know perfectly well how to install wooden windows in a wooden house, and you can do it yourself, and not spend extra money on the work of builders. The main thing is attention and patience.
Korovin Sergey Dmitrievich
Master of Architecture, graduated from Samara State University of Architecture and Civil Engineering. 11 years of experience in design and construction.
Thanks to your operational characteristics Double-glazed windows made of PVC material have gained particular popularity among the population. They are installed in buildings and structures made of concrete, brick, and wood. Installing plastic windows in a wooden house requires following certain rules.
Important installation details
When starting the installation, you need to prepare the equipment you will need: a building level and a plumb line, and also know how to insert a plastic window. It is necessary to install a PVC window strictly observing the placement in a level plane. This will ensure correct work all elements, the doors will not open or close spontaneously.
The technology for installing a PVC window involves its correct placement in a level plane
When purchasing plastic structures, you need to buy additional special fasteners for installation. The frame is fixed in the frame of a wooden structure using self-tapping screws and special fasteners. By following the technological process and correctly installing plastic windows in a wooden house, you are guaranteed to receive window units that will last for a long time.
 The window frame is secured using anchor plates
If you dismantle the sashes, the structure will become much lighter and it will be easier to move it, but mounting metal-plastic windows It is still not recommended to go alone in a wooden house. To remove the doors, you need to remove the pins from the hinges.
How to install PVC double-glazed windows
Do-it-yourself installation of plastic windows in a wooden house is carried out in stages:
- preparatory activities before installation;
- installation of PVC windows;
- control and verification of location in space;
- blowing with foam.
To understand how to install plastic windows both in a wooden house and in a timber or log house, let’s look at each stage in more detail.
Carrying out preparatory work
First of all, you need to remove exact dimensions, measure the opening, and order the window structure from a trusted manufacturer. To do this, most often they invite a representative of a company that produces plastic frames. You can take measurements yourself. After this, they determine the color of the structure and the completeness of the fittings necessary for the functioning of the window.

When the manufacturer delivers the product to the site, the following steps must be completed:
- if the decision is made to replace installed windows in the old opening, first of all, it is necessary to dismantle the structure;
- after which they clean dust, dirt and remove debris that got into the opening from dismantling;
- It is worth aligning the opening if its geometry is broken.
Having completed the preparation, they insert a plastic window into a wooden house with their own hands.
Fastening the window structure into the prepared opening
We install the window sill first; it will be the base for the double-glazed windows, so it needs to be placed strictly level (horizontally). For fastening strength, notches are made on the sides of the box approximately 8 mm deep. Adjustment is carried out using plastic plates or boards. Fastening occurs with self-tapping screws to the bottom of the box. When screwing in, you should place washers under the screw head; this will prevent damage to the surface.
The next step is to properly install the handle. The film that protects the structures should not be removed; it protects them from damage when the windows are installed. When attaching, the handle must be placed horizontally. When all the fittings have been assembled, the installation of metal-plastic windows begins.
First you need to set PVC frame by level. A frame is placed on two-centimeter bars and leveled horizontally, using a water level. After this, they move on to vertical alignment.
Having obtained ideal parameters at the water level, fix the frame with self-tapping screws to the frame, using mounting brackets, which were specially bought in the store. It is important not to get the self-tapping screw into the ridge of the log where the socket is installed.
 Secure the frame with self-tapping screws
After attaching the window element, we get 2-centimeter gaps around it for the mounting foam.
Before using polyurethane foam, you need to hang the shutters so that after foaming the frame profile does not bend and damage the window. It is important to remember that foam can only be used when the sash is closed..
Control and foaming of the structure
After hanging the sashes, you need to check how the double-glazed window opens and closes. If a window that is half open does not close or move further, then the frame is considered to be installed correctly and the alignment is correct. After closing the sash, foam it with installation foam and leave it for complete fixation for a day.
Why is casing made for plastic windows in a timber house?
To obtain high-quality PVC windows in a wooden house, you must strictly observe the installation features, that is, install them on a special frame (base). The need for such a design is due to the characteristics of wooden buildings. Unlike a building made of stone (concrete or brick), a wooden panel house unstable over a long period.
 The casing prevents frame deformation when the house shrinks
The building will be completed within the first five years after its construction. In this case, the walls dry out up to 6 cm. This important nuance must be taken into account when installing a plastic window in frame house. It is clear that you cannot simply insert a plastic window into a wooden house; you need to create a structure for the opening, which is called a casing, or they also say a window frame. Its direct purpose is to prevent the frame from being affected by wall shrinkage, so the socket:
- strengthens the opening;
- bears the load;
- prevents the effects of shrinkage.
The pigtail looks like a box made from thick boards. The structure is attached to the side rack on a groove, no fasteners are used. There remains a shrinkage compensation gap above the pigtail for wooden house. There are several options for installing it:
- A groove is cut in the log into which the block is placed. Self-tapping screws are screwed into the last element of the embedded beam;
- a groove is cut out in the racks on the sides of the structure, a tenon is cut out from the end of the log in the opening;
- A groove is made at the end of the logs, and a tenon is placed on the side posts of the box.
 Casing options
To make it work quality construction, you need to follow the technology for installing plastic windows in a wooden house. To begin with, cover the ridges of the logs with insulation and secure it with staples or small nails. This stage is necessary to insulate the house and eliminate creaks. Then the lower crossbar of the casing is mounted, and carriages (side posts of the frame) are stuffed onto the ridges, and the upper jumper is placed in the upper groove of the posts. After collecting the box, carefully connect it with self-tapping screws, it is important that they do not get into the logs.

The gaps that are visible in the opening after installing the casing must be filled with tow or insulation. Then the standard installation of plastic windows in a frame house or log house takes place.
 The cracks are sealed with insulation or tow.
The compensation gap is filled with flat boards pre-wrapped with tow. As the walls shrink, they are gradually knocked out. To do this, remove the top casing and, having knocked out the board, put it back.
The final stage when glazing a wooden structure
The final finishing after installing PVC windows in a log house is done in the same way as wooden ones, that is, after installing the frame structure and insulation, wooden trim is installed. When ordering PVC windows in wooden structure It’s worth taking a closer look at the option with a wood texture, this will allow them to look harmonious against the background of the felled building.
Many manufacturers of PVC structures offer not only the classic white color option for frames. You can order any shade that the customer desires. Colored plastic frames will cost a little more, but will be more suitable option for a home made of natural materials.
When ordering, it is important to take the correct measurements of the opening and not make a mistake in the width of the window sill. Self-installation PVC windows in a wooden house are not such a complicated process if you know all the nuances. You can do it yourself, without resorting to the help of expensive installers.
DIY installation of plastic windows in a wooden house

I hope no one will argue that since their appearance on the construction market, plastic windows have proven themselves only on the positive side, although there are a few unpleasant moments, but still. It is precisely because of their excellent performance and ease of installation that more and more homeowners are choosing them. PVC windows can be installed in any window opening without any problems, but when installing in a wooden house, you need to take into account a number of nuances, without which your entire work will go“down the drain.” Further in the article we will consider what these nuances are and will analyze all the stages of installing windows with our own hands.
Materials and tools
To complete this task, in addition to PVC windows, we will need the following materials:
| Characteristics | Purpose | |
| timber | 150*100 | Casing installation |
| Board | 50*100 | Casing installation |
| Lnovatin | Insulation of the sides of the casing | |
| High-quality insulation | Insulating the thermal gap at the top of the casing | |
| Thermal waterproofing tape | Waterproofing the thermal gap | |
| Galvanized screws | Casing fastening | |
| Screws for concrete | Nagel MRS | PVC fastening - windows |
| Linings | Plastic | Window installation |
| Sealant | Sealing seams | |
| Polyurethane foam | Sealing the gap between the frame and casing |
Let's prepare this from the tools:
- Hammer, drill, screwdriver;
- Chain saw, ordinary saw, grinder;
- Hammer and rubber mallet;
- Paint knife, ordinary knife, pliers, furniture stapler, screwdriver;
- Construction level, tape measure;
- Gun for polyurethane foam.

Preparatory work
1. We dismantle the old windows (if there were any), check whether there is a frame or, as it is also called, casing and in what condition it is (casing essential element window opening in a wooden house and therefore this stage is very, very important). If there is a pigtail and it is in in good condition– you’re lucky, you got rid of a lot of work, but if it’s not there or it’s in poor condition, then read below how to install it.
2. We check the opening for defects such as rot, chips and eliminate them.
3. We treat the opening with a special compound intended for wood, of which there are a lot in construction stores, and move on to the main work.
Instructions for PVC installation- windows
Step 1: As I wrote above, the window frame plays, perhaps, a key role in our task of installing plastic windows. But first things first, casing is a structural element that prevents deformation of windows during the shrinkage of a wooden house and therefore its installation is mandatory.
There are several modifications of this design, namely:
1. Casing in a “mortgage block”;
2. Casing into the “deck”;
3. Casing in the “spike monolith”;
4. “Fine” casing.
The last two options are most often used; we will also not reinvent the wheel and make a “spike monolith” casing.

First: Knowing the dimensions of the future window, we mark and cut out the corresponding opening.
Advice: We cut out the window opening at the top 5–10 cm higher than the frame will be installed. This is done in order to provide a thermal gap.
Second: We mark the future groove, usually it is made five centimeters in size. After marking, chain saw select a groove.

Third: We process the side bars. At the first stage, we should get a T-shaped beam “tenon monolith”. After cutting out this figure, all we have to do is make a bed for the top, that is, the upper jumper, it all looks like this.

Advice: If you plan to finish the outside of the house, then we buy rough material, but if the outside of the house is not additionally finished, then we use finishing material based on laminated veneer lumber.
Fourth: We treat the window opening and all elements of the frame with a special product that protects the wood from rotting and other troubles. At the same stage, it is necessary to make thermal insulation between the wall of the house and the window frame; for this purpose, it is best to use flax wool.
Fifth: We install the side elements of the casing, then measure and cut the board for the top bar (top). The top bar needs to be cut so that it fits into the groove of the side bars with little effort. After installing all the elements, we fix them to the walls of the house using self-tapping screws.
Paste a VALID AdSense code in Ads Elite Plugin options before activating it.

Sixth: We insulate the thermal gap left on top of the casing; this is best done using high-quality insulation installed as with outside windows, and from the inside. Then, the insulation is necessarily hydro- and vapor-insulated with a tape specially designed for such purposes. This tape has a self-adhesive strip, but for more reliable fastening it is better to go over it with a furniture stapler.
From everything I described above you should get the following:

Important: Never use polyurethane foam to insulate a thermal gap, since after hardening it will turn into a very hard substance that will transfer all the loads associated with shrinkage of the house, windows and the window frame will cease to perform its functions.
Step 2: We proceed directly to installing a plastic window in a wooden house; this step, like the previous ones, will be divided into several stages.
1. Remove the glass unit from the window frame. We start with the opening sash, insert the handle into the groove and move it to the open position; there is no need to open the sash. We remove the rod of the upper hinge, open the sash and remove it from the lower hinge.

2. We remove the side glazing beads from the “blind” sash; to do this, with a thin object, for example, a knife, we bend the glazing beads towards the glass unit and back, they should click and remove them. After all the glazing beads are removed, we put on gloves, since the edges of the glass unit are very sharp, and carefully remove the glass unit.
Advice: To avoid the glass unit falling out, first remove the side beads and only then the bottom and top ones.

3. Drill holes in the frame for fasteners. For this purpose we use a 6*70 or longer drill. We drill holes for fasteners at a distance of 15 cm from the corners and imposts of the frame and no more than 70 cm from each other.

4. Trying on the prepared window frame, having previously placed plastic pads under the corners and impost. Then we level the window frame using the same shims and a building level, applying it to the places where the glazing beads are attached and installing shims where necessary. Make sure that the upper part of the frame does not rest against the casing. The gap at the top should be at least 1cm.

5. After the frame is leveled and the necessary wedges are placed, we proceed to drilling the walls. It is impossible to cope with such a task alone, because one person will have to drill and the other will have to hold the window frame and look with a level so that the verticality of the window does not go astray. To begin with, we drill two holes at the top and bottom of the frame, insert screws into them, for fastening we will use concrete screws (MRS dowel), tighten them, but not all the way, as it may be necessary to adjust the lateral deflection of the window frame. After leveling the window, tighten all the screws.
Advice: There is no need to tighten the screws too much, as you can knock down the verticality of the window. It will be enough to slightly recess the screw head into the plastic.

6. We foam the gaps between the window frame and the casing. After fifteen minutes, as soon as the foam gains rigidity, you can insert double-glazed windows and finish the window opening. We will not touch upon finishing within the framework of this article, since this topic is very extensive.
Read how to make slopes for plastic windows here.
At this point, the installation of plastic windows in a wooden house can be considered complete, good luck with your work!
Video on the topic “Installation of plastic windows in a wooden house”:
Installing plastic windows in a wooden house with your own hands: installation features, instructions, video
Plastic double-glazed windows have gained popularity due to their performance qualities. But can they be used in the construction and repair of wooden buildings? Of course, it is possible and necessary.
Installing plastic windows in a wooden house has a lot of differences and features. The process includes a number of preparatory manipulations, primarily related to the fact that the structure tends to sag over time.
We install a PVC window in a private house
The technology features for installing PVC windows in a wooden house of new or old construction are not very different. In any case, experts recommend technology using casing - time-tested, this technology allows you to avoid deformation, regardless of the material from which it is made.


Installing a plastic window in a wooden house or cottage with your own hands will require the performer to have some knowledge and skills. Of course, if there are none, then it is more advisable to turn to specialists. The difficulty of self-installation of PVC systems in a wooden house lies in the fact that the frame is attached using a tongue-and-groove mechanism. This design makes it possible to create operating conditions in which the deformation and subsidence of wood does not directly affect the glass unit.
According to statistics, a wooden house can shrink up to 30 cm. Depending on the material, due to the drying of the wood within 1 year after the construction of the structure, the amount of structure shrinkage per meter of height is:
- log: 40-60 mm;
- timber: 30-40 mm;
- laminated timber 10-30 mm.
These factors should not be neglected, since subsidence of the building already in the first year threatens to crush the window with the crowns of the wall structure.
Shrinkage of walls can occur even after 5 years of operation of the house under the influence of seasonal changes in the composition and humidity of the air. At the same time, installation of windows in old houses also implies the presence of casing.
So, let's consider the algorithm for installing PVC systems in wooden houses.
Stage No. 1. Preparatory work
Before starting the actual installation, it is necessary to carry out a number of preparatory measures:
- dismantling the old window (if replacement is taking place);
- cleaning the opening from dirt and construction debris;
- make the necessary measurements and calculations;
- drawing up a drawing and recording the opening measurement parameters;
- aligning the contours of the sides of the window opening if the hole has an irregular shape;
- leveling is performed using putty or sealant;
- decide on the design and functionality (number of doors, their size, which of them will open);
- decide on the manufacturer and color of the product.
Only after completing all of the above manipulations do we order a window from the manufacturer, taking into account individual wishes.
Stage No. 2. Installation
Once the windows have been delivered and the necessary preliminary work has been carried out, you can proceed directly to installation. Tools:
- drill;
- construction level;
- chisel;
- screwdriver;
- roulette;
- mallet;
- pliers;
- anchor plates and bolts;
- window adjustment key;
- mounting foam;
- spacer wedges;
- spray bottle with water.
Casing: purpose, types and design
The casing is a box-shaped structure, which is made of three or four boards and installed around the perimeter inside the opening.

The system allows you to install a plastic window yourself, so that the window is fixed independently of the main structure of the wall and has a floating character. The window system is secured using grooves on the side, which are placed on tenons protruding from the end of the logs and beams.
To fix and seal the casing, only tow, flax batting or fiber insulation are used. Never use polyurethane foam.
Thus, shrinkage of the walls of a wooden building does not in any way affect the window, much less damage it. Depending on the fastenings, casings can be classified into the following types:
- into a thorn This design is characterized by the presence of a tenon, which is mounted on the side parts of the casing, and a groove, which is located in the logs of the opening;
- in the embedded beam. The basis of the fastening is considered to be a block, which is placed in a groove at the ends of the opening and passes through the casing posts;
- into the deck. The tenon is located at the ends of the window opening logs, but the groove is in the casing posts.
The box is a floating mechanism, which prevents deformation of the plastic window during operation, regardless of the type of installation of the casing.


Calculations should be made with high accuracy, since even a minor error can lead to deformation of the window frame or leakage of the structure. In addition, correct installation is the key to the quality of the plastic window itself.
How to make a pigtail (casing)
The design can be of two types: complex and simple. A simple window frame is the system described above, with bars and grooves. The complex design is performed somewhat differently: a ridge is cut out in the window opening, onto which a carriage with grooves is placed. This option is more reliable. When the walls shrink, the ridge can slide and does not allow vertical deviations, eliminating pressure on the window frame.
The casing is usually made of timber. Using a wood chisel, a 0.5 cm groove is knocked out in the center of the beam, and a tenon (0.5x0.5x.25 cm) is cut out from one end. A ridge with 0.5x0.5 cm spikes is cut out from the end of the opening logs. You can use a saw or chisel for this.

After the ridge is ready, we proceed to install the risers and form the structure of the opening between them. The beams are installed level, taking into account the gaps for wall shrinkage (1 cm on the sides and 0.5 cm on top). The frame made of beams is strengthened with the help of grooves with the main fabric of the walls and dowels between them. The gaps left are sealed with tow or other fiber. That's all, now you can start installing the plastic frame directly. You can watch the process in more detail in this video:
Stage No. 3. Installation in the prepared opening
After carrying out the necessary preparatory work and installing the frame, you can begin installing the window.
To begin with, we check the dimensions and location of parallels, the gaps between the casing structure and the frame. The margin for foaming should be: 4-5 cm at the top, 2-3 cm in width and height, 3-4 cm in the window sill area. Having made sure that the stock corresponds to these indicators, we proceed directly to installing the plastic frame.
The window is secured using special fasteners, which are sold at any hardware store. They are metal plates with holes.
Installation of a plastic window should be done level. If you neglect this factor, then you risk getting a structure with a slope, which significantly reduces the operational and aesthetic objectives of the window.
After the window is secured in the opening, it is necessary to fill the gap with foam. To avoid displacement of the structure during foaming, blocks are placed that will maintain the position of the frame without deviation. After drying, do not forget to remove it.
Fastening the window to the casing is done with care. In this case, it is necessary to select the correct location for tightening the screws. Under no circumstances should a window be secured in the ridge area!
That's all, we finish the process by completely foaming the opening. We put the sashes on and let the foam dry.

We have presented the correct way to install a plastic window in a wooden house. This process can be difficult, so if you are unsure of your abilities, it is better to turn to professionals.
However, installing a plastic window yourself is a significant cost savings. We invite you to watch a video tutorial on how to install a window yourself:
Installing plastic windows in a wooden house: DIY installation video
 Repair work in a wooden house differs significantly from similar buildings in other types. Most companies do not provide a guarantee for installations carried out here, especially for plastic windows. Isn't this a reason to think about DIY installation? Armed step by step video, you can achieve high-quality results while significantly saving the family budget.
Features of installing a window system in a wooden house
There are many prejudices about wooden houses. The service life of PVC windows installed here depends entirely on the quality of the structure itself and compliance with the technology of the installation process.
You cannot start working on a window opening in a new wooden house right away. To avoid deformation in the future, it is recommended to wait some time for the structure to stand, the wood to dry and evaporate excess moisture, the walls became static. Thus, the chance of the opening being undermined is minimized.
The outer part of a wooden house is not chosen as a place for a window. The opening may be in the center or closer to one of the corners, but not in contact with it.

The installation process itself is not too labor-intensive: it can be done with one pair of hands in a few hours. The subtleties of the preparatory work depend on whether the windows have already been installed before or whether the casing needs to be created from scratch. Similar technology can be used for PVC installation to any wooden building: bathhouse, gazebo, etc.
Preparing the workspace
To install plastic windows yourself, you need solid foundation- frame. If the previous windows were installed over the past few years, did not have time to acquire physical damage and were not touched by rot, then you can use the box from them as a frame for new system. With this option, measurements are made according to the new size of the opening, focusing on the preserved box.
If PVC is installed in a new building, then you will have to take care of the piping. This is the name for a structure that prevents the window system from deformation. There are several types:
- With a mortgage block;
- In the groove of a log wall;
- On a spike in the wall;
- With a quarter.

Using a rag, you can remove dirt, dust and start taking measurements. The reliability and feasibility of carrying out all further work: Inattention at this stage can jeopardize the entire installation.
Advice. If the opening is distorted, then to create a plan diagram with measurements, they are guided by the supposedly correct geometric shape and right angles, and the deformations are removed using sealant or ordinary putty.
Window sill installation and window preparation
The window sill is the basis of the entire window system, so its installation must be carried out with a level: the horizontal surface must be ideal from both longitudinal and transverse positions.
To do the work yourself, the following algorithm of actions is used:
- Small recesses (at least 5 mm) are made in the window frame for additional fixation of the window sill.
- Using plates made of fiberboard, plastic or wood treated with an antiseptic agent, level the level of the window sill.
- The window sill is installed using self-tapping screws. It is necessary to place a gasket or washer under the caps to prevent cracks. For self-tapping screws, you need to choose a place where they will be hidden by the future window. Typically, it is located at a distance of 2-4 cm from the end.
- After installing the window sill, check its horizontalness using a building level.

As for the window itself, before installation it is necessary to attach the handle in the down position (closed state).
Window installation
Installing a window in a prepared area of a wooden house is no different from installing it in another structure. The process is performed in the following sequence:
- Marking the window frame and drilling mounting holes. The procedure is carried out using a 6 mm drill for a corresponding self-tapping screw 1 mm smaller in diameter.
- Installation of the system in the opening. In this case, they focus on the window sill, the even level of which, thanks to additional control, is beyond doubt. The center is determined using a measuring tape.
- Level relative to the wall. To ensure that the window is parallel to the surface of the wall, use a plumb line. If it is finished with siding, which allows you to place a level between the trim and the wall, then you can use it.
- Fixing a beam that would completely fill the space between the window and its frame. It will become a stop for further installation. Installation without it may lead to blocking of the window opening/closing mechanism.
- The window is fastened using self-tapping screws from the bottom and top of the side posts, so that they do not interfere with the free opening of the window in the frame.
- Foaming cracks and removing excess foam.
Installing a PVC window yourself can save up to 60% family budget. Following detailed instructions their installation will make the structure resistant to seasonal deformations wood, extending the service life of the system for a long time.
The performance qualities of plastic window structures allow them to be used in the construction or repair of any buildings and structures. When working, it is worth taking into account the differences and features of the installation process.
Let's study in more detail the intricacies of installing windows in a wooden house.

Peculiarities
The peculiarities of installing plastic windows in a wooden house require a number of additional manipulations. This is due to the fact that the structure settles over time. Moreover, such work has differences in an old wooden house and in a new, newly built dwelling.

Before moving on to studying it, it’s worth clarifying what you need to know about shrinkage. This is a natural process of changing the parameters of the walls due to the drying of the wood base.
The shrinkage of a wooden structure depends on a number of factors:
- type of material (timber, laminated veneer lumber, log);
- time of material procurement (summer, winter);
- time of day of collection (evening, morning, afternoon);
- area of forest growth (field, swamps);

- density and resinity of the material;
- dimensions;
- humidity indicators;
- dimensions of the entire structure.


The greatest shrinkage will occur in a log frame. The shrinkage parameter of a rounded log has a lower value. The shrinkage rate of new laminated veneer lumber is even slightly lower. There will be practically no shrinkage observed in an old timber or log house.
Almost any wooden house is a constantly moving structure. This phenomenon is practically not observed in stone or concrete structures. Due to instability wooden structure The installation of PVC windows should not be carried out in a previously made opening, but in a pre-prepared box. It will represent a connecting link between the wall and the window structure.


The box is called differently: casing, pigtail, linden, etc. Without this element, a wooden house will “walk” and begin to put pressure on window structures.
In the shrinkage gap between the top in the casing and the wall of the house It is not recommended to use polyurethane foam. The hardened mass is rigid, so it will transfer the pressure of the upper elements of the wall to the window, negating the functions of the casing. The upper casing gap is insulated with other materials, which you will learn about later.

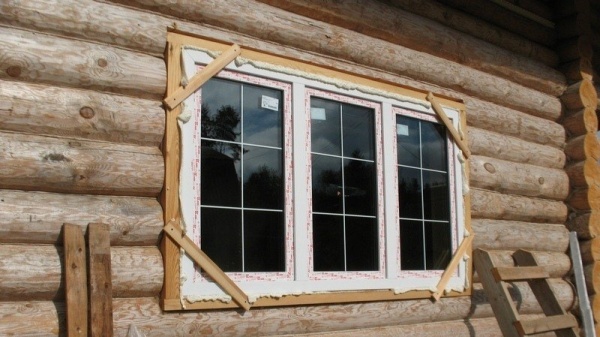
Another pitfall when installing windows can be incorrect calculation of window sizes. Without taking into account the installation gap, the window opening will have to be expanded in any case.
Negative on performance qualities the design will be affected by too large a window opening. Simply foaming it cannot be reduced, and without proper insulation, the slopes will always be cold. When installing windows, it is important to immediately protect the installation gap. The cracks on the outside are closed with special tapes.

Another important feature of installing plastic windows is exact alignment with the level. Inaccuracies at this point will lead to rapid failure of the fittings.
It is also important to take into account the correct placement of the window in the wall. For example, if it is located in a cold zone, this will cause it to freeze. Condensation will certainly accumulate on the inside.
Knowing the features of installing plastic windows, you can decide to install them yourself. After all, many companies providing such services do not guarantee their work, citing the unpredictability of wood behavior. Therefore, it is worth exploring casing options in more detail.


In addition to plastic windows, metal-plastic structures, wooden, aluminum, and combined ones can be installed in a wooden house. Wooden windows have a lot of advantages, but among others they are the most expensive. Plastic structures are more affordable and require less maintenance. Modern manufacturers offer designs in a wide range of colors.
When choosing any design, it is important to understand the installation process of a window structure. This is necessary not only for self-installation. Knowledge is also important for monitoring the process of work that employees will perform.


Casing options
Casing is definitely needed for windows that will be installed in a new wooden house made of timber or logs. The structure will also be needed for unstable soils. It will be additional protection for the window, which in this case may become warped.

There is no need to do casing for the windows of a frame house. Here the frame itself will provide the necessary rigidity of the structure. Considering the simplicity of the casing construction process, it is still better to do it for this type of building.
The correct casing installation technology involves the use of three types of structures:
- spike-monolith;
- embedded block;
- into the deck.

The most labor-intensive part is the tenon-monolith casing., but she is the most reliable. For this design, a groove is cut out in the box, the dimensions of which fit the pre-prepared tenon on the sides of the box. If you do not have carpentry skills, it is best to install the casing in the embedded block.
Casing “in the deck” is the most expensive both in terms of labor costs and materials costs. The guide for the box here is a spike, which is installed in the end parts of the opening. Grooves are cut on the sides of the tenon. The top is attached to the side decks with self-tapping screws, and the window sill is installed on wooden dowels.

Installation of any window frame begins with the window sill. After this, work moves on to the apex, under which side stands are needed.
It must be taken into account that the maximum shrinkage of the house is about 35 cm depending on the strength of the base. Regular timber can give a greater shrinkage - up to 40 cm, and a smaller one - laminated timber. The consequences of incorrect calculations may manifest themselves later in operation, resulting in the need to replace the entire structure.
Material for casing can serve as glued or monolithic timber. The use of laminated veneer lumber is not recommended in bathhouses, but this material is suitable for home use. Temperature and humidity changes are observed in the baths, causing the laminated veneer lumber to collapse.

If monolithic timber is used, it is important that it is dry. Material with moisture content greater than 12% will behave or crack.
The monolithic timber must be specially chamber dried; if this is not available, the material will have to be dried in the shade for about 4-6 months.
There are also such types of casing as:
- Draft. The cheapest materials are suitable for it. Casing is used for planned internal and external finishing works. In contrast, finishing casing does not require finishing. It already has a slope; the window can be installed immediately after attaching the frame.
- Arched. This decorative variety prized for its originality. This design can use several glued parts or a single curved block.


- Power. This option is used for large-scale panoramic windows, gates, balconies, as well as doorways. Thick wood is used for manufacturing.
- Eurosurface. This option is similar to finishing, as it does not require additional finishing. A special feature of this type is the use of solid lamellas with a special adhesive composition.
- Combined. This option is made from solid wood, and has an outer layer of a type-setting adhesive decorative base. This form combines beauty appearance and low price.


The casing for plastic windows of a wooden house can also be plastic. The installation features of this type require a wider opening in the log house (at least 10 cm) from the width of the glass unit. The manufacturing scheme involves installing a carriage with grooves, the dimensions of which should allow the frame to slide easily along the guides.
Preparatory work
The general rules for preparatory work will be as follows:
- A compensation gap is required between the top of the casing and the horizontal part of the window opening. It accounts for the maximum shrinkage of the house, which is possible at the time of installation of the frame.
- Wooden casing elements (tenon, groove, ends, top) must be treated with an antiseptic.
- The insulation is placed between the casing and the end of the wall. Suitable materials include flax wool and jute. The materials are secured using a stapler. The upper gap is insulated inside and outside. The insulation is secured with steam and waterproofing tape. If the tape is not sticky, it can be fixed with a stapler.
- The lower part of the frame is insulated with two-layer flax or jute. A windproof film is needed between the frame and the window sill.


- The frame is attached to the frame from the outside long screw, which should press the structure along the entire plane of the box.
- If there are gaps on the outside, they are carefully insulated.
- At this stage, it is not advisable to use polyurethane foam. It will prevent shrinkage. Foam should only be used as a last resort together with a vapor barrier.
- The best protection option would be to carefully caulk the gaps and then seal them with waterproofing tape. The main goal There must be no possibility of moisture getting on the insulation.
- Lastly, the trims are attached and the ebbs are installed.


To determine the size of the gap, you need to take into account the thickness of the box material, taking into account the seams and the shrinkage coefficient of the structure.
An important preparatory stage is marking the opening for the window. Before you start cutting out the opening, you need to accurately mark it, and for this you need a level. The window opening must correspond to the levels on all planes. The pigtail must be cut as accurately as possible relative to the given level.
If the house is not made of timber, but is made of wood, the lower crown of the opening for the window must be cut out in such a way that a horizontal surface is obtained. The size of the opening is determined by the parameters of the window design, taking into account the size of the gaps.

Preparatory work involves the installation of a pigtail, which can be:
- T-shape. For it, a hole for a groove is created inside the end of the log slope. In the future, you need to place the profile in this groove.
- U-shaped. To do this, you need to cut a spike at the end of the log wall. In this case, a groove is created in the side casing post.


Installation
You can insert the pigtail correctly with your own hands from the windowsill. Step-by-step instructions further implies the installation of slopes, and on them - an apex. It is better to insulate the wooden parts of the casing after the external platbands without window glass are installed.
You can initially install the window frame to the frame using self-tapping screws. Fasteners must completely penetrate the body of the structure, but must not penetrate the wall. It is unacceptable for self-tapping screws to be screwed into the log. Therefore, the length of the fastening elements should not be greater than the width of the frame. Special wooden brackets can be inserted as fastening elements.

Okosyachka
As a result of correctly carried out preparatory work, the frame along the frame should stand perfectly straight. The leading edge is placed strictly parallel to the casing plane. There should not be any significant distortions.

Decide what kind of waterproofing you will use when processing the gaps between the window frame and the glass unit. If the gaps are filled with foam, then it is worth considering that it is afraid of light and moisture. The seam is covered with platbands. The waterproofing used in this case should not allow water to pass inside, and moisture vapor should not escape outside. Proper waterproofing should not be susceptible to weathering.

If the frame is installed clean, this allows you to save on lining the window sill and slopes. For a more attractive final result, you need to know how to properly process wood. Accurate sizing calculations are also important, especially if done independently. Despite some difficulties, the solution with a finishing pigtail is the more correct choice.
Double-glazed window
Place the glass unit in the opening and carefully monitor the installation accuracy relative to the front edge of the frame. In wooden houses, it is not necessary to install a double-glazed window inside a third of the wall thickness. This is required by panel or brick buildings, as well as frames. The thermal conductivity of wood is lower compared to these structures.
If in a wooden house a double-glazed window is placed deep into the opening, the result will be a reduction in the already narrow window sill. In this case, the ledge from the outside must be additionally closed and subjected to hermetically sealed treatment. When installing plastic profile It is worth considering that the main conductor of cold inside is the profile itself.

A waterproofing tape with a vapor-permeable effect is suitable as a profile processing material. In combination with the tape, you can use Stiz-A sealant. It is acrylic, one-component, white, and adheres well to base materials. building materials, including wood.
The procedure for filling the gaps between the casing and the window structure is as follows:
- foaming;
- waiting for the foam to dry;
- cutting off excess foam with a spatula;
- sealing seams with tape.

You can buy self-adhesive tape in stores, which includes a membrane and a sealant applied on one or both sides. Rolls on sale come in various widths. For plastic windows, a narrow tape is sufficient. It looks like foam rubber. The foam on the inside of the window should also be closed. Special tapes are also selected for vapor barrier.

- Do not use metal fasteners when connecting casing parts.
- Observe optimal distance standards. For example, there should be at least 90 cm from the window sill to the floor.
- Install windows in a wooden house closer to the outside of the wall.
- Choose hard wood as a window sill. Usually, best qualities will have a window sill made of solid wood.
- Align the corners of the window opening with a level, setting it to 90 degrees. Diagonals may differ by 10 mm.
- Correctly calculate the window seating depth. The dew point isoline should run along the inside of the opening. In this way, it is possible to ensure that there is no condensation on the inside of the structure.

When processing casing both inside and outside, you can use various options color and texture design of surfaces. Once the window installation is complete, everything wooden surfaces You can simply sand and varnish. Use a stain that matches the color. This way you will achieve a more harmonious appearance of the window sill and other parts of the casing against the background of the walls or window.
Self-installation of a window structure allows you to save money, but incorrect work only increases costs in the future. For houses made of wood, there is a special technology for installing PVC windows.


Advantages and disadvantages of PVC structures
Installation requires a person to have special skills and knowledge; if they do not have those, then it is better to study the topic in detail. The best system fixation is a tenon-groove, it is this that allows you to avoid deformation when the wood shrinks, which has a Negative influence on the performance properties of window metal-plastic construction. New buildings are more susceptible to shrinkage, but even in houses built a long time ago, shrinkage can occur.
Professionals note that a wooden house sags by an average of 20 mm per year. It is not so easy to determine this with the naked eye, but by looking at the window design it is very easy.


It is rare, but it happens that for several years deformation does not occur, and then under the influence of the environment the distortion becomes visible. To prevent this from happening in a wooden house, casing must be done before installing the window. This is a very complex and painstaking process, but it cannot be excluded. If you carry out the installation, as in brick house, you will need constant adjustment of the fittings in the window structure. Plastic structures have many advantages, which is why they are in great demand on the market. Among them it is worth highlighting the following:
- low operating costs, since such a window does not need to be painted or treated against insects;
- durability of the material, which is resistant to temperature changes environment, it is not affected by ultraviolet radiation, does not corrode and does not rot;
- good frame rigidity;
- fire safety;
- no cracking or warping.


All these advantages make the window design suitable for all regions of our country. PVC copes well with the assigned tasks both in the south and in the north. But, like any material, polyvinyl chloride has disadvantages, since it is far from ideal. Among them are the following:
- inability to maintain required level humidity in the house, since such structures are completely sealed;
- it is impossible to repair such a window if the surface is damaged;
- there is always a lot of dust on plastic, since it attracts it with static electricity;
- the material has a high coefficient thermal expansion, therefore, the places where the plastic adjoins the wall are often damaged;
- Wood has better sound and heat insulation than plastic.

Important nuances
Installing plastic structures in a wooden house has its own characteristics. It doesn’t matter whether such windows are installed in a timber or log house, the technology must be strictly followed. When installing a plastic window, it is worth remembering that the shrinkage of the wood causes additional pressure on the frame. This is one of the reasons why casing cannot be done without.
It is not always a good idea to use polyurethane foam in the space between the top strip of the window and the wall, since it becomes quite rigid when it dries and also creates unnecessary pressure on the structure. In this case, all the benefits of casing are nullified.


If you do not take into account the gap between the frame and the wall, having calculated the incorrect dimensions of the window, you will have to increase the opening, since it will not be installed without negative consequences a window that is too large will not work. After foaming the gaps from the outside, it is better to install PSUL tape; it will not only protect from ultraviolet rays, but also from moisture.
Polyurethane foam, for all its advantages, quickly degrades and loses its properties if it is not protected. Inside a timber dacha, this must be done using a vapor barrier, and on the outside, waterproofing will help. Most window distortions occur when it is not installed level. Fittings in this design fail twice as quickly and require replacement.
We must not forget about the cold zone, in which the window begins to freeze from the side of the slopes, and condensation appears inside.


Manufacturers emphasize the tightness of PVC structures and excellent noise insulation as one of the main advantages of windows of this type. In fact, the wooden frame has natural ventilation, due to which the level of humidity in the room does not increase, the same cannot be said about PVC windows.
During their installation, in order to eliminate problems with condensation in the future, you need to install ventilation yourself, and if there are no special holes, you will have to try hard.
Significantly simplify the situation supply valves, which are special profiles installed on a plastic window.

I can't help but be pleased with the ease of installation. The user will need to remove the seal already present in the window structure and place the valve on the sash. It can be easily secured with self-tapping screws, but you will need to think through the exhaust hole, otherwise the system will be of no use.
No one will be happy that companies that install plastic structures in a wooden house do not guarantee their work, since they cannot fully predict the behavior of PVC. Even if you comply with all norms and requirements, there is no guarantee that after several years of operation the window will not stop working.


Manufacturing of casing
Only the casing protects the window structure in the log house from distortions, bends and other types of deformations. The casing boards must be dry and strong, otherwise they will not be able to complete the task. A board whose thickness cannot be less than 5 cm or a beam 15x10 cm is suitable for this. The thickness of the element is always equal to the thickness of the wall.
The rules for building an old wooden house do not change. The situation is completely different with frame buildings, since they do not shrink. Such houses are already created with openings for windows and doors; they have the necessary rigidity for installation. A log house that has stood for more than ten years also does not shrink.

Casing can be carried out different ways, such as:
- spike-monolith;
- embedded timber;
- into the deck.

The most reliable of the three options is the last one, but it is also considered the most labor-intensive. Those who do not have enough skills and abilities are recommended to do casing using the second method. It is necessary to make grooves in the middle of the window opening, vertical to each other with dimensions of 5x5 cm. You can use circular saw, chainsaw, ax and even a chisel.
Before driving the timber into the groove, it must be wrapped in linen. The seal will be located between the wall and the element, but it should extend slightly onto the window opening.


Placed on a block edged board and fix it with self-tapping screws at the top and bottom. Two bolts are enough in each case. Before doing this, it is worth drilling a recess slightly larger than the diameter of the cap. If a monolith tenon is used, the T-shaped beam is cut out in advance and then installed in the existing groove, after which it is secured with self-tapping screws to ensure reliable fastening.
Elements of the window structure, located vertically, should be at a distance of 8 cm from the top of the window opening. That is, a five-centimeter beam laid on the upper jamb should be at a distance of 3 cm from the wall. It is this distance that is taken as the shrinkage gap.


The top strip of the window should not dangle in the grooves; it should only go in with force. The final fastening is made with self-tapping screws, which are driven in at an angle. The final work at this stage can be considered the installation of insulation. The gap is closed with polyurethane foam, which can be laid in one or more steps. If it is necessary to apply the composition twice, then you should wait ten minutes until the first layer hardens. In hot weather, the foam must be moistened with water from a spray bottle.
The material quickly deteriorates under the influence of the sun and other weather conditions, so it is covered with a vapor barrier on the inside, and a windproof membrane is used on the outside.
It is prohibited to use a vapor barrier on both sides, since then moisture will accumulate under it, and this will contribute to the formation of mold.


Installation
You can install a window structure with your own hands, insert the structure into a box, install a window sill, make slopes, but it is better to first study the technology so as not to spoil everything. The main tools you will need are the following:
- level;
- polyurethane foam;
- screwdriver;
- drill;
- spray;
- key to adjust windows;
- chisel;
- bolts;
- spacer wedges.
It's easier to install windows with a partner, since not everything can be done on your own. It is worth understanding that a double-glazed window has an impressive weight and it is impossible to hold it while carrying out work alone. Before installation, it is better to check the measurements taken to determine the presence of gaps. There should be 5 cm left for foaming on top, 3 cm on the sides, and 4 cm at the place where the window sill is installed.
Incorrect mortise in wood village house will cause many problems in the future.

Before installation, it is imperative to purchase special fasteners from a hardware store, which are metal plates with holes made. Professionals advise using them, stipulating this requirement by the fact that the use of self-tapping screws that penetrate through the frame completely deprives it of its tightness, and accordingly reduces the level of thermal insulation.
The window is installed only by level and nothing else; distortions threaten to cause quick damage plastic product and breakdown of fittings. Be sure to remove the sashes from the window, thereby reducing the weight of the frame at the time of work. The insert must be positioned evenly and attached only to elements dictated by the standard. When foaming the gaps, you can prevent them from moving by placing bars under the frame, and then removing them.


It is important to choose the correct location of the screws; it is strictly forbidden to screw them in at the location of the ridge.
Okosyachka
The pigtail is assembled after preparing the window opening. The upper part is cut out of a 15x4 cm board and grooves are created through which it will be attached to the ridge. This part of the opening is located at the top; it must be flat and free of kinks, otherwise difficulties will arise later with the installation of the plastic structure.
The protrusion, which plays the role of a comb, is covered with rolled tow, and then the carriage is put on - prepared wooden element with a cut groove. This is done in order to improve thermal insulation and get rid of squeaking. Upper part The pigtails need to be screwed to this element with self-tapping screws, but so as not to touch the comb.

Double-glazed window
Double-glazed windows are delivered to the installation site assembled; before installation they must be disassembled, this is the only way to reduce the weight of the structure. Using special key, it is necessary to remove the upper pins that hold the sash open.
Then the handle is turned and when open, the sash is easily removed from the lower fastening, but it is worth remembering that this is the heaviest part of the structure.


To knock out the glazing beads and remove the glass unit, you need to use a spatula or a hammer and a knife. Carefully moving the element away, you should simply remove it from the frame. The short sides can be slightly pryed from the corner and pulled.
Experts advise immediately removing the protective film from the outside of the window structure before it sticks to the surface and reacts with the plastic under the influence of ultraviolet radiation. Then it will be almost impossible to tear it off. It is necessary to drill holes for the dowels, which should be located at a distance of no more than 20 cm from the corner, and no more than 70 cm from each other.

Plastic windows can reduce heating costs, since the sealed design prevents the formation of drafts. It is impossible not to note the aesthetic appeal of such products and the cost savings on maintenance. But plastic windows will meet the requirements only if the installation was carried out correctly.
Self-installation of PVC structures in a wooden house has some difficulties, which is why it should be done in accordance with the instructions of specialists. The time of year does not affect the installation process in any way. Availability modern technologies allows work to be carried out with equal success in summer and winter when a polyurethane frost-resistant sealant is used.


Many users are unhappy with the accumulation of condensation and say that moisture constantly accumulates on the inside. This can be avoided by simply ventilating the room or installing exhaust devices, high quality ventilation system. In cold weather, you can immediately determine the presence of poor sealing; the condensation that appears will indicate places where it is necessary to foam more.
If the installation is carried out by workers, you should make sure that the installation of plastic windows is carried out according to established standards, then in the future you will not have to face unpleasant surprises. A professional installer will not carry out work if sub-zero temperature air.