We build our own bathhouse at the dacha. What and how to build a simple bathhouse in the country? Bath sewage system
During the construction of the bathhouse, actions should be taken in stages, erecting a reliable and warm structure. Created reliable foundation, on which wooden walls are attached. Interior finishing and ceilings are made using insulation and moisture-resistant materials. The roof is covered with insulating layers and equipped with a ventilation outlet.
We build a bathhouse with our own hands - step by step show construction
The entrance to the bathhouse is located on the south side. This is prudent, since in winter snowdrifts from this position accumulate in the smallest quantities and melt at an accelerated pace. In order for the room to be illuminated by the sun to the maximum, it is advisable to place the windows from the west.

When a place for building a bathhouse is chosen near a reservoir with clean water, it is advisable to locate the building no further than 20 m from water body. This way you can get a huge supply of water and avoid saving fluid during water procedures.
Bathhouse with swimming pool
If it is possible to add a swimming pool, you will get a full-fledged bath complex. You can build such a structure with your own hands. A special bowl is purchased at a hardware store, and a separate place is equipped for it. All that remains is to supply and drain the water. Having shown their imagination, many owners carry out designer mosaic decoration and equip bright lighting, which creates a fabulous effect at night.

The pool can be placed in the room adjacent to the bathhouse, if you equip a polycarbonate canopy or roof in advance; options with glass walls. The pool is also convenient if it is located in a room adjacent to the steam room. The pool is designed to immediately plunge into cool water after a hot steam room.

Creating a “cascading pool” is the most fashionable idea at the moment. This is a kind of cascading waterfall, which is found only in natural areas. A closed water circulation system is created, and the edges of the structure are lined with special stones, which are usually used for alpine slides. To create a real beach atmosphere, you can create a 3D drawing on the walls that will depict your favorite beach or a beautiful tropical area. At the design stage, it is necessary to provide for a developed electrical network, large-scale water sources with the possibility of continuous water supply and drainage.
Bathhouse foundation


To create a high-quality foundation, you need to choose technically pure components. The mixture is made up of cement, water, sand or gravel. The listed components, except water, are mixed in a ratio of 1:3:5. The liquid is added gradually with constant stirring until the mixture becomes liquid.

The procedure is given in the table below.
| Procedure | Description |
|---|---|
| The construction site is being marked. Location of external and interior walls marked with a cord stretched between strictly vertical stakes. |
| It must be deepened based on the height of the foundation with the addition of layers of sand cushion and waterproofing. |
| The sand cushion is located 15-20 cm in height. Coarse sand is used to fill this space. An alternative to this material is gravel. It is advisable to create the backfill in layers, at each stage wetting the material with water and compacting it. |
| To do this, the sand cushion is completely leveled. When it dries, you can install a kind of fencing in the form of long boards, plywood, or use special permanent formwork. |
| Reinforcement stools are placed on the inner surface or stones are laid out that are stable enough to support the reinforcing bars. Cannot be created reinforcement cage directly on the sand, otherwise when pouring cement its lower edges will remain uncovered. Reinforcing bars are purchased. The largest cross-section should be for elements that are driven in like pegs. They serve as the basis for the entire structure. They should be installed on reinforcement stools on both sides, parallel to the formwork line. Horizontal rods make the frame complete. Longitudinal pegs should be fastened to transverse pegs at all intersection points by welding parts or fastening with thin wire. |
|
|
| Immediately after mixing the mixture, it is necessary to pour the foundation. It is advisable to do this in one step, however, for large volumes of work, the first row is formed first, and after some time the second. |
| While pouring the mixture, it is necessary to work in parallel with a deep vibrator. It is needed for speedy compaction of concrete. If you do not use it, the mixture will settle when it dries, and air bubbles will remain inside, which will make the foundation of the bathhouse less strong. |


 Foundation type – strip. Longitudinal bottom layer of reinforcement


Brick prices
Video - Foundation for a log house
Water supply in the bathhouse
The water supply system is organized taking into account the basic requirements:
- possibility of filling water in one design;
- protection of water from freezing at sub-zero temperatures.

The steam room should operate in several options:
- “Russian” steam room, in which a constant supply of wet steam is maintained;
- sauna, where steaming is carried out exclusively using dry steam.
How to find the optimal source of water?
The best option for a bathhouse is an artesian well.


There are wells for sand. Drilling them is estimated to cost a small amount, but it is necessary to install special filters, which is also a costly undertaking.


Before drilling a well, you must make sure that there is no radioactive substances. Often, a high percentage of radon gas is found in the ground, which is a completely radioactive element that is harmful to health. The study can be ordered from special companies or you can check information about the territory in the regional fund.
The optimal and least expensive option is to dig a conventional well.


Once a decision has been made about the water supply method, the aquifer can be found by observation, experimentation, or test drilling. To equip a well, you need special rings with a tongue-and-groove system that can be quickly fastened to each other. This technology ensures that the rings will not move horizontally. It is advisable to additionally use metal rings to tighten the elements so that the fastening is more reliable.
A bottom filter should be formed at the bottom of the well. For this, stones, crushed stone are used, and geotextiles can also be used.
Water from the well is supplied to the bathhouse through the outlet pipe. It should be completely sealed. Bitumen mastic is not suitable for this. It is advisable to perform multi-layer waterproofing using elements made of silicone, concrete or liquid glass.

Work execution technology.
- The hole is closed with silicone, which is plastered with tile adhesive. It must be 100% resistant to water and frost.
- The glue dries completely. Then fiber rubber is applied to it. This material is usually used to protect showers from leaking.
- After this layer has dried, the glue must be applied again, but to a greater thickness.
- Plaster is applied with tile adhesive.
- After a day, the surface is covered with blue clay, on which foam plastic should be laid.
- Loams make the well more decorative.
- All of the above actions should be done in the exact order both from the outside and from the inside of the structure.

If a silent system is required, you need to install submersible pump, which descends directly into the well.

TO pumping station you should connect the receiver so that it can be easily used without additional switching on every 3-5 minutes. This device will also help normalize the pressure in the system.
Prices for a pumping station
pumping station
Pipe selection
They are considered the most comfortable metal-plastic pipes, however, they are often not optimal for a bathhouse. In winter, their gaskets dry out, which can cause a temporary interruption in water supply. Propylene pipes do not corrode, have excellent wear resistance and are equipped with a one-piece structure without additional gaskets.

Plumbing is carried out from the pumping station to the structure of the filter, tank and collector. A tee is installed inside the well, which serves to connect the drain valve and check valve necessary for installing the strainer. Additionally, a mesh type filter is placed in front of the pump. It is advisable to ensure that this element of the system is designed for at least 30 tons of liquid and has a carbon cartridge.

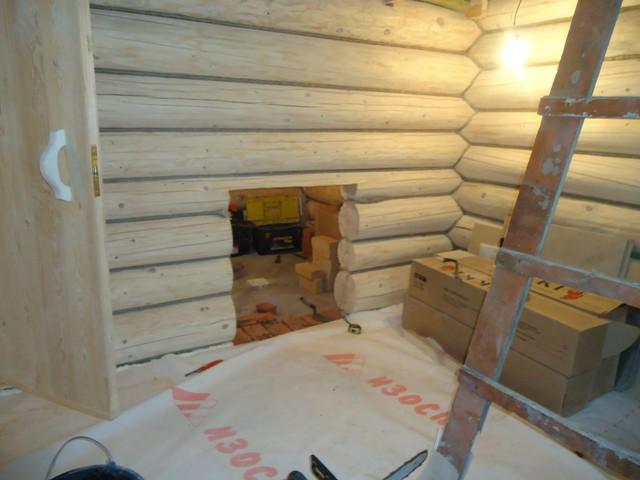
Most often, baths are made from timber. Logs are a completely natural material; they do not lose their properties over many years, therefore they make the room “breathable” and provide natural thermal insulation with constant air exchange. Ventilation of the room occurs automatically, but a special hole for air outlet is required, as this is required by building codes.
Log walls are automatic humidity regulators. If the bathhouse is used for its intended purpose almost every day, the walls almost never dry out, so a slight smell of fresh wood is constantly felt in the building.
It is necessary to select the most straight logs that do not have defective particles or damage; the presence of knots is also undesirable, since such material requires additional processing. Before use, the logs are cleaned, then special protective compounds, with the help of which the material becomes fire-resistant and not susceptible to damage by insects.

The strongest species are pine and spruce, growing in the northern regions. To ensure that steaming in a bathhouse is accompanied by a pleasant aroma, you need to build walls of linden. If you need to purchase a tree with a persistent resinous odor, you need to choose a material with a high content of knots or cavities filled with this substance. With constant use of the bath, the resin will leak out, which will affect the aesthetic appearance of the walls. It is advisable to compare the smell from different materials, choose solid elements without cavities with resin, but with a pleasant aroma.
Prices for rounded logs
rounded log
Construction of a log house “in the paw”
You should choose logs that have equal thickness. The ends of the paws are marked according to a pre-drawn template. The length of the protruding ends depends on the width of the logs. The bars should be trimmed before laying, but in most cases, for the first crown of the building, the material is left completely intact. The highest quality samples are selected for it, since this is the place that is most exposed to negative factors that can lead the tree to rot.


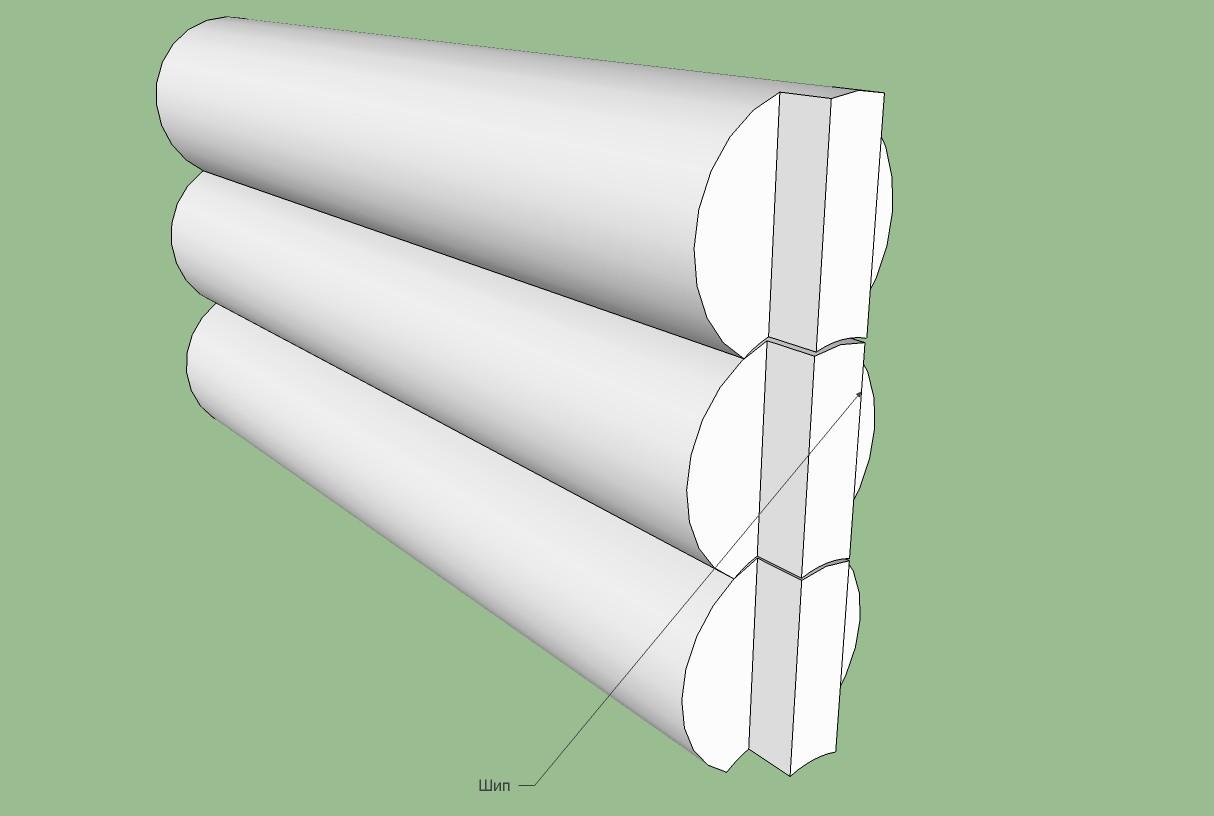
 The sketch shows the following symbols: 1 – “warm corner” cutting method; 2 – edging; 3 – wooden spike or dowel for attaching adjacent crowns; 4 – cutting in (cutting in) wooden inserts to seal the joints; 5 – waterproofing layer (roofing material); 6 – interventional insulation (for example, jute); 7 – first crown; 8 - foundation or trim; 9-10 – arrangement of the opening. The sketch contains the following symbols: 1 – method of cutting a “warm corner”; 2 – edging; 3 – wooden spike or dowel for attaching adjacent crowns; 4 – cutting in (cutting in) wooden inserts to seal the joints; 5 – waterproofing layer (roofing material); 6 – interventional insulation (for example, jute); 7 – first crown; 8 - foundation or trim; 9-10 – arrangement of the opening
Logs are cut by laying them out into two equal parts, which differ in the shape of the cut.
- Root thorn.
- Insert tenon.


Creating a cutting template
When creating a template, the following scheme for attaching beams is provided:
- Forming a small hole.
- Beam installation.
- Fastening both beams.
 Chopping to the paw - marking


Video - Cutting a log house “in the paw”
To give the crowns rigidity, they are fastened with spikes in increments of 1 m. This procedure is necessarily used for the two highest crowns, which serve as the basis for cutting ceiling beams. Nests for spikes are made at a depth of 0.2-0.3 m, while the thickness of these elements is 0.25 cm with a width of 0.6-0.7 cm. When these parameters are met, a height of up to 150 mm is provided.

Video - Fastening logs with dowels
Video – Nageli. Rules of use and errors
A sealant should be laid between the bars to insulate the structure. Moss, felt or tow are used as insulation. It is installed after the wall structure is created. To do this, the seal is installed using tamping. Popularly this action is called caulking. This procedure should be carried out twice. For the first time after the completion of the construction of the walls, and then after a year and a half, that is, after the shrinkage of the structure.
Video - How to caulk a log house
Walls made of timber: construction features

Walls made from timber are rated as the easiest to construct. Structural elements must have a cross-section of 150x150, and they are initially made from logs. They are given shape by filing. Croakers that are removed during the preparation of beams should not be thrown away. They are used for arranging the floor in the attic.
The bars can be fixed “in the head” or “in the paw”, but the joints should be strengthened with spikes, placing them in a vertical position.


Stages of cutting timber walls
- Cutting out the corner shape for fastening with an adjacent structure and making a connection with a tenon.
- Cutting corners on dowels using insert keys.
- Fastening the bars when forming a structure on dowels.
- When using tongue and groove beams, the connection is made using insert slats.
- Keyed connection.
- Fastening the structure with dowels.
Prices for timber
Video - Construction of a bathhouse from timber
Video - Construction of walls from timber (part 1)
Video – Construction from timber (part 2)
Stages of work during the construction of a bathhouse
The log house of the bathhouse must be assembled in compliance with the right technology installation of all parts. Only then is it ensured high quality and durability.
Waterproofing is applied to the foundation.
Video - Foundation waterproofing

 Waterproofing the foundation of a log house
To protect the lower crowns from destruction, a wooden board with a thickness of at least 5 cm and a width of at least 20 cm is placed under them. The wood undergoes an antiseptic procedure. The board is covered bitumen mastic or special resin on three sides. The exception is the top surface and end parts.

In the photo - a board laid on the foundation for a log house
If the materials listed above are not available, roofing felt should be used. They cover three sides of the board, after which it lies on the waterproofing layer. When there is a loose fit of the board to the waterproofing, it is necessary to level the surface. To do this, all gaps are measured, small pieces of roofing material are cut out to fit the obtained parameters and laid out on the surface. When laying additional layers, they should be joined tightly so that there are no significant gaps, and protrusions are also unacceptable.

If roofing felt is not used in the design, it can be replaced with any material for waterproofing, in particular, tow, felt, hemp, and it is advisable to pre-clean these elements and coat them with an antiseptic composition. If all these measures are carried out, the formation of drafts will be excluded in the crown area. Also, the wood will be completely protected from rotting.
Thermal insulation should be placed on the lining, which serves as the basis for the first crown. In order for the wood to fit tightly to the lining, it must be planed or hewn. These measures are carried out only if the quality of the material allows the edges to be cleaned. When there is a risk of wood rotting, the contours should be left untouched, only the unevenness that is too noticeable should be trimmed.

The second row of frame crown logs is located perpendicular to the first. These logs are higher than the lower ones by 50% of their diameter. The resulting space must be tightly filled with brick or decorative stone.
Thermal insulation should be laid between the logs, trying to fill all possible gaps. At the end of the work, you need to make sure that there are no drafty areas. To prevent precipitation from affecting bottom part bath design, you need to select a groove between the second and third rows. A drain board is installed in the hole. It can be replaced with roofing steel. This material covers the entire length of the base and should hang down by at least 5 cm.


Bath floor
Even at high air temperatures in the bathhouse, the space near the floor rarely heats up to more than 30 °C. The quality of thermal insulation is not particularly important, but it should be remembered that strong temperature contrasts should not be allowed.
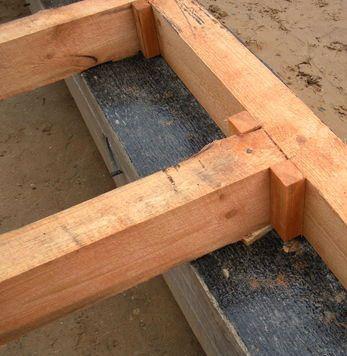
Recommended flooring materials: fiber mats, cork boards, planks. To organize constant drying of the floor, it is necessary to raise it on the joists. When you need to fix the flooring on a wide floor, it should be done in several steps, having previously marked the individual sections.


Mounted first wooden joists. To do this, pillars made of solid brick are pre-installed directly on a base of crushed stone or soil. The logs are laid in approximate increments of 1 m. To create the logs, it is advisable to use tongue and groove boards.
Floor boards are made from hardwood and must be at least 3 cm wide.
The floor can be left wooden in all compartments except the steam room. This room is constantly maintained under high temperatures and high levels of humidity. The best material for flooring is ceramic tile. To ensure comfortable movement without slipping, you can equip wooden grates, which it is advisable to take out to dry after steaming.
A drain is installed in the place of the greatest slope of the floor so that there is no stagnation of moisture in the room.

When the building is surrounded by perimeter walls, you need to allocate separate rooms, which should also be securely separated from each other.
For the installation of wooden partitions, special wooden blocks. When the partition is laid out between the already laid floor joists, it is mounted anywhere, secured to the crossbars.
Sometimes partitions are mounted in the opposite direction to the floor beams. In this case, a purlin is installed in the intended space, which is a reliable basis for the partition.

There are several types of partitions.
- Single solid from boards.
- Double solid boards.
- Double with a gap, that is, the possibility of free air circulation.
- Double with full filling, that is, without drafts.
- Frame and sheathing.
If the simplest partition design is chosen, they are made from boards 4-5 cm thick and 10-20 cm high. They should be planed first. This action can be performed only on one side. The use of boards with a wider diameter is not recommended, because they tend to deform. To ensure complete blocking of the cracks and the possibility of long-term operation, you need to choose tongue and groove material.

The bars are connected with steep tenons of 10-12 cm. The pitch of their arrangement is calculated from the height of the boards; it is optimal to take breaks of less than 1 m. If round tenons are not available, nails without heads are used instead, but you should ensure that their length is within 6- 8 cm
On the walls next to the partition it is necessary to draw vertical lines and mark them with a cord. To check the evenness of the fastenings, it is advisable to use a plumb line. In addition to the walls, they should subsequently be drawn along a line to the ceiling and 4x4 cm boards should be nailed to them. Then grooves are formed, the width corresponding to the structure of the bars.
In front of the place where you plan to insert boards for the partition, you should leave a gap, that is, do not fasten the bars at a distance of 20-30 cm. Only fastening wooden guide structures is allowed on the beam. Natural shrinkage of the structure should be provided for in advance. To maximize its compensation, the partitions are measured a few centimeters shorter than the main walls of the bathhouse.

The bars are first placed in the grooves, then moved until they are closed. The partition is provided without holes, so fastening should be done as tightly as possible, using spikes or quarters.
Skirting boards are nailed down along the perimeter of the space separated by the partition. Usually small holes are formed separating structural elements. They should not be overlooked. They must be caulked with tow or plaster.

A double partition is made with the connectors left or when they are filled with material that plays the role of thermal insulation. It is advisable to use mineral wool in any configuration, including in the form of slabs.
The thickness of the boards is approximately 2-2.5 cm. With these parameters, the gap between the rows will be about 0.4 cm. A double partition is constructed by alternately assembling the first and second sides. When creating gaps is not planned, insulation should be laid between each row of beams in parallel with the assembly of the walls. The upper edges of the boards are held in place by inserting them into the grooves. The bottom edges are nailed to the boards with long nails.
To save on the construction of partitions, they should be constructed using a frame-sheathing method. To assemble the frame, you can choose between tenons, notches or nails. The main material is boards. The support for the frame is a beam. An alternative fastening is carried out on crossbars when inserting structural elements into the grooves.

The upper edge of the structure should not reach the ceiling by 1-2 cm. The remaining gap should be filled with tow mixed with a gypsum solution. You can also use boards that completely cover the joint without leaving any gaps. To insert the door frame into the partition, additional boards should be placed nearby to close the frame leaf.
Video - Partitions in the bathhouse
Creating a bathhouse roof
The ceiling in the bathhouse should be equipped with maximum heat and vapor barrier, since the most wet air always rises to the top and accumulates under the roof.

The boards are mounted as floor beams.

A vapor barrier is laid between the boards.

Vapor barrier of the ceiling in the bathhouse with foil
Insulation is laid over the vapor barrier.

The structure is covered with boards laid perpendicular to the beams.

The gap between the insulation and waterproofing will improve the characteristics of the insulation “pie”
The ceiling consists of the following elements:
- hemming boards;
- beams performing the function of beams;
- primary plating;
- hydro- and vapor barrier;
- thermal insulation.
When settling in attic space, the ceiling design is slightly changed. A layer of clay coating approximately 1-2 cm thick is created on top of the boards. Wood chips can be used as insulation. Its thickness should be impressive, more than 15 cm, and it should also first be mixed with weak cement mortar. If subsequently too much condensation forms on the ceiling, then the thickness of the insulation is insufficient. It should be increased by applying the backfill a second time.
Video - Insulating a bathhouse ceiling
The wooden floor is constructed with the following sequence of actions.
- Primary laying of beams.
- Application of cranial bars.
- Installation of reel boards. They can be created from low-grade wood, but must first be knocked together.
- Vapor barrier laying. Glassine is usually used.
- Installation of insulation. IN Lately Mineral wool has become popular.
- Laying ceiling boards.
- They are being filed.
- The parts are fastened with anchors.
- Final waterproofing is carried out, for which roofing felt is excellent.
The beams should be placed no more than 10 cm deep into the structure. The rear wall of the nest forms a gap with an end, the optimal width of which is no more than 3 cm. The inside of the nest is filled with cement mortar.
If the beams rest too heavily on the walls, they should be shortened. A cross section is unacceptable, since sudden actions may lead to cracking of the part. The cut should be made at an acute angle.
Prices for mineral wool
mineral wool
Video - How to make a reliable roof on a bathhouse
Video - Do-it-yourself roof for a bathhouse
- This is a difficult but completely doable undertaking. First of all, the owner must choose suitable material for the construction of a bathhouse.

Choosing a place to build a bathhouse
Start by choosing a suitable location for the building. The following recommendations will help you with this:

Before starting any construction activities, prepare a bathhouse project.

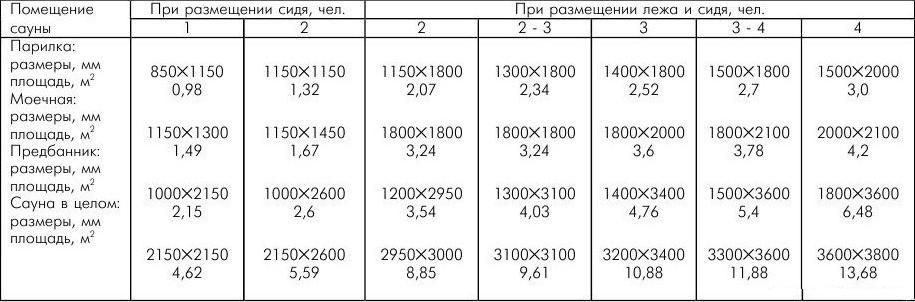
Define optimal size structures. One vacationer must have at least 5 m2 of the total area of the building. For example, if you are building a bathhouse for 4 people, its area should be at least 20 m2.

The standard sauna consists of a steam room, a washing room, a dressing room and a relaxation room. Set the dimensions and features of the spatial arrangement of the listed premises that are convenient for you.

Prepare the following drawings:

You can make all these drawings yourself or find them in an open source. In general, timber bathhouse projects remain almost the same. If you have the desire and a sufficient budget, order the preparation of drawings from a professional.

Materials for building a bathhouse
To build a bathhouse from timber you will need a whole set of different materials and devices, namely:
- timber Traditionally, material with a cross section of 150x150 mm is used;

- floor boards. The best option is a four-meter edged board 15x5 cm;

- boards for the ceiling. Typically, lining is used with a width of 10 cm and a thickness of 2 cm;

- materials for interior decoration. The lining is perfect;

- vapor barrier material. The best option is modern vapor barrier films;

- waterproofing material. If possible, use penofol. Plastic film is also suitable;

- insulation for the ceiling. Mineral wool materials are well suited;

- sheet asbestos. With it you isolate wooden elements buildings from high temperatures. Insulation sheets must be attached to the walls near the sauna stove. Wooden elements installed in close proximity to the chimney also need insulation;

- bulk materials for arrangement. The set is standard: cement, sand and crushed stone;

- material for finishing roofs. Focus on your preferences. The main thing is that the roof of the bathhouse looks good surrounded by the roofs of other buildings on the site;


- insulation for inter-crown space. Use jute. Tow and moss are also suitable.

It is best to start building a bathhouse in the spring, because... After completing the main activities, the wood will need to be left for a six-month “wintering”. During this time, the material will dry and shrink as required.
Buy cement immediately before starting construction.
Bathhouse Construction Guide
The work is carried out in stages - from preparing the construction site to equipping the bathhouse with various accessories.
First stage - Preparing the area
Clear the construction site of all kinds of debris, bushes, large roots and, in general, anything that could interfere with the foundation stage.


Stage two – Pouring the foundation


Attach furring boards to the rafters. Lay hydro-, heat- and vapor barrier materials; bath insulation is one of the most important elements its construction will directly depend on the quality of the built bathhouse. Install the selected roofing finish.
Prices for various types of timber
Fourth stage – Internal equipment
Start by arranging the necessary communications.

You should take care of installation at the stage of creating the foundation. To do this, create a pit outside the bathhouse or drainage well, connected to the bathhouse by a pipe laid with a slope.

After completing the sewerage installation, make the floor. It can be concrete or wood. Concrete floors are usually tiled. This coating is more durable.
Wooden floors are traditionally made to leak. The technology is extremely simple: logs are installed, floor boards are nailed to them with some clearance. You can also create a small hatch to drain waste and cover it with a perforated grill. The floor in this case should be made with some slope. As a result, moisture from the floor will fall into the hatch, and from there through the pipe will be discharged into a drainage well or pit.


To ensure that the wood lasts as long as possible, thoroughly ventilate the bathhouse after each visit.
Insulate the ceiling and walls of the building using suitable moisture, heat and vapor barrier materials. Install doors and double glazed windows. Provide running water and electricity to the bathhouse. Install the necessary electrical appliances.


Prices for thermal insulation materials
Thermal insulation materials
Fifth stage – Oven and shelves
Choose the design of the shelves at your discretion. They are built in the same order: first, a supporting frame is mounted from a strong beam, after which boards are nailed to the supports.
Also choose the oven at your discretion. You can lay out a traditional one, install a convenient metal unit, or a modern electric heater.

Heavy stoves require the installation of an individual foundation. At this point, everything is also determined separately, taking into account the characteristics of a particular furnace.
Prices for different types of stones for stoves
Stones for stoves
Stage six - Additional accessories


In conclusion, all you have to do is add various accessories to your country bathhouse, namely:
- brooms;
- wooden mug for adding water;
- buckets;
- various kinds wooden gratings etc.
The interior arrangement of additional rooms in the bathhouse is left to your discretion.

Good luck!
Prices for accessories for baths and saunas
Accessories for baths and saunas
Video - Do-it-yourself bathhouse in the country
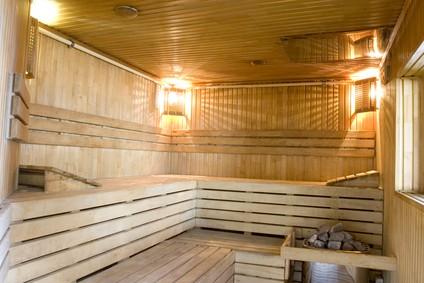
Without a steam room, the bathhouse becomes an ordinary room where people wash. It is steam that has healing properties, rejuvenates the body, gives strength and good spirits. At first glance, setting up a steam room is not particularly difficult. Is not large room has a minimum of architectural delights. However, when arranging it, it is necessary to follow a number of important rules. Only then will the steam room be able to bring real pleasure to lovers of a real Russian bath.
It is necessary to design a steam room before starting construction of a bathhouse. Its dimensions will depend on many indicators.
When making calculations, it is necessary to take into account the following nuances.

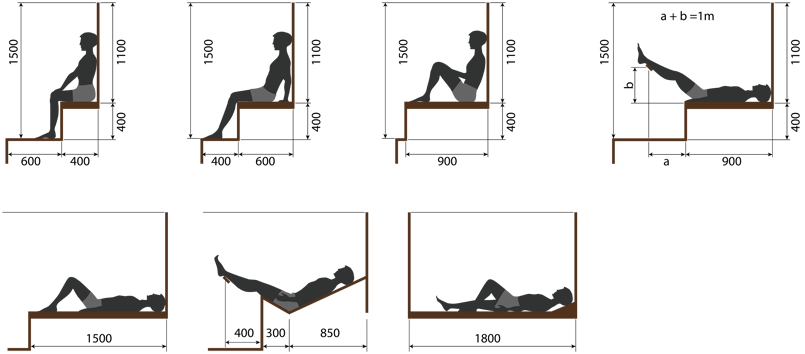
The first sketch below shows a small sauna with a steam room, in which the shelves accommodate seating only.
The other two pictures schematically show more spacious rooms in which you can steam while lying down.
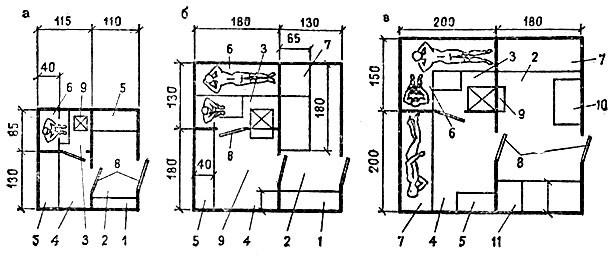
1), 10), 11) Clothes hanger, wardrobe.
5), 7) Benches.
2) Rest room.
6) Shelf.
3) Steam room.
8) Doors.
4) Wash room.
9) Oven.
By schematically depicting the location of the stove and shelves in the steam room, you can calculate its dimensions in advance and avoid annoying mistakes during construction.
Type, power and dimensions of the stove. According to fire safety standards(), the stove in the bath should be located at a distance of at least 32 cm from wooden structures. If the walls are protected by non-combustible materials, then you need to retreat 26 cm from them.
An iron stove has high power, compact dimensions and the ability to quickly heat even a large steam room. However, its surface becomes very hot, and there is a risk of accidental burns in case of careless actions. In view of this. In the steam room, there should be a free distance between the shelves and the iron stove.
 An example of installing a metal stove in a steam room

A brick heater does not heat up so quickly and its size is much larger than a metal one. However, it retains heat longer and it is impossible to get seriously burned on it. Therefore, there is no need to locate the oven at a significant distance from the shelves.


When installing an electric heater, it makes sense to make the steam room as small as possible. This will save energy when heating the room.

So, when planning a steam room, you should carefully think through everything at the construction stage. After the walls, partitions and roof have been erected, you can begin directly to work on interior design steam rooms
Prices for electric heaters
electric heater
Floor installation
The flooring in the entire bathhouse is done first. The floor level in the steam room should be higher than the level of the clean floor in the wash room.

There are several options for its design.
Wooden floor
The easiest way is to install a wooden floor. To do this, support logs are installed on the foundation.
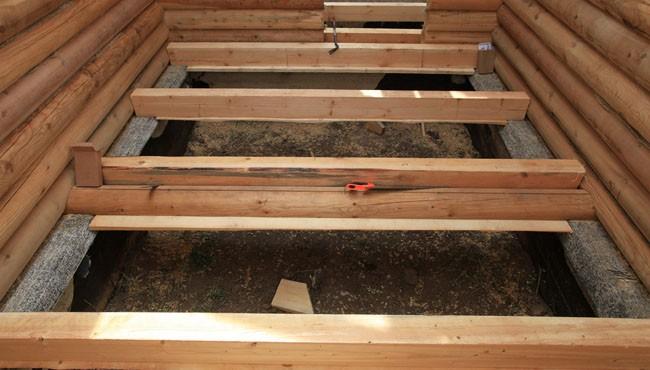
Planed boards 50 mm thick are screwed onto them at a distance of 5-10 mm from each other.

It is important that there is at least 50 cm between the floor and the ground level, and that there are openings in the foundation for fresh air.
This will provide good natural ventilation in the steam room, and the boards will dry evenly after finishing the bath procedures. However, this flooring option should only be used in areas with warm and temperate climates. In northern regions, such ventilation can cause the heat from the steam room to dissipate too quickly.
Video - Floors in a bathhouse on logs with insulation
Concrete floor
A concrete floor in a steam room can last much longer than a wooden one. However, the costs of its arrangement will be slightly higher. In addition, it will be necessary to additionally lay a finishing coating on it.
Before starting work on installing cement screed in the steam room and washing room, you should dig a pit 10 to 15 cm deep to drain water. Its walls can be secured with cement or tiles. An iron grate is placed on top of it. From the pit, water will flow through the drain pipe into the sewer.

As soon as the water drain is ready, you can begin installing the screed.

The clean floor level in the steam room should be higher than in the washing room. Therefore, before starting work, a mark is made on the walls to which the floor structure will reach. And then they put down the distance from it that is necessary to lay all the layers of the screed.


The procedure for arranging a concrete floor
| Illustration | Description |
|---|---|
| the site is carefully leveled, if necessary, the top part of the soil is removed |
| pour a 30-40 cm layer of sand and crushed stone, spill it with water, compact it, making a slope towards the drain hole |
| pour the first layer of concrete 5 cm thick |
| After the screed has dried, strips of waterproofing material (roofing felt, glass insulation) are rolled out over it. |
| ON waterproofing material lay insulation 50 mm thick |
| install reinforcing metal carcass from masonry mesh |
| pour a layer of concrete up to 10 cm thick |
| level the concrete with a board or rule, not forgetting to make a slight slope in the direction of the sewer hole |
| lay tiles or gratings from boards |


Video - Draining the bath
Vapor barrier and ceiling finishing
High-quality insulation of the ceiling in the steam room is of paramount importance, since hot air from the stove rises to the top. Therefore, it is unacceptable to have places on the ceiling through which it could easily go outside.
Ceiling insulation work is carried out in the following sequence.
| Works | Illustration |
|---|---|
| A water vapor barrier is attached to the floor beams. It could be: Foil with a density of at least 100 microns; Foil penoizol with a thickness of 5 to 10 mm; Water vapor barrier membrane “Izospan”, “Megaflex”, etc. For installation, use a construction stapler and staples with a height of 8 to 12 mm. The tool must be well adjusted to prevent breaks in the protective membrane. The strips are fastened with an overlap of at least 20 cm, the joints between them are carefully taped with aluminum tape. At the edges, the insulation should extend 15 cm onto the walls of the steam room. | |
| After attaching the waterproofing to the floor beams, wooden slats 50 mm wide and 25 mm thick are screwed strictly level. The distance between them should be no more than 70 cm. Before installation, they are treated with an antiseptic composition. | |
| Linings made of linden, birch or aspen are attached to the slats. Finishing material placed perpendicular to the sheathing boards. Installation begins on the opposite side of the door. Fastening is done either with galvanized nails or with clamps. | |
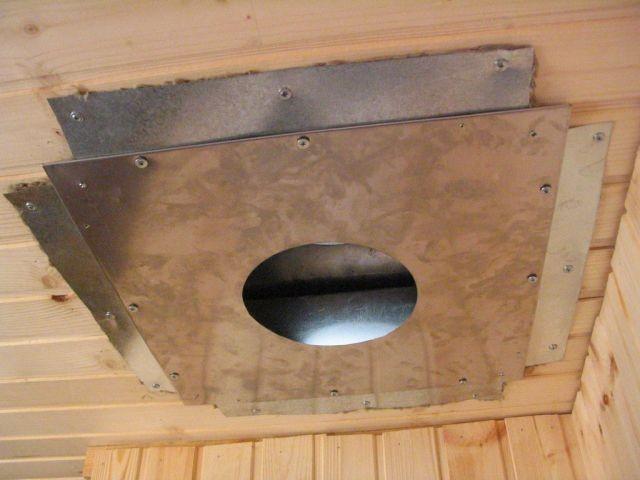
| From the attic side, grooves are made in the floor beams and transverse fasteners for the chimney are inserted into them. | |
| A rectangular opening for the chimney is cut out on the ceiling. | |
| A layer of insulation with a thickness of 150 to 200 mm is laid between the floor beams in the attic. | |
| A wind and vapor barrier membrane is rolled out over the insulation and secured with a furniture stapler. | |
| Then the floor boards are installed in the attic. |
Prices for vapor barrier
vapor barrier
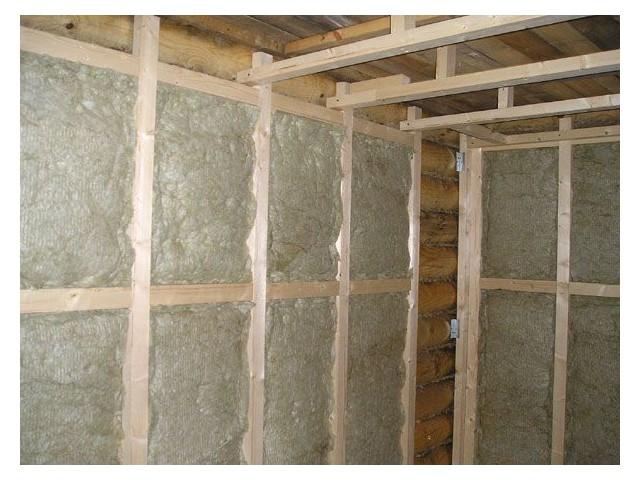
Wall insulation
If the walls in the bathhouse are built from foam blocks or frame technology, then the steam room requires additional insulation. The inside should be a cold-proof thermos that will perfectly retain the heat emanating from the stove. This will save fuel, which is used for heating and maintaining the desired temperature in the steam room for a long time.
Before starting work, an opening is cut in the wall to install the stove.
Then a wind and vapor barrier film is attached to the walls.

At the next stage, basalt non-combustible insulation is tightly laid between the bars.
Prices for basalt wool
basalt wool
After this, a water vapor barrier is nailed to the bars with galvanized staples.
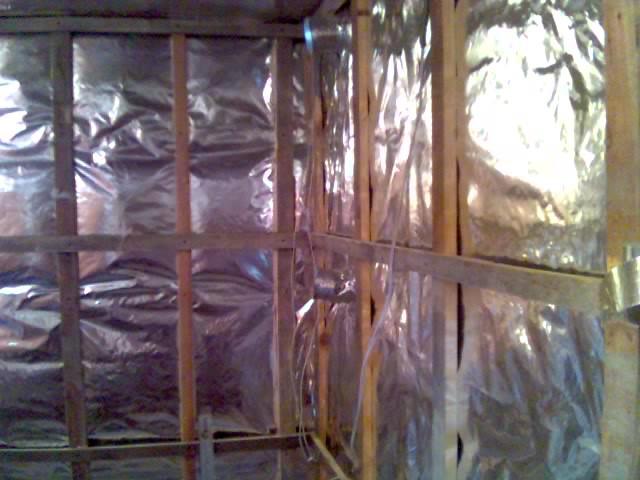
The following can be used as protective material:
foil with a density from 150 to 200 microns;
foil foamed penoizol;
waterproofing membrane for baths.
Strips of moisture-resistant material are nailed with staples, overlapping each other by at least 15 cm, and the joints are sealed using special tape.
Then slats 25 mm thick and 30 to 50 mm wide are horizontally attached to the bars using galvanized self-tapping screws at a distance of 70 cm from each other. The sheathing should be installed as level as possible; for this you should use laser level or plumb line. Installation begins with the two outer slats, then a cord is pulled between them. And already focusing on it, they nail down the remaining parts of the sheathing.
At the next stage, the clapboard board is directly attached. To do this, use either ordinary galvanized nails 40-50 mm long, or special clamps.
 The principle of fastening clamps into the groove of the board
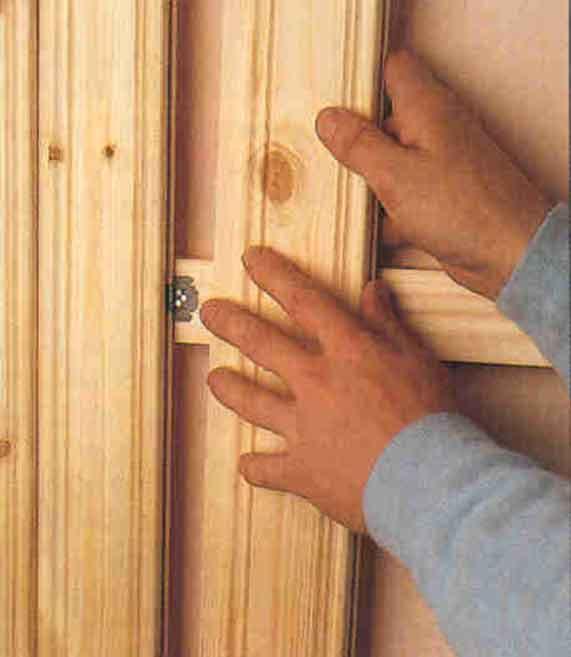
Finally, even holes are cut in the walls for ventilation. They are masked from above with plugs or flaps. If necessary, install a fan in the supply or exhaust opening.
Prices for lining
If the walls in the steam room are made of logs or profiled timber, then they do not require such careful insulation. In this case, it will be enough to attach foil or foil penoizol to them. Then nail the sheathing and install the lining.

Furnace installation
The stove in the steam room can be installed in iron, brick or electric. The location for it should be chosen at the bathhouse design stage. The furnace firebox can be located both inside the steam room and outside it.
Installation procedure in a steam iron stove:


Installed on a pre-prepared platform or hung on the wall using special brackets. It does not require installation of a chimney.


It is imperative to observe the distances specified in the instructions from the oven to the walls and shelves.
Brick oven
The brick oven is laid out at the stage of construction of the bathhouse.


Only that part of it that will contain the stones should go into the steam room. It is best to place the firebox in the dressing room or outside.
Video - Basic mistakes and where to start building a bathhouse
Video - Building a bathhouse from scratch. Main questions
Door installation
The door in the steam room is installed last. It should close tightly and not let heat out. Doors made of solid wood or tempered glass are best suited for this purpose.
Installation wooden door consists of the following steps:

under casing adjust the doorway;


The “casing” cannot be screwed to the beam, it must move freely along the grooves, the gaps between it and the wall are carefully caulked;
Another way to install a wooden door is to cut grooves into the opening.

Wooden blocks are installed in them so that their edge does not reach 5-10 cm to the top of the opening. And the door frame is already directly attached to them.

Fixing the frame to the rail and hanging the door
Glass doors are attached to special hinges.


Video - Casing under a plastic window in a log house
Video – Okosyachka (part 1)
Video – Okosyachka (part 2)
Video – Okosyachka (part 3)
How to make shelves correctly
The number of shelves in the steam room depends on its dimensions. Their height is selected depending on the height of the owners of the bathhouse. IN standard version It is allowed to have three-level shelves, each of which is 35 cm in height. However, it is also possible to have two shelves. In a small steam room, the lower level of the bench can be equipped with a retractable mechanism and can be pulled out as needed.

First you need to choose the shape of the shelves and assemble the frame. It is best to make it from larch. There are quite a lot of options for its location. It can be rectangular or angular.


Wooden panels are laid on top of the installed frame.


The boards in them should be spaced loosely, at a distance of 1 cm from each other.
Shields should be made from linden or aspen. Coniferous wood is not suitable for this purpose, since when exposed to high temperatures, resin is released from them.
Efficient ventilation
An important stage in arranging a steam room is. In its absence, prolonged stay in the steam room becomes unsafe for human health. And improper installation of air ducts can lead to heat loss and unnecessary fuel costs for proper heating of the room.
You should not make a hole for the ventilation duct directly on the ceiling of the steam room. This will lead to large heat losses, and hence a decrease in the effectiveness of bath procedures.

The most common are several options for the location of ventilation ducts in the steam room.
| Location option | Diagram or illustration |
|---|---|
| The oxygen supply comes from the opening, which is located behind the stove; a fan is mounted into it. The distance from the floor is 25 cm. The outflow is carried out naturally through a gateway, which is located on the opposite wall. The lower it is located, the better. | |
During the actual bathing procedures ventilation holes in walls can be closed with valves. And then open them as needed.

Galvanized or stainless steel pipes. Apply plastic structures not recommended in the steam room. The pipes must be secured using special clamps.


It must be remembered that the diameter exhaust duct should be slightly larger than the supply air.
Having decided on the ventilation scheme, you should make holes of the required size in the walls or floor.

Their diameter depends on the area of the ventilated room, but it cannot be less than 100 mm. Then you need to insert ventilation ducts into them.

The remaining distance between the wall and the pipe must be filled with non-flammable insulation. Attach a protective grille on the street side.

Electricity
At the final stage of arranging the steam room, installation is carried out electrical wiring. All switches and distribution boxes must be located outside the steam room and shower room.
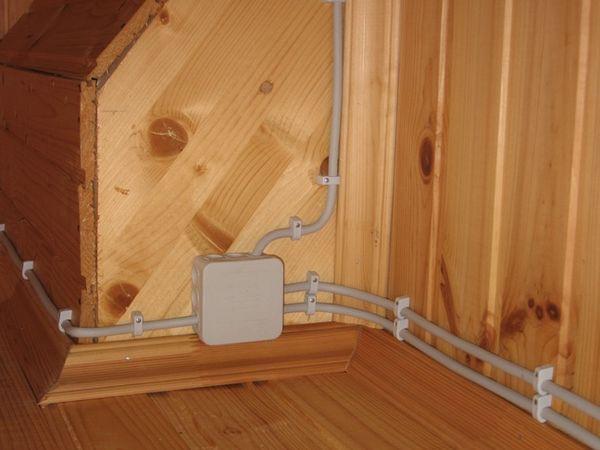
The wires are laid in corrugation on top of the lining.


In the steam room, they are covered from above with wooden plinths.
Lights in the steam room should be protected by wooden grilles.


Video - How to properly decorate a steam room in a bathhouse
You can build a Russian bathhouse with your own hands from start to finish, install windows and doors yourself, install a wooden font and furniture assembled with your own hands. But first you need to properly raise the frame, lay the floor, sew up the ceiling, and build a stove. Studying step-by-step instructions and advice from professionals will help with this.
Russian bath: features of its action
The human body temperature does not exceed 40° because he sweats, due to which he releases excess heat into the surrounding air with the release of excess fluid. This is the basis of the operating principle of any type of bath. The differences are only in the ratio of temperature and humidity.
In a Turkish bath (hammam), the humidity reaches 100%, and the temperature of the air, stone floor and benches does not exceed 40°. In a sauna (Finnish bath) this ratio is completely opposite. At 120° the humidity is only 40%.
But the optimal combination of temperature and humidity for health (and there will be no negative consequences from such a procedure) can only be maintained in a Russian bathhouse, but only if it is properly designed and built.
A bathhouse cannot be called a cheap pleasure. If you order its construction on a turnkey basis, the amount may turn out to be unaffordable. With average prices for materials and specialist work, you will have to pay from 7 to 22 thousand dollars. You can build the simplest bathhouse yourself, saving significant money.
Construction of a Russian steam bath
Russian baths, as close as possible to traditional ones, are coming back into fashion. They have their own characteristics:
- the foundation is a boulder stone that does not require a plinth;
- walls - logs, wild, debarked and dried, selectively chopped logs that have not undergone any other processing;
- assembly without metal parts such as nails or corners;
- caulking natural materials such as tow and moss;
- insulation natural materials, for example, peat or moss;
- waterproofing - natural resin;
- roof - shingles, turf or shingles;
- the stove must be made of stone;
- font - barrel, swimming pool (you can always run outside and plunge into a river, lake or rub yourself in the snow).
All this creates a lot of unnecessary difficulties; the bathhouse itself is generally flammable and short-lived. But there is every opportunity to independently build a bathhouse with the same qualities, but much more practical and modern. It is recommended to make a sauna house not only with a steam room, but also with a washing room, where there is a font, a tub for dousing or a shower, and a dressing room.
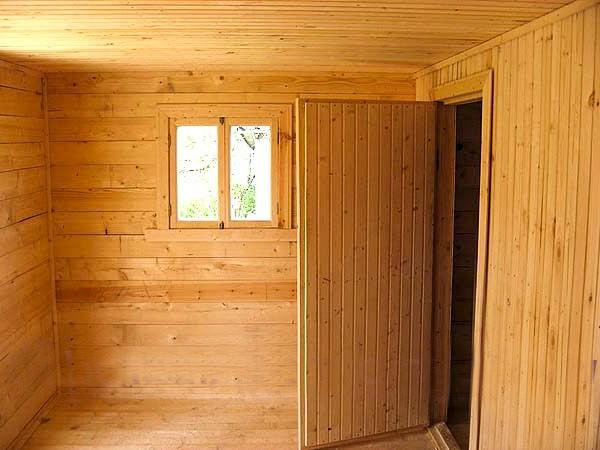
Waiting room
They undress in it, store towels, sheets, brooms and brooms, relax between visits to the steam room, and drink tea. This room serves as a barrier to cold air. There is a window there (for security reasons and for beauty).
Steam room
A heater with a water tank is installed in it, and beds or shelves for lying on are built. The oven provides uniform, strong heating and exposure to superheated steam without convective air mixing. In the steam room there may be small window for ventilation, which will help avoid waterlogging (one or two ventilation holes can be made for the same purpose).
Washing
Heat in this room comes from back wall ovens. After visiting the steam room, you need to cool down in the font or shower, which removes waste and toxins from the body. At the same time, sweating does not stop, and due to high humidity it also intensifies. The washing machine's operating principle is similar to that of a hammam.
Preparing for construction
On small area you can build a small bathhouse that can comfortably accommodate three to four people.
Selecting a location
If the area is small, then you don’t have much choice. But if it is spacious, then there is an opportunity to use all possible advantages.
You can limit yourself to the simplest and cheapest foundation if the site has good hard soil and deep groundwater. The bathhouse should not be located close to the well, as it is considered a source of pollution, the house (so that moisture from the drain does not damage the foundation), the toilet and the compost pit (so as not to wash away their contents).
Selecting wall material
Although a bathhouse can now be built from anything, for example, from brick, polystyrene concrete, aerated concrete, expanded clay or foam blocks, there are physical laws that confirm the appropriateness of the conservative practices of our ancestors. And all due to the fact that it heats up very much and then cools down, high humidity is created in it, and after ventilation the rooms dry out quickly. Blocks and bricks in this mode must have a special multi-layer cladding.
The tree may not have any cladding. In addition, it is this material that, when heated, gives an exceptionally healthy and beneficial heat. Therefore, for aesthetic and practical reasons, it is recommended to dwell on it.
Choosing a wood species
The intensity of the steam depends on the wood from which the walls of the steam room are made:
- Linden, with its low heat capacity, produces light, light-duty steam. In such a bathhouse, the air is always hotter than the walls, and they are also very useful. But you can no longer find linden logs; they are practically not harvested.
- Oak with a high heat capacity produces “vigorous” steam, which is difficult to endure. In addition, the walls add temperature. Oak logs are incredibly expensive, so they are usually used only as lower crowns.
- The best option is coniferous species. The heat from the walls and the air in such baths is approximately the same. In addition, the material is quite accessible. The best conifer tree for the sauna log house - larch, but you will have to fork out the money to buy it. If this is not possible, then pine or spruce will do.
What you need to pay attention to when buying wood:
How to choose the right type of lumber
Glued imitations are suitable for any building, except for a bathhouse. The lamellas from which the timber (or log) is made warp and deform due to temperature.
Solid timber can be profiled or regular edged. The main disadvantage of the second type is frequent warping as a result air drying. Profiled timber is expensive, and not just any one is suitable for building a bathhouse; for example, material with recesses at the top is not suitable due to the collection of condensate in them.
Therefore, most often a log is used to build a bathhouse. Raw or wild is difficult to buy. Therefore, it is recommended to choose a rounded log: it is well dried and smooth. It should not have radial cracks, as condensation accumulates in them, and this leads to rotting. Likewise, it should not have cuts in the upper part. To cut into a bowl, the log must have a so-called moon groove at the bottom.
You need to choose the cutting method in advance. There are several options for designing the ends of the logs and assembling them into a structure:
- "into the bowl";
- "in the paw";
- Canadian cabin.
How to make a drawing of a bathhouse
Since the length of a rounded log is 6 meters, it would be logical to take this into account when designing a bathhouse, making its side exactly like this. The building must have a steam room, a washing room, a dressing room and a stove. The height of the bath is usually determined solely by capabilities, but traditionally the floor to ceiling should be 220 or 230 cm.
Approval of the project by administrative authorities
This is a key step. Without approval of the project before the start of construction, an already built bathhouse can be demolished due to any complaints from neighbors, and you will lose the labor and money invested. The project should include the following items:

Approximate material calculation
To carry out the calculation, you need to take into account what diameter the log will have. A larger one is better for a bath, but it is more expensive. The optimal diameter is 280 mm. The cost of 1 m 3 of such logs with cups is on average about 8 thousand rubles.
Now you need to determine the height of the pediment. To do this, it is recommended to focus on natural conditions. At large quantities rainfall, the gable should be high, and the roof steep, so that the snow does not linger on it, and when strong winds on the contrary, so as not to create excessive windage. The average height of the pediment is 1.5 m.
Photo gallery: drawings of a log house and necessary parameters
 Top view and log cross-section parameters
  A drawing of a log house will help in filling out the initial data
  To calculate the amount of material, you must fill in all the initial data
  A special calculator can help with the calculation.
  All values can be entered into a special table
What tool will you need?
To build a bathhouse with your own hands you need:
- electric saw;
- grinder with a set of discs;
- drill with various drills and grinding attachments;
- planer, jointer (or electric analogues);
- axes;
- crowbar, mount;
- pliers, nail puller;
- bayonet and shovel;
- hydraulic level;
- hammers;
- mallet;
- bit;
- set of chisels;
- files;
- caulk tool;
- tape measure and carpenter's meter;
- buckets;
- wheelbarrow;
- stairs;
- construction trestles;
- container for concrete or construction mixer.
Now you can proceed directly to construction.
Step-by-step instructions for building from scratch with your own hands
All work can be divided into stages that follow each other. Between some of them it is necessary to make a certain time interval.
Construction of the foundation
First you need to select its type:
- Foundation made of natural boulders. Large stones with a cross-shaped notch are specially selected for the corners.
- Unrecessed or shallowly buried strip foundation. Markings are made on the ground, a trench of the required width and depth is dug, formwork is made, filled with mortar, covered with film, and dried. Advantages: comparative lightness and low cost of construction. Disadvantage - cannot be used on unreliable soils with closely suitable groundwater, clayey and sandy.
- On unreliable soils and on a slope, it is recommended to install a columnar pile foundation made of asbestos-cement pipes concreted into soil with a stone filler. Advantages - resistance to subsidence and soil sliding. The disadvantage is that it is more difficult to insulate the underground.
- Metal welded pile-grillage foundation. Dignity - beauty and functionality. Disadvantage: it requires special equipment for manufacturing.
- The best foundation for a small bathhouse is a non-buried columnar foundation. Made from ready-made concrete blocks measuring 200x200x400 mm. Advantages: ease of construction, low cost, versatility for any soil. There are no disadvantages.
Waterproofing and foundation sheathing
All types of foundations, except boulder foundations, require waterproofing between. It is usually done using roofing felt or bitumen.
Lathing with thin slats over waterproofing is needed to prevent capillary seepage of moisture into the frame. However, a columnar block foundation does not need it.
Drain system device
This stage occurs immediately after the foundation is laid, before the construction of the log house, simultaneously with the insulation of the subfloor.
In the old baths, the drain went straight through the plank floor to the ground, so the building was placed on a natural slope. Now such a drain is prohibited, but you can use the idea itself both in the steam room and in the washing room. It is recommended to organize a drain through the entire floor or collect it at one point where a drain grate is installed. But the first option will be more environmentally friendly.
Important! Under no circumstances should a bathhouse drain be connected to a common septic tank; it will simply choke due to volley discharges. You need to dig a separate drain hole.
The subfloor is first insulated with expanded clay, then concrete screed downhill This work can only be done in summer, as the concrete will not be strong if it is poured in the cold. The cement is mixed with the addition of a water-polymer emulsion (at the rate of 200 ml per 10 liters of concrete). The dried and already hardened foundation is coated with bitumen mastic, then left for a week. It is advisable to build a primitive water seal that can eliminate unpleasant odors.
Features of the floor in the bath
It cannot be strictly connected to the log house. The ends of the logs, on which the floor with slots are laid, are inserted into the slots of the lower crown. It is advisable to make the logs from “tar”. The floor may have slots or a ladder. In the vestibule it is always solid. It is recommended to use a tongue and groove board for the floor.
Lifting the log house
It is placed sequentially, each crown is fixed with dowels - round dowels (it is advisable to take oak ones). A hole for fastening half the thickness of the previous one is drilled through the log, all the way down. They take it off. They put caulking. Insert the dowel by piercing the caulk with it. Thread the top log onto the dowel. Repeat in a checkerboard pattern.
Do not forget to remove a piece of log in those places where there should be openings for windows and doors on their upper side.
Caulk is laid between the logs in a stretch, and then the finished log house is caulked with a cord.
Residential buildings are insulated with synthetic waterproofing agents, but this is not suitable for a bathhouse. Jute will replace traditional moss and hemp. It literally fuses with the wood and seals the room perfectly. This type of caulking is sold in sets (tape and cord).
Don't forget about the so-called technological break. The finished log house is sewn up on top with any auxiliary material, including cardboard, and covered with film for drying and shrinking. The process can take from six months to one and a half years. Only after this period has expired can construction continue.
Cutting openings for doors and windows
Openings are cut down from the marks left with mandatory control by a hydraulic level. The trimmings will go to the ceiling and furniture. You can immediately make a frame for the doorway. Since the log house is constantly “walking”, an ordinary door frame will not withstand the changing load. There is a special technology by which only vertical parts are fixed, which eliminates its deformation. To do this, mark a hole for the door along a hydraulic level or plumb line, and remove the wood according to the intended profile. The height of the opening should be more doors by 5–7 cm, so that there is freedom for deformation. It is then recommended to fill this gap with tow and then cover it with platband. The edges of the logs are trimmed so that the platbands can be secured.
What should the ceiling be like?
It is recommended to choose a suspended ceiling due to its durability and cost-effectiveness. This design It consists of beams connected to a log house, which also serve as rafters. After constructing the ceiling, it is caulked with jute, covered with roofing felt and insulated with mineral wool.
Roof installation
The roof is suitable gable. The rafters are mounted from timber.
All work takes place in several steps:
- First, the central pillars are installed at the height of the pediment.
- Then the ridge and rafters and light sheathing are installed.
- A coating is placed on it. It is better to use for a bath traditional materials for the roof, for example, metal tiles, corrugated sheets, galvanized iron, slate. It is surprising that the most durable and stylish coating is shingles. But if earlier it was material for the poor, now everything is completely different.
Exterior and interior decoration
If the frame was raised correctly and given enough time to shrink, then no interior decoration of the walls will be needed.
Doors and windows
These parts can be bought or made yourself (from tongue-and-groove boards with dowels).
Installation should be carried out according to the following plan:
- A door frame with a door is inserted into the finished frame.
- The vertical is adjusted and verified according to the hydraulic level. Fixed with self-tapping screws.
- The top gap is filled with tow, tucked around the perimeter of the door, if necessary, and trim is installed on both sides of the door.
- Handles and locks are installed.
Bath furniture
Bathroom furniture can be used for a steam room (shelves) and a washing room with a dressing room (benches, table).
Shelves come in different widths. This depends on personal preference, although there are some design traditions that allow you to calculate the minimum size suitable for a person of average height and build. It is customary to increase the average sizes to comfortable ones.
The minimum distance from the shelves to the ceiling should be at least 110 cm. In such a bathhouse you will not overheat on the upper tier, and there will be enough space to sit or lie with your legs raised. There are people who like to wave a broom very actively. Then it makes sense to leave it at the top more space(up to 1.5 m). The lower tier is traditionally located no lower than 30 cm from the floor of the steam room.
It would be advisable to make the shelves not from pine, but from linden, since it has lower thermal conductivity and does not emit resin. The frame can be made from timber, then sheathed with prepared boards.
Even at the construction stage, it is necessary to use modern impregnating compounds that can withstand high temperatures and humidity without harming human health. This way you can protect the building from fungus and rot. Those that are suitable for the ceiling cannot always be used to cover furniture.
Manufacturers of varnishes and paints (Senezh, Empils, Rogneda, Dulux, Tikkurila, Nobel, Belinka, Teknos) produce many such products with water-repellent natural substances such as paraffin, wax, oil. They are divided into those suitable for external walls, internal surfaces that a person does not touch with his body (ceiling) and furniture.
Pyroprotective and antiseptic impregnation The cutting of logs is usually done at the timber mill, but it needs to be done again after construction.
The first application of the compositions to furniture is carried out immediately after its manufacture on a dry and clean surface, or even before manufacture (on wooden blanks). The product should be evenly distributed with a sponge, soft cloth or with a brush. Due to the thick consistency, a spray gun will not work.
How to build a sauna stove
For all sauna stoves there is a single condition, the fulfillment of which is mandatory - lengthening the combustion channel so that the door is located in the dressing room (firewood is placed in it in that room).
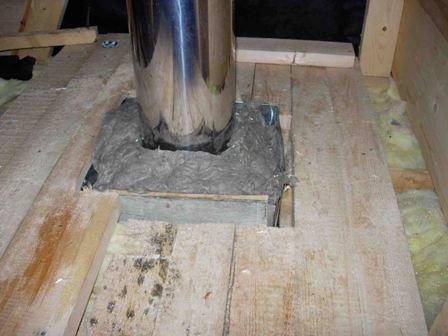
You can install a metal stove by purchasing it ready-made, or build a brick one yourself (it is much better due to its slower heating and long-term heat transfer). The most difficult thing in this case will be to correctly remove the chimney through wooden roof, insulating it with special metal sheets and vermiculite.
Stones must be selected as carefully as possible. They must have the following qualities:
- heat resistance (does not collapse due to temperature changes);
- heat capacity (gives off heat for a long time);
- environmental friendliness (does not emit harmful substances when heated);
- homogeneity and the same coefficient of thermal expansion (foreign inclusions with a different thermal expansion can explode when heated);
- round shape (it improves the circulation of hot air).
The stones should be:
- up to 13 cm for the first layer on the grill;
- up to 9 for the intermediate layer;
- up to 6 for the top layer.
If the heater is made correctly, then unforgettable moments of steam await you.
Features of operation
Only a steam room provides the healthiest and only correct ratio of humidity and heat. But even there there are extreme values. This is also confirmed scientifically. The best state of health at a certain combination of humidity and temperature is graphically expressed by a homeothermal curve. Below the first curve is the optimal combination of temperature up to 90° and humidity up to 80%, which is what the Russian steam bath provides.
While in the steam room, the body is washed with hot, humid air, especially when exposed to it with a broom, due to which everything warms up. In this case, there is a constant flow of oxygen to the tissues.
After being in the steam room, you need to plunge into the ice plunge pool.
Video: building a bathhouse from a log
Steam in a Russian bath trains blood vessels, improves immunity, reduces weight and pleases the soul. And if it is also built with your own hands, then the pleasure increases many times over.
Since ancient times, the bathhouse has been a place where you can relax and unwind. These ancient buildings surpass even outdoor recreation in popularity.
How to build a bathhouse yourself?
Building a bathhouse with your own hands is a difficult task and its implementation will require a certain amount of knowledge, which you will soon learn about.

To build a bathhouse with your own hands, you will need to familiarize yourself with the action plan:
- Design a bathhouse;
- Understand the stages of construction;
- Get building materials;
- Connect communications;
- Arrange the bathhouse from the inside.
After familiarizing yourself with the stages of construction, you need to decide on the place where the bathhouse will be located, since a lot also depends on the location.

The best option would be if:
- the bathhouse will be located on a hill, this will significantly simplify the installation of a water drain;
- there will be a river or pond next to the bathhouse;
- The window in the bathhouse will be located opposite the house, which will allow you to observe its firebox.


For garden house the distance will be no more than 3 meters, and for buildings such as a bathhouse this distance should not exceed 1 meter.


It is best to order the design and drawings of the bathhouse from local designers; this will cost about 5,000 rubles. You can also search for ready-made sketches and photos of bathhouses on the Internet that best suit your preferences.

Bathhouse made of brick, stone or blocks
As materials for a brick bath, you can use brick, stone or blocks directly.

To build a bathhouse, you need to dig a pit and fill it with 20 cm of sand, then fill it with water to compact it.

The second step is to lay crushed stone on top of 10 cm thick sand, which then needs to be covered with sand again.

The last step will be to install a system for drainage and drainage of the building.

Bathhouse made of timber
The first layer for the base of the bathhouse will be a 20 cm layer of sand, crushed stone is applied as the second layer, and concrete pouring is laid as the third layer. The key stage will be the reinforcement of the building.

Metal rods need to be inserted into the layers for a more durable structure, and for additional stability, metal plates should be laid in the middle, which are tied with wire.

Note!

The next stage of work is the blind area, which is needed to ensure that the foundation of the bathhouse is not washed out with water.

It is best to make a blind area from clay, it is much stronger than concrete, and also does not form cold seams in the process. A layer of crushed stone must be poured on top of the blind area.

Next, you need to install a drain in the bath. First you need to dig a hole and bring its trench to the edge of the foundation of the building, cover the walls of the hole wooden planks with reinforced wire, and then fill everything with concrete.

Frame bath
The foundation for such a bath structure is made using simplified technology, which is the advantage of a frame bath. It is necessary to make a foundation of asbestos-cement pillars, which, after installation, are filled with concrete mixture.

The next step will be marking the walls. Then you need to start connecting the boards using nails. The top and bottom harness. The walls for such a bath are made in a lattice structure.
Note!


The materials needed for the walls are bars, insulation, and materials for the outside, for example OSB boards or a block house, and inside you can use clapboard.

Materials for insulation and vapor barrier
It is worth insulating a bathhouse from the outside only if there is heating in the building.

For wooden bath it is necessary to make a grid that will be inserted into the insulation. The work will require mineral wool with a layer width of 50 mm.
Bath floor
In case of frame bath, when it remains to insulate the floors, as well as install the floor boards, in addition to this, it is necessary to install logs, a subfloor, and secure the structure for steam removal, then lay the insulation and check the waterproofing.

It is best to make the floor from concrete, as this will allow the bath to dry faster and it will last much longer. Wooden panels are laid on the concrete floor; they can then be taken out to dry and you can easily go about your business.

Note!

DIY bath photo


