How to build a sauna with your own hands? Procedure and choice of material. Do-it-yourself bathhouse in the countryside photo projects
Washing in a country bathhouse is a pleasure available to everyone. Its construction does not require large financial investments. In a minimal plan, such a structure is erected in a few days.
In this article we will look at the topic of how to build the simplest bathhouse in your country house quickly and inexpensively.
Let's start by studying ready-made options, and discuss the designs of walls, floors, stoves and sewers that are popular among craftsmen.
Design Features
The main conditions for the comfort of any bath are:
- Walls, floor and ceiling well protected from heat loss.
- Reliable insulation of structures from water and steam.
- Compact, quick heating oven.
- Effective sewerage and ventilation.
Examples of country baths
In photo No. 1 we see a simple bathhouse, reminiscent of Diogenes’ barrel. You can only take a steam bath in it. You won't be able to wash yourself here because there is no sewage system in the building. However, if desired, it is not difficult to do. To do this, you need to install a standard shower tray in the corner of the bathhouse and lead the drain pipe into the septic tank.

Photo No. 1 Build such a “barrel sauna” at your dacha and steam to your heart’s content
An important advantage of this design is its low weight, allowing it to be placed on a plank terrace.
The device itself the simplest bath from the container category is shown in photo No. 2.
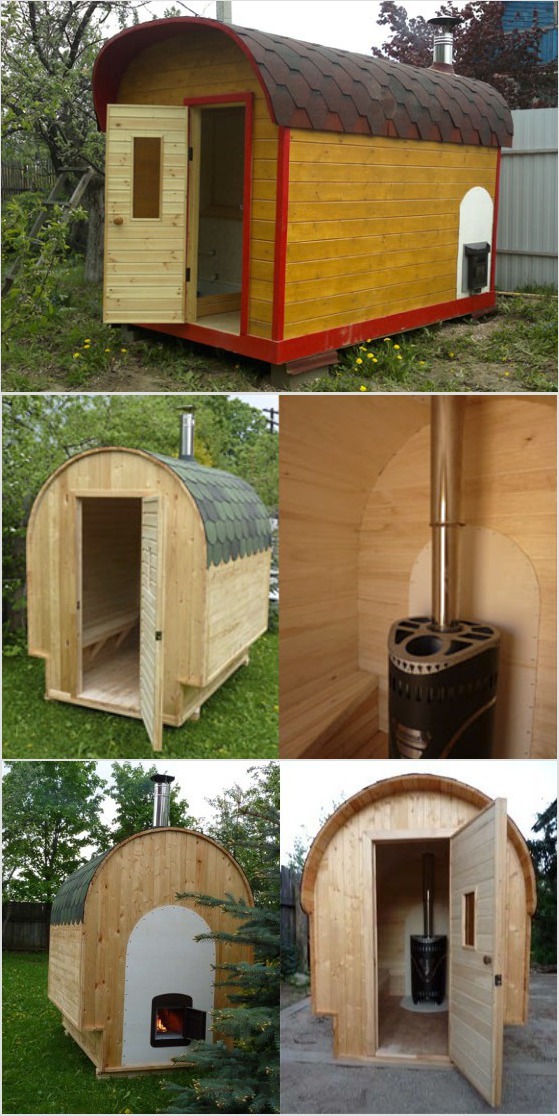
Photo No. 2 Option for a container country bath
It consists of one steam room. For washing, the owner needs to attach a canopy with summer shower or supplement the room with sewerage, and the stove with a tank for heating water.

Improvising on the theme of a barrel-shaped bath, let's turn our attention to cellular polycarbonate. It can be quickly and easily assembled original design. In order for it to retain heat well, you will need two large sheets of this material and a frame made of metal or wooden blocks. A mineral wool insulation 10 cm thick is laid between them.

The ends of the building can be made from boards, stuffed onto an insulated wooden frame. Place such a bathhouse anywhere: at your dacha, on a polar ice floe or on the top of Everest and you will always be comfortable in its steam room (photo No. 5).

Photo No. 5 Simple barrel-shaped bathhouse
A small Russian bathhouse, made from scraps of timber, can be installed on oak posts. We see an example of such a structure in photograph No. 6.

Photo No. 6 Oak posts are an excellent support for a small wooden bath
Larger structures require their own foundation. There are three possible options here:
- Rubble concrete tape.
- Brick columns.
- Piles made of asbestos cement pipes.
Do not forget that the type of foundation affects the choice of material and wall design. Pile and columnar foundations are used for installation wooden frame, as well as for baths made of timber or logs (photos No. 7 and No. 8).

Photo No. 7 Bathhouse made of SIP panels on screw piles

Photo No. 8 Brick columns - the best option for timber, log and frame structure
The “tape” of rubble concrete is suitable for any walls (made of gas silicate blocks, logs and frames).

A cheap, reliable and simple version of a bathhouse is obtained using technology. For such a structure you will need little: a truck of firewood, a cart of straw and a dump truck of clay (photo No. 10).
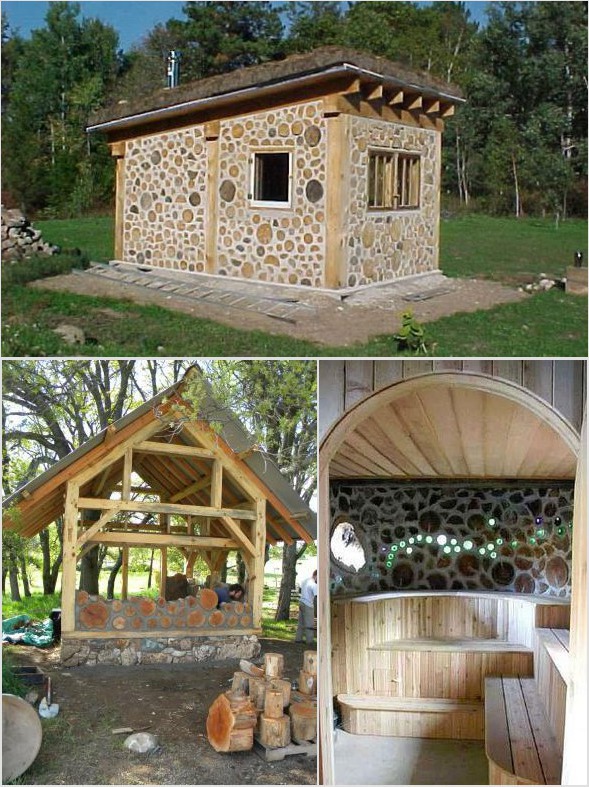
The best shape for a wood burning structure is round. It eliminates the need to reinforce masonry corners and looks aesthetically pleasing and original.
Borrowing from birds the technology of building nests from branches and clay, you can build such a simple and warm bath(photo no. 11).
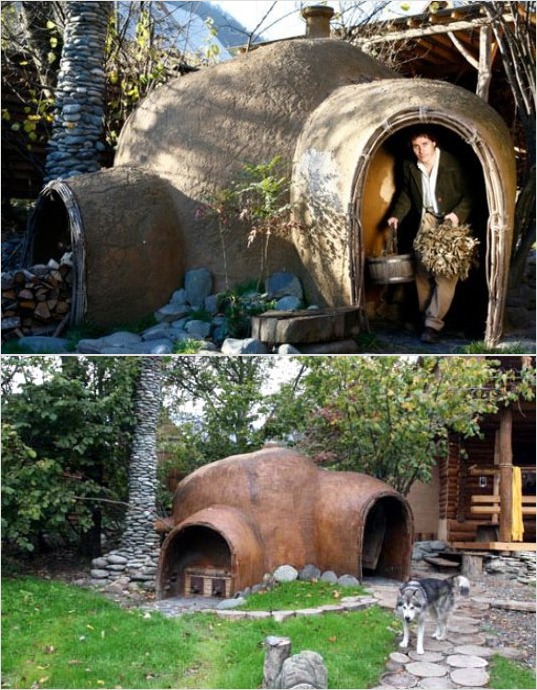
Photo No. 11 Wicker frame coated with clay - “know-how” of an inexpensive bathhouse design
Recommendations for choosing finishing, insulation, sewerage installation, flooring, roofing and stove
For exterior finishing For a frame bath, we can recommend the following materials:
- Wooden blockhouse.
- Metal tiles or corrugated sheets.
- Plastic siding.
- Cement particle board (CSB).
- OSB board.
- Flat slate.

Photo No. 12 A simple, but at the same time very nice option for exterior finishing of a bathhouse using unedged boards
It is best to use ecowool as insulation. It does not accumulate moisture, does not rot and does not burn. If ecowool is not available in your region, then you can buy ordinary mineral insulation in the form of a semi-rigid slab. It is easily and simply placed in the spaces between the frame posts.
To protect mineral wool from water vapor and reduce heat loss, the walls are lined with sheets of foil polyethylene. After this, a frame of slats is attached to them and trimmed with wood: alder, linden or pine clapboard (photo No. 13).

Photo No. 13 Steam and heat insulation of the walls of a country bathhouse built from any material
We do not recommend installing OSB board indoors. This material is under the influence high temperature releases toxic gases.
Options for steam and thermal insulation of walls of a frame structure, as well as a bathhouse built from blocks or logs, are presented in Figure No. 1.

Building a simple bathhouse with your own hands includes sewerage. It can be made from standard plastic pipes discharged into a cesspool or drainage well.
The water intake funnel is placed in the center or in the corner of the room, and the floor is made in the form of expanded clay concrete screed with a slope towards the drain. Before concreting, you need to compact the soil and cover it with several layers of waterproofing. Wooden flooring is an excellent option, but in a bathhouse it quickly rots and requires replacement. Instead, we recommend making gratings from wooden slats and put them on concrete screed. After washing, they can be removed, taken outside and dried.

The design of the bath ceiling is standard. First, a vapor barrier film is “attached” to the rafters and counter-battens (3x4 cm) are stuffed. A clapboard cladding is attached to them. The gaps between the rafters are filled with insulation and covered with under-roofing film. It protects it from weathering and atmospheric moisture (Fig. No. 2).

Fig No. 2 Ceiling structure of a country bathhouse
A counter-lattice is placed on the film, creating a ventilated gap between the roof and the insulation. The work on installing the ceiling and roof is completed by installing the main sheathing and laying the roofing material (slate or metal tiles).
The main “detail” of any country bathhouse is the stove. It should provide rapid heating of the air and maintain a high temperature. A metal stove heats up the fastest.
To accumulate heat and create steam, it must be equipped with a compartment for stones. There are many options for stoves for simple baths, so we will not dwell on them in detail. Let's just say that the easiest way to make a heat generator is from steel pipe large diameter, an old gas cylinder or barrel (photo No. 15). Another easy-to-use material is a steel sheet 3-5 mm thick (photo No. 16).

Photo No. 15-16 A simple stove made of a pipe and a stove made of ferrous metal
Knowing the simplest welding techniques, you can assemble such a structure without outside help.
Building your own bathhouse is an activity that needs to be approached with all responsibility. As practice shows, most often timber is used to make baths, which makes it possible to create an environmentally friendly, reliable and durable building. This article will discuss how to properly build a bathhouse from timber.
Advantages of timber
Perhaps the most important advantage of timber is the simple construction of a bathhouse from scratch using of this material. In addition, the timber stands out qualitatively among other materials used in the construction of bath structures, and even against the background of its closest analogue - rounded timber.
The main advantages of the timber are as follows:
- Ease of working with the material, thanks to which you can build a bathhouse yourself, without resorting to the services of professional builders;
- Traditional timber has the smallest shrinkage coefficient compared to other wood materials;
- Building a bathhouse from timber is much cheaper than using other building materials;
- A special beam for a bathhouse may have fasteners prepared from the factory, which greatly simplifies the installation process.

However, despite the qualities described above, you need to understand that timber is different from timber. That is why, since we are building a wooden bathhouse, we should choose the material wisely in order to avoid unpleasant consequences.
Choosing timber for a bath
The quality of the wood directly affects the characteristics of the building, so you need to pay a lot of attention to this issue. When choosing, you need to immediately check the timber for integrity - even extremely minor defects and flaws should be absent. The fact is that any damage has a cumulative effect, as a result of which a small crack can eventually lead to damage and destruction of the tree. It is necessary to understand which wood is better to build a bathhouse from, and which one is better to refuse.
The surface of the wood should not have blue stains on it. The presence of such defects always indicates rotting of the material from the inside, which is most likely caused by dangerous and extremely harmful microorganisms. Naturally, using such wood in the construction of a bathhouse (and any other buildings) is strictly prohibited.

If, during a visual inspection of the timber, traces of damage by rodents or beetles were noticed, then such material is also not suitable for arranging a bathhouse. Good timber has a smooth and smooth surface without damage, dents, cracks, bends or distortions. The presence of any of the listed signs is a guarantee of the fragility of the material.
Algorithm for building a bathhouse

The stages of building a log bathhouse are as follows:
- Construction of the foundation.
- Foundation waterproofing.
- Arrangement of the first crown.
- Arrangement of the remaining crowns.
- Creation of door and window openings.
- Caulking cracks.
- Roof arrangement.
Foundation arrangement
A completed wooden bathhouse is relatively light in weight, so the extensive monolithic foundation under the building is not required. A strip or column foundation would be a suitable option.
When choosing a strip foundation, you will first have to dig a trench around the perimeter and under each wall of the future building. A mixture of sand and gravel is first poured into the bottom of the pit, then a reinforcing mesh is laid. Next, everything is carried out according to an algorithm familiar to many - the formwork is installed and the concrete solution is poured.
The depth of the foundation is determined individually depending on the degree of soil freezing. As practice shows, the average depth of a trench is about 70-100 cm. In order for the foundation to reliably protect the structure from dampness, it must be raised at least half a meter above ground level.

Along the perimeter of the strip base, you need to pour strips of crushed stone and sand. Then these strips can be filled, for example, with concrete mortar, or a wooden floor can be installed on top of them - you will have to choose the final option yourself. In the same way, you can build a bathhouse in the country, which is what many do.
The columnar foundation is arranged differently. The work begins with the installation of brick supports or asbestos pipes filled with concrete. These elements should be installed around the perimeter, at the corners of the structure and under each wall of the bathhouse. The supports are installed not just in the ground, but on top of a concrete pad. The distance between individual posts should be about 1.5 m.
In any case, the base must be reinforced to ensure maximum strength. When the concrete hardens (and this usually takes about a month), it will be possible to continue work on arranging the bathhouse.
Foundation waterproofing
Heated bitumen is poured over the hardened concrete, onto which sheet roofing felt is laid. When the bitumen hardens, this entire operation will need to be repeated, resulting in a reliable water barrier that can prevent moisture from entering the wooden elements of the bathhouse.
Treating wood with an antiseptic serves partly the same purpose - most special means improve the resistance of the material to all types of damage.
Arrangement of the first crown
Having finished preparatory stages, you can finally start laying the bathhouse. The first stage is laying the first crown. Slats, the thickness of which does not exceed 15 mm, are laid on the waterproofing in increments of 30 cm. Naturally, all slats must be soaked in antiseptic before starting work.
The laid slats protect the building from direct contact with the foundation, thereby significantly providing additional protection for the wood from moisture. The lower beams are laid on top of the slats.
The first crown should not be fixed immediately. First you need to make sure that the structure is laid out correctly and evenly, for which you use a square and a level. Only after the beams have been leveled can they be fastened. There are several ways to do this, but most often the timber is secured with anchor bolts.


However, often when arranging a private bathhouse, they simply refuse to fix the lower crown. The reason for this is quite simple: the dead weight of the structure is large enough to hold the structure in place. In addition, this method gives unexpected advantage– if it is necessary to replace part of the lower ring, much less effort will be required.
Regardless of the method of fastening, the space between the crown and the base is filled polyurethane foam, after which you can do further work.
Installation of other crowns
A layer of heat-insulating material is laid on top of the first crown. For baths, jute, moss or tow are usually used. It is advisable to lay out the material in such a way that a small part of it (about 10 cm) sticks out - in the future you can use this tolerance for caulking.
After the first row, it’s quite logical that it’s time to lay the second one. It is fixed with wooden dowels, for which suitable holes are pre-drilled in the beams. One dowel can connect several sequentially laid rows.

All other rows forming the walls are mounted in the same way. It is worth checking the structure for horizontal and vertical alignment every 2-3 rows. Also, we must not forget about the sealing material, which must be present between all the crowns.
The top two rows of the bathhouse are not fixed. The fact is that wood shrinks over time, and installing ceiling beams It is possible only when this process becomes practically invisible. Before laying the beams, the upper crowns are dismantled.
Creating door and window openings
There are two fundamentally different schemes used to create doors and windows in a wooden bathhouse:
- Windows and doors are created after the construction of the bathhouse. IN in this case At the stage of laying the crowns, it is necessary to leave gaps that correspond in size to the products being installed (more details: " "). When the bathhouse is built, suitable openings are cut out in the right places using a chainsaw.
- Windows and doors are prepared in advance. This method is much more complicated, since its implementation will require special grooves and bars with end notches.

In practice, the first method is most often used, which is quite simple and does not require any special costs.
Caulking cracks
The assembled structure should be left for about six months so that the wood subsides sufficiently. At this time, the structure should be covered with boards and slate. After this, you can begin to seal the cracks.

Roof arrangement
Roof installation, which can only begin after the building has settled, is as follows:
- Wooden ceiling beams are laid above the top frame of the walls.
- Rafters are attached to the fixed beams at a distance of about a meter.
- A decking made of pre-selected material or lathing for a sheet roof is nailed to the rafter legs.
- Now you can fasten the material in accordance with its laying technology.
- The ridge is covered with a sheet of galvanized iron.
- The gables are covered with suitable material (for example, siding or clapboard).

When the outer part of the roof is installed, all that remains is to equip the interior space - install insulation, waterproofing and carry out finishing work.
Conclusion
This article talks in detail about how to set up a bathhouse from scratch with your own hands. This process is far from the most labor-intensive, especially if you approach it responsibly and the actual execution competently.
The bathhouse has become very popular in our country, but it is believed that it was invented in ancient times in Egypt. The Egyptians respected water procedures and considered it the most important task to maintain the cleanliness of their bodies.
The bathhouse is functional. Many owners of country houses want to build it on their site. Having some construction skills and the necessary materials, you can build a bathhouse yourself.
Bathhouse design
Bathhouse installation work begins with design. At this stage, all parameters are taken into account: dimensions, placement and choice of materials. Even when constructing a bathhouse at your dacha with your own hands, the project can be ordered to specialists.
The greatest demand is for the following building options:
- Construction project 3*3 m, while the steam room and washing room are located on an area of 4 square meters. meters, and the rest room is 3.5 square meters. meters.
- Plan 3*5 m assumes separate location washing and steam room. There is also a lounge and terrace.
- Project 4*4 m consists of a washing room and a steam room, which have the same area. An area of 6.46 square meters is allocated for the rest room. meters.
- Plan 5*4 includes a steam room and a washing room, a relaxation room with an area of 6.62 square meters. meters and a terrace.
The choice of project depends on where exactly on the site the bathhouse at the dacha will be located.
The location is planned taking into account safety regulations. This object should not be located next to a residential building or near the neighbors’ bathhouse. An original solution would be to build a country bathhouse on the banks of a pond or river.
After choosing the location of the bathhouse and creating a project, you should begin choosing building materials. Economical options include building with bricks or blocks.
It is worth considering the most good options baths with an area of 4*5.
Large bath projects
The simplest 4 by 5 bathhouse project
A simple design for a bathhouse in a country house consists of a minimal set of components. The building consists of one floor. This project does not have a vestibule, the purpose of which is to separate cold air from the street and hot air from the room. If there is no waiting room, then you cannot use the bathhouse during the cold season. Since hot air will promote the formation of condensation on the door.

The project assumes the following premises:
- Rest room with dimensions 2.85 * 4 meters. Furniture and appliances are placed in it.
- The washing room, measuring 1.8*2, contains a toilet, sink and shower.
- The size of the steam room is 2*2, it has a stove.
Project of a bathhouse with a 4 by 5 terrace
This option is similar to a simple project, but is complemented by a terrace. If desired, it can be glazed or arranged as comfortable place for relax.

The design includes the following premises:
- Terrace measuring 1.5*4 meters.
- Rest room 2*3.5 meters.
- Shower room 1.5*2 m.
- Steam room 2*2 m.
Bathhouse with waiting room 4 by 5
The project provides for the placement of a dressing room measuring 1.1 * 1.7 m. This room allows you to use a country bathhouse in cold weather. You can also store firewood in it.

From the dressing room you can go into a small corridor and into the rest room. From there a door leads to the washing room and steam room.
Dimensions of the steam room
When building a steam room, it is worth considering the rules fire safety and sanitary standards. Shelves should not be placed next to the stove.
The design of the premises must take into account the number of people who will use the steam room.
This room must be supported heat. To achieve maximum effect, it is recommended to provide close heating from the stove. The best option is a steam room for two places. Depending on the location of sitting or lying places, the dimensions of the room are planned. For one person and a seat, the size is 0.84 * 1.15 m. Comfortable room parameters for two with the ability to stretch out on a bench are 1.8 * 2.4 meters.

If a stove is selected, the following rule will help calculate the dimensions of the room: the further a person sits from the stove, the weaker the heat source. If you are located at a distance of 3 meters from the heating source, then the heat will be 4 times less than when placed at a distance of one and a half meters.
The steam room should not be huge or too small. The optimal height to build a sauna is 2.2-2.4 meters. You cannot make ceilings lower than 2 m.
There are 3 canopies installed in this room. All of them have a height of 35 cm. The top canopy is the widest.
Choosing a convenient place for a bathhouse
Before building a bathhouse, you need to choose a convenient location on the territory. The following rules will help you do this correctly:
- It is not recommended to build a bathhouse near any bodies of water.
- The distance from the well should be at least 10 meters.
- A good option for building in the backyard.
- When designing a building, it is worth deciding on thermal insulation and vapor barrier.
- You should not plan to build next to a field or road.
- The construction of a country bathhouse on the south side is considered a good option.
- Fire safety needs to be considered. It is worth starting construction away from a residential building.
- It is better to locate the property further away from the neighbors' property.

Mistakes when building a bathhouse
Even with a high-quality project and a serious approach, errors occur in construction or finishing work. To minimize the shortcomings when building a bathhouse at the dacha with your own hands
worth your time increased attention the following points:
- It is important to plan the dimensions correctly interior spaces. For a building for two or three people it should not be less than 10 sq.m.
- The height of the building should be 2-2.3 meters. If the ceilings are lower, then this is inconvenient. With higher ceilings, there is an irrational consumption of coolants.
- It is better to place windows on the south or west side. In this case, the doors are located from the south.
- To reduce heat loss, windows are made small. Doors should be no larger than 75*180 cm.
- A bathhouse in a country house should be built from lightweight materials that have energy-saving properties.

It is also worth paying attention to the selection of high-quality and safe equipment. When choosing materials for cladding, it is not recommended to consider resinous wood species.
Material selection
After drawing up a design for a bathhouse at the dacha, you should decide on building materials. Economical An option is to build from blocks and bricks. Such materials are easy to maintain and have a long service life.

Frame The bathhouse is being built in a short time. The wall of such a structure consists of lining, insulating layers, cladding and facing material.
It is believed that the best material for the bath is wood. This is a natural and environmentally friendly material that creates a special atmosphere in the room.

Wood as a building material has the following advantages:
- The wood warms up quickly and does not create condensation.
- The humidity and heat generated in a wooden building are good for health.
- The walls allow moisture and air to pass through.
- There is no feeling of dampness.
- Wood has low thermal conductivity.
The construction of a bathhouse at the dacha involves the following stages:
- foundation construction;
- installation of walls;
- roof installation;
- insulation of floors and walls;
- façade finishing;
- installation of a stove and chimney;
- facing works;
- installation of shower and toilet;
- furniture arrangement.
Foundation for a bathhouse in the country
The foundation of a country bathhouse can be piled, striped or columnar. At the same time, the construction technology differs.
Columnar
Columnar-type foundations are characterized by simple installation and low financial investments.
Used for timber buildings. A feature of this foundation is the construction of supports only in places of greatest load. These are the corners of the building and the intersection of load-bearing structures and partitions.

The construction of such a foundation has the following features:
- The pillars are made of brick or stone.
- The distance between the supports is filled with crushed stone.
- The trenches are then filled with mortar.
- The main load from the building falls on the pillars.
Tape
Most often, a do-it-yourself bathhouse in a dacha and other country buildings are built on strip foundations. A similar foundation can be laid even under massive walls.
Foundation belt type extends along the perimeter of the entire building. Its construction does not require any special equipment.

Construction consists of the following stages:
- Creating a trench.
- Installation of reinforcement ties.
- Pouring with concrete mixture.
If the foundation needs to be raised slightly above the ground, then formwork.
Pile
Pile supports are used for country bathhouses made of timber and for buildings that are located on moving soils.

Piles can be reinforced concrete, metal or concrete. They are driven or screwed into the ground until a solid layer of soil is reached. A slab or strip foundation.
Slab
On difficult soils, a slab foundation is used, which is solid slab under the entire surface of the building.

This is a reliable type of foundation, the construction of which is labor-intensive.
Construction of the walls of a country bathhouse
To build a bathhouse you need to choose quality solution, which depends on the type of masonry and material. The walls are erected using cinder block, brick or aerated concrete.
When doing the laying, do not rush to avoid deformation. During construction work, a plumb line and level are used.
It is worth deciding in advance on the placement of windows and doors.
Finishing of bath rooms is carried out using linings. External work can be done from any material.
Bath roof installation
At the end of the construction work, the roof is erected. This element performs protective function from weather conditions.
When building a bathhouse, the simplest roof options are used, without unnecessary frills.
Creating a durable roof requires certain experience and knowledge of construction technology.

Bath roof design
The roof design for a bathhouse assumes the presence of the following elements:
- Supporting system of rafters.
- Flooring equipped with waterproofing materials and lathing.
- Attic floor.
Flat the roof is erected without overlap. Bathhouse roofs can be gable or single-pitch.
Two ramps or one?
In order to reduce the budget, the bathhouse structure is adjacent to a residential building. In this case, a pitched roof is used. It is a flat roof, which is characterized by ease of construction and low cost.
For a bathhouse, a roof with two slopes. If the roof is high, then you can arrange a room in the space under the slopes.
The slope of the roof and its height are influenced by parameters such as climatic features and the practical use of space.
Door and window openings
Installing door and window openings is not difficult. The quality of energy saving depends on the correct installation of windows and doors.
When building a bathhouse, you need not only to select high-quality material, but also to carry out installation taking into account all the rules and technologies.
Windows and doors can be either wooden or metal-plastic. In some cases, glass doors are installed.

Floors in a country bathhouse
When constructing floors for a bathhouse in a country house, high-quality insulation is required. In order for the floor not to become damp and to have good energy-saving properties, it is necessary to insulate the base from the inside.
Floor installation has the following features:
- Waterproofing and insulation are laid along the foundation using mineral wool.
- The floor in the shower room is poured taking into account the laying of sewer pipes and the water supply system.
- Expanded clay is used in other rooms.
- Layers of vapor barrier and insulation are laid.
- The board is spreading.
Interior and exterior finishing
To build a bathhouse, you need to think through the finishing work inside and outside the building in advance.
Insulation is considered an important stage in any finishing work. External finishing work consists of foam insulation and decorative cladding.
The interior decoration is accompanied by insulation using mineral wool.

Indoor insulation is carried out as follows:
- The surface of the walls is covered with waterproofing materials.
- A wooden sheathing is attached.
- Vapor barrier and mineral wool are installed.
- Foil is used as a vapor barrier and used for finishing.
- The ceiling is insulated. Fiberglass is laid between the beams. You can put mineral wool on top. Vapor barrier and rough finishing are carried out.
- Interior finishing is done using lining. Exterior paint, siding, facing brick or plaster.
- Then the stove and chimney are installed. At this stage, high-quality sealing should be done to prevent smoke from entering the room.
Arrangement of a country bath
To properly decorate a bathhouse, it is necessary to equip the bathhouse with all the necessary accessories, furniture and decor.
Indoor installation includes electricity, water supply, sewerage and installation of a stove.
When carrying out electrical wiring, you must comply with the installation requirements in wet areas.
Photos of a bathhouse in the country
Before starting construction work, it is necessary to draw up a competent project and select desired style building.
Interesting options can be seen in numerous photographs. Special video lessons also demonstrate the process of building a bathhouse.
An example of a bath made of gas silicate blocks. Personal experience with your own hands.
On your own summer cottage we decided to build a small sauna. The drawn up project assumed the following dimensions: 5 * 5.3. The ceiling height was 2.25 m.
From the variety of materials presented, we decided to focus on gas silicate blocks. A gable roof was planned in advance, under which a living space was supposed to be located.
The steam room was insulated and equipped with a vapor barrier. Lining was used as finishing. Tiles were used in the shower.
Our choice settled on gas silicate blocks due to the unique properties of this material. He's different high performance thermal insulation, fire safety and resistance to rotting.
Made for blocks strip foundation, which was supplemented with layers of roofing felt for waterproofing.

Walling
For our bathhouse, blocks with dimensions of 20*30*60 were chosen. For masonry, a solution of cement and sand was used in a ratio of 1 to 3.
The walls were erected in several stages:
- The blocks were installed from the corner. A level is needed for leveling. A layer of solution was applied to the roofing felt. Then the block was laid, which was tapped with the handle of a trowel.
- Subsequent rows of blocks were installed with a slight offset of 15 cm. In this case, the seams of the new row covered the previous ones.
- The attic gables were erected in the same way, to a height of 1.9 m.

Finishing work in the steam room
The inside of the steam room was lined with clapboard. To prevent condensation from appearing on the gas blocks, additional insulation was performed:
- The slats were attached to the wall using self-tapping screws.
- Mineral wool was laid between the cells.
- Then they performed a vapor barrier with foil and a special film.
- We completed the sheathing for the lining.
- The lining was mounted in a vertical position using nails.
- After installation, the lining was coated with special oil.


Finishing the shower room and attic
In the washing room, gas silicate blocks were lined ceramic tiles. For installation we used moisture-resistant glue.

To finish the attic, we used lining, which was attached to a special sheathing. After installation, the entire lining was covered with antiseptic solutions.

A sauna made from gas silicate blocks is an excellent option. It is convenient to work with such material, and it is cheaper than other analogues.
When designing baths, you should take into account many factors - from location to area. Financial opportunities also play a significant role; if the bathhouse is planned primarily as a place for family recreation, then it is not necessary to build a palace.
For full functioning, 2-3 rooms are enough - a dressing room, a steam room and a washing room. The last two rooms are sometimes combined into one to save space.
Layout of a small bathhouse
In an effort to reduce the space occupied by a bathhouse, you should not be too zealous - there are certain standards. So, two people should fit freely in the steam room, taking into account the fact that they use brooms. If it is very crowded, then you will hardly be able to enjoy going to the bathhouse.
Features of the layout of a bathhouse with a small area

Small log sauna
Layout small bathhouse begins with the choice of material for its construction - it can be a log, timber, brick or foam blocks. Wooden structure the most preferable, since it allows you to breathe easily and freely, and naturally maintains a balance between humidity and high air temperature.
What you should especially pay attention to:
- Foundation - the weight of the structure does not require the construction of a powerful foundation; the best option is a strip or support-pile foundation. They won’t have to carry out significant excavation;
- The convenient arrangement of the rooms inside will facilitate both the process of visiting the bathhouse and the preparation for it;
- It is advisable to install the stove in the dressing room so that it can be lit without interfering with others going into the steam room or washing room. The firebox must be protected from the possibility of accidental fire;
- An important point is ventilation. It is carried out through windows and doors. It is better to give preference to wooden window structures - this is an environmentally friendly material that emits a pleasant aroma. In addition, it is a source of natural air exchange;
- Small baths are built according to the same rules as their large-scale counterparts - the shelves are located along a blank wall, the door threshold is high, and the frame is low. This is important so that less steam comes out when opening;
- There should be no locks, and all doors in the bathhouse open outward.
The useful area of the bathhouse cannot be less than 10 square meters. meters, otherwise it will be impossible to steam in it and wash comfortably.
Convenient bath layout for two people

Bathhouse project of 3 rooms
It is not always possible to build a spacious bathhouse and you have to be content with modest dimensions. But even if it is not possible for two people to be in the steam room at the same time, then the presence of a separate washing room will allow the structure to be used for its intended purpose.
Competent design internal space makes it functional:
- Dressing room - area will be 2.7 square meters. meters. It can be used both as a locker room and as a rest room. But its main purpose is to prevent the penetration of cold air;
- The plan of a small bathhouse necessarily includes a washing area - an area of 1.7 square meters. meters. There are two options - install a shower stall or equip a simple shower. The second is to place stools and basins, and pour water into them from a tank located behind the stove. With such a volume, you can fit everything you need in it. It will be heated by a stove chimney;
- And the most main room– steam room. Its area is 1.14 square meters. meters. The heater is placed in the corner, so it will give off some of the heat to the washing area. It will not be possible to place a lounger, so you will have to steam on a stool or bench.
Note! If a residential building does not have a bath or shower, then a small bathhouse is an excellent solution. She will combine business with pleasure.
Project of a small bathhouse of two rooms

Small frame bathhouse made of timber
If you don’t want to huddle in tiny rooms, then combining a steam room and a washing room can get a good result. The external size of the bathhouse can be 3.6 * 2 meters - this is quite enough.
How to build a small bathhouse with your own hands on a plot of land, this is only possible if you have a carefully thought-out project:
- Dressing room with a total area of 2.4 sq. meters - here you can already turn around. The dimensions allow you to place a tiny table where you can enjoy drinking tea. The role of the locker room remains;
- The steam room and washing room are combined to create a room of 3 square meters. meters. The shower will have to be sacrificed, but now there will be a full-fledged sun lounger and a bench for washing. Basins with water are placed on it. Excess moisture There is no need for a shower, it will make the air heavier and make breathing difficult.
To ensure that the benefits of bathing procedures in this project are not reduced, the following instructions must be followed:
- Install a more powerful stove that can heat two rooms at once;
- Do not spray water around the steam room - this will increase the humidity;
- Bathing procedures begin in the steam room, and only then begin washing.

Photo of a small bathhouse on the lake shore
In both layout options, the door should open outward, and the building itself should be installed no less than 5-10 meters from capital house. These are mandatory fire safety requirements. Ceilings in the bathhouse should not be made more than 2.2 meters, and door frame more than 1.5 meters. Otherwise, it will not retain heat.
The stove can be any - electric, wood or gas. But the latter is not very desirable. Electric is easy to install and makes it easier to control the temperature level.
But the best one is wood-burning. It creates a unique spirit and aroma of the bathhouse.

The price of a wood stove is not that high
A bathhouse is the dream of almost every owner of a suburban area. But the size of the plot does not always allow for the construction of a large and spacious structure, and then you have to be content with the small. But this does not make the bathhouse any less functional.
With the right approach to planning, it turns out useful and convenient. The video in this article will tell you in more detail about small bathhouses and their advantages.
Small bathhouse: how to build it yourself, layout, video instructions, plan, photo and price
How to build a 3x3 sauna with your own hands

The primary task facing every owner of a country plot is the construction of a small bathhouse located not far from the country house. Our article will talk about how to build a 3x3 sauna with your own hands, which would fit perfectly into the space of a small household plot.
The starting material used for the construction of such a structure is most often traditional wood beams. For those wishing to deviate from established traditions, such common building materials as brick, silicate and foam blocks or natural (artificial) stone can be offered.
Structural features
The bathhouse, measuring 3x3 m, is a small one-story building that can accommodate 2-3 people at a time. Its usable area usually does not exceed 8‒8.5 m² and is distributed as follows:
Note that the dressing room in such a bathhouse is also used as a relaxation room. Despite the limited size of the room, it is usually possible to fit a small table and 2-3 benches. The table can be made folding, which allows you to free up as much space in the dressing room as possible while lighting the stove and cleaning the room.
When choosing the design of a bathhouse building, one should not exclude from consideration the option of a small-sized structure that is simply attached to the main residential building.
What to build a bathhouse from?
The simplest and cheapest way to make a wooden bathhouse from timber is to use a standard frame structure installed on a lightweight strip foundation.
A bathhouse made from traditional “round timber” also looks good, which is well-sanded logs selected according to the appropriate diameter. Forest moss is usually used as insulation in these structures, laid between the individual crowns.
In addition to timber and round timber, profiled or laminated timber can be used to construct a bathhouse. In any case, the material you choose must be well dried (that is, subjected to a shrinkage procedure in advance). Thanks to this, you will be able to start using the sauna building immediately after finishing it.
Note! When erecting a structure made of brick or stone, the strip foundation for a bathhouse must be designed for a heavy load.
Work order
The construction of a bathhouse from the material you have chosen is usually carried out in the following order:
Foundation preparation
Basically, the type of foundation is not a whim of the customer, but is selected based on many factors. Often, for the construction of a bathhouse, a pile or columnar foundation is made. In some cases, it may be necessary to make a slab foundation. We will consider only one type of foundation, which is more universal and applicable in most cases.
The strip foundation for a log house made of three-meter timber is made shallow, which is also acceptable when using rounded logs. The procedure for its preparation is as follows:
- First, a square of appropriate dimensions is marked, after which trenches 10–15 cm wide are dug to a depth exceeding the soil freezing mark.
- The bottom of the dug trench is covered with a layer of sand about 15 cm thick, which is then spilled with water and thoroughly compacted. After compaction is completed, the bottom of the trench is filled with crushed stone, after which it will be possible to proceed to the preparation of formwork, assembled from ordinary unedged boards.
- IN finished formwork imported or self-made is poured concrete mixture, which should include moisture-resistant cement.
- The foundation is waterproofed using suitable rolled material (roofing felt, for example).
Walling
When assembling a box from 100×100 beams for lower crowns It is advisable to use larch or aspen blanks that have a larger cross-section (150×150 cm, for example). The base frame is attached to the foundation using special plates, the counterpart of which is fixed to the lower beam of the frame.
The construction of the foundation is carried out using one of the well-known methods, which involves the use of the method of joining beams (logs). Given the relative lightness of three-meter beams, the assembly of the frame is most often done manually and without assistants.
For reliable connection between the crowns (without gaps), pre-prepared wooden dowels and a special jute seal are used.
Manufacturing of roof, ceiling and floor
When arranging a roof for a 3x3 meter bathhouse, preference is usually given to one of the simplest structures: single-pitch or gable. The optimal angle of inclination of the roof is selected taking into account the brand of material used as a roofing covering (inexpensive roofing felt or slate are most often used for these purposes). You can see a sample of roofing arrangement in the photo located at the end of the article.
At the next stage of work, the ceiling is installed, made in the form of flooring, laid directly on the walls of the building. The floor covering is fixed on special logs placed directly on the foundation.
Interior decoration of the building
Before finishing the bathhouse, the walls and ceiling of the building are reliably insulated; in this case, special attention is paid to the steam room. To finish it, it is advisable to use natural types of insulation material (mineral wool, for example) and then apply a layer of foil to it. Note that the foil in this case is used as a reflector capable of retaining heat inside the steam room.
After installation of the insulation and foil is completed, the walls and ceiling of the room are sheathed with clapboard made from special types of wood (linden or aspen).
As for the dressing room, it is not at all necessary to use expensive materials; the walls of this room can simply be impregnated with special waterproof varnishes that perfectly highlight the texture of the wood.
How to build a 3x3 sauna with your own hands - building a small sauna
Learn how to build a 3x3 sauna with your own hands. The article describes how and from what materials to build such a small bathhouse.
Do-it-yourself small sauna

A small do-it-yourself sauna is a great option when the area near the house or in the yard of the dacha is limited. In addition, with this solution you can significantly save your budget, but as a result you will get a full-fledged place of rest, which will not only relieve stress after have a hard day, but improve your health and enjoy time with family and friends.
Examples of projects
Ideally, the bathhouse includes 4 rooms in its design:
You can expand the functionality of some rooms by combining them with each other. At the same time, the comfort of your stay is not lost. The overall size of the building will largely depend on how many people will be inside at the same time.
- 1.20 mx2.50 m. Very compact solution. In this case, the bathhouse consists of only two rooms: a steam room and a dressing room. The dimensions of the first are 1.20 m×1.50 m, the second - 1 m×1.20 m. There is no rest room, but in the dressing room you can easily change clothes. The washing room can be combined with a steam room. This size will be enough for one person.
- 2.50 m×2.50 m. In terms of the number of rooms - the same as the first option. The size of the steam room is 2.50 m×1.50 m, the dressing room is 1 m×2.50 m. At the same time, it will be possible to organize additional space for storing firewood. In such conditions, two people can comfortably fit.
- 3 m×3 m. This option can be planned in different ways. If you want the steam room to accommodate three people, then it can be made 3 m x 1.50 m in size; the washing room can be made separate by placing a shower stall there. The size of this room will be 1 m × 1.50 m. There is also a dressing room of 2 m × 1.5 m. You can combine a washing room and a steam room, then there will be space that can be used as a relaxation room, which will also serve as a dressing room.
- 4 m×3 m. In this case, you can separate 4 m2 for the steam room (for example, 2 m × 2 m). The washing room will occupy 1 m × 1.50 m, leaving 2 m × 3 m for the rest room. In such conditions, four people can comfortably fit. They will be able to be in the steam room at the same time, and also enjoy communication in the waiting room.
- 4 m×4 m. In such an area you can already turn around well. The steam room can be left measuring 2 m × 2 m. A separate dressing room can be made measuring 2 m × 1.50 m. The rest room in this case is 4 m × 2 m (one side will be 2.50 m). The washing room can be combined with a rest room; for this, an electric boiler and a shower stall are installed. They can be placed in one of the corners of the room, which does not take up much space.
These are indicative examples. You can easily vary the size of the premises within accessible limits. You may want to reduce the steam room because... there is no need for 4 people to be there at the same time. At the same time, it will be possible to expand the space of the rest room.
Choosing material
Various materials can be used to build walls. Much will depend on the project you choose, as well as the amount of money planned. For example, you can use ordinary brick. You can read how to build a brick sauna here. The following points will be positive:
- availability;
- ease of delivery;
- relative ease of construction;
- long service life (with proper care - up to 150 years);
- ease of maintenance;
- possibility of combination with the main structure;
- when using new brick there is no need for cladding;
- freedom to choose the form of construction.
The negative aspects include:
- high cost of material;
- the need for good ventilation, because brick has poor vapor conductivity;
- lighting such a bathhouse takes more time than building made of wood;
- high costs for interior decoration.
Along with brick, foam block is often used. This is a more progressive material; it has properties characteristic only of it:
- light weight with large size;
- high laying speed;
- ease of adjustment of block shapes;
- good thermal insulation;
- relatively low price;
- excellent sound insulation;
- environmental friendliness;
- If you follow the recommendations, there will be little glue consumption.
There is also a fly in the ointment:
- uneven pores can be a problem when hanging furniture;
- Shrinkage may occur over several months;
- poor bending resistance.
The most favorite manufacturing method is a rounded log. A lot can be said about its advantages, here are just a few:
- high environmental friendliness;
- nice appearance;
- low heat capacity;
- no need for interior and exterior finishing;
- pleasant internal atmosphere.
The negative side is:
- unprofitable to use in small buildings;
- some complexity of construction;
- high cost of material;
- long shrinkage time.
One of the cheapest and fastest options is the construction of a frame structure. Minimal construction skills will be required for this method. The advantages are:
- no need for a massive foundation;
- availability of materials;
- relatively low cost compared to other options;
- ease of care;
- very fast heating of the steam room with good insulation;
- ease of laying communications;
- seismic resistance;
- no shrinkage.
One of the disadvantages is the need to organize good sound insulation. High level boominess – transmission of various vibrations, which can cause inconvenience. It is also important to ensure good ventilation so that moisture does not accumulate inside, which will lead to the development of fungus and mold.
Strip foundation
In the case where a really small bathhouse is planned, there is no point in sinking the foundation to the level of soil freezing. This will only increase the overall cost of the project. With proper manufacturing and waterproofing, you won’t have to worry about the walls being cold. This type of base will be relevant for any of listed options buildings
- The first thing that needs to be done is to clearly define the territory that will be allocated for construction.
- Next, debris is removed. In addition, you will need to remove the top layer of soil with grass to make it easier for you to carry out further tasks.
- Using pegs, the boundaries of the future building are marked.
- Special holders are made to make it easier to navigate with excavation. To do this, two pieces of board 50x50 cm (or whatever is at hand) are sharpened on one side and connected using a transverse crossbar from a board 10 cm wide, its length should be about 70 cm. You will need 8 such structures. They are installed two at each corner of the house. Between them two fishing lines are stretched to the width of the future foundation. Be sure to check that all angles correspond to 90°. This way you get clearly defined lines that will be difficult to move even if you hit them.
At the stage of laying the foundation, provision is made for the supply of necessary communications. This could be a water supply and sewer drain for washing water.
Pile foundation
There are several ways to build a foundation. Piles can be bored or driven. In the first case, a well is drilled, formwork is made, reinforcement rods are lowered and the entire space is filled with concrete. In the second option, ready-made concrete, wooden or metal posts with a pointed end are driven in immediately. The most suitable options for a small bath will be screw ones. They consist of a metal base in the form of a pipe and blades that help immerse the supports into the ground. You can purchase them or make them yourself. If you chose the second option, then you need to act like this:
- The first step is to find out to what depth the soil freezes. To do this, you can contact the appropriate service.
- Pipe blanks with a diameter of 110 mm are purchased. The thickness of its wall should be more than 3 mm. The total length should be such that it can be sunk below the freezing level by 50 cm and at the same time so that it is 30-40 cm above the ground surface. Additionally, you can buy blanks for screws. It is also necessary to make a square cap on the pile. It should be 25x25 cm in size and 5-6 mm thick.
In each of the described options, separate supporting elements for the stove, especially if you plan to use a heater. This is very important, because its weight can be large, which can lead to damage to the floor and joists.
Construction of brick walls
For a bathhouse, it is better to use red brick, which has undergone heat treatment and has a lower thermal capacity. To calculate the quantity required material, you need to calculate the area of each wall. To do this, the width is multiplied by the length. Then you need to divide this number by the area of one brick. The area of the masonry joints can be neglected, because you will still need to make a reserve in case of battle or marriage.
The wall can be erected using several methods:
- in two bricks with external insulation.
- with air gaps, they are about 6 cm;
- with a layer of insulation between two rows of bricks.
Work begins with the construction of corners. This is an important process because... It is they who will subsequently ensure the correctness of the entire structure. In order to maintain the vertical level of the future walls, two metal profiles of 5x5 cm and a length equal to the height of the future walls are dug into the corners. They are leveled and secured with jibs. A fishing line is stretched between them to the height of one row. After it is laid, the line is rearranged to the height of the next one. The thickness of the seam should be about 20-25 mm. It should be applied at a distance of no more than a meter so that it does not have time to dry. Additionally, the plane is checked using a bubble level. If the second and third types of masonry are chosen, then it is necessary to ensure a bandage between the two walls. This is achieved by laying two bricks transversely opposite each other at certain intervals. Also, each row should be offset by half a brick to ensure the overall interweaving of the entire plane.
A lintel must be installed over windows or doorways. Usually it is reinforced concrete. You can purchase it ready-made or pour it directly on site. It should extend beyond the openings by at least 25 cm. Supports are installed and mounted on them. wooden plank. Two rows of bricks are laid out on edge. Between them there are reinforcement rods, which should also extend 25 cm beyond the opening, and it is better to bend them to intertwine them with the existing masonry. Concrete is poured inside. After complete hardening (usually 10-12 days), the lower supports can be dismantled and the logs removed.
Walls made of foam blocks
The general installation principle will be the same as in the previous case. You should also start with the corners, which must be accurately and clearly set.
In the same way, guides are made from profiled pipes. But there are some nuances:
- In order to achieve the best adhesion, the base row is laid on cement mortar. It is better to make the ratio with sand 1:3. It is very important to maintain a horizontal plane so that all other rows also lie correctly.
- All other rows are fixed with special glue.
- The thickness of the adhesive layer should not exceed 5 mm. Only in this case will it be possible to achieve ideal thermal insulation.
- Every 3 rows a seam is placed metal grid, which serves to provide additional rigidity.
- Foam blocks are placed on the edge.
- Lintels over doors and windows are made in the same way as in the case of brickwork.
Log walls
This is exactly the option that comes to mind when it comes to a bathhouse. To make it, you will need to stock up on rounded or profiled logs. It is better to make external walls from this material. Because The structure is small, it is good if the partitions are framed.
After the construction of the walls is completed, primary caulking is performed. During which the hanging insulation is simply driven into the joints. Complete shrinkage of the building can last more than 1.5 years.
Frame walls
After the foundation is erected, an additional foundation is made for such a structure. It is carried out according to the example of the grillage discussed above. For the corner posts we will need exactly the same timber as for the base. In addition, you will need to stock up on edged boards with a length equal to the height of the future walls, a width equal to the width of the grillage and a thickness of 5-10 cm.
- At the base, it is imperative to check the diagonals so that they are the same. It is attached to the concrete foundation using anchor bolts. It is advisable to recess the head. For this purpose, a countersunk groove is made in advance. Waterproofing made of bicrost or roofing felt is laid under the grillage on a concrete foundation.
Erection of the roof
For small buildings The ideal solution would be a pitched roof. It is necessary to plan its production at the design stage. It is very important to be able to raise one wall higher than the other. When this is done, in the case of a wall made of brick and foam block, waterproofing made of bicrost or roofing material is laid on the upper end. Additional beams are mounted on it, which will serve as a Mauerlat. They are attached to the base using anchor bolts or walled-in studs. Beams are laid on top onto which the sheathing will be placed. They can be secured to the Mauerlat using metal corners.
In another option, the walls are made the same. Ceiling beams are laid on the Mauerlat. On one side, vertical boards are installed that will form a pediment, from which the rafters are lowered onto the other wall. At the point where they adjoin the Mauerlat, they are cut to the required angle. They are secured with metal corners. To make it easier to maintain the roof in one plane, the two outermost elements are installed first. A string is stretched between them, which will serve as a level.
The ceiling must be insulated. A vapor barrier is attached to the top of the ceiling crossbars. Thick foil can play this role. Insulation in the form of mineral wool is placed in the space between the beams. Additionally, it is covered with plastic film. WITH inside The filing is made using wooden lining or polished edged boards.
Finish line
An integral part of every sauna is the stove. You can make it yourself from sheet material or metal pipe large diameter. In another version, it is laid out of brick, but in this case it can take up a large space. For small spaces, it is better to use electric options that are purchased ready-made.
A shelf is installed inside the steam room. It is better not to use coniferous wood for it, because... When heated, it may release resin, causing burns. Good stuff for her there will be aspen, larch, linden or oak. If the space is small, a width of 40 cm will be sufficient; it is more convenient when there is a footrest. The fastening material must be flush so as not to burn the skin (it must also be made of stainless material). It is better if the entire structure is assembled on dowels.
For wiring, you must use a double braided cable. It is better if it is non-flammable (usually the marking has the prefix “ng”). Be sure to lay the conductor in the corrugation. There are no switches installed in the steam room itself. The lamps used are waterproof with an index of IP68.
Make sure there is good ventilation. To do this, you can install an adjustable supply valve, as well as anemostats with an outlet to the gable through the roof. This will be enough to ensure that all moisture is removed after taking a steam bath.
As you can see, there are no restrictions on what you can build a small bathhouse from. Choose the option that suits you best.
Small sauna with your own hands - how to build
This article tells you how to build a small sauna. Find out more about preferred materials, sizes and other options.
What and how to build a simple bathhouse in the country?
 Washing in a country bathhouse is a pleasure available to everyone. Its construction does not require large financial investments. In a minimal plan, such a structure is erected in a few days.
In this article we will look at the topic of how to build the simplest bathhouse in your country house quickly and inexpensively.
Let's start by studying ready-made options, and discuss the designs of walls, floors, stoves and sewers that are popular among craftsmen.
Design Features
The main conditions for the comfort of any bath are:
- Walls, floor and ceiling well protected from heat loss.
- Reliable insulation of structures from water and steam.
- Compact, quick heating oven.
- Effective sewerage and ventilation.
Examples of country baths
In photo No. 1 we see a simple bathhouse, reminiscent of Diogenes’ barrel. You can only take a steam bath in it. You won't be able to wash yourself here because there is no sewage system in the building. However, if desired, it is not difficult to do. To do this, you need to install a standard shower tray in the corner of the bathhouse and lead the drain pipe into the septic tank.

An important advantage of this design is its low weight, allowing it to be placed on a plank terrace.
The construction of the simplest bathhouse from the container category is shown in photo No. 2.

It consists of one steam room. For washing, the owner needs to attach a canopy with a summer shower or add a sewerage system to the room, and the stove - a tank for heating water.

Improvising on the theme of a barrel-shaped bath, let's turn our attention to cellular polycarbonate. You can quickly and easily assemble an original design from it. In order for it to retain heat well, you will need two large sheets of this material and a frame made of metal or wooden blocks. A mineral wool insulation 10 cm thick is laid between them.

The ends of the building can be made from boards, stuffed onto an insulated wooden frame. Place such a bathhouse anywhere: at your dacha, on a polar ice floe or on the top of Everest and you will always be comfortable in its steam room (photo No. 5).

A small Russian bathhouse, made from scraps of timber, can be installed on oak posts. We see an example of such a structure in photograph No. 6.

Larger structures require their own foundation. There are three possible options here:
- Rubble concrete tape.
- Brick columns.
- Piles made of asbestos cement pipes.
Do not forget that the type of foundation affects the choice of material and wall design. Pile and columnar foundations are used to install a wooden frame, as well as for bathhouses made of timber or logs (photos No. 7 and No. 8).


The “tape” of rubble concrete is suitable for any walls (made of gas silicate blocks, logs and frames).

A cheap, reliable and simple version of a bathhouse is obtained using a technology called “clay mortar”. For such a structure you will need little: a truck of firewood, a cart of straw and a dump truck of clay (photo No. 10).

The best shape for a wood burning structure is round. It eliminates the need to reinforce masonry corners and looks aesthetically pleasing and original.
By borrowing from birds the technology of building nests from branches and clay, you can build such a simple and warm bathhouse (photo No. 11).

Recommendations for choosing finishing, insulation, sewerage installation, flooring, roofing and stove
For the exterior finishing of a frame bath, we can recommend the following materials:
- Wooden blockhouse.
- Metal tiles or corrugated sheets.
- Plastic siding.
- Cement particle board (CSB).
- OSB board.
- Flat slate.

It is best to use ecowool as insulation. It does not accumulate moisture, does not rot and does not burn. If ecowool is not available in your region, then you can buy ordinary mineral insulation in the form of a semi-rigid slab. It is easily and simply placed in the spaces between the frame posts.
To protect mineral wool from water vapor and reduce heat loss, the walls are lined with sheets of foil polyethylene. After this, a frame of slats is attached to them and trimmed with wood: alder, linden or pine clapboard (photo No. 13).

We do not recommend installing OSB board indoors. This material releases toxic gases when exposed to high temperatures.
Options for steam and thermal insulation of walls of a frame structure, as well as a bathhouse built from blocks or logs, are presented in Figure No. 1.

Building a simple bathhouse with your own hands includes sewerage. It can be made from standard plastic pipes led into a cesspool or drainage well.
The water intake funnel is placed in the center or in the corner of the room, and the floor is made in the form of expanded clay concrete screed with a slope towards the drain. Before concreting, you need to compact the soil and cover it with several layers of waterproofing. Wooden flooring is an excellent option, but in a bathhouse it quickly rots and requires replacement. Instead, we recommend making gratings from wooden slats and laying them on a concrete screed. After washing, they can be removed, taken outside and dried.

The design of the bath ceiling is standard. First, a vapor barrier film is “attached” to the rafters and counter-battens (3x4 cm) are stuffed. A clapboard cladding is attached to them. The gaps between the rafters are filled with insulation and covered with under-roofing film. It protects it from weathering and atmospheric moisture (Fig. No. 2).

A counter-lattice is placed on the film, creating a ventilated gap between the roof and the insulation. The work on installing the ceiling and roof is completed by installing the main sheathing and laying the roofing material (slate or metal tiles).
The main “detail” of any country bathhouse is the stove. It should provide rapid heating of the air and maintain a high temperature. A metal stove heats up the fastest.
To accumulate heat and create steam, it must be equipped with a compartment for stones. There are many options for stoves for simple baths, so we will not dwell on them in detail. Let's just say that the easiest way to make a heat generator is from a large-diameter steel pipe, an old gas cylinder or barrel (photo No. 15). Another easy-to-use material is a steel sheet 3-5 mm thick (photo No. 16).

Knowing the simplest welding techniques, you can assemble such a structure without outside help.
A simple do-it-yourself bathhouse - options and construction features
Options for simple baths made of various materials, photos of examples and their descriptions. Recommendations for building a simple bathhouse at the dacha with your own hands.
A do-it-yourself frame bathhouse, the step-by-step construction instructions of which includes several stages, is built quite easily if you follow the technology for constructing frame buildings. The option of constructing a frame-panel bathhouse is considered the most suitable for most homeowners. The simplicity of construction has made this type of bathhouse one of the most popular among owners of suburban areas.
This is due to the fact that this design looks very good from the outside, requires little time and money, and is guaranteed to serve its owner for up to fifty years.

The main advantages of frame baths
Baths of this type have a number of advantages besides those already mentioned. This way you can build the structure yourself without using heavy construction equipment or outside help. The structure can be erected regardless of the time of year, with complete absence of shrinkage. The design of the structure allows for covered communications. When using a frame structure, it is possible to choose a practically unlimited number of options for finishing the building both inside and outside.
At the same time, a frame bath can, if necessary, be moved to another place, sometimes without dismantling its structure. This allows it to be moved to a new plot if the old one is sold.

In the process of building a frame-panel type bathhouse, it is necessary to take into account and properly think through its thermal insulation. The fact is that the walls of such a bathhouse retain heat worse than the walls of, for example, a wooden structure, so it definitely requires good thermal insulation.
The second point worth paying attention to is the vapor barrier. The whole question here is that the frame structure of the building favors the collection of steam condensate in it. It is possible to get rid of it only by using a vapor barrier film or glassine. This insulation is laid between layers mineral insulation and building cladding.
When selecting building materials for a frame bathhouse, you should pay serious attention to ensuring that the boards used during construction work are dry. It is desirable that they be aspen, linden or larch. These types of wood are practically not deformed and have reduced thermal conductivity.
 Frame mini bath
Main stages of work
If we consider the construction of a frame-panel bathhouse in stages, then it consists of the following operations:
- laying the foundation;
- wall assembly;
- roof construction;
- finishing of the building inside and out.

Separately, it is worth mentioning the preliminary work. These include drawing up a construction plan, its estimate, purchasing building materials, and laying out communications.
So, even before the construction of the foundation begins, it is worth marking and clearing the site for the bathhouse, performing the necessary excavation work, and purchasing all the necessary building materials.
Laying the foundation of the structure
In order to make a frame bathhouse, a foundation built according to a simplified scheme is sufficient. The fact is that a building of such a design weighs extremely little and can be built, for example, on asbestos-cement pipes filled with concrete mortar.
To build it you need:
- make wells with a depth of 1.5 meters and a diameter of 200 millimeters;
- cut the pipes in half and place them in the wells, then fill them with sand;
- fill the pipes with a concrete solution made from fine crushed stone, water, sand and cement.
 Foundation for a frame bath
The strapping from the boards is created at the next stage of construction work. Their size should be 50x100 mm, and they should be impregnated with an antiseptic. The strapping marks the walls, while the boards are mounted with the outer edge and nailed together. The strapping is fastened to the base using supports.
To make the entire structure highly durable, the strapping and logs are secured using metal fasteners embedded in concrete. Upon completion of its production, this building construction impregnated with an antibacterial substance.
Installation of bath walls
Having decided to build a frame bathhouse with your own hands, the builder should know that when installing the walls, the distance between the axes should be 0.6 millimeters. At the same time, such a wall should not provide for the arrangement of a window or doorway or a connection with other walls.
The gap for such walls is up to 0.4 millimeters. To provide overall structural strength in the area where the frame, walls and lintels join, an additional rack must be installed. Upon completion of frame installation, its geometry is checked.

Further work begins with drawing out the corner of the building. To do this, first a wall is built that directly communicates with the harness. After checking for verticality, it is temporarily secured using struts. The rest of the walls are installed in approximately the same way. When their construction is completed, the sheathing is installed.
Roofing construction and finishing
The assembly of rafters and other roofing elements is usually carried out on the ground. They are lifted directly onto the roof by hand and placed strictly above their stand. There are several types of roofing, but the most common for baths is ventilated.
It allows excess moisture to be removed from the room. During its construction, the sheathing is placed directly on the beams, and the hydro- and vapor barrier is laid under the counter beam. The finished roof is covered with ondulin, and the gables are covered with sheets of chipboard.

The final stage of the construction of the bath complex is its finishing inside and out. Exterior walls are now usually finished with siding or blockhouse. The cheapest option is boards, most often spruce or pine. Sometimes a frame bathhouse is plastered or covered with tiles. At the same time, do not forget about waterproofing and insulating voids in the building cladding.
The interior of a bath usually excludes the use of paints and varnish due to their high toxicity when heated. It is best to finish the ceiling and walls with the same OSB sheets. You can use clapboard or wood siding. To avoid rotting of the walls, the walls must be insulated with foil.
 Finishing the bathhouse with clapboard
Separately, it is worth mentioning the joints between the walls and ceiling. The fact is that the installed heat insulator must have a margin of 15 centimeters. You should check whether the floor boards are nailed face down to the joists.
We must not forget about fire safety: it is better to separate the steam room from other rooms with bricks.
Do-it-yourself frame bath: step-by-step construction instructions
A do-it-yourself frame bathhouse, the step-by-step construction instructions of which includes several stages, is built quite easily if you follow the technology for constructing frame buildings.
How to build a frame bathhouse with your own hands

In our country, a summer cottage or your own house without a bathhouse looks, to say the least, lonely. For centuries, bathhouses were built from logs and could not boast of a variety of layouts due to the peculiarities of the material. Today the situation has changed. Construction technologies and modern materials will make it possible to turn the most daring architectural ideas into reality. By following the advice in this article, you can learn how to build a frame bathhouse with your own hands step by step.
Frame technologies have been used to build houses for about 200 years. Construction using this technology is widespread in Scandinavian countries and North America. The simplicity and relatively low cost of construction have become the reason for the growing popularity of frame construction in Russia.
Preparing for construction
To start construction and accurately calculate the material, it is advisable to have a project. You can find it on the Internet or order it from a specialized company. Do-it-yourself frame bath projects (photo) are best ordered from professionals, however, you can draw it yourself, but you need to be as careful as possible. In addition, for the construction of a bathhouse you will need certain materials, namely:
- timber 100x100 mm;
- dry planed board 50x150 mm;
- insulation, vapor barrier;
- waterproofing;
- facade elements (siding, metal tiles);
- interior elements (lining, panels, etc.).

The next stage after purchasing the material will be preparation of the construction site and construction itself. Let's outline the main steps:
- foundation construction;
- raising and covering the main frame;
- roofing;
- interior finishing works.
It is very important to create the correct design for a frame bath, but it is better to use existing drawings. Below is a diagram of a do-it-yourself frame bathhouse, photo projects.

Construction of the foundation
The main frame of our bathhouse is a lightweight structure, so the requirements for the foundation will be minimal. You can use a foundation made of concrete blocks placed around the perimeter of the frame or a so-called columnar foundation.
The columnar foundation consists of asbestos-cement pipes filled with concrete. The depth of laying pipes is selected based on the type of soil. If the soil is dense - clayey, it is enough to dig the pipes 0.5 meters. For light soil types - sandy, the depth should be at least 1.5 meters. The optimal pipe diameter is 100 mm, standard length 4 m, take this into account when calculating the amount of material. When digging in pipes, a gasoline drill will be an excellent assistant; you can rent one, as it is quite expensive. The diameter of the well should be twice the diameter of the pipes. The pipes are cut, taking into account the laying depth; it is enough to leave 0.5 meters on the surface. After installing the pillars in the well, fill them in a circle with soil and compact them well. The pipes are filled with concrete. Composition of the solution (cement grade M400):
An important point: the distance between the columns is selected based on the thickness of the walls (optimally 27 cm). To strengthen the foundation, you can additionally fill the pipes using the tape method (along the perimeter of the frame).

Construction of walls of a frame bath
If you purchased dry material for the frame, then construction can begin immediately after the foundation hardens. Otherwise, let the wood dry for a while. Next, guided by the project plan, prepare frame racks and roof rafters. Mark the mounting locations for the racks and begin installing the main frame. The assembly of the bathhouse begins with treating the plinth timber with a fire-bioprotective compound. The treated timber is laid around the perimeter of the bathhouse and connected with nails and staples. Support beams are mounted on top, connected on top of the structure with 50x150mm boards. Constantly check the accuracy of installation of the supports with a level.
Important point: when assembling the main frame, use only NAILS of the appropriate size. The use of self-tapping screws is unacceptable! The difference in the fracture resistance of nails and self-tapping screws makes the use of the latter in frame assembly DANGEROUS! (SNiP 31-02).
Wall assembly procedure:
- two racks are mounted in the corners and several intermediate racks;
- the frame is sheathed with OSB board (the boards are leveled and fastened with self-tapping screws);
- Some more racks are mounted and covered with OSB.

Following this algorithm, the entire structure is assembled. Consider the location of door and window openings. It is advisable to select the distance between the internal frame posts according to the width of the insulation board. Calculate the locations of windows and doors in advance so that the racks do not have to be moved during construction.
Advice! When assembling the supporting frame, the racks can be reinforced with slopes; after covering the structure with OSB boards and installing the roof, the slopes are removed.
Roof construction
A do-it-yourself frame bathhouse requires mandatory work on the roof of the building. As written above, the rafters and roof base are mounted on the ground, after which they are installed according to the design diagram. The rafter material is a board with a section of 150x50 mm. Before the final assembly of the roof, it is necessary to lay a beam (mauerlat) around the perimeter of the frame; it serves as the lower support of the rafter system. Be sure to cut the OSB for the gables before final installation of the roof structure. During installation, assemble the rough flooring for ease of assembly.
Before the final covering of the roof, you need to lay the sheathing. The sheathing is laid from the ridge with 100x25 mm boards. After assembly, the sheathing can be laid on its own roof covering. A good roofing material is metal tiles or ondulin. In order to rafter system roofs have not become damp and collapsed over time, it is important to good ventilation. To do this, a vapor barrier is laid under the rafters, and the roof sheathing is placed on top of the rafters.

Next, you should close the gables, install windows and doors, and you can begin interior decoration. Do-it-yourself frame bathhouse step-by-step instructions will help you make a reliable construction, so construction should be carried out strictly according to the indicated stages.
Interior decoration
The first priority is to lay the floor. The classic procedure for laying a floor consists of the following points:
- 50x50 mm bars are nailed onto the strapping logs.
- The subfloor is laid on them.
- Waterproofing (roofing felt, roofing felt) is laid on the subfloor.
- Minslabs are laid on top, the thickness of the slabs is about 10 cm.
- A layer of vapor barrier is laid.
- Then the finishing floor is laid.
- An exhaust pipe is installed to ventilate the space under the floor.
It is worth noting that when installing the floor, errors are possible, which can then lead to the rework of part or the entire floor. Take floor assembly seriously. We will provide recommendations from experts that will help your floor last as long as possible:
- Don't neglect the vapor barrier.
- Do not replace the membrane vapor barrier coating with regular polyethylene.
- Carefully seal all waterproofing seams with sealant.
- The thermal insulation layer must be dense and of sufficient thickness.
- Don't forget about ventilation.

An important point: before laying the floor in the washing compartment, solve the problem with draining the water. We talked about organizing sewerage in a summer cottage in one of our previous articles. In the washing compartment, the floor should be slightly sloping towards the drain hole. The floor boards must fit tightly together.
After installing the floor, proceed to finishing the windows and doorways and installation interior partitions. After that, all that remains is to cover the walls and ceiling with clapboard; for a paired compartment it is better to use clapboard made of non-coniferous wood - alder, ash, linden. Pine is perfect for other rooms. A vapor barrier and insulation are installed under the sheathing. A few words about the façade cladding. Several types of materials are used:
- siding (plastic or metal);
- lining (plastic, wood);
- imitation timber;
- block house.
Each of them has its own pros and cons. The choice is yours.
How to build a frame bathhouse with your own hands - step-by-step instructions - projects - photos
Frame buildings are quite common due to the simplicity of construction technology. You can build a frame bathhouse with your own hands if you have
How to build a frame bathhouse with your own hands step by step?
Prefabricated and inexpensive frame baths are very popular. All more owners country houses decide to build it on their site themselves, since construction does not require large investments. Find out everything about building a frame bathhouse with your own hands, a video from the foundation to the roof from the article.
How to build a frame bathhouse with your own hands: step-by-step instructions with photos
The advantage of a steam room built by yourself is that the weight of the structure is light and the building does not require a powerful foundation. You can purchase for construction inexpensive materials. It is necessary to purchase asbestos pipes with a diameter of 100 mm and a length of 4 m. You need sand, crushed stone, and cement. The materials left over from the construction of a house, gazebo or garage are also quite suitable. We invite you to familiarize yourself with the advantages of building a frame bathhouse with your own hands, namely:
- The structure is prefabricated, low cost.
- It can have any shape, design and will harmoniously fit into the exterior of the site.
- Possibility of carrying out construction work all year round.

A frame bathhouse’s design is significantly different from a building made of brick, logs and foam blocks. To make the room more practical, you need to pay special attention to vapor barrier and thermal insulation. Craftsmen recommend using vapor barrier film and mineral wool for these purposes. In this way, a high degree of tightness will be achieved, and normal air exchange will not be disrupted. This point needs to be given due attention, since the disadvantage of frame buildings is the tendency to form a large amount of condensate.
Before starting construction, you must select the type of structure. Most inexpensive option- This is a frame bathhouse attached to the house. This saves money on the construction of walls, and the capital structure gives the structure greater rigidity. A separate building with an attic or gazebo is a wonderful opportunity to combine business with pleasure. However, the cost of such a bath will be higher.

Where is the best place to place a frame bathhouse on the site? In this matter, you can completely focus on your personal preferences. It is better to place the structure in a recreation area on suburban area. Many owners decide to build a sauna next to a pond or swimming pool. If you place the steam room next to the grill, then after the thermal procedures you can immediately start eating delicious food.
Boards made from these types of wood have low thermal conductivity, and they should only be placed vertically. Boards made from the above wood are able to maintain excellent appearance and shape for a long time; they do not deform under the influence of high temperatures.
How to build a frame bathhouse with your own hands: stages of construction
It takes a little time to build a bathhouse yourself, but this will not affect its service life in any way. According to reviews from many owners of such structures, they can easily last for several decades, strong enough to withstand gusts of wind and heavy snowfalls.
We suggest following the following sequence of work:

- Pouring the foundation. For this, previously purchased asbestos pipes are required. First, wells with a diameter of at least 200 mm and a depth of up to 1.5 meters are dug or drilled. Pipes are inserted into them, the vertical position is established using a level. The perimeter of the well is filled with sand, and the pipe itself is filled with concrete mortar. The sand around the pipe is carefully compacted.
- Flooring. Attaches to asbestos pipes wooden beam as shown in the photo. Subfloor boards, vapor barrier and insulation are laid on the fixed timber. The flooring is laid last. The entire tree must be treated with an antiseptic to protect against pests and rotting. Mineral wool is suitable as insulation.
- Construction of walls frame bath. The assembly of walls begins with the formation of a corner. Wood and logs are fastened together using nails. The last step is to install the inner lining, which is carefully polished. The external parts of the frame bath will be exposed to high temperatures and high humidity, so they must be treated twice with furniture varnish.
- Erection of the roof. On top harness beams with a diameter of 150x150 mm are laid, the distance between them is 50 cm. The rafters are assembled. The roof must be assembled taking into account certain features. For example, it must be well ventilated, sufficiently durable and well protected by the roofing material. The ceiling is insulated, and lining is used for cladding.
- Finishing work . Boards are attached to the logs with their front side, after installation vapor barrier material. All voids are filled with thermal insulation material. In the steam room, brick fences are built to protect the walls from the high temperature emanating from the boiler or furnace. The outside walls can be sheathed with any finishing material. For example, siding, which is quickly installed and inexpensive. You can use pine boards, which cover the entire structure along the outer perimeter.

Despite the fact that a frame bathhouse is assembled quickly and is simply arranged, this structure turns out to be quite attractive and practical. Maintenance of the structure is simple and inexpensive, and with proper use it will last for more than 50 years.
Do-it-yourself frame bathhouse: video from foundation to roof
Owners country house People increasingly prefer a frame bath; building one with your own hands is simple and inexpensive. Photos and videos from foundation to roof
Do-it-yourself frame bath: ready-made drawings, step-by-step instructions and finishing recommendations
Building a frame bathhouse with your own hands is quite simple. If it is also properly insulated and protected from moisture, it will be possible to get a steam room that will be practically in no way inferior to structures made of stones or rounded logs.
Advantages and disadvantages of a frame bath
Every construction material has its advantages and disadvantages that must be taken into account. IN Lately Frame baths have begun to become popular, so it makes sense to find out why they are better than structures made from other materials.
The advantages of such a bath:

However, it is important to know that a frame bath has significant disadvantages:
- Costs for insulation and finishing materials. The frame building itself is cheaper than a stone or timber steam room, but the cost increases several times during finishing and insulation work. Panels for decoration and plastering are required.
- Shrinkage. The process takes at least 2 years, and the building may sag by 10 cm. This may lead to deformation of the finishing layer. To reduce the effects of shrinkage, it is recommended to use chamber-drying materials during the construction process.
- Difficulty of choice quality material for insulation. If you use budget mineral wool, the bathhouse will not be able to fully cope with its functions. The use of budget polystyrene foam is also not allowed, since the material is easily flammable.
Preparation for construction: project drawings
Creating a drawing requires certain skills. If they are not there, then it is better to entrust this work to a specialist or use a ready-made drawing.
Before drawing up a diagram, it is important to decide on the following points:

You need to include all the information received in the drawing, as well as supplement the project with the necessary details. The more detailed the diagram, the easier it is to build a bathhouse.
 The more detailed the project, the easier it is to make a frame bathhouse yourself
A standard bath includes a corridor, a dressing room, a washing room and a steam room.
 A standard frame bath consists of a dressing room, steam room, shower and rest room
Quite often a separate room for recreation is provided. It is recommended to mark the installation location of the stove on the diagram. If this is a steam room, then it is best to place the stove in the corner closest to the door. The stove can be stone or brick.
It is recommended to determine in advance the dimensions of each room and indicate them in the drawing. The standard dimensions of the steam room are 200x240 cm. The optimal ceiling height is 220 cm. This design can accommodate 2–3 people at the same time.
In the drawing you can see a bathhouse for a suburban area with a balcony measuring 1.5x4 m. The overall dimensions of the building are 4x6 m. The project is suitable for organizing gatherings in an open area in the summer.
 A frame bath can be equipped with a terrace for gatherings in the warm season
This bathhouse consists of 3 rooms:
The corridor is shown separately in the diagram. There is no room for a locker room. There is a small changing area in the washing room. The terrace connects to the living room.
The optimal wall thickness of a frame structure is 100 mm or more. The wood that is used in the process of making a bath must be treated with an antiseptic. It is recommended to use dried, calibrated lumber.
It is mandatory to perform a vapor barrier of the insulating material on the internal base. In the steam room you need to use foil vapor barrier. The reflective layer can increase the temperature inside the steam room.
Walls and ceilings in the stove area should be made using non-flammable materials. For example, the frame is made of a rack-mount metal profile, which is coated with zinc. Cuttings can be made from asbestos cord. In these places, a basalt slab can be used as an insulating material.
Required device supply and exhaust ventilation in all rooms. Floors in the sink should be made with a slight slope or along a screed. The top and bottom floors need to be insulated in the same way as the walls.
The minimum size of a frame bath is 3x4 m.
 The minimum size of a bathhouse for a comfortable stay of several people is 3x4 m
The budget version of the frame is made in this way: the racks are sheathed on the inside and outside with boards up to 25 mm, basalt insulation or ecowool is laid inside the frame structure.
If you plan to use ecowool inside the walls, it should be carefully compacted and horizontal platforms for unloading should be installed. The frame must be sheathed inside and outside. To do this you will need to make a sheathing. On the outside, the insulation material is covered with a membrane to protect it from the wind. In the horizontal plane, the use of ecowool is a more economical option compared to basalt insulation.
The outside of the frame structure can be covered with any facing material. The inside of the building is covered with clapboard, plasterboard sheets with tiles or imitation timber.
The frame should be assembled from the following parts:
- bars;
- slats for creating sheathing;
- boards for the floor base.
Instead of plank flooring, the floor base can be covered with tiles. You need to choose based on personal preferences, however, in the case of a steam room, it is recommended to give preference to wood. There will also be materials for protection. Quite often, lining is used for wall cladding.
 It is recommended to cover a frame bath with wooden clapboard
To cover the structure from the outside, you can use larch lining. The inside of the building is clad with clapboard made of coniferous trees. Sheathing boards must be mounted vertically.
Excess moisture and elevated temperatures will negatively affect structural elements, so it will not be possible to do without the use of special protective materials. You can use glassine, polyethylene or roofing felt. A vapor barrier should be placed between the insulation and the sheathing. The disadvantage of roofing felt is that during the heating process it will emit bad smell. Therefore, it is not recommended to use it.
You need to pay attention to the selection of material for thermal insulation. If you choose wisely and install the insulation correctly, it will be possible to significantly reduce heat losses, as well as the cost of heating a bathhouse building.
Mineral wool is used as insulation in most cases.
 A good insulation material for a frame bath is mineral wool.
A good option is to use fiberglass. In some cases, the ceiling is insulated with expanded polystyrene, and the floor base with expanded clay.
Calculation of materials and list of tools
As an example, we will consider the calculation for a frame bath of the most common sizes. The frame is made of timber, the size of the structure is 5x4 m. The base will be reinforced columnar.
 For the frame structure, you can use a lightweight foundation made of asbestos-cement pipes
Coniferous wood lining is used to decorate the walls inside and outside. The roof will be gable, the covering will be metal tiles.
A pressing issue is the choice of wood. The material must be dried. Linden, larch or aspen are most suitable. These rocks have low thermal conductivity; they are capable of maintaining their original structure for a long period of time. The walls are erected from boards 2-3 cm thick. Larch or pine slats are suitable for external cladding.
In terms of cost and reliability, a columnar reinforced base is the best option for frame construction.
 Columnar reinforced foundation is suitable for the construction of frame baths in most regions
It can be used in most regions. You will need to prepare materials in the following quantities:
- concrete - 2 m 3;
- edged boards for the frame - 0.3 m 3;
- reinforcing bars - 80 linear meters
The frame can be made from boards, pieces of plywood sheets or OSB. If the soil on the construction site is clayey, then formwork is not necessary.
The most complex and financially expensive part of the bathhouse is the frame. The purchase of materials at this stage must be approached carefully. List of required materials:
- beam 120x120 mm - 5.3 m 3;
- mineral wool 10 cm thick - 36 m2;
- material for vapor barrier - 40 m2;
- wooden lining - 70 m2;
- material for waterproofing - 40 m2.
To save money, instead of bars you can purchase 50x100 mm boards.
 To save money, you can use 50x100 mm edged boards during the frame manufacturing process
The timber must be of the second grade and lower, the board can only be of the first grade. The cladding of the walls on the outside can be done not with wooden lining, but with plastic sheets or corrugated sheets.
The floor is made of edged veneer boards. The ceiling should be covered with clapboard. If you want to save money, you can use mineral wool for thermal insulation. List of materials:
- edged boards - 1.8 m 3;
- boards 150x50 mm - 0.2 m 3;
- plinth - 20 linear meters;
- mineral wool - 20 m2;
- wooden lining - 20 m2.
You can save money on attic flooring. If you do not plan to use it, then the mineral wool can be covered with unedged boards or pieces of slabs.
The roof is gable, the attic can be used to store tools.
 The best option for a frame structure is a gable roof.
There is no need to insulate the roof. The rafters will be hanging. You will need the following materials:
- drainage system - 1 set;
- slats for rafters - 0.2 m 3;
- lathing strips - 0.1 m 3;
- cornice slats - 0.1 m 3;
- metal tiles - 20 m2.
In a bathhouse, quite often, instead of a drain, a blind area around the perimeter is installed using a cement-sand mortar.
It is important to think through all architectural and construction tasks, which include:
- internal lining of the bathhouse building;
- selection of optimal materials for construction work;
- actions required to ensure safe use designs.
After preparing the tools and materials, you can proceed to construction work.
Step-by-step manufacturing instructions with photos
A building of this type is lightweight, so the base can be lightweight. The easiest way is to make a columnar foundation on asbestos cement pipes, which will later be filled with concrete mortar. Sequencing:

Next, the structure is tied. To do this, you need to prepare slats with a cross section of 100x50 mm. The materials will need to be pre-treated with an antiseptic mixture to protect them from rotting. The walls are marked, after which the slats are placed along the outer line.
 Before tying the boards, you need to treat them with an antiseptic.
The boards must be placed on the outer edge and nails must be driven in for fixation. The base trim can be connected using supports.
The upper and lower trims should be made of boards, while the bottom one should be cut off from the base to make it possible to lay roofing material. The horizontal position should be checked with a level. If deviations are found, it will be necessary to lay only several layers.
Intermediate racks are mounted taking into account that it is possible to install thermal insulation and cladding materials in the future. To increase the strength of the structure, the harness and joists should be secured using pre-fixed iron plates.
 To add strength to the structure, it is recommended to use metal plates
The binding must be treated with a mixture that prevents rotting.
How to make walls
In the process of building walls, the interaxial distance is essential. The indicator will be equal to 0.6 m, provided that preparation of the opening and joining with the remaining walls is not planned. Otherwise, the gap must be reduced to 0.4 m. The distance between the racks will depend on the dimensions of the doors and windows. For the frame you need to use 50x100 mm boards. Sequence of actions for constructing walls:

If you plan to make a frame bathhouse with an attic, you need to leave space for installing doors and windows.
For the frame structure, 100 mm strips are used, so the insulation must be of appropriate thickness.
 The thickness of the mineral wool should correspond to the thickness of the boards
During the installation process, the excess length and width can be compressed, as a result the resulting gaps will be tightly closed.
During the insulation process, each connection must be carefully inspected, otherwise the structure will be leaky. Such baths are unsuitable for use. Vapor and waterproofing is made from foil. The minimum thickness of the material is 40 microns. The foil joints are sealed with tape or foil film. The foil is laid in strips from bottom to top. To secure the foil to wooden parts, you need to use a manual stapler.
How to arrange a roof
For convenience, you can make a template that will allow you to easily assemble the rafter system.
 Installation gable roof must be carried out according to the scheme. A template can make the process easier
You will need to do the following:
- The roof must be assembled on the ground and then lifted up. Each structure is located above the corresponding rack.
- To make work easier, temporary ceilings made of thick planks can be laid on the slats.
- Each part has its own place above the rack, so it is important not to make mistakes when performing calculations.
- It is recommended to make the roof ventilated. To do this, you need to lay the sheathing and ondulin between the rafters and the counter-batten.
- The gables need to be covered with OSB boards.
- Doors and windows are being installed.
After this, you can sheath the structure on both sides. It is also important to take care of quality ventilation. For a small bathhouse, an asbestos-cement pipe with a diameter of 12 cm is suitable. The part must be taken to the attic.
The outside of the bathhouse is covered with siding, boards, plaster or ceramic tiles. Waterproofing material should be laid under the sheathing. The resulting gaps can be filled with thermal insulation material. You need to leave a small gap between the clapboard and the foil for ventilation. For this purpose, strips several cm thick should be nailed to the vertical supporting parts. The distance between the elements must be selected taking into account the distance between the supports.
 In the diagram you can see the design of the wall cladding
To give rigidity to the walls, they need to be covered with plaster shingles. After the cladding work is completed, the outside of the structure must be plastered.
Guidelines for internal cladding of frame buildings:
- The inside of the building should not be painted, as paints and varnishes will release harmful chemicals when heated.
- To make a rough ceiling, you should use OSB boards. They must be secured to the bottom of the floor beams.
- The walls in the steam room should be covered with foil. The remaining walls can be covered with glassine.
- The minimum ceiling height is 2.2 m. In this case, it will be possible to install lining and additionally insulate the ceiling.
- It is important to pay attention to the joints between the walls and ceiling structure. The vapor barrier material must protrude at least 15 cm.
The slats can be nailed using different methods - during the fitting process, a selection is made into a groove or a quarter. The slats must be attached to the joists with the front part.
There is no need to make holes between the foil and the corrugated sheet; the sheets are nailed to the foil. Fixation is done using self-tapping screws with rubber gaskets.
After this, the furnace and boiler are installed. It is important to remember fire safety rules. The wall that will be used for the soaring room and resting place must be made of brick. It is recommended to place the heating boiler in the dressing room. The best option is a brick stove, but if you have no experience in laying a similar structure, it is recommended to entrust this work to a qualified stove-maker.
When working with foil, you need to be careful, as the material is easily damaged. Any gaps will significantly reduce the effectiveness of thermal insulation. The vapor barrier should be fixed with a stapler, and it is important to ensure that there is no sagging of the material. The minimum distance between the wooden paneling and the insulating material is 1 cm.
 In a bathhouse, it is best to attach foil using an ordinary stapler.
Frame structures are convenient in terms of finishing. Work can be done both inside and outside. If there is a forced break, you can make partition frames at this time, upholstering them with blockhouse or clapboard. In this case, the time will be spent usefully.
For most regions, the optimal thickness of the walls of a frame building is 10 cm. Insulation can be done either with mineral wool or with expanded polystyrene. A layer of mineral wool 12 cm thick can replace a wall made of bars 50 cm thick.
 You can insulate a bathhouse from the inside using mineral wool
For northern regions with cold climates, there are 2 methods of insulating a bath:

If you plan to use expanded polystyrene, then after installing the sheets you need to make a thin screed using a mesh of reinforcement. Finally, a topcoat should be applied.
 It is not recommended to use sawdust and clay to insulate the ceiling
During the cooking process, they will be mixed in water with clay, and therefore the insulation will have a lot of weight. In addition, a large amount of liquid often causes wet ceiling parts made of wood. This has Negative influence on performance characteristics bathhouse building.
Frame walls are an excellent bait for rodents who love polystyrene foam. In 2–3 years, solid sheets can turn into dust. Therefore, it is not recommended to use polystyrene foam for insulating rooms inside a frame structure.
Particular attention should be paid to the quality of vapor and waterproofing. Such a bathhouse does not have free supports; each of them will carry the load and hold other parts of the building. If the strength is compromised due to prolonged exposure to moisture with one rack, the sauna may become unstable. In this case, complex repair work will be necessary. It is best to prevent such a situation at the stage of insulating the rooms.
To insulate the insulation, it is best to use aluminum film.
 It is best to insulate the insulation with aluminum film
However, the material is not cheap. If you want to save money, you can use plastic film. The material is cheaper, but in terms of steam and water protection parameters it is practically not inferior to foil. It should be remembered that polyethylene can be damaged when exposed to sunlight. For this reason, it is important to cover the frames. This will reliably protect the film from exposure to ultraviolet radiation.