The process of building a bathhouse: quickly and cheaply! Do-it-yourself bathhouse in the country: an inexpensive option (photo, video) How to build a small bathhouse.
Who hasn’t dreamed of building a real bathhouse on their summer cottage? But sometimes it is so small that a full-fledged bath structure simply cannot be squeezed in there. In this case, a mini-sauna can be an excellent way out of the situation. In terms of comfort and functionality, it practically does not differ from a standard-sized bathhouse, and the time, effort and money to build such a structure will take much less. In addition, it is quite possible to make a small bathhouse with your own hands. This will be discussed further.
Features of designing the interior space of a bathhouse
When creating any project, the first step is to select suitable material for the construction of a structure. And the bathhouse is no exception in this matter. Thus, when constructing a bath structure, builders mainly use materials such as foam blocks, bricks, timber or solid logs. Professionals recommend giving preference to natural materials – wood. But this is no longer a matter of taste, but of financial capabilities.
When designing a small bathhouse, you must adhere to the same technologies as when planning a bathhouse of standard sizes. But in our case, it is still important to take into account some points:
- For construction small bathhouse There is absolutely no need for a powerful, complex foundation, since we're talking about about small loads. Therefore, in order to facilitate the process earthworks and reduce the cost of funds, it is quite possible to get by with a strip/support-pile one.
- The location of functional areas should be approached very seriously, since in a small structure, all the flaws and imperfect layout will be immediately noticeable and will certainly cause inconvenience.
- It is best to place the stove in the dressing room so that it does not interfere with going from the washing room to the steam room and vice versa. The firebox must be protected as much as possible from spontaneous combustion.
- The principle of building rooms in a mini-bath should be absolutely the same as that of a standard one. So, the shelves must be installed along a blank wall, the door threshold should be raised as high as possible, and the frame should be made low. All this is done with the aim of trapping steam inside even when the door is opened.
- Under no circumstances should there be locks in bath rooms, and all doors should only open outwards.
Attention! To make it convenient to wash and comfortably steam in a bathhouse, the area of the structure must be calculated in such a way that its useful part is at least 10 square meters. m.
Basic drawing of a mini bath: compact and functional solution for the dacha
So let's consider simplest project bath design. Any bathhouse should have four main rooms: a dressing room, a washing room, a steam room and a relaxation room. It is necessary to clearly understand what the minimum dimensions each of them can have. So, for the dressing room and steam room you can choose the optimal dimensions - 1.5x2 m; the washing area can be 1x1 m; and the rest room is 2 times larger than the washing room.
Construction of the foundation
After determining all the basic parameters of the bath premises, you can proceed directly to construction work. When choosing the appropriate type of foundation, pay special attention to the type of soil of the area on which the bathhouse will be built. If the soil is hard enough and the groundwater is deep, then a lightweight foundation will be sufficient. We lay flat stones around the markings of the future building, cover them with a small layer of clay and lightly press them. We lay wooden beams on top. We complete the process by covering the beams with waterproofing bitumen.
If there is soft or wet soil on the site, use a strip foundation. Prepare a trench, fill it with a layer of sand, then crushed stone and compact it tightly. Then place the reinforcing mesh on top. All that remains is to prepare a cement solution with which the pit will need to be filled. Don’t forget about waterproofing: roofing felt sheets can be used for this purpose.
Frame construction
There are many options for constructing bath walls. We will use the simplest and fastest - frame. For its construction we will need the following materials:
- wooden blocks (5x5 cm);
- boards (minimum thickness – 2.5 cm);
- foil/film for waterproofing;
- thermal insulation.

Frame mini bath: the simplest and fastest construction option
According to a previously prepared project, a frame of beams is assembled. WITH inside covered with boards. You can use regular screws or anchors as fasteners. Don't forget about heat and waterproofing. The first thing we install is a material that does not allow heat from the bathhouse to pass out. For this purpose, you can use expanded clay, sawdust or mineral wool (rarely used). Suitable for creating a waterproofing layer bitumen mastic. The final stage of wall construction is the internal board covering (not mandatory, but a desirable element).
Advice. For finishing the washing area, it is best to use materials that can withstand frequent contact with water: galvanized steel, polystyrene, etc.
All that's left is to build the roof. First we prepare rafter system and mount it on the frame. Then we begin laying the roof: metal tiles, slate, etc. will do. Don't forget about the chimney - you need to leave a free opening on the roof for it.
To complete the appearance of the bathhouse, lining or a block house is used as a protective and at the same time decorative element. Lining is the most common option for finishing the external frame of a bathhouse. This material is cheap, practical and durable. In addition, it is a fairly successful imitation of a wooden beam. The block house is similar in appearance to the clapboard, but is more presentable appearance and quality of wood.

A mini bathhouse sheathed externally in wood will delight with its aesthetic appearance
We have finished decorating the bathhouse, all that remains is to carry out communications. Let's start with the water and sewerage system. The water supply system (we use the gravity principle) is installed as follows:
- We prepare two 50-liter water tanks, as well as a hose and mixers.
- We install the containers so that the tank with cold water was half a meter higher than the hot tank.
- We connect the tanks with a hose: connect one end to the bottom of the “cold” tank, and the other to the top of the “hot” tank.
- As an additional connecting element we use a pipe with a mixer.
To ensure complete drainage of water after a bath “session”, it is necessary to design an effective drainage system. This is quite easy to do. You just need to dig a drainage well not far from the bathhouse, and make drain holes in the washing room, to which you place pipes at a slight angle and direct them to the well.

Diagram of one of the options for connecting communications to a mini bath
A mini-oven or heating element is quite suitable for heating water in the washing room. To ensure sufficient air ventilation in the bathhouse, it is enough to make several wall holes near the entrance and close them with special barriers.
At this point, the process of constructing a mini-bath for a summer residence can be considered complete. Follow the instructions in the article and you will be able to build a comfortable and high-quality bathhouse for your family.
Video: Do-it-yourself mini sauna for your dacha
A vacation without a bath is not a vacation. Replace the bathhouse with suburban area neither a summer shower nor a bath can. Of course, if your budget is very limited, you should not attempt to build a two-story bathhouse complex with a swimming pool. But it is possible to build a small cozy bathhouse on a suburban plot with minimal investment.
In this article, we will look at how to build a budget sauna with your own hands, reveal the secrets of choosing and saving building materials, and tell you how to prevent lapses and mistakes for novice craftsmen.
The most popular materials for building baths are wood, bricks and blocks. A wooden bathhouse can be in the form of a log house or frame.
Wood

Wood is a classic material for building baths. Wood is valued for its environmental friendliness and ease of processing. Wooden baths quickly warm up, and the essential resins released into the air have a beneficial effect on the well-being of visitors.
However, wood is far from an ideal option for construction. In order for the walls of the bathhouse to be smooth, you need to choose high-quality timber or logs. Don't forget about shrinkage. The better the wood is dried, the lower the percentage of shrinkage and the risk that the log house will “lead.”

It is important to be able to work with an ax and saw, to have sufficient physical strength and endurance to cut out locks to connect corners, external and interior walls, floors. Of course, you can buy a ready-made log house with delivery to the site, but this involves additional costs and is not relevant for the construction of a budget bathhouse. It is best to carry out the construction with at least two people, because it is extremely difficult to lay the crowns alone, especially the top ones.

For the construction of a bathhouse, hardwood, such as linden, is best suited. This material is considered relatively light, therefore, if the geological conditions of the area allow, you can save on the foundation and limit yourself to a lightweight strip version (monolithic or prefabricated).
What else can you save on? For example, on insulation and finishing. If the bathhouse will be used for its intended purpose only in the warm season, there is no need to purchase insulation, beams for sheathing, steam and wind insulation, finishing decorative material for the facade of the bathhouse. Wood, if thoroughly sanded and coated with protective impregnation and varnish, is quite aesthetically pleasing and fits perfectly into landscape design private land plots.

In a budget bathhouse, you can save on organizing a full-fledged sewerage system and water supply. Since ancient times, in Russian baths, the floors were made to pour, and water was carried in buckets in advance. Yes, this causes some inconvenience, but it will not spoil the overall pleasant experience of the bath procedures.
What can't you save on? Wood is a highly flammable material. If you just neglect to close the ash door, a falling hot ember will lead to a fire and damage to property. A similar situation is possible if the rules are ignored fire safety when installing a stove and Therefore, in no case should you skimp on:
- fire-bioprotective impregnation;
- fire cutting;
- materials for insulating the floor in front of the firebox and
We strongly do not recommend saving on fasteners. Firstly, the difference will be insignificant, and secondly, low-quality metal hardware will quickly begin to rust, and unsightly black smudges will appear on the walls. The worst thing that rusted fasteners will lead to is the collapse of building elements due to the loss of their strength.
It is very important to properly organize ventilation in wooden baths. Even if the bathhouse area is only 4-6 square meters. Visitors are unlikely to like the aroma of mustiness and mold, and the owner will not be pleased with rotting floors and walls.

Now let’s talk more specifically about wood prices in order to roughly calculate construction costs.
| Lumber | Breed | Section or diameter, cm | Price in rubles per cubic meter |
|---|---|---|---|
| Profiled timber | Pine, spruce | 140x140 | From 11.5 to 14.5 thousand rubles. |
| Profiled timber | Larch | 140x140 | From 16.5 to 18.5 thousand rubles. |
| Round timber | Larch | From 180 to 460 | From 8.5 to 10 thousand rubles. |
| Carriage | Larch | 150x250 | From 15 thousand rubles. |
*The average cost of building materials is current for 2017.
Based on the cost of new lumber, budget sauna It definitely won't work. The way out of the situation is to buy used timber at a price of 1000 rubles per cubic meter or from 80 rubles per 1 piece. Used pallets can also be useful if used correctly.
Bricks and blocks
A bathhouse made of blocks or bricks will undoubtedly be more durable than a wooden one. And a fire that suddenly breaks out is not scary stone walls. At your own taste and discretion, you can build a bathhouse of any size and shape, as long as funds and personal time allow.

Brick manufacturers always have a wide range of products from the most different forms, shades, textures. For example, by combining bricks of two different shades when building walls, you can build a bathhouse that will be very neat and aesthetically pleasing in appearance.
On a note! IN brick bath the window can be replaced with glass blocks. They have sufficient light transmittance. But in this case, it is important to take care of effective ventilation.

A brick bath takes longer to warm up than a wooden one, and cools down much faster. Brick walls need finishing, and this adds expense items to the overall estimate. For laying bricks, a cement-sand mortar is used, which can be bought ready-made and simply diluted with water the right proportions, or prepare the mixture yourself and spend less money.
How much will it cost to build a bathhouse made of M100 ordinary brick?
| Building material | Description | Price |
|---|---|---|
| Width 120 mm, height 65 mm, length 250 mm. | From 6.20 rub. for 1 piece. | |
| Has the same dimensions as a regular one. Used for laying those walls that are subject to direct heating. For example, a base for a stove and a protective screen are laid out of fireclay bricks. | From 41 rub. for 1 piece. | |
| River sand for cooking masonry mixture or concrete mortar for pouring the foundation | From 68 rubles for 30 kg | |
| The purpose is the same as that of sand. Crushed stone fraction 5-20 mm. | From 86 rub. for 30 kg | |
| M400 | From 195 rub. for 50 kg |
As an example of calculating the cost of masonry, let’s take a single brick and laying it in one brick (the wall thickness will be 25 cm). Using the table data we get:
- taking into account mortar joints per 1 sq. m of masonry requires 102 bricks;
- 102 bricks x 6.20 rub. = 632.4 rub.
Brick prices
Typically, bricks are purchased with a margin of up to 15%, taking into account possible defects. And to the cost of laying 1 square meter of wall you need to add the cost of the mortar. Don’t forget that you may need a concrete mixer, joint compound, a set of mason’s tools, etc.

Foam blocks and gas blocks are materials that are increasingly used for the construction of baths. Their main advantage is the high speed of construction. The disadvantages are similar to bricks.
The blocks are laid with reinforced rows, fixation is carried out with special glue or cement-sand mortar.
To build a bathhouse, blocks measuring 200 x 300 x 600 mm are often used. One such block costs from 93 rubles. For internal partitions, blocks of smaller thickness are suitable - 100 or 120 mm and cost from 50 rubles per 1 piece.

Number of blocks in 1 sq. m the following:
- with a wall thickness of 20 cm, there will be 5.5 blocks in one square meter of wall (5.5 x 93 = 511 rubles);
- with a wall thickness of 30 cm, there will be 8.33 blocks in one square meter of wall (8.33 x 93 = 774.69 rubles).
We conclude: for the construction of a budget bathhouse, it is preferable to use not brick, but blocks 200 x 300 x 600 mm, construction should be carried out with a wall thickness of 20 cm. You need to take into account the cost of glue for the blocks (from 155 rubles for 30 kg, consumption is approximately 1.2- 1.4 kg per 1 sq. m of masonry) and do not forget that blocks are purchased with a reserve.

Important! In an effort to save money, you should not sacrifice the reliability and durability of the bathhouse. You can always buy, for example, a used brick for pennies, but there is no guarantee that in the next decade such a brick, and with it the walls of the bathhouse, will not begin to collapse.
A big plus of building a bathhouse from blocks is the high strength of the walls, which is achieved by reinforcing the rows. Provided the reinforcement is done correctly, the walls will not crack. Even when building a budget bathhouse, you should not neglect the safety margin of the walls, so as not to start major repairs of the bathhouse in the next few years.
Prices for foam blocks
foam block
Construction of a bathhouse made of aerated concrete with a brick base
We will consider the process of building a bathhouse with dimensions of 6x5 m. This area is enough to arrange three main rooms: a relaxation room or dressing room, a shower room, and a steam room. If the free space on the site does not allow the construction of a 6x5 m bathhouse, you can reduce the dimensions to 4x4 m, and inner space divided into a dressing room and a steam room, without a shower and other amenities.

So, let's begin. Inspect your land plot, prepare the site for construction. It is necessary to remove debris, uproot stumps, remove upper layer soil with grass growing on it, level and compact the area.
You need to prepare a bathhouse design in advance with the order of the masonry. Using the drawings it is easier to calculate the amount of building materials and carry out construction.
Mark the area, dig trenches, and pour a shallow strip foundation. Don't forget about the products. You can read more about pouring technology.
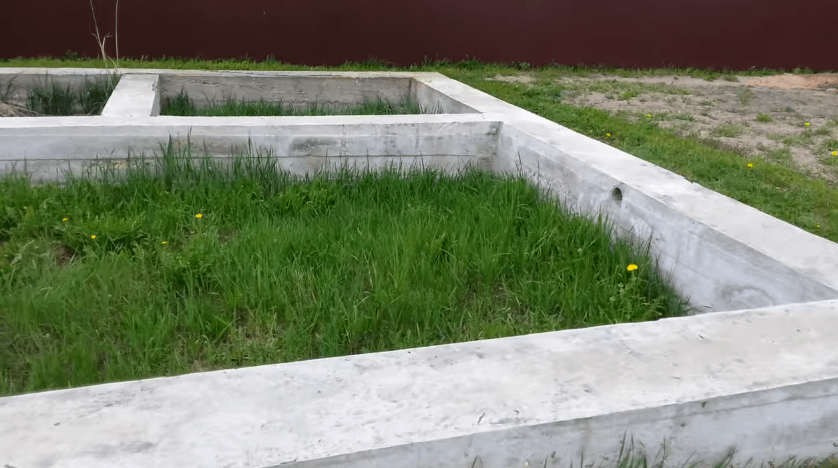
It is important to especially carefully level the upper surface of the foundation during the pouring process. If, however, the base has horizontal deviations, it is necessary to level everything with cement-sand mortar.
Step 1. We lay waterproofing material, for example, strips of roofing felt, on the foundation strip.


Prices for roofing material
roofing felt
Step 2. Mix cement-sand mortar for brick laying. To prepare the solution we use the following proportions:
- cement M400 – 1 bucket;
- sifted river sand - 2 buckets;
- dishwashing detergent or any similar - from 50 to 100 ml.
Important! We recommend that you first add water to the concrete mixer or solution container and detergent, then add cement and sand, stirring constantly. The consistency of the finished solution will resemble thick sour cream, and if you run your finger over the mixture, a clear, non-blurring trace will remain. Kneading should be carried out for 3 to 5 minutes.

We transfer the finished solution into buckets and transport it to the construction site.
Step 3. We begin laying the brick plinth. We will work from the corners of the bathhouse.
Apply the mortar to the brick with a trowel. We lay the brick on the corner of the foundation (along the outer edge). Place a bubble level on the brick and, if necessary, tap the brick with the handle of a trowel. We repeat the procedure at the next corner of the bathhouse foundation.

It is important that the bricks laid at the corners are at the same level. To check, we pull the mooring thread and additionally check the position of the bricks with a water level. Place the second brick at each corner perpendicular to the first.

We lay the plinth “in one and a half bricks”. At standard sizes bricks, the total width of the base will be 38 cm. This width is made up of one brick length (25 cm) and one brick width (12 cm), 1 cm is the connecting mortar seam.

Place the first outer row with a spoon facing outwards. We lay the bricks on the mortar previously applied with a trowel, pressing it into the mortar and moving it slightly back and forth. We leave a gap between adjacent bricks, into which we add mortar with a trowel. We immediately remove the excess solution with a trowel. We knock the bricks so that they are all in the same plane (the reference point is a stretched mooring thread). As a result, if you look at the base from the “street” side, you will see a row laid “in half a brick”.
We lay the inner row with a poke towards the future premises of the bathhouse. Next, we carry out the laying according to the order scheme, observing the bandaging of the seams.
We lay out 2 rows of bricks and move on to arranging the floor covering.

Step 4. To arrange the floor covering, you need to prepare the beams.

The beams must be fixed in the “sockets” of the plinth to a depth of 10 cm. We measure the width of the interior, add 20 cm, and get the length of the beams. The section of beams can be selected using the table.
*Section is indicated in millimeters. The beams are laid on edge. Maximum floor load 400 kg/m 3 .
We cut the roofing felt into rectangular pieces 15 cm wide. We wrap the ends of the beams with roofing felt and fix it with a construction stapler.
We lay the beams on their ends, maintaining an equal distance between them.
We continue with bricklaying.


We lay out two more rows, observing the dressing. We also lay brick between the beams, sawing it with a grinder if necessary.

The height of a single row brick is 65 mm. Accordingly, two rows of bricks plus two mortar joints will be 150 mm high, the top surface of the beams will be flush with the surface of the brickwork.

Laying the fourth row
Recommendation! If the brick is pre-moistened with water (without soaking it), it will not absorb moisture from the mortar. The masonry will be very strong. The recommendation is relevant for work in hot weather.
Step 5. The basement is built, we move on to laying walls from aerated concrete blocks.
We lay a layer of roofing felt on the brick over the entire surface of the external and internal walls of the bathhouse.

We begin work again from the corners of the bathhouse. Mix the solution and place a layer on top of the roofing material.
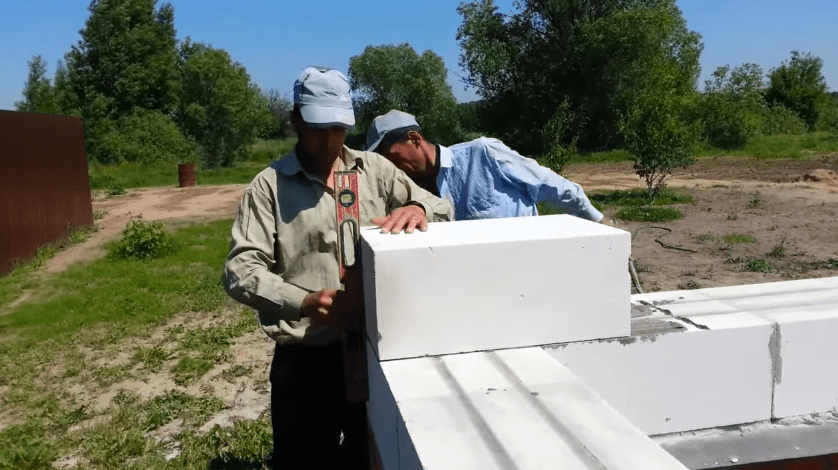
Level the solution with a notched trowel. Installing the first block.

Similarly, we install the second block on the adjacent corner of the plinth. The most difficult thing is to bring both blocks to zero. We carry out the check using a hydraulic level, a bubble level, if you have a laser level, it is better to use it.


There is no hurry here. If necessary, you can remove the block, remove excess solution, or add more solution. The horizontal deviation should not be more than two millimeters.


We lay out the first row of blocks on the solution. If the distance between adjacent blocks does not allow installing a whole block, you need to use a hacksaw with small teeth to make a cut. After cutting, sweep away the dust with a brush.

When laying out the blocks, do not forget about the doorway.

Step 6. Let's move on to reinforcing the first row of blocks.
We prepare a set of tools for work in advance.
| Tool | Approximate minimum cost, rub. |
|---|---|
| 450 |
| 490 |
| 500 |
| 600 |
| 365 |


*Used tools will cost less.
For reinforcement we use corrugated rods of class A3. The diameter of the rods is 8 mm. It is not advisable to take reinforcement of greater thickness.
Using a hand wall chaser, we cut two grooves for the reinforcement. For convenience, you can draw two parallel straight lines using a ruler on the surface of the blocks in advance with a pencil. At the corners of the bathhouse and at the junction of the internal partitions with the external walls, the grooves are round and parallel.

We clean the surface of the groove from dust using a damp brush.

We take the reinforcement and put it in grooves. We bend the reinforcement at the corners. Please ensure that the reinforcement bars are not connected at the corners. The rods can be connected at a distance of more than 30 cm from the corners.

We remove the reinforcement from the grooves and place it on the surface of the blocks.
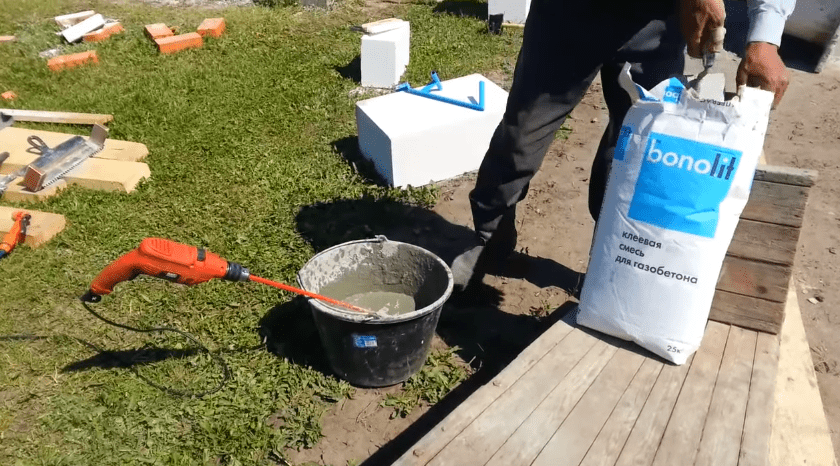
Mix the aerated concrete adhesive ( approximate cost for 25 kg – 220 rubles).

Pour water into the bucket, then add the dry mixture from the bag. Mix the glue with a drill with a mixer attachment at low speeds (up to 800 rpm). The consistency of the glue should be similar to thick sour cream. The glue should not spread.
Fill the grooves with glue. Spread the glue with a spatula. We embed the reinforcement in the glue. If necessary, add more glue on top of the laid reinforcement so that the surface of the gas blocks is smooth, without grooves or bumps.


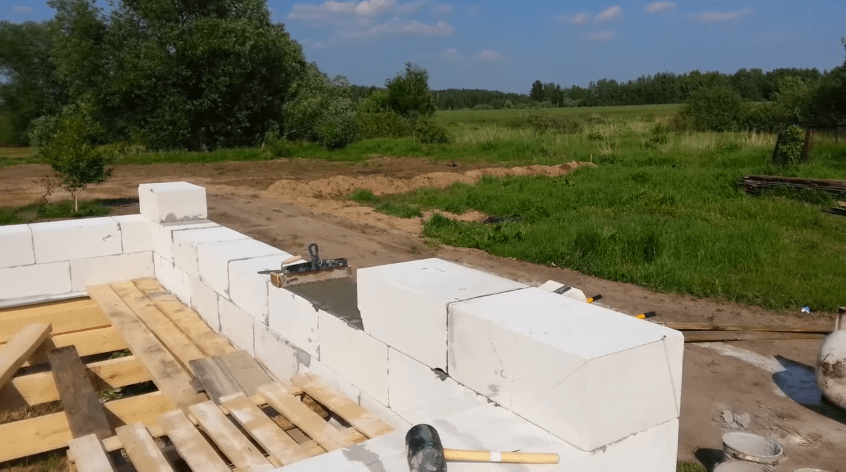
Step 7 We proceed to laying the second row of gas blocks. We start traditionally from the corner. Let's start applying glue under the block.
Important! Do not forget about the need to lay blocks with a bandage similar to half-brick brickwork. The displacement of the upper block relative to the lower one should be from 15 cm to ½ the length of the block.
It is most convenient to apply glue with a ladle (trowel). The working width of the trowel must correspond to the width of the block. This will allow you to apply the glue quickly and accurately. But sometimes builders use homemade devices, for example, as in the photo. The main thing is to evenly apply a thin layer of glue over the entire surface of the blocks.
On a note! The applied layer of glue can be continuous, but it is the use of notched spatulas or special ladles that can reduce glue consumption.

We continue laying the blocks of the second row. We check the correct installation of the blocks in two planes - vertical and horizontal. If necessary, grind the surfaces of the blocks.

To make tying the blocks easier, you can start laying with half a block. We cut the gas block with a hacksaw. Sweep away the dust with a brush. Apply a thick layer of glue (2-3 mm) to the ends of the block. Installing the block.
We continue laying the blocks of the second row. We check the correct installation of the blocks in two planes - vertical and horizontal.
Important! If the bathhouse is more than 6 meters high, it is recommended to reinforce every fourth row of masonry.
Prices for cement M600
cement M600
Step 8 We move on to laying lintels and their reinforcement.
There should be reinforced lintels above the window and door openings. The easiest way is to use U-blocks, but this comes with additional costs.
To save money, you can manually make recesses in ordinary gas blocks. To do this, we make two cuts along the width of the recess on the block with a hacksaw, then remove the excess material using a chisel and a hammer.
To lay the blocks, we make formwork from boards. On top part The formwork will rest on the blocks. Horizontal board We fix it with supports and fasten the elements with ordinary self-tapping screws.
The reinforced belt should protrude beyond the window and door opening by at least 15 cm. We install the blocks on the formwork. We fasten the ends of the blocks with glue.
Inside the blocks, closer to the outer edge, we lay pieces of EPS (Penoplex) 50 mm thick.
Let's start knitting the armored belt. For tying we use plastic clamps (ties). The reinforced belt consists of four long parallel rods, and every 0.5 m there are vertical sections of reinforcement. In cross-section, the armored belt should form a square.
Important! The armored belt cannot be laid directly on aerated concrete. Plastic clips must be used. Without clamps, the reinforced frame will not occupy correct position and will not be filled with concrete mixture on all sides.
We install the frame with clamps and fill it with concrete flush with the edges of the gas blocks. We compact the concrete mixture by piercing it with a rod or wooden slats. Level the surface as thoroughly as possible.
Now you need to take a technical break and wait until the solution sets. This will take from 10 days to two weeks.

Step 9 So, the concrete in the lintels has hardened, we continue construction. If the height of the walls is insufficient, we lay out another row of blocks. In our case, this row will be the final one on the first floor and at the same time will serve as an armored belt.
We make the armored belt on the floor using the same technology as the lintels, but with one difference. Now the armored belt will be poured along the entire perimeter of the external and internal walls. For the sake of economy, we do not use U-blocks, but cut and hollow out solid wall blocks.
- We lay the entire row of prepared blocks on the glue.


- We install polystyrene foam boards. We cut them carefully, using a ruler, so that the edges are even.
- We knit a reinforced frame.


- We install the clamps and lay the frame inside the blocks.

We pour concrete.
- Level the surface.
- We are waiting for the concrete to harden.

Step 10 The first floor cannot immediately end with a roof, of course. Let's move on to arranging the interfloor ceiling. It will be wooden. We place antiseptic beams with waterproofed ends on an armored belt. A similar technology was discussed above when the base was built.


But since now we are not laying brick, but gas block, we make cuts in each block under the ends of the beams.


It is important to accurately measure the distances between the beams and carefully select even rectangular niches in the blocks with a chisel and hammer. We lay the blocks in a standard manner, observing the dressing, applying glue to the previous row and the ends of the blocks.


Important! In our construction example, the bathhouse will have a small balcony. Therefore, several beams extend beyond the bathhouse wall.

Step 11 Laying the subfloor. We lay the edged board on top of the beams. We fix the boards to the beams with self-tapping screws right through the board. If the board is 50 mm thick, take hardware 8 cm long.
We leave a rectangular opening in the floor for access to the attic.

In the future, when the floors are ready, windows and doors are installed, decorative finishing will be done, foil vapor barrier will be stretched in the steam room, lining will be nailed or simple board from hardwood.
Step 12 Usually, a one-story bathhouse is enough for owners to spend their time comfortably. The space under the roof is often used to store fragrant bath brooms.
Sometimes in the bathhouse on the second floor they put a small sofa and a table, setting up a relaxation room. Our project provides just such a room on the second floor. After the bath procedures, it will be pleasant to relax, cool down, go out to the small balcony. A window on the second floor will increase the efficiency of ventilation and reduce the cost of building materials.
The roof has a complex configuration. On both sides there are two trapezoidal pediments, tightly laid with gas block. And if you look from the side of one of these gables, the perpendicularly located roof slopes on both sides are clearly visible.

Advice! If you are not confident in your abilities, limit yourself to building a simple pitched or gable roof.
The main stages of work during the construction of the second floor and roof:
- installation of vertical racks made of timber;
- installation of horizontal piping;

- laying floor beams on top of the frame;


- installation of extreme trusses along the gables;

Floor beams and rafters

- installation of intermediate trusses;

- masonry of gables from blocks;


- installation of vapor barrier on the room side;

- lining the ceiling and slopes from the inside with boards;

- laying mineral wool in two layers;

- installation of wind protection on top of the insulation;

- installation of counter-lattice under metal tiles;


- assembly of a gable canopy over the balcony, installation of a windproof membrane and counter-lattice on the canopy slopes;

- installation of metal tiles and additional elements.


You can watch the video to see how a roof of complex configuration is erected.
Prices for gas blocks
gas blocks
Video – Roof construction
Video - Construction of gables
Video - Rafters, armored belt
Video - Completion of installation of rafters, laying aerated concrete walls of the second floor
Video - Overlapping, vapor barrier
Video - Roof insulation
Video - Counter-lattice for metal tiles
Video - Washed down the ends of the counter-lattice, filing the ceiling
Video - Laying metal tiles
Shed roof for a budget bathhouse
Step 1. We attach the Mauerlat on top of the armored belt. It is a board fixed with dowels (wood grouse).
We drill holes in the boards and then in the blocks. We hammer in the dowels. We lay a layer of roofing felt as waterproofing. We lay the Mauerlat board and screw in the screws (capcaillie).


Step 2. Install vertical racks and horizontal strapping beam. The height of the front part is 130 cm, from the rear of the bathhouse – 30 cm. The roof slope will be 18 degrees.
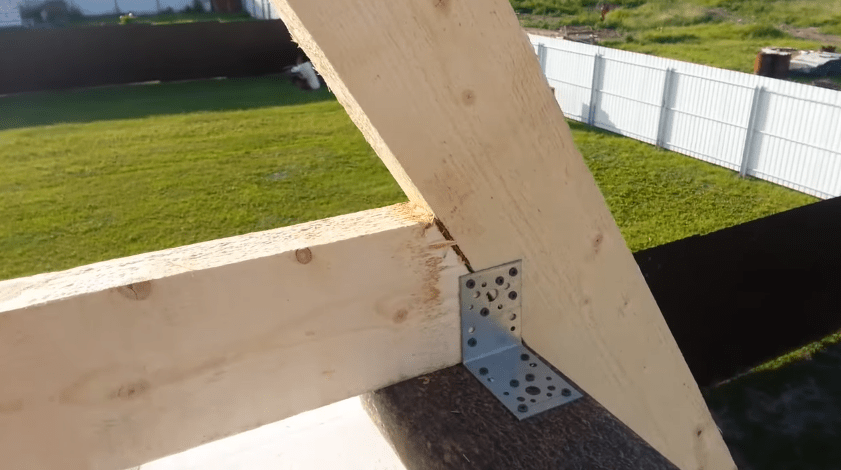
We fix the beams with metal perforated corners and wood screws.
On a note! To prevent the racks from becoming loose from gusts of wind, we temporarily fasten the boards connecting the front and rear frames with self-tapping screws.


Step 3. We lay the rafters (we place straight boards on edge and fasten them with perforated corners to the horizontal beams of the front and rear frames).

Step 4. We install counter-lattice boards perpendicular to the rafters.

Step 5. We fasten the corrugated sheets. We cut off the counter-battens sticking out at the edges of the boards.


Step 6. We strengthen the frame with jibs. On the sides we install posts made of timber and one additional jib to later attach the sheathing.


Step 7 We hem the rough ceiling.


Step 8 We cover the frame with plywood. We treat plywood sheets with protective impregnation.


Step 9 We foam the gaps between the blocks and plywood.

Step 10 If decorative finishing of the facade is not yet planned, we attach protective canopies made of tin.

As decorative finishing You can use plaster on the façade of the bathhouse. It is necessary to select a mixture for cellular concrete. Conventional cement-sand mixtures are not suitable for this purpose. Aerated concrete quickly absorbs all the moisture from the plaster, the decorative coating cracks and falls off.
To plaster the facade, you need to clean it with a grater from any remaining glue and sand off any unevenness, if any. After sanding, you need to apply the “Aerated Concrete-Contact” primer to the walls. The plaster solution is applied with a wide spatula over a fiberglass mesh secured with self-tapping screws. After the plaster has dried, you can paint the facade or simply apply a water repellent.
It’s hard to imagine without an indispensable attribute - a hot bathhouse, raising vitality with the aromas of birch broom and eucalyptus steam. Bath procedures cure many diseases, relieve stress and provide an opportunity to communicate mentally with loved ones. So, no matter how you look at it, you can’t do without her, my dear. The topic of our research is a do-it-yourself bathhouse. , photo, important nuances and the invaluable experience of practitioners - all this is in this material.
Read in the article
What is the basis for choosing the optimal location for building a bathhouse?
Perhaps it will be news to some that the bathhouse cannot be placed in any place. There are many official and practical principles which should be followed. Moreover, incorrect choice place can lead to dire consequences. Let's look at all the rules.
Location of the bathhouse in the summer cottage
There are three main requirements when planning the location of a bathhouse complex on a garden plot:
| Distance from site boundary | The distance from the bath complex to is at least three meters. The building should not obscure the territory of the neighboring plot. This gap will protect the buildings from a possible fire, because the bathhouse is a fire hazard. Another important aspect is drainage. A three-meter zone, even if your bathhouse has the most primitive drainage system, will not allow dirty water penetrate into adjacent areas. For reliability, you can lay it along the fence filled with gravel. And a couple more important points: the distance to the neighbors’ residential building should be at least eight meters (six if the bathhouse is brick). When deciding where to build a facility, keep in mind that smoke from sauna stove should not reach the windows of the neighbor's house. |
| Distance to the reservoir | On the one hand, the location of the building on the banks of a river or lake is very advantageous. And it’s easier to collect water, and the pleasure of diving into the cool waves after a steam room is guaranteed. On the other hand, you should strictly follow the rules that protect the reservoir from negative influences. To do this, the structure must be located no closer than 15 meters from the shore. This distance will also protect the structures from being washed away during floods. The coastline should be strengthened with your own hands using wooden or concrete frames. |
| Gap to residential building | The Russian one is located on the leeward side of the house at a distance of at least twelve meters. This will prevent smoke from entering the rooms. It is advisable that there are no other easily flammable structures near the building. Experts recommend maintaining a four-meter distance from the barn. |

There are situations when, with the purchase of a summer cottage, a bathhouse is inherited, as they say. In this case, of course, it is not always possible to move it to a new place in accordance with the listed rules. But, with the help of competent reconstruction, fire safety standards can be achieved.
How to attach a bathhouse to a house without damaging the main structure
The size of the plot does not always allow meeting all of the above requirements. There is only one way out - to attach a bath complex directly to the house. Let's consider the advantages and disadvantages of this solution:
- saving site area;
- In winter, it is more convenient to use a home bath, since there is no need to go outside;
- you can save significantly on, since one wall will be internal;
- you can use general and .
Advice! When purchasing material, make a small supply. It will come in handy if the part is damaged.
Step-by-step construction of a small bathhouse:

- A columnar or foundation type is suitable for a bathhouse. The base does not require reinforcement. A small wooden bath does not pose a serious load;

- Considering high humidity V bath room, it is necessary to protect the foundation of quality. It is best to use mastic and two layers of roofing felt;

- Before installation, the crown should be treated with a special compound or regular used machine oil. It is important to set the crown level and prevent bending;

- We make logs from 50x150 per edge. How to make floors we will discuss in detail below;

- There is no need to rack your brains about how to lay timber if you have profiled material at your disposal. Walls from it are assembled simply as the children's designer. For additional fastening, dowels made of wood or iron are used. How to build using dowels in the following video:

- doors in a timber bathhouse can simply be cut out after laying and shrinking the walls;

- Before the final shrinkage of the walls, a rough roof is installed. After a year, you can make a regular one on the rafters.
Advice! The most environmentally friendly steam room is made from beams. Drawings and dimensions of structures with different layouts can be found freely available on the Internet.
A short video on how to build a sauna from timber:
Related article:
This technology is used to speed up the construction of not too heavy buildings and other architectural structures. In the article you will find step-by-step instructions for constructing the structure and useful tips specialists.
Frame bathhouse - cheap and cheerful
It may surprise you, but for a frame bath you won’t need any drawings or any expensive projects. Everything is quite simple - we start from the dimensions of a standard sheet and assemble the bathhouse, like a construction set, quickly and inexpensively. The foundation you will need is the simplest, columnar or on stilts. Lightweight design frame technology does not shrink and assembles in a matter of days.
Pros and cons of such construction:
| Advantages | Flaws |
| Light weight of the finished structure | The need for exterior and interior decoration |
| Excellent, in no way inferior to brick and wooden models | Comparative fragility of the design |
| Construction speed exceeds all other construction technologies | |
| Low cost of materials and labor make this design the cheapest | High fire hazard |
| Ease of assembly allows you to build such structures yourself |
How to make a high-quality structure based on ? It is necessary to provide reliable vapor barrier. The humid climate of the bathhouse and exposure to precipitation adversely affect the wall material.

Insulation of the bathhouse is another aspect. It doesn't matter if you are building a 3x4 mini sauna or a full 6x6 sauna. From good insulation The comfortable temperature in all rooms depends.

You can use metal or wood for the frame. The first option has virtually no disadvantages. It does not dry out or become deformed. Saunas with a metal frame are easy to repair. The only disadvantages of metal structures are the need for detailed diagram and qualified. If the choice is made in favor of a wooden frame, make sure that the board and timber are made of larch or linden.
For internal lining use natural lining.

Internal organization frame baths are no different from other options. The only thing worth remembering is that you need high-quality insulation of the wiring and protection of the area around the furnace from accidental fire.
In general, reviews of frame structures are positive. You can find it online detailed photo reports home craftsmen about construction. You can find construction plans for baths measuring 2x4, 3x5, 4x6 and larger.
Photo and video story about how to build a frame bathhouse:
We build a bathhouse with our own hands: an overview of the construction stages
Building a bathhouse in a country house with your own hands begins with a project. You can use a ready-made project or order an individual design from one of the companies specializing in such developments. It is not difficult to prepare a construction plan yourself; a simple village bathhouse has a simple layout.

- Where to start construction? Of course, with the construction of the foundation. This is the first stage, which must be approached very responsibly. To build a durable structure, you will need to install a foundation that matches the soil characteristics. In the old days, wooden baths were placed on large stone boulders.

Guided by the experience of our ancestors, the bathhouse small sizes should be installed on a hill - on a pile or columnar foundation. Compact panel buildings made of OSB do not require a reinforced base. It's a different matter if construction is planned. In this case, you cannot do without a tape. It, unlike, will cost more and require more time to manufacture. How to properly install a strip reinforced foundation for a bathhouse - in the following video material:
- Next step - . In an ordinary Russian bathhouse, it is preferable to make floors from boards. They are less durable than concrete floors, but you can walk on such floors barefoot, they dry quickly from moisture and do not heat up to extreme temperatures in the steam room. But the logs should be made from asbestos-cement pipes; this little trick was suggested by professional builders. Concrete logs do not rot, they are strong and durable.
- The walls in the bathhouse complex can be made of logs, beams, and panels. They are , . You can assemble walls from sandwich panels. It all depends on your decision and financial capabilities. It is clear that building a brick sauna from scratch will be more expensive than, for example, a frame structure.
- It is easier to assemble the roof rafters for a bathhouse complex on the ground, and then lift it and install it on the walls.

- The last stage is the installation of equipment for the bath. The inside of the walls is usually sheathed with birch or linden clapboard; the outside of the frame structure can be sheathed or an imitation of a log frame can be made from slabs.

This is a brief description of the main stages of construction. It's time to show each of them in more detail. We offer step by step show construction of a bathhouse complex and video instructions on how to build a bathhouse.
Do-it-yourself columnar foundation for a bathhouse: step-by-step instructions and video
Basically, frame bath can be built without, for example, on a substrate made of car tires. But keep in mind that within a year or two the structure may become warped. And the lower trim will rot from exposure to flood waters.
The best option is a columnar foundation. It will withstand the lightweight structure perfectly. On it you can build not only a bathhouse, but also a home and others.


Advantages and disadvantages of a columnar foundation:
| pros | Minuses |
| It can be erected with your own hands, without the involvement of special workers. Installation of a frame structure on a foundation does not require special skills. | Not suitable for brick and block buildings |
| Suitable for almost any soil (including heaving) | |
| Compensates for differences in height on the site, does not require leveling | |
| Installs in one to two days | Does not provide for arrangement ground floor or basement |
| Doesn't need | |
| Has a long service life | |
| Does not require capital investments |
The installation depth of the bases differs in:
- buried, installed below the soil freezing mark;
- shallow - from 40 to 70 centimeters deep;
- into the drain hole lined with brick or concrete. The pit is located in close proximity to the bathhouse structure and is periodically cleaned using a special machine; The drainage system for the bathhouse is laid at the stage of forming the foundation
It is necessary to dig a trench in advance for sewer pipes and remove them to the drainage area from the steam room and washing room. The pipe should be laid with an inclination of five degrees. To prevent the drain from freezing, you can insulate it yourself using heat-insulating materials.
A step-by-step guide to arranging a drainage well in the following video and photographic material:
Another significant point is the installation of floors in the steam room and sink. The easiest option is leaking floors. Water simply penetrates through the cracks between the boards. Under them there is a sealed receiving plane with a hole for drainage.

Advice! In non-leaking floors, the drain must have a water seal, otherwise unpleasant odors will spoil the pleasure of bath procedures.
You can also make completely concrete floors and cover them.

But it should be taken into account that it is easy to slip on the tiles, and in the steam room the ceramics heat up quickly, so you cannot enter it barefoot.
It remains to resolve the issue of water supply. In a separate building, it is better to carry out the water supply underground, in a protected enclosure. If your region has severe winters, it is worth considering heating the water supply to prevent the occurrence of emergency situations. Photo reports that are not difficult to find on the Internet will tell you how to install such a system.

Article

Advice! For a lightweight structure, you can use not concrete pipes, but plastic or wooden poles treated with resin to protect them from rotting.
Detailed video material on how to build a foundation for a 4x4 sauna with your own hands
Bathhouse with shower in the country: how to supply and drain water
A well-thought-out drainage system is an important point in the design of a bath complex. Proper drainage in the bathhouse will not only protect the base of the building from mold and rot, but will also save you from problems with neighbors in the area.
Where can you drain the sewer:
What could be more pleasant than after completing work at your summer cottage, take a steam bath in your own bathhouse, wash off the dirt and relax your soul and body? Of course, a luxurious bathhouse with a swimming pool in the country is an unaffordable luxury for many, so it’s worth taking a closer look at the projects of small buildings and building the one you like with your own hands, investing a minimum of money and getting maximum benefit and pleasure.

A small bathhouse can be built using frame technology, laid out from foam/gas/cinder blocks, bricks, or a frame made of logs or timber. The most environmentally friendly material is wood, but bricks and blocks are more durable, reliable and fireproof.

Table. Comparative table of prices for materials for the construction of bath walls
| Material | Make/model/type/grade | Size/section, mm | Price in rubles |
|---|---|---|---|
| M150 | 250*120*65 | RUB 16.90 per piece (240 pieces on a pallet) | |
| First grade | 100*100*6000 | Price per 1 m3 from 5500 to 6700 rubles. | |
| First grade | 150*150*6000 | 5500-6900 rub. for 1 cubic meter. | |
| First grade | 40*100*6000 | 7500 rub. for 1 m3 | |
| 2.3 grade | 40*150*6000 | 5500 rub. for 1 m3 | |
| - | 9*1250*2500 | 548 | |
| - | 12*1250*2500 | 802 | |
| - | 60*250*50 | 40 rub. per piece (133 pieces in one cubic meter) |
Prices for foam blocks
foam block
Economy bath project
Having looked at the prices for materials, you will notice that it is more profitable to build a bathhouse from blocks or Canadian technology. Moreover, the latter will be more profitable if some of the materials are used or low-grade (for example, instead of an edged board, you can use an unedged one, adding color to a country bathhouse). More accurate data on material consumption can be obtained after drawing up a project and estimate.
Before starting construction, it is extremely important to think through the design of the bathhouse, calculate the amount of materials, note all dimensions and at the same time plan not only the location of the premises, but also the furniture in them.
 Installation of a shelf in a steam room
  Selecting a bath size
The main room in any, even the smallest bathhouse is the steam room. There must be two or three floors of shelves and a heater. Even country cottage area is small, and the bathhouse is planned to be very modest; the steam room cannot be made with an area of 3-4 square meters based on the simultaneous stay of two people (visitors should be comfortable steaming with brooms, sitting and lying on the shelves at full height). Such standards are determined by safety considerations (in a very cramped steam room it is easy to get burned on a hot stove or scald your skin with hot steam).

Also, if the entire stove is located entirely in the steam room and fuel is loaded from the same room, it is worth increasing the usable area of the room by another 1-2 meters to make it convenient to store and add firewood to the firebox. Directly in front of the stove, a pre-furnace sheet measuring 1x1 m must be laid, which is also noted on the plan diagram of the future bathhouse.
The bathhouse certainly provides for water procedures; accordingly, you should think about a small shower located in separate room or adjacent to the steam room. The second option, when the steam room and washing room are combined, allows you to save space and reduce the cost of installing sewer drains and interior partitions.

The last important room of the bathhouse is the dressing room or dressing room. There should be benches and hangers for visitors, a cabinet for bath accessories, and possibly small table. It is also possible and preferable to have the heater located in the steam room, and the loading door opens into the dressing room, which allows you to save on heating.

In an economy bath you can do without:
- plumbing system. But you will have to equip a stove with a tank and bring water in buckets manually;
- separate bathroom. These amenities can be taken outside or into a country house if the bathhouse in the country house will be used only in the warm season.
But you won’t be able to do without electricity and sewerage, so it is advisable to order or build a septic tank/cesspool/drainage pit, as well as extend a power line to the site where the bathhouse is being built, because steaming by candlelight is very inconvenient.

Be sure to indicate on the plan diagram:
- dimensions of the building and each room separately;
- ceiling height and overall height of the bath;
- furnace location;
- the sides into which the doors will open, including the firebox;
- location of windows (in the steam room the window is located at a height of 185 to 195 cm from the floor and not above the shelf);
- location of the socket and switch, shield and lamps (only products with a moisture protection level higher than IP54 are used).
Below are several projects of small one-story country baths.


Video - Designing a bathhouse
Video - Bathhouse project. Compilation
Construction of a small frame economy bathhouse at the dacha
Let's start with the base of the bathhouse - the foundation. Since the bathhouse will be small and relatively light, there will be no need to pour a monolithic slab or make a buried reinforced tape. For a one-story bathhouse, a columnar foundation made of blocks or asbestos pipes with concrete poured into them is sufficient.
Stage 1. Marking

This stage is required for any type of construction. We choose a place on the site where the bathhouse will be located.
We take 4 pegs and a plumb line. We drive the first stake into the soil strictly vertically, that is, we mark the first corner of the house. From this point we set aside the length of one of the walls and drive in a second stake. We tie both pegs with a cord.
We place the third and fourth stakes in the same way. We check the equality of the marking diagonals and, if necessary, adjust the stakes and cord.
We also use a cord to mark the places where the interior partitions will be located.
We arm ourselves with a shovel and remove the top layer of soil along with the grass inside the cast-off. We level the bottom of the resulting base horizontally and compact it.
Video - Marking the foundation
Stage 2. Foundation
Let's consider the option of arranging a columnar foundation made of concrete blocks measuring 20*20*40 cm. Their price ranges from 45 to 60 rubles per 1 piece. You can use ordinary bricks (13-16 rubles per piece), including used ones.

We take a drill or a shovel and start digging holes measuring 50x50 cm for blocks or 35x35 cm for bricks. The distance between the holes is no more than 2 m, the depth of each is approximately half a meter. The holes should be located in the corners of the house, under load-bearing walls and interior partitions.

We tamp the bottom of each hole, fill it with a layer of sand and crushed stone (each layer up to 10 cm) and repeat the compaction process again.
Fill the crushed stone with liquid cement laitance. We stick one steel rod strictly vertically into the center of each hole.
We lay out bricks or blocks around the rod, 2 pieces at a time. in every row.

The posts should rise 20-30 cm above the soil. We check the horizontalness of the entire base by pulling the rope and using a bubble level. If necessary, we compensate for unevenness with a layer of cement mortar.


We cover each column with a piece of roofing felt.
Stage 3. Economy bath frame
For the frame you can use timber 100*100 cm or 150*150 cm. load-bearing elements It's not worth saving. It is also advisable to impregnate the wood with a fire-retardant composition.
The lower harness consists of 4 beams.


Connecting corners using the “claw” or “half-tree” method.
 Connecting the beams of the lower trim
We cut threads on the reinforcing bars protruding from the corner posts (the pins on the intermediate posts can be cut off). We drill holes at the ends of the beams for these pins. We cut out the ends of the beams according to the diagram shown.
We assemble the lower harness by putting the bars on the pins. Tighten the nuts and locknuts from above.


Between the vertical beams we nail or fasten with self-tapping screws horizontal jumpers from a 50x50 mm bar. We strengthen the corner posts with jibs made of 50x100 mm boards.


All that remains is to make the top trim. To do this, we use a 50 mm thick board, which we screw to the ends of the vertical beams long screws on wood.


Prices for wooden beams
wooden beams
Stage 4. Gender
Let's look at an example of arranging a leak-proof floor in a bathhouse. In order not to waste time cutting lumber, we take fastening perforated corners, self-tapping screws and assemble the floor joists. We place boards 50x100 cm between the beams of the lower frame on the edge, maintaining a distance between the logs of 40-45 cm.

Assembling the floor covering from a board in the “on edge” position for greater rigidity

The floor joists can be covered with OSB-3 sheets (approximately 480-550 rubles per sheet 1250x2500 mm and 9 mm thick) or use the same wooden boards from which the joists are made. A hole must be provided in the subfloor for installing a drain from a washing room or steam room.

Be sure to stretch Izospan or other vapor barrier film under the wooden subfloor.
To insulate the floor, we again attach logs on top of the subfloor, between which we lay expanded clay, sawdust or red moss, cover the entire “pie” with waterproofing film and assemble the finished floor from boards or moisture-resistant plywood (from 260 rubles for a sheet of 4 grades measuring 1525x1525 mm and 4 mm thick). The use of polystyrene foam as insulation, including packaging, is possible only in the dressing room.

Prices for Izospan
Stage 5. Roof
Before making the roof, we assemble the top floor (ceiling). We use the same fasteners and boards that were used when installing the floor joists.
It is better to make a gable roof for a frame economy bath. It will make the bathhouse more attractive in appearance, and the space under the roof will be easily converted into sleeping area or a warehouse for brooms. On the other hand, a lean-to structure will require less materials.


Templates for cutting rafters, racks, floor joists
Table. Types of roofs, diagrams
| Roof type illustration | Advantages | Description |
|---|---|---|
| Flat or lean-to | Saving of materials, ease of assembly, ability to use the roof. | For baths up to 6 meters wide, it is permissible to organize flat roofs with a slope of 10-25 degrees and inclined rafters. The ceiling is made from coniferous bars from 100x100 to 150x200 mm. Laying step from 40 cm to 1 m. On top of the beams, a continuous, gap-free sheathing from edged boards or OSB is assembled, then a sheathing for insulation is installed - expanded clay with a layer of 10 cm, mineral wool or expanded polystyrene. Several layers of roofing material or other moisture-proof material are laid on top of the insulation. The roof itself can be made from corrugated sheets, antiseptic-treated boards, etc. |
| Gable. Suitable for baths with an area >12 sq.m. | Possibility of using the attic for household purposes or for overnight accommodation. The roof is stable and durable | The roof angle is selected from 30 to 45 degrees depending on the type of terrain. To install such a roof, the top trim and the Mauerlat must be made of timber. Roof trusses They are isosceles triangles with a jumper between the edges (crossbar). The rafters rest on the Mauerlat and can hang a maximum of half a meter. The rafters are cut according to a template and assembled into trusses using metal fasteners and long self-tapping screws. The outer trusses on the gables are attached first, followed by the remaining rafters at intervals of up to one and a half meters. A sheathing of slats or boards is placed on top of the rafters, a vapor barrier is stretched, and then secured roofing material, for example, profiled sheet. |


Video – Roof construction
Stage 6. Interior and exterior decoration
Table. Brief description of the stages of insulation, insulation and finishing of an economy bath
| Work order | Scheme | Description |
|---|---|---|
| Polystyrene foam will provide the walls of the bathhouse with additional rigidity and retain heat. For installation we use polyurethane foam and PSB-S-15. We cut out pieces of foam plastic according to the distance between the frame posts, insert foam plastic between them, and foam the cracks. It is recommended to cut out the foam 0.5-1 cm larger in size than the existing openings to avoid gaps. |
||
| We use 2x5 cm slats. We fasten them horizontally. Fixation is carried out using wood screws. We take the distance between the slats equal to the width of the insulation. | ||
| We lay mineral wool slabs between the lathing slats. We stretch a polypropylene cord over the mats and secure it with small nails or a stapler. | ||
| The outside of the bathhouse can be covered with OSB-3 sheets, which can then be plastered or painted. Finishing would also be an acceptable option. unedged board or siding. | ||
| From the outside of the bath under the layer finishing material We attach the windproof film overlapping (you can use glassine). From the inside, we stretch foil vapor barrier on the walls and ceiling with a thickness of 80 microns. We fix the overlaps of the strips with metallized tape. |
||
| Internal lining | The traditional material for interior decoration is lining. Economy option - aspen. It is better not to use pine lining in a steam room. In the dressing room, the walls can be covered with PVC panels or moisture-resistant plasterboard, and then painted. |
|
| External skin | Many interesting materials are used as external cladding, such as shingles or shingles. These are thin wooden planks that are fastened with nails to the walls, and the rows are fixed with a slight overlap (top to bottom). An environmentally friendly and economical solution. |
Stage 7. Ventilation
An economy bathhouse is probably a compact room, but this does not exclude the need for ventilation.

The hole for air flow is traditionally installed near the heater, closer to the floor, and installation work ventilation valve are produced simultaneously with insulation and wall finishing. Air flow from supply ventilation duct should fall on a heating element ovens. It is especially important to arrange effective ventilation if the firebox door does not open into the dressing room, but into the steam room.
The exhaust vent should be located closer to the ceiling. The hood must be equipped with a damper. The air is exhausted through a ventilation pipe to the roof; the head of the pipe is covered with an insect net.

Natural ventilation can be achieved by small window, located at a height of 185 cm above floor level. Ventilation will occur with the windows and doors of the premises open.

Video - Ventilation in the bathhouse
Prices for bath fans
bath fan
Stage 8. Equipping the bathhouse
Having assembled a bathhouse with your own hands, make a metal stove with a heat exchanger and an external water tank. The main thing is to lay asbestos cardboard on the floor and wall behind the stove during installation, and cover it with a steel sheet to prevent spontaneous combustion of wooden surfaces.
It is not necessary to calculate the load on the floor and rafters for a separate metal stove; a floor structure made of 150x50 mm joists in increments of 45-50 cm and a 5 cm thick floorboard will perfectly withstand a heater.
Electrical wiring in the bathhouse is laid either before the finishing of the walls (hidden type) or after (external). Lamps and sockets are purchased and installed that are strictly moisture-proof, class higher than IP 54. Installation of a separate electrical panel and protection of all cables from moisture is required.


Prices for asbestos cardboard
asbestos cardboard
Other interesting projects of economy baths
A very unusual, but no less comfortable barrel sauna is a cylindrical wooden structure on two supports, internally divided into 2-3 compartments, the farthest of which is a steam room. The sauna is mobile, takes up little space, is economical and economical (very little fuel is needed to warm up a small steam room).


Turnkey barrel baths cost from 35 to 220 thousand rubles. In practice, to assemble such a bathhouse yourself, it takes half as much money and not a lot of effort and time.

Assembly and disassembly of the bathhouse is possible due to the boards used 45x90 or 50x90 mm with a tongue-and-groove connection. The length of the barrel, depending on the boards used, is 2.5-5 meters. The structure is secured with metal hoops. Additionally, the bathhouse can be equipped with a porch, roof, and canopy.
The water in the barrel bath is drained through holes in the floor. If you plan to install such a bathhouse at your dacha, you should remove the layer of soil, fill it with crushed stone, compact it, and install the bathhouse itself on a pair of stable, massive concrete blocks. The rules for installing the stove and laying electrical wiring are standard for any type wooden baths, including economy class.
A small do-it-yourself sauna is a great option when the area near the house or in the yard of the dacha is limited. In addition, with this solution you can significantly save your budget, but as a result you will get a full-fledged place of rest, which will not only relieve stress after have a hard day, but improve your health and enjoy time with family and friends.
Examples of projects
IN ideal The bathhouse includes 4 rooms in its design:
- dressing room;
- restroom;
- washing;

You can expand the functionality of some rooms by combining them with each other. At the same time, the comfort of your stay is not lost. The overall size of the building will largely depend on how many people will be inside at the same time.
- 1.20 m×2.50 m. Very compact solution. In this case, the bathhouse consists of only two rooms: a steam room and a dressing room. The dimensions of the first are 1.20 m×1.50 m, the second - 1 m×1.20 m. There is no rest room, but in the dressing room you can easily change clothes. The washing room can be combined with a steam room. This size will be enough for one person.
- 2.50 m×2.50 m. In terms of the number of rooms - the same as the first option. The size of the steam room is 2.50 m×1.50 m, the dressing room is 1 m×2.50 m. At the same time, it will be possible to organize additional space for storing firewood. In such conditions, two people can comfortably fit.
- 3 m×3 m. This option can be planned in different ways. If you want the steam room to accommodate three people, then it can be made 3 mx1.50 m in size, the washing room can be made separate by placing a shower stall there. The size of this room will be 1 m × 1.50 m. There is also a dressing room of 2 m × 1.5 m. You can combine a washing room and a steam room, then there will be space that can be used as a relaxation room, which will also serve as a dressing room.
- 4 m × 3 m. In this case, 4 m 2 can be separated for the steam room (for example, 2 m × 2 m). The washing room will occupy 1 m × 1.50 m, leaving 2 m × 3 m for the rest room. In such conditions, four people can comfortably fit. They will be able to be in the steam room at the same time, and also enjoy communication in the waiting room.
- 4 m×4 m. In such an area you can already turn around well. The steam room can be left measuring 2 m × 2 m. A separate dressing room can be made measuring 2 m × 1.50 m. The rest room in this case is 4 m × 2 m (one side will be 2.50 m). The washing room can be combined with a rest room; for this, an electric boiler and a shower stall are installed. They can be placed in one of the corners of the room, which does not take up much space.


These are indicative examples. You can easily vary the size of the premises within accessible limits. You may want to reduce the steam room because... there is no need for 4 people to be there at the same time. At the same time, it will be possible to expand the space of the rest room.
Note! All measurements are given in ideal values without taking into account the thickness of the partitions. This was done for greater clarity. If the bathhouse is adjacent to the house, it can be made in the form of one steam room. In this case, the bathroom will act as a washing room, and the rest of the area is available for relaxation.
Choosing material

You can use it to build walls various material. Much will depend on the project you choose, as well as the amount of money planned. For example, you can use ordinary brick. You can read how to build a brick bathhouse. The following points will be positive:
- availability;
- ease of delivery;
- relative ease of construction;
- long service life (with proper care - up to 150 years);
- ease of maintenance;
- possibility of combination with the main structure;
- when using new brick there is no need for cladding;
- freedom to choose the form of construction.
TO negative aspects can be attributed:
- high cost of material;
- the need for good ventilation, because brick has poor vapor conductivity;
- lighting such a bathhouse takes more time than building made of wood;
- high costs for interior decoration.

Along with brick, foam block is often used. This is a more progressive material; it has properties characteristic only of it:
- light weight with large size;
- high laying speed;
- ease of adjustment of block shapes;
- good thermal insulation;
- relatively low price;
- excellent sound insulation;
- environmental friendliness;
- If you follow the recommendations, there will be little glue consumption.
There is also a fly in the ointment:
- uneven pores can be a problem when hanging furniture;
- Shrinkage may occur over several months;
- poor bending resistance.

The most favorite manufacturing method is a rounded log. A lot can be said about its advantages, here are just a few:
- high environmental friendliness;
- pleasant appearance;
- low heat capacity;
- no need for interior and exterior finishing;
- pleasant internal atmosphere.
The negative side is:
- unprofitable to use in small buildings;
- some complexity of construction;
- high cost of material;
- long shrinkage time.

One of the cheapest and fastest options is the construction of a frame structure. Minimal construction skills will be required for this method. The advantages are:
- no need for a massive foundation;
- availability of materials;
- relatively low cost compared to other options;
- ease of care;
- very fast heating of the steam room with good insulation;
- ease of laying communications;
- seismic resistance;
- no shrinkage.
One of the disadvantages is the need to organize good sound insulation. High level boominess – transmission of various vibrations, which can cause inconvenience. It is also important to ensure good ventilation so that moisture does not accumulate inside, which will lead to the development of fungus and mold.
Strip foundation

In the case where a really small bathhouse is planned, there is no point in sinking the foundation to the level of soil freezing. This will only increase the overall cost of the project. With proper manufacturing and waterproofing, you won’t have to worry about the walls being cold. This type of base will be relevant for any of listed options buildings

At the stage of laying the foundation, provision is made for the supply of necessary communications. This could be a water supply and sewer drain for washing water.

Note! If the soil in your area is known to be highly mobile, then a shallow foundation would be a bad option, as it can easily collapse under the pressure of the layers. In this case, it is better to evaluate the possibility of installing piles.
Pile foundation

There are several ways to build a foundation. Piles can be bored or driven. In the first case, a well is drilled, formwork is made, reinforcement rods are lowered and the entire space is filled with concrete. In the second option, ready-made concrete, wooden or metal posts with a pointed end are driven in immediately. The most suitable options for a small bath will be screw ones. They consist of a metal base in the form of a pipe and blades that help immerse the supports into the ground. You can purchase them or make them yourself. If you chose the second option, then you need to act like this:


In each of the described options, separate supporting elements for the stove should also be provided, especially if you plan to use a heater. This is very important, because its weight can be large, which can lead to damage to the floor and joists.
Note! Such a foundation will ideal solution for frame structures, log buildings, as well as small foam block baths. If the soil in the area where construction is planned is quite strong and rocky, then you can use something between pile and strip foundation– columnar. In this case, separate holes with a size of 50x50 cm are dug every meter to a level below freezing of the soil. Formwork and metal lathing are installed inside and mortar is poured.

Construction of brick walls
For a bathhouse, it is better to use red brick, which has undergone heat treatment and has a lower thermal capacity. To calculate the quantity required material, you need to calculate the area of each wall. To do this, the width is multiplied by the length. Then you need to divide this number by the area of one brick. The area of the masonry joints can be neglected, because you will still need to make a reserve in case of battle or marriage.

The wall can be erected using several methods:
- in two bricks with external insulation.
- with air gaps, they are about 6 cm;
- with a layer of insulation between two rows of bricks.
Work begins with the construction of corners. This is an important process because... It is they who will subsequently ensure the correctness of the entire structure. To maintain the vertical level of future walls, two are dug into the corners. metal profiles 5x5 cm and a length equal to the height of the future walls. They are leveled and secured with jibs. A fishing line is stretched between them to the height of one row. After it is laid, the line is rearranged to the height of the next one. The thickness of the seam should be about 20-25 mm. It should be applied at a distance of no more than a meter so that it does not have time to dry. Additionally, the plane is checked using a bubble level. If the second and third types of masonry are chosen, then it is necessary to ensure a bandage between the two walls. This is achieved by laying two bricks transversely opposite each other at certain intervals. Also, each row should be offset by half a brick to ensure the overall interweaving of the entire plane.

Above the windows or doorways a jumper must be installed. Usually it is reinforced concrete. You can purchase it ready-made or pour it directly on site. It should extend beyond the openings by at least 25 cm. Supports are installed and a wooden board is mounted on them. Two rows of bricks are laid out on edge. Between them there are reinforcement rods, which should also extend 25 cm beyond the opening, and it is better to bend them to intertwine them with the existing masonry. Concrete is poured inside. After complete hardening (usually 10-12 days), the lower supports can be dismantled and the logs removed.

Walls made of foam blocks
The general installation principle will be the same as in the previous case. You should also start with the corners, which must be accurately and clearly set.

In the same way, guides are made from profiled pipes. But there are some nuances:
- In order to achieve the best adhesion, the base row is laid on cement mortar. It is better to make the ratio with sand 1:3. It is very important to maintain a horizontal plane so that all other rows also lie correctly.
- All other rows are fixed with special glue.
- The thickness of the adhesive layer should not exceed 5 mm. Only in this case will it be possible to achieve ideal thermal insulation.
- Every 3 rows, a metal mesh is placed in the seam, which serves to provide additional rigidity.
- Foam blocks are placed on the edge.
- Lintels over doors and windows are made in the same way as in the case of brickwork.
Log walls

This is exactly the option that pops up in the imagination when it comes to a bathhouse. To make it, you will need to stock up on rounded or profiled logs. It is better to make external walls from this material. Because The structure is small, it is good if the partitions are framed.


After the construction of the walls is completed, primary caulking is performed. During which the hanging insulation is simply driven into the joints. Complete shrinkage of the building can last more than 1.5 years.
Frame walls
After the foundation is erected, an additional foundation is made for such a structure. It is carried out following the example of the grillage discussed above. For the corner posts we will need exactly the same timber as for the base. In addition, you will need to stock up on edged boards with a length equal to the height of the future walls, a width equal to the width of the grillage and a thickness of 5-10 cm.


Erection of the roof
For small buildings the ideal solution would be pitched roof. It is necessary to plan its production at the design stage. It is very important to be able to raise one wall higher than the other. When this is done, in the case of a wall made of brick and foam block, waterproofing made of bicrost or roofing material is laid on the upper end. Additional beams are mounted on it, which will serve as a Mauerlat. They are attached to the base using anchor bolts or walled-in studs. Beams are laid on top onto which the sheathing will be placed. They can be secured to the Mauerlat using metal corners.

In another option, the walls are made the same. Ceiling beams are laid on the Mauerlat. On one side are installed vertical boards, which will form the pediment, from them the rafter legs are lowered onto the other wall. At the junction with the Mauerlat they are cut to the required angle. They are secured using metal corners. To make it easier to maintain the roof in one plane, the two outermost elements are first installed. A string is stretched between them, which will serve as a level.

The ceiling must be insulated. A vapor barrier is attached to the top of the ceiling crossbars. Thick foil can play this role. Insulation in the form of mineral wool is placed in the space between the beams. Additionally, it is covered with plastic film. The inside is hemmed using wooden lining or polished edged boards. Read more about insulating the ceiling in a bathhouse.

Note! For a house made of timber, when attaching the rafter legs to the mauerlat, it is better to use floating corners. This is necessary to prevent the roof from skewing during shrinkage.
Finish line
An integral part of every sauna is the stove. It can be made independently from sheet material or a large-diameter metal pipe. In another version, it is laid out of brick, but in this case it can take up a large space. For small spaces, it is better to use electric options that are purchased ready-made.

A shelf is installed inside the steam room. It is better not to use coniferous wood for it, because... When heated, it may release resin, causing burns. Good stuff for her there will be aspen, larch, linden or oak. If the space is small, a width of 40 cm will be sufficient; it is more convenient when there is a footrest. Fastening material should be recessed flush so as not to burn the skin (it should also be made of stainless material). It is better if the entire structure is assembled on dowels.

For wiring, you must use a double braided cable. It is better if it is non-flammable (usually the marking has the prefix “ng”). Be sure to lay the conductor in the corrugation. There are no switches installed in the steam room itself. The lamps used are waterproof with an IP68 index.
Make sure there is good ventilation. To do this, you can install an adjustable supply valve, as well as anemostats with output to the gable through the roof. This will be enough to ensure that all moisture is removed after taking a steam bath.
As you can see, there are no restrictions on what you can build a small bathhouse from. Choose the option that suits you best.
Scheme
 Frame-panel bathhouse with porch