Build a house in the country from timber. Country house made of timber
After a week of work and the bustle of the city, I want to relax in the lap of nature, breathe fresh air. Perfect option– small country cottage area with a house. Dachas are often simply called plots of land that are distributed to citizens for growing crops. Sooner or later, the owner of such a plot has a desire to have a house where he can relax after working in the garden beds and spend a weekend in nature. Hiring a crew is expensive and simple summer house small sizes you can build it yourself.
How to build a country house without outside help?
When thinking about a house on a summer cottage, you should decide whether they will live in it temporarily during the summer season or whether it will be possible to live in it throughout the year. This determines how much money will be spent on construction. For year-round residence you need to build a permanent structure with communications and heating. This requires a lot of funds and manpower.
If it is planned only seasonal accommodation, then you can build a house with your own hands. At first glance, it may seem that this is a complex and difficult task for a person far from construction. But, starting to understand the nuances of construction, it is clear that you can gain construction experience during construction, if you wish.
There are several technologies that make it easy and quick to build a small country house. The simplest and most economically advantageous technology is frame construction. It allows you to build a house yourself without outside help. This is the most cheap option when choosing materials, since you can use used materials. True, they must be of high quality for the structure to last a long time. Another advantage of frame construction is speed. If you put in the effort, you can build a house for finishing in a season.
What material is suitable for the walls of the dacha - choose the appropriate options
On the construction market big choice various materials, from which walls can be built. The choice depends on the preferences of the developer, the purpose of the future home and operating conditions. For a country house, you should select inexpensive, easy-to-install materials that do not require a solid foundation. Let's consider several options for such building materials:

You can build a country house from other materials. For example, you can use building materials from a dismantled house if they are in a condition suitable for construction. But all loads must be correctly calculated.
It must be remembered that the heavier the walls, the stronger the foundation needs to be made.
Layout – convenience and ease of use
Any construction consists of stages and begins with design. Even a simple country house needs a plan and construction project. A country house must have a kitchen, which can be combined with a living room to save space, dividing the rooms with a light partition. If a second floor is planned, then it is better to place bedrooms on it. For summer cottage good option obtaining additional space for relaxation is the veranda.

After design, further steps include:
- Floor installation.
- Preparation of the site for construction and installation of the foundation.
- Walling.
- and ceiling.
- External and internal Finishing work.
Each stage requires certain knowledge and skills. Therefore, before starting this or that type of work, you should study the nuances associated with their implementation.
How to make a strong foundation and save money?
Having decided on the place where the house will be located, you need to carry out preparatory work for foundation construction. To do this, stumps are uprooted, bushes are removed, and the top fertile layer ground and level the surface for the foundation. Then, using a tape measure and a corner, markings are made for future corners and walls. Pegs are driven in at the corners, and threads are stretched between them to limit the size of the pit. The foundation depth should be below the freezing depth. Usually a pit is dug about a meter deep.
Since a lightweight foundation is needed, it can be made from railroad sleepers. First of all, a geotextile fabric, Dornit 150, should be laid at the bottom of the pit. It is used as an additional reinforcing layer, as well as preventing the penetration of capillary moisture to the house structures. Next, sand is poured in several layers, each of which is well compacted. A layer of gravel or crushed stone is placed on top of the sand. At the next stage, sleepers are laid on the concrete layer and tied together. The structure is then filled with concrete.

For small suitable for home concrete strip foundation. To do this, you need to dig trenches about 50 cm wide around the perimeter of the house and interior walls, install the formwork, lay reinforcement in it and fill it with concrete. The foundation must stand for about 3-4 weeks for the concrete to gain strength.
More thorough, but also more expensive. It can be used if a basement is being built. In this case, the blocks will play the role of walls. The ceiling can be made of slabs or a reinforced frame can be arranged, formwork can be built and poured with concrete.
A popular foundation for the lungs frame houses is a columnar foundation. A sufficient diameter of the pillars will be 30 -40 cm. The pillars are either dug into the ground to a depth below the freezing depth, or are installed on solid foundation directly to the ground. Must be installed corner posts. Intermediate ones are placed at a distance of 2-3 m from each other.
The floor is made of tongue-and-groove boards along joists laid on the foundation. First, the subfloor is installed. Along the perimeter installed poles beams are laid. Then you should install the cross beams on opposite posts. This creates a subfloor frame. Beams can be made of wood, metal, concrete - depending on the financial capabilities and preferences of the developer. Moisture-resistant insulation is laid between the joists, and a flooring. An easier way to install a floor is concrete screed.
Reliable and warm walls – longevity of the building
The simplest house for a summer residence is a house with frame walls.The technology for constructing walls is simple:
- 1. To protect the walls from moisture, two layers of roofing material are laid on top of the foundation. The timber frame is laid first on the foundation. At the ends, the beam is cut in half to connect the beams to each other at the corners.
- 2. Next you need to install support posts in the corners. For stability, they are temporarily strengthened using jibs.
- 3. Racks along the walls are installed at a distance of 50 cm from each other and also secured. Window and door blocks attached to support posts.
- 4. After placing all the beams, it is necessary to secure the upper beam for strapping and secure all the posts well. To one support post you need to attach two slopes to the beam bottom trim and two slopes to the harness on top. The installation of the beams must be checked with a building level to prevent vertical and horizontal deviations.
- 5. The outside walls of the frame must be covered with a special windproof and waterproofing film, which, in turn, is secured with a counter-lattice.
- 6. The walls are sheathed on top with either OSB boards or sheets of plywood that are resistant to moisture.
At the same time as the wall frame, the ceiling frame is made. Beams are installed along the perimeter, and then transverse beams are installed. At the stage of interior finishing, the ceiling is sheathed with plywood, plasterboard or other finishing material.
Roof – reliable protection from bad weather
Best suited for a country house simple roof– single-pitched. But if you want to have a big attic space, which, if desired, can be landscaped and obtain additional usable space, then you need to install a gable roof.
Mounted for roof rafter system. It consists of several farms. It is more convenient to assemble individual roof parts on the ground using a template. After the individual elements have been assembled, they begin to install the rafters and install trusses on them. First, the façade truss is installed. The correct installation is checked by the building level. The façade truss is then secured using slopes. A similar truss is installed at the opposite end of the roof, and is also temporarily secured using slopes.
A cord is stretched between the installed outer trusses, along which all intermediate structures are installed. When all the trusses are installed, their lower ends are secured with brackets to the floor beams. The trusses are secured at the top using a ridge beam. The outer part of the roof is covered with a windproof and moisture-proof film, on top of which a counter-lattice is mounted.
Roofing material should be selected before installing the roof, since the manufacturer roofing material indicates which rafter system is needed. To avoid problems when working with roofing materials, when purchasing them, you should take a laying diagram. The roof can be made from ondulin, bitumen shingles, slate or any other roofing material that will be most beneficial.
Cottage for a summer residence - comfort for the soul
Everything is important during construction wooden elements treat houses with special chemicals, which protect wood from rotting, fungus, biological influence, and increase fire safety.
When the walls and roof are ready, all that remains is the exterior and interior finishing. A budget option facade finishing– painting OSB boards oil paint. Another attractive finishing material is siding. With its help you can make your home beautiful appearance and choose the color of your choice. The slats are easily attached to the frame of the house using screws.
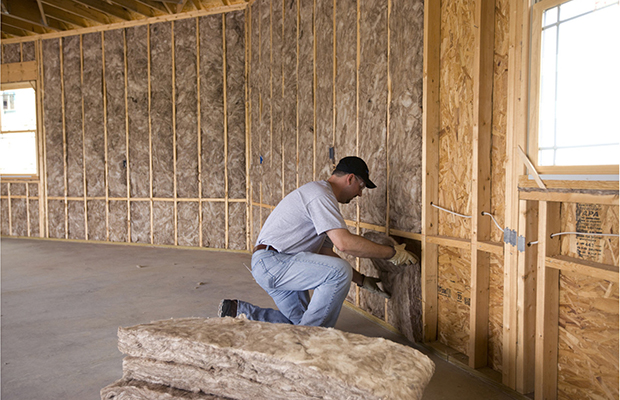
You can use the remaining cladding boards to cover the slopes of windows and doors. Window openings should be carefully processed with a jigsaw and plane. Window slopes should be sheathed wooden slats 19 mm wide. Cladding boards with outside nailed to the slopes. If wall insulation is necessary, it is better to do it from the outside so as not to take away the usable space inside the house. Mineral wool is an inexpensive and easy-to-install insulation material.
To conduct electricity, you need a waterproof power cable, which is best done underground. To protect the cable from damage, it must be laid at a depth of at least 60 cm, sprinkled with a layer of about 10 cm of sand on top. To protect the cable from shovels when digging, it is better to put it on top protective film and bricks.
If not great experience electrical work, it is better to entrust the electrical wiring to specialists.
Interior decoration you can create an atmosphere of comfort and peace, where you would like to relax and unwind. Therefore, despite the fact that the dacha is a seasonal habitat, you want it to be cozy and comfortable like home. This is achieved by interior and furniture corresponding to the chosen style. Often frame houses are lined with clapboard from the inside. For small dacha will do country style. You can also make furniture with your own hands, then the house will be filled with homely warmth. How more work do it yourself, the cheaper the construction will be.
If you prepare in advance all the materials necessary for construction frame house, then you can build a house on your own in one summer season. Finishing work can be done gradually, whenever possible, the main thing is to build the box of the house and install the roof. The better the work is done, the longer the house will last.
How to build garden house do it yourself, stages of construction, how to insulate a house, tips on building a foundation, walls and roof. Interior and exterior finishing.
A large number of people, if they don’t already have it, then at least in their minds want their own summer cottage and, of course, to have a garden house built on it. To save on construction costs, many create small structures with my own hands, but if opportunities allow, it can be built to more impressive sizes.
This article will help you create the garden house of your dreams, after reading it you will learn - design features garden house, what tools are used for this, how the laying takes place reliable foundation, the nuances of constructing the frame and the correct execution of the cladding. How to perform high-quality insulation, what a foam coat is and why you need a ventilated façade.
How to correctly create and take into account the design of a garden house, proper space planning, technology for constructing a garden house, the reliability of wall construction, the formation of high-quality floors and ceilings, how to install a roof, the nuances of creating a country house. How much does it cost to build a garden house?
Correct construction of the roof and attic, high-quality interior and exterior finishing structures, how to install ceiling joists.
What are economy class houses, revealing the issues of building a panel structure, what materials are best used for this.
Design features
For today construction technologies offer the construction of garden houses not only from classic materials (logs, cinder blocks, bricks), but also to use plywood sheets, OSB, as the main building materials, aerated concrete blocks, foam blocks, timber, etc.
But it is plywood garden houses that have excellent soundproofing and thermal insulation characteristics together with ease of execution and inexpensive construction costs.
Another advantage of this construction is the opportunity to make a house out of plywood with your own hands. This allows you to significantly reduce the cost of hiring professional teams. But it must be borne in mind that garden houses made of timber and plywood have some disadvantages, for example, the vulnerability of the latter to aggressive actions external environment. Accordingly, additional measures need to be taken to protect this building material, and this, in turn, increases costs.
Plywood is also an unsafe building material for home residents in terms of penetration by intruders. Therefore, during construction garden house timber and plywood require external finishing work, for example, siding, which, in addition to decoration, also hides from prying eyes the main material used in construction.
Expert opinion
Filimonov Evgeniy
Professional builder. 20 years of experience
Ask a question to an expertCountry houses are built according to frame technology, which is gaining increasing popularity in many
Countries of the world.
This is explained by its main advantages:
- there is no need to rent special construction equipment;
- no strong foundation required;
- the country house has excellent energy saving characteristics;
- the ability to quickly complete construction work;
- Due to the lightness of the structure and the materials used during construction, the walls do not shrink.
But the wood that is used to build a house (boards for roof sheathing, bars for wall frames) must be dry, and plywood sheets must have a minimum of chips at the edges. In addition, all wood materials are additionally subject to treatment with special compounds that can provide the required fire safety and also protect from moisture.
The construction of a frame plywood house can be divided into the following stages:
- foundation construction;
- construction of wall frames and plywood cladding;
- roof installation;
- insulation;
- finishing works (internal and external).
It is clear that you first need to make a house project, calculate the materials, purchase these materials: all these points are described in various articles on our website. This time we will focus on the actual construction.
The first stage of cottage construction in Tyumen is the creation of a foundation for a future dacha made of timber. Before deciding what kind of foundation you will have, you need to know what kind of soil is on your site, what is the level groundwater. Based on this information, decide on the type of foundation and purchase materials for it. We will consider the option of arranging a strip foundation. Trenches of the required thickness are dug for it (depending on the walls). We water the bottom of the trenches with water to compact it. After this, we fill in crushed stone or stone, put several rods of reinforcement with dressings at the corners. Pour concrete into the prepared trenches to ground level. The part of the foundation that should be above the surface is constructed from stones and a thicker mortar, in top part foundation, you must remember to put in reinforcement. Next, the foundation must harden and stand. This option is very economical, but if you don’t skimp, you can build formwork for the foundation, and then pour concrete. In addition, reinforcement can be done in other ways.
The second stage is, in fact, the assembly of the dacha from timber. Such houses are assembled on wooden dowels. To make them, you can take old boards or scraps. We trim these trimmings on one side, and then saw them into right size– for us it is 120 millimeters: you should get neat planks, as in the photo. Next, we saw these planks into square sticks, sharpen the ends and the dowels are ready.
You also need to prepare insulation. You can take ready-made rolled moss, you can use moss for these purposes.
Construction will also require jambs for doors and windows. You can order their production, you can try to make them yourself from timber: but this is a very complex process that not every carpenter can do.
When everything is prepared, we begin construction. A cottage made of timber, built with your own hands, will become your real pride!

When the second crown is ready, it is necessary to mark and install the dowels that will connect the beams. To do this, marks are made on the upper and lower beams, holes are drilled and dowels are driven in. After this, you need to spread moss and tow on the logs for insulation. After the next crown is laid, it is advisable to plant it with a sledgehammer. You also need to stuff moss into the gaps in the corner joints. Do not forget to alternate connections in the corners from crown to crown.
After all the crowns have been laid, taking into account the openings, we install window and door jambs. Next, we arrange the roof and move on to finishing. This will be discussed in more detail in the following articles.
 Nature lovers and country life who did not have time to acquire at least a 6 by 6 frame garden house ,
but having land plot, usually dream of at least some kind of refuge in their possessions. Making a home with your own hands frightens most citizens. But in vain. Today you can find a sea of information about step by step construction, from experienced craftsmen. It will not only give you confidence, relieving you of worries and fears. Using the recommendations of professionals, you can carry out all the necessary manipulations competently and in the proper order, significantly saving on hiring a work team.
Nature lovers and country life who did not have time to acquire at least a 6 by 6 frame garden house ,
but having land plot, usually dream of at least some kind of refuge in their possessions. Making a home with your own hands frightens most citizens. But in vain. Today you can find a sea of information about step by step construction, from experienced craftsmen. It will not only give you confidence, relieving you of worries and fears. Using the recommendations of professionals, you can carry out all the necessary manipulations competently and in the proper order, significantly saving on hiring a work team.
Of course, it’s a good idea to use the services of specialists. They guarantee (most often) quality, and lead times will be noticeably reduced. construction work. But if the budget is limited and you want, or have a desire to try yourself in such an interesting business, nothing prevents you from rolling up your sleeves and building a garden house cheaply. An additional bonus is that for yourself everything is usually done exactly as you imagine and dream. Sometimes it can be difficult to explain your vision to hired employees.
Then the walls are assembled from the timber, fastening the joints with dowels. It is laid between the crowns. In general, insulation is desirable for each next layer. For an economy class home, they usually use a tourniquet or tow. Next, work begins on.
Roof
For rafters, a board with a cross-section of 150x25 or 100x50 mm is used. You will also need roofing felt with glassine. To make the task easier, racks measuring one and a half meters are placed in the center of the building, and a beam is attached to them. On the resulting structure are located.
Installing the roof of a one-story garden house on a frame can take only one day. The type of specific roofing material is selected individually, according to your own capabilities and taste. We must not forget about the climate characteristics of the area where the future homeowner lives. Sheets of ordinary galvanized iron are often used.
Finishing
 Using glassine
 The finished frame must be covered with glassine, and only the selected finishing material is mounted on it.
It can be different, in accordance with the budget and preferences of the owner. Looks great, which is attached with self-tapping screws. One-story frame garden houses, finished on the outside, look attractive wooden clapboard or . Both wooden and plastic windows
. Doors made of wood or an imitation of this material will look natural. indoors can also be covered. Or you can cover them with plasterboard, which is then covered with paint or wallpaper. The floor is made of planks.
Approximate cost
Garden house projects
Results , Neat frame garden house
made with your own caring hands, it is convenient to use for permanent or temporary residence. It is spacious enough to store equipment and household supplies.
It has enough space to receive and accommodate guests. And if in the future it is planned to build a grandiose structure, then it can become the place of residence and base for an entire construction team.
It’s not that difficult to build a small 4x6 garden house with your own hands, without involving workers. The main thing is a responsible attitude towards construction, attention and patience. And, of course, strict adherence to recommendations and compliance with requirements. And very soon your plot of land will be transformed and take on the appearance of a real home. Every person who purchased small area land for a dacha, seeks to build in short time house, or similar easily erected structure. To have a place to relax after a hard time, or shelter from inclement weather. Well, it’s natural to get settled in everyday life. Of course, it is advisable to build a house so that it can accommodate the whole family and guests who come for the weekend. The task is, of course, enormous, but quite doable if you have accumulated savings to build a country house, because you will need a large number of new building material.
If possible, you can hire hired workers to build this structure.
Of course, this will significantly increase financial expenses for your family, and if this is not possible, you will have to build a country house with your own hands.
Mostly, dacha owners build their houses with their own hands in order to save money on hiring a construction team and invite relatives and friends to help with the construction, which naturally reduces the cost of the construction process.
Summer residents also sometimes use used materials, which can be purchased at half the price compared to market prices, but this will reduce the durability of the structure by half.
When building his country house, the author decided not to skimp on the basic material and buy everything on the construction market so that it would last for a century and the house would last for a long time, delighted his family and his guests with its comfort and aesthetic appearance.
Of course, wood was chosen as the main material for construction, what could be better and more beautiful than a tree. The author purchased bars and boards at a local sawmill, which turned out to be much cheaper than in a hardware store.
When starting construction, I pre-drilled holes for the supporting pillars, inserted and filled cement mortar. I tied the poles with boards and left them for a day for the solution to dry. Then he began construction, step by step moving towards his cherished goal.
And so now let's take a closer look at how he built his country house, and what he needed for this.
Materials: board 30 mm, timber 100 by 100, timber 40 by 60, batten 50 mm, insulation, professional sheet, lath, fiberboard.
Tools: a circular saw, drill, drill, screwdriver, hammer, shovel, electric plane, angle, ruler, tape measure, circular saw.
And so the first thing he did was invite his neighbor and together they drilled holes to install the pillars.

Then I installed the posts and filled the holes with cement mortar.

I made a screed at the bottom and top so that the pillars would stand level, and after a day, after the solution had gained hardness, I began further construction.

The author makes the top harness.

Then he moves on to creating the roof ridge.


Next he makes the roof sheathing.


Shows the rafter attachment point.

The remains from sawing will also come in handy somewhere.

Next, he proceeds to installing the roof from a professional sheet.


Then he moves on to installing the floors of the house.


So we have a place to store boards from precipitation.

Prepares a batch of boards, cutting them apart on a circular saw.


And begins finishing the cornice.


She covers the walls with boards, and seals the gaps between the boards with slats.

Next we move on to the ceiling trim.