DIY shoe rack made of wood. Everything on the shelves: we make a shoe stand in the hallway with our own hands
Shelves from furniture stores do not always fit into the required size. Therefore, today we will try to make some original shoe shelves with my own hands.
The simplest shoe rack from old furniture
First you need to cut the boards into blanks. Standard height between shelves - 23 cm. width should be such that it fits both women's and men's footwear– it should be 30-35 cm. Depending on the number of family members, the size of the shoe rack and its height may vary. The shelves in it are installed on different heights: for children's and adult shoes, shoes, boots and sandals, a large shelf for boots.Let's say we need to make a shoe rack measuring 100x35x46 cm. For it we will need three side walls measuring 35x45 cm, a top board 100x35 cm and three shelves 47x46 cm.
Shelf 100x35x46 cm
If the surface is too worn, you should first remove the varnish from the boards using sandpaper or a grinder with a special attachment. Since this creates too much dust, it is better to carry out work on the balcony. Damaged areas are puttied.
The boards are fastened together furniture corners using small self-tapping screws 12 mm long. A thin sheet of HDF is attached to the back of the shelf, which is used to line cabinet furniture.

Fastening the shelves
Advice. So that the shelf can be moved close to the wall, in places adjacent to the baseboards bottom part the side walls need to be cut at an angle of 45°.
Shelf made of wood or wooden slats
The principle of making a shoe rack from wood is similar to the previous one. The only difference is in the fastening. To securely fasten the boards together, holes are drilled into the side walls. holes for inserting screws. The same holes are prepared on the crossbars on the end side.The screws are screwed into the board so that their heads are slightly recessed into the wood by a couple of millimeters. The holes are leveled with sandpaper and puttied. You can also hide the holes using plastic plugs - they are sold at any furniture store.
To strengthen the product, additional fasteners are attached to its rear ends. metal corners. Before starting work, small irregularities are smoothed out with a grinder, grinder or emery cloth.

Connection of bars

Shoe rack made of wood
You can darken wood using water-soluble or alcohol-based stains- a dye that gives wood specific color. You can replace it with a regular one potassium permanganate– it perfectly paints wooden surfaces. To ensure an even coating, the wood must be slightly moistened before painting. After painting, the product is varnished and thoroughly dried.

Stain treatment

Another option wooden shelf for shoes
Advice. A shoe rack can be turned into original ottoman, if you cover its upper part with foam rubber and cover it with fabric of a suitable color.

Ottoman-shelf for shoes
Original round shelf
1. To make a rounded shoe rack using a jigsaw, you need to cut out round blanks. Their diameter should be about 600 cm. You can replace the compass with a nail driven into the center, with a pencil attached to it on a cord. After cutting, the edges are carefully sanded with sandpaper or a sander.2. Now let's start manufacturing crossbars. You will need 8 of them (4 for fastening between the lower and middle workpieces and 4 for installing between the middle and upper). The size of each of these parts is 160x200 mm. After cutting, they are also polished.
3. On the underside of the round blanks we mark the places for attaching the partitions. To do this, draw two straight lines with a pencil at an angle of 90° to each other. The intersection should be exactly in the center of the workpiece.
4. On each line we drill 4 holes for inserting screws. We prepare the same holes at the ends of the crossbars.
5. Now all that remains is to fasten the parts together and paint the shelf in any color or cover it with stain or varnish.

Round shelf
6. You can make a shelf like this angular, if you use only 1/4 of the rounded workpiece.

Corner semicircular shelf
Wall mounted shoe rack
To save space in the hallway, shoe shelves can be made hanging. Attaching them to the wall is easy. To do this you will need a hammer drill or drill, anchors (L-shaped hooks), dowels, a screwdriver and the shelves themselves:
Metal suspension (anchor)
To ensure that the shelves are positioned strictly horizontally, we mark the wall using a building level; We place attachment points on the resulting line;
Drill the required holes in the wall;
We prepare the same holes in the shelf itself;
We insert dowels into them and screw the boards to the wall.
Advice. It is better to drill at a slight angle to the ceiling. In this case, the fastening will be more reliable, and the shelves will fit more tightly to the wall.

You can also attach shelves to the wall using metal profiles
Shoe rack made of metal pipes and PVC pipes
Original designer shelf can be made from metal and wood in a matter of minutes. For this you will need:Wooden, stained or painted boards;
Metal pipes;
Angle adapters;
Connecting couplings (when using pipe scraps of insufficient length);
Plastic plugs for legs;
Rust neutralizer.

Flanges for metal pipes
First, the metal must be treated from rust using neutralizer(special liquid). Next, the pipes are cut into pieces, and metal structure assembled using corner adapters. The pipes are attached to the shelves using flanges. To prevent the metal from rusting in the future, finished design Can be painted or treated with clear or colored varnish.

Shelf made of metal pipes and wooden boards
Such a shelf can also be made from water pipes. PVC pipes . To do this, they are cut into pieces of the required length, drilled into them through holes for fastening shelves, and corners, tees or plugs (fitting connections) are put on the ends. All that remains is to cut the boards or fiberboard to the required size and install them on the shelves.
Video: DIY shoe rack (shoe rack)
Shoes need to be stored somewhere, but is it worth spending money on purchasing an expensive shoe rack? If you wish, you can make your own shelf from any available materials - laminate, and even pipes and boxes. This does not require special carpentry skills.
We will briefly tell you... You will find lists of materials and tools, diagrams, drawings and photographs. It's time to take on your entryway!
The choice of materials and tools will vary depending on the design of the future shelf. Therefore, develop single standard problematic. The most technically difficult solution is considered to be the “slim” solution.
The difficulty of such cabinets lies in the installation large quantity various accessories. All other shelves are much simpler, so when compiling a list of necessary things, we will proceed from the most complex schemes. You will need the following tools:
- screwdriver;
- electric drill;
- hacksaw for wood (or metal);
- chisel;
- ruler;
- Sander;
- pencil.
DIY wooden shoe rack
How to make a shoe rack with your own hands
Before you start self-production shelves for shoes, you need to decide on the design of the future product, its dimensions and functionality.
You can create shoe shelves from anything - profiles, wood, slats, laminate, metal and even cardboard. The most popular (in terms of design) are rotating, round and angular models.
In some cases you may need to drill and sand (metal, wood). In some places we will make do with simple gluing and cutting (cardboard boxes). And some varieties will seem exotic to you.
For those who have an old unnecessary closet, the process of making a shoe rack can be incredibly simple, just watch the following video:
- You can build a modular shelf with your own hands from plywood, and not just a shelf for shoes. This shelf will be attached to the hallway wall and will not take up much space, and the drawings for its manufacture are quite primitive. In addition to sheets of plywood, you will need:
- drill;
- jigsaw;
- hammer;
- perforator;
- glue;
pins.
Plywood is cut into identical rectangles (for example, 20x30 cm). The parts are carefully polished, after which the assembly process begins. Sheets of plywood form U-shaped structures that are “nested” into each other, forming something like a labyrinth. You can hang any number of similar blocks in the hallway.
Fastening is carried out using wooden pins and holes drilled in plywood.

Plywood shoe rack
Made of wood The easiest way is to make a shoe rack with your own hands from store-bought items, rather than from “raw” wood. But since you have decided to start this business from scratch, prepare following materials
- and tools:
- sandpaper;
- plane;
- metal corners;
- wood glue;
- screwdriver (can be replaced with a screwdriver);
- saw;
- self-tapping screws;
- varnish (or paint);
pencil and tape measure.
- We will use a wooden board as the material. The width of the workpiece is 25-35 centimeters, the thickness is a couple of centimeters. The manufacturing process looks like this:
- Vertical side walls are cut out (80-90 centimeters each).
- The support bars and crossbars are being prepared.
- Four fragments of 60-70 centimeters are cut out (these are shoe shelves).
- All workpieces are processed with sandpaper.
- The bars are attached to the side walls using self-tapping screws.
- Metal corners are attached to the rear ends of the product.
- Shelves are laid on fixed beams.
A DIY wooden shoe rack can also become a comfortable ottoman. In the following video you will learn how this is possible:
From chipboard
Making your own shoe racks from chipboard is in many ways similar to the previous options. In addition to a screwdriver, drill and other standard tools, you will need:
- mounting knife;
- hex wrench;
- square;
- edge tape;
- plugs;
- screws;
- confirmations.
The shelf can be made, or it can be made with rounded or straight ends. IN general outline the process looks like this:
- The sidewalls are marked and cut out.
- Using a sanding machine we get rid of chips and unevenness.
- Take a hot iron and cover the edges with special tape.
- Trim off the excess edge tape with a knife.
- We process the corners with fine-grained sandpaper.
- We make cuts (if the plan requires it) and assemble the product.
The following video will tell you how to create a shoe rack with your own hands from chipboard and pipes:
From laminate
You can create a minimalist and stylish shoe rack with your own hands using regular laminate. To do this, you will need laminate sheets (the quantity depends on the level of the shelf) and metal tubes with slots. The slots can be made with a grinder (using metal circles), and plastic plugs can be placed at the ends.
If desired, you can create frame structure up to the ceiling, but then you will have to think about additional fastenings to the wall.
The number of sections is limited only by your imagination and the size of the hallway.
Photo of laminate shoe racks

From slats
Not a bad solution for country house slats can serve. Having stocked up on the required amount of this material and a minimum set of tools (hammer, nails, screwdriver), you can assemble a shoe rack with your own hands from slats with two or three tiers in a short period of time. Let's list the advantages of such a shelf:
- ease;
- budget;
- good ventilation;
- practicality.
Shoe rack made of slats

From profile
You can also assemble a shoe rack with your own hands - from a profile, also using tempered glass as materials. From the tools you need:
- Bulgarian;
- glass cutter;
- electric drill (with metal drills);
- jigsaw;
- building level;
- screwdriver
For your purposes, you can use a galvanized profile or a regular multi-colored one. The first will be more moisture resistant, the second will fit better into the chosen interior. A similar structure is mounted on the wall:
- The profile is applied to the wall and secured with one self-tapping screw.
- After this, take a level and check the horizontalness of the markings.
- The remaining screws are screwed in.
- The frame is mounted.
- Previously prepared glass shelves are installed.
Shoe rack in loft style

From boxes
Most a budget option- a shelf for shoes, assembled with your own hands from cardboard or cardboard boxes. It takes up little space and looks beautiful in a small hallway. Work procedure: do-it-yourself shoe rack made of cardboard
- The contours of the blanks are drawn on the box with a pencil.
- The blanks are cut out using a cardboard knife.
- Rectangles are folded into special boxes.
- The blanks are placed on top of each other, forming grooves for shoes.
- Fastening is carried out with staples.
- The shelf is mounted on the hallway wall and covered with decorative film.
Cardboard shoe rack
From pipes
To make this shelf, you can take water pipes plastic pipes- for example, those from which risers are installed in bathrooms. The tools you will need are a hacksaw. The procedure for assembling a shoe rack with your own hands from pipes is as follows:
- We cut PVC pipes into equal segments - these will be the “boxes” of our shelf.
- Sand the edges with sandpaper.
- We cover the sections with decorative film.
- We fasten the sections together with plastic holders on both sides. The diameter of the pipes and the shape of the structure may vary. New cells can be easily integrated into the circuit if desired.
Pipe shoe rack

We do not suggest doing metalwork or going to a blacksmith. It’s quite easy to make a primitive metal shoe rack with your own hands - to do this you need to get an old, out-of-use stepladder. Procedure:
- A fragment of a stepladder is cut out, consisting of several “steps”.
- The edges are sanded.
- The fragment is fixed on the hallway wall.
- They cling to the crossbars plastic hooks- shoes will hang on them.
Homemade shoe rack made of metal materials

Corner
For the simplest corner shelf For DIY shoes you will need MDF sheets, a jigsaw, a drill, drills and screws. It is advisable to have a pencil, a building level and a jar acrylic paint. The actions are:
- Two identical rectangles and several triangles are cut out (their number depends on the tiers).
- The rectangles are fastened with self-tapping screws, forming a corner structure.
- The same self-tapping screws are used to mount the corner shelves inside.
- The shelf is covered with acrylic.
- Now we put the shelf in the corner of the hallway and secure it with dowels to be sure.

Round
To make a round shoe rack with your own hands, you will again need a jigsaw and MDF sheets. The shoe rack will have two tiers, so we will need to cut out three “round pieces”, the radius of which will correspond to the largest shoe size your household. Further actions:
- Having coped with round blanks, you need to cut out rectangular ones (4 pieces).
- Grooves are cut in the middle of the rectangular blanks.
- Rectangles are inserted into each other, forming crosses.
- Using a screwdriver, the crosspieces are attached to round workpieces.
- The ends are sanded and covered with film.
Photo round shelf for shoes

When entering a home, a person finds himself in a hallway, which should be functional. It is not easy to equip it correctly because small sizes, but it is necessary to provide a place to store shoes. To do this, you don’t have to buy expensive furniture - you can make shelves for shoes in the hallway yourself. Lack of space forces owners to choose multifunctional solutions. For example, a clothes hanger can be combined with a shoe rack.
Every owner wants his home to look perfect, and for the pieces of furniture to combine and complement each other. To do this, from the huge variety of shoe stands that can be seen in the photo, you need to choose suitable option. The main requirements for them are versatility and compactness.
Types of shelves
The choice of shelves depends on the number of shoes, area and style of decoration of the room. They should be simple and reliable, they should be easy to make with your own hands. This universal solution which saves space and has an attractive appearance. Shelves are placed at the bottom of the wall. An ordinary hanger consisting of a row of hooks and a small shelf-bench, under which shoes for daily use are stored, will perfectly complement the interior. A good solution is a rack, the upper part of which will become a bench. It is usually equipped open shelves(example - in the photo).
Externally, such shelves in the hallway resemble cabinets, but do not have doors and often they also lack side walls. There are drawers or doors under the seat, and a stylish hanger can stand next to it. The rack will allow you to put things in order, it is practical and universal option. Models with open and closed shelves, in which the shoes are placed on the entire sole.
A slim cabinet with folding doors is suitable even for a very small hallway. Shoes will not gather dust, but they should only be placed in the cabinet when they are dry and clean. The open hanger with shelves and seat is practical and convenient. It will fit clothes and shoes used every day. To store shoes not used this season, provide closed systems. Special stands are made from ordinary cardboard boxes, they are covered with material that does not get wet and covered with pebbles. Shoe shelves in the hallway can be made horizontal, multi-tiered, or vertical. Creating own design The product can be made in a combined version, combining several types in one design.
Shelf materials
There are a huge number of materials suitable for making shelves and racks for shoes. Before starting work, please note the following:
- budget for making shelves;
- the number of people who will use the shelves;
- will this model of rack or shelves be combined with a hanger;
- Is a seat (bench) on top required?
The following materials are used to make shelves: metal, wood, plastic, etc. Narrow and corner models are made from chipboard. Shelves of the simplest design are attached to the wall and take up minimal space. They look quite original and do not reduce the space of the hallway.
From natural wood make shoe racks for classic interiors. Wood is an affordable and environmentally friendly material and is easy to process.
A DIY shoe rack made of metal will provide natural ventilation. Her distinctive feature is that the metal will not absorb odors. This shelf can be decorated additional elements and add personality. The metal does not rot and does not get wet. If it is treated with an anti-corrosion compound, it will not rust. Metal shelf, as a rule, is mounted on a wall or mounted on racks.
How to make a shoe rack with your own hands
The easiest way is to make shoe racks with your own hands. For this you will need ordinary tools and materials:
- wooden bars – 6 pcs.;
- self-tapping screws (3 mm – diameter, 25 mm – length);
When making a shoe rack with your own hands, you need to start by making the side parts. To do this, prepare 6 identical bars 33 cm long (33 cm is the required depth, which will allow you to place shoes of any size on the future shelf). Then evenly distribute the 4 remaining bars on the workpiece and make cuts on them of the required depth.
The universal width of the shelf is at least 62 cm. It will allow you to place several pairs of shoes in one compartment at the same time. Each shelf is made from two blanks, which are attached to each other with self-tapping screws. After all installation work sharp and rough parts of the shelves are sanded using special paper.
The height of a shoe rack made with your own hands will be approximately 80 cm. Its lower part is located at a distance of at least 25 cm from the floor, which will allow you to place boots and other types of high shoes.
Racks for shelves can be made from planks 80 cm long. Special cuts are made on them the size of the thickness of the timber (in this case - 16 mm), the distance between cuts should be 25 cm. The shelves are inserted into four prepared racks with pre-cut sections.
The upper part of the rack is made from the materials that remain after preparing the shelves and racks for them. To do this, 33 cm bars are sanded, varnished and fastened with self-tapping screws to the finished structure.
Note! If you use 4 screws for each shelf, then you will only need 2 screws to secure the top.
Remember that you can create any structure for storing shoes with your own hands, be it a rack, a cabinet or a regular hanging shelf on the wall. You can find enough on the Internet ready-made options, but if you have the time and desire, experiment. This way you can get an exclusive piece of furniture that all guests will admire. Everything you need to create shoe shelves in the hallway with your own hands - it's a little imagination and basic consumables.
Practical and versatile products are very popular. We recommend choosing multifunctional models that can easily change their appearance. When choosing a shoe storage option, focus on your habits and the ease of use of the rack or shelves in your hallway. For example, for a large number of shoes, you can choose a high rotating rack.
From the materials available in the house, which, for example, remained after renovation, it is quite easy to create original shelf or a DIY shoe hanger. A wire hanger will become in an interesting way solving the problem of storing house shoes in small hallway.
Often special holders and hanging containers are installed in a small corridor. Hanging furniture will be a great way to place shoes in small room. Wall shelf will give the room additional volume and save space on the floor. We recommend hanging doors on the shelf to hide its contents. In this case, the room will look tidier. If you place a multi-tiered structure along the wall, it will fit not only shoes b, but also, for example, umbrellas with bags.
The carousel shelf is assembled from several round parts. It provides a separate place for each pair of shoes.
Old wooden or metal staircase Easily converts into a convenient storage system. The ladder is very easy to attach to the wall. Additionally, it can be painted in the desired color, and hooks can be attached to the crossbars.
Autonomous systems, like the one in the photo below, can be used to sort shoes. Ordinary pallets, decorated with paintings or appliqués, will become reliable storage containers and decorate the interior of your hallway.
Using your imagination, you can simply create an original shelf for storing shoes that for a long time All household members and guests will admire it.
Shoes underfoot in the hallway create inconvenience and clutter up the space. Buying a special shelf or even a cabinet is expensive for many people, and why should it, if from scrap materials in the house and garage you can create not only a functional structure, but also emphasize the design of the hallway. For assembly, we will use both standard wood materials and non-standard ones - PVC pipes, pallets and even cardboard.
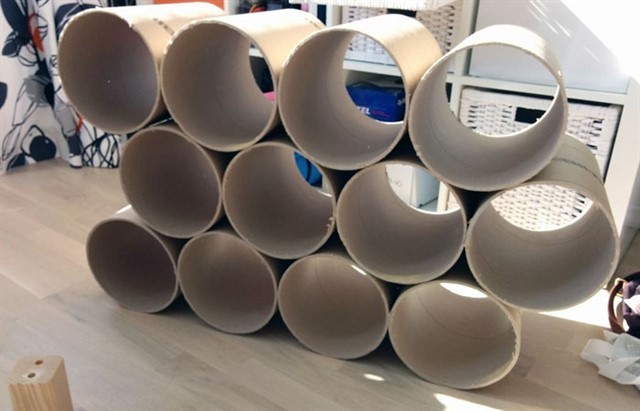
Depending on what kind of shoes you store in the hallway, the diameter of the pipes will depend. Let's start with more simple option, which is suitable for storing demi-season, summer, children's, and house shoes. We use as a basis sewer PVC pipes with a diameter of 110 mm. This is enough to accommodate shoes up to size 42. For shoes larger size We recommend using pipes with a diameter of 160 or 200 mm. Additionally, for shoes, you will need a hacksaw, a tie belt, aerosol can with paint. The work order is as follows:
- 1. Cut off the required length of pipe with a hacksaw. We recommend 30 cm, but you can make the length shorter or longer, it will all depend on the size of your shoes. One such pipe is a cell for one or a pair of shoes. We make as many of these cells as you need to accommodate the entire collection.
- 2. Sand the sharp edges formed after cutting with sandpaper
- 3. To make the shelf fit better with the interior, paint it in the chosen color. It is more convenient to work with spray paint, but you can use other materials
- 4. We arrange the pipes in a pyramid and tighten them with a belt.
- 5. Insert shoes into each cell and enjoy the result.
It is better to fasten pipes for such a shelf with liquid nails
But if you need a larger shelf for shoes in the hallway, we purchase PVC sewer pipes with a diameter of 300 mm. It will certainly fit not only shoes and sneakers, but also long boots. We divide the selected pipe into equal sections using a hacksaw and also clean the sharp edges with sandpaper. To decorate the compartments, we suggest using paper wallpaper or self-adhesive vinyl film. Decorate not only the outside, but also inner part so that the shelf has a complete look. Insulating or fabric tape of a suitable size will help hide the joints formed along the edges. Next, we fasten the blanks together using hot glue or bolt fastening. You adjust the number of sections in each row yourself. They can be the same, presented in the form of a pyramid or a honeycomb, your imagination is at work here.
Classic wooden shelving unit
A shelf for storing shoes made of wood is a simple and convenient option. Due to the fact that wood lends itself well to processing, it is easy to work with. To achieve the desired shape and size, you will need a plane, sander, saw, hammer, screwdriver set, as well as a pencil and tape measure for marking. To create shelves, we prepare in advance: wooden blocks and strips, screws, varnish for opening.
We saw off six equal bars 33 cm long. These will be the sides of the structure, 2 for each shelf. Their length is the depth of the rack, which is enough to comfortably store an adult pair of shoes. Using a plane, we make cuts on the sides of the sidewalls that correspond to the depth of the long bars on which the shoes will stand. For each shelf, we suggest providing 4 cross beams about 62 cm long, so that several pairs of shoes can comfortably fit on one tier. We insert the long beams into the recesses made in the sidewalls and fasten them together with self-tapping screws. We carry out the same procedure with the remaining shelves, you choose their number yourself. Sand sharp edges with sandpaper.
The optimal distance between each shelf should be at least 25 cm so that you have the opportunity to place not only short boots, but also long boots. In our case, the total height of the structure will be slightly more than 80 cm and consist of three shelves. To connect the shelves we use wooden planks, we also make cuts in them to the depth of the timber every 25 cm.
In our case, we make the lower cuts at a distance of 25 cm from each other, and the last one at 33 cm. Thus, after connecting the shelves, the upper part of the structure will protrude literally 7 cm, this is enough. We cover the upper side strips with a cross bar, making a side. We grind the sharp edges with a machine or sandpaper, and open the structure with several layers of varnish. The shoe shelf is ready. With your own hands, you can fit at least three pairs of shoes on one shelf.
In order to make this unusual shelf, you will need plywood and shoe brushes, maybe old Soviet ones. First, let's decide on the dimensions of the upper part. We measure the dimensions of the future shelf. The length of the structure will depend on the number of brushes. Make the depth of the shelf 5 cm greater than the width of the brush. We have decided on the dimensions, now we cut out two absolutely identical blanks and connect them together with a “book”, we get an angle of 90°. To connect the parts, we retreat 1 cm from the edge of the bottom of the shelf and connect both ends with a screw. We do the same with the second side. Next, we cut out two identical squares from plywood, the sides of which correspond to the width of the shelf, and fix them on both sides, closing the corner.
Let's do the brushes. If they have handles, cut them off with a hacksaw and smooth the rough edges with a file. We drill two holes in each brush on each side, using screws we screw them to the bottom of the shelf in one or several rows - it all depends on the quantity. The first part of the structure is ready, set it aside.

If the brushes have handles, they need to be sawed off
Let's take another sheet of plywood. It should be equal to the length of the first part, and its width should correspond to the largest shoe size. On average you will get 35–40 cm, which corresponds to size 43–44. To make the bottom side, we cut out another plywood board equal to total length and 15 cm wide. We fix both parts at 90°, connecting the ends according to the same principle as in the first part of the structure. We get a side for shoes.
Now we connect the first and second blanks together with screws, paying special attention to the corners. We paint it, and when the paint dries, we make two side holes in the back panel for wall mounting. This shoe rack will fit into any hallway and will not take up much space. Thanks to the brush holders, the shoes will not fall over.
This shoe rack is more complicated. To make it yourself, you will need certain carpentry skills, additional tools and materials that may not be available in the arsenal. Let's look at two options for a round rotating shelf with shelves - regular and with a soft pouf for sitting.

Using a jigsaw, we create circles from wooden slabs and mark out the sections
For the first option, we prepare a wooden slab 12 mm thick and cut it into three equal squares of 70 cm each. These will be the bases for the shelves. If you want to make the shelf taller, cut out more blanks. Square shape turn the cut slab into a circle with a radius of 35 cm using electric jigsaw. We cut the slab into equal planks - these are the walls of the sector, in each of which there will be a pair of shoes. Moreover, they should not be the same in height in each tier. For example, for the lower shelf they can be made higher, sections for high boots, and the upper ones can be made symmetrical for shoes and sneakers. To make the sectors even, use a protractor to mark angles of 60°, and use a ruler to make markings on both sides of the circle. We nail nails onto each line of the sector until we bring them all the way. We apply liquid nails to the markings and fasten the board, finally fixing it with reverse side iron nails. We do the same with the rest of the shelves.
Let's do wooden frame To raise the shelf above ground level, connect it to the bottom shelf. Next, paint all the elements in your favorite color, after sanding the edges. We recommend using white paint and a black border for contrast. So that each shelf rotates freely, we install it between the tiers turntables, fix them strictly in the center, having previously drilled a hole for the bolt and nut.

The final stage will be painting the shelf
The second option is a rotating shoe rack with soft seat. General principle its build is unchanged. However, instead of three or more tiers, we recommend making two, adjusting the comfortable seating height. Also, instead of a frame base, you can attach wheels to make the shelf mobile. We make the upper part of the bookcase soft. We use batting as a base. We cut out two circles from the filler, corresponding to the diameter of the shelf, and two more smaller ones, about 7–10 cm. When laying the batting, we get a protrusion. It's time for upholstery. We cut the fabric along the diameter of the circle with a margin of at least 5 cm. We fix it around the entire perimeter using construction stapler. You will learn more about at what distance to fasten the staples and how to select upholstery material in the article about. We cut off the excess fabric, and to hide the staples, we frame the outline with upholstery tape.
Cardboard shoe shelves, like other cardboard furniture, are gaining more and more popularity in interior design. The base used is ordinary cardboard boxes, which are found in almost everyone’s home. If you don’t have them, think about the nearest store or warehouse, where such boxes lie in a crowd unused. Besides corrugated cardboard To work you will need colored wide tape, scissors, a ruler and a glue gun; if you don’t have one, you can use regular PVA.

Cardboard rectangles are folded into triangles
We prepare the cardboard by cutting out a rectangle with sides 45x35 cm. This size will be optimal for both small and big couple shoes We measure 15 cm from each edge with a ruler and make folds. We cover the sides that we will bend into a triangle with colored tape; this will be the central part of the stand. We fold the cardboard into a triangle along the folds and secure it along the edges and center with colored tape. We repeat the same manipulations with all other sections - we choose their number at your discretion. After you have completed all the sections according to plan, we begin assembling the cardboard shelf. We fasten the bottom row of triangles together with colored tape, and for reliability we go over the joints with a glue gun. We do the same with the remaining rows, fastening them together. When finished, you will have a shoe stand made from triangles. We store shoes in through sections.
Attention, in order for the design to serve you for a long time, shoes must always be dry and clean.
Another budget invention made from cardboard is vertical shelves for shoes. It’s easy to make such a design with your own hands. It is ideal for storing slippers, shoes, sneakers and summer shoes in the hallway and does not take up much space. For work you will need a sheet of cardboard 70x60 cm.
We retreat 2.5 cm along the length of the cardboard from the edges. From these points we measure a vertical line of 25 cm and draw a horizontal segment 20 cm long. We connect the sides, we get a rectangle of 25x20 cm. A square of 25x25 cm is formed between the two rectangles. we retreat the upper corners of the square by 11 cm. We draw diagonals in bottom corners square and we get two triangles on both sides. Draw a rectangle with sides 35x25 cm from the square down. As a result, you should get a T-shaped blank, where the protrusions are two equal rectangles with sides 25x20 cm, and the central part is a square 25x20 cm and a rectangle 35x25 see. Cut off all excess.

To work you will need a large sheet of cardboard.
Now we bend the cardboard along the lines, first vertical in the center, and then diagonal. To avoid damaging the material, use a ruler to make an even bend. After this, lift the bottom rectangle (35x25 cm), then the T-shaped top and wrap the diagonal bends behind the base on both sides. In your toga you should have a pocket with triangular ribs on the sides. Fixing the bends on the back side of the base regular glue for cardboard. For reliability, we recommend a glue gun. We make several such pocket shelves, and then connect them together by the upper protrusion with the same glue. You adjust the number of sections yourself. If desired, the shelves can be decorated, painted and upholstered with twine, and covered with self-adhesive film. At the end, we make a hole in the last section and hang a vertical shelf on the wall.
Simple shelves made from boxes and pallets
You can make a shelf for shoes from boxes that can also be found on the farm. To construct them, you will not need to additionally purchase complex parts and tools. If you are the owner of mesh boxes, we fasten them together in a vertical position using a clamp or strong wire. The front part of the shelf remains open, we put shoes. We choose the number of tiers ourselves, it all depends on the size and depth of the boxes.
You can do the same with wooden boxes. To fasten them together you will need nails and a hammer. This design will look better if it is sanded and the wood is painted. If desired wooden boxes You can not fasten them together, but hang them on the wall in a chaotic manner.
However, the simplest shoe stand is constructed from a pallet. All you need to do with it is sand it and repaint it the color you want. Having placed the pallet in a vertical position, we insert shoes into the spaces between the slats. It will hold up well and will not fall.
How to save and make original stand under your own shoes - find out here!Ideas, useful tips, manufacturing instructions.
Making a stylish shoe stand with your own hands
A beautiful shoe rack can become not only a place to store shoes, but also a full-fledged element of the hallway interior. The choice of options in stores is extensive, but the prices are often overpriced. To make a spacious and compact shoe rack that fits perfectly into the look of the corridor, you need to put in a little effort and imagination. Let's consider options for making shoe racks from available materials with your own hands.

Types and purposes of homemade shelves for the hallway
Before installation, be sure to measure the space where you plan to place the shoe rack. For a small hallway, the ideal option would be a narrow (20-30 cm) and high shelf; in a larger room, a closed cabinet with a width of 60-90 cm would look good.
Should the shelf be closed? If you want the hallway to look more aesthetically pleasing, this is a good option. Do not forget to regularly ventilate closed shoe racks, otherwise you will not be able to avoid unpleasant odors. This problem can also be solved by installing a lamp inside for drying and disinfecting shoes.

The advantages of homemade shoe shelves are obvious:
- you can use eco-friendly materials;
- the cost of a homemade shoe rack is several times less than in a store;
- You can make a shelf for a hallway with a non-standard layout.
The design of a shoe rack directly depends on its purpose and the number of residents. Here are some popular and practical options:
| Shoe shelf design | Description |
| Classical | Shoe shelves of this type are popular due to their simple and convenient installation. It can have a regular rectangular or asymmetrical design. |
| Hanging | The shelf is attached to the wall using slats, straps or cables. Conveniently folds when necessary (for example, if you need to carry furniture into a narrow corridor). |
| Corner | Fastening is carried out on adjacent walls. Great space saver. |
| Floor | The support in this design is on the floor. Suitable for spacious hallways, but can also have compact dimensions if the sections are distributed not in width, but in height. |
| Closed | This option looks more aesthetically pleasing. Doors can be made of plywood or frosted glass. |
| Cassette | Shoes will be stored vertically here; there are 2 or more cassette-type drawers on the door, which slide out when opened. Good for small corridor(width 20-25 cm). |
There are many options for making shelves. The interior can be decorated with shelves made of metal, in particular aluminum; processed clay shelves, dense oak, and glossy plastic look very beautiful. The material of manufacture can be anything, as can the configuration of the elements. Based on the type of installation, shoe racks can be divided into several types.
Materials and tools for making shelves
From the selected material for manufacturing shoe shelf depends on its service life and ease of use. For example, a shelf of cardboard box make it easier than ever, but it won’t last long. But as a temporary option it will work great.  When choosing wood as a material, you should take care of the final treatment of the wood with varnish or paint so that the attractive appearance is preserved for a long time. There is no universal set of tools, due to the peculiarities of installation and material. But you will probably need the following tools:
- electric drill;
- perforator;
- simple pencil;
- sandpaper;
- mounting hardware;
- screwdriver;
- wood hacksaw;
You will also need varnish or paint, the color of which is selected to match general interior hallway
How to make a shelf with your own hands
Before starting work, it is worth drawing an approximate layout of the future product, where you also need to indicate the dimensions. After this, they begin marking on the material, where they indicate the location of the fasteners (if any), the required length and width. Here are a few useful recommendations:
- When creating a simple shelf for shoes, you can do without using metal fittings - all elements are fastened with self-tapping screws.
- The doors are easy to install if you use awnings.
- Materials should be treated with varnish or painting before assembly. If you do this after, the layer will be uneven, and the procedure itself will be problematic. The process of assembling a shelf for shoes depends not only on the design, but also on the complexity of processing the material, and the features of working with it.

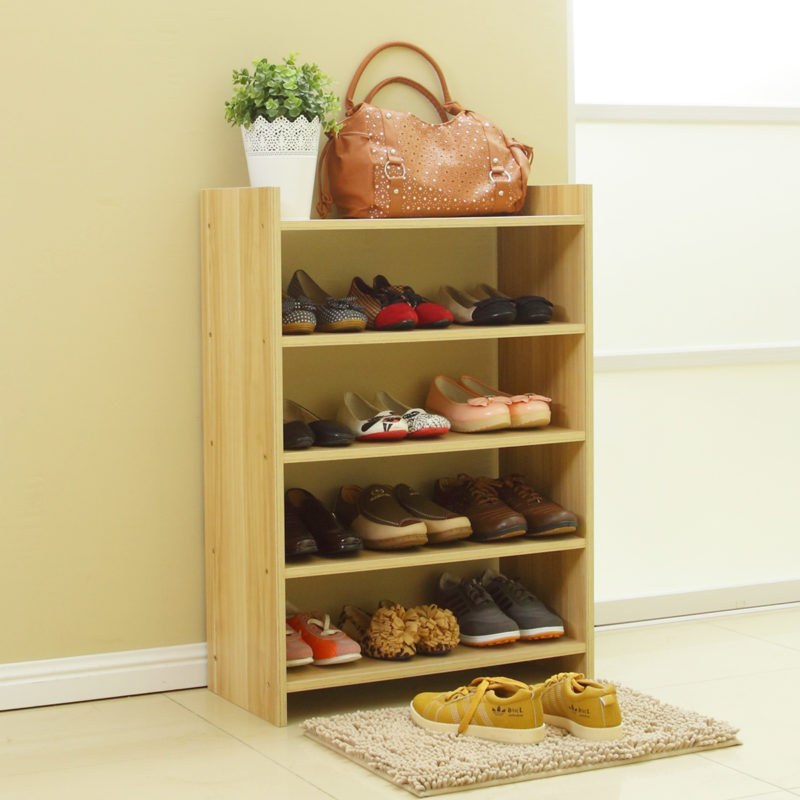
Wooden shoe rack
First of all, a shoe rack should have small dimensions, but at the same time accommodate a sufficient number of pairs of shoes. This is its integral feature. There are many materials from which this structure can be constructed, but the main one is wood. Unlike chipboard and MDF, it will not unstick or swell when exposed to moisture. To do this, the wood should be varnished or painted.
What will you need?
Basic kit for making: wood, glue, screws, glazing beads, varnish or paint. Tools you will need: saw, screwdriver or screwdriver, hammer, sandpaper, drill. Beads, screws, and drills are selected in accordance with the size of the structure. Self-tapping screws need to be small, but capable of being firmly fixed in the structure. Please remember that wood may crack or split if wrong choice screw size.

Assembly of the structure
A depth of 35 centimeters will be sufficient. This distance is enough to accommodate almost any shoe. This will be the length of the sides of the structure. You need to saw off 6 elements of 35 cm each. You can determine who in the family has the most big size shoes, and measure the distance along it, leaving 1 cm in reserve. Then you need to distribute 4 bars on one of the elements and make a cut to the depth of the bars. The bars must be spaced evenly.
Each shelf should be able to accommodate 3 pairs of shoes, so its length must be determined based on the 3 largest pairs of shoes in the family. 4 pieces of this length will go on each shelf. To connect the elements, it is necessary to cut out recesses. These places must be secured with self-tapping screws. For a more aesthetic look, you can drill holes and use glazing beads and glue that will hold the shoes without any problems. This operation is similar for each shelf. After this, sand the tops of the side panels with sandpaper.
Any height can be set, but a reasonable limit is no higher than 80 cm. High shoes should fit in one of the compartments of the structure. The distance between the shelves (between the floor and the first shelf) should be 30 cm. All connections are made in the same way.

Practical shoe rack made of chipboard
To make a simple shelf for shoes from chipboard, you need to take two sheets of canvas (the dimensions are determined based on the space in the hallway). Will need fiberboard sheet for the back wall. The assembly algorithm is simple:
- We attach the bottom and the shelves themselves to the two side walls. For the screeds, use a drill (8 mm drill); at the end, use a drill with a diameter of 5 mm.
- The folding element is secured with medium-sized self-tapping screws;
- Top part fastened with 4*30 self-tapping screws;
- The shelves are mounted inside;
- Fasten back wall products.
- This is a budget and uncomplicated option that can be used in any hallway layout.

Beautiful laminate shoe rack
If after renovating your apartment there is unused laminate, you can use it to make a stylish and compact shelf that will fit seamlessly into any design. For production you will need laminate sheets, the number of which depends on the tier and metal pipes with slots. They can be made using a metal grinder. If desired, the structure can be made to any height; for safety, the edges of the tubes are sealed with plugs.
 From profile
An interesting option are shelves for shoes made of profile and tempered glass (or wood). For manufacturing you will need the following tools:
- glass cutter;
- jigsaw;
- Bulgarian;
- level;
- electric drill for metal;
- screwdriver
You can use a regular colored profile or a galvanized one; the second option will be more reliable, as it is resistant to moisture.

Step-by-step instruction
- The profile is attached to the wall with one self-tapping screw;
- Using a level, check the horizontalness of the markings;
- Screw in the remaining screws;
- The frame is assembled;
- Already cut shelves are attached to the frame.
- This option will look good in a Hi-Teck design.
 Simple shoe rack made from boxes
The presented design is able to withstand a lot of weight, despite the fact that cardboard is a fairly flexible material. To make it, it is advisable to use boxes from household appliances. Depending on the height and width, take required amount boxes The structure is attached with glue, tape, a stapler or another method. The finished shelf can be decorated as your imagination dictates. There is one drawback - this shelf is only suitable for summer shoes.
 Corner shoe stand
Most suitable material to create a corner wooden shelf for shoes - larch. It tolerates dampness well and is easy to use.
First, we decide on the size and design of the shelf, draw a diagram and calculate the required amount of material.
To create a corner shelf you need the following materials and tools:
- two boards up to 2 m long (the ends of the boards can be rounded or cut with a wave);
- shelves cut from the same board (in this case, the shelves can be cut different sizes and forms);
- jigsaw for cutting;
- plane and sandpaper for leveling;
- corners and screws for connecting parts;
- level to check the accuracy of the design;
- antiseptic;
- varnish or paint.
The boards must be sanded and treated with an antiseptic, varnished or painted. Varnish is chosen if you want to emphasize the naturalness and structure of the wood, paint - if preferred rich colors and when deciding to use special design techniques with color play.
 Construction connection
To create a lightweight structure, the two main boards are not attached to each other: they are installed at an angle and connected using shelves. First, the lower shelf is attached, then the upper one, the structure is installed vertically and its evenness and stability are checked. Then the remaining shelves are installed.
The space between the shelves must be sufficient, otherwise there will be a feeling of crampedness and congestion.

Decorative elements
To further decorate the shelf, you can use thin decorative slats cut out yourself. Or purchase a decorative wooden lattice partition, and after sawing it, decorate the shelf by adding carved stops.
Using decoupage or aging techniques in painting will also add a fresh touch to the interior of the hallway. Bright colors can be relevant to complement the interior.

Making a carousel shelf
The carousel shelf takes up little space and at the same time can accommodate many pairs of shoes. To make it you will need: fiberboard, metal pins and screws.

How to do
Blanks in the form of circles and quadrangles are cut from fiberboard. Using a compass and a rod, markings are made for the pins.
Discs for stands are fixed with discs smaller diameter, which are located at the required height.
Prepare the bottom, on which quadrangular blanks are installed, attached with a corner. The bottom circle is conventionally divided into 3-4 parts (space for 3-4 pairs of shoes on the “floor”).

To make a shoe shelf, you can use your imagination and then the most interesting ideas come to mind. unexpected decisions. Here are a few ideas that will be of interest not only to independent use, but also as a gift for loved ones.

On video: DIY shoe rack from an old closet