Set the time on the sixth generation starline key fob. How to set the time on a Starline key fob
"Starline A93" is a car security system with a modern and convenient function remote start engine. Car alarm functions are configured using the Valet service button, which is mounted in the car interior, and a key fob with an LCD display and control buttons.
Setting the time on the key fob
To use all the functionality of the Starline A93 car alarm, you need to correctly set the time on the key fob. To do this, press button No. 4 until three signals are heard: one melodic and two short. At this moment, the clock icon will start flashing.
REFERENCE. After entering the function menu, the user needs to immediately begin setting the clock. If this is not done within 8 seconds, the key fob will automatically exit the function menu
The user sets the hours and minutes using buttons No. 2-3. After setting the hours, the transition to minutes is carried out using button No. 4.
Another light press on button No. 4 puts the key fob into alarm setting mode. The alarm clock is set according to the same principle as the current time. Exit the alarm clock setting mode using button No. 4. If there is no activity for 8 seconds, you will be logged out automatically.
Factory reset
To reset the settings to factory settings, you need to turn on the ignition and press the Valet button 9 times. The car will notify you that the alarm is in the mode of resetting all user settings with 9 siren signals.
To exit the reset mode, you need to turn off the ignition, or wait until the system exits automatically. The vehicle will emit three beeps to confirm exit.
Automatic engine start
Using the Starline A93 alarm system, you can program the following parameters:
- starting the car engine on an alarm clock;
- periodic autostart of the engine;
- launch car engine by temperature.
It is not possible to start the engine automatically if the vehicle's ignition is turned on, the brake pedal is pressed, the hood is slightly open or the parking brake is applied, and on vehicles with a manual transmission the "soft neutral" procedure has not been performed.
Starting the engine on an alarm clock
When this function is activated, the car engine will automatically start at the specified time. To activate the function, perform the following steps:
- the key fob cursor is moved to the icon with the image of a clock and button No. 1 is briefly pressed, after which the car emits one light signal, and the key fob emits one melodic sound;
- the key fob display shows the time after which the engine will automatically start according to the alarm clock;
- after 5 sec. The current time display on the key fob resumes.
The engine autostart function using an alarm clock is activated for one start cycle. The fact that the mode has been successfully enabled is indicated by active icons depicting a clock and a bell on the key fob display.

Periodic engine starting
The Starline A93 alarm system allows you to regularly start the car engine at regular intervals. The start period can be set from 2 hours to 24 hours with a minimum increment of 2 hours.
To activate the mode, you must:
- place the key fob cursor on the icon with the image of an hourglass and briefly press button No. 1 - the car will respond with one light signal, and the key fob with one melodic sound;
- The key fob display will display the current value of the car engine autostart period for 4 seconds (for example, “4H” means that the engine will start every 4 hours).
To change the engine autostart period, you need to lightly press button No. 1 until the display shows desired value. Each press of button No. 1 increases the automatic start period by 2 hours.
After the desired autorun period value is displayed on the display, press button No. 1 and hold it until a melodic trill sounds, or wait until the selected autorun period is automatically saved, which will occur 4 seconds after selecting the desired parameter. At the same time, two short melodic signals will sound on the key fob, and an icon with an hourglass will begin to appear on its display. A few seconds after setting the selected parameters, the engine will automatically start and warm up.
Engine start based on temperature
This feature monitors the outside air temperature and, if necessary, starts the car engine to warm up. The starting temperature is set within the range from -3 o C to -27 o C, the minimum step is 3 o C. The minimum period of time between repeated starts (excluding the time spent warming up the engine) is 60 minutes. Once the user activates the temperature-based engine start function, the number of temperature starts is not limited.
To enable engine autostart mode based on temperature, perform the following steps:
- press the icon with the image of a key and button No. 1 - the car reacts with one light signal, and the key fob emits a melodic trill once;
- over the next 4 sec. the key fob display shows the current value of the starting temperature;
- to change the temperature value, you need to press button No. 1 (1 press = 3 o C);
- after selecting the desired temperature parameters, hold down button No. 1 until a sound signal is heard, or wait for automatic saving, which occurs after 4 seconds.
If the engine autostart function based on temperature is successfully activated, the key fob emits two short melodic signals, and the icon with the image of a key on the key fob display becomes active.

How to register a key fob
You can register up to 4 key fobs in the memory of the Starline A93 car alarm remote control. To do this you need:
- disable security mode;
- press the Valet button seven times;
- turn on the ignition - the car will emit seven siren signals;
- briefly press buttons No. 1-2 - the car will emit one siren signal, and the key fob will emit one sound signal;
- turn off the ignition - the car will respond with three light signals.
If there are several key fobs, then the second point is repeated for each of them. In this case, the interval between recording key fobs should not exceed 5 seconds.
IMPORTANT! When registering key fobs, all information about the previous key fobs is deleted from the system memory. Therefore, all new and old key fobs must be registered within one programming cycle
Setting the sensitivity of the shock sensor
The vehicle impact sensor is located in the transceiver. Its sensitivity is determined on a 14-point scale, where the value “01” corresponds to the minimum sensitivity, and the value “14” corresponds to the maximum. A value of "0" disables the selected shock sensor level.
Setting the sensitivity of the sensor warning level
To adjust the sensitivity of the shock sensor warning level, you must do the following:
- disable security mode;
- turn off the ignition;
- press button No. 3 on the alarm key fob, first for a long time, until a sound signal is heard, and then once, while the car will emit three light signals and two beeps of the siren, and the key fob will make a melodious sound and an indication of the warning level of the shock sensor will appear on its display;
- Short presses on buttons No. 2-3 select the required value of the sensor sensitivity level.
The factory setting for this parameter is 10.
Setting the sensitivity of the sensor alarm level
To adjust the sensitivity of the alarm level of the shock sensor, you need to press button No. 3 on the alarm key fob, first for a long time until a sound signal is heard, and then once - the car will respond with one light signal, and the key fob will make a melodic sound. After this, an indication of the alarm level of the shock sensor will appear on the display.
The factory value of the sensitivity of the alarm level of the signal sensor is 5. To correct this value, you need to use buttons No. 2 and No. 3. It should be taken into account that the sensitivity value of the alarm level of the shock sensor cannot be higher than the sensitivity value of the warning level.
To exit the mode of adjusting the sensitivity of the shock sensor, press button No. 3 first for a long time until a sound signal is heard, and then briefly. The car reacts with three light signals and two siren signals. The keychain makes a melodic sound.

Disabling the alarm
If the battery in the key fob is dead or the button is broken, the alarm can be turned off in an emergency way or using secret code.
Emergency shutdown of alarm without key fob
For emergency shutdown for the Starline A93 alarm system without a key fob, you need to use the Valet service button. They work like this:
- open the door with the key - an alarm sounds;
- turn on the ignition;
- press the service button four times within 20 seconds;
- turn off the ignition.
After that alarm system turns off. You can start the car.
Emergency alarm shutdown using a secret code
To disable burglar alarm using your personal secret code, you need to do the following:
- open the door with the key;
- turn on the ignition;
- within 20 seconds, press the Valet button the number of times corresponding to the first digit of the secret code;
- turn off the ignition;
- turn the ignition back on;
- press the Valet button, but this time the number of presses must correspond to the second digit of the secret code;
- turn off the ignition.
The car notifies you when the alarm is turned off. sound signals and flashing emergency lights.
Correctly setting the time on the Starline key fob is necessary to be able to automatically start the engine using a timer.
The nuances of setting the clock and date depend on the specific alarm model and will be different for series A and versions E, D and B.
[Hide]
Setting the time for series E, D, B
- Instructions for setting the time on the StarLine signaling key fob for models E90, E91, B94, B64, D94 and D64:
- Press button 4 with your finger and hold it until one long and two short beeps sound.
- Wait until the signals sound again (one short and two long) and the main menu functions appear on the display.
- By pressing keys 1 or 4, activate function F-1, which allows you to set the time and date on the key fob.
- Press button 4 and do not remove your finger from the key until there are two short beeps.
- Using buttons 1 (back) and 4 (forward), select settings parameters - gradually add year, month, date, hours and minutes.
Set the desired value for each parameter using buttons 2 (increase) and 3 (decrease).
- Additionally, you can set an alarm, set a timer, select the type of signal you like from the list and adjust its volume.
- leave the key fob for 8 seconds, after which the menu will automatically exit, saving all set values;
press and hold button 1 until two short beeps, which will help exit the menu and save all changes made.
How to set the time for A series To set the time for car alarms StarLine
- models A91, A92, A93, A94 and A61, you must perform the following algorithm of actions:
- Press button 3. Do not remove your finger from the key until you hear: 1 short melody, 2 short beeps, 1 short beep.
- When the hour display flashes, use buttons 1 (increase) and 2 (decrease) to set the clock correctly.
- Briefly press button 3 and wait until the minute indicators flash. Adjust the minutes, also using keys 1 and 2.
- Quickly click on key 3 and wait for the key fob to enter alarm setting mode. Set the necessary parameters again using buttons 1 and 2.
- To exit the menu, stop any actions with the key fob and after 10 seconds it will automatically hide the programming functions, saving all the entered parameters.
Photo gallery of key fobs of various versions of the Starline alarm system
The photo shows the detailed arrangement of buttons on different models:
StarLine D64 StarLine A93/A63 StarLine B64 StarLine A64
Video about setting the time on the Starline A93 key fob
Reasons for settings failure
Failure of the set time indicators in the StarLine car alarm key fob, as a rule, is caused by three main reasons:
- problems with the power supply;
- disruption in work software;
- mechanical damage.
However, there are other factors that can affect the operation of the device and interfere with the clock, alarm and timer functions.
Why are key fob indicators reset?
The main reasons for the key fob to malfunction and reset the time indicators:
- My battery is almost done. When the battery runs out, the device does not have enough energy to normal functioning. As a result, serious disturbances in the operation of the pager may occur, including the time indicators being reset to zero. To prevent this, you need to regularly check the battery volume indicator, which is on all key fobs security complex StarLine. When the battery charge drops to a critically low level, the key fob emits a corresponding signal, and a characteristic icon appears on its screen. To replace the battery, you will need standard AAA batteries.
- Replacing the old battery with a new one. When you install a new battery, the time, date and timer settings are automatically reset. All other settings are saved in full and will be activated the first time the unit is connected to the alarm system.
- Incorrect operation of the software. Sometimes glitches occur in the key fob software system, which can not only reset the time and date, but also disrupt the settings protective function alarms With this type of failure, the only way to optimize the operation of the key fob is to reflash the device. It is recommended to entrust this task to specialists.
- Short circuit. The malfunction is a consequence of water getting inside the device body. To eliminate it, it is necessary to determine exactly which part burned out when the contacts interacted with moisture and whether it needs to be replaced.
- Mechanical damage. A fall to the floor or a blow to the key fob may cause the device to mechanical damage, for example, disconnecting some contacts.
- Manufacturing defects. Sometimes the cause of persistent failures in time settings is a manufacturing defect. The key fob may stop working immediately after installing the alarm or after a certain period of time, depending on the severity of the assembly flaw. If the warranty period has not yet expired, you must replace the faulty device with a working pager. Before you start using it for its intended purpose (setting the car on security, turning the alarm on and off), you need to link it to the anti-theft system.
Trouble-shooting
If after replacing the battery the key fob still does not work, then perhaps the cause of the failure was a more serious breakdown that requires repair.
What will you need?
To troubleshoot a StarLine car alarm key fob, you need to prepare the following tools, devices and items:
- small Phillips screwdriver;
- a brush with soft bristles;
- cotton buds;
- a bottle of medical alcohol;
- multimeter;
- soldering iron with a thin tip.
Repair instructions
To eliminate the breakdown and restore all functions of the remote control you need:
- Remove the battery from the device.
- By using Phillips screwdriver Unscrew the screw holding the two halves of the key fob body together.
- Take a soft brush and gently clean internal parts pager from dust and other contaminants.
- If there is stubborn dirt or liquid droplets inside the device, carefully remove them using a cotton swab dipped in undiluted rubbing alcohol.
- Using a multimeter, check the operation of the system board, transistor, diode and others important elements. If, according to the diagnostic results, any part turns out to be non-functional, it must be replaced with a working one. You can purchase components for an alarm key fob at a radio parts store or other specialized sales points.
- Using a soldering iron with a small tip, install the new part into the device. With the same device you can return the loose contact to its place.
- Assemble the pager body and tighten the screw with a screwdriver. Reinsert the battery.
StarLine keychain disassembled
How to reset the key fob settings?
To reset the already configured key fob parameters and return factory setting alarm, you need to do this:
- Get into the car, turn the key in the ignition and turn on the engine.
- With the engine running, briefly press the service button 9 or 10 times, depending on the model security system.
- Turn off the engine and wait for 9 or 10 short beeps from the anti-theft system, which indicate successful entry into the reset mode.
- Take the key fob in your hands and make one quick press on button 1.
- Wait until one short signal sounds from the security system, confirming that the settings have been reset to factory settings.
- To leave the reset mode, you must turn on the car engine or wait a while until the system automatically exits.
If all reset steps were completed correctly, the car will respond with 5 flashes of side lights and 1 melodic signal, the duration of which will be longer than the previous ones.
The Starline alarm key fob displays not only useful system information, but also the time, which can be manually adjusted.
Most key fobs car alarm that have a screen can also display the time. This is not only practical in terms of controlling your schedule and time awareness, but also convenient when implementing additional features automatic start. Starline does not lag behind its competitors and also uses the watch function in its arsenal. Setting them up is not difficult; you need to know the main principles of controlling the alarm key fob.
ATTENTION! A completely simple way to reduce fuel consumption has been found! Don't believe me? An auto mechanic with 15 years of experience also didn’t believe it until he tried it. And now he saves 35,000 rubles a year on gasoline!
Despite the fact that Starline has simplified the time setting procedure to the maximum, some issues related to unsuccessful installation attempts continue to arise.
Possible reasons for time settings failure
If you find that your Starline key fob no longer displays the time correctly, then you should check the condition of the battery. This is quite easy to do, thanks to the built-in low battery indicator function. If the battery loses the necessary quality work energy, a corresponding picture appears on the display, accompanied by a sound signal. And although this reason is extremely rare, especially for Starline, check any possible options necessary.
The second reason could be changing the battery. After installing a new battery, the time is automatically reset.
Be careful, replacing the battery inevitably entails resetting the anti-burglary protection, so the first thing you should do is not set a new indicator, but set the car to the Starline alarm system.
Another reason is incorrectly adjusted clock indicators or incorrect procedure for setting.
Debugg
Regardless of the conditions that caused the crash or reset, you will have to restore the watch. This can be done in two ways:
- Classic. The time is set using service commands on the alarm key fob;
- Radical. Replace the battery at zero hours zero minutes. The temporary values will be reset and the countdown will begin from the specified point.
Setting new indicators on the Starline alarm display has general principles for most models. They are performed using a specific algorithm of actions, which can be divided into three types, depending on the generation Alarm Starline and some of its features.
Making settings for series E, D, B
Starline car alarms are marked , D and allow you to set the time period by performing the following actions: 
Press the fourth button on the control panel and hold it until three signals count down - one long and two short. After this, 4 menu functions will appear on the screen. Select the one you are looking for by pressing the fourth key again. You can set the date and time using the first function. It is designated F-1. After this, hold down the fourth button again, wait for two signals and start setting the time using the first two service keys. 
Making settings for the A series
Setting the necessary parameters on the Starline Series A alarm system depends on the model number.
And it provides for the presence of four service keys, which determine the features of the commands produced.
You can set the time parameters on these devices by long pressing the fourth key. After three consecutive beeps, the hour digits will flash, and changing the values will be possible using the second and third keys. To set the minutes, press the fourth button again and repeat the steps described. 
And they have a simplified appearance and are content with the presence of three service buttons.
To carry out this procedure on the key fobs of these models, you will need to press and hold the third button with the image of an asterisk until three characteristic signals occur. After this, you can adjust the hours and minutes. The opening and closing keys of the lock allow you to decrease or increase the numbers, and the asterisk button allows you to move between hours and minutes. 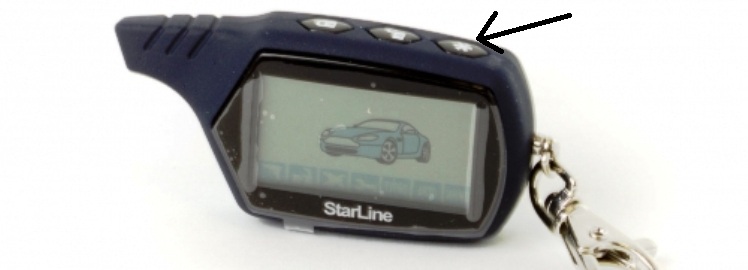
What happens if you don't configure it?
The least that can happen in this case is that you will lose additional information. More than that, such autorun parameters as starting by alarm clock, by a given interval or by timer, for models a91 and b9, will be lost.
The consequences of this may be an unheated engine and increased collection time, failure of the starter due to high loads during standard starting in the cold season, as well as the need to replace the battery after prolonged non-use vehicle at low temperatures.
Full use of all functions of the anti-theft complex is possible only after correctly setting the time parameters. How to set the time on the Starline A93 key fob is described in detail in the instructions for using the “alarm”.
The nuances of setting the clock and date depend on the specific alarm model and will be different for series A and versions E, D and B.
Instructions for setting the time
Setting the clock on an alarm system with automatic engine start of a Starline A93 car is done as follows:
- Take the communicator and install the battery into it. To do this, dismantle the back part of the cover and install it in a special seat battery, taking into account polarity.
- The key fob will turn on. If the key lock has been activated, unlock the device.
- Click on button number 4 and hold it down until the communicator speaker plays a melodic signal. After a pause, the device will emit two more short-term sound pulses.
- The pager will go to the time settings adjustment menu. To set the clock, the second and third buttons are used. The second is for reducing parameters, the third is for increasing. To quickly add or subtract hours, you can hold down these keys.
- To set the minutes, click on the fourth key.
- The same buttons (2 and 3) are used to adjust the minutes. The second key is used to decrease, the third - to increase indicators. For quick adjustment, the buttons are pressed.
Andrey Sharshukov clearly demonstrated the process of adjusting time parameters.
How to set up auto-start on alarm?
You need to set the alarm time to start the car engine like this:
- Activate the function programming menu.
- Move the cursor on the communicator screen to the indicator with a clock symbol, then click on the first key. The car's lights will blink once, and the communicator's speaker will play a melodic signal.
- The time will appear on the communicator screen after which the function of starting the internal combustion engine by alarm will be activated. To adjust the parameter, use the pager buttons.
- Five seconds after setting the alarm clock parameters, the time indication will appear on the pager screen.
Setting up the option to start the internal combustion engine by alarm in the alarm system is performed for one cycle of starting the unit. The activation of the function is indicated by active indicators with a symbol in the form of a clock and a bell on the remote control.
Alex Sila talked about adjusting the time parameters for remote starting of an internal combustion engine.
Reasons for settings failure
If the wrong time is displayed on the communicator display, the reason may be that the battery is low. Key fobs of Starline anti-theft systems have a battery charge indication function, so the consumer can timely determine its condition. If the battery loses capacity, it will not be able to perform its main function. As a result, a symbol indicating a discharge will appear on the communicator’s display, and the device’s speaker will also emit a corresponding sound signal.
The problem may be caused by replacing the power supply. When a new battery is installed in the communicator, the system automatically resets the time parameters. In addition, when changing the battery, all parameters of the anti-theft system will be reset. After completing the replacement, it is necessary to activate the protective function, that is, arm the car. Only then is it possible to adjust the time parameters.
The reason may be that the pager is not working correctly. If you are sure that a working battery is installed in it, you need to look for the problem in the software part. Problems with its operation may be caused by moisture getting on the board. Sometimes flashing the device can solve the problem, but we recommend entrusting this task to specialists.
GO FASTRELIABLE talked about replacing the battery in the device.
Trouble-shooting
Eliminating the problem begins with checking the communicator and replacing the battery, if necessary. If the remote control breaks down, the pager is replaced with a new one or repaired.
When the fault in the key fob is fixed, the user must reset the time on the pager.
The repair is performed as follows:
- Disassemble the device body. Remove the battery from it.
- Using a small Phillips head screwdriver, remove the bolt that holds the front and back of the pager together.
- Perform a visual inspection of the board. Clean with a soft brush inner part devices from dirt and dust. If dirt cannot be removed from the board, use a cotton swab dipped in an alcohol solution. Carefully remove any dirt without flooding the circuit with liquid.
- Check the condition of the board, this will require special equipment. Using diagnostic tools, you can identify damaged tracks and contact elements on the board. Failed components must be re-soldered; this will require a soldering iron with a thin tip. After soldering, the remaining wear products are carefully removed using fine-grained sandpaper.
- Assembly is performed in reverse order.
Remove the battery and disassemble the device body Soldering communicator board components Damaged board winding that needs to be replaced
There are two ways to replace the battery:
- Ordinary. The battery is changed, after which the consumer adjusts the timing parameters in accordance with the instructions.
- Non-standard. The battery in the communicator is changed at 00:00. This will automatically reset the indicators to zero, after which the time countdown will begin from the specified point.
Why is it necessary and what will happen if you don’t set the clock?
If you correctly program the key fob for remote start by alarm, the power unit will start at a specific time.
That’s why it’s so important to correctly set the time on the Starline A93 key fob.
If the user does not set the time correctly, this will lead to problems with the timer used to start the motor in automatic mode. The start will be performed, but at a different time when the consumer does not need it. Accordingly, if a trip is necessary, the car’s engine will not be warmed up. As a result of high loads during starting, the starter mechanism wears out faster. If the alarm system has an alarm function (not for starting the engine, but a reminder), then the option will also not work correctly.
Setting the time on the key fob
The Starline A91 alarm system is in deserved demand among consumers. It operates at an impressive distance, is able to ignore radio interference, and is simple and reliable to operate. Before using this handy anti-theft tool, you need to understand its basic features and functions.
- To set the time on the key fob, you need to press and hold button No. 3 with the image of a snowflake until sound signals follow:
- one melodic;
- one short;
two more short ones.
Sound signals notify the user that the key fob is ready to adjust the time. Current time. First, set the “clock” field, which flashes on the display. Each press on button No. 1 with the image of a closed lock increases the time by one hour, and each press on button No. 2 with the image reduces it.
When the “hours” field is filled in, proceed to setting the “minutes” field. To do this, briefly press button No. 3 (snowflake) - the “minutes” field begins to blink. Again, use button No. 1 (lock) to increase the time by one minute, and button No. 2 ( open lock) are reduced.

Alarm. After the minutes are set, press button No. 3 (snowflake) and proceed to setting the alarm clock. When the “alarm clock” field flashes, use button No. 1 to increase the time again, and button No. 2, if necessary, decrease it.
The next short press on button No. 3 (snowflake) allows you to turn the alarm on or off. Button No. 1 (lock) turns on the alarm, button No. 2 (open lock) turns it off.
Timer. If you press button No. 3 (snowflake) again, a field for setting the timer will appear on the display. Just like the clock and alarm clock, the timer is set using buttons No. 1 and No. 2.
By pressing button No. 3 again, you can switch to the mode of enabling or disabling the timer. Button No. 1 (lock) turns on the timer, button No. 2 (open lock) turns it off.
Autorun programming
The Starline A91 alarm system allows you to program engine auto-start based on temperature, timer or alarm clock.
Autostart based on engine temperature
Press button No. 3 (snowflake) on the key fob and hold it until you hear first one melodic and then one short signal. Then, also pressing the third button, move the cursor along the icons located at the bottom of the display until it stops at the icon with the image of a thermometer. Press button No. 1 (lock) – a melodic signal sounds. The system is activated. As soon as the temperature drops below the programmed value, the engine will start to warm up.
In order to disable this function, you need to press button No. 3 (snowflake) again and hold it until the second sound (melodic sound, then a single signal). After that, using the same third button, move the cursor to the thermometer icon and press button No. 2 (open lock). The key fob notifies the user with a melodious signal that the function has been disabled.

Autorun by timer
To activate the engine autostart function using a timer every 2, 3, 4 or 24 hours, do the following. Press button No. 3 (snowflake) and hold it until you hear first one melodic and then one short signal. Then, using the same third button, move the cursor along the icons located at the bottom of the display until it stops at the icon with the image of a fan. Press button No. 1 (lock) – a melodic signal sounds. The system is activated.
To disable the autorun function by timer, you need to press button No. 3 (snowflake) and hold it until the second sound (melodic sound, then a single signal). Then, using button No. 3 (snowflake), move the cursor to the fan icon and press button No. 2 (open lock). A melodic signal from the key fob will notify the user that the auto-start function by timer is deactivated.
Auto start on alarm clock
First, you need to make sure that the clock on the key fob is set correctly and the alarm is set at the right time.
To activate the engine auto-start function on an alarm clock, you need to press and hold button No. 3 (star) until the remote control emits three beeps and the corresponding icon appears on the display. The display will show set time alarm, which will then change to the current time. The LED indicator will flash in a series of two flashes.
To turn off the auto-start function on an alarm clock, you need to place the cursor on the icon again and press button No. 2 on the key fob (open lock). After two flashes of size and a melodic signal, the icons will disappear. This function is activated for one startup cycle. To start the engine next time with an alarm, you will need to activate this function again from the key fob.
Setting the sensitivity of the shock sensor
To adjust the sensitivity of the shock sensor of the Starline A91 system, you need to perform the following steps:
- disconnect the battery terminals (as an alternative, remove the fuse that controls the interior lighting);
- find the location where the shock sensor is attached (as a rule, it is located under the front panel, in the area of the steering column and pedals);
- disable the security mode, switch to programming mode and use the buttons on the remote control to make the necessary changes.
The sensitivity level has 10 values (0 – minimum, 10 – maximum). Factory settings assume 4-5 levels of protection. When adjusting the alarm sensitivity, you need to take into account the vehicle load level. The operation of the alarm should be considered correct if there are no false alarms.
After setting up the system, you need to wait 2-3 minutes, and then turn the alarm on and off several times to ensure its stable operation.

How to “register” a keychain
If you have lost your key fob or it has broken down, don’t worry, you can purchase a similar original or compatible device in auto stores. The new key fob must be “registered” in the system. To do this you need:
- turn off the car ignition;
- Press the programming button (Valet) seven times;
- turn on the car ignition;
- listen to 7 sound signals that warn that the user has activated the key fob recording mode;
- pick up new keychain, simultaneously press and hold buttons No. 2 (open lock) and No. 3 (snowflake);
- After the siren sounds once, the buttons can be released.
The new key fob is “registered”.
To exit the “registration” mode for new key fobs, you need to turn off the car’s ignition. The parking lights will flash 5 times to confirm.

How to turn off the alarm without a key fob
The skills to turn off an alarm without a key fob will come in handy if the remote control is faulty or its battery is dead. To deactivate the system, there is a programming button (Valet), located in an inconspicuous but accessible place in the cabin.
Deactivation without a key fob: if the personal code has not been set:
- We open the car door with the key, and the alarm signals are turned off. If the key fob was not used to activate the alarm, the turn signals will flash 4 times.
- Turn on the ignition for 20 seconds and press the service button three times.
- The ignition turns off. The siren sounds twice. Security mode is disabled. You can start the car.
Deactivation without a key fob: if a personal code has been set:
- Open the car door with the key. The alarms sound and the turn signals flash 4 times.
- Turn on the ignition and press the service button a number of times identical to the number of the set personal code.
- The ignition turns off. The turn indicators flash 2 times. If the personal code had one digit, the security mode is disabled. You can start the car.
If the personal code had 2 or 3 digits, the user should carry out the second and third deactivation in the same order.
Factory reset
To reset the Starline A91 alarm settings, use the following algorithm:
- turn on the ignition and press the service button located in the car 10 times in a row;
- turn off the ignition, and the siren will emit 10 short signals, notifying the user that he has switched the alarm to reset mode;
- press the service button once, after which one siren signal sounds;
- press button No. 1 (lock) on the key fob, after which the system notifies with a short single signal that the factory settings have been reset;
- To exit the reset mode, turn on the ignition or wait until the system automatically exits this mode. As confirmation, the side lights flash five times and the key fob emits a melodic signal.
All. The alarm has been reset to factory settings.
Thus, the Starline A91 alarm system can perform automatic functions, or it can perform mechanical functions, configured by pressing buttons. A significant part of its functions are changed by programming. Therefore, by customizing the system you can create a convenient and reliable anti-theft system, which will serve you for a long time and without failure.