Making a floor in the shower. How to make a shower floor with a drain
Not on every summer cottage There is a shower, although it is practically impossible to do without it here. After working in the garden or around the house, everyone will want to freshen up. And this is where an economical and easily constructed heated summer shower comes to the rescue. The main advantage of this type of shower is that it is used both in cold and warm seasons, unlike the usual summer shower. We’ll look further at recommendations for building a heated shower with your own hands.
Features of manufacturing a combined heated garden shower
We suggest that you familiarize yourself with the recommendations that will help you build a combined heated shower at your summer cottage. The main advantage of this shower is that on warm days it is used as a summer shower and does not turn on the heating, thereby saving energy, and when it is cold outside, the water in the shower is heated using a heating element.
Building a shower with your own hands is not a difficult process if you carefully understand everything. The main advantages of such showers are the accessibility of their arrangement, due to the minimum number of components, and if the shower is properly decorated, it will become a real highlight of the summer cottage.
The process of bathing in the shower after hard work has a positive effect on human health, relieves fatigue, relieves stress and relaxes. It is possible to purchase a ready-made shower, but it self-production will cost many times less.
When choosing a place where the shower will be located, you should proceed from the fact that in the summer the water should warm up well, so it is not recommended to place the shower stall in the shade, since the water tank must be constantly exposed to direct sunlight.
The best option for shower location is open area garden But, it should be taken into account that electricity must be connected to the shower, which will ensure heating of the water using a heating element. The garden shower includes:
- heated tank;
- tap;
- watering can;
- racks;
- moisture-resistant material;
- rug.
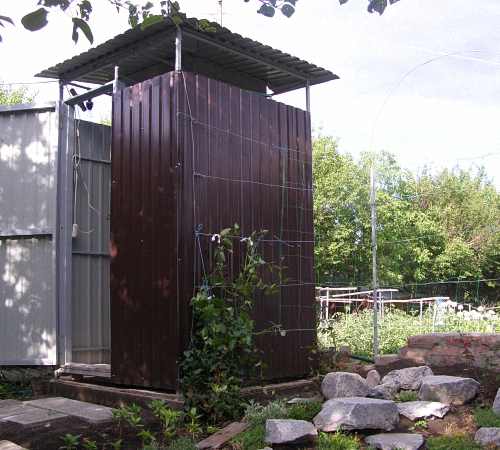
To build a shower of this type, having chosen a place, you should install racks and make sure that the structure is strong and stable. A dark-colored tank is installed at the top of the shower. Since it is it that will attract heat at a time when the water is heated by the sun. A hose, tap and watering can are installed at the bottom of the tank. Installing a rubber mat on the floor will make bathing more comfortable, and the racks are covered with moisture-resistant material, such as film or shower curtains. This shower is perfect for swimming in the summer or spring time of the year.

Another way to locate a shower is to attach it to one of the walls of the dacha. You should carefully consider the choice of the wall to which it will adjoin, since the sun's rays should fall directly on the tank.
In this case, the tank is connected to the wall and clings to it, a frame, hoses, a watering can and a tap are installed, and electricity is supplied. To protect the wall from moisture, it must be made moisture resistant. To do this, cover it with tiles or fix the film. But keep in mind that the water will not warm up well in such a shower, so you will need to use heating more often, since the shadow of the house does not provide good access to the sun.
Heated country shower: manufacturing instructions
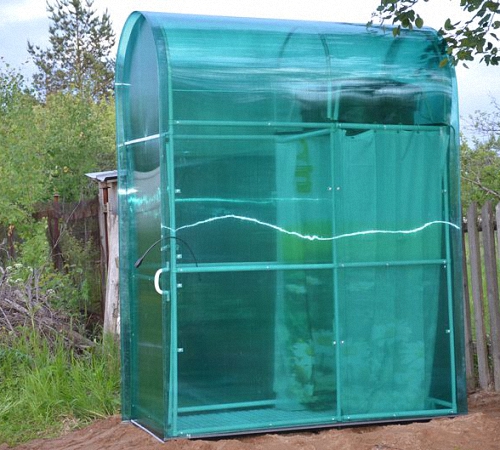
We suggest considering the option of constructing a heated polycarbonate summer shower. Before moving on to studying the instructions for its manufacture, let’s get acquainted with the main advantages of the equipment of such a shower:
- when using such a shower as a summer shower, the polycarbonate warms up very well, so in summer the heating elements are practically not used;
- the cabin retains heat for a long time;
- polycarbonate is resistant to mold, so this surface is more antiseptic;
- the material is durable and has a long service life;
- ease of installation and dismantling;
- a variety of colors allows you to choose polycarbonate in accordance with the wishes of the buyer.
When building a heated summer shower, you need to plan its location in advance and make a project.
The place where the shower will be installed must first be leveled. Water must flow downhill, so this aspect also requires organization. The surface of the drain must be lined with a water-resistant material, for example, concrete, roofing felt or waterproofing film. To prevent unpleasant odors and provide ventilation, a special mesh should be laid over the drain. If the shower will be used by more than three people, it is recommended to build a drainage hole into which the water will flow. The recommended pit depth is from two to three meters, and the distance from the pit to the shower is at least three meters. Sand or crushed stone is placed at the bottom of the pit. Use old ones as walls car tires or a plastic sewer barrel. The drainage pit must be closed, for example, wooden planks, for the safety of animals or small children.
When the preliminary work is completed, proceed to the construction of the structure frame. To do this, it is recommended to use an aluminum profile, which will help give the shower the desired shape. Use polycarbonate sheets with a thickness of eight to sixteen millimeters. A water tank is placed on the roof, and to ensure the shower operates in the cold season, you need to install a heated tank or an autonomous water heater.

Tanks for heated summer showers are different. In relation to their shape they are divided into:
- oval;
- rectangular;
- square;
- flat.
Depending on the material from which the tank is made, they are:
- steel;
- plastic.
Among steel water tanks there are:
- stainless steel tanks;
- made of galvanized steel;
- from ordinary metal.
When choosing the volume of the tank, you should be guided by how many people will bathe in the shower. The average recommended volume for a family of four is 100 liters. It is better to choose dark-colored tanks, as they have higher thermal insulation properties. Heated tanks are equipped with special taps and heating elements that are connected to electricity. Therefore, they do not require preparation; after purchase, they can be safely installed on the roof of the shower.
To increase the heating efficiency even more, you need to install a polycarbonate roof on top of the tank, which will create a greenhouse effect and retain the warmth of the water.
Another mandatory component of each tank is a device that indicates the amount of water in the tank. Since the heating elements are very sensitive to an anhydrous environment, and if there is a lack of water, they burn out, this parameter must be constantly adjusted.
To equip the floor in such a shower, you should install a drain pipe and make a small threshold separating the shower part from the locker room, in which things, towels and soap products will be stored. A pallet is placed on the floor, and then a rubber mat.
The door must be made of polycarbonate; for this, its frame is first constructed, to which the hinges are attached. After installing the polycarbonate, a handle is attached to it. Use a waterproof bath curtain to separate the washing and dressing areas.
To make the shower more beautiful and attractive, it is recommended to decorate the area located nearby with beautiful flowers, decorative figures or mosaics.
1. When choosing a place to install the shower, make sure that there are no strong drafts there, which will lead to the possibility of illness for the person using the shower.
2. Volume drain hole should be two and a half times larger than the water tank.

3. Do not place drainage and septic materials directly under the shower stall; they should be installed close to it. This procedure will reduce the risk of unpleasant odors.
- waterproofing roll materials;
- roofing felt materials;
- gutter reinforced with metal mesh;
- hydrostekliozol.
5. Do not use clay when constructing a waterproof layer, as it will erode and clog the drainage system.
6. To improve the efficiency of water drainage, install the shower stall on an elevated area, if available.
8. The minimum cabin size is one square meter, but this will require additional locker room space.
9. In practice, the most convenient size of a heated summer shower is a cabin 190 cm long and 160 cm wide.
10. Make sure that the base of the shower cabin frame is strong, since a tank filled with water is installed on top. It must be durable and withstand heavy loads.
11. To make the outer lining of the shower, you will need one of the following materials:
- polycarbonate;
- slate sheets;
- films;
- linings;
- moisture-resistant plywood.

12. It is desirable that the cladding material fits harmoniously into the exterior of the entire site. It is possible to paint it or apply decorative patterns that will make the shower not only a place for bathing, but also decorative element dachas
13. Make sure that the door is closed tightly, because drafts are not allowed in the shower room.
14. Since the shower door is constantly exposed to moisture, it is recommended to install special sealing mechanisms on it to save heat inside the room.
15. To use the shower in winter, you need to resort to insulation. Any insulation in the form of mineral wool, polystyrene foam or expanded polystyrene is suitable for this. To fix the insulation, use a film laid on top of it and secured with a stapler.
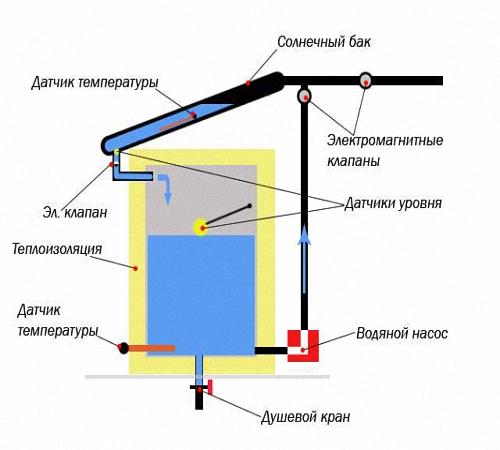
Features of the construction of the heating system, floor and installation of the water tank
The location of the water tank is the support pillars that are located above the shower stall. In order to save money, it is possible to purchase an ordinary barrel of one hundred or two hundred liters, and independently arrange it for the shower. Before installing the tank, you should make a thread in it into which a ball valve with a watering can will be installed.
There are three ways to fill water:
- manual - involves pouring water into buckets;
- pumping - connection to a circulation pump;
- water supply - connection to the water supply system, if available.

To construct a water supply, use metal-plastic pipes. The water flow is adjusted using a tap or water pressure. It is better to worry about installing a plumbing valve that will regulate the amount of water in the tank.
To install a heated floor in a summer shower, it is recommended to do concrete screed. Next, a wooden pallet is installed on which it is comfortable to stand with bare feet. It is possible to install a wooden floor without a cement screed, but in this case, a small draft will appear, causing discomfort when swimming in winter.
Another way to equip a shower is to install a purchased plumbing tray that has a siphon hose for draining. In this case, the installation of a waterproof layer in the lower part of the shower is not required.
A popular mistake when arranging a heated summer shower is installing a loose door and thick walls that do not allow air to pass through. Poor ventilation contributes to the spread of fungus and mold, due to the fact that the walls practically do not dry out.
In summer, when the water is heated by the sun's rays, there are no problems when swimming. But sometimes you have to come to the dacha in autumn, spring and even winter. In this case, swimming in a summer shower will be very cold. For these purposes, it is recommended to install a heating system that will provide the shower with hot water.
Let's consider the option of constructing heating using a blowtorch:
1. Use only pipes that are made of metal. The pipe that delivers water to the reservoir on the roof of the shower is located several meters away from the shower stall. A shelf with a heat exchanger and a water heater is installed outside the room. If there is no shelf, the option of using a table is possible.
2. To make a heat exchanger, you should make a coil from a thin pipe, pre-twisted into a spiral. If warm water is required, three layers of pipe winding are sufficient; if hot water is required, about eight windings will be required.
3. Insert the casing into the pre-made coil. A large saucepan or bottomless bucket is quite suitable for making it. Fix the coil in the casing by welding.
4. The ends of the coil are connected to a metal pipe that supplies water to the shower. It is better to make a coupling mount that can be easily removed in winter.
Another important aspect in the construction of a heated summer shower is its aesthetics and attractive appearance. In addition, correctly selected finishing materials play an important role. It is recommended to use moisture-resistant materials indoors that will not deteriorate over time. To improve soil drainage, it is recommended to plant moisture-resistant plants next to the shower, thus avoiding waterlogging of the soil.
Before you buy a heated shower, you should study the requirements that apply to it:
- profitability - affordable cost that justifies its quality;
- environmental friendliness - a heated shower must be made from materials that are harmless to human health;
- fire safety is another requirement, since a heated shower is connected to electricity, all contacts and connections must be made with high quality and in accordance with fire standards;
- comfort - being in the shower should be pleasant, and the size should be comfortable for bathing;
- modernity is a requirement for the design of the purchased one; it must be harmoniously combined with the overall exterior.
When choosing a model of a purchased shower, you should be guided by the volume and shape of the tank, which are chosen based on individual preferences. There are models with or without booths. It is possible to install additional options, such as automatic heating and draining of water, additional nozzles and hygiene devices.
There are pedal options or showers with separate changing rooms, they differ in cost, the latest models are more expensive, but much more convenient to use.
Another requirement for a heated shower is the convenience of its installation, since the shower is purchased, a maximum of three hours is allotted for the time of its connection or installation.
The shower stall should have a window or mesh elements through which light and air will flow, killing fungus and mold.

Among additional functions purchased summer heated shower:
- indicator that is responsible for the level of filling of the tank with water;
- heating devices or shutdown timers;
- water draining or filling devices;
- thermostats.
The location of the heating element is lower, middle and central.
A warm floor in the shower is not a luxury item at all, but a necessity. As a rule, electric heated floors are installed. Moreover, you can do the installation yourself; it is important to prepare the necessary equipment and arm yourself with photos, videos and diagrams.
- 1 Why do you have a heated floor in the shower?
- 2 Types of heated floors
- 2.1 Budget and economical TP
- 2.1.1 Features
- 2.2 Budget TP with fast heating
- 2.3 Fast heating and easy installation
- 2.1 Budget and economical TP
- 3 Popular myths
Why does the shower have a heated floor?
It would seem that the bathroom is a room where a “warm floor” system is not required. However, this is not entirely true. The presence of TP allows you to get rid of many pressing problems for the bathroom:
- Helps inhibit the growth and development of fungus and mold;
- Eliminates excess moisture;
- Allows you to protect against colds due to sudden exit from a hot bath into a cold room;
- Provides increased comfort while showering.
It is important to note that the TP can be installed either on the entire floor or separately in the shower area without a tray. The choice is yours.
Types of heated floors
In fact, all types of TP installed for the shower can be divided depending on what requirements the consumer places on the system:
- Financially accessible system with economical operating mode;
- Budget-friendly underfloor heating with fast heating;
- Efficient heating and easy installation systems.
So let’s consider each of the presented options separately in order to understand their features, advantages and disadvantages.
Budget and economical TP
These include systems that use single-core and double-core cable sections mounted in a screed. Compared to heating mats, costs will be 20-30 percent less.
In this case, the cable can be installed freely, regardless of the size of the room. It is easier to arrange this system for arranging individual zones than when using mats. Therefore, if you want to do TP only in the shower area, there will be no problems.
Peculiarities
- To obtain higher power per 1 sq.m., the cable pitch should be no more than 6 centimeters. This is true for those cases where the heated floor is the only heating system.
- You can reduce the cost of the system by purchasing cheap single-core cables.
- It is better to lay it in a screed, as this will allow you to create an additional layer of thermal insulation under the screed. This way you will save on electricity consumption.
- To install the cable, you need to pour a screed, the thickness of which will be about 3-5 centimeters. In this case, the floor will warm up in 90-120 minutes.
- If thermal insulation is not planned, then it is better to use thin cables or heating mats mounted in tile adhesive. This will heat up much faster.
Budget TP with fast heating
In this case, your choice is thin heating sections that are mounted in tile adhesive.
Laying occurs according to the same principle as in the case of laying in a screed. Only here you are already using tile adhesive. Please note that you cannot use a layer of thermal insulation material.
By installing such a system, you can provide floor heating in 15-20 minutes.
Fast heating and easy installation
Not everyone wants to tinker with complex systems underfloor heating, so they opt for the ones that are simplest in terms of installation.
For showers, it is important to use heating mats that are installed in tile adhesive. Compared to using a cable, working with mats is faster and easier. It is important to take into account that the cost of mats is approximately 30 percent higher than the price tags for cables. The floor heating time is about 20 minutes, or even less.
As you can see, the systems can be different, and their choice depends on the wishes and requirements of each individual consumer.
One way or another, it is possible, and sometimes even necessary, to install a heated floor for a shower. For example, in order to take care of the health of children or to increase the level of comfort of staying inside a given room.
Popular myths

As practice shows, people are afraid to use TP for bathrooms for two reasons. But both are mere fiction. And now we will explain why.
- Electricity underfoot in a room with high humidity. Roughly speaking, a person is afraid of being shocked. There is no need to be afraid of this, since the heating cables are made with several layers of polymer insulators. Plus, they are grounded and protected by screens. In the top layers of insulation, which is made of PVC, the coating is created in such a way that moisture does not penetrate inside. Add to this a layer of the screed itself, tile adhesive and tiles. As a result, electricity will not get anywhere near your feet. In order to finally convince yourself of the security of the system, do not spare money on good cable and a double screen on it.
- High energy consumption. The second common myth is that the underfloor heating system consumes a large amount of electricity, and therefore you have to pay a lot of money for its use. But in fact, to heat the floor, laid ceramic tiles, you won’t have to use a lot of energy. Due to thin layers, heating is carried out quickly. Plus, the systems are equipped with a thermostat, and all TPs have switches. That is, you turn on the heating when it is needed, then turn it off. Believe me, the numbers in receipts for electricity payments will not change after installing the “warm floor” system. But the level of comfort when taking a shower will increase significantly.
Well, heated floors have every right to your presence even in the soul. This makes water procedures more comfortable; there is no strong temperature drop when leaving the water. Plus, TP additionally affects the preservation of an attractive interior. It’s no secret that moisture has a destructive effect on even the highest quality finishing materials, furniture and plumbing fixtures.
Of course, it is better to entrust the installation of such a system to specialists of the appropriate profile. They will pick up optimal materials, will calculate the necessary parameters and perform the work at the highest level.
A shower without a tray is a convenient solution that saves space and gives the shower a more aesthetic appearance. Water flows down an inclined plane, decorated with ceramic tiles, into a specially designed drain (ladder) and is discharged into the general sewer system. Since moisture has direct contact with the surface, the first step is to high-quality waterproofing shower without tray. For this purpose, various insulating materials are used, each of which correct use is able to provide reliable moisture protection of the room.
The bathroom usually does not have a large area, especially in houses old building. Therefore, every square meter here is worth its weight in gold. The factory tray usually takes up a lot of space in the shower. At the same time, it does not provide much useful space, and therefore many refuse this attribute, preferring a shower without a tray.
The absence of a bulky element contributes to more interesting organization internal space. In addition, such a shower creates additional convenience for people with weak physical abilities, since in this case there is no need to step over the high side.
From an economic point of view, a shower without a tray also has its advantages. This attribute (pallet), made of quality material, costs a lot of money. In addition, it requires constant care, which requires additional costs. Therefore, its absence saves money in family budget.
Shower without tray – optimal solution to save space and money
Features of shower design
Behind the external simplicity of a shower without a tray lies a complex system. To comply with all the points (drain in the bathroom floor, waterproofing, correct slope), a headroom of at least 150 mm is required. And this despite the fact that the floor level should be lower than in other rooms. It is advisable to provide for this criterion during the design of the house, otherwise you will have to raise the floor and create a side around the perimeter of the shower.
Floor installation
Under a neat layer of ceramic tiles lies a real “pie”, each level of which performs an important function.
The bottom layer is a concrete base, which acts as a support for the entire structure. Next, insulation made of dense polystyrene foam or expanded polystyrene is placed. Then there are two layers of screed, between which there is waterproofing.
Important! Waterproofing plays a decisive role when installing a shower without a tray. For apartments in multi-storey buildings, it is of particular importance, as it prevents flooding of neighbors below.

Floor installation in the shower room
The drain ladder is installed on a concrete base in a designated place, and the drainage pipe is connected to the general sewer system. If the drain is installed in the center of the shower, then there should be a slope of 3% on all sides. When the drain in a shower without a tray is located in the corner of the room, a slope of 2% is maintained.
Areas of special attention
In addition to the floor, there are other surfaces in the shower that need good waterproofing. The so-called wet zones include:
- seams between the wall and the floor;
- bottom of the wall;
- area on the wall that is exposed to water when showering;
- pipes that collect condensate, and the places where they are inserted into the base.
These surfaces are considered an area of special attention, therefore they are carefully treated with waterproofing material.

Wet and humid areas in the shower
Waterproofing the shower floor: basic methods
There are several ways to moisture-proof a floor, each of which is effective in its own way. However, in order to get the desired result, it is necessary to maintain the correct technology and be able to work with the material.
Roll insulation
Waterproofing a shower floor without a tray can be done using rolled self-adhesive or fused insulation materials. In this case great importance has foundation preparation. If there are uneven surfaces, the surface is leveled cement screed. The hardened base is treated with bitumen mastic, on which the material is rolled out.
The strips are laid with an overlap of 100 mm and an overlap of about 150 mm on the walls. If built-up waterproofing is used, then all joints are soldered using a construction hair dryer. The edges of the self-adhesive waterproofing are pre-lubricated with special glue and pressed tightly.

Moisture insulation of bathroom floors using fused rolled material
Bitumen-polymer insulation
In the following way Waterproofing a shower without a tray is the use of bitumen-polymer mastic, which is sometimes called “liquid rubber.” The main advantage of this method is the ease of application of the material and the absence of complex preparation.
The surface must be cleaned and primed before applying mastic. “Liquid rubber” is applied with a brush, the layer thickness is maintained within 2-4 mm. All joints around pipes and drains, as well as the seam between the floor and the wall, are especially carefully processed. After polymerization of the mastic, a reliable waterproofing layer is formed.

Floor treatment with bitumen-polymer mastic
Polymer-cement compositions have good adhesion and high elasticity, so they are excellent for moisture-proofing floors. Such mixtures consist of cement, quartz (white) sand and polymer additives, which, after filling all cracks and depressions, crystallize, forming reliable protection from leaks.
The pre-prepared mixture is applied to a slightly moistened surface with a hard brush or spatula. Particular attention is paid to wet areas. After the first layer has dried, it is moistened and a second layer is applied, while leveling the surface with a spatula. As a rule, two layers are enough to completely protect the surface from moisture, but if necessary, a third layer can be applied.
For your information. Unlike other methods of waterproofing a shower floor without a tray, the polymer-cement composition does not require the use of additional cement screed. After it has dried, you can begin installing the tiles.

Application of a polymer-cement composition to the surface
Penetrating insulation
The mixture of penetrating waterproofing material consists of special cement, quartz sand and chemically active ingredients. Penetrating into the structure of concrete and filling its pores, the active elements react with cement, forming a structure of high-density crystals. Thus, the waterproof layer is formed not on the surface, but inside the concrete base.
Since the penetration reaction occurs only in the presence of water, before applying the composition the surface is well moistened until completely saturated with moisture. The technology of floor moisture insulation itself is similar to the method of applying bitumen mastic and polymer-cement insulation: the material is applied to the base with a brush, and all wet areas are carefully treated.

In the case of penetrating waterproofing, the concrete itself acts as a waterproof layer.
Moisture protection of walls
When it comes to waterproofing a shower without a tray, protecting the walls from moisture also plays an important role. To implement it, the following steps are performed:
- The wall is cleared of stains, old paint and other contaminants.
- Surface defects (cracks, potholes, etc.) are sealed with an insulating compound, after which the entire wet area is treated with waterproofing material.
- In areas that will be most exposed to moisture, you can apply two layers of moisture protection.
It is not necessary to use the same type of waterproofing for walls and floors. For example, you can lay roll insulation on the floor, and use polymer-cement material for the walls.
Advice. Since the bathroom is a place with high humidity, it must be equipped with good ventilation. To ensure reliable removal of moisture, a fan is installed in the exhaust hole, the power of which is selected in accordance with the area of the room.

Waterproofing bathroom walls
Arranging a shower without a tray is not as simple a process as it might initially seem. Surface treatment must be thorough, because any missed area, even minimal, can lead to dire consequences in the future. Therefore, it is better to entrust this work to specialists who have good experience in waterproofing various rooms and objects.
We have already talked about materials and methods . You need to understand that this is an extremely important procedure that cannot be avoided. Today we will talk about waterproofing a shower without a tray and with a tray. Considering the fact that this interior work, which are carried out for further finishing, it is best to use coating materials.
Materials for shower waterproofing
The mastic should be applied with even movements (not chaotically).
Regardless of whether you are waterproofing a shower without a tray or with a tray, you will definitely be laying tiles in the future. Therefore, as a protective layer, you should choose a material that can be covered with tiles. Of all modern insulations, only latex mastic is optimal. Concrete can also be pre-treated with penetrating compounds. Popular brands of latex mastics:
- Knauf Flechendicht;
- Ceresit CL 51;
- Grida HydroMEB Acrylic.
To waterproof showers without a tray and with a tray, you can use special plasters or simply add additives to the cement that reduce its porosity, thereby making the material waterproof. But still, this method is not as reliable as mastics. Due to unavoidable mixing of the building, microcracks may appear in the concrete structure. The elastic membrane made of mastics easily tolerates small vibrations of structural elements without any damage. In this case, additives to concrete and impregnations will be an excellent auxiliary measure for waterproofing a shower tray or floor screed.
Waterproofing a shower without a tray

Even if there is no pallet, boundary walls are still needed.
What is a shower without a tray? This is a separate corner in the bathroom where a water supply outlet is installed and there is a sewer hole for water outflow in the floor. In this case, the floor is on the same level as the entire bathroom. To prevent water from spreading throughout the room, the shower area is separated by a threshold approximately 5 cm high.
By default, we will assume that the floor surface has already been prepared and a leveling screed has been applied to it, which in the shower area should be made at an angle to the water outflow. Waterproofing a shower without a tray begins with the construction of a threshold. You can make a lathing and fill it with concrete or use small-piece materials (brick, foam concrete) for this purpose.
After this, you can begin applying protective compounds. Need to process:
- pan bowl;
- threshold (completely on all sides);
- adjacent walls - if tiles are not laid.
Also read: ““. Along with these works, it is necessary to carry out comprehensive waterproofing of the floor in the shower with an overlap on the walls along the entire perimeter of the bathroom. First thing work surface needs to be cleaned of dust. The degree of adhesion of mastic and concrete depends on how well the preparation is done. Then the ready-made latex mastic is applied with a roller or brush to the floor, as well as to the walls in wet areas (shower, sink, toilet, bidet).
Waterproofing of a shower room is carried out in at least two layers.
In this case, it is advisable to apply the material not chaotically, but with even movements parallel to one of the walls. The second layer must be applied in the same way, only perpendicular to the first layer. Thus, the possibility that there will be a loophole for liquid that is invisible to the eye will remain in some area. After the acrylic has dried, a drain is installed - a mesh on the sewer pipe through which the water flows out. Usually it comes with a polymer insert that seals the drainage system. Silicone or bitumen sealant is used to seal all joints.
Waterproofing shower with tray

Erection of the pallet makes it easier to connect communications.
A shower tray is a bowl that is located above the level of the bathroom floor. This approach facilitates the sewerage supply. For example, in an apartment multi-storey building It is impossible to make a shower without a tray, unless you raise the floor level of the entire bathroom, but this is already overkill. Pallets are:
- plastic or metal, manufactured in production;
- concrete, made on site.
Factory-made pallets come with or without adjustable legs. In the second case, you will need to make an overpass from bricks or foam blocks. Waterproofing in a shower with a tray includes a set of measures to protect:
- gender;
- walls;
- wet areas.
Everything is standard and there are no special tricks. We talked about this in an article about . The factory pallet is installed in its place and coated with sealant in places where it abuts the wall. All other joints are sealed with rubber gaskets. Waterproofing a concrete shower tray follows the same principle as a shower without a tray. Essentially, this is the same concrete bowl, only installed above the floor level.
Many people have switched from traditional bathtubs to shower cabins. These are sealed structures from which water closed door It doesn’t go anywhere except the sewer. But it also happens that the cabin leaks. In this case, it is better to entrust the waterproofing of the shower stall to professionals; it may be necessary to replace one of the structural elements, for example, if the plastic is cracked. If a leak appears at the joint, you can try to cover it with sealant.
Bathroom renovation is a complex, multi-stage process that involves several types of construction work. This room is different increased level humidity, which is constantly present there, and a humid environment is an excellent source for the formation of mold and mildew. In addition, it can spread to other areas of the house - and this cannot be allowed. To “cut off” moisture from the bathroom from the rest of the apartment, waterproofing is used. Waterproofing is especially important in a shower room that does not have a tray - water falling on the floor can easily penetrate through the ceilings not only into other rooms, but also into neighbors - and this, you know, is a direct path to conflict. That is why great attention must be paid to waterproofing work when renovating a bathroom.
There are always areas in bathrooms that are exposed to increased moisture. More attention needs to be paid to the following areas:
- floor and lower part of walls;
- shower cabin;
- area around the washbasin;
- shower cabin, bath.
The bathroom is a high humidity zone!
Choosing waterproofing materials for the shower stall
Manufacturers offer big choice materials for waterproofing work. You can give preference to one or another method of creating a waterproofing barrier by carefully studying the working conditions. You need to find out what material the walls are made of, what kind of “pie” is on the floor, etc. Sometimes one type of waterproofing is enough, but it is better to use them comprehensively, for each zone - the most suitable materials.
Types of waterproofing:
- coating;
- polymer-cement;
- penetrating;
- roll;
- elastic.
Roll waterproofing is an old and proven method of cutting off moisture. Waterproofing of the shower room is carried out using rolled materials based on fiberglass and polymerized bitumen. They are self-adhesive and fused. The first ones are laid on the existing adhesive layer, the second ones are glued to the surface using gas burner. The advantage of this method is its low cost, the disadvantage is that it does not have a very long service life.
A more modern method is coating waterproofing, for which bitumen-based mastics (bitumen-polymer and bitumen-rubber) are used. Such compounds are often called “liquid rubber”. They have high elasticity, good adhesion to the base and a longer service life. To protect against external damage, the mastic layer is covered with a cement screed.

Polymer mastics block the path of water, but leave the wall “breathable”
Another type of materials for coating waterproofing is polymer-cement compositions. They are dry mixtures intended for mixing with water, which are used for plastering walls adjacent to wet areas, as well as for laying heated floors. They are characterized by high elasticity and do not require additional screed.
Polymer mastics are another type of materials for waterproofing showers and bathtubs. This is a more high-tech method of cutting off moisture, based on the effect deep penetration composition in the thickness of the base. After polymer mastics dry, a durable, waterproof layer is formed, which is highly elastic and allows water vapor to pass through.
Penetrating waterproofing is the most modern method barriers to moisture. The material used is a mixture of finely ground quartz sand with Portland cement and special chemicals. Upon contact with a moistened surface, the active ingredients enter into chemical reaction with concrete components, forming insoluble crystalline compounds that tightly seal the pores of concrete. At the same time, the strength of the base itself increases, and for many years the reaction continues, “self-healing” the newly formed microcracks in the concrete. Crystalline formations reliably block the path of water, while allowing vapor to pass through, so the wall remains “breathable.”
The choice of materials for waterproofing is based on the type of substrate on which they will be applied. For example, on concrete foundations it is better to use polymer-cement and penetrating waterproofing materials, and on porous brick walls, bitumen mastics and the same polymer-cement membranes have proven themselves well.

Penetrating waterproofing seals concrete capillaries
How to waterproof a shower floor
The floor is the surface that is most susceptible to moisture, so it needs particularly reliable waterproofing, regardless of whether you are installing a bathtub or shower stall with or without a tray. It is mandatory for all bathrooms to lower the floor level compared to the rest of the house. If this is not possible, a high threshold is installed to separate the bathroom from the hallway.
To get a high-quality result with your own hands using polymer-cement waterproofing, you must follow a strict procedure:
- The floor surface is thoroughly cleaned of dust, dirt, debris, adhering drips of plaster, etc.;
- The surface is slightly moistened;
- The components of polymer-cement waterproofing are mixed according to the instructions on the material packaging;
- The mixture is brought to a homogeneous state;
- The solution is applied with a hard-bristled brush to the entire surface of the floor and the lower part of the walls;
- Particular care is taken to coat the joints of the floor and walls, the places where communications are discharged - riser pipes, sewerage, water supply, etc. These places can be strengthened with polypropylene mesh;
- The first layer dries within the time specified in the instructions for the material;
- The surface is moistened again, a second layer of waterproofing material is applied;
- The second layer is dried again for the required amount of time, after which the waterproofing of the shower floor is completed and finishing work can begin.

Considering that polymer-cement waterproofing is based on cement, it has good adhesion to the base
If you want to go down the path least cost, your choice is roll waterproofing. It gives good results, but the service life of these materials is relatively short.
- The floor surface is leveled so that differences are no more than 5 mm. The joints between the floor and walls are rounded using a cement-sand mixture;
- The canvases are cut to size, taking into account an overlap of 15-20 cm on the walls. The resulting sections are moistened with solar oil - this is done to increase the elasticity of the material, better adhesion to the base and remove excess quartz sand from the surface;
- The cut panels are left to rest for 24 hours so that the surface is leveled;
- The floor is thoroughly cleaned of debris, dust, and dirt;
- Bituminous mastic is applied to the surface to be glued in a single layer, waterproofing material is laid and carefully rolled;
- The second layer of bitumen material is laid transversely to the first in a similar manner;
- Finished surface coat with heated mastic and sprinkle quartz sand for better adhesion of waterproofing to the screed.
It is imperative to overlap the canvases on each other by 10-15 cm, gluing these places and pressing well. It is necessary to carefully roll the corners between the floor and walls. If bubbles form, cut them with a sharp knife, carefully coat the folded edges and press well.

When laying roll waterproofing, special attention is paid to gluing the seams
DIY penetrating waterproofing
Similar materials are already produced by many manufacturing companies, each of which considers their products to be “the best.” In fact specifications All penetrating waterproofing systems are quite close. You can get excellent results with any of them, the main thing is to strictly follow all the requirements of the instructions for use. Let's consider the sequence of work when using the Penetron waterproofing system:

Penetron acts as a deep impregnation primer. When applied to a wall, Penetron penetrates concrete up to 900 mm
- The main requirements for users of penetrating waterproofing materials are high-quality surface preparation. It must be thoroughly cleaned of dirt, layers of foreign materials, and dust;
- Along the perimeter of the floor at the junction with the walls, a groove measuring about 25x25 mm is made. Debris and dust are removed. The entire surface of the groove is well moistened;
- The Penetron material is mixed with water according to the instructions. The groove is primed in one layer with Penetron;
- The suture material “Penetrit” is prepared according to the manufacturer’s recommendations. The resulting mixture is placed in the groove, the mixture consumption is 1.5 kg per 1 linear meter of the groove;
- After the joint material has set, the entire surface of the floor and the lower part of the walls is moistened. A layer of “Penetron” is applied;
- After the first layer has dried, it is moistened and covered with a second layer;
- Surfaces need constant moisture. Surfaces treated with Penetron are periodically wetted for 2-3 days;
- 21 days after applying waterproofing, the walls are cleaned wire brush from sand and cement and are ready for laying decorative coatings.

With high-quality waterproofing of the shower room, you don’t have to worry about the microclimate in the house and conflicts with neighbors
Using one of the described technologies, you can achieve excellent results in waterproofing your shower. However, given the many subtleties of this process, especially with regard to high-tech materials, it seems more correct to leave these concerns to specialists. Correcting repair mistakes is always too expensive to make!
Are you organizing a shower room, but would like to do without trivial solutions in the form of a tray? A few secrets for waterproofing your bathroom floor will help you create an exclusive interior that fully meets your requirements.
Do without a shower tray? No problem! Let's talk about how to insulate the shower floor from negative impact moisture.
When designing rooms in your home, you should pay special attention to the protection and safety of floors and walls. Don't forget about moisture insulation in the shower. The ability to install a moisture-proofing layer and drainage system is important. A shower without a tray is a simple and economical solution. This option is excellent for small bathrooms.
Waterproofing a shower floor without a tray is one of the most difficult and critical steps in finishing a bathroom, especially if it is... Many factors must be taken into account: resistance to adverse factors, protection from moisture, system functionality and aesthetics.
Photo: Waterproofing a shower floor with coating mastic
To equip the drainage system, moisture insulation and sloping floor, an appropriate height reserve should be provided - at least 15 cm. Otherwise, the floor level in the shower room will need to be made higher than in other rooms. Waterproofing the floor in a shower without a tray should be carried out over the entire surface, not excluding the drain.
Basic requirements for waterproofing shower floors
Surface preparation
Make sure there are no various damages (cracks, chips) on the surface of the shower floor. Clean the surface from debris, grease, and dust. All protrusions and cracks should be repaired and leveled. There should be no protruding screws or nails. The porous surface must be primed. Make a slope towards the drainage area.
Waterproofing materials
Waterproofing in the shower is necessary in order to prevent moisture from reaching the surface of the walls and floor and affecting these surfaces for a long time. Therefore, the insulating sheet must be High Quality. When performing moisture-proofing work, you should pay attention to quality characteristics selected materials. Special adhesive moisture-proofing materials have gained particular popularity recently. This is a roll type of coating, which is based on modified polymers and bitumen. Using them, waterproofing a shower floor without a tray is ideal.
The coating is laid using the hot or cold method. There are self-adhesive options that must be laid correctly and pressed tightly to the surface. You need to start working only after all measurements have been taken.
Special hydro-coating compounds can also be used. They are very hardy and persistent. This group includes polymer and rubber mastics with the addition of bitumen, for example, or bitumen mastic.
To ensure good adhesion and impart elasticity, plasticizers can be added to the composition. Using a notched trowel, spread the mixture over the surface.
Video: Waterproofing in the bathroom
When carrying out moisture-proofing work in a shower room, it is important to follow the installation technology of all elements. The joints between the walls, floors and drainage element must be correctly connected. These places must be well moisture insulated.
The waterproofing layer can be laid on the screed. This fabric is fixed with sizing. After which you can lay the floor covering, for example, tiles.
The drainage recess can be built directly in the floor screed itself. All elements of the drainage system are placed there. The free space is filled with concrete mortar.
To create moisture insulation in the shower, the most common is polyethylene of special thickness or roofing felt. The insulator layer is laid out on the floor, fixed and the covering is laid on it.
To check the operation of the system, just add a little water.

Approximate consumption:
- 1.0 - 2.0 kg. per 1 sq. m. - base solvent
- 1.0 - 1.5 kg. per 1 sq. m. - water based
- 1.5 - 2.0 kg. per 1 sq. m. - hot
* exact specifications Please check with the manufacturer for materials and methods of use.
A warm floor in the shower is not a luxury item at all, but a necessity. As a rule, electric heated floors are installed. Moreover, you can do the installation yourself; it is important to prepare the necessary equipment and arm yourself with photos, videos and diagrams.
- 1 Why do you have a heated floor in the shower?
- 2 Types of heated floors
- 2.1 Budget and economical TP
- 2.1.1 Features
- 2.2 Budget TP with fast heating
- 2.3 Fast heating and easy installation
- 2.1 Budget and economical TP
- 3 Popular myths
Why does the shower have a heated floor?
It would seem that the bathroom is a room where a “warm floor” system is not required. However, this is not entirely true. The presence of TP allows you to get rid of many pressing problems for the bathroom:
- Helps inhibit the growth and development of fungus and mold;
- Eliminates excess moisture;
- Allows you to protect against colds due to sudden exit from a hot bath into a cold room;
- Provides increased comfort while showering.
It is important to note that the TP can be installed either on the entire floor or separately in the shower area without a tray. The choice is yours.
Types of heated floors
In fact, all types of TP installed for the shower can be divided depending on what requirements the consumer places on the system:
- A financially accessible system with an economical operating mode;
- Budget-friendly underfloor heating with fast heating;
- Efficient heating and easy installation of the system.
So let’s consider each of the presented options separately in order to understand their features, advantages and disadvantages.
Budget and economical TP
These include systems that use single-core and double-core cable sections mounted in a screed. Compared to heating mats, costs will be 20-30 percent less.
In this case, the cable can be installed freely, regardless of the size of the room. It is easier to arrange this system for arranging individual zones than when using mats. Therefore, if you want to do TP only in the shower area, there will be no problems.
Peculiarities

- To obtain higher power per 1 sq.m., the cable pitch should be no more than 6 centimeters. This is true for those cases where the heated floor is the only heating system.
- You can reduce the cost of the system by purchasing cheap single-core cables.
- It is better to lay it in a screed, as this will allow you to create an additional layer of thermal insulation under the screed. This way you will save on electricity consumption.
- To install the cable, you need to pour a screed, the thickness of which will be about 3-5 centimeters. In this case, the floor will warm up in 90-120 minutes.
- If thermal insulation is not planned, then it is better to use thin cables or heating mats mounted in tile adhesive. This will heat up much faster.
Budget TP with fast heating
In this case, your choice is thin heating sections that are mounted in tile adhesive.
Laying occurs according to the same principle as in the case of laying in a screed. Only here you are already using tile adhesive. Please note that you cannot use a layer of thermal insulation material.
By installing such a system, you can provide floor heating in 15-20 minutes.
Fast heating and easy installation
Not everyone wants to tinker with complex floor heating systems, so they opt for the simplest ones in terms of installation.
For showers, it is important to use heating mats that are installed in tile adhesive. Compared to using a cable, working with mats is faster and easier. It is important to take into account that the cost of mats is approximately 30 percent higher than the price tags for cables. The floor heating time is about 20 minutes, or even less.
As you can see, the systems can be different, and their choice depends on the wishes and requirements of each individual consumer.
One way or another, it is possible, and sometimes even necessary, to install a heated floor for a shower. For example, in order to take care of the health of children or to increase the level of comfort of staying inside a given room.
Popular myths

As practice shows, people are afraid to use TP for bathrooms for two reasons. But both are mere fiction. And now we will explain why.
- Electricity underfoot in a room with high humidity. Roughly speaking, a person is afraid of being shocked. There is no need to be afraid of this, since the heating cables are made with several layers of polymer insulators. Plus, they are grounded and protected by screens. In the top layers of insulation, which is made of PVC, the coating is created in such a way that moisture does not penetrate inside. Add to this a layer of the screed itself, tile adhesive and tiles. As a result, electricity will not get anywhere near your feet. In order to finally convince yourself of the safety of the system, do not spare money on a good cable and a double screen on it.
- High energy consumption. The second common myth is that the underfloor heating system consumes a large amount of electricity, and therefore you have to pay a lot of money for its use. But in reality, you don’t have to use a lot of energy to heat a floor laid with ceramic tiles. Due to thin layers, heating is carried out quickly. Plus, the systems are equipped with a thermostat, and all TPs have switches. That is, you turn on the heating when it is needed, then turn it off. Believe me, the numbers in receipts for electricity payments will not change after installing the “warm floor” system. But the level of comfort when taking a shower will increase significantly.
Well, a warm floor has every right to its presence even in the shower. This makes water procedures more comfortable; there is no strong temperature drop when leaving the water. Plus, TP additionally affects the preservation of an attractive interior. It’s no secret that moisture has a destructive effect on even the highest quality Decoration Materials, furniture and plumbing.
Of course, it is better to entrust the installation of such a system to specialists of the appropriate profile. They will select the optimal materials, calculate the necessary parameters and perform the work at the highest level.
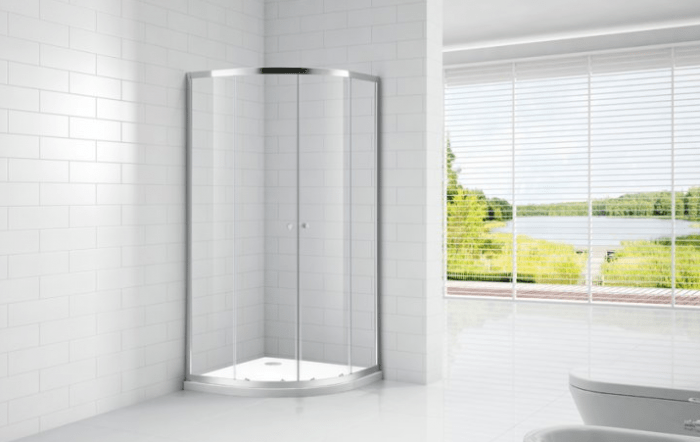
Cramped plastic shower cabins are gradually disappearing from the bathrooms of our apartments and houses, giving way to the once leading position of a new word in arranging the interior of a home shower. Today, a shower without a tray is becoming not only interesting, but often the minimized and maximally functional design of a shower without a tray allows you to throw out a clutter of plastic from the bathroom and make it more comfortable and spacious.
What is the secret of a shower stall without a tray?
Most lovers of new ideas who have built a shower stall in their home without a tray note not only Beautiful design new soul, many of the problems associated with the operation of the old system are gone forever. The new design of the shower cabin has become much more convenient and safer to use thanks to three main innovations:
- Instead of a slippery acrylic tray raised 15-20 cm above the tiles, in the new shower design a person stands directly on the floor;
- The functions of collecting water flowing onto the floor are performed by the floor surface made of tiles laid with a drainage slope in the direction of the drain or sewer drain;
- Instead of inconvenient curtains, sliding doors or shower curtains without a tray, a more aesthetic and practical glass fence is used.
All communications, water supplies and drain pipes are hidden in concrete walls and floors, under tile cladding and double waterproofing.

Important! A simple, at first glance, design of a shower cabin without a tray in practice turns out to be a rather complex structure that requires high-quality and careful planning and installation of all structural elements.
Often, a floor drain is supplemented with built-in heating of the “warm floor” type. This device becomes especially useful for showers. country houses, in which heating and water heating is carried out using coal or wood stoves or boilers.
Installation of a shower stall without a tray
If the installation of cold and cold supply pipes hidden under the tiles hot water has been used for quite a long time, and any competent person familiar with installation can build a wiring according to such a scheme plastic pipes in the wall channel, then assembly and installation drain ladder For a tile pallet, it is still better to entrust it to professionals.
The main problems that one has to face in the process of planning and installing a shower structure come down to the following:
- To install a drain ladder, it is necessary to either redo and lower the level of sewer pipes in the house, or raise the surface of the shower floor by 10-15 cm and equip it with side skirts that prevent water from spilling throughout the bathroom;
- When using a shower without a tray, a large amount of water can scatter in the form of splashes and drops of water throughout the room, so a corner location is most often chosen for a shower stall;
- If in a plastic booth most of the splashes and spilled water were absorbed by the polycarbonate walls, then in the new design the water flows fall on the wall tiles. Therefore, a very high-quality waterproofing of a shower without a tray is required, laid directly under the concrete screed of the tile base.
In addition to the above, you will need to make the correct angle of the tile and maintain the angle of inclination of the drain pipe of the water seal. The drain itself has double waterproofing and a special flange mount, which ensures a stable position of the drain even under the weight of a very heavy person.

Features of the design and design of a shower cabin without a tray
Refusal to use a bulky plastic tray in the shower and the use of a floor-mounted water drainage system allowed us to take a completely different look at the design and design of the shower compartment. First of all, the shower space has become open and transparent, even if you install light-permeable partitions, a small structure made of glass and tiles will look much more elegant and attractive than a box made of acrylic and polycarbonate.
Layout diagrams for a shower without a tray in the interior of a bathroom and apartment
In the process of development and design appearance For showers without a tray, several solutions have been developed that can be called classic, widely used in arranging cabins for apartments and private houses.
For example, a fairly effective solution is to use mosaics and small tiles to decorate the walls and floors of the shower compartment. This cladding scheme makes the floor less slippery and eliminates the need for special safety silicone gratings or mats.
Advice! You can make the floor in the shower stall safer in a simpler and more affordable way, for example, by installing a grate made of polished wood, oak or walnut.
A wood surface polished and covered with waterproof varnish will reduce slipping and at the same time serve as a heat insulator if the shower room does not have a heated floor.
The design of the floor drain can be made in the form of a recess in the floor or equipped with side skirts, as in the photo. This is the most rational decision for the construction of a shower stall in a small bathroom for an apartment with a standard layout.

Very often, designers try to hide a shower stall without a tray in a dedicated niche. Even if there are no niches in the layout of the room, they are equipped with the help of additional walls and false partitions.

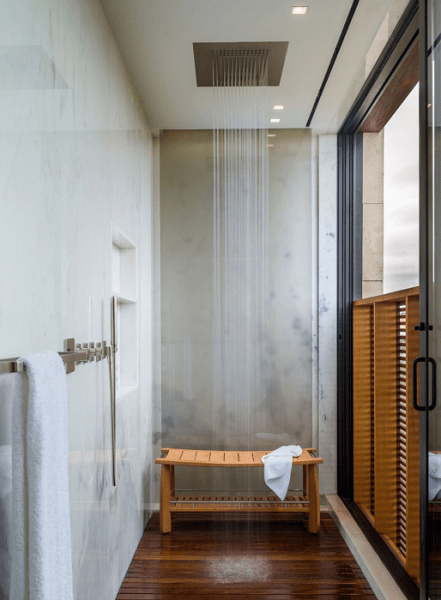
A relatively new solution in the arrangement of shower cabins is the use of ceiling water dividers. Refusal wall structures allows you to reduce water consumption and at the same time reduce the scattering of drops and foam around the shower.
Forms and methods of arranging a shower enclosure without a tray
To protect the space from flying drops of water, sheet glass, molded polycarbonate or ordinary silicone shower curtains are most often used. This technique allows you to visually increase the light content relative to small space shower stall and make it more comfortable.
When using glass partitions to enclose shower stalls without a tray, an inherent drawback of this kind of solution appears - the remains of soapy water and salts are very clearly visible on the clean surface. transparent surface glass Therefore, shaded, frosted or textured glass will be more practical.

In private homes, a shower compartment without a tray is often equipped with a transparent ceiling, or the room is supplemented with a small window. This solution eliminates the need for additional lamps and light sources.

Often the most daring designers end up with a glass shower enclosure without a tray.

This solution makes sense for relatively small or combined bathrooms, where the use glass partition not always justified. This is not to say that such a solution is very convenient, since flying spray can flood the room and make the floor wet and slippery even with the most careful use of the shower. Therefore, for apartment options, it would be more preferable to install at least the simplest through glass partition without a back wall.

This layout option allows you to block the main direction in which drops of water predominantly fly away; the absence of side panels makes it possible to effectively dry the surface of the tile and glass from residual water with a draft. Often this scheme is used for the simplest shower designs that do not produce large quantity steam supersaturated with moisture.
In this sense, corner or completely enclosed showers are inferior to open enclosure schemes, so often a cabin sealed on three sides with glass panels has to be equipped with its own ventilation system.

It is worth mentioning that completely enclosed shower cabins without a tray have their advantages. For example, such a design can be installed even in a residential space, in a studio apartment, where most of the space is designed as one large room. In addition, in a closed shower without a tray, you can install a steam generator for a steam room or equip a massage shower.

Conclusion
Today, a shower room without a tray is becoming the de facto standard for a comfortable modern living space. Most apartments and houses of the new layout are designed taking into account the wiring and arrangement of communications for the floor drainage option, without the use of special podiums or sides. Even if the apartment owners decide to move the shower stall from the bathroom to any other place, it will be quite easy to do this due to the low level of the drain in sewer pipe. For apartments with an old layout, it is almost impossible to carry out such a re-equipment without a radical and expensive re-laying of communications.
Experienced summer resident Alexander Turkovsky talks about how to set up a warm shower stall with hot water at your summer cottage.
We almost always had a light shower stall with a tank heated by the sun in our garden. But even in the best of times it remained cold and drafty. Therefore, I have long been planning to improve it so that I can wash myself even in cool weather. To do this, it was necessary to insulate the cabin, arrange its heating and provide it with hot water. I didn’t want to use electricity for this purpose - it would be a bit expensive, and I was scared by frequent failures and power surges in the electrical network.

WOOD STONE
The hint, as often happens, came from neighbors. They used a wood-burning heater, which, while the water was heating up, managed to warm up a small shower room. I decided to arrange the same shower for myself, equipping an old utility block where there was an old shower. At the same time, it was necessary to keep within the size of 135 x 110 cm. The wood-burning heater was purchased several years ago and was waiting for its turn. A pressure water supply from a well was made especially for her.Friends gave away a shower tray that did not fit in their building. With great difficulty we managed to arrange this equipment in a cramped booth. Moreover, it was necessary to connect a normal siphon to the pan and ensure drainage to the outside.
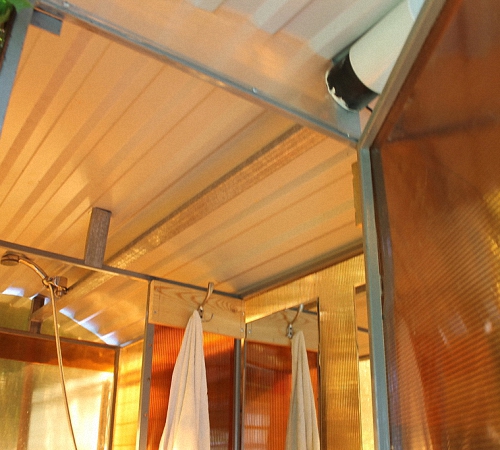
CABIN INSULATION
The work began with repairing the roof, since the old roofing material was already leaking. I replaced it with three sheets of ondulin. Three, because there is also a toilet under the same roof. The outside of the “plumbing plant” was covered with old plywood, which added rigidity to the structure, provided additional thermal insulation and made Friends give away a shower tray that did not fit in their building. With great difficulty we managed to arrange this equipment in a cramped booth. Moreover, it was necessary to connect a normal siphon to the pan and ensure drainage to the outside.

CABIN INSULATION
Rolled polyethylene foam (PPE) cached with foil is well suited as insulation. I specifically looked for a PPE version on sale with foil covered with lavsan film, since unprotected foil is easily damaged by mechanical stress.The work began with repairing the roof, since the old roofing material was already leaking. I replaced it with three sheets of ondulin. Three, because there is also a toilet under the same roof. The outside of the “plumbing plant” was lined with old plywood, which added rigidity to the structure, provided additional thermal insulation and made it less drafty, because the old walls were covered with slab scraps. Paint the plywood with paint. I attached rain canopies (from old roofing iron) above the doors of the toilet and shower.
I decided to make hydro and thermal insulation over the entire area of the cabin, including the floor. At the top of the cabin I made a support for attaching PPE, strengthening additional strips, leveled the floor and added a plinth for smooth bending of the insulation.
To attach the insulation sheet I used construction stapler with 12 mm staples. I felt the wall through the insulation and secured it where the support was located. I started with the ceiling, then covered the floor and finally the walls. I did not fix the sheet on the floor, in order to avoid unnecessary holes in the wet area, I attached it only to the walls, wrapping the sheet with a trough.
The door was sheathed so that the insulation sheet occupied the entire area visible from the inside. And then along the perimeter of the opening at its end I attached strips of insulation to seal the narthex. The effect of the decoration immediately made itself felt: in cold weather, if you closed the door behind you, a feeling of warmth immediately appeared. Upper part I have not yet sheathed the wall through which the chimney exit was planned.

SPEAKER INSTALLATION
I had to rack my brains about how to install a tray and a column on such a floor. I used a sheet flat slate 8 mm thick, but I didn’t risk simply placing a wood-burning heater on it, since three legs with a small support area under the weight of the structure filled with water could crush the sheet on the floor. A piece of flat iron ~5 mm thick was found on the farm. I cut it out with a grinder required square, painted it in two layers with “Rusty Stop”, put a piece of polyethylene foam under it and placed an iron column on it. As one would expect, it turned out to be unstable, so to prevent the column from wobbling, I secured the neck of the pipe with wire braces to the walls.SMOKE PIPE INSTALLATION
I bought a stainless steel pipe with a diameter suitable for the column at the nearest stove store. I took two straight sections (0.5 and 1.0 m long), three 90° turns, and also a “mushroom” for the pipe. After assembling the two turns inside, it became clear where the pipe should go through the wall. The passage was made from slats and old roofing iron, laying the contact patch with sheet asbestos. On the inside, I attached PPE to a previously unsheathed area of the wall, and on the outside, I attached scraps of plywood. I assembled the last outer turn, a 1 m pipe and a fungus. I didn’t attach the pipe to the shower - practice has shown that friction is quite enough to resist the wind (sometimes it can be corrected), and for the winter I remove the pipe, leaving only the “fungus”.The chimney inside the shower is too close to the ceiling, so insulation is needed. I wrapped the pipe with sheet asbestos: I moistened it with water for plasticity and secured it with wire. You can’t leave exposed asbestos, so I wrapped the pipe with more aluminum foil tape on top.
SUPPLY WATER
Before installing the pan, I installed the water supply. I used a PVC hose with clamps and a thick rubber gasket. The entry was made through the back wall, making a hole of the required size in it with a circular cutter.ORGANIZE DRAIN
Before installing the pan, it was necessary to install a siphon. It’s a strange thing: I thought that since there are a lot of pallets on sale, there must be a lot of siphons for them. But I found a suitable design with great difficulty, having gone through almost all the plumbing stores in the area one by one.When I installed the siphon, it turned out that its height was lower than the floor; I had to make stands for the legs of the tray from an antiseptic board. I also looked for a corrugated pipe for a long time required diameter for drainage equipment. This pipe was brought out from behind the cabin (the hole was made with a circular cutter), and led it into the nearest raspberry patch.

HEAT SHIELD
Having filled the column with water, I carried out a test fire. First of all, I was interested in the effectiveness of the thermal insulation of the chimney inside the shower. In the end, I decided to make a screen between the pipe and the ceiling. To do this, I screwed a slate plate to the ceiling, using old porcelain rollers from electrical wiring to form the gap.WATER SCREEN
I made a curtain rod from an old hula hoop, cutting off the excess part, and attached it to the wall with screws. I screwed old soap dishes that had accumulated around the house into the corners and attached hooks for clothes and towels. It’s inconvenient for me to wash while standing, so I bought a compact plastic stool. It can also be used when you are baking.On a bath day, I connect the hose from the well to the inlet hose, open all the inlet taps and light the stove.
ADVANTAGES AND DISADVANTAGES
Operation showed the advantages and disadvantages of this bathhouse. The advantages include efficiency, since usually one armful of firewood is enough to heat both water and the room itself. To control the heating of water, I adapted a thermometer, isolating it from the room air with pieces of PPE.The downside was the splash of water from the shower towards the speaker. I have not yet been able to come up with a good shield or apron for insulation. Another drawback is that the drain hole from the column turned out to be inconveniently located. It was not possible to adjust the hose, so all the water drains onto the floor. To ensure drainage, I had to slightly tilt the cabin and adjust the position of the tray to ensure guaranteed water drainage. This modification came in handy in the fall, when I had to drain the water from the pump. In addition, the drainage through the pan siphon turned out to be weak, which led to blockages. I had to buy a plunger and put it in the shower.
The third drawback was the lack of a dressing room where you can undress or dress after you have washed and cooled down. It’s difficult to cool down in a bathhouse; it’s hot and humid here, making it harder to dry quickly. But even here a way out was found - a curtain with the door open.
A volume of 90 liters of water, heated to 50-60°C, is enough for two people to wash twice and use it sparingly. The shower is turned on to rinse briefly, and the rest of the time the low flow mode is used.
The thermal insulation is good: the heater, heated in the evening, did not have time to cool down overnight - it was possible to wash.
The idea of an economical microbath turned out to be so interesting that for the future I planned to make essentially the same new one, but adding a dressing room.