Do-it-yourself interior sliding doors: video, photo, installation. We install sliding doors with our own hands
There is probably not a single person who is completely satisfied with the dimensions of their home. No matter how much space there is, for some reason there is always not enough. Installing sliding doors will help free up space at least a little, which also look very attractive and modern, giving the room some zest. These doors can be customized to suit any style. If their design is well chosen, they can become a chic addition to the interior.
Before you move on to installing sliders, you need to weigh the pros and cons. Like all other designs, sliding doors are not perfect. They have their own advantages and disadvantages, due to which their installation in some conditions will be impractical.
Advantages and disadvantages of sliding doors
Let's start with the advantages:
When installed correctly, such doors open very easily;
They are a wonderful way to disguise a room; they can fit perfectly into the interior;
They will not receive damage from hitting the jamb in a draft;
The main thing is that they take up virtually no space when opened. Such doors can go behind a closet, sofa or any other furniture or decorative element, however, for this, the interior items must be located at some distance from the wall.

It seems that sliding doors are good for everyone, but, as usual, things cannot happen without a few fly in the ointment:
Most big drawback sliding doors - the impossibility of a tight connection, which is why they practically do not become an obstacle to smells, sounds and light. The movement mechanism simply does not allow the canvas to press against the doorway. That is why they are not used as entrance or balcony doors;
It will not be possible to hang pictures or mount switches, sockets and other electrical elements on the wall into which the door leaf is hidden or onto which it runs;
If selected hidden design, then you will have to periodically clean the niche, which is very problematic to do. To make this process a little easier, you can make one of the walls removable, for example from plasterboard.

So, the disadvantages do not frighten you and the decision to change the interior doors has been made. Where to start? First you need to decide on the type sliding design.
Types of sliding doors
All sliding doors can be divided into two main groups:
1. Parallel sliding.
2. Sliding-folding.
Each of these types differs in assembly technology, fittings and has its own design features.
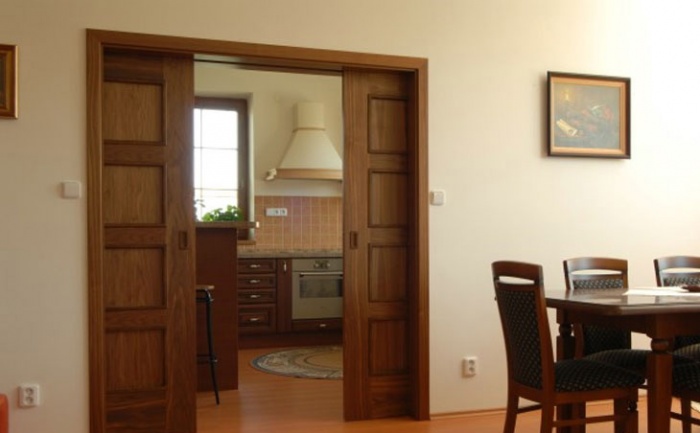
Parallel sliding doors can have one, two or even several leaves. Usually the number of sashes does not exceed four, and the entire length of the opening is divided equally between them. The most common subtype of parallel-sliding structures are compartment doors, which are a single-leaf or double-leaf slider, the principle of operation of which is similar to the compartment doors of passenger cars. They are distinguished by ease of installation and higher, in contrast to other options, sound insulation properties.
Installation of single-leaf sliders will not cause any special problems even for a person completely unfamiliar with construction work, but multi-leaf structures are complex. That is why in this article, intended more for non-specialists, we will consider the simple process of installing single-leaf sliding doors.

Another option is pencil doors. When opened, the doors go into a special niche built into the wall. If it is not possible to arrange a hollow part in the ceiling, the canvas can be disguised as plasterboard partition, hiding the mechanism.

Sliding-folding structures consist of several sections, usually four to seven, folding together like an accordion book. Such doors are well suited for zoning a room and are indispensable for narrow corridors.

Speaking about sliders, we must not forget about the so-called rotary doors, which can either open in any direction or move in any direction. The leaf of such a door can rotate 360° around its axis; it is neither right nor left. This makes them convenient to place in narrow rooms with limited space.
If a hidden structure is chosen for installation, then you need to make sure that there are no chimneys in the wall where you plan to install a “pocket” for the entry of the sash, ventilation holes, hidden electrical wiring, as well as water and heating pipes. In general, it is very problematic to create a niche in a finished wall, so if it is impossible to do this during the construction process or overhaul, then it is better to use a plasterboard masking panel applied to the wall.
When buying a door leaf, do not forget to take into account that when closed it must also cover part of the doorway, at least by 50-70 mm, otherwise the cracks will simply catch your eye. Moreover, if it is mounted only on the top rail, its weight should not exceed 50 kg. It is also necessary to ensure that the door has somewhere to move away, that is, that the length of the wall on which it fits is greater than the length of the movable door.
Be sure to make sure that the ceiling and floor are parallel. A deviation of 1 mm per 100 cm is allowed. Large non-parallelism can lead to misalignment of the entire structure and its jamming during operation.
If the door is planned to be installed in wooden or plasterboard openings, they should be reinforced with a metal frame made of channels, corners, or attached for a guide metal beam. This beam must be attached to load-bearing walls using anchor bolts.
Handles and locks for sliding doors are chosen to be of a hidden type, otherwise they will interfere with the full opening of the door.

What you need to prepare for installing interior sliding doors
So that when working you are not distracted by such trifles as searching stores for suitable fittings or a missing bar the right size, it’s worth being fully prepared in advance. You will need:
1. Of course, the door leaf itself.
2. A wooden block, the length of which must be at least twice the width of the sash, and the width and height are equal to 50 mm.
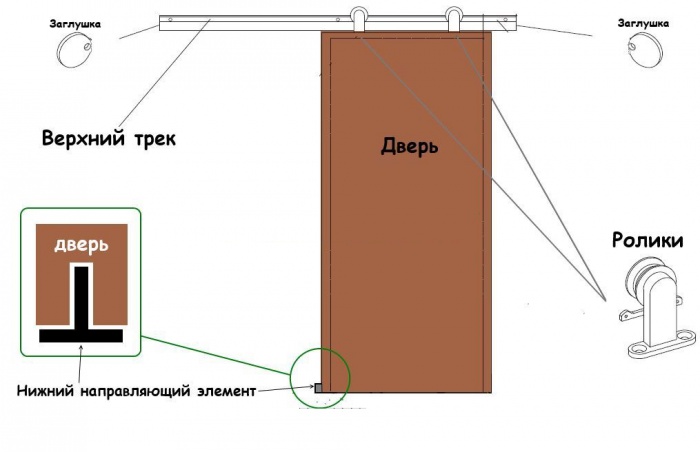
3. Set of fittings for sliding doors. Typically it includes rollers, an upper and lower rail, travel stops, carriages, a decorative strip for masking the rollers and rail, two extensions, two trims, handles and locks. For each sash you should purchase two rollers, and if the weight door leaf exceeds 75 kg, then four.
4. Anchor bolts.
5. Self-tapping screws.
How to install sliding sliding doors correctly
So, installation of interior doors. Let's break the whole process into several stages:
1. First you need to measure the upper border of the door leaf, placing it against the wall adjacent to the opening. This is done in a closed and open position, in order to prevent possible unevenness of the floor. From this line you need to measure another 70 mm upward and draw a horizontal line at this level. This is where we will place the main mechanism.
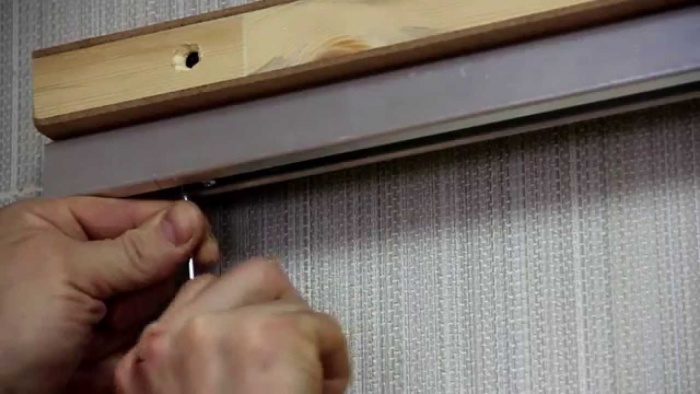
2. Attach to the marked line wooden beam, so that its middle is exactly above the upper corner of the opening from the side open door. This must be done as tightly as possible, without leaving the slightest gap, even if you have to bend the beam to make the connection.
3. We proceed to fastening the upper guide rail. The location of its extreme hole is calculated in the following way: the thickness of the door leaf is divided exactly in half and 5 mm is added to this value. Now the guide is attached on both sides with self-tapping screws without the slightest bend; for this, the previously found distance to the hole is set aside from the most protruding point of the wall. After this, you need to make sure that the door leaf moves freely along the rail. It should not touch either the wall or the opening.

4. We insert the assembled carriages inside the top rail. There is no need to apply any lubricants inside the guide to facilitate their movement. If the movement of the carriages is difficult, it means that either during their assembly or at the stage of installing the guide, some mistakes were made, for example, the rail was not laid straight, but with a slight curvature. After ease of movement is achieved, we install stops along the edges of the guide.

5. Move on to the bottom groove. In order to make it, on both sides of the lower end of the sash, at a distance of 15 mm from the edge, we drill holes with a 6.5 drill to a depth of 20 mm. Now we select a groove across the entire width of the blade, the width of which should be a couple of millimeters greater than the width of the guide knife, and the depth should be 18 mm. Alternatively, attaching two slats or plastic profile at the bottom of the door, with a distance between them slightly greater than the width of the flag.

6. We hang the door on the guide. First, we attach fastening brackets to the upper end strictly in the middle of its width, so that they are not visible after installation. We roll the outer carriage to the first bracket and connect them by hanging the cutout on the adjusting bolt, so that the nut and washer are on top of the bracket. We tighten the fastening.

7. Slightly tilting the bottom of the door towards you, insert the guide flag into the lower groove.
8. Install platbands.
The video below will demonstrate the main stages of installing hidden sliding interior doors.
As you can see, the installation technology interior sliding doors It is not particularly complicated, and if you really want to, you can do this work yourself. If you want something extravagant, original design, then it is better to turn to professionals, those who know the subtleties this process.
IN small rooms Every meter of usable space counts. This is why many homeowners are replacing swing doors with sliding doors. Installing sliding doors yourself is quite simple. However, the mechanism for such a design costs almost the same as the canvas. Such expenses are justified if it takes up too much space; in other cases it is better to install a swing model.
Sliding sliding doors have very low sound insulation, since they do not fit tightly to the wall. The noise of a structure installed in a pencil case is much better at hiding the noise. However, they do not achieve sound insulation swing door.
Types of sliding doors
Sliding structures differ in the type of movable mechanism. On this basis, they are divided into rail and suspended. Each model has its own pros and cons.
Hanging type model on top rail
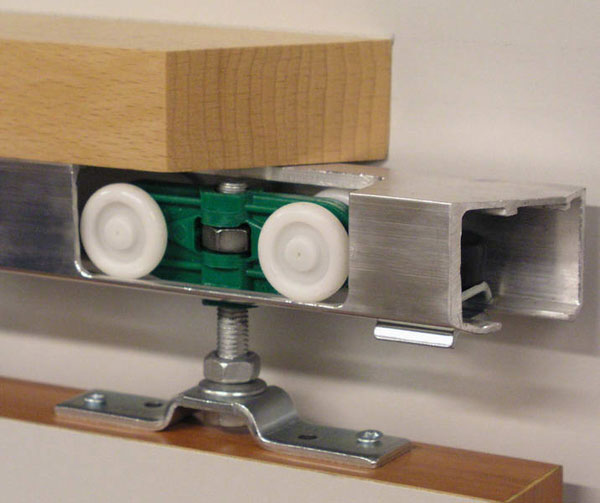
The suspension mechanism consists of a square profile with a groove, inside of which there are two curved strips. The rollers attached to the product run along these slats. The guide is made of metal, as are the rollers. But they have rubber or plastic linings that provide a soft and quiet ride.

When installing a sliding interior door on a rail, no devices or mechanisms are installed on the floor. All the fasteners that are on the canvas are two rollers on top. They move along the groove due to special wheels. Such doors are considered one of the easiest to install. Installation sliding door includes the following steps:
- installation of profile rails;
- installing rollers to the top of the door;
- inserting the product into the rail groove;
- installation of gate valves to limit rail movement;
- inserting the lower roller into the groove and installing the door;
- installation of decorative overlay on fittings.
The door fastening itself is very simple; in addition to the rollers and rails themselves, the kit includes plugs and fasteners. The product with the top rail has extremely low performance soundproofing. Therefore, it is not recommended to use such structures in living rooms.
Sliding structures on rails
There are two fastening rails on sliding doors. Movable rollers are mounted at the top and bottom. This method of fastening makes the product very stable, so it can be shaken.
Note! The metal profile of the fasteners is constantly clogged with dust and debris, which complicates cleaning in the house.
Mounting options
Regardless of the type of fastener, the installation of sliding interior doors can be:
- Kupeynaya.
- Cassette.
- This option is considered the most labor-intensive and costly. A niche in the wall is equipped for the product, in which a guide is placed. When opened, the canvas is pushed into the wall. Such designs are the most effective at saving space.

Cascade.
Similar designs are very popular in Asian countries. The model consists of 2-3 canvases. One is stationary, while the others ride on rails and move behind it.
If you plan to install sliding doors yourself, choose a compartment design. The models are easy to assemble and highly maintainable. The main feature that is necessary for installing an interior door with your own hands is a smooth opening. You cannot place anything near the wall to which the base of the sliding door is moved, otherwise the movement of the door leaf will be disrupted. A significant disadvantage of the models is their low sound insulation. This is due to the fact that sliding doors are installed with a gap. Without it, the canvas will scratch against the wall. Cassette structures provide the best access to room space. Inside the niche you can install
soundproofing materials , which will hide the noise. However, installation of such a model is possible only at the stage of repair or construction. In addition, a decorative wall is assembled for the rail, and this deprives the room of useful space. Cascade products are a modification of compartment structures. The main difference is larger number guide rails. Installing such products is the most difficult, as it requires
high accuracy
. Cascade structures are classified as premium for their complexity and aesthetics.

Installation Features
You can install sliding interior doors with your own hands even if you don’t have specific skills. Installation instructions are included with each product. By following it, you can complete all the work yourself. Below the assembly process is described in more detail than in the standard instructions.
- Do-it-yourself sliding door installation
- The opening, regardless of the fastener design, the place for the structure must meet the following characteristics:
- Smooth surface on all planes. The walls of the opening should not have serious differences or flaws.

After aligning the opening, you can begin installation. The first step is to attach the rollers. Depending on the manufacturer and model, fasteners may have their own characteristics. To assemble some products you need to step back 15-20 cm from the edge, but most often the rollers are mounted right at the edge.
To begin with, markings are made on the canvas for fasteners.
Important! Make sure that the distance from the edge to the roller is the same on both sides.
At the marking site, drill holes 1 mm smaller than the diameter of the fastener with a drill. After the grooves are ready, the plates are fixed. Self-tapping screws are used as fastenings; their length must be at least 75 mm. The greater the weight of the canvas, the longer the fasteners. Special support holders are mounted into the plates, into which rollers are inserted. The fasteners on the sides of the canvas must be secured with plugs.

The rollers come with pins. The movable elements themselves are screwed onto them. If the model is not equipped with handles, they must be purchased separately. It is recommended to install the handles before installing the product in the opening. In a model without a groove, markings are made with a pencil and the material is removed along the contour with a carpentry tool. Fittings are attached to the resulting hole.
Note! Only submersible fittings are suitable for sliding doors.

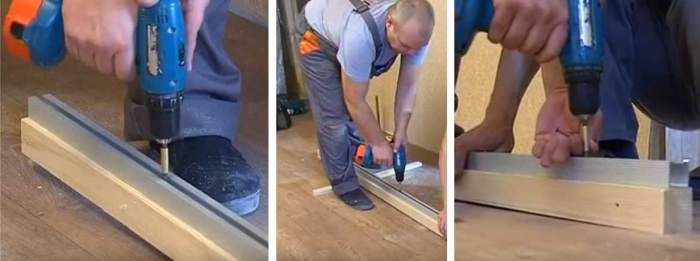
When the canvas is ready, the rail is attached. The easiest way is to screw the guide to the block, and not directly into the opening. For this they take wooden plank square or rectangular cross-section with a side of 60 cm. The length of the block should be twice as long as the door itself and a margin of 5-10 cm. The rail is cut along the length of the block.
The guide is screwed to the block with self-tapping screws from 85 mm. Minimum number fasteners - 4, the more often the better. The recommended step between screws is 10 cm, the same distance is made from the edge of the canvas to the first fastener.
Next you need to measure the height of the bar. The rail is threaded onto rollers of the canvas and the height is measured. Using this value, holes are made on the wall for attaching the guide rail. The canvas should not stand on the floor. A distance of 8-10 mm is left from the floor to the structure itself. If there are no coverings on the floor, the thickness of the floor finishing is added to the value.
The level is used to adjust the mark for mounting the bar. For this, fasteners from 12 cm are used, but more reliable fasteners are anchor bolts. IN concrete walls use dowels.
Markings for the guide are made with a thin drill or nail. After that, holes are drilled for dowels or screws and the timber is mounted. The final stage is inserting the sliding doors into the rail. After rolling up the structure, plugs are placed on the sides of the fittings; they protect the structure from slipping.
When the door is open, a flag roller is screwed onto the floor. It regulates the movement of the blade along the vertical axis.
The installation of a decorative overlay on the fastening profile will give the structure an aesthetic appearance. It is placed on finishing nails or self-tapping screws with decorative plugs. Screw the cover directly into the block.
To install a sliding structure you will need more materials and tools. If you want to know how to install sliding cassette doors, watch detailed video instructions:
Almost any panel can be attached to a rail and a sliding door can be constructed. But for the system to function without failures, it is necessary to install high-quality fittings. Durable fasteners and rollers ensure long door life. Therefore, there is no need to skimp on accessories.

The canvas itself can be made independently. Most cheap option- frame made of timber with a body made of plywood or chipboard. A solid product made of solid or laminated wood looks most aesthetically pleasing in the interior. However, the assembly of such a product will cost more. Products made from particle boards are covered with a film or a laminating surface. Wooden panels You can simply sand it and coat it with protective compounds.
It is very difficult to design a roller mechanism on your own. If you don’t have a special tool, including a cutter, you won’t be able to make the fittings yourself. It is much easier and cheaper to purchase a ready-made product.
In an effort to make your home more comfortable and cozy, you often come up with the idea of replacing conventional swing doors with sliding doors (they are also called sliding, sliding, hanging). The good news is that you can install sliding doors yourself without any problems. The bad thing is that a normal mechanism costs about the same as a high-quality blade. What is captivating about them is that when open they hardly “eat up” space. They either hide in the wall (a better, but more difficult to implement option), or move along it.
All this is true, but there is a significant drawback - a very low degree of sound insulation, especially in the sliding door version. When the canvas simply covers the opening. When installed in a pencil case (in the wall), the situation is a little better, but the degree of sound insulation of a swing door cannot be achieved even with this installation method. If all this doesn’t scare you, you can start studying the systems, selecting them, and then installing them.
Sliding door systems
There are two types of mechanisms: suspended and rail. Neither is perfect. Briefly about their advantages and disadvantages below.
Top rail suspension system
The suspension mechanism is a supporting beam to which is attached a guide in the shape of the letter “P” with “legs” bent inward. The rollers to which the door leaf is attached move along this guide. If we talk technical terms, This hanging door on the top rail.

When installing such a door, the floor under the door remains smooth, only on the right and/or left in doorway the lower roller is installed. It slides along a groove made in the lower end of the blade. It is necessary so that when moving it does not deviate vertically. This design is the easiest to install. Installation is very simple and consists of several steps:

That's all. Doors on rollers are installed. But this system, in the form shown in the photo, has very low noise insulation characteristics. They are practically zero: the passage is simply blocked.
Rail sliding doors
This type of door has two rails: top and bottom. Rollers are also installed at the top and bottom. Thanks to this design, the system has high degree rigidity: it can be shaken, and this will not cause much damage.

The disadvantage of having rails in the floor is known: they are difficult to clean. Debris and dust constantly get into the grooves, so you have to keep them clean. This type of door is most often used in cabinets. They are used as interior doors if there are active children in the family. Then safety is more important than difficulties with cleaning.
Mounting options
Regardless of the sliding door system, installation methods can be:

The simplest installation option is sliding doors. They can be installed independently, not only at the repair stage, but also after it. It is only important that the opening is smooth and the wall has normal load-bearing capacity. The disadvantage of such a system is that you cannot place anything close to the wall in the place where the door rolls back. There is one more thing: very low sound insulation. This is easy to explain: if you look from the end, there is a gap of several millimeters on the sides. It is necessary so that the canvas does not “shuffle” along the wall. And all sounds penetrate perfectly through it, becoming only a little quieter.
Cassette doors are good because when open, the door leaf is located in a niche in the wall and does not interfere. The second advantage is that seals can be installed around the perimeter of the opening, which provide much higher sound insulation performance. The disadvantage of installing a sliding door in a niche is that it can only be done at the renovation stage. The second drawback: to make a pencil case for sliding doors, they usually install a false wall, and this means stolen centimeters of space.
Cascade doors are one of the types of sliding doors. It simply has a larger number of guides: according to the number of movable door leaves. Installation is perhaps the most difficult: there are many parts and high installation accuracy is required. The systems belong to the elite category, and they rarely save on installation: repairs will cost more.
Features and installation procedure
You can install sliding doors yourself even without much experience. It is quite possible to do without installers. It will take a little time, and also installation instructions. We will try to give detailed description process with photo and video materials.
Self-installation of sliding interior sliding doors
Systems may vary slightly, but general rules remain the same. There are several requirements that must be met before installation:
- The opening must be level, otherwise you will have to take a canvas that covers all deviations with a margin.
- The load-bearing capacity of the sides of the doorway should be high, as should the wall above it.
- The opening must already be finished: plastered and painted, covered with wallpaper or decorated with decorative panels.
Next we proceed to assembly. First you can attach the rollers. U different manufacturers There are some recommendations. Some recommend retreating 1/6 of the width of the door leaf from the edge, in other systems they are attached immediately from the edge, and the indentation is provided mounting plates. This is the system we install: in it, roller platforms are installed immediately from the corner.

Marking the installation location of the rollers
We center them, measuring so that the distances are the same. Having positioned the plate, use a pencil or marker to mark the locations for the fasteners. Drill holes in the marked places. The diameter of the drill is 1 mm less than the diameter of the screw.

We set the plates and screw in the screws. The length of the fastener depends on the weight of the canvas, but not less than 70 mm. We twist them exactly perpendicularly, otherwise unnecessary stress will arise.

Installation of rollers
Supports for the rollers are inserted into the installed plates. They are fixed with a lid on the side surface. Next, roller platforms are screwed onto the threaded pins.

It is also convenient to install handles and locks before hanging. They need special, mortise ones. If you bought ready set, the required holes are available. If you have used a regular canvas, you will have to trace the outline with a pencil and remove the excess with a chisel. After the handle or lock fits into the recess, the attachment points are marked, holes are drilled for them and the fittings are installed.

The most convenient way is to hang sliding doors on a dry wooden beam. Its cross-section is less than 50*70 mm, its length is twice the width of the door leaf + 5 cm. We cut the guide to the same length.

Having aligned the guide along the beam, it is attached to the beam with self-tapping screws no less than 8 cm long. The number of fasteners is at least three, departing 10 cm from the edges and in the middle (more often is possible, less often - not).

Now you can measure at what height to mount the timber. A guide with a beam is “rolled” onto doors with installed rollers. This way you can accurately note how tall the doors are. We drill at least four holes in the side edge of the beam for mounting to the wall.

The guide with the beam “rolls” onto the rollers on the door
Add 7-10 mm to the resulting mark - the doors should hang and not shuffle along the floor. 7 mm is the minimum gap, which is sufficient if there is no floor covering in the opening. If they are planned (later to lay laminate, carpet, linoleum, etc.), then the thickness of these coverings must also be taken into account.

To prevent the canvas from “walking” during installation, it is wedged with small wooden wedges. At least two stops are required - near both rollers.

Having placed the beam against the wall and adjusted its position using a level, we mark its position with a pencil. If the wall allows, you can fasten it to the wall through and through, but for this you need to use self-tapping screws at least 120 mm long, or better yet, place it on anchor bolts.
If the wall, for example, is concrete, the installation of dowels is required. To do this, you need to transfer the marks for the fasteners to the wall. This can be done using a thin and long drill, the diameter of which is smaller than the drilled hole.

An even simpler option: a long thin nail. It is inserted into the hole and a mark is made on the wall with a couple of blows. The following procedure is known: drill holes for the dowel plugs, insert the plugs, hammering them in if necessary. Then we install the doors.

Attaching sliding doors to the wall
Stoppers must be secured along the edges of the guide. They are inserted from the sides, the required location is established experimentally (so that the canvas covers the opening completely when closed, and rolls back sufficiently when opening. They are fixed using clamping screws.

Having opened the doors, we install the flag roller on the floor. It fits into a groove cut into the bottom of the blade. It is necessary to ensure that the doors do not deviate vertically.

First, we insert it into the groove, mark holes for fasteners, drill, then secure with short self-tapping screws (length about 15-20 mm).

At this point we can assume that the sliding doors have been installed. They are already fully functional. Remained Finishing work. Mounting beam with guide is closed decorative overlay, matched to the tone of the door leaf. It can be nailed directly to the timber with finishing nails.

Only when you put it out, make sure that the wheels are closed. It’s much more beautiful this way)) Now that’s it, you’ve installed the sliding doors with your own hands.
A video tutorial on how to install such a door is shown below. There are several installation options.
We install cassette-type sliding doors (in a pencil case)
The process of installing the guide and hanging the door leaf is almost identical to those described above. There is no need only for finishing, but all other stages are necessary. Instead of editing decorative strip, a false wall is mounted at a distance of at least 10 cm from the wall. It is usually made from plasterboard profiles, which are covered with wall plasterboard. But this is not important - you can use gypsum fiber board or plywood, or any other suitable material.
Where does the distance of 10 cm come from? The thickness of the door leaf and the gaps on both sides are 5 cm. At least another 5 cm is added to this for installation of the profile. So it turns out to be 10 cm.
Since the main load will fall on the wall, the frame made of profiles need not be reinforced. If such a wall does not seem very reliable to you, you can insert wooden blocks, which are screwed with self-tapping screws. This will make the structure very rigid.
The basic principles for calculating a pencil case for a sliding door, as well as marking features and principles for preparing a doorway for installation, see the video.
Homemade sliding doors
Any door leaf can be installed on rollers and will work as a sliding door. The guide and all other components - rollers (carrying and flag), stoppers, stops - can be purchased. Hang on them at least a piece of plywood or a door assembled from several boards. This will be the simplest and cheapest option. But making the mechanism yourself is a more difficult task. One of the options for a mechanism made from scrap materials sliding door(from round pipes different diameters) in the video. The system was supposed to be installed in a closet, but, judging by designs, easy can even withstand a solid oak door.
Interior doors are one of the key elements in the interior of a house or apartment. Installing door structures allows you to solve several problems at once: isolating a specific room from other rooms, increasing its level of comfort, protecting it from noise and drafts. Modern manufacturers offer consumers door designs in a wide range of types, and one of the most popular solutions is interior sliding doors.
The key difference between sliding doors and other types of products is how they open and close - the slider simply slides apart, moves to the side or diverges. In the article we will talk in detail about the advantages of sliding doors, their features, and also provide step-by-step instructions for self-assembly of structures.
Types, pros and cons of sliding interior doors
The demand for sliding interior doors among buyers is growing and this is explained by the fact that their installation in the interior allows for rational and ergonomic use of living space, which is especially important for rooms with small area. Sliders are classified into several separate varieties:
- Structures built into the wall. Their installation involves mounting rollers on the door leaf and guides on the wall or doorway. Such sliders open and close in the same way as compartment doors, that is, when the rollers move along the guide elements, the doorway will open for entry or exit from the room.
- Accordion sliders. Doors of this type are made of small lamellas that fold to open the entrance to the room.
Accordion sliding doors are an interesting option for modern interior, however, it is extremely important to choose a design made of high quality and from high-quality materials, otherwise the product will quickly fail and lose its useful functionality.
Before deciding whether you will install interior sliding doors in your home, you should study in detail all the pros and cons of the designs. The advantages of sliders include the following characteristics:
- The originality of the solution allows you to create an ultra-modern interior;
- Space saving;
- Safety in operation;
- Reliable room insulation.
There are also disadvantages to interior sliding doors. In particular, it is worth keeping in mind that their installation is a difficult and quite expensive process, and the structure itself and its elements will require regular care.
Features of the functioning mechanism
In order to install interior sliding doors with your own hands in a high-quality manner, it would be advisable to study in detail in advance the mechanism of operation of the structures, which can be:
- Hidden type. Movements for opening and closing the door will occur in the interior space and therefore the mechanism will need to be installed at the stage of wall construction by installing the door frame inside.
- Open type. Doors with such a mechanism can be installed without problems at any stage of repair and construction, including the finishing stages. Installation of the product will not require any adjustments to the wall structure, since the movement of the canvas will occur along guide elements located along the wall surface.
Doors with an external functioning mechanism are available on the market in wide range, which provides an excellent opportunity to select best option to suit any interior style and room size.
Having decided on the type of door based on the functioning mechanism, it is also important not to lose attention to the selection of guide elements - profiles along which the door leaf will move during operation. Profiles can be mounted in different areas of the doorway - in the upper or lower part, on both sides at once.
The simplest option is to install a sliding door on runners placed at the top. Profiles mounted in the upper part of the opening have a fairly long service life, since they are less susceptible to mechanical damage. However, this arrangement of elements is suitable only for low-weight door structures.
Roller for sliding doorsFor heavy doors it is better to use combined option guides, which also provide a smoother movement of the blade when opening and closing, but installing guides at the bottom is rarely used, since the runners mounted in this area quickly deform and require constant cleaning.
Step-by-step guide to self-installation of sliding interior doors
Below we provide detailed instructions By self-installation doors with external functioning mechanism. Preparation process for installation work They always start by purchasing material and collecting tools that may be useful. It’s worth preparing in advance:
- The door structure itself with all components;
- Door fittings – profiles, locks, handles, rollers;
The number of rollers is determined by the weight of the door - if its value exceeds 30 kg, then it is advisable to use four rollers. It is better to purchase locks and handles of a hidden type to avoid damage finishing walls as work progresses.
- Bars with a section of 50x30 for fixing the runners;
- Fasteners;
Tools that will be useful for installation work include a level, tape measure, hacksaw, drill and chisel.
Preparation
At this stage of work on installing an interior sliding door, it is important to accurately determine the location of its installation and the side of its opening. After measurements and calculations, the old structure (if any) is dismantled from the opening, and the opening itself is cleaned of debris, dust and dirt, after which a box is installed in it.
When installing a frame in an opening, do not forget about the need for a technological gap between the door structure and the floor surface. If the floor in your house is completely finished, it will be enough to leave a gap of ten millimeters in height before finishing the finishing layer. If fine finishing surfaces are yet to come - to the height of the gap you need to add the height of the screed and the thickness finishing coating surfaces.
Work with the opening
This stage begins with measurements - the height and width of the door structure should be determined. To obtain accurate indicators, measurements are taken at several points at once - at the top, in the center and at the bottom. The height of the structure is measured in two states at once, closed and open. This approach to measurements will allow you to take into account floor unevenness and avoid mistakes when installing the door.
Next you need to strengthen the bars. They are installed along a line that is drawn directly above the top edge of the box. The center of the installed beam should be above the side of the frame that you choose to open the door. That is, if the door opens to the right, then the center of the block should be located with right side boxes.
After securing the beam in the selected area, the upper guide elements are mounted. They are fixed to the bar using fasteners. A simple test will help you make sure that the guides are secured correctly: run a roller along the profiles and if it moves freely and easily, you’ve done everything right!
Installation of the lower guides can be done using various methods:
- By inserting the rails into part of the subfloor.
- By installing elements directly on the floor surface, followed by closing it with a threshold. The threshold will protect the runners from mechanical damage.
- Installation of a packet knife, which will support the structure and ensure its correct movement.
Another option is a non-threshold system with carriages and roller elements. It is optimal because door design will move easily when opening and closing, no damage will occur flooring, there is no need to waste time installing rails.
Assembly and installation phase
To assemble a sliding door, you should initially install a roller mechanism on it in the upper end part of the structure. At the bottom of the product is done. To make the groove correctly, you need to drill holes on both sides, at a distance of about 15 millimeters from the edge. Between the finished holes, choose a groove ten to eighteen millimeters deep.
Having finished with the fittings, all you have to do is install the door into the opening into the guides. Having put the structure in place, be sure to check its progress and, if everything is fine, insert rubber shock absorbers into the profiles, which act as limiters holding the door in place.
They complete the installation of the interior sliding door by masking all visible structural elements. Decorative trims are used for this purpose.
As a conclusion
Interior doors are a beautiful and functional element of residential interiors that can last a long time, provided correct installation design and regular maintenance. There is also nothing complicated in installing the product - you just need to spend time studying some of the features of the work and have basic skills and knowledge in the field of home repairs.
We hope the article helped you learn useful details about the process of self-installation of interior sliding doors, and you can now easily carry out this work on your own, without the involvement of professional craftsmen.
An excellent option for any apartment or house would be to install sliding interior doors. They can replace conventional swing doors and save space. With their help you can effectively and beautifully divide the space large room, installing them in the right place from wall to wall. Having decided on the design and shape of the doors, you need to purchase all the necessary parts, starting with the door leaf and ending with all the small details of the fittings and subsequent finishing. How to install a sliding door interior door with your own hands, it is best to consider the example of the simplest design with one solid door leaf. During the description of each stage, the nuances of installing other possible systems will also be described.
Getting ready for installation
Before installing the door, you should put the opening itself in order and decide on which side of the doorway the sliding doors will be attached.
Look at your usual route from the entrance to the apartment and to the outermost rooms. For aesthetic reasons, it is better to make the sliding door mechanism from the side of the room you enter. This is especially true for doors that are not hidden in the wall or behind a false panel. However, in view of the fact that the space where the door leaf is retracted cannot be occupied by furniture and things, in the case of a passage from the corridor to the room, it is more logical to mount the entire structure from the corridor side. There is not much furniture in it.
Sliding door installation process
1. Installation of guides
The first step is to install sliding doors yourself by applying markings on the walls to further secure the guides.
If you use the bottom guide, it must be deepened into the floor. It is advisable to think about this at the stage of installing the floor covering so that the guide is secured to the very base of the floor ( concrete screed). You can check the horizontality of the guide using a level.
The top guide profile is installed next. The reference line should mark the position of the bottom edge of the guide. The height of its placement is equal to the height of the door leaf and an increase of 15-20 mm for the lower gap to the floor and the upper gap from the door leaf to the guide. The last parameter can be determined from the instructions supplied with the fittings. Typically 10-20mm to access the adjusting nuts on the door holders.
It is necessary to strictly observe the horizontal installation of the guide, otherwise the door will subsequently begin to spontaneously shift towards the inclination. You can check the correctness of its placement using a building or water level.
The length of the guide is twice the width of the door leaf plus 4-5 cm of reserve for its normal movement. The margin for installing plugs and the space for the closer, if any, are also taken into account.

Example of a sliding door delivery package
Typically, brackets are used to secure the top track, but for solid doors made of solid wood or glass, the structure will need to be reinforced. To do this, it is better to use a wooden beam measuring 50x50 mm or wider, depending on the width of the guide profile, which will be securely attached to the wall, and the guide will be narrower to the beam. In the case when the door is installed on a plasterboard wall, it is necessary to provide an additional profile in the wall frame and attach the guide to it or in close proximity using plasterboard anchors. If the wall is monolithic or brickwork, then dowels are used (in the case of brickwork holes for dowels are located in the volume of the brick, and not between them). Additional strengthening and use of a base in the form of a beam or profile is even more important if a sliding compartment door or multi-sectional options are installed, which involve the use of a guide with several grooves.
2. Fastening holders to the door leaf, fittings (handles, locks)
The next step is to attach brackets to the door leaf, with which it will hold onto the roller carriages. They must be installed following the instructions, along the sides of the upper end of the door, retreating 1 cm from the edge. The best option for any type of sliding doors, except in the case where the holder will be in the form of a clamp on the sides of the door leaf. For completely glass doors special fastenings are used in the form metal plates with rubber backing, between which the edge of the glass is clamped. Such grips eliminate the need to make holes in the glass.
When assembling the accordion door, holder brackets with a rotating roller are installed on each section. Most often, each section is secured in the central part, but it can also be secured along the edges of the sections. In this case, on the first section the staple is held by one edge, and on the next by the opposite edge. This is how the positions on all components alternate.
At the same stage, you can install the necessary elements into the door leaf, such as handles and locks. It is better to postpone the installation of the lock mates on the doorway until later; you still have to hang the door on the guide and adjust it. It should be noted that for doors that will completely extend into the wall space, handles and all fittings are selected and installed deep into the door leaf and do not protrude beyond its dimensions.
It is better to install brush seals on the bottom or side end of the door after the first installation of the door on the guides and their adjustment.
3. Installation of the door leaf
Having secured the guide and the necessary elements on the door leaf, you can carry out control unit to adjust levels and check steps already completed. For this stage, you will need an assistant who will support the blade while you insert the carriages with rollers into the groove of the guide. If a partition door is installed to divide the space of a room and the guide is fixed from wall to wall, the carriages are inserted into the guide in advance, which has a special window for this. Fastening the door leaf in this case comes down to joining the bracket holders on the door and the anchor extending from the carriage.
4. Installation of limiters and closers
 The limiters will prevent the movement of the door leaf along the guides and will prevent carriages with rollers from falling out of it. It is important to correctly distribute the stops, especially if it is a multi-section or folding door. Stoppers will prevent the structure of such products from coming together too tightly, thereby damaging the connection between sections. Plugs made to the shape of the guide profile or as pins, which are inserted into the guide in the required places, can be used as a limiter. It is advisable to select limiters with special stops from soft plastic or rubber. With them, there will be no constant sound of impacts when opening, and the moving parts of the doors will work longer.
5. Fastening platbands and extensions
The trims cover the sliding door mechanism to protect them from dust and debris and to give an aesthetic appearance. This is not relevant for doors built into the wall or behind a false panel. In this case, only corners are installed on the edges of the walls with brush seals to close the gap between them and the door leaf.
Installation of platbands is carried out on brackets pre-screwed to the wall or to the guide itself using latches. This option does not leave any visible fasteners on the outside.
A boundary structure is installed against which the door will rest when closed. This can be either a wooden beam with necessary finishing, or a special profile, which is purchased along with the rest of the fittings. It is installed strictly vertically, using a plumb line. The counter part of the locking mechanism of the door lock will be installed in this profile. Its installation should be postponed until the door is completely installed on the guides and adjusted.
6. Check and final adjustment of the door
Since previously the door guides were installed strictly horizontally, which prevents spontaneous opening or closing of the doors, the position of the door leaf is adjusted to a greater extent for visually correct perception. The door should fit snugly and evenly against the boundary structure and move parallel to the floor surface. Using this setting, you can visually eliminate some unevenness or distortions of the floor or walls by adjusting the average position of the door leaf.
Having completed all installation work, the ease of movement of the door and the operation of the locking fittings are checked. If everything works fine, then the installation was successful.