A flowerbed of tires, a cup and a saucer. Mug, cup made from tires
The desire to improve the summer cottage, transforming it into an attractive one cozy corner For comfortable rest, quite natural. Favorite by many gardeners flower arrangements are an ever-popular item landscape design suburban areas. A worthy setting for such compositions is often flower beds made from tires, which are one of the easiest products to create and practical to use. Of course, you can purchase ready-made flowerpots in specialized stores. But flowerbeds made from tires created with one’s own hands are not only a beautiful and functional design element that gives exclusivity and uniqueness to the design of the site, it is, first of all, the pride of every summer resident.
How to choose the right tire?
It's great when it's possible to have a choice. Choosing between old tires domestic manufacturer and imported products, preference should be given to the latter. Imported waste tires have softer and thinner rubber, which is much easier to work with. If you choose between “summer” and “winter” tires, then the winter version is more suitable for work.
Deciding to create original flower beds from tires with your own hands, turning old waste tires into street vases of fancy shapes, you need to prepare the source material in advance and think about its design
In order to make a flowerbed from an old tire, it is advisable to choose wheels with maximum tread wear. The worn-out tread layer makes the product softer and makes it much easier to turn it inside out.
Tires contaminated with soil and sand must be cleaned. And the point is not even that it is more pleasant to work with a clean product. It’s just that when working with dirty tires, the blade of the knife and file becomes dull much faster.
Step-by-step manufacturing example
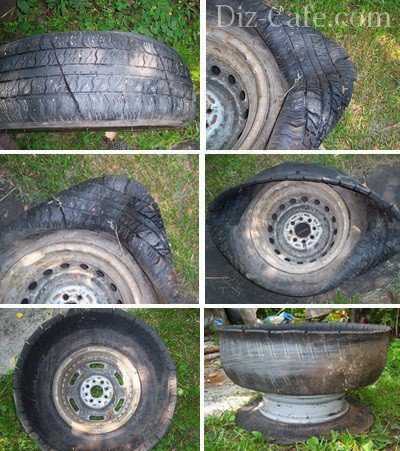
Before you start making a flower bed from a tire, you need to think about what it will look like. ready product: a bowl with smooth edges, a flowerpot with a wavy cut line or a flowerbed in the shape of a large flower bordered by petals or fringe.

The drawing, along the contour of which the cutting line will be drawn, is applied to the side of the product
When thinking about the shape of the cut, you must be guided by the fact that the result should be a design based on the “pan-lid” principle: deep Bottom part and cut off top. The contour can be easily drawn along the entire circumference with a felt-tip pen or chalk.

The cut edges, made with wavy lines or shaped like teeth and fringe, look interesting.
Stage #2 – cutting along the contour
When thinking about how to make a flowerbed from an old wheel, designed in the shape of a large flower, you need to cut out petals along the edge of the product. The size of each petal should not exceed 10-12 cm. Otherwise, when turning the tire out in these places, the rubber simply will not bend, and the flowerbed will not take an even round shape.

You can use a shoe knife to cut the wheel. A well-honed tool will significantly speed up your work
You can make the cutting process easier by using liquid soap to lubricate the knife blade.
It's great if you have a jigsaw on hand. Using a jigsaw, it is convenient and quick to perform figured cutting.
Labor mechanization is described in detail in the video:
After cutting the tire along the contour, along the tread grooves it is necessary to make longitudinal cuts at a distance of 5-10 cm.
Stage #3 - turning the tire out
When creating a flowerbed on a leg out of wheels with your own hands, the first thing you need to do is turn the rubber tire inside out. For many craftsmen, this stage of work becomes a real stumbling block. The process of turning out the rubber itself is quite a labor-intensive process.
In order to cut the metal cord, you need to use a grinder to make several cuts along the outside. Cut through the rubber smoothly. The contact of the disk with the cord can be judged by the plaque formed on the surface of the product and the white smoke emitted. Make the cuts at an equidistant distance of 15-20 cm.
After spending preparatory work, you can start turning the tire out. Before you start turning the tire for your flower bed inside out, we would like to tell you one secret: it is enough to turn at least a small piece of the tire inside out, and work will go"like clockwork."
The turning process is clearly shown in the video:
The flowerbed made from old wheels is ready, you can start decorating it.
Finished product design
Creating and growing flower beds in black forms is not entirely aesthetically pleasing. Therefore, once the flowerbed has been given the desired shape, you can begin to decorate it. Until the outer surface of the inverted flowerpot is covered with a layer of dust, it is advisable to paint it.

Painting is the easiest and affordable way design of a black rubber flower bed
For painting rubber products Oil, enamel and nitro paints are excellent. The paint lays on a clean rubber surface in an even layer and lasts for quite a long time. You can also use leftover car paint to paint your flower bed. By using aerosol can the job can be completed in just a few minutes.
Using light-colored colors to decorate a flower bed will prevent overheating of the soil inside the container.
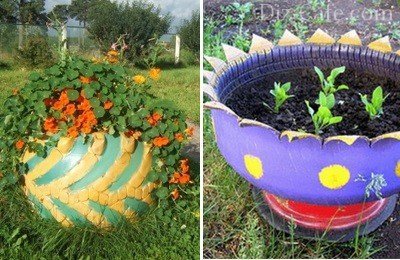
The combination of colors looks interesting when the base of the flowerbed is decorated in one color, and the cloves or petals are in another.
Most craftsmen paint the rubber flowerbed only from the outside. But still, to give the container a more attractive appearance, it is advisable to slightly capture the upper part of the inner surface of the product.
When designing a flowerbed, you can give complete freedom to your imagination. Glass aquarium pebbles glued to the petals of a flower bed will create the illusion of dew drops.
If you want to further decorate the flowerbed, you can apply an ornament of a different color over a plain layer of paint. But you shouldn’t be too zealous: if the flowers grow wildly, the flowerbed pattern may be completely obscured by hanging or creeping plants.

Minimum costs, a little free time - and a chic decoration for arranging a suburban area is ready
Such a flower bed will be a worthy addition to the interior and an element of the landscape design of the dacha. All that remains is to fill the container with a layer of soil and plant your favorite flowers.
Old worn out tires from car wheels are sent to a landfill. But for people with imagination they turn into funny decorations for personal plot or country house. You can make different animals from tires and additional materials. Although they are difficult to make, they look unusual and interesting. But novice craftsmen should try making it in the form of a tea set, consisting of cups on saucers or a teapot and cup.
To work you need to collect tires different diameters and magnitude.
You will also need:
- self-tapping screws;
- dense wire;
- thick hose;
- a piece of linoleum;
- dye;
- fertile soil.
Flowerbeds inviting tea drinking - DIY cups
Flowerbed in the form of a cup on saucers
To make them you need only 4 tires for each cup. Three tires should be small, and one should be large (from a tractor or truck). The big tire is a saucer for the cup. It is placed on the ground; for greater stability of the structure, it is better to bury the bottom tire in the ground.
On a large tire, one tire at a time must be secured with self-tapping screws. smaller diameter. Handles for cups should be made from thick wire or a durable hose and secured with self-tapping screws. After one craft is painted red with white polka dots, let the second cup be purple with yellow circles.

After the paint has dried, the cups need to be filled fertile soil and plant beautiful flowers. The original flower beds and decorations for the site are ready!
Flowerbeds in the form of a tea set - how to make a teapot
You can make a teapot using the same principle. For it, you can use tires of the same size, or play with the shape of the craft. For example, lay out the tires in descending order or place two tires of slightly larger diameter in the middle.
You need to attach a handle to the teapot, and form a spout from a piece of linoleum. It can also be made from a slightly flattened wide pipe (metal or plastic).

The cup and teapot are painted in bright colors and decorated with artificial white flowers cut from plastic bottles.

Such crafts are convenient because they are durable. You just need to paint them in the spring and they again acquire a “marketable appearance”.

Plants in such flowerbeds can be grown as decorative or well-flowering. You can plant perennials and then there will be less hassle, but it is much more interesting to place seasonal flowers there, then your flower beds will be fragrant in spring, summer and autumn with different aromas and colors.
If your husband comes to your aid, you can experiment with tires and turn them into different flowerpots, stools and chairs, a sandbox or swing for children and many others interesting crafts that will transform your suburban area or garden. Read about it here.

Look at other options on how you can make such original and beautiful flower beds.
The miracle of a flower bed in the form of tea cups with your own hands
It has long become very popular to use recycled materials to decorate your site: tires, bottles, old dishes or household items. This allows you to save your own money and take care of cleanliness surrounding nature. In this article we will tell you how to make an interesting flower bed from tires with your own hands.
When creating crafts from tires, remember:
- Since there is a wire inside the rubber from which the tires are made, in order to cut it you should take metal scissors. You can also use electric jigsaw or Bulgarian. Imported winter tires are the easiest to manipulate.
- If you cut a tire with a knife, then in order to make it easier to work and the edge does not quickly become dull, you need to constantly wet the blade in a soapy solution or the rubber itself liquid soap.
- Before painting the workpiece obtained from a tire, it must be washed with detergent, then wiped with a solvent, and only then can paint be applied. For these purposes, it is best to use weather-resistant types, and then it is worth securing with a couple of layers of varnish.
- If you are making a hanging flower bed from a tire, then in order to avoid waterlogging of the soil and rotting of the roots of the flowers planted in them, you should drill several holes in the bottom of the tire. This will give an opportunity excess water leak after watering.
- If you need to turn the tire inside out, you must first bend it in half. After this it will be easier to turn it out.
There are many options for how to make flower beds from tires. The most commonly used are a cascade, a pyramid, a free-standing flowerpot or an animal. The first two types are very simple, you don’t need to cut anything to create them, but the second, on the contrary, are complex; their execution requires a certain skill in making figures from this material.
If you want to decorate your garden with an unusual flower bed, then you can make it in the shape of a tea cup or teapot, and you will now learn how to do this.
Master class on making flower beds from tires in the shape of a cup
You will need:
- 3 wheels different sizes: from the truck, from the LAWN and from passenger car(size 13).
- Tools: hacksaw, pry bar, sharp knife, screwdriver.
- Self-tapping screws.
- Brushes, foam sponge, stencil and paint: red and white.
- Plastic pipe with a diameter of up to 4 cm.
- Soap solution.
- Solvent.
Progress:

As you can see, our workshop for making flower beds from tires in the shape of a cup is not at all complicated, which means that anyone can bring such a project to life.
The problem of recycling used tires has been of concern to environmentalists since the late 70s of the last century. This is especially true in our country, where there are not yet enough enterprises capable of using them as recyclable materials. As they say, in such a situation, everyone saves themselves as best they can, so we can only welcome those craftsmen who are trying to free landfills from this non-degradable waste and, for example, make flowerbeds from tires with their own hands. They can be very different, from simply worn tires dug into the ground in which flowers are planted, to complex flowerpots in the shape of swans with a bright pattern. If you are interested in this idea and want the area in front of your house to be decorated with a beautiful tire, you can read below how to make one with your own hands.
Which ones to use
If you have the opportunity to choose, then a complex flowerbed of tires, made with your own hands, the production of which involves cutting out figures, will look better if you use foreign-made products, since they have thinner and more pliable rubber. In addition, it makes sense to give preference to winter tires, since they are more textured, and worn-out tires. The fact is that a worn proctor is softer, so the process of turning it inside out is easier and does not require much effort.
"Flower"
To make original ones with your own hands, just take 4 any tires, preferably the same size. You will need to remove the rubber from the metal rim and cut it so that you get two identical halves. You need to do this with three tires, and leave the rubber casing of one untouched, since it will be used as the core of the flower. Then the halves and the whole tire must be painted in different colors and dug 5-6 cm into the ground, laying out a flower with 6 petals with a round center. The composition will look more interesting if the core is planted with flowers of one type, and the petals with another.

Flowerbed-pyramid
This one is very simple and nice option flower beds made from tires, made by yourself, are suitable for areas or yards with small area. To implement it, you will need 6 tires, which need to be painted in bright colors and laid in 3 rows, in which there will be 3, 2 and 1 tire. If the dacha plot is quite spacious, then you can make the design more complicated by placing a flower of 5-6 tires in the bottom row, 3 in the second row and crowning it with one. Such a pyramid will look especially impressive if you choose a plant with large leaves for the top “pot”.
DIY flower beds made from car tires in the form of a vase
There are more difficult option, the implementation of which will require a lot of patience. However, the result is usually simply excellent.
So, to create original flowerbeds from tires with your own hands in the form of large vases reminiscent of open flowers, you need to:
- Place the tire on a flat surface and use chalk to draw petals of the desired shape around the entire circumference. In this case, the size of each petal should not exceed 12 cm.
- Cut the workpiece with a sharp knife or jigsaw along the marked contour. To make this task easier, you can apply a little liquid soap to the knife from time to time.
- Make longitudinal cuts along the tread grooves at a distance of about 10 cm.
- Using a grinder, make several cuts along outside and smoothly cut the rubber with an indentation of 15 cm. If everything is done correctly and the grinder touches the metal cord, white smoke should be released.
- Turn the tire inside out so that you get a kind of flower on a stem.
- Decorate using enamel, oil or nitro paints.

To make a flower bed made of tires with your own hands even more beautiful, you can apply an ornament or stick various decorative elements on top of the base layer of paint using a stencil.
Pyramid slide
If you have 3 tires of different sizes, or at least two and one plastic bucket with a capacity of 0.5 liters, then you can make a pyramid according to the principle of a well-known children's toy. To create it, tires need to be laid on top of each other in descending order of diameter, filling each one with earth. You need to place a bucket on top and plant it in it and in the tires from the lower layers climbing plants, so that as they grow, they hang from the hill, covering it all.
Flowerbed "cup"
A flower bed made of tires, made with your own hands in the shape of a cup, will also look original. Moreover, if space allows, then you can even install a whole tea set on your site.
For such a craft, first of all you need to make a lower part that will represent a saucer. You will need a tire from a truck, with which you need to cut the sidewall with a jigsaw (to make the work easier, it is recommended to cool the jigsaw blade in a soapy solution from time to time). Having finished this work, take the R13 tire and cut off the sidewall with a well-sharpened, or even better, shoe knife, lubricating the blade with liquid soap. After this, the tire is turned inside out so that the tread is inside, and you get a bowl without a bottom. The next stage is making the upper part of the mug, for which you will need a tire of a slightly larger diameter, for example, from a UAZ. Both sides are cut off. In this case, on the one hand, this should be done so that the resulting hole is no larger in size than the diameter of the “bowl”. In addition, a strip for the handle is cut from scraps of the largest tire.

When all the details are ready, you should start painting and assembling the flower bed. To do this, the “saucer” and handle are painted one color, and the parts of the mug are painted another. Next, at the place where they are going to install the flowerbed, lay a piece of cellophane and place a “saucer” on top, and first install a “bowl” in its hole, and then the upper part of the mug. Next, use self-tapping screws to secure the handle and use a stencil to apply the mug to the mug in the color of the “saucer.” All! Now you know how to make a flower bed from a tire in the shape of a cup with your own hands. All that remains is to fill it with soil and plant flowers.
"Piglet" and "Ladybug"
If you are wondering how to make it with your own hands in a simpler way, but so that it looks original, you can use your imagination. To do this, you can simply remove the “elastic” from the rim, turn it inside out and paint it accordingly. For example, if you want a ladybug to appear on your property, you can paint the tire red, apply black dots using a stencil and draw a face with eyes. You can also make a funny pig by painting an inverted tire bright pink and attaching a spiral tail cut from a plastic bottle. After the soil is filled into such a flowerbed and the plants are planted, you need to cut out a head with ears and a snout from a piece of rubber from another tire and insert it inside the tire circle, between the flowers.
Flowerbed "frog"
A flower bed made from tires, made with your own hands, can be the most different shapes, for example, resemble a frog. For this craft you will need:
- three used car tires;
- two lids from one-kilogram buckets of ice cream or ghee;
- PF enamel green, yellow or red;
- self-adhesive colored paper;
- hose;
- awl;
- sponge;
- wire.

How to make a flowerbed "frog"
The manufacturing process is very simple: the tires need to be painted in green color and, if desired, apply yellow rims on top. Then install two tires in the chosen place, and a third one on top, between them. From a hose, also painted green, you need to cut two sections about 1 m long, and from another tire - 4 legs and lay two in front of the lower tires, and two between them, having previously attached “hoses” to them. When the frog's body is ready, you need to move on to designing its head. To do this, you need to paint eyes on the lids of the ice cream buckets, and a mouth with red paint on the top tire. After that, all that remains is to fill the soil and plant the flowers. If you wish, you can turn the frog into an enchanted princess by making her a crown from a plastic bottle painted with yellow paint.

"Sun"
Many summer residents are interested in making their own hands in the form of the sun. For this craft you will need one tire, bright yellow paint and several plastic bottles. The tire must be removed from the metal wheel and buried in the ground so that only a semicircle remains above the surface.

Then you need to make holes on the tire with a diameter equal to the size of the necks of plastic bottles, and, after lubricating them with glue, screw them into the tires. After this, the entire structure needs to be painted yellow and plant flowers.
Flowerbed-pool for aquatic plants
Water lilies can be an excellent decoration summer cottage. However, what to do if it is not possible to arrange at least small pond or a swimming pool? In such cases, it is enough to make a “water” flower bed from a tire. To do this, you need to cut off the top part of the tire and dig it halfway into the ground. Then you need to lay on top a round piece of a special waterproofing film, which is intended for arranging swimming pools, with a diameter 1 m larger than the diameter of the tire. The edges of the film protruding above the side of the tire must be folded outwards, secured and covered with small round stones or broken bricks. All that remains is to place at the bottom of the reservoir a small mesh basket with soil in which the roots of the water lily are planted.
The easiest way is to set old tire onto the plot, throw soil there and plant seedlings. This is, of course, simple, but it doesn’t look like an exclusive decoration. Well, let's try to improve the situation. Take bright acrylic or oil paints, we will select several of them that are most compatible in color and paint several tires. Then we’ll install them on top of each other and get a wonderful multi-level flower bed.
Original vertical flower bed DIY tires are created from several tires of different diameters, stacked on top of each other like a pyramid. You can put a flower pot on top if you don’t have a small tire on the farm. After painting and filling internal space tires with soil, can be grown in the resulting flower bed hanging plants, for example, petunia or strawberries.

Flower beds made from tires can also be hanging. Attach a strong metal chain (thick cord, rope, etc.) to the tire and hang it on a tree. In order to be able to pour soil into the flowerbed, the bottom of the tire must be covered. For example, fix inside a flowerpot with a diameter slightly larger than the inner circumference of the tire. Or put a thick piece of rubber inside - think for yourself, there will probably be a material suitable for covering on the farm.

A snow-white hanging flowerbed made from a car tire is a spectacular “highlight” of modern style
And if you get a little creative, you can make a composition out of tires on the theme of... well, for example, homemade tea party. Several tires will perfectly play the role of a teapot and a cup - just complement them with simple details - cutting a pipe and bent pieces of metal tape.


Turtle flowerbed - fun creative
From a tire and tread, cut into equal 4 parts, you can make a flower bed in the shape of a turtle. We make cuts in the sides of the tire and insert tread scraps there - these will be the turtle's paws. We secure them with wire staples. We cut out the tail from a piece of rubber and also secure it with staples. For the neck of the turtle, take a piece plastic pipe, on which we secure a head made of crumpled newspapers with tape. You can put a straw or plastic panama hat on your head.

This do-it-yourself bed of tires must be painted according to all the “turtle” rules, otherwise it will not be clear what you wanted to depict. Draw eyes, a mouth on the head, paint the torso and paws in a bright color.
Flowerbed made from an inverted tire
Flowerbeds made from inverted tires resemble pot-bellied round flowerpots, to create which you will need:
1. Cut out a design of flowerbed petals on the top of the tire
Petals can be rectangular, triangular, round and even wavy. To begin with, they should be drawn with chalk or soap, and then cut out using a sharp knife, hacksaw or jigsaw. If you decide to use a knife, we recommend that you moisten it with soapy water while working - this will make it easier to overcome the resistance of the dense rubber.


Carefully cut out the petals using any sharp cutting tool
2. Turn the tire inside out
Many people are interested in how to turn a flowerbed tire inside out, because this is not an easy task and requires considerable effort. To do this, you need to turn the tire upside down with the side on which we did not cut anything, grab the cuts from the bottom with your hands and, pressing on the tread, carefully turn it out. Once you've done about half of the tire, flatten it into an oval and easily turn the rest out.

3. Paint the flowerbed in a spectacular color
We paint the resulting flowerbed in any color that will be in harmony with the rest of the landscape objects on your site. You can settle on a single color, but multi-colored ones, for example, in the form of stripes or a bright pattern, will look more impressive.

Vases on a leg - a more complicated option
Let's look at how to make a flower bed out of a wheel. This means that to create a flower bed we will use a tire with a metal disk in the middle. To do this, place the wheel on a flat surface and cut out the pattern of the petals, reaching with a knife (or other cutting tool) to the tread.

Then we turn out both the upper and lower parts of the tire without removing the disk. As a result, you will get a kind of flowerpot in the form of a flower on a leg, into which soil is poured and plants are planted.

After this, you need to take care of how to paint the flowerbed from the wheel. Upper part can be painted in a bright “floral” shade, and the bottom one in green. Then a huge rubber flower with living plants in the middle will bloom on your site.

Master level - flowerbed in the shape of a swan?
A swan flowerbed is made similarly to a flowerpot made from a tire, the only difference is in a more complex cut out design. If for a flowerpot it was necessary to form the same type of petals, then here - the wings, tail, neck and head of a swan. We transfer the diagram to the surface of the tire and begin to cut out the figure of a swan. The head and neck are cut out along the black contours, the tail along the red ones, and the wings along the blue ones. After this, the tire is turned out in the same way as in the two previous cases.
.jpg)
We make a beak from a piece of rubber (wood, plastic or other material) and paint it with red paint. We put the two halves of the head together, insert the beak between them and secure all parts of the head together with self-tapping screws. We screw in self-tapping screws on both sides of the head in the places where our swan's future eyes will be. Then, so that the screws are not visible, they are covered with two circles cut out of black electrical tape - these will be the eyes. Raise your head straight and up, slightly pressing it into the tire. This creates a fold, which also needs to be fixed with self-tapping screws.
.jpg)
On last stage At work, the swan is painted - here you can show your imagination and come up with any color for the bird’s plumage.