How to make a house out of cardboard. DIY cardboard house plans: dollhouses and for cats
Today we will make movable “real estate”, . If kids take part in the construction process, that’s great! I will definitely mention the advantages of each craft. But such a characteristic as the availability of the main material is common to all “buildings”.
How to do
pitched roof, thanks to the upper flaps of the large four-valve cardboard box?
Here's a simple way:

All that remains is to cut out the windows and door. Cover everything with beautiful paper. Choose the decoration of the house at your discretion. You can take the same one as on photo , you can come up with something of your own.
Source
Cozy corner for games
Now you can buy any house. But it’s much more interesting to do it yourself. Especially when the idea is too simple, as in this craft. And there is one more plus! The structure is taking shape! Need more space? Or has the baby stopped liking the corner? It can be easily and simply removed.
Making:


Construction of parts - drawings and diagrams of a children's house
The difference between this craft and the previous one is that it consists of separate cut out pieces of cardboard. Therefore they are used big boxes.
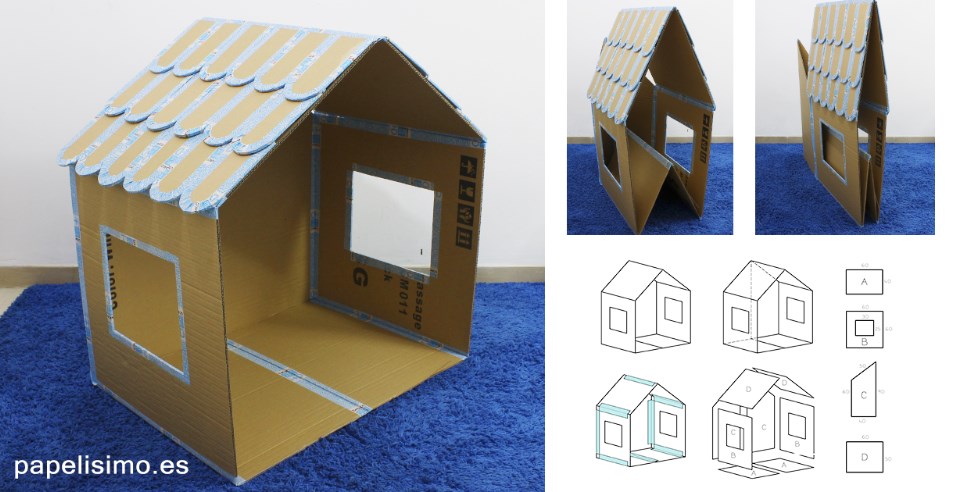
We will need: 
- 2 rectangles measuring 40 by 60 cm. This is the floor;
- 2 – 60×60. Side walls;
- 2 – 60×50. Roof;
- 2 parts measuring 40(bottom)×60(side)×50(top)×90(side). Back wall;
- 36 parts 20 by 10 cm. Roof tiles. (there are a lot of details, so if convenient, use templates ).

Making:

Such a house is easy to assemble and hide, and if necessary, take it out.
Form and ideas
The shape of the house depends only on the wishes of your baby. Cardboard allows you to do anything, even round designs. You just need to stock up on hot glue, tape and a utility knife. And how easy it is to dispose of the toy later! I burned it and that’s it, there’s no trash in the house!


Another simple MK with step-by-step photos:
Castle for princesses
Houses may be different. For example, if you have a princess, she definitely needs a real castle!
pay attention to video
, what a huge box is needed for this design. But you can use several smaller boxes. Just connect them first, and then model the “lock”.
We work:
- We secure all seams with tape. We pay special attention to the bottom and top of the box.
- We cut out the jagged parapet on top.
- Let's do semicircular windows in front of the lock, and in the shape of a heart on the sides.
- Gates in a castle are different from doors. To make them, cut a hole with an arch on top. But don't cut off at the bottom. We thread the ribbon under the gate. We pass the tape into the lock so that by pulling it, you can close the gate.
- Cover with fabric self-adhesive film or wallpaper the walls of a princess's palace.
More ideas for castles - pictures can be enlarged by clicking on them.

A dollhouse is a special home in which children's favorites live. You can buy it at a toy store, but you can save money and make a cardboard house with your own hands together with your child. This will be a fun activity that will bring joy to both of you.
What will you need?
Do fairytale house Quite simple for a child. You just have to stock up on imagination and patience. You will also need:
- sharp knife;
- glue;
- scotch;
- scissors;
- watercolor;
- brush;
- colored paper and other finishing materials.
Make it beautiful Dollhouse Drawings and photos will help you.
For a doll
A fairytale house can be made into several floors: for this you will need 2-3 boxes, but you can get by with just one. If there are no solid boxes in the house, use tape to connect several cardboard sheets: the dollhouse will turn out just as good.
- Take a cardboard box. If it is not glued, secure the edges well. It is better to do this with tape, otherwise the fairy house will turn out to be fragile and may fall apart during the game. Cut out the windows.
- Fasten two separate sheets of cardboard at a 45 degree angle. This will be the roof. Place it on top of the box.
- From separate sheets of cardboard, cut out partitions for the rooms that will contain the fairytale house.
- Place them inside the box.
- Now it's time for finishing. It can be arbitrary: from fabric, colored paper, beads, scraps or scraps. You can cover a dollhouse for children with white paper, and then ask the child to color it. He will certainly be happy to take part in this venture!
- Concerning interior decoration, don’t skimp on your imagination here either. After the next renovation, there will always be pieces of wallpaper, fabric, oilcloth left in the apartment. They can also be placed inside and pasted over the dollhouse.
This is what a children's fairy-tale house might look like in the photo.
And this is what the dollhouse looks like from the inside:
Video instruction
Scheme
For babies
Sometimes children don’t want to play with dolls, but rather climb into a small children's playhouse and arrange your space in it. Let's give them this opportunity! Making a children's house with your own hands is also very simple. The only difference will be in size, so you will have to look for a large box household appliances, for example, a refrigerator or washing machine.
- Glue the sides of the box or connect them with tape.
- Use a utility knife to make holes for the entrance and windows.
- To have more space in the house, you can remove the top of the box and attach an L-shaped roof in its place. Thanks to this technique, the kids will feel more spacious in the house.
- Now all that remains is to do the finishing. Children's house can be decorated natural materials: twigs, beams, cones, etc. You can simply cover it with paper and paint it.
The ideal fastening for all elements would be tape or a stapler. Glue is an unreliable material: a children's house can break during play.
This is what the children's house looks like in the photo. Agree, the craft scheme is very simple and is unlikely to be a problem for loving parents.
Wood
For the New Year
The New Year's house for children will be different only external finishing. The craft pattern will be the same. To give the product a fabulous, New Year's look, cover it with glitter, cotton wool, and attach paper snowflakes.
You can put a small artificial Christmas tree inside and decorate it, and Father Frost and the Snow Maiden or a snowman can live in this house.
This is how a New Year's house for children will look in the photo.
You can put it under the Christmas tree or decorate your room with it.
If you want to make a small dollhouse, it is recommended to take designer cardboard or just thick paper. Cardboard from under household appliances will look rough and will be difficult to glue together.
Windows from the inside can be imitated with tape. If you want to light it up, stock up on a flashlight, turn it on and put it inside the house. You can use a garland. This is what this craft for children looks like in the photo.
Crafts for children are always an opportunity for parents and kids to communicate and show their creative abilities. Let your house be the way you dream of it!
The New Year's time is coming - a time of miracles, when everyone can feel a little like a helper to the kindest old man in the world. After all, think about it, if in addition to gifts for the children of the whole planet, the old grandfather also had to decorate our houses, how would he manage to do everything? That is why we, adults, help him in every possible way, because it is impossible for children to stop believing in Santa Claus.
Decorating your home is the most important task in the process of creating a New Year's mood. Buy in store ready-made elements decoration is not a difficult matter, but to do it new Year decoration with your own hands is something completely different! In this article you will find more than 20 master classes and schemes for creating New Year's houses. At first glance, it may seem to an unprepared person that creating a New Year's house from paper, cardboard or any other materials is an impossible task. In fact, this is not the case, especially if you have a ready-made template. So, if you are serious, then get ready to become a real builder, because in this article you will find diagrams of not only single houses, but also entire winter villages!
You can make a very beautiful New Year's house with your own hands from an ordinary cardboard box. The inside of the box is usually brown, which actually works to our advantage. The box will have to be gutted and turned inside out. Draw a house template and cut it out. Next we glue the walls and floor. You can leave the top with an improvised roof and use the house as a gift box, or you can glue a full roof and put it under the Christmas tree. You can draw on top of the cardboard with a special white marker, white gouache or regular corrector. Externally, the house is very reminiscent of the gingerbread delicacy that is common in the Western world. Well, you and I are familiar with the gingerbread house from the famous fairy tale by the Brothers Grimm “Hansel and Gretel”. If your children have not heard it yet, then it’s time to read this story, and a homemade gingerbread house from a cardboard box will be an excellent attribute for a small dramatization!
More Gift Boxes:

On the eve New Year's holidays Shop windows are full of gift boxes, decorative bags, and wrapping paper for every taste. Smiling sellers helpfully offer to provide packaging services New Year's gifts. And it all seems great, because you must admit, it’s much nicer to receive a New Year’s trinket in a beautiful package. But on the other hand, the whole meaning of the gift is lost, the very gift that should […]
If you are planning to make not just a house, but an entire Christmas village, then you will definitely need a church. Print out our finished diagram, cut it out of cardboard, glue it in the right places and the church layout is ready. Now all that remains is to decorate it with sparkles and artificial snow so that the church becomes truly winter. You can download the finished diagram below.

So, the church is ready, now all that remains is to build the houses of the local residents. Download the finished diagram from the link below, cut it out of cardboard, glue the house and decorate it. Who should be accommodated in the houses? Anyone! Little dolls, pine cone elves or any other inhabitants that you have. If there is a little Santa Claus, then feel free to accommodate him too! You'll get a whole residence!

If there are any problems with cardboard, then you can easily make a New Year’s house from salt dough. You can use it as a candlestick, it looks very cool. So get ready salty dough, roll it out to about 1-1.5 cm thick. Cut out the walls, windows and door. This can be done with special molds, and if there are none, then use a stationery knife and a ruler. Glue all the walls and glue the roof. Cover the joints with the remaining dough. When the house is dry, sand the rough edges with a sanding knife and enjoy your creation!

Cute houses in the style of Danish architecture can be made using this scheme. At the link below you will find diagrams of all three houses, which you simply need to print and bend along the lines. Place an electric candle inside, turn off the lights and enjoy the city's winter landscape!

If you love cornflakes or, like real Englishmen, you eat oatmeal in the morning, then you will probably have cardboard boxes of appropriate sizes. Below is a step-by-step master class on how to make a New Year's house with your own hands from a cardboard box. Follow the instructions carefully and you will succeed!

Excellent New Year's houses are made from magazine clippings. Find a picture of a suitable house or castle, cut it out and glue it in a circle. Place an electric candle inside and enjoy.

Wonderful New Year's houses can be made from plain white paper, decorating some parts (roof and windows) with sparkles. You can download ready-made templates from the link below. Watch the step-by-step instructions and make your own New Year's house!

If you have accumulated a lot greeting cards, you can make wonderful houses out of them, which you can use to decorate your apartment, combining them into garlands. Or you can use these postcard houses to congratulate friends and acquaintances. You will find step-by-step instructions for making houses from old open doors below.

You can make craft houses not only from paper or cardboard. Felt is also an excellent material for making. The manufacturing process is incredibly simple; step-by-step instructions can be found below. All that remains is to get some felt and an electric candle. New Year's craft the house is ready!

With our ready-made scheme and step by step instructions You can make a whole city, especially if your team has little fidgets ready for handicrafts. You will also need electronic candles or you can use a New Year's garland. Add some mini Christmas trees and the New Year's city is ready! And most importantly, the whole family is in a New Year's mood!

New Year's houses can also be made from scrap materials, which is especially great when these materials are no longer suitable for use, such as milk packaging. If you look at it, the house is almost ready, all that remains is to make the roof and adjust the size of the house itself. If the box doesn’t look very presentable, you can cover it with paper and draw windows and doors, but if you’re happy with everything, then the craft house is ready!

From this step by step wizard class you will learn how to make a simple New Year's house from ordinary cardboard. The main difficulty lies in the template, and if you do not have spatial vision and architectural education, drawing something more or less complex on paper is quite difficult. Therefore, using the link below you can download a ready-made diagram of the house and glue it together yourself.

Download the finished house template, cut and glue. The DIY Christmas house craft is ready!

Download this simple template, print and cut out. In our instructions, the house is made from an old music book. You can make from plain white paper or “draft paper”. A little decor, an electric candle and Voila! Your DIY paper house is ready!

If you don’t have time to tinker with voluminous houses, but want to decorate your apartment with the whole city, then this option is especially for you. You will need a sheet of Whatman paper (thick) in A2 format, a printed template and a stationery knife. From the links below you can download two various options cities. Ready-made schemes printed on A4 sheets, printed, glued and transferred directly to whatman paper for cutting.

Getting ready for the New Year with the children and making Santa Claus's house out of paper. Download the finished template, print it and glue it together. Young designers will be delighted!

As already noted, house crafts can be made from the most different materials, including those made from wooden sticks. Popsicle sticks are quite suitable for this job, but you had to collect them all year. In any case, you can take notes on the idea and be sure to do it next year!
A very cute New Year's house can be made from paper straws. For this you will need: thin paper, scissors, glue, pencil, decorative elements. Cut the paper into strips of the same size. Wrap the paper strip around a pencil and glue it with glue, remove the pencil. You will need about 50 tubes to make a house like in the master class. When the base is ready, glue on the roof, and then the windows and other decorative elements.

Incredible New Year's houses can be made from felt. Volumetric or flat, in the form of gingerbread houses or clocks. In addition, felt houses can be used to decorate pillows or socks for gifts. You will find the finished patterns under the photo.

You always want tea drinking to bring not only taste pleasure, but also aesthetic pleasure. A box of tea bags doesn't look very nice, especially on a holiday table. To somehow decorate the serving of tea, tea houses were invented. You can buy them ready-made, or you can make them yourself. You can use plywood or more for the base of the house available material– cardboard. Let's consider making tea house made of thick cardboard.
To make a house you will need materials:
1. Cardboard.
2. Pencil and ruler.
3. Scissors.
4. PVA glue.
5. Acrylic paints.
6. File.
7. Napkins for decoupage.
8. Eggshells.
9. Sponge, brushes.
10. Twine.
11. Varnish.
The process of making a tea house.
1.To make a house, you need to make a sketch and think over the dimensions. We will make the base of the house according to scheme No. 1.
2.According to the calculations performed, we outline the foundation of the house. Then we cut out the parts.

3.To assemble the house body, you need to prepare 3 short strips. Glue the strips to the bases of 3 sides of the house.

4.Then cut out 4 long strips. Using these strips we will fasten the side walls of the house. First, we fasten the 2 sides of the house together.

5. We strengthen one more side of the house. For strong fastening, we use stable elements with which we support the walls during gluing.

6. Carefully place the front wall with the cutout on top of the prepared fasteners and press lightly.

7.To ensure the strength and stability of the structure, additional parts must be cut.

8. We fix the walls of the house from above and below using prepared parts.

9.The walls are fixed together, we glue the base of the house.

10. We glue the external joints with masking tape so that in the future the structure does not have cracks or bends.

11. Let's start making the roof. To do this, we use scheme No. 2.

12. We draw out the cardboard according to diagram No. 2. We cut out the elements of the diagram.

13.In order for the roof slopes to be secured to each other, it is necessary to glue the strip in the form of a three-dimensional triangle.

14. We close the voids with small triangles.

15.Fix the roof slopes.

16. We glue the gables on both sides.

17.The body of the house is assembled. Let's start priming. For this white acrylic paint paint over inner part house foundations and roofs.


18.Then we prime the outer part of the walls of the house.

19.On the roof we prime only the gables.

20.Next you need to start decorating. Let's start with the foundation of the house first. For this we will use napkins for decoupage. Cut out a drawing of a suitable size from a napkin and place it with the colored side on the file.

21.Then carefully pour water onto the napkin.

22.Attach the file with the drawing to the front wall of the house.

23.Press the drawing to the wall.

24.Remove the file from the drawing.

25. Cover the drawing with glue.

26.Glue another pattern to the side walls.

27. Decorate the free space around the drawing with eggshells.


28.Prime the shell.


29. Paint the shell pink.


30.Using a sponge, make impressions with dark paint on the shell.
If you think about it a little, you can make great things from the simplest and most ordinary materials that are often at hand. with my own hands.
One such example is wooden house made of paper.
But as for the ideas that arise to create such a miracle, they appear for a variety of reasons. Sometimes inspiration just comes and that’s not bad at all.
For this we need
Cocktail straws
A4 paper
Multi-colored cardboard
Glue
Scissors
Step 1


The first thing you need to do is take paper, preferably A4 format, without cells or rulers. The paper should be white. Next, you need to twist it into tubes.
Step 2

For more comfortable work, the paper must be divided into several equal parts, and only then rolled. First, do it on the sides, and only then in the middle.
You can never calculate how many of these tubes are needed in the exact quantity. That's why, do them as you go. It will be easier this way.
Step 3

As for the foundation, in order to build it, you need to select fairly thick cardboard. Remember, the “life” of your house will depend on it. You will need to glue paper tubes to the side parts. Several need to be made shorter.
Step 4

Once you have completed the process of laying out the tubes in three rows, make a small mark where the doors and windows will be. Remember, in order for your house to look more symmetrical, you need to place both windows and doors at the same height.

Step 5

For bright effect, in the middle of the windows you can make curtains from colored paper. By the way, in order for all fastenings to be stronger, you can use transparent tape. But this is all optional, of course.
Step 6

Next, don’t forget about the roof. But initially, you need to build several supports so that it does not collapse. The roof can be cut from cardboard. Moreover, the shape of the cuts can be very different. It all depends on your own imagination.

It is advisable to glue the roof with a simple, colorless glue so that it all looks more realistic.
Step 7


After you complete all the steps listed, decorate the windows with the simplest self-adhesive. And in the same way, decorate the doors. As for stairs, you can make them out of them, or you can not make them out of them. And if you still prefer a house with stairs, then you can build them from the tubes that you made. If necessary, do more. It is advisable to cover the steps with “wooden” self-adhesive tape.


Step 8

And the final stage will be making the railings. And they are also made from tubes, having previously pasted them in Brown color. And now, your house is finished. All that remains is to decorate it. Here, you can dream up. For example, put up a variety of figures, animals, a fence, or even a vegetable garden, as if it were a real village. In any case, it will turn out just great!