DIY slate fence. What to consider when building a slate fence with your own hands Slate fence wave distance between posts
A slate fence is an economical and quickly erected structure, but it does not have a spectacular appearance. The fence has a sufficient level of reliability to protect the territory from the entry of stray animals and unauthorized persons.
Advantages and disadvantages
When designing a fence, it is necessary to take into account the disadvantages of using slate. They can affect the durability and ease of use of the structure. Among the disadvantages, the following properties and characteristics of slate can be noted:
- hygroscopicity, due to which the use of this material is recommended for regions with a moderately humid climate;
- weight (at least 10 kg/m²), which requires the installation of powerful supports;
- low degree of aesthetic appeal;
- fragility, characterized by instability to mechanical impact, as a result of which the fence may be damaged by being hit by a stone from under the wheels of a passing car.
A slate fence also has its advantages. They are often the deciding factor in favor of choosing this material for fencing:
- Non-flammability.
- UV resistance.
- Durability (the service life of flat slate is at least 15 years, and wave slate - at least 20).
- Low price.
- Frost resistance.
- Flexibility in processing.
If you choose between chain-link mesh and slate, the advantages of the second are obvious. But in all respects it is inferior to corrugated sheeting, except for price.
Types of slate for fencing
Slate is made from an asbestos-cement composition, which can contain modifying additives in an amount of no more than 5% of the total volume of the mixture. There are 2 types of this material:
- flat;
- wave.
Each group has different types materials whose properties you need to know when choosing a fencing method garden plot or local area.
Wave
A fence made of wave slate can hardly be called an aesthetically attractive design, but it is advantageous due to its low price. In the first years of production of this material, only 1 type was produced. Subsequently, the range expanded and today you can buy slate with different heights and wave step. These 2 sheet parameters are indicated through a slash: 40/150 mm and 54/200 mm. The thickness of the sheets depends on their size. The larger the canvas, the thicker it is.
In accordance with GOST, the following types of wave slate are distinguished:
- sheet 175x112.5 cm, type 40/150 (6 waves), thickness 5.8 mm, weight 23.2 kg;
- sheet 175x98 cm (7 waves), thickness 5.8 mm, weight 26.1 kg;
- sheet 175x113.5 cm, type 40/150 (8 waves), thickness 5.8-7.5 mm, weight 26.1-35 kg.
Manufacturers can produce products in other sizes. Today the market offers wave-dyed and flat slate. The service life of these materials is 1.5 times longer than that of traditional gray slate. Strength is achieved by introducing special additives and pigments into the composition.
Flat
A fence made of flat slate has more advantages than a fence made of wave slate. Smooth flat sheets are easy to install and have greater strength due to their increased thickness. It matters more a wide range of standard sizes of canvases. But first of all, you need to decide what kind of slate is required for building a fence: pressed (LPP) or unpressed (LNP). The corresponding abbreviation is located on each asbestos-cement sheet.
Pressed flat slate has the best strength and other performance characteristics. But LDL also has its advantage: it is lighter in weight. LPP is a frequently used material for fencing various industrial and agricultural facilities. The demand is due to high strength, durability, and suitability for re-installation.
Metal
Metal slate is called popular construction material- corrugated sheet. These sheets are made from sheet steel, galvanized and painted. powder paint. A protective layer is applied on top of it, the thickness and composition of which may vary.
Manufacturers offer a wide range of corrugated sheets with different colors and wave profile. Metal slate is more durable and aesthetically attractive than asbestos-cement slate. But the price of these materials differs in favor of the second.
How to make a slate fence?
- In order to make a slate fence with your own hands, you need to calculate the amount of materials required.
- Determine the length of the fence around the perimeter.
- Subtract the distance required to install gates and wickets.
- Divide the resulting value by the width of the selected type of material. If the result is a fractional number, it is rounded up.
- Add 1-2 canvases for reserve.
- If you buy wave slate, take into account that it is laid with an overlap of 1 wave.
Select the material of the pillars and their cross-section. You can use metal or wooden supports. Take into account that hinged and side pillars will be required to install gates and wickets.
It is recommended to buy slate measuring 175x113.5 cm. Be sure to pay attention to the thickness of the sheets. Not only the strength of the material depends on it, but also the ease of its installation. So, a sheet measuring 175x113.5 cm and 10 mm thick weighs 40 kg. A similar sheet with a thickness of 8 mm is 30 kg.
Preparation of tools and material
Metal supports are good for their strength and durability. In order to prevent the formation of rust, the pillars are coated with anti-corrosion primer. You can use any compositions based on alkyd, epoxy, polyurethane, oil, or polyvinyl chloride. If further painting of the supports is planned, anti-corrosion treatment of the metal is carried out in 2 stages:
- if pipes show signs of rust, apply special rust primers;
- Alkyd primer “GF 017” or epoxy primer “EP 076” is applied to bare metal;
- After the first layer has dried, the pipes are coated with a second type of primer: two-component primer for painting.
With this preparation, fence and gate supports will last for many years. But in order for them to be stable, they need to be installed correctly. The optimal pipe cross-section is 50 mm. If it is decided to install wooden supports, they are also prepared by covering them with a protective antiseptic primer. Optimal cross section wooden poles- 100x100 mm.
Select and buy slate. The canvases are stored in a place where they will be protected from accidental impact. If wave material is purchased, The best way stacking - without horizontal displacement of waves.
A slate fence is erected in different ways:
- install flat panels in frames welded from metal corners;
- pour a concrete strip and slate sheets rest on it;
- They fasten the canvas to the posts using self-tapping screws and screws, and reinforce the structure with veins.
To complete the work you will need the following tools:
- grinder with a disc for metal (for trimming metal poles and frames from corners);
- screwdriver with drills (if installing wooden poles);
- roulette;
- bubble level;
- plumb line;
- fasteners (wood screws for wooden supports, screws with nuts for metal);
- pegs and rope for marking.
Frame structure
In order to build a slate fence, first of all, mark the area. Pegs are driven in at its corner points. If the distance between them is too great, intermediate ones are driven in. A rope is pulled between these supports. Then follow the step-by-step instructions:
- Using a tape measure, find the location of the pillars. Optimal distance between them 2-2.5 m.
- At the found points, holes are dug using a hand drill or a shovel. Each post must be installed 1/3 into the ground. At the same time, its lower end should be buried 20-30 cm below the freezing point of the soil in the construction region. In this case, the column will not change its vertical position during seasonal soil movements associated with the processes of freezing or thawing.
- The lower part of the pillars, intended for immersion in the ground, is waterproofed using coating insulation - bitumen-based mastic. Particular attention is paid to the ends.
- The bottom of each pit is leveled and compacted.
- Pour a layer of sand 5-7 cm thick onto the bottom and compact it.
- Place a 10 cm layer of gravel on the sand and compact it.
- Install the post and level it vertically using a level and jibs.
- The pit is either filled with concrete or filled with gravel, carefully compacting each layer.
- All pillars are installed.
- Mounted between supports wooden joists(veins) made of boards or metal pipes. You can use a corner.
To make the fence more stable, formwork is installed along its line and a concrete strip with pillars embedded in it is poured. But this stage of work is not necessary.
Installation of sheets
You build a slate fence with your own hands by installing sheets one by one and fixing them with self-tapping screws or self-tapping screws. The simplest one, but reliable way fastening asbestos-cement sheets with nails. In this process, skill is important so as not to break the slate fence by accidentally hitting it with a hammer. If screws are used to secure the sheets, a wrench is required.
It is important to install the first canvas correctly, carefully aligning it horizontally. All subsequent sheets are mounted, focusing on the first one. You can apply in the following way: install the first and last sheet in one line of the fence and stretch a thin rope between these sheets. It is important to ensure that it does not sag and, if necessary, install intermediate sheets.
Finishing and decoration
A gray slate fence has an unsightly and dull appearance. There are several options for its design, each of which can give the fence aesthetic appeal. Metal corners installed along the lower and upper lines of the canvas will provide the fence with a finished look. Metal can be painted with any suitable moisture-resistant paint.
Slate is also painted. This will not only give it visual appeal, but will ensure resistance to moisture. Acrylic paints are recommended for painting slate. Before starting work, you need to decide how the paint will be applied: with a brush or a spray gun. The second option is the most preferable, since slate has a porous surface that is difficult to paint. The composition applied by spraying will penetrate into all cracks and create a durable waterproof layer.
In order for the finishing layer to be firmly held on the slate surface, all fencing sheets are pre-coated with a primer deep penetration. Choose a composition that is recommended for treating surfaces before painting. There are also special paints for slate, but not every construction supermarket can buy them.
Another way to decorate the fence is to plant along the fence climbing plants. As they grow, they will fill all the sheets, pillars and veins. Appearance the fence will resemble a hedge in its beauty.
Despite the low price of slate, fencing made from it cannot be called the most inexpensive. But it is cheaper than brick or corrugated board. At self-installation fence, you can also save on installation work.
Each owner summer cottage or the owner of a private house, there is a need to build a fence or replace an old fence. The costs of such a necessary undertaking are very significant, and this forces one to incline towards budget decisions those who cannot afford the construction of expensive and solid fences.
An example of a classic slate fence
Budget construction option
A slate fence can be an excellent option if large expenses for such construction are not envisaged. Despite the fact that this building material is intended for roofing, its use in the construction of a fence is quite justified. Often, when replacing roofing material, old slate begins a second life as a building envelope: it is in no way inferior to new if painted.
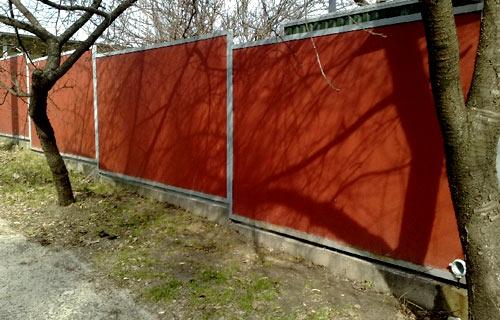
This is what a painted fence made of slate and a metal corner looks like
This material is low cost, its installation does not require special skills and is accessible to everyone.
Therefore, the decision to build a slate fence with your own hands will help save money on paying employees. The slate surface is easy to paint, which makes it possible to harmonize with the house and environment. By choosing this option for fencing the site, the owner can be confident in the durability and cost-effectiveness of such construction.
Flaws
For all its advantages, slate is still roofing material and may not be an ideal choice in all respects. Let's list the main disadvantages of using it:

From all of the above, we can conclude that the use of such a fence is advisable for demarcating a neighboring property, but is of little use for a front boundary.
Wave and flat slate
The industry produces two types of slate - wave and flat. One of the options for flat slate is pressed. It is heavier, but also able to withstand greater loads. It is better to take a flat sheet, regardless of whether it is pressed or not, into a metal frame made from corners to improve the strength properties and give the fence a neat appearance.
The use of wave slate simplifies the installation process. In this case, you need to be careful and lay the sheets overlapping with the waves aligned.

An example of a flat slate fence
How to build a slate fence yourself
If you decide to build a slate fence with your own hands, then the first thing you need to decide is what type of sheets will be used for the fence. After this, measure the length of the planned fence and calculate required amount pillars based on the fact that their pitch is 2.5–3.0 meters. The number of sheets can be calculated using the total length of the fence and the dimensions of the sheets. It is better to purchase sheets with a small margin, because they are very fragile.
Preparation of materials
Before you start building a fence, you need to take care of providing yourself with materials, so that later you don’t get distracted and don’t have to buy what’s missing. Here is a list of basic materials:

It should be noted right away that the given dimensions of the corners and beams are approximate and may be different. The main condition in this case is to ensure the strength and reliability of structures.
The corners should be cut into equal parts. The length of the segment should be equal to the diameter of the pipe that is used as a column. Holes for fastening are drilled on the larger side of the corner.
The sections of pipes that will be in concrete are protected by applying an anti-corrosion compound, then covered with molten bitumen, adding a solvent to it. When working with bitumen, precautions must be taken, since this material is flammable. After bitumen treatment, the pipe section is painted oil paint.  To work you will need the following tools:
- Hammer;
- Grinder (for cutting slate);
- Drill and drill bits;
- Spanners;
- Construction level and cord;
- Welding machine (if you decide to weld corners or install a fence made of flat slate).
Installation of posts
With help garden borer necessary, observing the given step. In order not to stray from the line of the future fence, you can pull the construction cord and focus on it when drilling. To do this, you need a thread (or cord) to be attached to.
The depth of the posts must be at least 50 cm.
This is necessary to ensure sufficient strength and stability of the support, since it bears a considerable load from the guide bars and slate sheets.
After a hole has been dug with a drill, the soil must be compacted manual tamper(this is a log with a block nailed to the end like a handle, resembling the letter T).
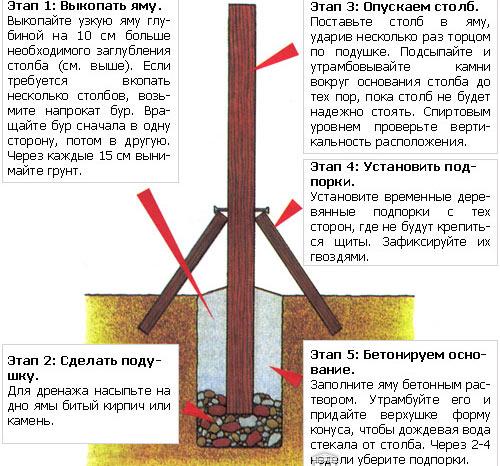
Steps to install wooden fence posts
Then the column is installed. It can be secured in the hole with broken bricks, if available, or covered with gravel. If it is necessary to ensure its strictly vertical position, checking the level or plumb line. If the pole tilts under its weight, it must be reinforced with supports until the concrete hardens.
How to attach a beam and a corner
After pouring the concrete, it is better to wait a week so that it hardens well and acquires the necessary strength. If this is not possible, then you must wait at least 24 hours before installing the fence.
In the pipes from above and below, at the level of fastening the upper and lower beams, holes are drilled according to the size of the studs (bolts). After this, using a pin, the corner is attached to the pipe so that its profile resembles the English capital letter L. This method has a positive effect on the rigidity of the structure.
Beam fastening options
The load from the weight of the fence and timber can be directly transferred to the post itself if the latter is attached to the post simultaneously with the corner with a pin. To do this, a hole corresponding to the diameter of the stud is drilled in the beam, then all the elements are pulled together.
Another option is to attach the timber to the corner. In this case, additional holes are drilled in the corner through which the beam is attracted to it. This operation must be preceded by attaching the corner itself to the post.
The end sides of the beams are connected to each other using a joint, which is called an end joint by carpenters. To do this, cuts are made at the ends of the beams to half their width.

Sample of fastening beams to pillars
When combining the beams, their ends are connected like a puzzle, the joining points are fastened with screws or bolts.
Slate fences are not considered traditional fencing options, but, under certain circumstances, they can help solve the problem quickly and inexpensively.
- Long service life of the material. Asbestos-cement sheets, even without additional treatment, can last for several decades. They do not change their original properties under the influence of low and high temperatures, and are not subject to rotting and oxidation;
- The cost of new material is affordable, although most often sheets that have been used but have retained their shape are used for permanent and temporary fencing;
- Assembling a fence from flat slate with your own hands, as well as from corrugated material, will not be difficult even for a novice builder;
- Asbestos cement sheets allow you to make maximum use of the master’s imagination. If desired, the sheets can be cut and original design elements can be created. On flat surfaces you can apply paint to create entire paintings.
Slate fencing has negative qualities:
- Fragility. Asbestos-cement sheets are quite easy to damage when hit by a hard object or when bent. The sheets burst, crack, and in the end, to repair, the entire element has to be replaced;
- Slate does not burn, but at high temperatures it bursts, shooting out individual pieces.
What slate to use
You can make a slate fence with your own hands from wavy or flat sheets. Wave material is more often used as a roof covering, while flat slate has a much higher more options applications.
Flat slate
Abbreviations used to refer to this material LP-P and LP-NP, which means flat pressed sheet And flat unpressed sheet.
The difference between pressed and unpressed material is determined by the different values of bending strength.
Pressed sheets have greater strength due to a denser structure, which increases the service life of the material, its frost resistance and resistance to impact loads. TO positive aspects non-pressed products include their low weight compared to pressed sheets, as well as lower cost.

The industry produces flat slate in three main sizes:
- 1x1.5 m;
- 2x1.5 m;
- 3x1.5 m.
Wavy slate
The following abbreviations are used to refer to corrugated sheets: VO, VU and UV, which means wave ordinary, wave amplified And unified wave. The sheets differ not only in strength characteristics, but also in size: VO - 1120x680 mm, VU - 2800x1000 mm, HC - 1750x1125 mm.
Ordinary corrugated products are used to organize roofing on small private housing construction projects (sheds, cottages, bathhouses), reinforced sheets can be used to cover roofs on industrial facilities, and universal slate is suitable for any buildings and structures.

For fencing, the most suitable option would be to use reinforced corrugated sheets.
It has the highest strength among the considered asbestos-cement wave materials, which means it will last longer as a fence material. In addition, the reinforced sheets are lightweight (27 kg), which is important when constructing a corrugated slate fence with your own hands.
Buy slate specifically to build a fence, special meaning No. If you have to spend money on fencing, especially if you have to make a fence on the facade of the site, it is better to purchase stronger and more durable sheets from corrugated metal sheets, but if you have to make a fence between neighboring areas, then it is best to make a fence from old slate with your own hands.
Which base to choose
Two options can be used as a foundation for a slate fence: a strip base and individual concreting for each post.
Tape base
This type of foundation involves removing soil along the entire perimeter of the future fence. The width of the tape should be at least twice the diameter of the post, and the depth depends on the depth of soil freezing in the area, but cannot be less than 0.8 m.
Wooden formwork is prepared for pouring. The pillars are installed at the time of pouring, tracking verticality using a plumb line.
This type of foundation is quite expensive and its organization for the construction of a slate fence is not reasonable. The use of slate implies savings, and strip foundations are best used for the construction of permanent brick or concrete fences.

Individual concreting of pillars
It is much more efficient and cheaper to concrete each support. Individual concreting is carried out as follows:
- Holes are dug at the designated points using a drill or manually. The diameter of the hole should be twice the diameter of the post. The depth of the hole must be at least 800 mm.
- Sand is poured into the bottom of the hole and compacted; fine gravel is poured on top and also compacted.
- Roofing felt is used for waterproofing equipment. It is laid along the length of the hole so that it fits snugly against the walls; in this case, the roofing felt also acts as formwork for concrete.
- Concrete for pouring the support is made from M400 cement and sand in a ratio of 1:3.
- The solution prepared in a concrete mixer is poured into the hole, after which the post is inserted.
- To install the pole strictly vertically, you need to check it using a plumb line and a vertical level.
- The concrete gains full strength within 28 days, but to continue installing the fence it is enough to wait 7 days. The strength gained will be enough to install guides and slates.

Required materials and tools
To make a slate fence, you will need to prepare the following materials:
- flat slate. The height of the fence will correspond to the height of the slate - 1.5 m, the length of the slate should be chosen based on the ease of operation and the marking of the support pillars;
- supporting For corner posts and gate supports, it is best to use stronger ones. metal pipes with a cross-section of 100 mm, metal posts with a cross-section of 80 mm will be sufficient for intermediate supports and gates;
- used as transverse guides for asbestos-cement sheets edged board 50 mm thick;
- To install jumpers on a pole, you will need to organize a jumper in the form of a metal corner, 250 mm in size. Each post will require at least two jumpers to attach the guides at the top and bottom;
- Self-tapping screws will be required as fastening material for the slate; bolts and nuts will be used to fasten the guides.
To install the structure you will need to purchase the following tools:
- level;
- plumb line;
- drill for preparing holes for posts;
- shovel;
- container for preparing concrete or concrete mixer;
- drill;
- screwdriver;
- welding machine;
- hacksaw;
- wrenches;
- cutting wheels for concrete and grinder;
- safety glasses, gloves and respirator.
Asbestos dust is very harmful to health, so when working with slate with cutting wheels, you need to use a respirator and safety glasses.
Calculation of the required amount of materials with examples
In order to correctly calculate the required amount of materials for a slate fence, you should accurately measure the length of the future fence. Before starting work, you need to find reference points marking the boundary of the site; this must be done by the owner himself. To avoid claims and disputes with neighbors, you may have to call surveying specialists and update the site layout plan.

Let's assume that the boundary boundaries of the site coincide with the existing ones, and using the example of a site of 20x25 meters, we will make a step-by-step calculation of the necessary materials:
- The perimeter of the site is 90 m. To equip the gate you will need 4 meters, and for the gate 1 meter, respectively, for the blind fence there remains: 90-4-1 = 85 meters. If flat slate with dimensions of 1.5x3 m is used for installation, to cover 85 meters you will need: 85/3 = 28.33 sheets, rounded to big side and it turns out - 29 sheets.
- Considering the height of the fence is 1.5 m and the need to bury the support post into the ground at a distance of at least 1.5 meters, we find the height of the post to be 3 meters. For corner supports and gates you will need 6 pillars with a cross section of 100 mm.
- To calculate the number of intermediate supports, you should divide one side of the fence by the distance between the posts (it is recommended to install posts every 2.5 meters). 20/2.5=8 pillars in width and 25/2.5=10 pillars in length. From the length of the front side, you need to subtract the width of the wicket and gate: 20-4-1=15, and also divide by 2.5. The total will be: 20 pillars in length (two sides), 8 pillars in width on one side, and 6 pillars on the front side. A total of 34 intermediate supports with a cross-section of 80 mm and a length of 3 m are required.
- Boards 50 mm thick and 130 mm wide were chosen as transverse guides. If there are two rows of guides at the top and bottom, 180 meters of boards will be required.
- A metal corner 50x50 mm long 250 mm will be used as a support for the guides. The total number of pillars is: 6+34=40, respectively, 80 pieces of corner will be required, total length 20 meters. When purchasing a corner, you should take into account the length of the standard product (6, 9 and 12 m).
- To attach the guides to the support, you will need 80 mm long bolts with nuts. 80 supports with two attachment points will require 160 bolts.
- To fasten the slate, self-tapping screws 50 mm long will be used. Each sheet will require 12 screws (fastening pitch 500 mm), respectively, for the entire fence you will need: 29x12 = 348 screws.
- Concreting one support will require 5 kg of cement and 15 kg of sand. In total you will need: cement - 40x5 = 200 kg (4 bags), sand - 40x15 = 600 kg.
The depth of the support pillars depends on the depth of soil freezing in the construction area, so the height of the pillars will differ depending on the climate zone.
Instructions for building a slate fence
The construction of a fence consists of several stages. The following instructions will help beginners in construction independently complete all the work step by step and without errors.
Planning. Before starting work, you should prepare a plan. On the site diagram you should mark the points where the corner posts, the distance between them is measured, and the installation locations of intermediate supports are marked.
Marking. All support placement points are transferred from the plan directly to the site. The corner points are found first and pegs are placed on them. Next, a cord is stretched around the entire perimeter, which will allow you to accurately mark the installation locations of the intermediate supports; a peg is also driven in to indicate the location of the support.
Excavation. At the next stage, holes are prepared for support pillars. The depth of immersion of the support into the ground depends on the depth of freezing in the area, but making holes less than 0.8 m deep is not recommended.

Preparation of pillars. Before installing the poles, it is necessary to prepare them for being in an aggressive environment, for which metal surface they are cleaned of rust and painted with special compounds or bitumen.
Concreting. As formwork for concrete, roofing material is used, which is placed along the walls of the hole. It is advisable to compact the bottom of the hole and fill it with sand and gravel. After preparing the hole, concrete is poured into it and a post is inserted.

The verticality of the installation is checked using a plumb line and level. Further work with supports is possible only after a week, after the solution has gained sufficient strength.
Installation of supports for guides. TO installed poles pieces of corners with holes for fastening the guides are welded. The places where the pipe sections are attached and the bases themselves should be treated with anti-corrosion compounds and painted.
Installation of guides. The guides are bolted to the prepared bases. Once installed, wood rails must be painted to strengthen the wood and protect it from rotting.

Slate installation. Fastening the slate to the guides is best done by two people so that a partner can hold the sheet in the required position. The slate is attached with self-tapping screws to wooden guides using a screwdriver. To prevent chipping and breaking through the base, a rubber washer should be placed under the head of the self-tapping screw.

The use of roofing nails for fastening slate is not recommended, as you need to have certain qualifications to work with them.
When marking the fence, you should leave small gaps between the sheets and in the places where the sheets adjoin the ground. These gaps will help reduce the windage of the entire structure, which will allow the fence to withstand hurricane winds.
Final works. On last stage install a wicket and gate. Gate leaves and gates are usually welded separately from metal profile or corner. To attach the leaves to the posts, special gate awnings are used.
The wicket and gates can also be covered with flat slate, but since these elements will be often used, it is recommended to use a lighter and more durable metal profile sheet. After hanging the gate leaves and gates, locks are installed.
At the final stage, they begin finishing works . To extend the service life of asbestos-cement sheets, it is recommended to treat them with coloring compounds. Acrylic paints for concrete are best suited for this purpose.
The use of paints will allow you to change the gray, nondescript color of slate. In addition, if you have artistic skills, you can decorate the entire surface of the fence with bright and original designs.
Video on the topic
Flat slate is commonly referred to as sheet asbestos cement. Such products have been known for a long time and are used for the construction various designs, including fencing. A fence made from such material is considered one of the cheapest. So that there is no doubt about the advisability of using these products, we will briefly discuss the advantages of such fences.
Features of slate fences

- No foundation required, as for brickwork.
- Low construction cost. If you rely on average data (each region has its own), then, for example, for a sheet measuring 3.5 x 1.5 (with a thickness of 10 mm) you will have to pay about 720 rubles. The same 12 mm sample will cost around 1,000 rubles. And if you take into account that you do not need any special equipment or machinery, or the services of professionals, then the cost-effectiveness of this option for constructing a building envelope is obvious.
- During operation, flat slate does not need regular care. Anyone who has encountered wood fences knows how much time and effort has to be spent on treating the material with various special compounds - fire retardants, antiseptics. It is enough just to paint asbestos cement, although some owners do not even do this. By the way, if you consider how much work it takes to paint a picket fence, then the “plus” of flat slate is obvious here too.
- Maintainability. There is no point in even comparing which is easier - replacing a sheet of slate or a reinforced concrete slab in the fence. And the process of restoring the integrity of brickwork is even more difficult.
- For those who do not like the curious glances of their neighbors towards their site, such a fence will provide reliable protection in this regard.
Technology for constructing a flat slate fence
We will not dwell on the process of preparing the route - how and with what to clean it, how to make markings. Each owner has his own plot of land, and he himself will determine the amount of work. Therefore, we will consider only the main stages of construction. A thrifty owner will figure out what and how to improve.
- Installation of supports

As such, it is more convenient (from the point of view of fastening asbestos-cement sheets) to use metal pipes. The locations for the holes are determined based on the dimensions of the products, since the greater their weight, the more often the pillars should be placed. But you also need to take into account the length of the profile used.
The pipe installation process is very simple. A small layer of fine crushed stone (gravel) mixed with coarse sand is poured onto the bottom of the hole. This “bedding” compacts well. After this, a support is installed in the hole, leveled vertically, and the same crushed stone is backfilled. Moreover, you need to “load” it in small parts, simultaneously pouring cement + sand with a solution (previously tamping the next portion of crushed stone).
- Curb construction
By the way, this is not necessary. As a rule, its installation is carried out if it is planned to lay out the area with tiles. But this work is also quite simple. A shallow trench is dug between the pillars and exactly the same “fill” is made as in the holes. The curb elements are laid on top and fixed using the same method.

Since the slate fence is located in the open air, it is better to use galvanized fence. The blanks are fixed on poles in such a way as to create a frame on which asbestos cement sheets will be fixed. Essentially, these are 2 horizontal guides running from support to support. As an option, additionally install a corner at the bottom on which the sheets will rest. This will also protect the lower sections of the slate from mechanical damage.
For greater reliability of such a “skeleton”, it is advisable to install between the profiles (at a certain distance) and vertical racks from pieces of this material.
So-called farm screws are used as fastening elements.
- Installation of sheets

Holes for fasteners are first marked and drilled in the material. Experts advise fixing slate with roofing screws. The only special tool that will be useful is a screwdriver. Given the massiveness of the sheets, the work is performed with an assistant.
Its peculiarity is that, firstly, it is necessary to work only with well-dried products. Otherwise, after drying, the gap between the samples will become even larger, turning into a decent gap. Secondly, you shouldn’t place them too tightly, since when wet the slate slightly increases its dimensions. And the owner determines the specific interval between sheets himself, taking into account these recommendations.
- Surface treatment
- It is necessary to think about how to “disguise” the tips of the fastening elements protruding from the back side of the slate fence. Most likely, a coat of paint will be enough.
- External finishing of sheets.
Useful tips

- Sheet asbestos cement has a porous structure. And since any fence is a structure located outside buildings, in the open air, experts recommend painting flat slate. Acrylic paints are most suitable, as they have good water-repellent properties. In addition, their elasticity ensures that during operation the coating layer will not become cracked or begin to “shag”. There are even special compositions on sale that are designed specifically for painting slate fences.
- There are recommendations to bury the lower sections of the sheets, then you won’t have to deal with constructing a curb. Of course, each owner decides for himself whether it is advisable to install slate in this way, but we should not forget that the material is capable of absorbing moisture. Therefore, the usefulness of this advice raises some doubts. Including in terms of the maintainability of such a fence. Better sheets mount so that there is a small gap between them and the soil.
- When determining the depth of the holes, it is necessary to focus on the load that the supports will experience. This is not only the weight of the sheets, but also, for example, gusts of wind. In addition, will the poles be mounted lighting? There are many nuances.
- To connect the fence with other structures (for example, a building), a corner is attached to their surface (vertically).
- It is not recommended to use a wooden beam (instead of a profile) to fix sheets, since the service life of any wood is limited.
Slate is a budget material for fencing
By improving a private property, the owner strives to make it beautiful and protected from the noise and bustle of the city. A fence placed around the perimeter of the site organically completes the exterior and hides the yard from prying eyes. Moreover, it does not have to be expensive and massive. You can make a fence with your own hands from slate - budget material, which turns into a functional structure by assembly with available tools.
Slate is a building material made from asbestos cement. It is not a high-strength product, so it is recommended to install slate fences away from the roadway (to avoid damage from stones bouncing off wheels). But if you need to delimit a plot between neighbors, create enclosures for animals, or separate the yard part of the property from the garden, a slate fence will be the most economical option fences.
The advantages of slate are:
- Low cost;
- Easy to assemble;
- Fire resistance;
- Possibility of painting in any color.
The material also has disadvantages. For example, when processing asbestos-cement sheets with a drill or grinder, you should not inhale the resulting dust. Slate is not one of the environmentally friendly materials. The service life of the material depends on the installation location. In cold regions slate fences will not be durable. IN favorable conditions The service life is increased, and coating with acrylic paint will help extend the life of the fence.
Slate can be wavy or flat. Both types can withstand heavy loads and high temperatures. They are not afraid of moisture and corrosion. But the materials are very brittle when bending. Therefore, you need to work with them carefully.
Preparation for installation of the fence
Like any construction project, building a slate fence with your own hands requires preparation and consistent execution of work.

Installation of a slate fence
First you need to stock up on materials from which the fence will be created.
- Slate – wave or flat. The owner chooses the type of material at his own discretion; there is no fundamental difference between the sheets. But flat slate is easier to attach to the frame.
- Steel pipe, the diameter of which reaches 100 mm. It will be spent on creating racks. If the pipe diameter is too small, the design will be unreliable. But craftsmen also do not advise buying a pipe with a diameter of more than 100 mm.
- Wooden beam 100 x 50 mm. The slate plates will be attached to it.
- Metal corner measuring 85 x 50 mm - it will turn into a frame for fastening wooden block.
- Sand, crushed stone, cement - they are used to prepare a concrete solution, which will be needed during the installation of columns.
- Fastening elements: studs Ø 10 – 12 mm and self-tapping screws with a wide head (their hexagonal head fits a wrench).
Tools that will be useful in your work:
- Plumb;
- Level;
- Bulgarian;
- Rope;
- Hammer;
- Welder;
- Set of wrenches;
- Drill with drills.
Installing columns
Having decided on the size of the future fence and purchased slate sheets and missing materials, the owner must install corner posts and place the remaining elements in relation to them.

Methods for installing fence posts
The following instructions will help you organize all the steps:
- Digging holes for posts. The depth of the holes is made such that it is at least 2 spade bayonets. Immediately mix the solution needed to fill the first supports.
- The pipe for making posts is cut into equal pieces. Their length depends on the height of the planned fence, which is built from slate with your own hands, plus a small reserve that will end up in the hole.
- Installation of racks is carried out by lowering them into a hole and filling them with crushed stone. The verticality of each support is checked with a building level. Deviated posts are corrected and the holes are concreted.
- As soon as the 4 corner posts are secured, a cord is pulled between them and holes are dug for other load-bearing elements.
While the supports are being placed between the corners, the rope is not removed. The correct location of each column during installation is verified with a level. Failure to follow this rule may result in the finished fence becoming skewered or falling.
We fasten the corner and beam
The fastening of the iron corner and wooden beam is carried out after waiting for the concrete to harden. The mixture sets well in about a week, but if the work needs to be done quickly, it is advisable to wait 2 days. Next, identical sections are made from the corner with a size that matches the diameter of the pipe. A slight upward error is allowed.

Posts with fastenings for wooden beams
After cutting the angle, holes are made in the pipe that match the diameter of the studs. Drill holes at the top and bottom. Exactly the same holes are drilled in the center of the corner segment. Then, using a pin, the corner is attached to the support. The result should be a shelf on which the beam will subsequently be placed. This method of fastening gives slate fences rigidity and strength.
Fastening a wooden block is done in different ways:
- In the process of attaching the angle to the support, the beam is also drilled, focusing on the diameter of the pin, and the entire structure is immediately connected with a pin. As a result, the part will be held on the pole itself.
- The corner is carefully fixed with a pin and holes are drilled in the shelf adjacent to the support. Through the holes the beam is pulled to the corner.
If a slate fence is installed as a temporary structure, the posts do not need to be concreted. To fasten the beam, you can use knitting wire. To obtain a reliable, durable fence you will have to work hard; it is forbidden to ignore the stages of construction.
We fasten the sheets and improve the structure
Do-it-yourself installation of a slate fence is done using self-tapping screws. As a guide, stretch a cord between the posts and check its horizontalness with a level, then attach the sheets to wooden beam. The first sheet of slate, which determines the direction of the entire structure, is installed very carefully. Secure it with 4 or 6 screws. All subsequent sheets are also fixed with self-tapping screws.

Installation of a slate fence
When building a fence from wave slate along the edges, you must try to make different half-waves. They will provide a better quality overlap connection. When installing each subsequent plate, you must ensure correct alignment. It is not recommended to make the reserve large. It should be such that the next sheet from the outside appears to be a natural continuation of the previous one.
To give finished design For a finished look, you can frame the fence using iron corners 25 x 25 mm. The parts are bent in accordance with the dimensions of the slate sheets and welded. A cutout is made on any shelf at the bend to facilitate bending. Corner frames are secured metal plates and welded.
Since slate looks discreet, it will help to make the fence more impressive acrylic paint for external work (not oil-based). A bright fence looks much prettier, and coating it with paint protects it from the aggressive influence of the environment.
You can embellish the surface of slate using cement mortar. The fence is cemented and drawings are applied to the hardened canvas through stencils. The finishing composition is mixed from Portland cement, achieving the consistency of a thick dough. The surface of the slate sheets is leveled by spreading a layer decorative composition, and then apply patterns.
As an option for decorating slate, it is worth considering a plaster coating. The owner chooses colored plaster to suit his taste or gives the fence an impressive look by creating splashes of color on the plastered decorative base.
How to extend the life of a slate fence

Extending the service life of slate
As you can see, it is very easy to install a slate fence with your own hands. It is economical in construction and does not require daily maintenance. But in order for the structure to last as long as possible, the owner must know some tricks:
- Sheets of material should not be fastened flush to the ground. It is necessary to leave a 10 cm gap for ventilation. If finances allow, it is better to lay strip foundation on sand cushion 5 – 10 cm high.
- Paint slate sheets regular paint- waste of money. Acrylic or alkyd-acrylic based compositions intended for outdoor use help increase the service life of the fence.
- Trees with fragile branches should not be planted near slate fencing. In strong gusts of wind, branches can break off and fall onto the structure. Find out in advance at what distance in relation to the fence you can place trees and shrubs.
Whether it is worth building a fence from used slate is a controversial issue. If the owner requires a temporary structure of an unpresentable appearance, then old material will come in handy. But you will have to work with it very carefully due to its increased fragility and partial loss of its original qualities. If the enclosing structure is installed for years, it is better not to save money and buy new sheets.
Don't be afraid to seem greedy by building a fence from slate sheets with your own hands. For little money you will get a budget option a fence that has an aesthetic appearance and is not afraid of changes in weather conditions. The design will look appropriate not only in rural areas or on country dacha, but also on modern streets of the private sector of large settlement. Slate is a non-flammable and non-toxic material, so neighbors will not oppose such a fence. The main thing is to decide in advance on the boundaries of your site and not to seize someone else’s territory.