DIY corner rack with shelves. DIY corner shelf How to make corner shelves by hand
Shelves are often used not only to complement and decorate the overall interior of the room, but also for a clearer and more expedient organization of space. Thanks to their use, the apartment owner has the opportunity to conveniently arrange a huge number of small things that would simply get lost in closets.
Today, there are a lot of different models on the market that are made of different materials. They also differ in design.

You can choose not only products with classic design, but also ultra-modern designs.

But more and more often people prefer to make such interior details themselves. Wondering how to make a shelf with their own hands, they re-read a lot of literature and look through many catalogs.

However, this does not mean that self-production The shelves are complex and it is beyond the capabilities of a person who does not have special skills. No, that's not true at all.

Familiarization with literature in in this case necessary in order to create a product with beautiful design, which will fit into general interior. Let's take a closer look at what kind of shelves there are.
Types of shelves
Any specialist will tell you that before you start creating a product, you need to decide for yourself what kind of design you want to get and whether it will be combined with the interior. And only after that you can start creating the product.

After all, for a house decorated in a classically styled style, it is completely unacceptable to use trendy and modern shelves. They will look extremely ridiculous.


The most popular and widely known subtype of shelves is the classic shelf. This is due to the fact that it is quite easy to install, and the appearance, thanks to its simplicity, seems refined and sophisticated.
Used successfully and open, closed shelves. Closed products are most often used for decoration and installation in rooms decorated in more modern styles. Glass and sometimes plastic are used to construct them.

Open structures can be used both in modernly decorated houses and in apartments with a classic design. Over the past few years, this particular type of shelf has gained enormous popularity and is therefore gradually replacing the classic options.

IN small rooms Quite often you can see corner shelves that have a special method of fastening. They are mounted on adjacent walls that are adjacent to each other. They are most often used in bathrooms, kitchens and utility rooms.

In addition to the above types of shelves that are mounted on the wall, there are suspended and floor-mounted structures. Hanging shelves are mounted in an unconventional way.

They are installed using cables and vertical racks, and attached directly to the ceiling. This mount looks quite unusual and original.

Floor structures are most often used in hallways. After all, it is floor shelves for shoes, made by yourself, not only look beautiful, but also help you organize the space of a small hallway. At the same time, making them is quite simple.
How to make a simple shelf?
To create the claimed product, you should purchase or prepare some tools and materials in advance. As connecting elements, you can use whatever suits you best. But the most popular are ordinary screws, brackets and dowels.
Note!


For example, let's take a photo of the shelves with our own hands, which is presented below. It shows a product with the following parameters: width 250 mm, height 300 mm, length 1100 mm. For convenience, the manufacturing process will be divided into stages.
Stages of work
At the first stage, you need to complete the markup. To do this, you should lay the boards on a table or any other flat surface and transfer the measurements from the drawings. The side walls must be exactly 268 mm high.

This marking is optimal because the side walls will be located between the two parts.

The second stage requires cutting the boards. To get smooth and neat cuts, you need to use a jigsaw. After cutting, you will end up with 2 fairly long pieces and 2 shorter ones.

At the third stage, you can begin processing the resulting workpieces. The resulting segments should be coated with a special protective varnish or stain, having previously sanded them.

Note!

If you only plan to paint the shelf, you can get by with treating it with a regular antiseptic primer. This way you will not only increase the service life, but also achieve a more uniform distribution of paint.

At the fourth stage of making a wooden shelf with your own hands, you begin to directly assemble it. The bottom board should be laid on a flat surface. Step back 8 mm from the ends of the workpiece and draw two lines parallel to the cuts.
2 points should be marked on them with a distance of 5 cm from the edge. At the marked points it is necessary to drill holes for self-tapping screws. The same manipulations must be done with the second workpiece.

After this, you should install the side blanks on the lower section of the board and secure them. Once you are done with attaching the side panels, proceed to install the top panel and secure it.

At the fifth stage, you should attach the brackets to the ends of the side panels, and make several holes in the wall for the dowels. After this, screw in the screws so that they protrude by 5 mm. And now your shelf is ready.

In the same way you can make acoustic shelves, but you need to take into account the size of the equipment itself. Measurements should be taken carefully, because if you make a mistake, the work will have to start again.
Note!


DIY photo of shelves


Very often you have to hang shelves on the walls to accommodate all the elements. To rationally plan the interior, it is worth using the corners and, thus, freeing up the walls for cabinets and shelving. To do this, you need a corner shelf, which you can make yourself from existing materials. The article will discuss basic recommendations on how to make a corner shelf, as well as basic examples of designs.
Place corner shelves in different rooms
You can install a corner shelf in any room, but in most cases it is great for the kitchen or bathroom. Any housewife will quickly place on it a variety of jars with seasonings, cereals and other kitchen utensils, and in the bathroom such a shelf near the mirror will allow you to accommodate all hygiene products and free up the necessary drawers. It is worth noting that these premises have sufficient high level humidity, which means the wood will need to be additionally treated with antiseptics and at least two layers of paint applied. The best option will become plastic or glass, since they have larger number advantages:
- resistant to moisture and temperature changes;
- mold and fungi do not appear on surfaces;
- withstand heavy weight;
- easy to clean;
- A variety of colors will allow the design to fit into any interior.

Also, corner shelves on the wall are rational option, which is suitable for bedrooms, children's rooms and living rooms. Any other furniture can be placed under the shelf, for example:
- nightstand;
- computer desk;
- armchair.

Regardless of what material was used, the design will look impressive and presentable. The corner shelf will conveniently accommodate all sorts of little things: books, photographs, dishes, candles, toys and much more.
Note! To add more impact to a corner shelf, you can swipe to it. LED backlight. Using this method, designers add depth to the wall.
Required materials and tools
Before you begin planning and manufacturing, it is worth collecting the available materials and calculating: will there be enough of them? You can make your own corner shelf from a wide variety of materials, such as:
- wooden boards;
- plywood;
- glass;
- plastic;
- window sill profiles;
- iron and others.

The first 4 options are considered the most common and practical. Anyone can handle them, and no special tool is required, as is the case with glass or iron. The set of tools in each case will be varied, but if we talk about lumber, then it is worth preparing in advance:
- hacksaw;
- jigsaw (manual or electric);
- saw;
- stationery knife;
- drill;
- sandpaper;
- glue and fasteners;
- ruler;
- pencil;
- paints and varnishes (paint or varnish);
- tassels.
Note! For comparison, when making a corner glass shelf you will need fewer tools: fasteners (screws and dowels), a level, a drill, a felt-tip pen and a ruler.
Step-by-step instruction

- Suitable as the main material regular board, which remained from the renovation. The width should be selected individually, based on the items that will be placed on it and the place where it will be installed.
- In addition, for fastening you will need glue with a dispenser and screws (3.0x25 mm). Semicircular slats can be used as decoration.
- We mark the board at a 45° angle to the required length and use a hacksaw to cut it at an angle of 45°. As a result, we get 4 shelves.
- From the remains of the board you need to cut out racks of the same size (for example, 5x20 cm) in the amount of 6 pieces.
- All elements must be cleaned sandpaper until perfectly smooth.
- Let's start assembling the structure. Each shelf, except the top one, must be secured with two racks. The markings are applied in the middle, then the elements are fastened with screws. To strengthen the fasteners, use PVA glue.
- For ease of fastening, the middle shelf posts are placed along the edges.
- The remaining parts of the corner shelf are assembled in the same way.
- If you wish and have free time, you can decorate the shelves using semicircular slats. So, with their help you can make low handrails so that small or round accessories do not fall out. On finishing stage the shelf is painted.
Note! After the first element has been cut out, it is necessary to place it against the wall and check the correctness of the calculations. To prevent the board from bursting when fastening, the hole for the self-tapping screws is drilled slightly smaller than the screws.

Corner glass shelf
To make a small and simple design, you won’t need a lot of time and special skills, even if we're talking about about a glass shelf. So, to be precise and produce a design correct sizes, it is necessary to take measurements. After this, a diagram is drawn on paper indicating all the obtained parameters.
You can cut the glass yourself; if you don’t have a tool, go to a special workshop. Here craftsmen can cut out in a few minutes the required form. The following can act as holders:
- metal rods;
- aluminum profile;
- wooden frame.

IN ideal It’s worth buying special holders that will come with screws and dowels for fastening. The holders are attached to the wall and the glasses are put on one by one. Using a building level, levelness is checked. As a result, the cost of the shelf will be lower than the cost of a new one from the store.
Note! For convenience, experts recommend creating a template for the future shelf from cardboard. This will avoid inaccuracies.
Only by strictly observing the data obtained after measurements can a high-quality and reliable product be manufactured, in particular, a corner shelf. It is very important to measure between the walls, since this angle is not always 90°. You can take as a basis the most different materials that are gathering dust in a barn or garage.
The problem of space is relevant for small-sized and large apartments. It is very difficult to fit everything you need into limited square meters.It is almost impossible to imagine a home, office or apartment without convenient shelves. The element performs an aesthetic, decorative role.
Shelves help free up space and diversify the usual interior of the room.
Shelves are used in absolutely any room and for completely different purposes. Look great in bathrooms, kitchens and living rooms.

Let's consider the features and advantages of building corner shelves yourself.
Previously, handicraft production of any furniture was considered the lot of the poor. Wealthy people preferred to purchase interior elements in stores. But everything there had almost the same design, so thirty years ago the interiors in different houses were almost identical.

Today original furniture self-made is a source of real pride.
In modern stores there are dozens of different models of furniture, but even among such a variety it is difficult to choose one option that can meet all the preferences of the owner of the house. In this case, there are only two options: order furniture directly from the manufacturer, or build it yourself.

Making shelves on the wall with your own hands is not at all difficult, and you can use a wide variety of materials.
The first option may seem ideal. However, not every master will be able to make furniture of high quality, inexpensively and take into account all your wishes. Finding such a specialist is not easy, and there is no point in searching if you need a simple wall shelf.

This design element is easier to build on your own.
Making your own shelves has many advantages.

Making a shelf yourself: how to decide on the design and materials?
Any wall shelf can have different shapes and design. They can be complex (with additional elements), or simple. Simple shelves can be used in the kitchen.

They are used to store seasonings or kitchen utensils, so invent complex design it makes no sense.
It’s very easy to make semicircular shelves. This option is ideal if you don’t have the time or desire to do something more complicated. Also simple shelves can be used in apartments and houses decorated in minimalist styles.

Such styles do not welcome complex shapes and intricate designs.
Shelves with additional elements can be used in living rooms. They can consist of several sections, or have an unusual shape, for example, in the form of the letter “L”.

Often such furniture occupies not only a corner, but also some part of the wall.
You can decorate such furniture in an original way cutting, if you have experience in this matter. The shelves located in the corner also differ in availability back wall. It may be present or replaced by a wall. If you want to preserve the wall decoration, then furniture wall still better to build.

It doesn't require much effort.
In this article we will look at the process of constructing a classic-shaped corner shelf. This form is very simple and versatile. It won't even take two hours to make.

To get started, you need to decide not only on the shape of the product, but also on the material.
Let's look at the types of materials and their advantages.

To quickly decide on raw materials, be sure to consider comparative characteristics presented in the table.
| Characteristics | Materials | |||
| Tree | Plastic | Glass | Metal | |
| Aesthetics | + | + | + | +/- |
| Durability | + | – | + | + |
| Ease of processing | + | + | – | – |
| Price | high | low | high | low |
| Moisture resistance | + | +/- | + | – |
| High temperature resistance | + | – | + | + |
| Strength | + | – | +/- | + |
Having analyzed all the characteristics, you can see that it is simpler and easier to create a corner shelf from wood.

In this article we will look at detailed instructions production of such furniture.
Tools
To make a shelf out of wood, you need to properly prepare the raw materials and tools. You should start by preparing the tools. To build a corner shelf made of wood, you need to find:
- Electric jigsaw;
- A regular 50 cm ruler;
- Hacksaw;
- Glue;
- Drill;
- Building level;
- Sandpaper;
- Fastening for shelves.

Tools for making shelves.
Materials
The main raw material for creating a shelf is an ordinary board that was lying around on the balcony after renovation. You can also use leftovers old furniture, or purchase a board in a store. When choosing the main raw materials, consider several criteria:
- Design. The board should have a suitable color and beautiful ornament;
- Quality. It is better not to use rotten and old boards;
- Integrity. The sheet for making furniture should not have scratches or dents.
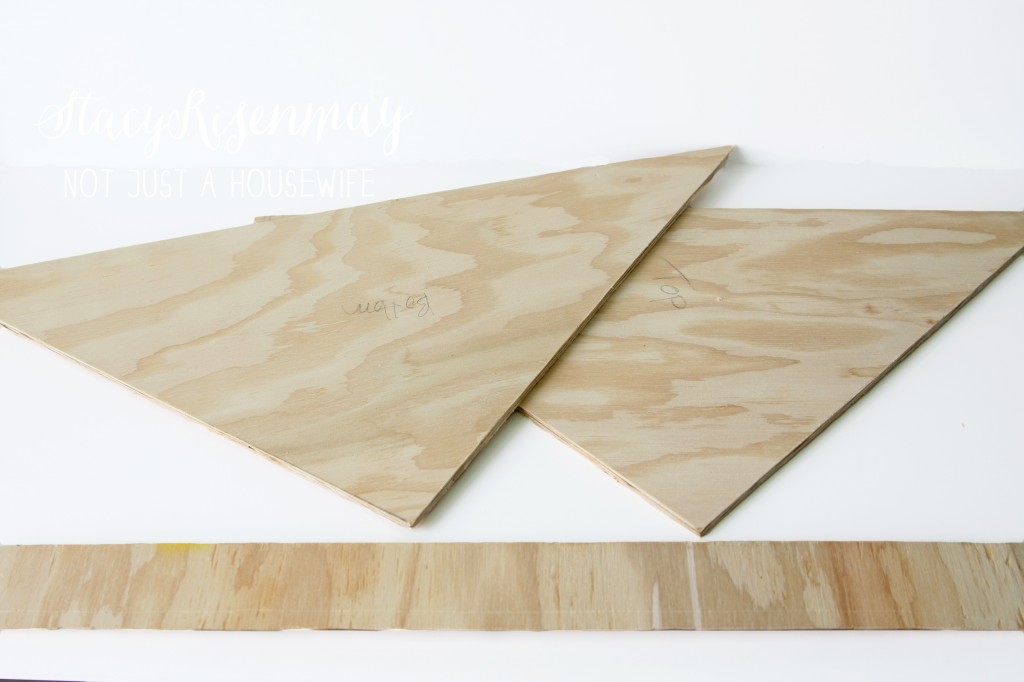
You need to cut out blanks from the prepared board.
Cut the pieces of plywood diagonally, sand the edges. You can cut four posts from the remaining wood. They must be the same size.
Manufacturing process: step-by-step instructions
As you can see, the shelf manufacturing process does not require special costs and tools that are difficult to find at home. Almost all materials and equipment are available to any owner. In this section we will look in more detail at how to make a corner shelf.

VIDEO: Master class on making a corner shelf.
Corner shelves in the interior - 50 photo ideas:


Often the corners in rooms are empty, although there is a way to use them rationally: arrange corner corners. Such designs compare favorably with standard ones appearance, and most importantly, they save free space in rooms with small footage.
They are sold in furniture stores and made to order, but building them yourself won’t cause any difficulties either. Today we will tell you how to properly place such furniture in the house, choose suitable materials for making and making corner shelves from wood, chipboard, glass and scraps metal-plastic pipes without the help of professionals.
Corner shelves on the wall
Hanging corner shelves are good because they allow you to free up space below for other furniture. Typically, such shelves are used to store books, souvenirs and other small items. It is also convenient to place flowers, icons, telephones, bathroom and kitchen accessories on them. We will look at the nuances of creating models suitable for each of the listed cases, and will start with a corner shelf for the living room.
Corner shelves save space in the room
Shelves for flowers, souvenirs and other small items are made of metal, plasterboard, glass, but the most popular material there are still wood and its substitutes: they are practical, easy to maintain and without extra effort can be processed at home. To save money, wood boards(MDF, laminated chipboard) you can not take full-size ones, but choose from leftovers on the market; there you often come across pieces of sizes suitable for shelves.
In addition to the material, you will need tools for wood processing - a drill, a jigsaw, sandpaper, a tape measure, a ruler and a marker for marking. You can’t do without fastening elements (screws, dowels) and trim tape for finishing the edges.
The decorative wall shelf in question consists of three tiers connected by sidewalls. First, we make a design drawing and indicate the dimensions of the components on it. Then we make individual parts from cardboard or paper and transfer them to the material, in this case - laminated chipboard, tracing the outline with a marker or the tip of a stationery knife.
 Construction drawing
 The parts are cut out using a jigsaw with fine teeth. After cutting, it is better to number the shelf fragments so as not to confuse them during assembly. In the finished parts, mark the fastener locations (for fastening individual fragments of the structure and for hanging on the wall) and drill holes of the required diameter with a drill.
Before joining, the components of the structure are cleaned of dust and sawdust and equipped with a decorative edge. To do this, the trimming tape is applied to the cut areas and glued by running a heated iron over the surface covered with a rag. If the tape turns out to be longer than necessary, the excess is carefully cut off with a stationery knife, and the resulting edge is cleaned with sandpaper.
 Processing slices
 After completing the processing of the parts, we begin assembly, focusing on the diagram and numbering. Dowels are inserted into some of the holes and the parts are connected to each other with self-tapping screws, using a screwdriver or screwdriver. Upon completion of assembly, marks are made on the wall for the fasteners on which the shelf will be hung. In this case, you will need four of them - one for each jumper.
Drilling holes with a drill required depth(For concrete walls It is worth using drills with a Pobedit tip) dowels are placed in them and the shelf is fixed with self-tapping screws. The finishing touch is to decorate the heads of the wall fasteners with special caps to match the color of the shelf. The design is ready! Now all that remains is to arrange books, photos and other little things dear to the heart.
 Fastener caps can be disguised
 Corner shelves for the kitchen
The kitchen accumulates a considerable amount of all kinds of jars with spices and sauces, small utensils for cooking, serving, and the like. If the main cabinets are already full, they will come to help in the fight against kitchen chaos corner shelves on the wall. They are hung above the dining area, above the stove or in other suitable place. Of course, such a shelf must be durable and spacious, so we opted for a two-tier structure made of fiberboard.
 Kitchen shelf layout and diagram
 The tools needed are similar to those used for the living room shelf. The fittings and fasteners are also similar, but you will additionally need hinged hinges and confirmations (furniture screws). The first step is to measure the available free space and, focusing on it, draw up a drawing of the shelf, indicating on it the parameters of all parts. Take the sketches given in the article as a sample or find others on the Internet.
Work on the construction of a kitchen corner shelf is carried out in the following order:
- We make sidewalls. To do this, contours of parts are applied to sheets of material, which are then cut out with a jigsaw. It is more convenient to perform this work for two sidewalls at once, if it is possible to fasten 2 fiberboard sheet clamps.
- If chips occur when cutting parts, they are treated with sandpaper or a grinding machine.
- The cuts on the sidewalls are covered with trim tape, ironing it with an iron. In places of bends, the iron is applied to the tape with the nose part.
 Sidewalls and crossbars
 - After making all the sidewalls, cut out the rectangular crossbars with which they will be connected. To give the design originality, the edges of the crossbars are rounded. Pasting the sections is done in the same way as on the sidewalls.
- Let's start assembling. At the junction of the two inner sidewalls with the upper crossbars, slots are cut out in the side parts of such length and thickness as to fit top part shelves.
- In the remaining joints, two holes for confirmations are drilled on each side with a drill.
 Connecting parts
 - The shelf elements are joined and fastened by screwing in the confirms until a slight crack appears when tightened.
- The last one is inserted into the pre-cut grooves. top bar shelves. At the point of contact with the outer sidewalls, it is fixed with confirmations.
- Finally, the fastener heads are masked with decorative plugs and the shelf is hung in the chosen location. Suitable hangers can be purchased at the market or at a hardware store.
 Assembled shelf
 Corner shelves for icons
Majority Orthodox people icons are kept in the house. A special place is required to place them; traditionally, icons are placed in the corner of the house facing east. A corner shelf, especially a wooden one, is perfect for these purposes.
 Simple single-tier shelf for icons
 Making a shelf for icons does not require special skills; difficulties arise only if you want to decorate it openwork carving or balusters. But you can do without such finishing or purchase the necessary parts from professional wood carvers. We will look at creating a simple single-tier shelf.
Natural wood looks more noble than substitutes, so it’s worth choosing it. Suitable materials include solid wood and wide planed boards. The first step is to outline the outline and cut out a corner that will become the basis of the structure and a cornice - a narrow strip attached to the front of the shelf.
 Preparation and assembly of the structure
 If desired, the cornice is made curly - wavy at the bottom. The connection between the cornice and the shelf is made using dowels (protruding wooden pins). To do this, 2-3 cm recesses are drilled in a triangular fragment and dowels are placed inside them so that they protrude outward by 1 cm.
Then the places opposite the dowels are marked on the cornice and holes are drilled to allow the two parts to be tightly connected. Before assembling, it is recommended to sand the shelf components and varnish them. Ready product is equipped with four hangers (two on each side) and is attached to the wall. Interestingly, if you place the same structure lower, you get original shelf under the phone on the wall.
Corner shelves in the bathroom
 Glass shelf for bathroom
 The bathroom is the place that needs saving space more than others, because the rooms for taking water procedures in most apartments cannot be called spacious. Therefore, it is more rational to use corner structures for storing things. It is clear that a corner shelf on a wall made of wood or chipboard is not The best decision for the bathroom, after all high humidity will quickly destroy material prone to rotting. In this situation, it is more appropriate to use products made of plastic or glass, which are resistant to moisture and can be easily treated with disinfectants.
Such shelves are available in abundance in any plumbing store, but if you like to make things with your own hands and want to get an original item, adapted to your tastes and needs, you can make them yourself. Let's look at how to properly make a shelf for a bathroom using a glass structure as an example.
Tools you should prepare:
- drill;
- screwdriver;
- screws and dowels;
- tape measure and pencil;
- building level.
You will also need shelf holders (sold in hardware stores) and tempered glass no thinner than 5 mm. First you need to think about the design of the product, take measurements at the location where it will be placed and draw a template. Then the parts are cut out of the glass. It is recommended to order this procedure from a glass workshop, this way the shelf will look more aesthetically pleasing, and you will protect yourself from injuries and possible damage to the material.
The next stage of work is to fasten finished parts on the wall. To do this, the holders are put on and fixed on the shelf, it is brought to the wall and the places for the dowels are marked in the right place. Using a drill (with a special drill) according to the marks, checking the level, holes are drilled and fasteners are inserted into them. Then all that remains is to hang the structure and make sure that it is securely fastened.
 Holes for fasteners
 Corner shelves for books
Owners of a large library are familiar with the problem of convenience, when they want to place their favorite publications in immediate access without cluttering the room with cabinets and shelving. There is an exit. How to make classic ones wooden shelves We have already told you, but there is another option for a corner design that is ideal for storing books. Due to its unusual design, it will not take root in every home, but for lovers non-standard solutions you'll definitely like it.
 Roomy bookshelf from pipes
 Corner shelf on a wall made from scraps water pipes will compactly place your books and will cost very little. You will need pipes, carbon fittings, dowels, screws, paint and tools - an angle grinder, gas key, vice, welding machine.
Assembling the shelf in the following way– pipes are cut into fragments (in this case 15 pieces), connected with fittings and welded. If welding machine no, you can get by with screws by screwing them in at the junctions of pipes and fittings. The structure is fixed to the wall at the top and bottom points using dowels previously driven into the wall.
It is advisable to paint the finished product (spray paint will do) to hide defects, welding marks and differences in the color of parts. The resulting octagonal shelf will easily fit into modern interior apartments and organize your library.
Open corner shelves help make living and living spaces more functional. working space, can serve as an effective detail of the overall interior solution. The question of how to make corner shelves or a corner rack with your own hands is approached based on the available free space and the planned design.
Options for corner shelves and open shelving with your own hands
The appearance of furniture is largely determined by the materials used in production. An open corner rack can be made from solid wood and chipboard, MDF and plywood, glass and metal. And in every version it's the same constructive solution will look different.
An open corner rack can radically change appearance when changing minor details.

Also combinations of different contrasting colors can change regular model beyond recognition.

How to make an open corner shelving step by step
First of all, you need to decide overall dimensions open shelving. As a rule, all models have an extremely laconic design and easily fit into the allocated space, supporting the overall interior design.
Open shelves can be mounted either on the shelving frame or directly on the wall. In the second case, in order to neatly and beautifully attach corner shelves to the wall with your own hands, you will need to purchase special holders for shelves - toucans (pelicans) or consoles of various configurations.

Also, a corner rack with shelves can be floor or wall mounted. In the first case, it is necessary to provide a base box in the design. Usually I don’t make solid sidewalls all the way to the floor, so that the baseboard doesn’t interfere with moving the product close to the wall. After all, it is not always possible to cut it off; wiring is often “hidden” inside the hollow baseboard.
Let's look at an example of calculating the detailing and drawing up cutting maps for a corner rack with your own hands using the example of the first model.
Step 1. We draw the structure to scale, indicating the overall dimensions and numbering the parts. We are thinking about how the parts will be connected to each other. Since the rack will stand close to the walls, there is no point in using hidden fasteners in the form of dowels and eccentric ties. If through holes on the bottom shelf, in the places where the base box is attached, they are also “confusing”; abandon the Euroscrews (confirmations) in favor of the corners.

Step 2. We paint the corner rack with our own hands in the form of detailing, and draw up cutting maps. The calculation is given for chipboard with a thickness of 16 mm. For materials of a different thickness, the shelf dimensions will be slightly different.

Step 3. After cutting the parts and designing the radii, we roll up the visible parts with melamine or PVC edges.
Step 4. According to the fastener marking specifications, we drill the parts for further assembly.

If you did everything correctly, the corner shelf will be assembled with your own hands as a “construction set”, like a regular serial product.