Do-it-yourself hexagonal gazebo made of wood step by step. Where can I find the correct drawing of a hexagonal wooden gazebo? After studying them, we chose the simplest and most understandable
Gazebo on site country house This perfect place for relaxing, eating and communicating with friends and family. Among other things, a gazebo can be an elegant decoration local area, especially if it has an unusual shape - hexagonal. If you decide to implement such an idea, then you need to understand the intricacies of the production process of a hexagonal gazebo. We invite you to learn in detail about how the roof of a hexagonal gazebo is made and whether it is possible to make it yourself.
What to make from
First of all, you need to understand what building material the roof for the hexagonal gazebo is made from. There are two options:
- Metal.
- Tree.
The choice of material directly depends on what most of the beskdi is made of. If this is a tree, then it would be logical to use timber. If the frame of the entire gazebo is made of a metal corner or profile, then it is better to make the roof for the gazebo also of metal. Although it is possible to combine, but then labor costs will increase significantly, because you need to think about how to connect iron and wood reliably. In this article we will look at an example of manufacturing from iron.
Important! To make the roof of a hexagonal gazebo from iron, you must have welding skills. Although there is a technology for connecting metal profiles without welding, but with bolts. But it will take a lot of time to make the mounting holes.
Frame

The basis of any roof is the frame. The frame consists of rafter system, sheathing and other elements that give it special strength and rigidity. The rafter system contains several load-bearing elements. If you compare it with the roof on a house, the difference is only in size. The rest of the manufacturing principle is similar.
The roof must be based on a Mauerlat. This is a special beam that is welded to the vertical pillars of the support along the entire perimeter. This top trim will connect all the elements of the hexagonal gazebo into one structure.
Features of the structure of the rafters
So, as already mentioned, the basis is the rafter legs. It is they who bear the entire main burden. For rafters, you can use a corner or a profile pipe. In addition to the rafters, an important part of the hexagonal roof is the purlin. This is the part of the roof where all the rafters, and there will be six of them, converge at one point. This place is also called the ridge run. There is also a side girder that allows you to securely fix the rafters in a certain position.
Which run to use is determined individually in all cases. So, if during the construction of the gazebo you managed to maintain the correct figure, in which all sides are equal, then the ridge may not be needed. In this case, it is necessary to securely fix all the parts and for this, side girders are used.
But a hexagonal gazebo with an iron roof can be a little oblong. In this case, when constructing the roof, it will be necessary to construct both a ridge and side girder. Among other things, puffs must be used. They mean spacers that diagonally connect the mauerlat and the opposite ends of the rafter leg.
Important! The use of diagonal ties gives the entire structure of the hexagonal iron roof greater rigidity. Due to this, it is much more resistant to external influences.

A stand must also be used. It allows you to adjust the required roof slope. This stand is attached at the intersection of the puffs.
When forming an iron roof for a hexagonal gazebo, or rather, its frame, all of the listed elements are not always used. However, it is still necessary to ensure that the roof is sufficiently rigid and reliable. After all, it is necessary to take into account that it will acquire a certain windage after laying the roofing material.
Advice! You can make a frame for a gazebo with your own hands on the ground. It is important that the surface is smooth. In this case, all you have to do is lift the finished roof up and weld it to the support pillars. This will not be possible if your gazebo is large and it will be difficult to physically raise the roof.
Forming the sheathing

The assembled frame based on the rafter system serves as a good basis for the sheathing. The sheathing is laid perpendicularly rafter leg. It holds the entire frame together and makes it resistant to stress.
Moreover, the lathing manufacturing technology will largely depend on the selected roofing material. So, if metal tiles are to be laid, then the sheathing should be laid so that the edges of the sheet fall evenly on it. If you plan to use roll material or bitumen soft tiles, then you're on top metal roof hexagonal gazebo must be secured with moisture-resistant plywood or other similar board material.

Moreover, when forming a frame for a gazebo made of polycarbonate or other material, it is necessary to determine whether it will be closed or open. If it is open, then there is no need to sheathe the roof from the inside, except for decorative purposes. If you are building a closed hexagonal gazebo and plan to use it in winter time years, then you need to think about how exactly to insulate an iron roof.
How to make a roof deck

So, if the roof frame is completely manufactured and already attached to support pillars, you can start the finishing touch- flooring roofing material. Regardless of whether the roof is flat or sloped, you need to worry about its secure fastening.
Some people decide to cover the roof of a hexagonal iron gazebo with polycarbonate sheets. This material has many advantages. First of all, polycarbonate is light in weight, as a result there will not be a serious load on the building. However, if you do not follow the installation technology, water will leak through the polycarbonate. Therefore, special thermal screws are used for fixation. They use a special sealing rubber, which plays an important role in creating a tight connection. Among other things, you need to purchase a special strip for joining individual polycarbonate sheets.
The situation is completely different if the choice fell on profiled sheets. Their installation is not particularly difficult. It is important to observe the overlap of the material, as well as to correctly form the ridge of the hexagonal iron arbor. From a similar series, we can also mention metal tiles.

Important! Remember, both metal profiles and metal tiles have a special anti-corrosion coating. It is reliable protection from negative impact moisture. Therefore, when installation work It is extremely important to be careful not to damage it.
When laying roofing material, it is necessary to ensure that each joint is strong. It is necessary to make the correct calculation required quantity fastening element. For example, one sheet of corrugated board may require about 9 fasteners. However, it is necessary to look at each case individually.

If the roof in a hexagonal gazebo will be insulated, then it is necessary before covering it roofing material, do this job. Due to this, there will be free access from above. But do not forget about organizing a vapor barrier and waterproofing layer. Otherwise, the insulation used will be heavily saturated with moisture. And this will lead to the fact that its main functions will be completely lost.
Conclusion

So, here we have looked at the features of how to make a roof for a hexagonal gazebo step by step. After reading this material, it may seem that this task is impossible. However, as practice shows, in reality everything is much simpler. You can use the photos and videos at the end of this article to help. The most important thing is to make the correct calculation of the material, so that as a result, in the process of work itself, you will not have enough of something.
So, we hope this material has given you some useful insights. Additionally, watch the prepared video, and you will see that you do not need any special education to make a roof for a hexagonal gazebo made of iron. It is enough to have the necessary tool, material and desire at hand. If you already have experience in this work, then share it by leaving comments at the end of this article. Your experience will be an invaluable help for all beginning home craftsmen.
A good place to relax in country house or there will be a gazebo at the dacha. You can hide from the rain, relax, and spend time with friends and family. If you wish, you can make a gazebo yourself.
The ideal place for a summerhouse gazebo will be the shade of trees. The gazebo can be placed near the trees - this way you can relax in the gazebo throughout the whole day and not worry about the sun. Also, if possible, a gazebo can be built next to a pond. A hexagonal gazebo will stand out favorably on any summer cottage.
Advantages of a hexagonal gazebo:
- Takes up little space.
- Accommodates a sufficient number of people.
- Several benches can be placed.
- The gazebo is durable and stable.
- It looks beautiful.
Necessary tools for building a gazebo
To ensure that labor costs are minimal, and that building a gazebo for your dacha with your own hands gives you pleasure, it is advisable to purchase everything necessary tools.
We will need:
- Hacksaw.
- Chainsaw.
- Nails.
- Planer (preferably electric).
- Jigsaw (electric is also better).
- Circular machine.
- Hammer.
- Drill.
- Screwdriver.
- Level setting device.
- Plumb line (you can save money and make it yourself from nylon rope and a weight).
Construction of a hexagonal gazebo for a summer residence with your own hands
The most acceptable and durable materials for the construction of a gazebo - spruce or pine wood. For the price this construction material quite loyal.
Having a drawing of a hexagonal gazebo in front of you will make it easier for you to determine its dimensions. Using tools - a circular machine - it is necessary to prepare beams and boards of a given size. To make them smooth, they need to be processed with a plane.
Let's start marking the area for the hexagonal gazebo. In order for the geometric figure - a hexagon to be correct, you need to take wooden pegs and a piece of rope and draw the circumference of the future gazebo, proceed according to the dimensions indicated in the drawing. Next, starting from any point of the circle, you need to make notches that will be equal to the radius.
The next step is to dig a hole for the foundation. A hole is dug at the points where the lines intersect. The depth of the hole should be at least half a meter. It is best to fill the resulting hole with sand, compact the sand thoroughly (you can “trample” it with your feet, under own weight the sand will compact well). Then the sand needs to be watered. It is better to make the base of the gazebo reliable. Concrete blocks are good for this.
Laying concrete blocks
To make our gazebo strong, it is necessary to lay concrete blocks (or bricks). To do this, in those places where the corners of the future gazebo are marked, you need to drive in six reinforcement rods. The length of the reinforcement is no more than one and a half meters. Using a drill you need to drill holes, equal to diameter metal rods. After the holes are ready, you need to install concrete block on the fittings.

Let's take our pre-prepared wooden beams and drill a hole in each one. You need to put the reinforcement on top of each other (the “well” principle). Next, mark the intersection of the beams and cut them. To ensure that the beams sit firmly, you can make notches, connecting them according to the “floor” principle. Next, you need to assemble the wooden beams and secure them with nails. To between concrete base and there were no gaps between the wooden beams, you need to put roofing felt or any waterproofing material.

Base
The intended location for the future floor of the gazebo must be covered in advance plastic film. It is necessary to pour a thin layer of sand onto the film and place logs. The logs must be attached with bolts. To prevent the wood from rotting, the logs must be treated in advance with any protective agent (drying oil, mastic). Any building material can be used as flooring. Depending on your budget it can be as ordinary planed board, and plywood (choose moisture-resistant), as well as particle boards.
Frame assembly
We install bars that are located vertically. First you need to drill holes for the metal rods. After finishing preparatory work We will place the poles on the reinforcement. To ensure that everything is level and there are no distortions, the level of the pillars (vertical) must be checked using a plumb line. We perform the same operation step by step with each wooden beam. We should have a ring of bars.

The crown must be made according to the same principle, placed at the top and secured with bolts.
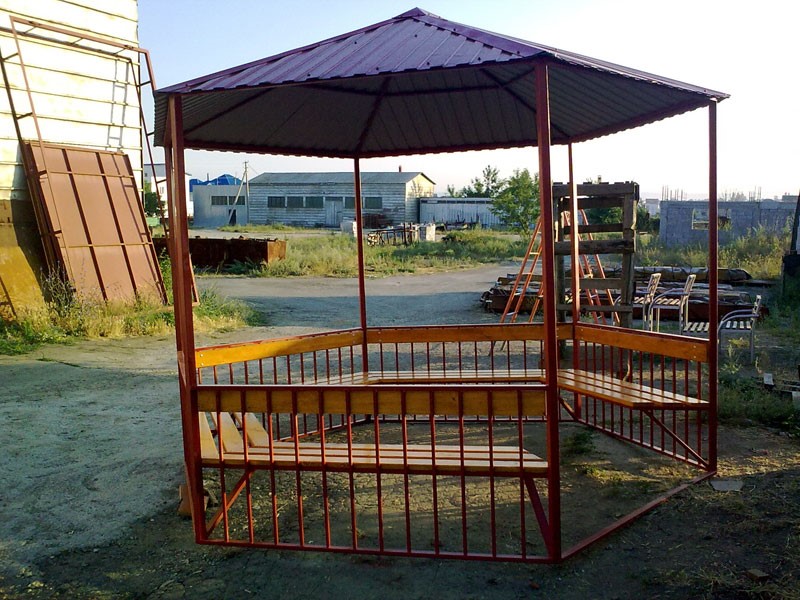
Installing a hexagonal gazebo roof
To secure correctly top part vertical stand, we fix the rack with the timber and saw them off from the end. The angle must be maintained at 60 degrees. Next, we fasten the structure using self-tapping screws. The frame of the hexagonal gazebo is ready.

The roof itself is best done separately. It is convenient to assemble the roof on the ground, and then install the structure on the upper ring of our gazebo. If, nevertheless, you decide to make the roof directly on the spot, then you need to attach a couple of boards to the upper ring and install a support on them - a post. Then you will need to attach the guide bars to the post.
When our roof is ready, it is advisable to sheathe it. This can be done with any covering material. Wooden slats will look best.

You can cover the roof with either tiles or corrugated sheets or use other roofing material.
According to the do-it-yourself hexagonal gazebo drawings, it is also better to make the railing yourself. To do this, take the boards and plan the railings. The chamfer needs to be removed. To install a railing in a vertical post, you need to cut a groove and fit the railing under it. You can see how to do this stage of the hexagonal gazebo in the photo.

If desired, vertical posts can be covered with ordinary clapboard or made with a decorative wooden lattice.
In order for the hexagonal gazebo to serve you long years, it needs to be processed. The wood can be varnished or, if desired, painted in bright colors.
And to make the path to the gazebo pleasant and convenient, you can make a wooden path with your own hands and a small porch.
You can find a drawing of a hexagonal gazebo with dimensions online, but it mostly looks like a sketch rather than a working drawing. Information drawings with individual structural units are usually paid for and are not freely available. The information provided below will reveal the secrets of some technical issues.
Marking the foundation for a hexagonal gazebo
First, you should brush up on your knowledge of geometry within the school curriculum.
Important. A regular hexagon is made up of six equilateral triangles with equal sides and angles of 60 degrees. It is this feature that greatly simplifies the task of marking and building the foundation of a hexagonal gazebo with a hexagonal roof.
To lay out the foundation you won’t need much:
- Leg-split.
- Small hammer or sledgehammer.
- Roulette.
- Rebar stakes.
Having decided on the location and location of the edges relative to existing objects on the site, do the following:
- Two stakes are driven into the ground with a sledgehammer and twine is pulled between them.
- A third one is installed at an equal distance from the outer pegs, which will be the center of the hexagon. From the center on the twine, measure a distance equal to the side of the edge and make marks.
- Now mark the first equilateral triangle in the following way. On the twine attached to the central stake, a size equal to the size of the edge of the triangle is marked. By setting the same size between the twine marks, an equilateral triangle is obtained.
- The following triangles are constructed in a similar way.

Marking the foundation using a cord and stakes is a task that everyone can handle
Laying the foundation
The type of foundation will depend on the type of flooring in the gazebo. A pile foundation is suitable for wooden floors, as well as concrete floors located at ground level. For concrete floors raised above the ground, a shallow strip foundation is suitable.

Explanation. The depth of the trenches should be at least 80 cm with a sand or crushed stone cushion of about 20 cm at the bottom. The embedded parts necessary for fastening the frame of the gazebo are installed in fresh concrete. in this case The photo shows metal embedded pins.

Installation of the bottom trim and installation of racks
To assemble the lower hexagon of the gazebo, you need a high-quality wooden beam coniferous species. There are several connection methods, which allows you to choose the most rational one for the existing drawing of a hexagonal gazebo with dimensions. All listed options provide sufficient connection reliability:
- Traditional half-tree connection.

Hexagon gazebo with half-tree connection on pile foundation. Reliable fixation of the unit is ensured by a pin insert passing through the technological holes of the timber connection. A hole is drilled in the lower part of the supporting post, with which it is put on the mortgage.
- Beam connection option bottom trim in the groove

- Connecting the strapping beam directly to the stand.

- Attaching load-bearing vertical posts to the finished gazebo floor.

Then they move on to laying the boards.

Now we proceed directly to installing the racks.

Note. Before the next stage of work, the installed racks must be set horizontally and well secured with spacers, since without the top trim they do not have sufficient strength when exposed to external influences.

Making a roof frame
Of course, technically it is possible to make a roof of any configuration, but the most suitable option there will be a roof that follows the contour of the structure; in this case, we will have to make a hexagonal roof for the gazebo. Structurally, it will consist of the following elements:
- Mauerlat (top trim).
- Rafters.
- Lathing.
- Roofing material.

Advice. The lumber for the rafters must be the same size, have normal humidity and be free of large knots. Preference should be given to coniferous wood such as pine, spruce, and larch.
The Mauerlat is made from timber of the same size with supporting posts (or boards of the same size as the rafters). In this case, the latter option is considered. In order for the Mauerlat to be securely fastened and lie on a vertical stand, a groove is made in the “half-tree”.

The groove is made from the outside of the gazebo.

The attachment point of the rafters to the mauerlat is carried out using a groove fastening, which prevents the rafters from slipping when exposed to a snow load.

The fastening point for the half-rafters is marked in blue, the fastening point for the main rafters is in red, and the groove is made in such a way that it overlaps the fastening point for the vertical post and the Mauerlat. Connection nodes where it is necessary to use mounting angles are marked in green.
Hexagonal roof crown structure
There are several ways to connect the rafters at the top of the roof. It is very difficult to give preference to any of them, so it is worth considering the most common methods.
- Using a hexagonal connector.

- Using a support stand.

- Connecting rafters using grooves.

Advice. It is recommended to first fit and assemble the roof frame on the ground, mark the parts, disassemble, and then install it on the gazebo. To facilitate the installation process, a temporary stand is required, which is removed upon completion of work.
Selection and installation of roofing for hexagonal gazebos
You can use any roofing, but we must take into account the surrounding landscape, the design of the gazebo itself and existing buildings on the site. Gray asbestos-cement slate will look extremely inexpressive on the gazebo.

Flexible tiles have a variety of color palette, which significantly expands design possibilities. It can be easily cut, which is important when doing roofing work, given the specific configuration of the hexagonal roof of the gazebo.
For flexible tiles, solid wooden flooring from boards, moisture-resistant plywood or OSB sheets are used as lathing.

Laying of flexible tiles is done in rows, from bottom to top, fastening is carried out special nails For soft roof, in addition, with inside sheets of flexible tiles there is a self-adhesive layer under protective film, which is removed immediately before installation.
Any person who spends most of his life in a noisy city sometimes wants to take a break from this hustle and bustle. In this case, a summer cottage helps many people out. Having a gazebo can help you relax and unwind in nature as much as possible. And since not everyone has it, let's consider simple methods its construction.
A properly built gazebo will be able to perform several functions at once. In rainy weather it will provide shelter from the rain, in the scorching sun it will provide refreshing shade and, most importantly, it will allow you to enjoy communication with loved ones in nature.
Let's divide the process into stages:
Site selection
The idea is to provide easy access for you and your friends or family to the gazebo. It will also be good if the structure is located under or near a tree. This way the roof will not get too hot under the sun, which will provide even greater comfort.
Foundation
Depending on the number of corners, pillar supports are poured. The photo shows the foundation for a hexagonal gazebo made of concrete and bricks.
But instead of bricks, you can also use racks. In order for the shape of the gazebo to be correct, draw a top view in advance and calculate required dimensions. After this, mark the area using pegs and twine. After this, in place of the stakes, dig holes about 50 centimeters deep. Next, place beams with a cross section of 20 by 20 centimeters there, so that they look 20 centimeters above the ground. Thus, you will need beams 70 centimeters long in quantity equal to the number of corners of the gazebo.
With exactly the same parameters, you can use a profile pipe for the base. If you do not plan to make a base, and the floor will be tiles or concrete screed, take into account the height of the pipe with the height of the gazebo.
It is good to use for mixing concrete. But if you don’t have it, you will need a trough in which you can conveniently make a batch and then fill the hole with it. The concrete solution is mixed in a proportion of 1/3/2/2 - 1 cement, 3 sand and 2 granulations, 1-2 water. It is important to maintain exactly this sequence, as this affects the quality of the solution. Add water periodically. For example, after mixing cement, add a little sand, then wait until everything becomes homogeneous and add again. The overall consistency of the mass should be similar to gray sour cream. Vary the proportions relative to the required volume.
During the process, while the concrete solution is still damp, use a thread and a level to check that all the posts create an even horizon. And do not forget about the need for central support for the rigidity and durability of the floor.
Base
If you made a support from wood, then use the example of the finished base in the photo to knock down the boards. After this, the floor is sewn up with a board 2.5-3 centimeters thick.
It is not recommended to carry out such an operation with metal, since it tends to bend. You can also make the floor from tiles or by making concrete screed. Large slabs will look very aesthetically pleasing. A more openwork option could be a marble floor.
Frame
In the metal version, your frame is already ready and only needs rigidity. It can be strengthened using partitions, but more on that later. For a tree everything is different. Bars 15 by 15 centimeters and at least two meters long are attached vertically in the corners. Installation is carried out using metal corners and self-tapping screws.
At the beginning, let’s mention what you can do if you wish. beautiful gazebo and without parapets.
If you want a fence, the approximate height will be 90 centimeters. And the choice of material will not be small:
- You can sew panels from wood or tree branches. In this case, the blanks are made according to the size of one side (from corner to corner).
- Polycarbonate. One of the most popular materials for the manufacture of gazebos. Also cut into sections.
- . You can do it yourself if you have it the right tools or order.
- Hedge. Having created only a side, you can put a climbing plant, for example, grapes, along it.
- Metal sides. Attached using welding joints. Later you can decorate with decorative elements.
The photograph shows one example.
Please note that the fencing can be extended, which will not allow uninvited birds to interfere with your rest and will create additional shade.
Rafters and roof
Rafters are mounted on the ground in the form of modules and then installed on the roof. Both metal and wood are equally suitable for this. Only the assembly methods will differ. When installing wood - nails and bolts, and for metal - bolts and welding.
The schematic drawing clearly shows an example of the “skeleton” of a roof.
Roofing
There are enough materials for the roof big choice: profile flooring, polycarbonate, slate, tiles and other coverings. Before laying, install waterproof material so that the roof is effective in the rain. After this, the material is cut out, if necessary, and attached to the beams of the rafter frame. Calculate the overlaps and lengths to avoid waste of material and save your budget. 
paints and varnishes
Regardless of whether you choose metal or wood, it will be useful to cover the gazebo with paint or clear varnish. This will make the building more beautiful and extend its service life to you.
Don't settle on one color. Choose a color to match the color of the roof, plants, furniture inside, or simply to suit your own mood. If the roof is made of polycarbonate, then the number of color combinations only increases.
For a wooden floor, you only need to be treated with special insect and temperature protection products and coated with paint.
You can also cover the floor with ceramics. To do this you need to have more or less smooth screed. Next, it is laid out on the glue under the level. Remember that the stationary or floor will be outdoors 24 hours a day all year round. In this regard, choose a tile that can withstand the load. This will help protect yourself from unnecessary costs.
No less beautiful and convenient solution will choose paving slabs. The semblance of tiles like in the photo or flat tiles will look beautiful. For preparation you will need a pillow of granulation and paving slabs at your choice.
Tools
Regardless of what you need, you will need a standard set: hammer, saw, hacksaw, drill. If you are making a gazebo with a metal frame, then welding the seams is best for fastening. Bolts and nails will only be needed to secure the roof and parapet cladding. In the wooden version, it is best to connect the beams with bolts, using wide washers so that the head does not push through the wood. For concrete, you will either need a container and shovels that are convenient for manual mixing. There will also be a need for consumable tools such as brushes, nails, bolts, electrodes for welding machine.
Materials
If the frame is made of wood, then the following materials will be needed:
- Beam 10 by 10 centimeters - racks and trusses.
- Slats 25*30 millimeters for covering the parapet or window grilles;
- For the roof, edged boards 25 millimeters thick will do.
- The floor is covered with a board no thinner than 4 centimeters.
- Fasteners - corners and screws;
- Roofing sheets - OSB works well.
By choosing metal as the material for the frame, the entire structure can be assembled from one type of workpiece. For a gazebo, a profile pipe with a cross-section of at least 50 millimeters or a corner with walls of 25 and 50 millimeters is best suited. The roof in this case can be made of wood or polycarbonate.
In both cases, the footage is calculated independently, since it depends on the scale of the construction.
The squaring of cladding materials, such as roofing and cladding, is determined depending on the size of the frame. Consumables also vary depending on the assembly method.
Types of gazebos
Classifying gazebos in your home according to any parameters does not make sense, because in our time the diversity in construction has reached unprecedented proportions. This is caused not only by fantasy modern masters, but also an abundance of materials. Combinations of plastic, concrete, wood, metal and brick are just the tip of the iceberg. In particular, plastic can help you inexpensively, but very beautifully decorate both the interior and exterior of your building, regardless of its design.
After reading the guide on how to make a hexagonal gazebo with your own hands, you have everything necessary knowledge for construction of any shape or design. All you need to do is apply this knowledge in practice
If you wish, you can build closed gazebo. To do this, you will need additional means - insulation, windows and a door. Also, the floor in such a gazebo can be made of ceramic. And inside, a fireplace or barbecue with a hood built into the wall will add coziness.
Such a gazebo can easily turn into summer kitchen, if necessary household appliances. In this case, a portable gas cylinder will not be superfluous; it can be connected to both the barbecue and the burner.

All of the above applies to rectangular or square shape. Shapes can be with many angles or round. It all depends only on your imagination. Also, for a quadrangular shape you will need additional supports, one in the middle of each side.
A gable roof for such gazebos is made in the same way as a multi-pitched roof, only with different shapes. Rafter structures are made in the shape of the letter “A”.
Quadrangular gazebos accommodate less people than the rounded versions.
In addition to experimenting with the form, you can try different kinds covering the walls or roof of a building. You can make the roof semicircular and use polycarbonate or corrugated sheeting. It will look very original.
Don't forget about additional elements exterior. They may include a barbecue, street benches, tables, hanging flowers and anything else that comes to your mind. When building, keep in mind the main thing, the goal of the gazebo is to arrange it for you as much as possible. comfortable stay.
Advantages and disadvantages
Pros:
- Possibility to make the gazebo portable. In this case, you can install it with bolts, which can then be easily unscrewed and assembled. If the concrete is not solid, then you can install the gazebo wherever you like or move it to free up the necessary space or simply change the situation.
- Wide scope for imagination. For inspiration, you can look on the Internet to see how you can decorate a gazebo. For example, if you get tired of the parapet sheathing, you can easily repaint it or replace it with something else.
- Independence from the budget. You can make a modest gazebo and gradually decorate it or cover it with more interesting materials.
- If the gazebo is collapsible, then you can remodel it, thereby increasing the covered area.
- By making the walls brick, the owner will reliably protect himself from wind and rain
Minuses:
- The tree is rotting. That's why wooden structures need to be treated with special means to prolong life.
- Fire hazard. This applies more to wood and plastic. When using these materials, carefully follow fire safety precautions.
- Service. Nothing lasts forever, so repairing even the slightest chips will significantly extend the life of your building
- Polycarbonate coating, although practical, is also not cheap. In addition, it enhances the sound of falling drops during rain.
Hexagonal gazebos are very beautiful, on summer cottages they look just great. It is quite possible to build such a structure with your own hands. However, you need to first think through the project, draw up necessary drawings and choose the optimal sizes.


Peculiarities
Install hexagonal gazebo It's pretty easy to do it yourself. Such designs are characterized by increased reliability. In terms of the number of seats and spaciousness, a hexagonal structure is inferior, for example, to an octagonal one, however, if you plan such a gazebo correctly, you can significantly increase the area for recreation. One of the main advantages of such structures is aesthetics.


Hexagonal gazebos can be classified as classic options, which do not cease to be relevant over time.
Kinds
Such structures are built from various materials.
Among the most popular options are the following:
- brick;
- wood;
- professional pipe


Forged metal structures are also popular. All materials have certain advantages and disadvantages. The final choice will depend on the specific situation and taste preferences of the owner of the summer cottage.


Forged
Forged metal gazebos look very beautiful. Such designs seem weightless, light, openwork. To create a forged structure, you need not so much construction skills as the ability to work with a welding machine.


Let's not forget about the disadvantages of metal.
- Rust may occur on such surfaces. To avoid this problem, you will need to use a special anti-corrosion agent.
- Metal gazebos are not resistant to high and low temperatures.

Profiled pipe
Structures made from such material can be assembled very quickly. When using a welding machine, this takes several days. Such gazebos are very stable; during their construction you can experiment with shapes. The main disadvantage of such options is the limitation in creating structures intended for use in winter. A closed metal gazebo does not retain heat well.


Brick
Brick gazebos look like small houses. Such options are most often chosen by owners of brick houses who want to complement the main structure with a similar building.
The advantages of such options make them quite popular.
- Originality of design. You can use not only brick, but also natural stone.
- The ability of the material not to heat up very much. At the same time, it is able to retain heat remarkably well.
- Durability. There is usually no need to update brick gazebos.


Disadvantages of such buildings:
- static – a brick gazebo will always be located where it was installed;
- construction work takes a very long time;
- high cost of bricks.

Tree
Construction of a gazebo from boards - perfect option for beginning builders. Working with such materials is quite easy. Some prefer more massive buildings - log gazebos. When constructing such structures, it is recommended to preserve the naturalness and texture of the material. In this case, the building will look especially beautiful.
There can be several advantages of wood. Let's highlight the most basic ones.
- Wood is aesthetically pleasing. Such material can fit well into any landscape.
- Such raw materials are environmentally friendly. Wood can be used by people who care about their health, as well as by allergy sufferers.


Of course, there were some downsides.
- You cannot install barbecues in gazebos made of this material, because it is not fire-resistant.
- Wood can deteriorate quickly. To avoid this problem, apply to surfaces special means, preventing rotting.


Preparation
Let's look at the intricacies of building a hexagonal gazebo using the example of constructing a gazebo from profile pipe. First you will need to prepare all the necessary tools. You should also decide where exactly the structure will be located. You will need to pay special attention to yourself important stage preparation: creation of a construction project, drawings, diagrams, calculation of dimensions. The results of all work will largely depend on this stage.

Materials and tools
To build a hexagonal gazebo, you will need to first prepare all the necessary equipment.
You will need the following tools:
- roulette;
- shovel;
- Bulgarian;
- screwdriver;
- welding machine;
- pliers;
- drill;
- self-tapping screws;
- screws;
- screws with thermal washers.


Certain materials will also be needed:
- roofing felt;
- concrete;
- professional pipe;
- edged board;
- flexible tiles;
- plywood;
- sand;
- gravel.


How to choose a suitable place?
The site on which you are going to build a building must be level. Make sure that there are no nearby groundwater. Clean the area, remove debris from it: then you will have to make a columnar foundation. Marking will need to be done using rope and pegs, focusing on the project plan and drawing.


Project
You can contact a company that specializes in project documentation. However, if you do not doubt your knowledge and skills, you can create a project yourself. There is another option: use ready-made example from the Internet.
It should be borne in mind that the drawing must indicate all important dimensions that will need to be pre-calculated.


If any information is not taken into account when creating a project, serious problems may arise during construction work. Remember that people in the gazebo need personal space (about 2x2 m should be provided for each person).
Construction
Construction works are carried out in stages. It is quite possible to cope with them on your own, you just need to take into account all the recommendations of specialists and devote a sufficient amount of time to the work, without trying to do everything as quickly as possible (quality usually suffers from this). Let's consider the intricacies of all processes.


Foundation
To properly install the structure, you will need to create a columnar foundation. You should not do without a foundation, otherwise after a while the building will shrink and everything will need to be redone.
To create a foundation, dig holes (according to the number of corners of the gazebo), their minimum depth is 600 mm. Then put it on the bottom sand cushion. Place crushed stone on top and pour concrete mortar. To strengthen the foundation, special mortgages are used.


The racks must stand level in the holes, otherwise the structure may tilt. You can use a level to check. The quality of the foundation will largely depend on whether the builder has the skills to work with a welding machine.
As racks, you need to use professional pipes having the following dimensions:
- cross-section – 8x8 cm (this is the preferred size, but you can choose another option);
- wall thickness – maximum 2.7 mm.


Floor
The floor of a hexagonal gazebo made from a profile pipe can be made of stone, brick, concrete, or wood. Some owners summer cottages and do without a floor at all, they simply leave lawn grass on the surface.
To create a wooden flooring, you need to install joists. After this, you should lay the boards on the surface. When creating a brick floor, first make a sand bed. To do this, dig a small hole around the perimeter of the base and pour sand and crushed stone into it. Then you will need to pour the concrete solution and lay the stone or brick until it dries.


If you want to make a stone floor, it is better to turn to professionals. Such work is characterized by increased complexity, because processing and laying stone is very difficult. Few inexperienced builders are able to cope with it on their own.
Roof
You will need to decide not only what shape it will be, but also the material. To create a roof, you can use metal profiles, tiles or slate.
First you need to install the rafter system. You can do this using the remains of a profile pipe. Some people prefer to use bolts, but this design will not be very neat. It is still recommended to weld. The rafters should extend approximately 150-200 mm beyond the racks.


Then installation is carried out. The roof needs to be covered step by step.
- First you should lay the plywood (layer thickness - maximum 2 cm). You can attach it to the rafters using self-tapping screws. They will be located every 150 mm.
- Then you need to insulate the roof from moisture using roofing felt (a reliable waterproofing material). This will help prevent rainwater from entering through the roof.
- Finally, cover the surface with tiles or slate.


To create a rafter frame, you can use wooden boards, but in this case you will have to take care of it. Special antiseptic agents will need to be applied to the wood to protect the surfaces from insects and rot.
Brazier
As noted earlier, it will be possible to install a barbecue in a metal gazebo.
Owners of summer cottages do this in different ways.
- The simplest option is to put a portable metal grill in the gazebo. However, the building must be quite large, otherwise there will not be enough space.
- Some people prefer to use a barbecue grill (gas or charcoal) that is portable or built on wheels. This is very convenient option, but many owners of summer cottages still prefer barbecues. Grilling kebabs using this device is much more enjoyable.
- If the foundation of the building is strong and monolithic, you can install in it stationary grill. This option is more suitable for brick gazebos.