Make a shelf for shoes. Shoe shelves - ideas for narrow and wide hallways
When entering a house or apartment, the first thing we do is take off our shoes and, in the cold season, outerwear. Placing outerwear never causes problems, but with shoes the situation is different. This problem especially concerns large families, as well as owners of extensive shoe collections.
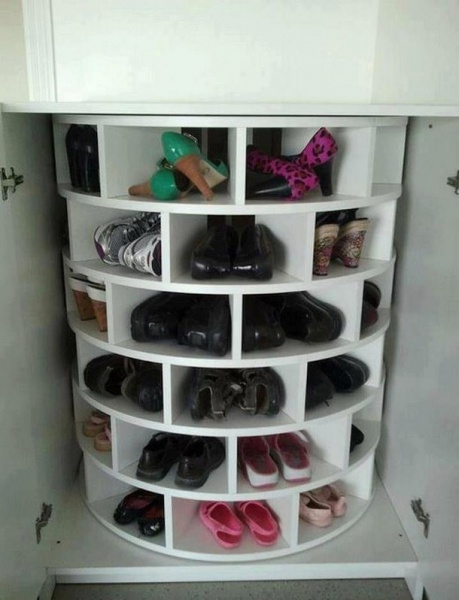
An ordinary person wears at least two pairs of shoes per season, and if there are three or more people in a family, then it turns out to be at least 6 pairs of shoes, or even more. But don’t forget about out-of-season shoes, which should also be stored somewhere. The problem of storing shoes is most often faced by owners of small apartments and small hallways. The solution to this type of issue is to install shoe shelves, and if your budget is small, then you should make a shoe shelf with your own hands. Making a shelf with your own hands will not only save your budget, but will also give your hallway individuality and exclusivity. Before choosing a shoe rack, you need to calculate how many pairs you will have in it. The number of pairs of shoes directly depends on the number of members in your family. The main types of shelves for shoes include Bona, Slim, Coupe, Cabinet, as well as shoe rack - overshoe rack. The slip is a kind of showcase with doors and holes for air supply; it is practical to use and has a lot of space for storing shoes. Slim type shelves are made directly from wood; it is advisable to place already dry and clean shoes in them, so as not to contaminate the lower shelves; this is not very practical and causes some discomfort. A Coupe-type shoe rack is very practical; often such shelves are made individually to fit the width and length of the hallway, so they fit perfectly into any interior. The Coupe shelf is usually high, but not deep and must have sliding doors (otherwise it will not be a compartment); due to the shallowness of the closet, the shelves in it are located at an angle (which allows you to put high-heeled shoes on them). Shoe shelf Cabinet - often has a compact and small size (only seasonal shoes fit in it), often such a cabinet has hinged doors, as well as 2 or 3 horizontal shelves, a soft ottoman can be located at the top. Shoe shelf Galoshnitsa is the newest invention for storing shoes, you can not only store, but also dry shoes in it, it can be installed not only in hallways, but also on balconies or storage rooms, it looks like a cabinet. A shoe rack can be made from any available materials; if desired, it will turn out no worse than many expensive shelves sold in stores. The most budget-friendly option is a shelf made from cardboard boxes, which are found in every home. For such a shelf you will need one large or several smaller boxes. Such a shelf will be relevant in the case of a very small hallway, because it will take up minimal space. We make blanks; to do this, use a pencil and a ruler to mark rectangles 30 cm long and wide along the entire side of the box. Then we cut out the future shelves with a special knife or scissors. Then we take our workpiece and fold it into three equal parts, after which the side parts should be folded into a triangle. There should be a pocket, so we fold all the blanks. After that, we arrange the prepared pockets on top of each other, leaving a groove for shoes between each, and then carefully secure everything with tape. For reliability, all pockets can be secured together with staples. It is recommended to mount the resulting structure on a cabinet or wall in the hallway. Also, such shoe pockets can be painted in different colors, or in one desired color, which will give your hallway bright and unusual colors. The next type of shelf for shoes that you can make yourself is a carousel shelf. This shelf can be placed in any standard closet you have in your home. The shoe carousel will be made of four rotating shelves, always round. Wooden pegs will be inserted into the round shelf in a vertical position. The shelves themselves will be mounted on a metal rod. To make such a shelf, you will need tools that almost every homeowner has at hand. We will need a cabinet of standard sizes, with a depth and width of 60 cm, and a height of about 190 cm; for shelves we will need 4 disks with a diameter of no more than 55 cm, as well as 9 disks with a diameter of approximately 10-12 cm. To hold shoes there will be you need round pins (022): 18 pieces 35 cm long (1), 24 holders 30 cm each (2), 16 pieces 25 cm each (3), as well as 32 holders 20 cm each (4). To support the shelves you will need a metal pipe with a diameter of approximately 40 mm and the height of the entire cabinet. On one round shelf we should fit 9 adult and 12 children's pairs of shoes. It all depends on your desire and imagination, because it is up to you to decide how many holders you need to install on one shoe shelf. For greater efficiency, you can make shelves with different numbers of holders, for example, on 2 shelves you can place 12 pairs of shoes (for children’s shoes or small ones), and on the other 2 shelves, 9 pairs of shoes (for large shoes). This shelf can be painted in any color, or varnished. It is best not to paint the surface of the supporting parts; this will allow your shelf to slide easily.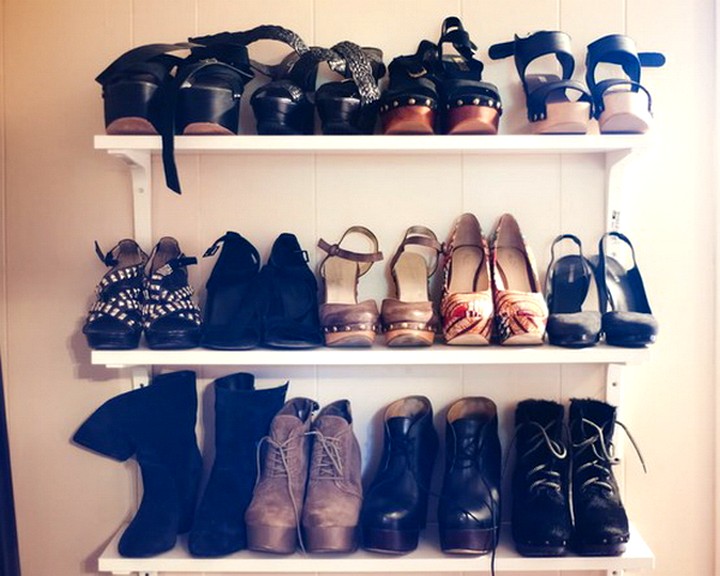
DIY shoe rack
This furniture accessory for the hallway can be bought ready-made, but it is better when the shoe rack is assembled with your own hands in the style of the room. In many cases, this is justified not only by reasons of economy, but also by lack of free space.
Similar articles:
What is it like, a shoe rack in the hallway?
The hallway in a city apartment is not spacious. Everyday shoes, which are taken off when entering the apartment, and house slippers often clutter it, and it seems impossible to install a shoe rack.
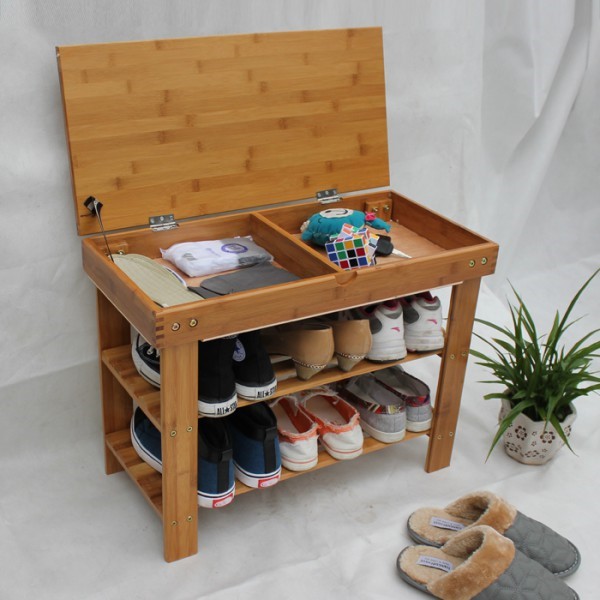
In a small hallway convenient option there may be a combined design with a seat and shelves underneath, which will provide space for storing shoes and a small bench for putting them on. By replacing a simple stool or ottoman with this design, it will be possible to solve the problem of boots and shoes lying around, even in a large family.


An option for such a shoe rack could be pull-out shelf with a door panel behind which the contents will be hidden under the seat. You can make such models yourself, decorating them to match the style of the hallway:
- for rustic interiors, wicker or wine boxes can be installed in a case made of thick plywood or MDF, and top part use as a seat;
- for Victorian or classic styles the same base can be decorated with plastic molding and a velvet cushion on the seat, or a door can be hung to hide the contents of the shelf;
- By covering the body with a plain film and without resorting to excessive decoration, you will be able to get a minimalist piece of furniture for a formal hallway.
A small space behind the door can be rationally used if you hang tiered shelves on a canvas or wall.
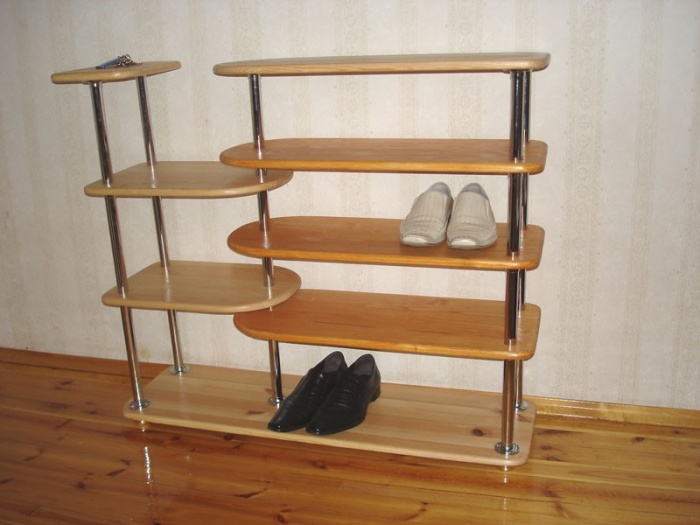
But most often there are shoe racks, which are openwork structures made of racks and shelves attached to them. They differ from each other only in material and size.
DIY shoe rack: what to assemble from?
You can make a shoe rack with your own hands from any available materials. Craftsmen assemble furniture from leftovers from apartment renovations:
- boards and bars;
- drywall;
- scraps of plastic and metal pipes.
For making shelves, parts from waste material: cardboard or plastic containers.
The most common option for a shoe rack in the hallway of a home is a plywood or plank structure. The material is easy to process and wooden shelf durable. Its disadvantage is low moisture resistance, therefore street shelves They are rarely built from wood.
A good outdoor shoe rack will be made of metal or plastic. Such products will last for decades, and you can come up with many options for how to make a shelf for a hallway, using the qualities of the selected material.
Homemade shelves for the hallway
Deciding how to do shoe shelf, the master should evaluate his skills and abilities, select necessary materials and prepare the tools:
- for woodworking you will need a hand or electric saw;
- when using metal or plastic tubes, a hacksaw will be useful;
- cardboard and plastic can be cut with a knife;
- fastening materials for a small product - screws for wood or metal;
- drill with drills and bits for self-tapping screws;
- to connect cardboard parts or decorate, you will need glue;
- you can finish a finished shoe rack self-adhesive film, remnants of wallpaper, paint or varnish.
If the product is intended for outdoor use, it is advisable to protect the metal from corrosion and the wood from rotting. For this purpose, impregnation and enamels for exterior use are used.
Cardboard version
Budget and simple shelf will come out of a large cardboard box. To make it you need thick corrugated cardboard. Having measured the space for the shelf in the hallway, you need to determine the required width and length of the cardboard container. To ensure neat edges and greater strength of the product, the valves of the bottom and lid should not be cut off. It is better to bend them inside the box and glue them to the walls.


For tiered shelves, you need to cut rectangular parts from another box. Their width is equal to the depth of the body, and their length is equal to its length with 2 allowances. The dimensions of the latter must be determined individually: they must correspond to the distance between the tiers. Bend the allowances upward and glue the shelves inside the body. Treat the product with decorative self-adhesive film to protect it from moisture.
You can also make a shoe rack made of cardboard on the wall with your own hands, taking up minimal space behind the door leaf. To make it, you need to select several large boxes from which you can cut rectangles measuring 60x70 cm. Cutting and assembly is done as follows:
- Set aside 20 cm from the edges of the long sides. Draw lines that will divide the workpiece into 3 parts.
- Set aside 25 cm from the top of the workpiece along the short sides and connect the points with a straight line. The workpiece will form a T-shaped figure that needs to be cut out.
- Along the top of the cardboard letter T, set aside 11 cm from the edges and mark these points.
- Connect each mark to the corner formed by connecting the crossbar of the T to its leg. You should get 2 slanted lines.
- Pressing the cardboard with a ruler, bend the workpiece along all existing lines, bending the parts upward. It’s easy to roll cardboard into a fragment of a future shelf. In this case, the triangles on the edges of the crossbar need to be placed on the wrong side of the leg of the letter T.
- Using silicate or any universal glue, secure the triangles. If you do everything correctly, you will get a convenient pocket with a protruding upper part. Make as many such pockets as necessary to create a shelf.
- Decorate the details to your taste: cover with film or wallpaper, paint, add the necessary details. Connect the fragments, bringing the parts protruding above the pocket to the wrong side above the tier. Use glue for fastening.
Make holes on the topmost pocket for hanging and place the shelf on the wall.
If you cut out many identical parts representing the type of shelving of the required dimensions from the facade, and then glue them all together, you will get a product in the spirit of European fashion designers. Between identical slats you can install spacers made of small pieces of cardboard. Then the shoe rack will turn out to be openwork.
Pipe construction
Metal tubes can be used different ways. Shiny chrome parts will help create an interior accessory in a high-tech or minimalist style. These parts are used to assemble the basis of the structure - the frame struts. You can connect them with tubes smaller diameter or chrome-plated utility shelves-lattices. For connections, use self-tapping screws and bolts with nuts.
For a fashionable loft or techno, do-it-yourself shoe shelves are assembled from pipes in the form of a pipeline. The craftsman needs skills in working with metal and taps for cutting threads. You can connect the pipes plumbing fittings different shapes.
From profile pipe craftsmen collect bent and forged products. But such work can only be done if there is equipment for cold forging. Parts of the structure are welded or connected with threaded fasteners. Elegant forged shoe racks made from pipes are appropriate even in classic interiors.
Plastic construction
When the apartment's sewer system is replaced, new PVC pipes are cut large diameter used for making various organizers. A shoe rack in the hallway, made in this style, will take up minimal space. It can be placed on the floor or hung on the wall. The length of 1 fragment should not exceed the shoe size of the apartment owners. You can determine this parameter individually or cut the PVC pipe into pieces 27-30 cm long.


Film, wallpaper, and paint are used for decoration. You can connect the parts of the structure with bolts or short self-tapping screws, or use superglue for PVC. The segments are placed on top of each other or form a honeycomb structure of any shape. When the assembly is completed, it is advisable to fix the shelf by attaching the upper part to the wall.
A small hallway space can be easily used rationally by strengthening the lower parts plastic bottles large diameter directly on the door, the wall behind it or the wall of furniture. With this method, you can occupy a small partition near the door, placing the bottom parts of the bottles one above the other to any convenient height. The easiest way to fasten is with self-tapping screws, screwing them into the bottom of each part.
From scraps plastic pipe and panels (wall, window slopes etc.) it is easy to build a rack-type structure by attaching straight shelves from panels to racks from pipe sections. The design is also suitable for outdoor use, as it is not subject to corrosion and rotting. A more complicated version will require connecting vertical and horizontal pipes using fittings. By using scraps of transparent polycarbonate, you can give the shelf some airiness. Plastic parts easy to connect with self-tapping screws.
Metal shoe rack
You can also assemble from the remnants of metal profiles for installing drywall convenient shelves under shoes in the hallway with your own hands. The design will be strong enough to serve as a seat, under which you can place several tiers for storing slippers and boots.
It is required to make 4 parts of vertical posts of the same length. To connect them, you will need 2 short and 2 long crossbars for each tier. An option for a simple design is a product made from racks that are connected by ready-made lattice shelves or parts from an old one household appliances(refrigerator, oven, etc.).
Using soft welding wire (up to 1 cm thick) for work, it is easy to simulate forged product, connecting bent parts by welding or clamps made of thinner wire. Segments welding wire easy to bend without special equipment using only a vice and pliers.
To shape the end parts of the parts, the wire must be heated in a flame gas burner and hammer it down. The design of the shoe rack is chosen at your own discretion, but its basic principle is a rack of twisted decorative vertical posts and horizontal crossbars connecting them.
A metal shelf can also be built from empty tin containers (coffee cans, paint, etc.). The parts are attached directly to the wall, as indicated for the shelf made of plastic bottles. Using cans different sizes you can create not just a shoe shelf, but also decorative panel, having additional functions shoe racks To make it mobile, you need to attach the tins to a plywood base.
Wooden shoe design
Make a shoe rack with my own hands made of wood is not too difficult. The simplest design is based on the principle of a rack: 4 racks made of bars, connected by boards or the same bars. Beautiful shelves are obtained by combining wood and transparent plastic (for shelves) or lattice metal parts.
If you have a jigsaw and lathe a craftsman is able to create beautiful shelves for shoes made of wood with decorative posts or carved sides. For minimalist interiors, it is enough to cut 2 identical boards without decoration for the side parts and several tiers connecting them. For the door, you can use a panel made of chipboard or MDF or a rectangle of plywood. To open such a door, use small furniture hinges installed on its lower edge.


The body consists of 2 sides, a bottom and a lid. Horizontal parts need to be cut so that they extend slightly beyond the vertical sides.
To assemble a shelf with your own hands, you need self-tapping screws and 1 metal stud with threads and nuts. Assemble the shelf like this:
- Strengthen the drum partitions around the central hole, along the radii of the circle. Fastening with self-tapping screws. Install the second circle, securing it with self-tapping screws.
- Drill holes for the pin in the center of the lid and bottom. Assemble the body using self-tapping screws, placing the sides between the bottom and lid parts. The distance between the sidewalls is 1-2 cm greater than the diameter of the drum. Attach legs 2-2.5 cm high to the bottom part. They can even be made from plastic bottle caps.
- Pass the pin through the holes in the cover, drum and bottom. If there are several drums, they should be separated with washers. Screw nuts onto the ends of the studs.
The dimensions of this shoe rack are at least 65x65 cm, so it is only suitable for a spacious hallway.
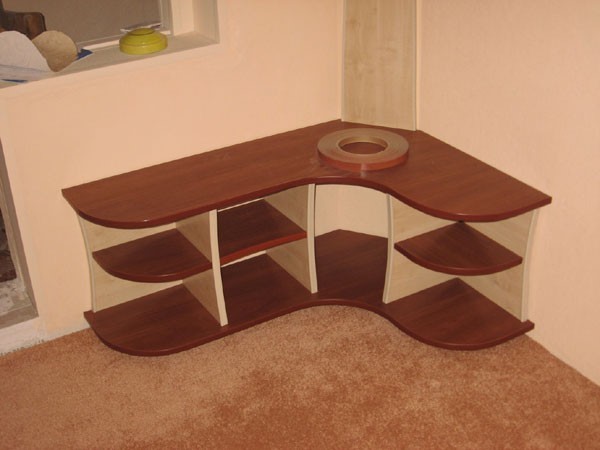
Corner shoe rack
In the partition behind the door you can place racks for shoes: you make them yourself from waste scraps. To make the simplest model, screw supports made of bars or metal profiles onto adjacent walls. On them you can mount triangles or squares made of boards, plastic, lattice parts, etc. planes on which it is easy to place 1-2 pairs of shoes. The height of the structure is dictated only by the convenience of the apartment owner.
To make a mobile corner shelf for shoes, cut out rectangular sides and triangular parts for the lid and bottom from plywood or chipboard. They should be slightly larger than the corner formed by the sidewalls. If internal tiers are needed, the dimensions of the legs of the parts must correspond to the internal length of each sidewall.
Assembly begins with the sides and connects them with self-tapping screws and a furniture corner. The bottom and lid are attached in the same way: with self-tapping screws through holes in the plane of the parts. The fasteners must be driven into the edge of the sidewalls and screwed in flush. For shelves, you can put supports from thin planks or fasten the parts to the corners.
What do you do with old furniture?
Inhabitants small apartments Often faced with the problem of storing shoes. Two or three pairs per season for one person is the required minimum, so even a small family of 3 people needs a design that allows them to compactly place shoes in the hallway.
Shoe storage options
There are several main reasons to make a shoe rack yourself. Undoubtedly, it is easier to purchase ready-made furniture, but often standard sizes not suitable for small rooms. The situation when shoes need storage at the dacha is also more practical to solve on our own from available materials, without resorting to additional costs. The third side of the issue is the desire to create an exclusive design, striking in its originality and unconventional approach. Let's consider various options for arranging a shoe rack, depending on the ultimate goals - to save space or budget.

From the point of view of saving money, the material for making the shelves is chosen as affordable as possible: it can be cardboard boxes or cheap plywood. The design of such shoe shelves depends solely on the owner’s imagination:
- From disassembled boxes, using tape and staples, the classic shape of a shoe rack with vertical racks and crossbars is assembled;
- Several cardboard containers of suitable shape are fixed together into a vertical shelf, and then attached to the wall. Its minimal depth allows the structure to be installed even behind a door.
Note! This shelf model is suitable exclusively for light shoes. To store winter boots, you will have to take care of a more secure place.
The plywood construction allows you to achieve good combination cheapness and originality. To do this, assemble a frame in the form of a box, after which it is equipped inside with shelves with asymmetrical curves, allowing you to place shoes various shapes and sizes.
Adherents classic interior It is better to make traditional shelves for shoes made of wood material or combined with metal elements. They can differ in height, have a variety of configurations, and be additionally equipped with doors. It all depends on the material possibilities, the area where the premises will be located and the design of the premises.
For those who like to impress others or simply push away from the usual forms, they will like non-standard approaches in the form of using PVC pipes or equipping a kind of shoe shoe that simultaneously performs two functions: storing and drying shoes.

Budget offers
Available materials in the form of cardboard, plywood or slats will allow you to build a shelf for shoes without additional expenses.
Cardboard
Most economical solution question - the use of cardboard. Such a product would be appropriate to place in a country house, but in some cases, with a creative approach to design, a shoe rack made of cardboard can be installed in an apartment. One option involves the following steps:
- on cardboard boxes markings are made with a pencil;
- elements of the workpieces are cut out with a special knife;
- boxes are formed from rectangles;
- the blanks are connected to each other, forming grooves for shoes;
- the elements are connected to each other by brackets;
- The shelf is fixed to the wall.

As mentioned above, it is also possible to build a standard model, where transverse elements are attached between the vertical parts. The connection is made using tape and staples. Decorating it with decorative film will help give a cardboard shoe rack a more aesthetically pleasing appearance.


Plywood
A shelf made of plywood will last much longer. To make it you will need:
- jigsaw and drill;
- perforator and hammer;
- pins and glue.
Having built a frame of the required dimensions, the internal filling with shelves is done at your discretion, depending on the number of shoes stored and their size.
Important ! Before joining, all parts are thoroughly sanded.

A more simplified model is a shelf assembled from U-shaped elements that can be attached directly to the wall or fixed on a previously prepared panel. As in the case of cardboard, it is recommended to cover the final structure with decorative film. This will not only make it attractive, but will also protect it from moisture, making it easier to care for.
Reiki
Slats can be a practical solution for a summer house. Minimum Required tools: screwdriver, hammer and nails. The design of the shelves in this case may be different, but all options have advantages, these are:
- saving costs on purchasing materials;
- ease of manufacture;
- good ventilation.
What models can be built from slats:
- The most primitive one is to connect two slats of different widths. There is a wider part at the bottom and a narrow one at the top. Shoes are inserted into the shelf with the toe.
- The following design of a shelf made of slats resembles the semblance of a pallet placed vertically. Pinned to vertical racks cross bars, the shelf is additionally equipped with slats for fixing to the wall.
- It's also easy to make a traditional shoe rack shape. For convenience, the upper part can be equipped with an ottoman.
It is worth noting that in each case it is better to carefully treat the slats so as not to damage the shoes in the future. At the final stage, it is preferable to carry out finishing work, be it painting or varnishing.

Classic designs
Traditional models of shoe racks are made of wood, chipboard and metal elements. In most cases you will need:
- saw and plane;
- screwdriver and screws;
- metal corners;
- sandpaper;
- wood glue;
- tape measure and pencil;
- finishing material (paint or varnish).
An essential condition is preliminary design. You can use ready-made diagrams or draw a sketch of a shoe rack yourself.
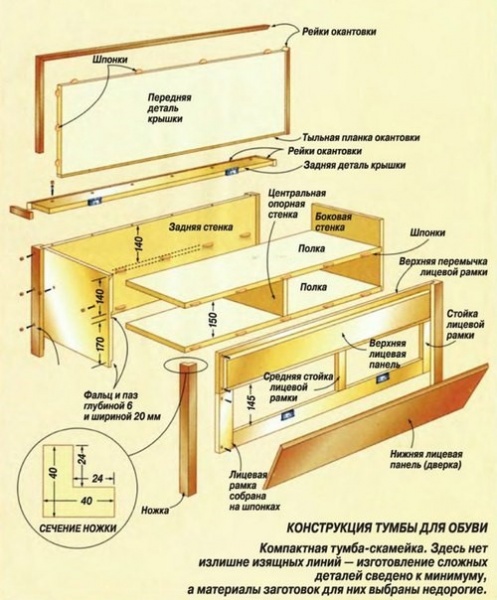

Tree
Let's talk about one of the many options. Suitable material there will be a board 25-35 cm wide, the thickness of the workpiece is 2 cm. Manufacturing includes the following steps:
- The side vertical walls are prepared. The height of the parts is 80-90 cm.
- For shelves, 4 fragments 60-70 cm wide are cut out;
- All items are processed sandpaper;
- Using self-tapping screws, the crossbars are connected to the side walls.
- To enhance strength, metal corners are fixed at the rear ends of the shelf.
- The final stage consists of finishing works- after treatment with primer or stain, the shoe rack is painted or varnished.
Chipboard and MDF
A shoe rack made of chipboard with an ottoman combines practicality and attractiveness. In the process of preparing parts according to the selected project, it may be necessary to remove chips and irregularities using grinder. Edges ready-made elements The future shoe shelf is covered with a special tape using a hot iron. Fine-grained sandpaper is useful for sanding corners; this will prevent damage to the shoes during storage. In some cases, slots should be prepared; the parts of the shoe rack are often connected using confirmations. To decorate an ottoman, take care of purchasing foam rubber and leatherette in advance.
By showing your imagination, you can make an original and practical shelf for shoes made of laminated chipboard. Material consumption is determined depending on the number of shelves; you will also need to purchase metal tubes and clamps to hold the transverse elements of the structure. The edges of the metal tubes are closed with plastic plugs.
A corner model of a shoe rack will fit well into the interior of a square hallway. The stages of its production are not much different from previous versions:
- a diagram of the future shelf is being prepared;
- for the material you can choose laminated chipboard or MDF;
- parts are cut out according to the selected dimensions;
- All roughness is removed from the edges, after which they are decorated with tape;
- The structure is assembled using confirmations.
The “Slim” shoe rack model has maximum functionality. Accommodating a large number of pairs of shoes, it has a compact size. It is extremely difficult to do it yourself due to large quantity accessories. Much easier to purchase finished design and get busy self-assembly. The following diagram will help you:


Use of metal elements
The designs have external lightness, in the manufacture of which they used for the transverse shelves metal elements. Working with such a sketch requires the presence of a grinder, a jigsaw for metal and certain experience. Having blacksmithing skills, you can create an exclusive model of a shoe rack with forged elements.

Extraordinary models
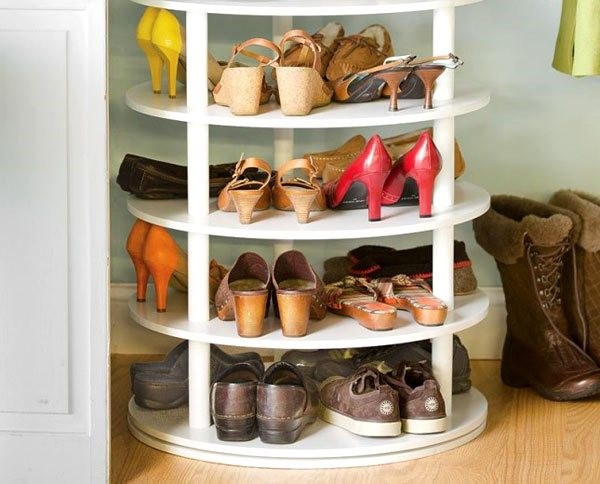
Non-standard shelves also have two directions: shape and material used. Sufficient room space allows you to install round shelf for shoes, the rotating mechanism contributes to the ease of use. The most difficult stage will be cutting out round blanks and installing a mechanism that ensures the mobility of the device.
Note! The radius of the circle must exceed the most big size shoes stored in your home.
If we consider non-traditional options for shoe shelves in terms of the chosen material, it could be a stand made of sewer pipes PVC. What does the assembly of such a shelf include:
- Sawing material to length, taking into account shoe size.
- Sanding the edges with sandpaper.
- Decoration of sections with decorative film. In this case, the imitation of birch logs looks very impressive.
- The individual elements of the shelf are connected to each other by plastic holders or belts. If necessary, this design of a shoe rack can easily be supplemented with new cells.

Regardless of which model you like best, important point is the final finishing that can turn the most unpresentable shelf into an exclusive furniture structure.
The issue of placing shoes in the house remains relevant both in summer and winter. Often the hallway is filled with shoes, especially in the evening, when the whole family has returned home from work or school. To avoid such a problem, you can make special shelves for shoes in the hallway, which will help not only decide on the issue of storing things, but also decorate the room. Every housewife knows what this is useful item necessary in the home, since the durability of shoes depends on both proper care, and proper storage, which a well-designed shoe rack in the hallway can provide.
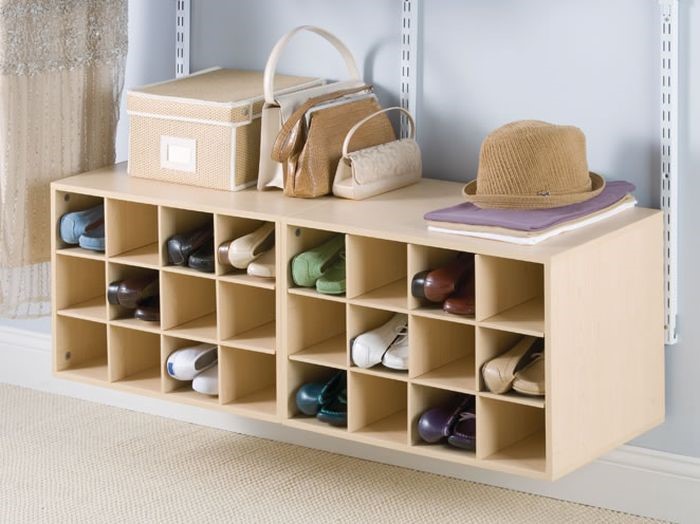
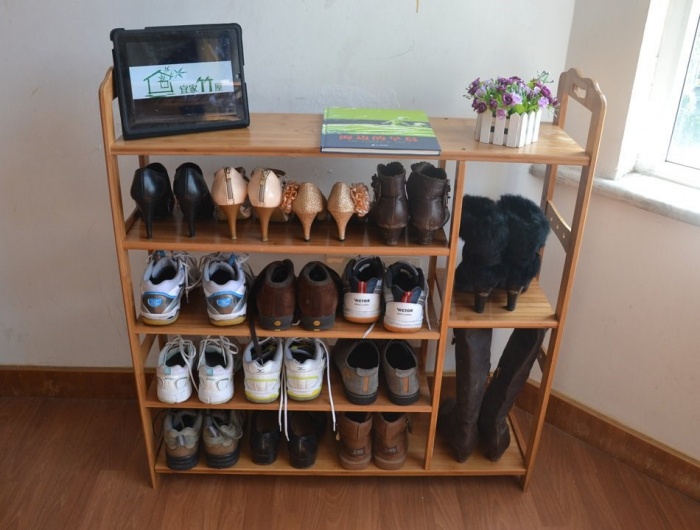
This piece of furniture should be characterized by versatility and compactness, because the hallway usually has a small square area. Shelves for shoes in the hallway can be made in various options execution. Among the varieties that you can make with your own hands, the following are popular:
- Models for walls. Perfect option V small hallway where it is impractical to install a cabinet. It is easy to create such a shelf yourself using wood as a material. If you wish, you can find many photos on the Internet and make the product according to the picture;


- Shelving. Most good choice to design free space. The upper part of the shelf plays the role of a bench or is used as a stand for various useful items;

- Slim cabinet. Such shelves are practical and convenient, as they hide shoes from prying eyes. To open, the product is turned 45 degrees. You can make any shoe rack in the hallway with your own hands: straight, rounded or angular;

- Stands. The most common type floor shelves. In production, you can use the usual bottom of a cardboard box, cover it with some material that does not get wet, and add pebbles.

What materials can it be made from?
From a large number various materials you can choose the one that suits your personal preferences and financial capabilities. Among the materials in demand: profiles, slats, laminate, metal, wood, even cardboard.
Plywood
Plywood is no less popular, from which you can build a convenient and practical bookcase. This type of shelves is attached to the wall, taking up a minimum of space, saving free space in the room. The plywood must be cut into even rectangular pieces, for example, 20x30 cm. The blanks are sanded, and then the assembly of the parts begins. The sheets need to be formed into U-shaped structures and placed inside each other.
In the hallway you can hang any required amount blocks.
The shelf is attached using wooden pins, as well as pre-prepared holes in the plywood. As a result, the product will look approximately like this:

Chipboard
You can make a shoe rack from chipboard. Here it is advisable to make narrow or angular models, with straight or rounded ends.

The process is quite simple and looks like this:

 Drilling holes in the chipboard
 This is a very economical and simple option for making a shelf, since the cost of chipboard is very low.
Tree
Wood is considered the most convenient to process, does not emit toxic substances and is considered absolutely safe.

Wood is the easiest to work with, as it lends itself to various processing processes, and it is not difficult to find. A variety of tools are used to process the material:
- plane;
- hammer;
- paper (machine) for sanding;
- screwdriver;
- saw;
- pencil or tape measure.
 Tools needed for woodworking
 DIY making
The easiest to make are shoe racks. You can easily make them yourself using ordinary tools, materials, visual example photo.
 Do-it-yourself ready-made shoe rack
 To create such a piece of furniture, just take:
- 6 wooden blocks;
- practical self-tapping screws with a diameter of 3 mm and a length of 25 mm;
- self-tapping screws for wood processing;
- special varnish for coating.
Creating a shelf with your own hands should start with the sides. The depth should be approximately 33 cm, which is quite sufficient for various shoe sizes. First you need to saw off 6 even bars, 33 cm each. Next, you should evenly distribute four bars on the workpiece material and make cuts corresponding to their depth.
 Bars - blanks for the sides of the shelf
 The optimal width of the shelf is at least 62 cm in order to accommodate at least several pairs in one compartment. Each shelf involves the creation of four blanks of a certain length. After this, pre-made blanks are inserted into the prepared recesses and fastened together with the structure with self-tapping screws. The rest of the shelves should be done the same, then sanded thoroughly. special paper sharp elements of the side parts. Each individual shelf will look like this:
 Assembling one shelf section
 The height of the self-made shelf is approximately 80 cm. Bottom part mounted at a distance of 25 cm from the floor, to accommodate tall types of shoes. The stands are made from wooden planks, 80 cm high. To create them, a special cut is made to the thickness and depth of the timber (16 mm) at a distance of 25 cm from each other. It is recommended to leave 10 cm at the top for the top of the shelf. You should prepare four identical racks, and then insert the finished shelves into the pre-cut areas.
 Connecting sections to each other with sidewalls
 According to this technology, it is also possible to create wall shelf with your own hands, which is especially suitable for hallways with a small square footage. It’s easy to find ready-made options with photos on the Internet and choose the appropriate option.
From the remaining material it is necessary to make the upper part of the shelf. To do this, special blanks of 33 cm are cut out. The top of the bars is carefully cleaned using sanding paper, but if possible, it is better to use a grinding machine. Ready product covered with several layers of varnish, and parts of the shelf are secured with self-tapping screws.
It is necessary to use 4 self-tapping screws for each shelf and 2 top fastenings.
You can create almost any shoe shelf. There are many photos of ready-made options on the Internet, but if you wish, you can experiment and make an exclusive piece of furniture. The main thing is to have a little imagination and all the materials necessary for the work.
 Unusual shoe rack made of plastic pipes
 A shelf for shoes is a necessary attribute of the hallway, because it frees up space and makes the room look neat. It’s easy to buy a shoe rack in a store, but it’s small simple design It's not cheap. If you have the desire and imagination, then figuring out how to make a shoe rack with your own hands is easy. Material home handyman Laminate panels, boards, plywood, pipes, cardboard and wooden blocks. By showing imagination and skill, you can make furniture that you won’t find in a store.
Made from PVC pipes
An easy-to-make shelf made from sections of PVC pipe will surprise you with its wealth of decorative possibilities. To make it you will need:
- sewer PVC pipe diameter 300 mm;
- sandpaper;
- wallpaper and epoxy glue;
- washable wallpaper.

The length of the plastic pipe is 3 m, so it must be cut into 10 pieces of 30 cm each, because each shelf compartment will be this long. You can cut the material with a jigsaw or grinder. Each part must be carefully sanded to remove roughness and make the surface of the ends as smooth as possible.

To decorate the blanks you will need a roll of wallpaper - choose the pattern and color to your liking. The shoe rack is located near the door, so it can get dirty in bad weather, so it is better to cover it with washable wallpaper that is easy to clean. Each part is glued on the outside and left to dry. The finished sections are assembled into a single structure. It will consist of three elements at the base and top, and four segments in the middle.

First, horizontal strips are glued together, and after the epoxy glue dries, the parts are glued to each other. It turns out interesting and original shelf, which requires minimal costs for materials, and which you can easily assemble yourself.
From cardboard

A cheap and lightweight design for summer shoes and slippers will be made from cardboard. Any boxes from household appliances will do. To do unusual shelf Prepare simple items for the hallway:
- scissors;
- scotch;
- stapler;
- ruler and pencil.

Several rectangles are marked on a sheet of cardboard, the width of which is 25–30 cm, and the length is taken to cover the entire sheet. The number of blanks depends on your desire - each is a pocket for one pair of shoes. The cut out rectangles are divided into three equal parts. The two side ones are bent in the shape of a triangle and fastened together with a strip of tape or a stapler. Having made pockets from all the blanks, they are partially inserted into each other and fastened with tape. This design is hung on the wall, so it would be appropriate in the country house or in the interior. rustic style. To make it more attractive appearance The product can be covered with colored paper or self-adhesive film. This simple and fun activity can be done with children.
Wooden
You can make a beautiful shelf at home. You will have to tinker with it longer than with cardboard, and the material costs are higher, but the result is worth it. The shelf will be round, made of wood, with two tiers and dividing bars. To work you need:
- 4 sheets of wood 15 mm thick;
- screws;
- dye;
- caps for fasteners;
- jigsaw;
- drill;
- Grinder.
Note! Quantity and size Supplies depends on the material you used and the size of the shelf, but, as a rule, the consumption is small.

Cut from three sheets round blanks for the top, middle and bottom of the shelf. The diameter of the circles is 600 mm, they are drawn using simple device. A nail is driven into the center and a 300 mm long cord with a pencil at the end is attached to it. Cutting blanks electric jigsaw. For the dividing bars, which will be mounted in 4 pieces on each tier, 8 identical parts measuring 160 by 200 mm are cut out. The edges of all workpieces are carefully processed with a grinder.

The places where the separating parts are attached are marked on the smooth surface of the parts. The markings are applied to the upper surface of the lower circle, the middle circle is marked on both sides, and the upper one on inside. Holes with a diameter of 2 mm are made at the fastening points, and the same marks are drilled on the separating parts.
Assembly

Along the marked lines, 4 strips are screwed to the bottom circle, each requiring 2 screws. The central circle is attached to the dividing elements, and between the fastening points holes are drilled for fastening the upper dividing parts. These strips will be located a level higher and located between the lower elements. They will also connect two circles - central and upper. The shelf is assembled, all that remains is to paint it and cover the places where the screws are screwed in with caps. A convenient and spacious shelf will be an excellent addition to the interior of the hallway.

Each handmade item not only has a practical function, it fills the home with special comfort, because it was made with love and especially for this place.
Video
See how you can make a good-quality shoe rack from an old closet: