Homemade snow removal equipment for the home. Homemade snow removal: do-it-yourself snow blower and accessories - how to make it yourself
Snowy season is the children’s favorite time: skiing and sledding, funny Games snowball fights and building ice castles... But the owners country houses The abundance of snow is not very encouraging, because you have to take up the shovel again and clear the territory. It’s good when you have the opportunity to purchase a snow blower and turn a seasonal chore into an enjoyable job. But if you don’t have extra money to buy a useful “helper,” you can always make a snow blower with your own hands from materials that have long been collecting dust idle in the corner of a workshop or shed.
Design #1 – auger snow blower model
We suggest first considering the option of how to make a snow blower with your own hands based on an old engine from a walk-behind tractor. To do this you need to prepare:
- Sheet (roofing) iron for assembling the auger body;
- Steel corner 50x50 mm for the structure frame;
- Plywood 10 mm thick for side parts;
- Half-inch pipe for arranging the handle of the machine.
When planning to equip a homemade snow blower with an air-cooled engine, it is necessary to provide additional protection for the air intake opening from small snow particles emitted during operation.
The engine power of this device is 6.5 hp. It is quite enough for clearing fresh snow from the garden area.
Thanks to the machine’s working width of 50 cm, it will be convenient to move the structure and clear winding paths on the site. The machine has compact dimensions, its width does not exceed 65 cm. This allows you to hide the snow blower in the barn at any time as unnecessary; it easily passes through a regular doorway.
To make the auger shaft, you can use a ¾ inch pipe. A through cut is made in the pipe, which is necessary to fix a metal blade measuring 120x270 mm. During operation, the captured snow mass from the transport belt will be moved by the auger to the blade. This blade, in turn, under the influence of the rotation of the shaft, will throw the snow to the sides.

The frame of the snow blower can be welded from steel corners 50x50 mm, and closer to the edges of the structure in the pipe to the transverse corners, all that remains is to weld two corners on each side, the dimensions of which are 25x25 mm
The engine platform will be attached to these corners in the future. You can fasten the transverse corners with the longitudinal ones and fix the control handles on them using bolts (M8).
The auger pipe is equipped with a metal blade and four rubber rings d=28 cm, the material for the manufacture of which can be the sidewall of a tire or a 1.5-meter transport belt with a thickness of 1.5 mm.

You can cut rings from the rubber base using simple device: drive two screws into the board, and then secure this structure tightly to the tape and turn it in a circle. You can significantly simplify the cutting procedure by using a jigsaw.
Since the snow blower auger will rotate in self-aligning bearings 205, they must be placed on the pipe. In order to make a snow blower yourself, you can use any bearings, the main thing is that they must be closed version. In the role protective casing for bearings, a support from the cardan of old Zhiguli models may come out.
Advice. In order for the structure to fit well into the bearings, you need to make a couple of cuts in it and lightly tap it. Such manipulations allow you to slightly reduce the diameter of the shaft.
For insurance homemade auger It is advisable to provide a safety pin against ice ingress. In addition to its direct purpose - cutting when the auger jams, it will serve as a belt fuse (if a belt drive system is installed). The auger can also be driven by a chain. Its rotation frequency is Idling comes out to about 800 rpm. All the necessary components for a snow blower can be purchased at any specialized store.

A piece of plastic is good for throwing away snow. sewer pipe d=160 mm. It is fixed on a pipe of the same diameter located on the auger body itself
An extension of this section of pipe will be a chute for throwing out snow, the diameter of which should be larger than the width of the metal auger blade.
Assembly of the structure
Before assembling the structure, you need to pay attention to the fact that the dimensions of the machine body should be a couple of centimeters larger than the dimensions of the auger itself. This will prevent the mechanism from touching the walls of the housing during operation.
Since the snow blower engine can be used for other purposes during snow-free periods, it is desirable to provide a quick-release convenient platform in the design of the unit, thanks to which the engine can be removed at any time without using any tools.
A significant advantage of this constructive solution is the ease of cleaning the body and movable parts of the machine from compacted snow. And storing such a snow blower is much easier: just remove the engine and the machine will become twice as light.

The basis for skis is wooden beams, which are additionally equipped with plastic linings. You can make such overlays from an electrical wiring box.
The snow blower is ready for use. All that's left to do is paint it homemade device and begin work clearing the snow.
Design #2 – rotary snow blower “Vyuga”
This device, quite simple in design, can be made in any workshop equipped with a lathe and a welding machine. The snow blower, designed by Penza craftsmen, performed well even in rather difficult snow conditions.
The design of the device is based on: an engine with a built-in muffler, a gas tank and a cable for controlling the throttle valve.

All components of the device can be purchased in the store or taken from the same motorbike
First you need to make a rotor using lathe based on the corresponding blank from the electric motor part. Externally it looks like a steel disk d=290 mm and 2 mm thick. The disk, connected with the help of bolts to the hub, forms a structure to which 5 blades are already attached by welding. To increase the efficiency of the blade mechanism, additionally with reverse side reinforced with stiffening ribs.

The engine cooling system operates on the principle of a fan, the blades of which are made of duralumin and are fixed on a pulley to start the engine.
The fan is protected by a soldered casing placed on the crankcase cover. To improve cooling quality, the cylinder head is placed at an angle of 90 degrees.
A shaft is mounted on the rotor housing on four ball bearings placed in pairs. It is fixed to the body using a steel clamping ring and bolts. The rotor body itself is pressed against the frame using a special bracket, which partially grips the pressure ring.
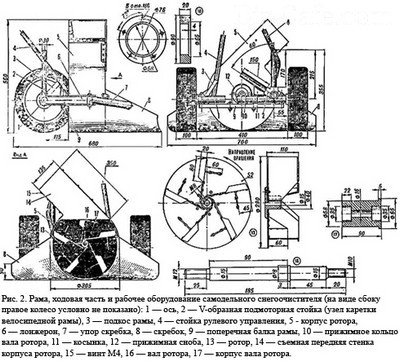
Assembly diagrams for the main elements of the Vyuga snow blower
The removable elements of the machine are the aluminum wall of the rotor housing and scrapers located along the frame.
A significant advantage of a homemade snow blower is the ability to adjust the working width by changing scrapers. On top and quality characteristics unit. The weight of the structure does not exceed 18 kg, which makes it possible for women to use it, and the snow throw range is about 8 meters.
Sooner or later, winter comes to every yard, and making allowances for our harsh Russian climate, this often brings with it heavy snowfall.
In this regard, many owners are increasingly thinking about how to make a snow blower themselves, and what is needed for this.
Despite the fact that ready-made models of such units are available for sale, their cost often scares people away, but the problem of clearing snow remains. That is why many will probably be interested in considering the question of what constitutes snow blower with your own hands and what you need to create it.
Where to begin?
 First of all, you should decide which unit the owner needs - one that runs on gasoline or electricity? Here you need to take into account the amount of work performed, because if we're talking about about removing snow cover from pedestrian paths and clear the area to the garage, then it is more rational to make an electric model. But if the owner has to clean a large area, then a gasoline unit is best suited.
Having decided on the type of engine, the next step is choosing the basis for the future snow blower - whether this model will be made from scratch or whether a walk-behind tractor can be used as a basis.
In the second case, the task is significantly easier, since to transform such a unit into a snow blower, most often it is enough to simply independently design the attached front equipment in the form of a bucket and auger, which will rotate the blades mounted on the rotor and throw the snow to the side. The only thing here is that it will be necessary to transfer the rotational movement of the power take-off shaft to a homemade rotor, but for a competent owner it will not be difficult to perform such a unit.
If you design a snowblower from scratch
It is important to know that any snow blower is always subject to a very high load, and therefore its design should be approached very responsibly. First, you should draw out a project on paper or using electronic programs, which will reflect the dimensions of the device, its design, main components and parts, mechanisms and transmission of rotational motion, wheelbase, handles and fuel supply system. Most often, homemade people prefer to make a device that can be moved independently, which makes them much more mobile compared to self-propelled ones.
The main technical catches of the unit include:
- engine;
- supporting frame;
- control handles;
- snow ejection pipe;
- fuel tank;
- snow catching bucket.
 A good do-it-yourself snowblower, the drawings of which can be found online in very large quantities, will work well and properly only if done carefully. In addition, all components should be assembled very carefully, for which it is recommended to carefully calculate everything. Fortunately, today you can purchase all the necessary components on the market, after which assembling the unit remains a matter of technology.
Step by step process making a gasoline snow blower with your own hands:
- Making the frame. A metal corner or profile pipe, which is cut and welded according to technical needs. Here you also need to remember to attach steel corners, which will serve as reliable support for the gasoline engine. Then the control handles are attached, selecting the options that will be most convenient for gripping the snow blower.
- Engine. It is best to take it from a simple fuel-powered walk-behind tractor or lawn mower, and then firmly install it on the frame. To facilitate the process, it is better to start the engine manually, since installing a generator and battery significantly increases the weight of the machine.
- Design of a rotating auger and intake bucket. It is best to weld the snow intake system from suitable pieces of steel sheet, having previously cut it into required sizes in height and length. A conveyor belt works well as a rotating auger, and to throw snow over the required distance, the easiest way is to attach a steel pipe of wide diameter and suitable length. It is recommended to attach a flexible plastic strip to the bottom of the bucket, which will easily slide over the bottom layer of snow cover.
Important points when creating a gasoline-type device
 To extend the life of the bucket and auger mechanisms, it is recommended to add safety bolts and bushings to them. It is also very important to protect the engine from snow emissions, stones and dirt, which will avoid the risk of engine jamming and failure. The engine should be mounted in such a way that it can be easily inspected for Maintenance. The gas tank should be located on top if possible, and its volume is not recommended to be larger than 2.5 liters. So, taking into account all these useful tips, anyone who can handle plumbing tools well can make a snowblower with their own hands. Before starting work, you should make sure that the person has all necessary tool and materials, so as not to waste time later purchasing missing elements.
Where can I watch a homemade snow blower in action?
Some compatriots still doubt the rationality of purchasing or creating such a device as a snow blower. However, in fact, such a unit can significantly save time and effort for each owner. Do-it-yourself snowplow, a video about the operation of which can the best way ensure the rationality of its creation, allowing you to cope with even the heaviest snow drifts. When creating such homemade unit It is not at all necessary to purchase all the elements, components and mechanisms, since with careful attention many of them can be made from scrap materials.
Summarizing all of the above, we can say with confidence that in fact there is nothing too complicated in the design of a snow blower. The most important thing is to carefully familiarize yourself with its main components, and then competently design everything you need. You should definitely take into account the useful advice and recommendations of those people who have actually created for themselves such an irreplaceable winter period assistant's time. So anyone who wants to save time and effort can design and construct a good and reliable snow blower.
Motoblocks, used in almost every farmstead, are seasonal mechanisms. In the spring there is plowing and sowing, in the summer there is crop processing, in the fall there is harvesting. IN winter time these useful devices stand idle, losing economic efficiency.
But it’s enough to make one more device for the walk-behind tractor, and you will get a homemade snow blower.
Almost throughout Russia, snow removal becomes mandatory procedure outside major cities. To mechanize this process at low financial cost, we will tell you how to build a snow blower with your own hands.
Operating principle of the screw mechanism
To make the right snow blower, drawings or at least sketches are required.

Before you start developing your own project, you need to understand the structure of the snow removal mechanism. The chamber in which the augers are installed moves with its lower cut along hard ground, picking up snow into its cavity, like a bulldozer blade.
A rotary auger structure is installed inside, which moves the snow towards the outlet. This part of the structure can be either in the middle or on one side of the chamber. If the working width is 1 m or more, it is advisable to make a receiving hole in the middle in order to load the rotor more evenly.

In addition to spirally arranged augers, the rotor is equipped with throwing blades, with the help of which snow falls into the receiving hole. Next, a mechanism comes into operation, pushing the snow through the bell in the desired direction, or plunging it into the body of a nearby vehicle.
DIY snow blower - types of designs
The main difference between auger snow blowers is not the method of collecting snow, but the ability to move it.
- Passive designs. The operator moves this type of mechanism independently; the power plant only powers the rotor itself. This design is easy to make, but you will have to make a lot of effort when removing snow, especially if the cover is high and dense.
The snow blower is equipped with a light, low-power motor, for example, from a chainsaw. Or you can adapt an electric motor if the cleaning area is located near the point of connection to electricity.
Sometimes such a snow blower is mounted on a walk-behind tractor. Only you will need a power take-off shaft to drive the screw mechanism. Then the walk-behind tractor itself provides self-propelled power, and part of the power goes to the drive for snow removal;
- Self-propelled structures. A homemade snow blower of this type is initially designed to be able to move independently. Either a drive wheel drive is installed on the frame, or a walk-behind tractor with its own wheels is integrated into the design.
It is more difficult to create such a project, but it pays off with ease of use and less effort that you spend when removing snow;
- There are also plow-type snow blowers. To work, you only need to make a semicircular blade. However, this design has serious drawbacks.

Firstly, such a cleaner requires a very powerful motor, since during work there is a lot of snow resistance on the blade.
Secondly, the quality of cleaning leaves much to be desired. At the edge of a cleared road, dense snowdrifts remain, which are more difficult to remove than virgin snow.
At the same time, the auger cleaner evenly scatters the loosened snow over a large area without creating dense piles.
How to make an auger snow blower with your own hands?

First of all, we make a snow removal chamber in which the rotary auger will operate. It must be barrel-shaped, with a receiving sector of at least 120°.
It can be made from sheet steel 2 mm thick, or from aluminum sheets 3 mm thick. Corrugated aluminum used for off-road vehicle equipment is excellent. It is more rigid due to the molded pattern.

The most economical option is galvanized iron sheet. Given the low strength, it is better to make the sidewalls from plywood or textolite.
Now about the most important part of the mechanism – the augers. They can be welded from sheet steel (or the same aluminum), or they can be cut from dense rubber, from an old conveyor used in granaries or in mining operations. If you can ask for old tires at a tire shop, the sidewalls make excellent blades for an auger.

Making a rotor from a steel sheet requires care and careful marking. Moreover, the spiral must be cut absolutely symmetrically, the pitch of rotation must be maintained along the entire length of the structure. Welding of segments is carried out using jigs, which can be made from a pair of vices.
Throwing blades are made of thicker metal, since they bear the load of throwing already compacted snow.
The result should be a design like this.
Important! When designing a rotary auger, do not confuse the direction of rotation and synchronize it with the casting blades. Right assembled mechanism allows you to do without an additional rotor in the output pipe. The force of the auger will be enough for the homemade snow blower to throw the snow a sufficient distance.


The finished auger can be adapted to a walk-behind tractor, mounted on wheels and moved independently. Or even attach it to the frame in front of an SUV or pickup truck. The main thing is to ensure the supply of torque to the working shaft.

Power plant for auger snow blower
If you decide to assemble a snow blower with your own hands based on a walk-behind tractor, the drive design lies on the surface. If you have a power take-off shaft, you simply drive the cardan, chain or belt drive onto the auger shaft, and come up with a clutch mechanism. There is no need to rotate the shaft idle.
If your walk-behind tractor is equipped only with a gearbox, it will be necessary to remove the belt or chain drive to the auger from the drive axle. Select the gear ratio of pulleys or chain sprockets in the direction of increasing speed.

The auger works more efficiently when high speed, the worm principle only works on very dense snow. That is, the auger shaft should rotate 2-3 times faster than the wheel shaft.
If there is an additional rotary mechanism ejection - its speed should be even higher, since the volume of snow in the center of the auger is maximum, and it must be thrown out of the chamber as soon as possible.
If there is no need to clear driveways to your home and garage, a snow blower can be lightweight and compact. The width of the working area is no more than 50 cm. This design is not necessarily self-propelled, and it does not need such a powerful motor. For example, from a chainsaw.

We make the chamber with the auger in the same way as in the previous version. We only select the appropriate materials and sizes. The auger rotates one revolution in each wing of the chamber; a secondary rotor on the outlet pipe is not needed.
Such a snow blower can move on improvised skids installed along the edges of the chamber. Instead of a rod, a chain drive is supplied from the chainsaw to the rotor. The drive sprocket remains the same.
No additional clutch mechanism is required; the standard chainsaw clutch copes with this task perfectly.
The only thing you should take care of is weight distribution. Since the chainsaw engine is mounted on one side (this cannot be done in the center, the feed blades get in the way), the control handle must be moved from the center towards the motor mount. Then it will be more convenient to work.

The outlet pipe is made of plastic water conduit. A diameter of 120-150 mm is quite enough for such a volume of snow.
This compact snow blower will clear paths in your yard in a few minutes, and it won't take much time to make. In the summer, the chainsaw is removed from the auger and used for its intended purpose.
All the details and secrets of making a snow blower from a chainsaw are in this video. You don’t even need a drawing, everything is clearly shown and explained in detail.
DIY electric snow blower
If you have a conditionally free electric motor with a power of 1-3 kW, you can use it to create a productive snowblower.
Important! The economy in this design only works when the length of the supply wire does not exceed 30 m. Given the aggressive operating conditions, the wire must be High Quality, and therefore expensive in terms of cost. A regular computer extension cord will not work.

Considering the design feature of the electric motor, the cleaning mechanism can be made not of a screw, but of a rotary one. Working attachment is put on directly on the motor shaft, the operating speed is high.
As a working chamber you can use a “snail” from ventilation system. The existing chute is great for throwing out snow. The size of the unit allows it to be moved manually.
Whatever the design of your snow blower, the main thing is that you saved on its purchase.
Snow, of course, is good. But when there is a moderate amount of it. And even in this case, residents of the private sector are forced to constantly clean it. It is often difficult to perform such work manually. While a shovel is a surefire tool, cleaning a large area can take quite a lot of time. Let's talk about how to do it yourself. This will help you save money and still get the equipment you need.
General information about snow blowers
This useful technique has been around for a long time. It was invented by a Canadian who was constantly forced to deal with mountains of snow near his home. Since then, snow blowers have improved significantly and become more productive, economical and easy to use. Before you start directly assembly work, you need to deal with the priority design. That is, the snow blower will drive itself or we will move it manually. The second option is cheaper and simpler. In general, we will look at several ways to make a snowblower with your own hands. More precisely, we will talk about cars different types. But let's talk about all this in order.

Auger snow blower
As a basis, we will take an old engine from a walk-behind tractor. A motor like this would suit us perfectly. To assemble the auger body we need sheet metal. The frame of the structure is made of steel angle with a section of 50 x 50 mm. To organize the side parts you need the most common 10mm plywood. We also need something to hold on to. A half-inch pipe can be used as a handle.
It is advisable to additionally protect the engine air intake, which will ensure its cooling, to prevent the entry of small snow particles. The width of the machine in our case will be no more than 65 cm, and its working part will clear paths 50 cm wide. This will give us the necessary maneuverability and ease of moving the unit. Well, now let’s move on to the practical part and look at how to make a high-quality snowblower with your own hands.

Making a screw
¾ can be used as a screw shaft -inch pipe. You need to make a cut in it on which the metal blade will be fixed. The principle of operation will look like this. As you work along the conveyor belt, the thrown snow will move towards the blade. From there it will recline to the sides. It is advisable to equip the screw pipe in the following way. Place a metal spatula and four rubber rings on it. As a material for the latter, old transport tape with a thickness of at least 1.5 cm can be used.
You need to understand that the auger pipe will rotate in self-aligning bearings. They must be closed. This will prevent moisture from getting inside the case and increase the durability of the unit. The transmission can be either belt or chain. The first one is less noisy, but also not very reliable; if jammed, it can fail.

Do-it-yourself auger: drawings and assembly of the structure
The walls of the machine body must be larger than the auger itself. This is necessary in order to prevent the working body from touching the walls. Typically, the engine installed on a snow blower can be used on other equipment at other times. Therefore, it is recommended to provide a quick-release design. For this purpose, a special platform is being built. This solution has a lot of advantages. Firstly, it makes cleaning the tool after work much easier, and secondly, after removing the motor, the unit will become much lighter. All metal elements can be connected to each other by welding, but it is advisable to use threaded connections. Also, first prepare a drawing that will guide you during assembly. After this, the unit can be put into operation.

Rotary snow blower
In terms of design, this unit is not too complicated. It is great for removing snow from areas of any size. To assemble the structure you will need a lathe and welding machine. In principle, such equipment can be found in almost any workshop. We will use the throttle cable and gas tank as a base.
The first step is to select a workpiece from which the rotor will later be made on a lathe. If you don’t want to bother with this, then you can buy it in a specialized store for little money. Externally, the rotor resembles a disk. When it is installed on the hub, the blades are attached to it, usually 5 pieces. It is advisable to install the blades by welding. The blades on the reverse side can be equipped with stiffeners, which will increase the efficiency of the structure and its performance.
You need to put a casing on the fan that will protect it from various elements. It is worth noting that various schemes Assembling the main elements of a snow blower involves placing the cylinder head at different angles. It is best to place the cylinder at an angle of 90 degrees for effective cooling.

Making a snow blower with your own hands
Our rotary snow blower is almost ready. All that remains is to complete the assembly, and the equipment can be put into operation. A shaft must be mounted on the rotor. It is mounted on ball-type bearings placed in pairs. Fixation to the body is best done using a clamping ring and a pair of bolts. The rotor itself must be secured to the machine body using a bracket. It will also hold the pressure ring, which is very convenient. It is advisable to equip the machine with removable scrapers. This is necessary so that you can adjust the grip width.
In some cases, this is an extremely convenient function, which, by the way, is not available in all purchased models. The snow throw range in our case will be about 6 meters, and this is with a unit weight of 18 kilograms. Overall, you will get a maneuverable and lightweight unit. As you can see, it is quite possible to build How to make a homemade snow blower, we figured it out. Now there are a few more important nuances.
Worth paying attention
If any large and hard element gets into the engine, be it a stone or a piece of ice, it may fail. To prevent this from happening, add safety bolts to the structure. Don’t neglect sealed bearings, but this has already been discussed above. If you decide to make an electric snow removal unit with your own hands, you must understand that it will only be effective over short distances. Otherwise, such equipment is more economical and less noisy than a gasoline engine. But you will have to get used to the wire that will follow you everywhere. Pay attention to the material used when assembling the structure. It should be as light as possible, but at the same time durable. If the unit is too heavy, working with it will be problematic.

Conclusion
You can also make a snow blower for a walk-behind tractor with your own hands. In this case, it is simply necessary to use drawings. It is on them that the main dimensions and design features unit. In general, this solution makes sense, especially since such equipment will move on wheels, which is very convenient.
We have dealt with this topic. There is nothing complicated, but assembly will take time, since you need to buy something and grind some parts yourself. When the assembly process is completed, you can put the structure in order. This refers to cosmetic work, such as painting, polishing, etc. As a result, your homemade snow blower will not be inferior to any purchased one. But you will save a significant amount, and you will also gain experience in such matters and be able to give advice to beginners.
10/16/14 at 1:41 pm |
Sanka Winter is undoubtedly a magical time, especially in good weather - fluffy snow carpet covers the ground, glitters in the rays of the sun and... interferes with walking. In order not to be walled up in high snowdrifts and not to spend the whole day trying to overcome the snow with a shovel, snow removal machines were created. In this article you will find necessary information
, which will help you assemble a snow blower with your own hands.
Different designs, same result
Through a gearbox, the engine rotates the auger, which breaks the crust, and rake the crushed snow to the rotor blades, which push the snow through the outlet pipe to a distance of up to 3 meters. This design is called a two-stage design because it uses both a raking auger and a snow-throwing rotor.
These are quite powerful machines, so those who assemble a homemade snow blower often simplify them: some have blades on the auger, which themselves throw away the snow, albeit not as well as the rotor. Or they do it differently, leaving one throwing rotor in the design, and the snow flows to it thanks to the efforts of a person raking it with a bucket. So that you have plenty to choose from, we have collected both options, which have already proven themselves more than once the best side, and are also fairly easy to upgrade based on what parts you have on hand.
Video about how a snow blower works
How to assemble a homemade snow blower?
If you are determined to assemble a snow blower with your own hands, first you need to choose a power unit for it. It could be petrol or Electrical engine, or maybe a ready-made device, for example, a walk-behind tractor. Note that the optimal engine speed is up to 1500 rpm.
For the frame you will need steel pipes small diameter or steel angle.
If you want to build a two-stage snow blower, you will most likely need a gearbox. The easiest way is to purchase it on the Internet with delivery.
Video homemade snow blower from chainsaw Friendship
Select and collect
It is best to make a rotary snow blower using drawings from the good old magazine “Modelist-Constructor”. It describes the design of the Vyuga snowplow, which even a schoolchild can assemble.
 The homemade rotary snow blower is structurally similar to the Vyuga. True, professionals advise installing more than two blades - this way the unit works more stable.
To assemble it, you need a gas or electric motor, two-millimeter sheet steel for the rotor and blades on it, as well as sheets of thinner steel or aluminum for the snow blower body.

In this design, the engine rotates a shaft through a chain transmission, at the end of which a rotor is attached. The shaft is secured through two pairs of bearings to avoid displacement. Many craftsmen use direct drive from an electric motor, but this can lead to overheating and rebooting of the latter.

Video of a homemade snow blower for the Favorit walk-behind tractor
Homemade snow blower with auger
To assemble such a unit, you need to go through several steps in succession:
1. A frame is made from pipes of suitable diameter or angles. Most drawings indicate dimensions of 50 x 70 centimeters. You should select them based on the size of the motor, as well as the fact that the bucket is proposed to be made in dimensions of 50 x 30.

2. The auger is made of a suitable pipe, in the center of which a blade 270 mm long and 120 mm wide made of 2-3 mm steel is installed, and the screws are made of dense rubber (conveyor belt) or the same steel. It is worth noting that the steel option is more preferable. To make the screws like in the picture, they need to be cut from a sheet of steel, welded and bent by hand according to the pattern below.
Pattern for two half-discs (spiral turns).
3. If you choose an auger from a conveyor belt, then you will need about one and a half meters 1 cm thick. 4 rings are cut from it, the same as in the pattern above.
4. To make the auger, you can purchase 1.5 m of 10 mm thick conveyor belt to cut out four rings with a diameter of 28 cm from it. You can cut it using two screws screwed into a board, rotating it in a circle, or with a jigsaw.
5. The bearings in which the shaft will rotate must be closed; in addition, it is better to close them with a rubber plug, otherwise they will quickly jam.
6. The walls of the bucket can be made of 10-15 mm plywood; to maintain rigidity, it is better to fasten them to the frame.

7. If you want to use an electric motor in this design, protect it from snow; if you have a walk-behind tractor, immediately think about what adapters you will need to purchase to connect to it.
 Homemade snow blower for walk-behind tractor. Please note: the body is made entirely of steel.
Electrical wires must be thick enough to withstand the load generated by the motor, and also have insulation that does not become brittle in the cold.
You can use these principles in your own design, since life still makes its adjustments, and the units self made come out unique. Making a snow blower with your own hands is not difficult, and as a result you can get good device for relatively little money. Happy designing!
